RSS
 

Posts Tagged ‘Cheap’

Lensrentals: Cheap Veydra Mini Prime lenses are ‘optically excellent’

27 Mar

Roger Cicala over at Lensrentals went on another OLAF testing spree, and this time the victim of his optical bench tests were the extremely affordable Veydra Mini Prime cinema lenses made for E-Mount and Micro Four Thirds sensors. These lenses are so inexpensive that Cicala has assumed (for some time) that they were also probably also ineffective. But as Roger put it:

[Today] we learned for the umpteenth time that doing scientific testing is a great way to shoot down Roger’s assumptions.

It turns out these lenses aren’t bad at all… in fact, Roger calls them “optically excellent.” And when he put them to the test against Zeiss CP.2 primes that cost 3x (or more) as much money, the Veydra Mini Primes (and here, again, we’re going to use his wording) “the Veydras just kick some serious resolution butt in this comparison.”

Here’s just one of those comparisons (more in the full test at Lensrentals), between the Zeiss Compact Prime CP.2 85mm T2.1 (average of 10 samples) and the Veydra Mini Prime 85mm T2.2 (average of 9 samples):

Zeiss on the Left, Veydra on the Right

Of course, this is a comparison on a single parameter: absolute resolution. But it’s also a comparison between a lens that costs $ 3,990 (the Zeiss CP.2) and $ 1,000 (the Veydra Mini Prime). Still, as Roger points out several times:

[These tests] won’t tell you a thing about how [the lens] focus breathes, how it handles, or whether it has that ‘film’ look. I will simply tell you how well it resolves (because you can roll your artsy eyes all you want; sometimes you have to make things look sharp).

The other factor to keep in mind is the image circle, because the Veydra Mini Primes are… well… mini. They’re only made for Micro Four Thirds and Super 35 image size and won’t cover a full-frame sensor. Still, the results of his test left Roger (and by extension, us) impressed.

Check out the full test over on Lensrentals, and if you’ve used them, drop a line in the comments about their real world performance.

Articles: Digital Photography Review (dpreview.com)

 
Comments Off on Lensrentals: Cheap Veydra Mini Prime lenses are ‘optically excellent’

Posted in Uncategorized


Comparison: Cheap IKEA LADDA batteries beat Panasonic Eneloop Pro recycle speed

01 Mar

Good batteries aren’t cheap… or maybe they are. Putting that notion to the test is Martin Cheung, who recently published a video in which he tests the recycle speeds of inexpensive rechargeable IKEA LADDA batteries against more expensive Panasonic Eneloop Pro batteries using Godox TT685 flashes. The results are surprising: the LADDA batteries actually demonstrated a noticeably faster recycle speed versus the Eneloop Pros.

The test was performed using both flashes, meaning the batteries were swapped to the opposite unit for retesting to ensure the difference wasn’t due to the hardware rather than the energy cells. The one caveat is that this is a test of recycle speed only—as Cheung explains in the video, he did not test the number of flashes the batteries are capable of powering.

Looking at each battery model’s specs, the Eneloop Pros ($ 21 per AA 4-pack) boast a 2550mAh rating, while the Ikea LADDA ($ 7 per AA 4-pack) have a slightly lower 2450mAh capacity. Assuming the two sets are capable of powering a similar number of flashes, however, the faster recycling speed and one-third cost of IKEA’s batteries make them the clear winner in this comparison.

Articles: Digital Photography Review (dpreview.com)

 
Comments Off on Comparison: Cheap IKEA LADDA batteries beat Panasonic Eneloop Pro recycle speed

Posted in Uncategorized


How to turn household lights into cheap DIY lighting modifiers

27 Nov

This article was originally published on Jake Hicks blog, and is being republished in full on DPReview with express permission from the author.


There is an almost endless supply of lighting modifiers available on the market right now—some are cheap, and some of the better ones are certainly a lot more expensive. But does cost directly relate to quality?

Well, a lot of the times yes it does, especially if you’re referring to build quality. In general, the more you spend, the better-made and more durable the modifier will be. But does that extra money you spend mean you’re getting a better lighting modifier overall? I would have to say no; in fact, for less than £15/$ 20 you can get some stunningly beautiful light from a homemade lighting modifier.

Read on to see examples of the stupidly cheap DIY lighting modifiers I’m referring too.

I’d like to think that my work is known for its creative approach to lighting. The reason for that is because I strongly believe lighting is the single most important subject in a shot.

I can honestly say that I’ve ‘saved‘ some frankly awful shoots through engaging lighting alone. Terrible locations, inexperienced or even no experience in the model/subject can certainly make a shoot hard, but far from impossible to pull off engaging results. Dynamic lighting can bring a boring room to life and flattering lighting can enhance any subject, lighting really is the one and only tool you need and should have complete control and mastery of.

So what makes good lighting? Well that is probably a topic/article/book/anthology for another day as there are certainly a lot opinions on the subject, but I think no matter how experienced or inexperienced you are as a photographer, we all know what we don’t like and we definitely know what we do like when we see it.

In this article I aim to show you a couple of very cheap alternatives to professional lighting modifiers that I think create some beautiful light that are very functional in a lot of situations.

Regular Household Lights

The lighting modifiers we’ll be taking a look at are the dome-like frosted globes. These can be fantastic at lighting a scene in a shot, as they spread light everywhere very evenly. It also turns out that, not only do they spread light everywhere, but they also create a beautiful portrait light as well. Let’s take a closer look at the lights in question.

I purchased two white frosted dome lights from IKEA. One was small and the other was far larger. The smaller one is intended to be used as ceiling light in a bathroom. The reason it’s intended for this is because it casts light everywhere from a very small source close to the ceiling making it ideal for small rooms and corridors.

Small bathroom ceiling dome light.

The second one I purchased was far larger and is actually originally intended as a table lamp. Again this dome-like design is perfect for casting light over a large area without being overly harsh.

Large table lamp dome.

Where can you get them?

I got mine from IKEA and they are silly-cheap.

The small globe is a ceiling light called VITEMÖLLA and it can be found here for £13. The one in the picture looks slightly different as it has a white base compared to my silver one but the dome (the important part) is the same.

The large dome is a table lamp called FADO and that can be found here for £15. It’s worth pointing out and making sure that you get the white one. There are several of these FADO’s in a variety of tones so just make sure you choose the white one as the others will be fairly useless.

Regular Photographic Modifier

I also wanted to get a bit of a gauge on how the light from these domes looked compared to a regular photographic lighting modifier. For the sake of this test I actually compared them to a few shots taken with a 22″ white beauty dish.

There’s a couple of reasons for this. Firstly, it’s probably my most used lighting modifier so I have a very good idea of how the lighting looks with it. And secondly, the beauty dish is pretty pricey compared to these domes so I thought it would be an interesting comparison.

The image above also gives a nice size comparison and it clearly shows how all three of the modifiers used in the test look when side-by-side.

Getting the Domes ‘Shoot-Ready’

Obviously the domes are designed for an alternative purpose to a photoshoot, so I needed to do make a few adjustments before they were ‘shoot-ready’.

Small Dome

The smaller dome was fairly simple: I just removed the inner wiring and bulb housing and then I simply rested it atop one of my standard dish reflectors. I could have taped it on but there was no fear of it moving or tipping out so I just left it as it was and it was fine.

The small dome was easily made shoot-ready by removing the inner workings and then simply resting it in a current reflector dish.

Large Dome

The larger dome took a little more work, but not much. I simply removed the inner workings once again and then found an old speed-ring to attach it too.

A speed-ring is the metal rotating mount that attaches modifiers like softboxes to your flash head. I’ve acquired a few over the years that I no longer use so I simply taped one of them to the dome. With strong tape like gaffers tape it was surprisingly snug and there was no fear of it coming loose even when mounted on its side.

The large dome was taped snugly onto an old speed-ring which enabled me to attach it to my light horizontally if needed.

The Setup

The actual lighting setup was nothing fancy, but I also wanted to try out some alternative colouring ideas at the same time.

The model was positioned about 5 feet from the white wall behind her. I had the main lights positioned about 2 feet in front of her and above eye level, and then I also had a small softbox on the floor at the models feet with an orange gel* in place for the entirety of the test.

*Obviously you don’t need to the orange gel but I was seeing how much the gel was washed out by the modifiers so that’s why I had it in place.

A very simple setup that involves two lights; a key and orange gelled fill light.

The Results

After I had taken a few shots with the beauty dish, I switched that out for the larger dome. Then, after a few more frames, I changed it too the smaller dome. The resulting images should speak for themselves.

Beauty dish Images

Beauty Dish Shot – Click to Enlarge Beauty Dish Shot – Click to Enlarge

The Small Dome Images

The small dome setup
Small Dome Shot – Click to Enlarge Small Dome Shot – Click to Enlarge

Large Dome Images

The big dome set-up
Large Dome Shot – Click to Enlarge Large Dome Shot – Click to Enlarge

CAUTION: I’m using LED modeling bulbs in my flash heads which produce very little heat. If your flash heads have tungsten modeling bulbs, these globes will get VERY HOT as there is nowhere for the heat to escape when the globes are in position on the heads. Be sure to turn them down or off entirely.

Conclusions

I think you guys can draw your own conclusions from the images above and however you feel about the three looks, I think one thing is very clear that we can all agree on: you don’t necessarily need to spend a lot of money on expensive modifiers to produce beautiful light.

The beauty dish obviously produces a more directional light, and you can see that by how dark the background is compared to the other setups. The other dome shots throw light everywhere so more light is spilling onto the background. Because of this beauty dishes directionality and lack of spill, you should notice that the shadows on the models face are darker too. In contrast, the domes are bouncing light around the room and that spilled light is filling in a lot of the shadows on the models face. This gives the appearance of a far more flattering light as a result.

This dome spill is far from being a bad thing either; in fact, if you’re using the domes in a small space you can use that spill and bounce to really blend the subject into a scene with just a single light. This type of modifier is perfect for location shooting or environmental shots, and it’s certainly something I’ll be using for that type of work.

The small dome actually produced a far better light than I expected. Its small source creates a contrasty light that falls off quite quickly, leaving brighter highlights and darker shadows as a result. I also found that this creates some nice shimmering effects on the skin and makeup as a result of the hard-light properties.

I was really excited to try the big dome, as I thought it was going to be far and away the best looking lighting. Although I wasn’t disappointed, I still feel the resulting light didn’t look like I expected. The light was very clean in that there was a very smooth transition from shadow to highlight, which was nice, but it was still darker overall than I expected.

As a singe beauty light I think the small dome won for me with its look. If I was shooting in a larger area and wanted to illuminate more of the subject in a scene then the big dome placed a little further away would surely be the best choice.

In hindsight, I think I know where I went wrong with this test and what I would like to do differently next time.

You’ll notice that the light stand did not move the entire time, so from the small dome setup to the big dome setup the angling of the flash head caused the light source to get a lot closer to the model, which required me to turn the power of the head down. That’s not a problem normally, but when I turned the power of the head down, I also reduced the amount of light that bounced around the room. This in turn reduced the amount of light falling back into the shadows making the light appear darker than it actually is.

I would like to try this big dome again, but move it further back from the model, thereby allowing that light to bounce around the room and giving a far softer impression to the lighting—perfect for environmental shots.

Closing Comments

So there you have it: a couple of great lighting modifiers and at the cost of just over £25 for the both of them! That’s pretty damn impressive in my book, and you’d be crazy not to grab at least one of them and give them a go. Of course, if you really wanted an excellent dome modifier then you can always grab the Profoto frosted dome one here for a cool $ 177! I’m sure that’s miles better 😉

As always, if you have any questions then let me know. If there was something that didn’t make sense and you wanted clarification on then let me know. Also if you’ve ever tested a DIY modifier that has provided excellent results, I’d love to hear about it. Let me know in the comments!


Jake Hicks is an editorial and fashion photographer specializing in keeping the skill in the camera not just on the screen. To see more of his work or read more tutorials, be sure to visit his website, like his Facebook page, and follow him on Instagram and Twitter.

Articles: Digital Photography Review (dpreview.com)

 
Comments Off on How to turn household lights into cheap DIY lighting modifiers

Posted in Uncategorized


Cheap purchases that will help improve your photography

18 Aug

Cheap items that will help improve your photography

Photography gear isn’t cheap. If you’re looking to take your photography to the next level, there’s no shortage of expensive lenses and accessories that will beckon to you.

Sometimes it’s worth it to save up for the right piece of equipment, but you don’t necessarily have to make a serious investment if you’re looking to make gains in your creative pursuit. Here are a few relatively cheap buys that will pay off dividends if you’re looking to try something new, build on your current photography skills, or just add another visual trick to your arsenal.

Go back to school

To really master the arts of things like lighting or post-processing, online courses are invaluable. They can also be pretty expensive. But if you’re looking to pick up some additional knowledge on the cheap, Creative Live hosts classes on an array of topics – and best of all, they’re free when you watch live. The Creative Live app also offers a free lesson of the day.

Along those lines, maybe read some books for inspiration. Remember the library? The library! Learn about past masters of photography or see what current photographers are doing. Bryan Petersen has a whole slew of instructional books, or you could look for some creativity boosters like David du Chemin’s follow-along lessons.

Join the club

Local photography groups can help you get out the door and put you in good company. Being around other photographers and making connections within your area’s photography community are great ways to keep furthering your skills, and organizations often have very affordable yearly membership fees or suggested donations – one Seattle group suggests $ 20 per year. Many clubs organize through meetup.com, which is a good place to start looking.

For an even lower barrier to entry, join a local photography group on Facebook for sharing and critiquing photos. And if you’re looking for extra incentive, think about starting a 365 or 52 project, where you take a photo a day or a photo a week for a year. There are tons of online groups to join for support and critiques, and there are also options for 30-day projects if you feel overwhelmed by an entire year.

White and black poster board

A couple of pieces of white and black poster board make for quick and cheap ways to play with lighting. White poster board can act as a reflector, and a piece of black poster board can help tame unwanted light and reflections. It’s not fancy, but it’s a very cheap way to add some visual tricks to product and still life photos. And depending on the situation, poster board can act as a makeshift backdrop for portraits.

Photo by northfromseattle, licensed under CC 2.0

Colored plexiglass

A bit of bold color can make your product photography pop. A brightly colored sheet of plexiglass costs somewhere around $ 10 and can lend product shots a new level of professional polish. Out here, west coast retailer TAP Plastics offers plenty of affordable options, but online options abound. Make sure to add on a bottle of glass cleaner to your order, if you haven’t got some already – the fingerprints will accumulate faster than you think.

Pop up flash diffuser

If you’re not ready to spring for a flashgun, you can dip your toe into the vast waters of lighting by modifying the light from your camera’s pop-up flash. Sure, a Gary Fong Puffer or a Light Scoop looks a little silly, but at $ 20 and $ 30 respectively, they’re a reasonably priced way to make more of what your camera already offers.

Speedlight modifier

If you’ve gone ahead and purchased a flashgun, congratulations – you’re already reaping the benefits of a more powerful and pliable source of illumination. But there’s a lot more you can do. For less than $ 10 you can start with a bounce diffuser, and for around $ 30-50 you can add something a little more exotic, like a Rogue FlashBender.

Or go no further than your local craft store: if you’re just looking to experiment, some construction paper can be fashioned into a snoot and taped to a flashgun. It doesn’t get much cheaper than that.

Wireless flash trigger

Moving your flash off camera will also open up new possibilities, and third-party radio flash triggers are more affordable than ever – a Yongnuo wireless trigger kit can be had for about $ 30. It’s a whole new ballgame when you free your flashgun from the confines of your camera hotshoe.

LED flashlight

You can drop a whole lot of cash on a fancy LED light for photography, but if your aim is to experiment with another kind of off-camera illumination, pick up an LED flashlight. They’re a great way to play with light painting, and if you’re feeling industrious, an LED flashlight can be modified into a makeshift Ice Light for a fraction of the cost of the real thing.

ExpoDisc

If you find yourself spending a lot of your photo editing time nudging the color temperature slider back and forth, ExpoDisc is worth looking at. At $ 50 it’s on the expensive end of ‘cheap’ but we know a number of wedding and portrait photographers who swear by it.

It’s a magical world – go exploring

To quote an extremely wise and temperamental philosopher, “It’s a magical world out there, Hobbes ‘ol buddy… let’s go exploring!” Photography is in itself a wonderful excuse to get out and explore. A new neighborhood, a historical site, a park – going somewhere new can spark creativity, awaken a new interest, and generally be a good exercise for the mind and the body. Pick a location, set yourself a goal, grab your camera and get out the door.

Articles: Digital Photography Review (dpreview.com)

 
Comments Off on Cheap purchases that will help improve your photography

Posted in Uncategorized


NPPA to raise dues for the first time in 11 years, because defending truth ain’t cheap

10 Aug

The National Press Photographers Association, the professional organization that regularly advocates for and defends the rights of visual journalists in and outside its ranks, has announced that it will be raising its membership dues for the first time in 11 years starting this coming January. Because, as they explain, “defending the rights and freedoms of visual journalists isn’t free.”

The news was announced in a blog post published earlier this week by photojournalist and NPPA President Melissa Lyttle. As more and more photojournalists are forced to work freelance, without the backing of a major media organization, the NPPA has had to adapt, writes Lyttle.

“This has made our legal advocacy work more critical than ever, as our members experience a rise in interference, harassment, and arrests along with an increase in assaults of journalists,” she writes. “We also see a public increase in the distrust of the media, challenges to the First Amendment by the current administration, state, and local government, an ever-increasing number of copyright infringements, and a rash of ill-conceived anti-drone laws.”

But all of this advocacy and legal work comes at a price, and so the NPPA board has voted to increase membership dues for the first time in 11 years, starting January 1st, 2018.

If you’re interested in joining the NPPA or re-upping your membership, you can do so at the old rates by the end of 2017. Once January 1st rolls around those annual rates will go up to $ 75 for student and retired member memberships ($ 10 increase), $ 145 for a professional membership ($ 35 increase), $ 240 for a family membership (households with more than one working photojournalist), $ 170 for international membership with surface mail, and $ 245 for international membership with air mail.

NPPA membership comes with several perks, including: discounted insurance, services and products; being listed in a searchable database of photojournalists; the ability to participate in the NPPA’s mentorship program; and more.

To find out more about the price increase, perks, NPPA’s mission or anything else about membership, head over to the official announcement or visit the NPPA homepage.

Articles: Digital Photography Review (dpreview.com)

 
Comments Off on NPPA to raise dues for the first time in 11 years, because defending truth ain’t cheap

Posted in Uncategorized


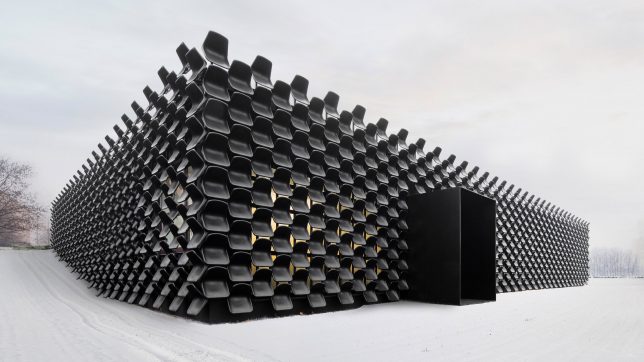
Cheap Seats: Sculptural Furniture Showroom Facade Made of 900 Black Chairs

19 Jul

[ By WebUrbanist in Architecture & Offices & Commercial. ]

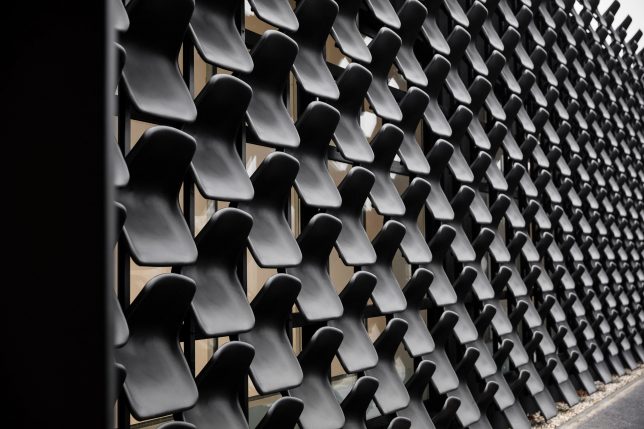
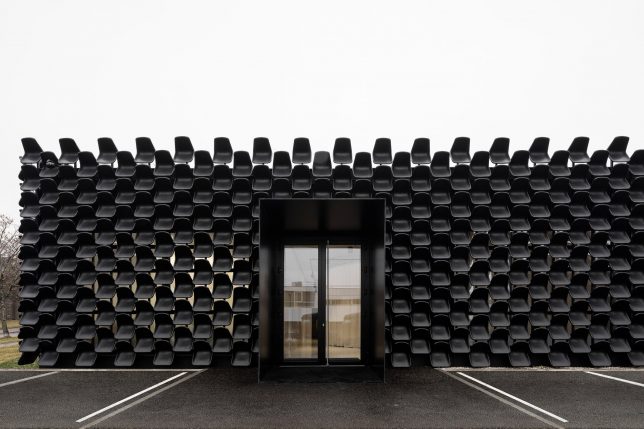
Using cheap and repetitive materials sounds like a recipe for kitsch, but this furniture-oriented facade clad in generic black chairs (at around $ 5.00 USD a piece) manages to pull off an elegant and refined look.

The clients, MY DVA (a furniture company), were looking for something additive, layered onto the existing bland building, but also reflecting their function (to showcase office and school furniture). The ideal solution would promote their wares while also entertaining visitors. It also had to be inexpensive.

Versed in product and urban design, Ondrej Chybik and Michal Kristof of studio CHYBIK+KRISTOF, took these concerns into account when designing the facade. Tapping into their respective backgrounds, they came up with cladding literally composed of product designs that also fits a neighborhood theme of repetition (filled with identical blocks of flats).

In total, the team used 900 Vicenza seats, a regular offering of the company, to form an undulating black box around the showroom, which functions well with the reduced light provided by these exterior shading elements.

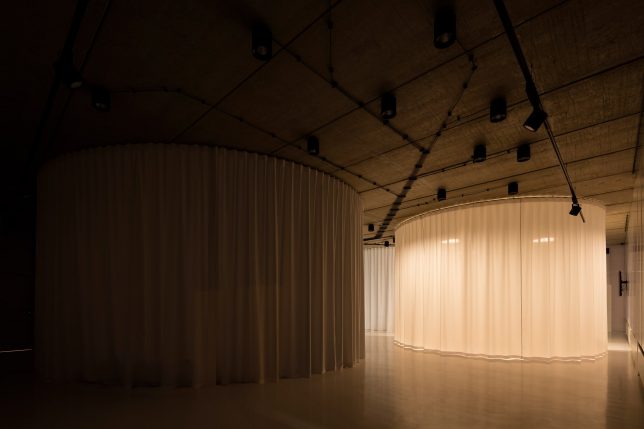
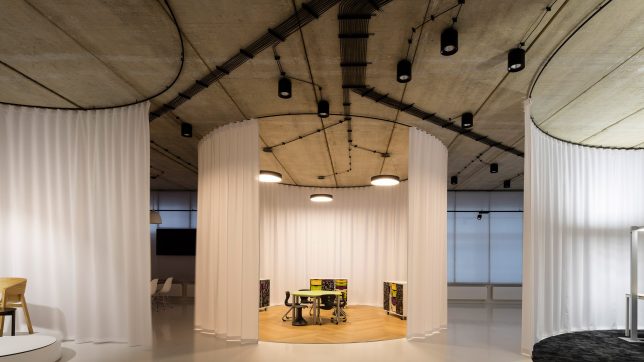
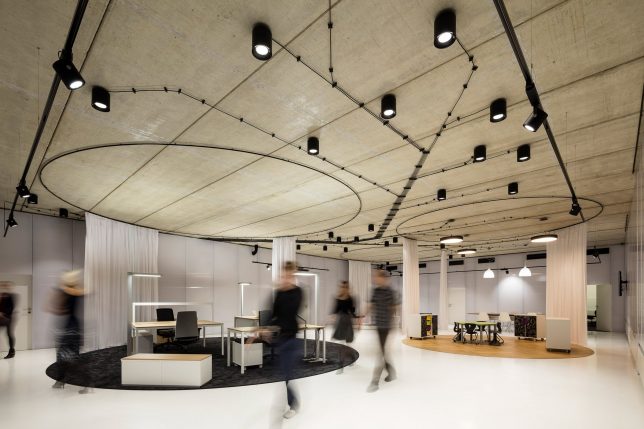
Inside, the space was pared down to expose a raw concrete ceiling, from which suspended curtains hang to create little galleries — adjustable lights in these zones simulate different lighting conditions for furniture client spaces.

Staff offices are located along the edges, off to the sides and out of the way behind translucent partitions, leaving a large, open, blank-slate showroom for furniture buyers.

Share on Facebook


[ By WebUrbanist in Architecture & Offices & Commercial. ]

[ WebUrbanist | Archives | Galleries | Privacy | TOS ]


WebUrbanist

 
Comments Off on Cheap Seats: Sculptural Furniture Showroom Facade Made of 900 Black Chairs

Posted in Creativity


Design Copyright Debate: Cheap Replica Eames Chairs Sold for 90% Less

09 Jun

[ By WebUrbanist in Design & Furniture & Decor. ]

discount famous chair design

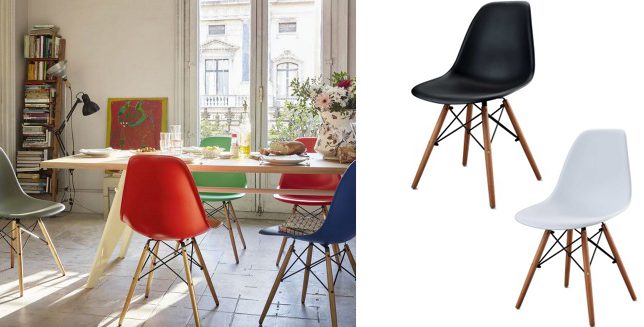
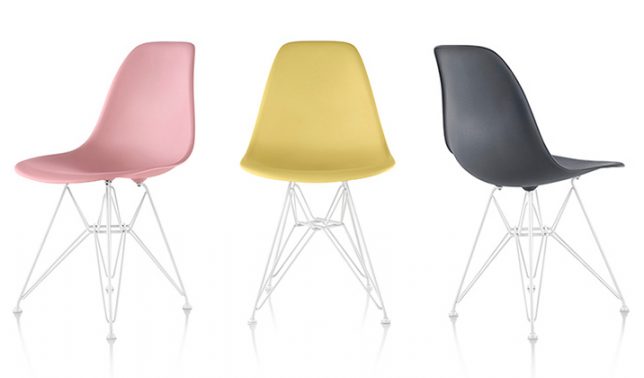
Seated at the center of a new design-related copyright conversation, a series of Eiffel chairs sold by discount superstore Aldi has designers arguing on both sides.

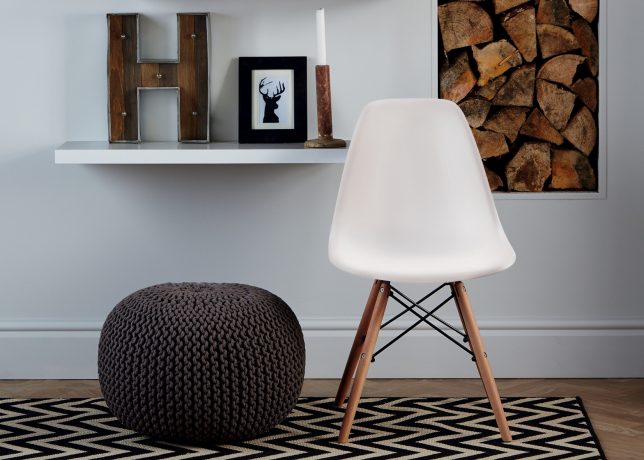
The chairs in question look significantly like the DSW Eames Plastic Chair (designed by Charles and Ray Eames in 1950), currently made by copyright holders Vitra in Switzerland.

eiffel eames chair copy

Critics point out that Aldi has been caught doing this before, selling things like Mies van der Rohe’s Barcelona Chair on countries where it can avoid copyright entanglements, either because the copyrights have expired or replicas are permitted by law.

Defenders of the discount retailer argue that the entire point of these plastic chairs was to create something cheap, comfortable and easy to mass produce. In other words: the fact that replicas sell for 40 GBP and licensed remakes sell for ten times that goes against the intent of the designers.

Either way, Aldi seems to way to stay out of the fray, perhaps planning to hide behind slight design differences when it comes to the structure, materials and details of the seats.

eamges moled chair original

In some places, like the United Kingdom, changes to laws have been proposed or are in the works, which may provide additional protections for rights holders now and into the future.

There is a larger question at work here though too: how close do designs have to be for them to risk creating intellectual property controversies? There are, after all, only so many ways to plan, design and construct a chair for a human occupant. These days, so many 3D models of seats have been uploaded to programs like SketchUp and it is easier than ever to simply cut, paste and print a copy of one’s own on a 3D printer.

Share on Facebook


[ By WebUrbanist in Design & Furniture & Decor. ]

[ WebUrbanist | Archives | Galleries | Privacy | TOS ]


WebUrbanist

 
Comments Off on Design Copyright Debate: Cheap Replica Eames Chairs Sold for 90% Less

Posted in Creativity


Orbis is Going Away. Grab One (for Cheap) While You Can.

11 Dec

For those of you late to the party, the Orbis Ring Flash Adpater is a passive, add-on light shaping device that turns your speedlight into a ring flash. There are others, but for a slew of reasons the Orbis has long been my favorite of the lot.

And it is about to go away forever. This post is a quick heads-up to grab one while you can—and a pointer to a fantastic deal on the last units as they are closed out.

The Orbis was developed in 2008 as a sophisticated answer to the DIY efforts of the Strobist community. After seeing what was possible with cereal boxes, aluminum foil and gaffer’s tape, reader James Madelin wanted to build something better. Meaning nicer looks, better durability, more efficiency, more color correct and with a better quality of light. So that’s exactly what he did.

The Orbis is surprisingly complex on the inside in the way it bends light around the donut. It strikes the balance between lighting efficiency vs. evenness (both being very important) just about as well as possible.

Interestingly, of all of the best ring flash adapters, the Orbis was the only one that was never knocked off by the shady Chinese photo gear copiers. It’s not that they never thought of it. Lord knows, they put out crap versions of all the others.

My guess? They cut one open, took a look inside and said, “Eff this. Let’s knock off the Ray Flash instead.

What it Will Do

The Orbis Ring Flash Adapter is not a flash. It is a passive light mod that mounts onto your existing speedlight.

Used alone, on-axis (classic ring light position) it creates that signature glam ring light look as seen above. And because it retains any TTL functions of the speedlight crammed into it, the Orbis is very popular with club/event photographers. Stick on a wideangle lens, work two stops over the ambient in TTL mode, and the results look cool as crap.

And that’s fine for event shooters. But I prefer to use mine more in a way inspired by portrait shooters like Greg Heisler and Dan Winters.

In this mode, the Orbis becomes a very sophisticated fill light. You can use it in combo with another off-camera speedlight acting as key light, and it fills in the gaps—to whatever level you choose based on how you power it.

The photo above of poet Linda Joy Burke is a good example. The key light is coming from upper left. I am working well above the ambient with my flash exposure. So Linda’s shadow side would be very, very dark without the Orbis that is wrapped around my lens.

The light from the orbis reaches into the shadow side without really adding any footprint, and creates legibility. How much? Your choice. Just dial the power of the ring-fill light up or down as much as you want.

This is a common way for portrait photographers to create exactly the amount of legibility they want in the shadows. Which means you can get more creative and/or edgy with your key if you want. ‘Cause the ring is gonna save your ass in the shadows.

Same here with this photo of blogger Sian Meades, done in London. I am in full shade here, and this light is completely being created with two speedlights.

The key light is at hard left, raking across Sian’s face. The fill light, in an Orbis, stuck right on my lens, is creating the legibility in the shadows of the key.

The ambient component here is minimal. Without the flashes the photo would be near black. The on-axis Orbis gives me complete control of my shadow density.

(To learn more about lighting either of these two photos, click on either one.)

Now or Never

And the Orbis will soon be gone forever.

They sold over the last seven years for $ 200, rarely if ever discounted. But the remaining units are being closed out for $ 129 (w/free shipping in US.) Or you can get it with the hands-free arm for $ 139 (+$ 7.40 shipping in US.)

This is a great deal. Because not only will it work on nearly any speedlight (but not bigass Vivitar 285s, sorry) it is built to last you likely for the rest of your shooting life.

Which is a good thing, because you’re not gonna be able to replace it.

Amazon: Orbis Closeout: $ 129, free ship US

Amazon: Orbis Ring Flash Adapter w/Arm: $ 139 + $ 7.40 ship US


Strobist

 
Comments Off on Orbis is Going Away. Grab One (for Cheap) While You Can.

Posted in Photography


Dirt Cheap: World’s Largest 3D Mud Printer Makes Green Homes

23 Sep

[ By WebUrbanist in Architecture & Houses & Residential. ]

3d printer aerial view

Able to print full-sized structures from mud and clay, this 40-foot-tall 3D printer represents a huge step toward printing affordable housing from free materials. The project was unveiled yesterday, debuting with a live demonstration at a three day rally event in Italy along with a series of workshops and conferences.

giant 3d house printer

wasp printer

Representing a hybrid of biomimicry, new technologies and ancient building techniques, the BigDelta printer from World’s Advanced Saving Project (WASP) draws inspiration from natural and human precedents.

3d printer demo

3d printer scale models

BigDelta’s structural strategies and resulting home shapes are informed by a breed of wasp that constructs mud homes as well as a long human tradition of creating earthen dwellings.

3d mud printer above

Building with water, dirt, clay and plant fibers taps into a set of plentiful organic resources, reduces environmental impacts, obviates the cost of and need to ship materials and provides naturally robust and insulated housing shells.

3d mud printer nozel

The lightweight steel frame of the printer itself, supporting a giant printing nozzle suspended in its open center, is easy to collapse and transport between construction sites.

3d printer italy stage

This larger model follows a smaller Delta prototype used to execute a series of complex geometric structures at reduced size, testing the technology and materials.

The design aims to address a growing housing crisis: “by 2030, international estimates foresee a rapid growth of adequate housing requirements for over 4 billion people living with yearly income below $ 3,000. The United Nations calculated that over the next 15 years there will be an average daily requirement of 100.000 new housing units to meet this demand.”

Share on Facebook


[ By WebUrbanist in Architecture & Houses & Residential. ]

[ WebUrbanist | Archives | Galleries | Privacy | TOS ]


WebUrbanist

 
Comments Off on Dirt Cheap: World’s Largest 3D Mud Printer Makes Green Homes

Posted in Creativity


The Cheap Camera Challenge – It’s Not All About the Camera

31 May

In my own classes, workshops and tours I tell my students that it is not the camera that makes good photos it’s the photographer. This video series by DigitalRev TV takes that statement to the next level with their Pro Photographer, Cheap Camera Challenge.

In this instalment street photographer Gary Tyson is given a cheap camera in a wristwatch. See how he uses it to make some pretty decent photos, interacts with people and uses it to his advantage rather than it being a disadvantage.

What can you learn from that video? What is the lesson there?

Sure maybe the photos are high resolution and won’t stand up to anything other than being on the internet. But take those same techniques and apply them using whatever camera you do have.

Are you up to taking the cheap camera challenge? I might give it a go myself!

googletag.cmd.push(function() {
tablet_slots.push( googletag.defineSlot( “/1005424/_dPSv4_tab-all-article-bottom_(300×250)”, [300, 250], “pb-ad-78623” ).addService( googletag.pubads() ) ); } );

googletag.cmd.push(function() {
mobile_slots.push( googletag.defineSlot( “/1005424/_dPSv4_mob-all-article-bottom_(300×250)”, [300, 250], “pb-ad-78158” ).addService( googletag.pubads() ) ); } );

The post The Cheap Camera Challenge – It’s Not All About the Camera by Darlene Hildebrandt appeared first on Digital Photography School.


Digital Photography School

 
Comments Off on The Cheap Camera Challenge – It’s Not All About the Camera

Posted in Photography