Action cameras have become more common in the past few years, and for a good reason. Originally created by GoPro, many big brands have also jumped in the action camera space. As the action camera space grew, there came along a lot of cheap copycats. With multiple brands and tens of models to choose from, it has become difficult to Continue Reading
The post Best Action Cameras for Every Budget: Are Cheap Action Cameras Any Good? appeared first on Photodoto.
The post 10 Cheap Photo Tricks for Creative Images appeared first on Digital Photography School. It was authored by Rick Ohnsman.
As the coronavirus crisis drags on, you may find that you’re getting out less to make photos. You could probably use some fresh and fun photo ideas as a pleasant diversion from the gloomy news. Whether you call these photo tricks, techniques, projects, or whatever, I suggest you give them a try and see what new and interesting photos you can make.
I think you’ll eat up these photo tricks with a fork and spoon! This is the last one in the collection, but be patient. Read the rest first, as there are some good ones; we’ll save this technique for dessert.
For a deeper dive
My intent here is not to get into great detail or give much “how-to” for these tricks. For some, I’ve already written complete articles and, where that is the case, I have linked to those articles so you can do a deeper dive into the subject.
For a few other tricks, I may not have written about them in-depth, but others have. The idea is that while these tricks may not be unheard of, this is a collection of photo tricks all in one place; it’s a jumping-off point for your photo exploration.
1. Bag a vignette
You may have heard of accessories called Lensbabies, a collection of adjustable and specialized lenses designed to give artistic, soft, blurred, and other looks to your image.
Now, I won’t pretend this trick will do for a few cents what specialized gear costing a few hundred dollars can do. But here’s a way to bag some interesting, Lensbaby-style images for dirt cheap.
This photo accessory costs a few pennies and easily fits in your pocket: the “Baggie Vignette.”
Here’s what you do:
Get a plastic sandwich bag and tear a ragged hole in the bottom of it. Pull the bag over your lens so that portions of the bag intrude into the edges of the image. Focus on your subject.
Viola, you have “Baggie FX.”
Play with the positioning, the size of the hole, various apertures, and lighting. Photo accessories don’t get any cheaper than this.
2. Bokeh with flair
Pronounce it how you like; bokeh refers to the look and quality of out-of-focus elements in a photo. Bokeh becomes especially noticeable when the out-of-focus elements are specular highlights.
Different lenses with different optics, different aperture blade shapes, and different numbers of blades will produce different kinds of bokeh, as will the photographer’s choice of aperture.
A wide aperture combined with out-of-focus highlights will give some nice bokeh effects. The pattern of the bokeh shape will depend on the lens. The Canon 50mm f/1.8 gives this kind of look.
Here’s a way to go a step further and make patterned bokeh. Lay a filter the size of lens you intend to use on a piece of cardboard, trace around it, and cut out the cardboard. Now cut a shape, such as a small star, into the center of the cardboard disc you made. Place the disc over the lens and tape it there, or sandwich it between the lens and a filter.
Here, a star pattern was cut in a “bokeh filter,” and the specular highlights in a piece of aluminum foil produced the star effect. Then the image was layered with another shot to create the final result.
With a wide aperture (a 50mm f/1.8 prime, the “nifty fifty,” works great), shoot something with some specular highlights and ensure those highlights are out-of-focus. The highlights will now be the shape of your “bokeh filter.”
Rather than make your own bokeh filter, you can also buy patterned bokeh filter kits with more elaborate shapes than you could probably cut yourself. For folks into 3D printing, this could also be a good project.
3. Reflect on this
You can take a still-life or product photo up another notch by shooting it on a reflective surface. You might think a mirror would be a natural choice for this, but because both the glass surface of a mirror, as well as its silvered backing, are each reflective, you will get two sets of slightly separated reflections if you shoot objects on a mirror.
A polished dark table proved just right for getting a reflection of the wedding rings. The jar of marbles was shot on a piece of black acrylic sheet and the bokeh effects were added with a string of Christmas lights in the background.
A better choice is a piece of acrylic plastic sheet, also known as plexiglass. You can get this in many colors, but I find a very dark black plastic sheet creates a look I like. (A piece of black tile would work well too, but I’ve not been able to find larger tiles.) Shoot with a black backdrop and you can isolate your subject nicely.
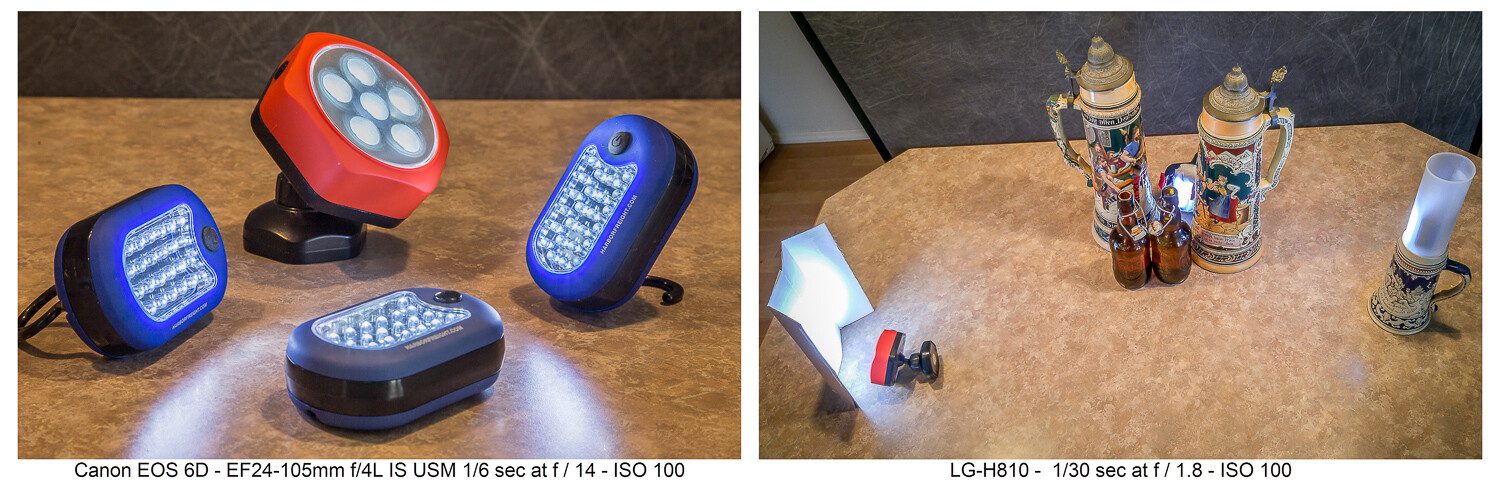
4. Big results with little lights
When we used film or less-sensitive digital cameras, big and often hot lights were needed for indoor photography. With the advent of LED lighting coupled with cameras offering low noise capabilities, we can now make images with very little light.
Also, when doing still-life photos, shutter speed can be anything you like: full seconds, or even minutes, if necessary. Now almost any lighting instrument can be used with some ingenuity. Small LED flashlights can also be used for light painting.
LED flashlights like these can be found cheap at the hardware store. The second image shows how they were used……to produce this image. Having limited light isn’t a problem when shooting still life where long exposures are fine. Canon 6D | Canon EF 24-105 f/4 | 3.2 sec | f/3.2 | ISO 100.
I have a collection of various flashlights (aka “torches”) and other LED lighting gear, which I’ve typically bought for just a few dollars online or at the local hardware store. Finding new ways to creatively use these little lights has allowed me to make some creative images. Take a look at this article which explores this topic further.
5. CD rainbow macros
Before you toss that scratched CD, add it to your bag of photo tricks. Mount a macro lens on your camera, or use whatever means you have to get close to your subject. Put the CD down with the reflective, non-printed side up. Then, with an eyedropper or other tool, place small water droplets all over the surface of the disc.
Waterdrops on a CD shot with a macro lens and lit in various ways can produce some colorful abstract images.
Focus your shot and get creative. The lighting is purely up to you. Perhaps try some shots in direct sunlight where the intense light will really pop the rainbow spectrum. Maybe try a small flashlight. Try a long exposure and light-paint the droplets. Anything goes when you’re making abstract images.
6. Oil and water abstracts
I wrote a complete article on this technique, which is another way to get some interesting and colorful abstract images. With minimal equipment and whatever lighting you like (even shooting outdoors with natural light), you can have a whole afternoon of fun.
Oil and water don’t mix, and that’s a good thing for this technique. A glass dish shot from above and through the mixture with some colorful objects in the background is the technique here.
7. Up in smoke
Add this to your collection of photo tricks to make some smokin’ hot images. An incense stick and some care with your lighting will get you going. Then take your shots to the computer where you can add additional effects. Have a look at my article here on DPS, “How to Make Interesting Abstract Smoke Photos,” for a full write-up on this technique.
This is a straight, side-lit shot of the smoke pattern rising from an incense stick.Take the straight shot on the left, mirror it in editing, and colorize it. Then you have a firebird! (At least that’s what I see. What do you see in this abstract?)The original smoke photo mirrored both horizontally and vertically and colorized in editing. Is this what they mean by “smoke and mirrors?”
8. Interaction with reflection and refraction
Find historic images of early photographers, and you might see them standing behind their cameras with black capes thrown over their heads. They did not have DSLRs, where the image entering the lens is reflected onto a mirror, through a prism, and then into the viewfinder right-side up. Instead, early photographers used the first “mirrorless” cameras, and the image came through the lens and displayed upside down on a ground glass at the back of the camera. The image was quite dim, which explains the need for the cape to better see the projected image.
The water-filled glasses refract the light while the black acrylic plastic sheet below reflects it. There’s a lot of light physics going on in these shots.
We won’t require you to take a course in optical physics so you can understand the behavior of lenses, light, reflection, refraction, or the differences in light transmission through various mediums. Just break out some glassware, pour in a little water, maybe use that piece of black plexiglass we mentioned earlier, find an interesting background, and go for it.
You are getting sleeeepy… The water in the glass refracts the light and flips the image, much like a lens.
If you do want to dive deeper into understanding light behavior, take a look at my article “How to Understand Light and Color to Improve Your Photography.” Maybe take a look at this one as well: “Just Dew It – Fun with Macro Dewdrop Photography.”
These tiny glycerin drops act as little lenses, focusing, refracting, and reversing the image behind them.
9. Zooming around
In our collection of photo tricks, this one is hardly a secret. You probably have done it before. No? Well, if not, and you have a zoom lens, it’s high time you tried the zoom blur effect.
The technique is simple enough. Set your exposure so you can get at least a one-second shutter speed, if not longer. This ought to be easy enough at night if you set the ISO to its lowest setting (such as ISO 100) and stop down the aperture to a small size (such as f/16 or f/22). If you’re shooting in the daytime and these settings alone don’t get you down to a second or more of exposure time, try adding a polarizing filter or a neutral density (ND) filter to reduce the light still further.
Lights at night make great subjects for the zoom blur technique. You’ll definitely need to work on a tripod.
You can do this technique handheld, but a tripod helps. Set your camera so you get the 2-second shutter delay, then with one hand on the zoom ring, trip the shutter. When you hear it click, zoom in (or out) during the exposure. Play with starting zoomed tight and then pulling out during the exposure, or starting wide and then zooming in. Lights at night can make for great looks. Try only zooming during the first or second half of the exposure. There’s no single way to do this, so play and discover what you can create.
Both these shots were zoomed during the exposure. See my fireworks article for the “Boom, Zoom, Bloom” technique.
10. Create a computer screen background
An interesting background can add to the story of your photo. If you have a good-sized computer monitor and are shooting a smaller object, being able to create a background on your computer screen opens all kinds of possibilities.
Create a unique background to go along with the theme of your photo by putting up something appropriate on a computer screen in the background of your shot.
Photographing screens would seem a simple process, but can be more tricky than you think. If you plan to do much of this, reading up on the best camera techniques for shooting screens would be time well spent.
Cheaper by the dozen
The title said 10 photo tricks, but I’m going to throw in two more for free and make it an even dozen. I really like the looks I can get with these last two.
11. Action sequences with Microsoft ICE
I wrote the article “Make Easy Panoramic Images with Microsoft ICE,” which focused primarily on how to use this free and very powerful tool from Microsoft to make panoramic images. That is good fun in itself and a very useful technique.
Toward the end of that article, I touched on something else you could do with ICE: sequential action images. These are great for showing the progressive steps of action, and ICE makes the technique quite easy. Follow the link, read through the article, and see how you can make images like this:
Pan with the action while shooting multiple images in continuous mode, then use the free Microsoft ICE software to assemble them. Quite easy, actually!
Here’s an alternative way to make sequential action photos with a completely different technique, one that’s more well-suited to capturing very fast action: “How to Use Multi-flash to Capture Compelling Action Photos.”
12. Phun photos with photoelasticity
Combine physics with fun and you get Phun, right? With this technique, you will be exploring what is called photoelasticity or, more specifically, birefringence.
Clear plastic tableware goes cosmic with this technique. Learn about birefringence.
You don’t have to understand what’s going on, and this isn’t hard to do. It just works and looks cool. Here’s what you’ll need to do:
Your light source will need to be an LCD computer monitor, TV or, for smaller subjects, a tablet, or even a cellphone. LCD screens emit polarized light, and using polarized light to backlight your subject is part of what’s needed to make this work.
Try to limit any other ambient light. The effect will be stronger if the LCD light is dominant in your shot.
Use subjects made of hard, clear plastic. Polystyrene is what is used for most clear plastic cutlery and drinkware, so these make good subjects. Often the plastic in cheap picture frames is made from similar materials. Glass objects will not work for this.
You will need a polarizing filter on your lens. Standard circular polarizing (CPL) filters work well.
Polarized light plus a polarized lens reveals the “mechanical stress patterns” within certain types of plastics. Clear styrene plastic usually works well.
Now, get ready to say “Wow!” Place your subject in front of the LCD light source. Bring up an image that will create a totally blank, white, bright screen so that light backlights your subject. You won’t see anything until you look through the camera viewfinder and through the attached polarized filter. Cool, huh?
Now rotate the filter. The computer screen will be white, black, or intermediate shades, while the plastic subject will show the rainbow birefringence effect. The patterns will be showing the mechanical stress within the plastic, with tighter patterns where the curves of the object are tighter.
Is it okay to still say “Groovy, man?” A second sheet of plastic was held in front of the lens, producing the colored background. Aside from some exposure and saturation adjustments, this effect is what you see through the lens while making the shot, not added later on the computer.
Just a tip when you are seeking potential subjects for this kind of photography:
Your LCD cellphone screen is a polarized light source. If you have a pair of polarized sunglasses, objects held in front of a blank white screen on the phone and viewed while wearing the glasses will show the effect if they are the right kind of material. You may have to tilt your head to get the same effect as rotating a circular polarizing filter.
Now go play
So there’s a dozen new things to try with your camera. You will also find that these kinds of photography will force you to use different exposure, focusing, camera control, lens selection, and editing skills than perhaps you normally might use.
Remember, even failed experiments can be lessons when you seek to determine what went wrong and then try again to get it right. Now go try some of these photo tricks, have fun, and post some of your images in the comments section. If you have any questions, feel free to post those, too.
The post 10 Cheap Photo Tricks for Creative Images appeared first on Digital Photography School. It was authored by Rick Ohnsman.
We’ve recently shared with you our complete guide to developing film at home, but what happens after your negatives dry? Sure you could scan/digitize them, but why not instead try your hands at the lost art of darkroom printing? Setting up a fully-functional B&W darkroom is way easier and cheaper than you may think – and it’s a ton of fun.
Our pals over at 35mmc.com have put together a complete and practical guide to get you set up in the darkroom and printing, all for around $ 100.
Read: How to setup a darkroom for cheap
About Film Fridays: We recently launched an analog forum and in a continuing effort to promote the fun of the medium, we’ll be sharing film-related content on Fridays, including articles from our friends at 35mmc.
We’ve recently shared with you our complete guide to developing film at home, but what happens after your negatives dry? Sure you could scan/digitize them, but why not instead try your hands at the lost art of darkroom printing? Setting up a fully-functional B&W darkroom is way easier and cheaper than you may think – and it’s a ton of fun.
Our pals over at 35mmc.com have put together a complete and practical guide to get you setup in the darkroom and printing, all for around $ 100.
Read: How to setup a darkroom for cheap
About Film Fridays: We recently launched an analog forum and in a continuing effort to promote the fun of the medium, we’ll be sharing film-related content on Fridays, including articles from our friends at 35mmc.
The Olympus AF-10 Super is by all stretches of the imagination, a very basic film point and shoot. Features are limited to a flash (with three settings) and a self-timer… and that’s about it. But limitations can inspire creative workarounds, and creative workarounds can lead to really satisfying photos, something 35mmc.com’s Hamish Gill found to be true. Read about his experience with the Olympus AF-10 Super, below.
Read: Olympus AF-10 Super – Pushing the functional limits of a cheap point and shoot
About Film Fridays: We recently launched an analog forum and in a continuing effort to promote the fun of the medium, we’ll be sharing film-related content on Fridays, including articles from our friends at 35mmc.
The post Do Cheap Photographers Take Work Away From the Rest of Us? appeared first on Digital Photography School. It was authored by Anabel DFlux.
Price tends to be one of the biggest points of contention with photographers. What is too low? What is too high? What’s just right? Running a profitable business is never easy. Whatever price you set, someone will likely have an opinion or two about it (solicited or not). Which leads to the biggest elephant in the room… do cheap photographers who price low take business away from those that price higher?
My answer?
No.
And here are 6 reasons why:
1. There is a client for everyone
This is business 101 that we often forget (and I am guilty of forgetting sometimes too!). Artists tend to be very emotionally tied to the work and the service provided, and photographers are certainly not exempt from this fact. As such, losing or not obtaining a client can feel like a personal jab even when it has nothing to do with us at all. You have to remember, there is a client for everyone!
This rings especially true in the tumultuous price debate. A client who is focusing on the price will not be looking for an expensive photographer. Likewise, a client who is focusing on high quality will often assume that cheap photographers cannot provide the quality that they seek. A Lamborghini is not concerned over the lower price of a Honda Civic because the Honda Civic buyers are not looking for a Lamborghini.
Alongside this, often price equates to years of experience. Photographers who are brand new may be absolutely fantastic and have beautiful quality images but aren’t able to charge the same as those that are seasoned professionals. Likewise, some clients do value quality work but simply cannot afford a seasoned professional. These two tend to find each other and work together well.
2. Client priorities are not always the same as yours
As photographers, we naturally (and rightfully) value professional photographs highly. From capturing memories to creating beautiful new stories, photographs are essential. However, the priorities we hold as photographers may not always ring true for the subjects in front of our lenses.
Some clients would rather invest their money into something else – something that holds more importance to them. Whether you agree or not, that’s not your decision to make. Some clients look for less expensive photographers because their finances are tied into something that they find to hold more worth to them (and thus receive what they have paid for). And that’s okay – let them.
3. Some clients will eventually understand the price versus value point
This is something that tends to happen to me often. A client will go to a very low-priced photographer, end up unsatisfied with the experience or the end result, and quickly learn the general value of the price. They then come to me and ask to shoot their concept once more. This does happen quite a bit. This is why staying firm on your policies and pricing is important (and tends to command respect).
Wait, wait.
This is assuming that the low-priced photographer has a quality that doesn’t match that of the higher-priced ones. What if a great quality photographer prices low? Doesn’t that cut into my jobs?
Some photographers have a different business model than the rest – known as the “low price and high turnover model.” This model works on the idea that you charge low, service many, and turn over a profit much like a photographer that charges high and services one.
However, what many don’t see behind the scenes, is the reason this model works is much of the process is automated or simplified. It allows the photographer to have a lower output of effort that matches their price. This service is not individualized, and generally not specifically tailored for the individual. It’s the difference that is similar to “ready-made” versus “custom-made” clothing. But this doesn’t work for all clients. The clients this does work for are likely not your clients if you have a traditional photographic business model.
Many major brands have a high-end and a low-end to their business. Take the car company Toyota, for example. Their high-end line is called Lexus – a luxury brand of car. Their consumer-grade line is just good ol’ Toyota. Both cars are great, hardy, and will get you where you need to go in comfort. A Toyota is not worse than a Lexus. The Lexus is just intended for a different kind of buyer.
Well, now that’s said…how do I justify my price?
4. Express your value and stand by your worth
First and foremost, confidence speaks volumes. If you set a price and are confident about it, stand by your worth and be firm.
That being said, every price needs something to justify it. Show the client what the value in investing in your work is versus someone else’s. Do you do something unique and different? Is your client experience above and beyond what the rest do? What do your years of experience or high-quality gear bring to the table? Do you have any awards or honorable mentions? These are all important topics to cover with your client when explaining what you offer and how much you charge for your offering.
5. Find your demographic and market to them!
Marketing is what makes or breaks a business. If people don’t know about you, how can they book you? Marketing is extremely important, especially in the social media age. Marketing is the act of spreading awareness about your business, whether it be through digital advertising, partnering with local businesses, or launching billboards!
If you’re finding that the clients you are marketing to keep choosing a photographer that prices lower than you, that is a big sign that this client base is not the right demographic for you. Demographics are particular sectors of a population that are divided by factors. For marketing purposes, factors tend to be interest, age, location, income, and more.
As a business owner, you need to find the demographic that relates to the service you are offering. Look at income levels that tend to align with your price point, and for clients with interests that may be more aligned with your offering (e.g., pet photographers will look for clients with interest in animals), and age group can also be a big factor. If you’re a family photographer, look for moms and dads, or youth sports – keywords like that!
Remember, you must segment your population based on more than one factor to find the right demographic. Filling out location and interests in the minimum is a good starting point.
6. Stop worrying about what others are doing and charging
Everyone has a different ideology when it concerns their business. They use the business model that suits them, dependent on variables you likely do not know about. As such, the running of their service (and what they charge for it) does not apply to you. It’s best to stop concerning yourself with what others are doing and focus on what you are doing for you!
The industry is changing, and society has changed its view on the value of art.
Conclusion
You’re not losing jobs because your competitors are cheap photographers, you’re losing jobs because you either haven’t found your right client base or you need to get better at expressing your value.
Focus on your business and what you can improve in your work, and the right clients will come! The world is not as small as it seems; there are thousands of potential clients out there for you.
Do you agree with this or do you think cheap photographers do take work away from us? Or perhaps you have some other valuable points to share? Share them with us in the comments section.
The post Do Cheap Photographers Take Work Away From the Rest of Us? appeared first on Digital Photography School. It was authored by Anabel DFlux.
The post 10 Cheap Photography Accessories that will Make Your Life Easier appeared first on Digital Photography School. It was authored by Suzi Pratt.
Camera gear is notoriously expensive, but there are some cheap photography accessories out there. Here are 10 affordable gadgets that you should seriously consider adding to your camera bag, no matter what kind of photography you do. They can help make your photoshoots run smoother and your workflow more effective.
1. Camera cleaning supplies
No matter how careful you are with your camera gear, it is bound to get dirty. Thus, it is essential to always have your camera and lens cleaning supplies on hand. Luckily, these items are pretty cheap, so there’s no excuse for not having them around. Here are a few cleaning tools in particular:
Lens cloth: microfiber cleaning cloths remove dust and smudges from filters and the front of your lens.
Rocket blower: also known as a bulb blower, use this rubber device to blow the dust off your camera sensor and the front of your lens. If using it on your camera sensor, be sure to point your camera downward so the dust will fall to the ground.
Lens pen: these have a similar function to lens cloths, but they are easier to keep clean and target problem areas.
Lens cleaning liquid: when a lens cloth or pen isn’t doing the trick, cleaning liquid will often give you the best results.
2. Rain sleeve
Even though many cameras and lenses are touted as weather-resistant, it’s still a good idea to carry rain gear with you. This is helpful not only for downpours but for shooting in other wet conditions such as riding on a boat or sitting in the first row at Sea World.
There are all kinds of rain cover options out there, including regular plastic shopping bags and Ziplock bags.
If you have a relatively small camera, a DIY home version might be just fine. But for those with larger cameras and lenses, it’s best to invest in dedicated camera rain sleeves, such as these made by OP/TECH. They are pretty cheap and reusable, and they have custom sizes to better fit your camera setup than what a regular plastic shopping bag can offer.
3. Foldable reflector
No matter what kind of photography you do, you should own a reflector. These flexible devices are great for adding a kiss of light to any scene. Reflectors come in many sizes and shapes.
The most versatile ones are 5-in-1, offering white, silver, gold, black, and translucent surfaces.
The latter surface is one that I use often to filter light and make it softer. This is where the LED flashlight can come into play if you filter its light via the translucent part of the reflector. Size-wise, reflectors can be pocket-sized, or human-sized. Get the size that makes the most sense to you or stock up on multiple ones.
4. Bubble leveler
Although many cameras have built-in digital levelers, sometimes it is easier to have a physical bubble leveler that you can always refer to. These cheap bubble levelers fit on the cold shoe mount of your camera and help you get a straight and level shot.
As an added bonus, you can also use these to level other items such as prints of your pictures when mounting them to a wall.
5. Battery holder
Most photographers have several spare batteries for their cameras. But do you have a method for keeping your batteries organized? If not, you need a battery holder. Think Tank makes battery holders for different capacities, such as 4 spare batteries or 2. They even have one for AA batteries. When I use these battery holders, I put them in facing the same way and replace them upside down as they drain and need to be recharged. That way, I know not only where all of my batteries are, but which ones need to be charged.
6. Memory card wallet
Similar to battery holders, it’s also a good idea to have a memory card wallet.
When I first started out in photography, I was a staunch believer in having as few memory cards as possible so that I didn’t accidentally misplace them. While this might be an okay practice for some, the truth is that camera file sizes keep getting larger. That means you’ll likely need to carry more memory cards.
If you use more than one memory card, you should have a system for keeping them organized. That’s where a memory card wallet is helpful. Use them not only to keep track of your cards, but also to know which ones are empty, and which are full (i.e. by turning them upside down when full).
7. Silver Sharpie
Have you ever noticed that a lot of camera gear tends to be black in color? Everything from batteries and memory cards, to camera bodies and lenses, they all seem to be the same color. This can make it tricky for labeling them with your name or indicators to tell them apart. Enter the silver Sharpie.
This is one of those tools I never knew I needed until I started using it. The main thing I use it for is to write my name and a unique number on each of my memory cards. I have 13 of them, so I need a way to tell them apart. I do the same for my camera batteries, external hard drives, and all kinds of items.
8. LED flashlight
This is an item that is so small and easy to slip in your camera bag that you might as well carry one. Portable light sources have a variety of uses, namely helping you find gear in your camera bag in dark lighting scenarios. Flashlights can also help you make a creative image via light painting, or adding a bit of extra light to a scene, especially when paired with the next item on the list.
9. External battery pack
These last two items might be arguable in terms of their “cheapness,” but they have a relatively low investment price considering how long they can last. An external battery pack is especially helpful today since many modern cameras can be charged via USB input.
You can also juice up your cell phone on the go, which is probably very helpful for photography since there are many smartphone camera apps out there to help you take better photos.
I’m a fan of Anker battery packs, such as the Anker PowerCore 10000, which goes for about $ 30.00 USD. I’ve owned the previous version of this battery pack for over 5 years, and it is still going strong.
10. Joby Gorillapod
These flexible tripods have been around forever and they are still incredibly useful. Think of those awkward places where a regular tripod won’t quite fit, and the Gorillapod is your answer for anchoring your camera to grab those unique shots.
Admittedly, Gorillapods aren’t the cheapest accessories out there, but it does depend on which size you buy. Smaller Gorillapods (for smaller cameras) can go for under $ 30 USD, but the larger ones will go for upwards of $ 40 USD. This may seem cheap to you, or it may seem expensive.
Either way, know that these Gorillapods are built to last. I have one that is over 7 years old and it still holds up both my Canon DSLRs and Fujifilm mirrorless cameras just fine.
Over To You
There you have it – 10 (relatively) cheap camera accessories that all photographers should have.
Would you add any items to this list? Let me know in the comments below!
The post 10 Cheap Photography Accessories that will Make Your Life Easier appeared first on Digital Photography School. It was authored by Suzi Pratt.
The post 5 Camera Accessories You Shouldn’t Buy Cheap appeared first on Digital Photography School. It was authored by Suzi Pratt.
With each passing year, it seems that camera gear and accessories get progressively cheaper. Third-party brands now offer everything from lenses and flashes to batteries and tripods. This gear is typically priced at a fraction of the price of name brand manufacturers and the quality is often on par. Photographers have often said that “you get what you pay for” when it comes to camera gear, implying that cheaper goods offer less quality. But is that still true today?
In this article, I’ll highlight 5 camera accessories you shouldn’t buy cheap and should consider paying full price for. This isn’t to say that there aren’t cheap, third-party brands offering solid quality for less. But these are items that you’ll want to research extra hard to make sure you’re buying the best product for your camera.
1. Camera strap
All cameras come with a stock camera strap that you can use to secure your camera on your shoulder. However, the quality and long-term durability of these camera straps are often questionable. Thus, it’s becoming more commonplace for photographers to purchase their own camera straps. Peak Design and Black Rapid are two popular brands offering sturdy and stylish camera straps. These straps are on the pricey side with the Peak Design Slide coming in at $ 64.95 and the Black Rapid Breathe at $ 68.99. Each strap also attaches to your camera differently, but their main benefit is being able to detach on demand if you need to remove the strap (ie. for use on a tripod or gimbal).
Are there cheaper camera strap alternatives? Certainly. But consider the fact that you are trusting the camera strap to hold hundreds or thousands of dollars of equipment and be sure to buy a camera strap that you can trust.
2. Tripod
Along the lines of keeping your valuable camera gear safe, it’s also wise to invest a little extra into a high-quality tripod. I’ve spent years buying cheap, compact tripods for travel only to have them fail on me sooner than expected. As a result, I’ve amassed a pile of broken tripods. Last year, I finally took the plunge and bought a more expensive Manfrotto tripod. Solid and reliable, I now wonder why I didn’t just buy this tripod in the first place.
When purchasing a tripod, it’s also important to buy a quality tripod head. Ball heads are popular and are often the default tripod head that you’ll receive. However, they tend to loosen over time. Luckily, there are many other tripod heads out there that offer more stability and precise control over your camera movement. My personal favorite tripod head is the Manfrotto MH804-3W, which I now use for all of my architecture and real estate photo shoots.
3. Camera batteries
When buying a new camera, it’s always important to budget for a few extra camera batteries. You’ll always want spares just in case, and authentic spare camera batteries are generally not cheap. For example, a spare Sony Z-battery for the A7III costs $ 78. Similarly, a spare Fujifilm battery is $ 65. Third-party brands such as Wasabi Power offer cheaper battery knock-offs, but there’s a risk in using these.
Battery knock-offs may or may not offer the same amount of power as the original batteries. I’ve used third-party batteries for certain cameras such as my Canon DSLRs and not seen any difference in their power. However, camera brands are getting smarter and will sometimes detect knock-off batteries. For instance, my Fujifilm X-T3 flashes a warning sign if Wasabi Power battery is inserted, and it definitely does not last as long as an authentic Fuji battery.
It’s also said that using third-party batteries can void your camera’s warranty. I’m not sure how the camera brand would know if you were using a knock-off battery, but it’s still something to look into.
High-megapixel cameras come at a price as they eat up storage on your memory cards and hard drives.
4. Memory cards
All of your photos and videos are recorded onto memory cards, so it is very important to select quality memory cards. SanDisk is one of the biggest and most reputable memory card makers. There are other brands such as Lexar and PNY that also make quality memory cards. But I’d be wary of buying memory cards made by any other brands. With that said, even the most reputable memory card brands tend to fail and malfunction, so also be sure to use multiple memory cards if your recording device offers multiple card slots.
5. Hard Drives
Related to memory cards, hard drives are also important for storing and backing up your photos and videos. If you’ve ever had a hard drive fail, you know the importance of choosing a quality hard drive and making sure you have a backup for your backup.
Similar to memory cards, even the most high-quality hard drives can fail, so the best brand names are up for debate. Western Digital and Seagate are generally good hard drive brands, even though I’ve experienced hard drive failures from them both.
Lately, I’ve had the best luck with Samsung SSD hard drives. I use a 1TB Samsung T5 as my main working hard drive and a 4TB LaCie Rugged Mini as my secondary backup. This combo is great for working on the road, as well as in the office.
Conclusion
There you have it – 5 camera accessories that you’ll want to consider splurging for because in some cases, you still get what you pay for. Are there cheaper, high-quality alternatives for these items? Certainly. But when it comes to these 5 items, take the extra time to read customer reviews and make sure you’re buying the best gear for your camera.
Would you add or remove any items from this list? Let me know in the comments below!
The post 5 Camera Accessories You Shouldn’t Buy Cheap appeared first on Digital Photography School. It was authored by Suzi Pratt.
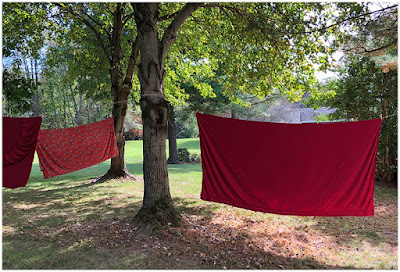
No matter how long you have been doing something, be it lighting or photography or, well, anything, you're never too old to be dumbstruck by a cool new idea.
Take the linens drying on the line above, for example. In the right frame of mind they are essentially super-portable outdoor light sources.
Dustin Dolby of workphlo is great at creating professional product shots using just one or two speedlights and some compositing in Photoshop. In this tutorial, he combines that approach—it takes just two speedlights to light these bottles, and he could have made due with one—with some simple smartphone light painting to create a dynamic and colorful soft drink product shot.
Here are the four exposures he composited together to light just the bottle. One shot using a stripbox through a diffusion panel on the right, one with a reflector added in on the left, another to light the label, and a fourth to give the bottle a bit of pop from behind:
Combine that with a long-exposure light painting shot done in darkness by simply waving a smartphone with a solid color background around behind your product, and you get these two final images—one for each flavor:
Check out the full video up top to see how all of these images were composited together to create the final product photos. And if you’re just getting into product photography and enjoy simple, one or two-light setups, definitely give the whole workphlo YouTube channel a look.


You must be logged in to post a comment.