RSS
 

Posts Tagged ‘Bulb’

TurtleRig launches latest versions of its Bulb Extensions for Flashpoint/Godox strobes

28 Jun

Lighting accessory manufacturer TurtleRig has announced the launch of its latest Bulb Extensions for Flashpoint and Godox strobes.

As explained in the three-minute promotional video above, the third-generation Bulb Extension units move the flashbulb forward 32mm (1.25in) so less light is wasted when used with certain speed-rings and light modifiers. The result is not only more light per flash (TurtlRig claims between 1/3rd to one stop of additional light) but also more even light, since modifiers like beauty dishes and parabolics benefit from having the light project more evenly than would be possible with the standard flashbulb position.

At the time, TurtleRig offers its Bulb Extensions for four different Flashpoint/Godox units, including the AD200, AD400, AD600 and AD600 Pro. Prices start at $ 20.95 and go up to $ 22.95 depending on the model.

Articles: Digital Photography Review (dpreview.com)

 
Comments Off on TurtleRig launches latest versions of its Bulb Extensions for Flashpoint/Godox strobes

Posted in Uncategorized


Cactus launches bare bulb wireless monolight on Kickstarter

08 Aug

Lighting manufacturer Cactus has officially launched its RQ250 bare bulb wireless TTL flash unit on the Kickstarter crowd funding website. Plans for the flash were originally announced at the beginning of the year, and now the company says it will be ready for delivery in October.

The head offers a maximum output of 250Ws and a recycle time of 1.1 seconds at full power

The RQ250 is ‘barely larger than a speedlight’ according to the manufacturer but offers the flexibility of a studio head. It can be controlled wirelessly via the Cactus V6 II radio transceiver system and allows TTL metering across the six main camera brands. Those who prefer manual control can adjust it in 0.1EV steps from full power down to 1/512th power, while the 4-cell lithium ion rechargeable battery provides 520 full-power bursts per charge. The head offers a maximum output of 250Ws and a recycle time of 1.1 seconds at full power. An integrated fan is designed to maintain a decent temperature in the head during intensive shoots, and the aluminum reflector helps by dissipating heat away from the body.

A range of modifiers will be available that connect to the head with via a twist lock bayonet system. The bayonet-mount reflector has a magnetic rim which allows further modifiers to be switched very quickly. The range that can be used will include softboxes, umbrellas and a reflector, as well as a set of magnetic gel holders, a snoot, a diffuser dome and barn doors. Initially it was said that the head would have a Bowens S-Mount bayonet, but it seems Cactus has changed this to its own mount but will offer an optional Bowens S-Mount adapter.

An LED in the head can be used as a 20W modeling bulb as well as an AF assist lamp that comes on only as the camera’s shutter release is depressed

The head can be used in two modes – Color or Speed. Color aims to produce consistent color balance as output varies, while Speed is designed for short flash duration to freeze motion in the image. High speed sync is also available.

An LED in the head can be used as a 20W modeling bulb as well as an AF assist lamp that comes on only as the camera’s shutter release is depressed. It can be kept on all the time at full brightness or linked to the selected level of output to give proportional lighting in multi-head set ups. Additional Speedlights can be used in one of four groups with the RQ250, and wireless control can be achieved with 2.4Ghz radio or optical slave settings.

The Cactus RQ250 is designed and assembled in Hong Kong, measures 194mm x 80mm x 80mm and weighs 1235g (2.7 lb) with the battery, reflector and tube loaded. It will cost $ 699 but can be snapped up for an early bird price of around $ 550 / £430 on Kickstarter.

See the Cactus website or the RQ250 Kickstarter page for more information

Press Release

Cactus RQ250 is now on Kickstarter

The Cactus RQ250, a palm-sized, 250Ws, Li-ion battery-powered TTL wireless monolight, is now on Kickstarter!

Cactus, the award-winning manufacturer of the world’s first cross-brand wireless trigger, is proud to present its first project on Kickstarter: The RQ250 Li-ion battery-powered TTL wireless monolight.

With the freedom of going wireless using portable flashes, location shooting is much easier than before. “Over the years, Cactus started to think about making a flash with all the essentials of a studio strobe, powerful yet portable enough like a speedlight, a light that can pair up with various kinds of modifiers to shape the light photographers want. A light photographers can use on location, fast and smart,” says Henry Chan, the head of R&D at Cactus.

The Cactus RQ250 is small, versatile, fits all kinds of light modifiers in just a click, and addresses all location shooting needs.

Small but Powerful

The RQ250 is so compact it can sit on the palm of your hand. Barely larger than a speedlight, it comes with 250Ws of power and a range of 10 stops, from 1/512 to full power.

Uni-body Design

What makes the RQ250 unique is its special flash head design. The 63-degree optical optimized reflector, which is equivalent to speedlight zoom setting of 35mm, not only makes it good to shoot with on its own, but it is also a perfect match with a lighting umbrella.

Inside the flash head sits Cactus TubeOneTM, the proprietary bare bulb that can be put instantly in a softbox. Coupled with the aluminium flash reflector and Cactus bayonet mount, changing instantly from a round head diffusion disc flash to bare-bulb requires only one click.

Magnetic Clip-on Modifier System Kit

With built-in magnets on the RQ250’s reflector head, clip-on light modifiers can be snapped into place and easily stacked to create the desired lighting effect. The optional kit to the RQ250 includes a barn door, a colour gel set, a diffuser dome, a honeycomb, and a snoot.

Instant Recharge and Fast Recycling Time

The RQ250 maximizes the power of its four-cell battery pack using our proprietary UltroEDTM transformer, which recycles in 1.1 seconds and fires a whopping 520 full power flashes on a single charge.

The RQ250 is also the only monolight of its size equipped with an integrated cooling fan and thermal sensors that allow optimal cooling in any environment photographers are working in. Together with the aluminium flash reflector that dissipates heat, the RQ250 can take a beating and still not overheat.

Colour Mode and Speed Mode

With colour mode on, the RQ250 is able to produce consistent colour temperatures across the entire 10-stop power range and over hundreds of shots, saving photographers a tremendous amount of time during post-editing.

In speed mode, lightning fast flash duration at low power outputs allows photographers to freeze the fastest of movements. With power adjustment steps as fine as 0.1EV, the 10-stop power range from 1/512 to 1/1 enables full manipulation of the RQ250 power band.

TTL on Eight (8) Camera Brands

The RQ250 is a wireless TTL monolight for Canon, Fujifilm, Nikon, Olympus, Panasonic, Pentax, Sigma, and Sony when triggered by a Cactus V6 II or V6 IIs. It supports TTL, high-speed sync (HSS/FP) as well as manual power control and works simultaneously with any portable flashes compatible with the Cactus V6 II or V6 IIs.

Modelling Light and AF-assist

A modelling light has always been an exclusive feature in professional studio lights, but we managed to put one in the small body of the RQ250. The RQ250 not only has one, but it has 20W, making it powerful enough to light any subject and allowing photographers to work freely in any environment. The modelling light can be used as an AF-assist to help photographers achieve accurate and efficient focus.

Kickstarter

The new RQ250 (MSRP: US$ 699.00) and its accessories will be available on Kickstarter for a pre-sale discount beginning August 6, 2018.

About Cactus

Headquartered in Hong Kong, Cactus is a brand under the R&D company Harvest One Limited. The RQ250 is designed, engineered and assembled in Hong Kong.

The manufacturer of the award-winning Cactus wireless flash triggers and flashes, the world’s first and only wireless triggering system that supports TTL/HSS across eight (8) brands of camera and flash systems, Cactus stands firmly behind its products and closely works with photographers to always cater to their needs.

Cactus has distributors and dealers worldwide. Learn more about the RQ250 and Cactus’s other products at www.cactus-image.com.

Articles: Digital Photography Review (dpreview.com)

 
Comments Off on Cactus launches bare bulb wireless monolight on Kickstarter

Posted in Uncategorized


How to Use Bulb Mode for Long Exposure Photography

09 Oct

Most DSLR and mirrorless cameras have a feature called Bulb Mode. If you’re like me, you probably saw that in one of the menus or buttons when you first got your camera and have promptly ignored it ever since. Even the name sounds weird, and at first glance, you might think it has more to do gardening than photography. But it’s actually a very useful option that can unlock all sorts of creative possibilities with your camera.

Learning to use Bulb Mode does take a bit of practice though, and it helps to understand how it got its strange name in the first place. But I think you’ll find that the payoff is worth your time.

How to Use Bulb Mode for Long Exposure Photography

Lightning shot using Bulb Mode.

History Lesson

Way back in the early days of photography, long before digital image sensors existed, and autofocusing lenses were little more than science fiction, the act of taking a picture still worked in many ways like it does today. Hidden inside the sealed innards of a camera was a piece of light-sensitive film onto which an image would be projected when the camera’s shutter was opened, thus letting light pass through the lens and onto the film.

It’s the same principle that DSLRs use today. The only major change is how the shutter is constructed and the manner in which the timing is controlled. A hundred years ago there was no such thing as computer-powered cameras or precise mechanical actuators that could open the shutter for a long period of time (typically longer than one second). Instead, the photographer held a small bulb in his or her hand which was attached to the camera’s shutter by a piece of tubing.

Squeezing the bulb opened the camera shutter and releasing the bulb closed it, which meant the timing of the shutter was entirely up to the individual taking the photo. As long as the bulb was squeezed, the shutter would stay open. This method continued to be used on cameras for years to come, and it’s even possible to find bulb-style shutter releases for cameras today.

In short, think of Bulb Mode as Time Travel Mode. It basically makes your camera function like a camera from 100 years ago, when you had to squeeze a bulb to open the shutter, and then release the bulb to close it. The only major difference is that unless you literally have a bulb-style shutter release like the one pictured below, you will press the shutter button to open the shutter and release your finger to close it. Pretty neat, isn’t it?

How to Use Bulb Mode for Long Exposure Photography

Squeeze the bulb to open the shutter on this Pentax 35mm film camera. Release the bulb to close the shutter. Image courtesy of Wikimedia Commons.

Bulb Mode Today

Most modern cameras allow you to set the shutter speed anywhere from 1/4000th of a second and 30 seconds, which gives you an incredible range of creative photographic possibilities. These shutter speeds work in tandem with a camera’s light meter, as well as the ISO and lens aperture, to help you get properly-exposed images with little to no fuss or hassle. With that in mind, the idea of squeezing a bulb to keep the shutter open seems more than a bit anachronistic. Why would anyone want to hold the shutter open manually when you can just dial in a preset value for the shutter speed and not worry about anything else?

The benefit of Bulb Mode is that it lets you keep the shutter open for as long as you want. The timing is not specified by you, the camera, or anything else which means it’s entirely your decision whether to use a fast, slow or extremely slow shutter speed. Using Bulb Mode, it’s possible to leave your shutter open for one, five, 10 minutes or even longer. The only limitation is your camera’s battery and your own degree of patience, which opens the door for some amazing photographic opportunities.

How to Use Bulb Mode for Long Exposure Photography

Finding Bulb Mode

Shooting Mode Dial

Canon mode dial, B is Bulb.

The first step in using Bulb Mode involves figuring out how to access it on your camera, especially if you did not have even known it existed and have never tried to look for it. Because Bulb Mode involves controlling the shutter you might think that you need to first put your camera in Shutter Priority mode, but that’s generally not the case.

For most cameras, you actually need to use Manual Mode and then set your shutter speed to as low as it can go. You will likely see decreasing speeds of 5 seconds (your display may show that as 5″), 10 seconds, and so on, all the way down to 30 seconds at which point one more click of the dial will put your camera into Bulb Mode. If this doesn’t work for you it’s possible your camera simply doesn’t have Bulb Mode (most DSLRs and mirrorless cameras do have it, on some Canons, it is on the Mode dial as B). If you really aren’t certain just Google the brand and the model of your camera along with the words “bulb mode,” which will likely turn up some useful results.

How to Use Bulb Mode for Long Exposure Photography

Instead of showing a shutter speed along with a light meter, my camera’s LCD screen now displays the word “bulb” to indicate that I have entered Bulb Mode.

Understanding Bulb Mode

Once your camera is in Bulb Mode a couple of things go a little haywire and you may think your camera is broken. Before you send it in for service, just know that everything is fine…but different. Right away you’ll notice that your camera’s light meter no longer works, and there is no indication of what exposure settings you should be using to get a properly-exposed image.

This happens because your camera has no idea how long you want to leave your shutter open, and without that information, it doesn’t know whether to indicate if the final image will be overexposed, underexposed, or just right. This can make Bulb Mode positively primitive territory, and if you have ever wanted to know what your photographic forebears had to deal with when taking pictures 100 years ago you now know firsthand.

The best way to figure out which settings to use is to simply start experimenting. The more you use Bulb Mode you will start to figure out what settings like aperture and ISO might be appropriate given the scene you are photographing. However, there are some general tips that can be applied, which I will cover in the next section.

Holding the button

The other weird thing about Bulb Mode, which directly hearkens back to the earliest days of photography, is the manner by which the shutter is controlled. To open the shutter you press the shutter button (a sentence which is most likely eliciting rolled eyes due to how obvious it sounds). However, there’s a catch.

The shutter stays open only while your finger is pressing the shutter button. It’s just like squeezing a pneumatic bulb in the early days of photography. As you might guess by now, the way to close the shutter is to take your finger off the button. It’s a strange feeling, and if you have a DSLR handy I invite you to give it a try right now. Go get your camera, put it in Manual, spin the control dial until you’re in Bulb Mode, and take a picture. I’ll wait.

How to Use Bulb Mode for Long Exposure Photography

Using Bulb Mode

Did you snap a photo? I bet it felt kind of strange to have the shutter open and close only when you pressed and then released, your finger from the button. This, of course, brings up the next logical question of how do you actually use Bulb Mode to get good pictures? While each person will use it in their own way, there are a couple of guidelines to think about if you want to get good results.

Low light

Bulb Mode is most useful when you have little to no ambient light. It is almost worthless in daylight or in a well-lit room (unless of course, you are using really good ND filters to block some of the light) The best time to try it is at night when everything is pitch black except what you are hoping to photograph.

Setting up to use Bulb Mode

It’s important to keep your camera steady with a good tripod. You are typically dealing with really long exposures, and even the vibration from your finger pressing the shutter button can affect the resulting image. So the sturdier your tripod is, the better your images will turn out. If you have a cable release or some kind of remote shutter trigger for your camera, now is a great time to use it. Make sure you have one that either locks or counts the exposure for you (if you’re using the small wireless one that camera with your camera, you may need to click it once to open the shutter in Bulb Mode and click it again to close the shutter).

Note: You cannot use the 2-second self-timer in conjunction with Bulb Mode, it will not work.

Finally, try using a small aperture of f/8 or f/11 and a low ISO setting like 100 or 200 since the shutter speed is the independent variable in most Bulb Mode photography. This isn’t a requirement, but depending on your subject you might need a wider aperture or higher ISO, particularly if you want to shoot images of stars or capture star trails or other astrophotography phenomena.

How to Use Bulb Mode for Long Exposure Photography

I was able to capture a bolt of lightning by holding the shutter open, and the long exposure also shows movement in the clouds too.

When to use Bulb Mode

Now it’s time to experiment and really have fun with Bulb Mode. Everyone will use it in a different way, but here are a couple of ideas to get you started.

  • The next time a thunderstorm rolls in, use Bulb Mode to capture lightning strikes. The longer you leave the shutter open, the more lightning bolts you may be able to capture.
  • Try light painting, and experiment with using different kinds of light on familiar subjects you might already have just laying around.
  • Set up your tripod next to a road and shoot light trails as traffic passes by at the night.
  • For a variation on light trails, get a friend have some fun with fire spinning. Note that safety must always come first in these situations, so be sure to keep yourselves, your gear, and the environment around you safe from damage. The best place is a beach with no one around.
  • You don’t need fireworks either, and you can get great results with different sources of light from flashlights to sparklers to twirling glow sticks.
How to Use Bulb Mode for Long Exposure Photography

Using a long exposure helped me turn this ordinary jar of pasta into a surreal glowing work of art.

Conclusion

These ideas are just scratching the surface of what Bulb Mode can do. The best way to learn is to try it for yourself. If you have any particular tips for using Bulb Mode that you think others would enjoy, or some ideas to try that I didn’t mention here, please leave your thoughts in the comments below!

The post How to Use Bulb Mode for Long Exposure Photography by Simon Ringsmuth appeared first on Digital Photography School.


Digital Photography School

 
Comments Off on How to Use Bulb Mode for Long Exposure Photography

Posted in Photography


Silence Of The Lamps: 10 Abandoned Light Bulb Factories

26 Jun

[ By Steve in Abandoned Places & Architecture. ]

abandoned_lightbulb_factory_1a
Things may look dim for these abandoned light bulb factories but hopefully the last worker out the door remembered to flip the switch on their way out.

abandoned_lightbulb_factory_1b

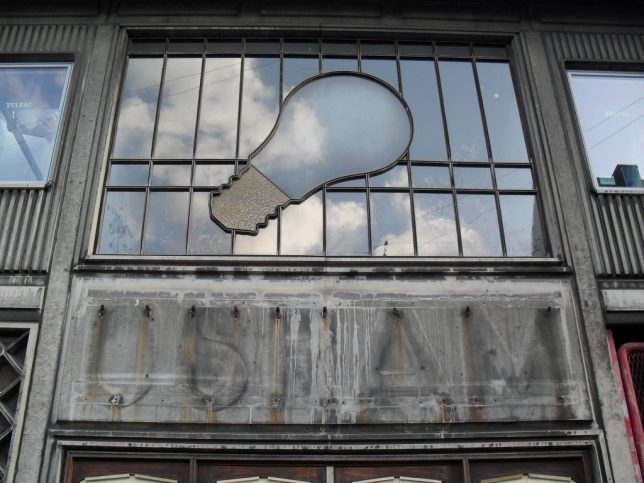
What’s the deal with the above OSRAM light bulb factory facade in Copenhagen, Denmark? Flickr user Stine Linnemann (stine_maskine) snapped the first photo on August 30th of 2009 while Flickr user maya weeks (mayaweeks) snapped the same – yet magically de-aged – facade almost three years later.

Back In The GDR

abandoned_lightbulb_factory_2b

abandoned_lightbulb_factory_2c

abandoned_lightbulb_factory_2d

Twenty-five years after the Berlin Wall tumbled, grungy relics of the GDR (German Democratic Republic, aka “East Germany”) linger on like a bad case of heartburn after too much currywurst. Take the distinctive building above, centerpiece of the former VEB Kombinat Narva Berliner Glühlampenwerk which was the main manufacturer of incandescent light bulbs in the GDR. Flickr user Mondrian Graf Lüttichau (Mondrian-Berlin) captured the semi-restored and partially re-purposed main building in 2014 and 2015.

Alien: Resurgence

abandoned_lightbulb_factory_3a

abandoned_lightbulb_factory_3c

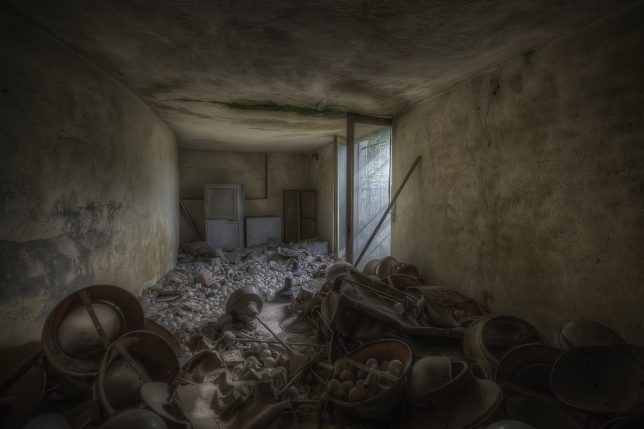
Stay outta there, Ripley!! This unnamed abandoned light bulb factory would make an ideal location shoot for some future Alien movie sequel, would it not? Kudos to Flickr user Andrea Pesce (Opissse) for not disclosing the site’s details – vandals would stomp those scattered light bulbs like so much bubble wrap.

Next Page – Click Below to Read More:
Silence Of The Lamps 10 Abandoned Light Bulb Factories

Share on Facebook


[ By Steve in Abandoned Places & Architecture. ]

[ WebUrbanist | Archives | Galleries | Privacy | TOS ]


WebUrbanist

 
Comments Off on Silence Of The Lamps: 10 Abandoned Light Bulb Factories

Posted in Creativity


Photographic Tutorial # 2 – Bulb & Long Exposures

15 Dec

Video #2 – Sorry it is a bit dark, one of my globes blew just before I started,whoops. Hi again guys, I had some really great feed back from my 1st video so I will continue to share these. This week I had a questions from Daniel Donnelly asking: How does Denis Smith create his Ball-Of-Light images? ( In some parts of this vid I misplace Daniel & Denis’s names oops haha) In this video I go over the methods Denis would use to create his unique images. Please see Denis Smith Photography to understand a bit more about the Ball-Of-Light project! www.denissmith.com.au Leave me any feedback & questions. Thanks so much guys! Phil Lagettie www.palmedia.com.au phil.lagettie@palmedia.com.au
Video Rating: 4 / 5


Photoshop CS5 404: Lighting Light Effects – 8 Bright Bulb – Part 1

04 Nov

Additional videos for this title: j.mp Photoshop CS5 404: Lighting & Light Effects by Mark Stope Video 8 of 64 for Photoshop CS5 404: Lighting & Light Effects A big part of any Photoshop composition is the lighting effects you use to add mood and ambiance to your scene. In this comprehensive tutorial, our resident Film Industry Pro Illustrator Mark Stope shows you how to achieve dramatic, sci-fi & fantasy lighting effects in your Photoshop compositions. In this tutorial you will learn how to create: Basic directional lighting tips Glows and lighting spill techniques Flares, Sparks and beams Neon and back-lit Signage Hologram effects And more This is a comprehensive tutorial, but you don’t have to watch the entire show. Use the detailed menus and keyword search features to quickly find topics of interest – that’s the essence of NonLinear Educating! More info on this title: j.mp

 
Comments Off on Photoshop CS5 404: Lighting Light Effects – 8 Bright Bulb – Part 1

Posted in Retouching in Photoshop


Long Exposure Photography at night (BULB mode) using Moonlight only.

03 Nov

razzi.me www.facebook.com www.PhotographersonUTube.com https
Video Rating: 4 / 5

Official video of “get get get” by Tantrum to blind. directed by Rasmus Wassberg. follow Tantrum to blind: www.tantrumtoblind.com www.myspace.com/tantrumtoblind www.youtube.com/TTBchannel
Video Rating: 4 / 5

 
Comments Off on Long Exposure Photography at night (BULB mode) using Moonlight only.

Posted in Nikon Videos


How to use BULB mode with cable shutter release for long exposure night photography

31 Oct

razzi.me www.facebook.com www.PhotographersonUTube.com https In this tutorial you will learn how to use the BULB mode for long exposure night photography
Video Rating: 4 / 5

Build this jib for about plus or minus 50 cent. Part: Crown Bolt Plain Steel 1/2 in. x 72 in. Square Tube 1/16 in. Thick (2) 8″ corner brace zinc plated(2) skateboard bearing(8 optional) 4 bolts 8 nuts

 
Comments Off on How to use BULB mode with cable shutter release for long exposure night photography

Posted in Nikon Videos


Bulb Mode How-To

20 Oct

Tutorial describing what Bulb Mode is, and how to effectively use it.
Video Rating: 4 / 5

Rent these and many more lenses at: www.borrowlenses.com See my photos at momentsofnaturephotography.com A comparison between the nikon 14-24mm, nikon 14mm, nikon 16-35mm and nikon 17-35mm lenses. In this video the good and bad qualities of these lenses are explained and my opinion on each lens is expressed. See more comparisons and wide angle lens reviews under my wide angle lens review playlist on my main page.

 
Comments Off on Bulb Mode How-To

Posted in Nikon Videos