RSS
 

Posts Tagged ‘Bridge’

Double-Helix Bridge Design for Beijing Based on Abstracted Olympic Symbol

23 Jul

[ By SA Rogers in Architecture & Public & Institutional. ]

double helix bridge 1

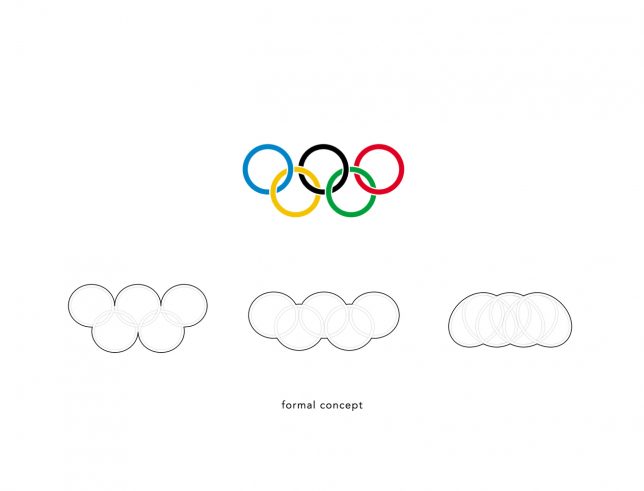
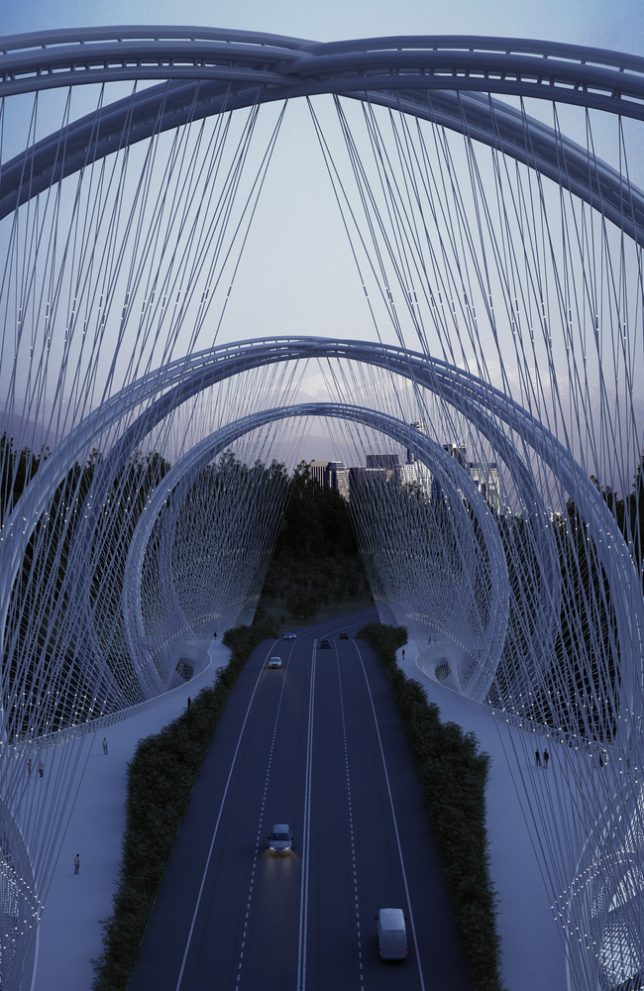
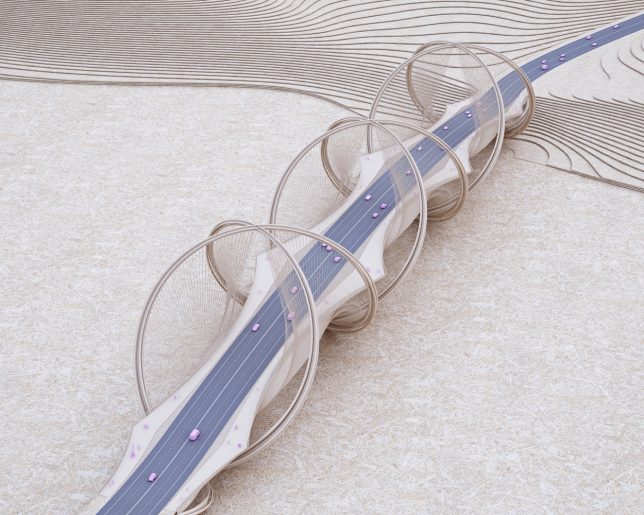
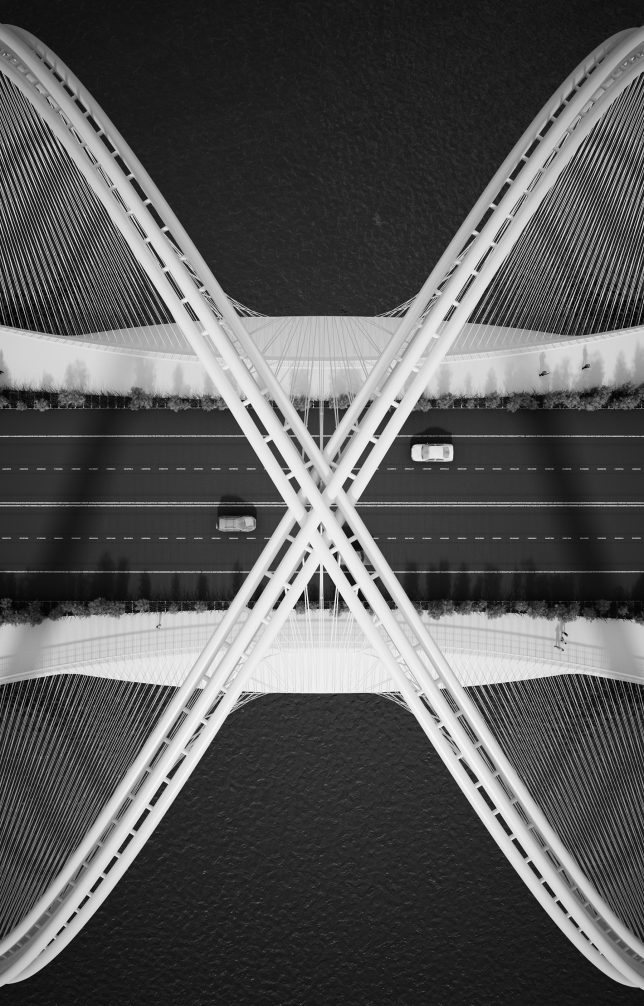
The Olympic symbol consisting of five interlinked circles is stretched out and rotated until the links create a three-dimensional double helix formation in this bridge design, which is scheduled to become reality in Beijing in time for the Olympic Winter Games in 2022. China has already made it clear that it’s willing to go big when it comes to Olympic architecture, filling Beijing with a series of massive structures for the 2008 Summer Olympics, and it aims to make its next turn hosting just as memorable. The San Shan Bridge (3 Mountains Bridge) by architecture firm Penda will connect Beijing with the city of Zhangjiakou, where most of the outdoor events for the Games will take place.

double helix bridge 8

160612_SanShanBridge_structure diagram


double helix bridge 5

bridge 2

Spanning China’s Gui River, the San Shan Bridge is supported by the double-helix structure made up of three sets of undulating steel arches that cross above and below the road surface, dipping into the water. The deck is suspended from the higher arches using high-strength steel cables in a woven pattern. Four vehicular lanes are edged with greenery, which separates the cars from pedestrian paths on either side. Using up to 5 times less steel than a conventional box girder bridge, the design is slim and lightweight in appearance despite its big visual impact.

bridge 1

double helix bridge 7

double helix bridge 2

The region surrounding the bridge is a popular recreation spot for locals and tourists alike, with booming growth leading to a need for more infrastructure. The bridge will not only provide a crucial (and highly memorable) artery from the city to the Olympic events, it’ll be a central component of the Beijing Expansion Masterplan. Nearly 1500 feet long, the bridge will take a few years to construct, but should be done by the time the Beijing Horticultural Expo 2019 rolls around.

Share on Facebook


[ By SA Rogers in Architecture & Public & Institutional. ]

[ WebUrbanist | Archives | Galleries | Privacy | TOS ]


WebUrbanist

 
Comments Off on Double-Helix Bridge Design for Beijing Based on Abstracted Olympic Symbol

Posted in Creativity


Crossing the Bridge: Canon XC10 Review

09 Apr

Canon XC10 key features

  • 12 Megapixel 1″ CMOS sensor
  • DIGIC DV5 image processor
  • Fixed 10x (24 – 240mm equivalent) zoom lens with image stabilizer
  • Face Detection/Tracking auto-focus mode
  • Records 4K XF-AVC UHD (3840 x 2160) video to CFast 2.0 cards
  • 305Mbps video codec (4K)
  • Canon Log (12 stops of dynamic range)
  • Slow and Fast motion capture
  • 12 Megapixel stills (JPEG only, no Raw)

Hybrid cameras are those capable of capturing both high-quality stills and video. Although they have been around since the release of the Nikon D90 and Canon 5D Mark II, a professional mirrorless hybrid camera is a new category for Canon. When Canon announced the XC10 at NAB 2015, there was some confusion as to what kind of camera it was. Was it a system targeted towards Canon DSLR shooters or Vixia shooters? A drone camera? Or a micro ENG camera? The only thing that was certain was that Canon positioned the camera as one that could credibly be used for both video and still photography work.

The XC10 is an all-in-one compact hybrid camera that features both 4K and Full HD video capture as well as 12 Megapixel stills. It has great ergonomics for handheld shooting, is built around a 1″-type sensor, and includes the ability to record Canon Log, providing up to 12 stops of dynamic range. Optically, it uses a fixed zoom with a 2x Digital Teleconverter and Optical Image Stabilization, as well as a built-in ND filter.

The XC10’s lens gives you a focal range of 27.3-273mm equivalent for video capture and 24.1-241mm equiv. for stills. For monitoring, the camera features a touchscreen with Vari-Angle LCD monitor and an included loupe to mount to the LCD for viewing in bright environments. Unlike the 1080p EOS 5D Mark III, the XC10’s video workflow options should meet the standards for professional video shooters, offering H.264 4:2:2/8-bit MXF 4K UHD (3840 x 2160) files (up to 305Mbps) to internal CFast 2.0 cards, or Full HD (1920 x 1080) to SD cards.

Its form factor sets the XC10 apart from typical DSLR and compact mirrorless cameras like the Sony a7R II or Panasonic GH4. With its adjustable side grip and loupe attached for continuous run-and-gun video shooting, the XC10 slightly resembles Canon’s Cinema EOS cameras, such as the C300 Mark II and the C100 Mark II. With its side grip and adjustable LCD, you can comfortably shoot and monitor your shots at any angle.

Though probably intended for slightly different audiences, on paper the XC10 has a couple of competitors in this space: Sony RX10 II/III and Panasonic FZ1000. All three cameras contain 1″-type sensors and capture 4K video. The RX10 II/III also give you cinematic picture profiles, including S-Log2 which, like Canon Log, extends the cameras’ latitude. Unlike the RX10 II/III and FZ1000, which are aimed at stills photographers, the XC10 does not support Raw image capture. Also, the XC10 is by far the most expensive of the three with a retail price of $ 2,499 (though street prices hover around $ 1,999).

And if video is your primary format, the XC10 could well be a solid replacement for your DSLR, especially if you need to capture 4K. So the question becomes, can the XC10 be a credible stills camera for people who primarily shoot video but need high quality stills in certain situations? Let’s find out.

Articles: Digital Photography Review (dpreview.com)

 
Comments Off on Crossing the Bridge: Canon XC10 Review

Posted in Uncategorized


Ribbon of Light: Replacing LA’s Most Iconic Historical Bridge

16 Mar

[ By WebUrbanist in Architecture & Cities & Urbanism. ]

bridge from above

Quite possibly the most filmed and photographed bridge in the world, the Sixth Street Viaduct, spanning the Los Angeles River, is a challenging icon to replace, but the Ribbon of Light aims to try.

sixth street viaduct original

The famous Art-Deco viaduct in question, built in 1932, has been featured in dozens of films, television shows, music videos and video games, including Grease, Gone in 60 Seconds, Terminators 2 and 3, Madonna’s ‘Borderline’ video and episodes of Lost and 24.

Some sequences show most recognizable part (directly over the LA river) being driven across, but many are shot from the river below. Unfortunately for fans, its was deemed seismically unstable thanks to compromised concrete supports, despite its historic landmark status with the city.

sixth street viaduct replacement

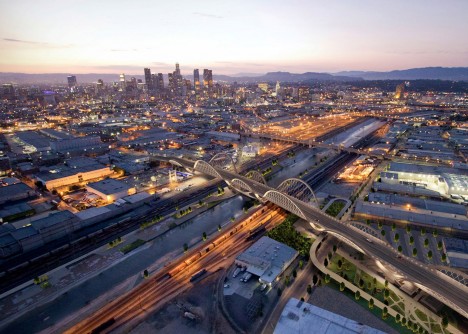
Architect Michael Maltzan, responsible for its replacement, has made his design an epic ode to its iconic curves, reprising and repeating them across a much longer portion of the new structure.

bridge at night

The new structure features arched trusses to be illuminated at night, suspended over a series of parks and paths being developed below and alongside it. A series of staircases and ramps will allow pedestrians and bikers to move up, down and across it as well.

new viaduct and park

The architects are clearly cognizant of the landmark they are replacing, and, in a way, are preserving its visibility through these repetitive forms, which actually extend much further out on either side than the original arches.

under bridge park

From the architects: “The project foresees a multi-modal future for the city, one that accommodates cars, incorporates significant new bicycle connections, and also increases connectivity for pedestrians to access the viaduct, not only at its endpoints, but along the entirety of the viaduct, linking the bridge, the Los Angeles River, and future urban landscapes in a more meaningful relationship.”

la river ribbon bridge

“These pairs of repeated concrete arches and cable-supported roadway deck are simultaneously elegant and efficient. The design approach unifies and optimizes the architecture of the viaduct through repetition, creating a unique configuration through the repeated use of arches, roadway and pier forms: an iconic structure.”

Share on Facebook


[ By WebUrbanist in Architecture & Cities & Urbanism. ]

[ WebUrbanist | Archives | Galleries | Privacy | TOS ]


WebUrbanist

 
Comments Off on Ribbon of Light: Replacing LA’s Most Iconic Historical Bridge

Posted in Creativity


Finally! Adobe updates Bridge CC for improved performance

10 Feb

Adobe has released a significant update to Bridge CC, its venerable file management program. Where Photoshop and Lightroom have seen multiple incremental updates over the past few years, Bridge has been left somewhat alone. That all changes today with multiple improvements including improved cache management, and an option to import images from external devices including iOS and Android mobile devices.

Sluggish performance, especially when displaying large numbers of thumbnails has been a perennial complaint among photographers who use Bridge. And although it has taken a while, Adobe seems to have listened to those complaints. Thumbnail previews are now generated on-demand rather than all at once, and metadata is loaded first so that filters can be used before all thumbnails have been generated. In another effort to boost performance, Adobe has introduced improvements to its cache management to automatically purge stale items when Bridge is idle.

This Bridge update also re-instates a feature that automatically identifies and stacks images shot in a sequence either for an HDR or panoramic composite. 

Bridge CC version 6.2 is available for download now.

Press release:

Bridge Reloaded

Today we are pleased to announce the release of Adobe Bridge CC version 6.2.

Bridge was brought back to be managed by Megan Donahue, Director, Creative Cloud and Arno Gourdol, Sr. Engineering Director, Creative Cloud and their awesome teams.  Arno is no stranger to Bridge since he has worked on several past releases.  Our team has been working on several new initiatives that enhance user experience around asset management used by Creative Cloud customers. Most recent initiatives launched by this team include collaboration features in Creative Cloud as well as Creative Cloud Assets, and Creative Cloud Libraries.

This latest release of Adobe Bridge CC includes updates to the following feature set:

Automated cache management

The central cache of Adobe Bridge stores thumbnails, previews, and metadata information in a database. This database improves the performance when users browse or search files. However, the larger the cache, the more disk space it uses. Cache preferences help you manage the trade-off between performance and cache size. We have worked on improving purging cache capability, which is an existing feature in Bridge. In this update, automatic purging of stale cache items has been enabled when the application is idle.

We are also providing a cache compaction option to set up cache clean-up at exit in case the database size increases beyond a certain size. Both these options improve performance of the application and help keep the cache and database clean over extended periods.

For more information see, Work with the Adobe Bridge cache.

On-demand thumbnail generation

To improve the responsiveness of Bridge when you are browsing through a large set of assets, we have made improvements to the way the thumbnails, previews, and metadata are extracted/generated. Now when you select a folder, the thumbnails/previews are extracted on priority for only the on-screen assets. The thumbnails for the remaining files are either generated on demand (when you scroll down/up) or when the application is idle. The metadata extraction happens on priority for all assets, thereby enabling the filter panel and search to become functional sooner.

This change enables you to work with bulky folders without any performance issues like hangs and not-responding states. With this change, you will now have a fully updated Filter panel even before all the thumbnails/previews are generated. This will also enable you to search for the files even before all the thumbnails/previews are generated.

Import from device option on Mac

On Mac OS 10.11.x, Bridge CC did not recognize the following types of devices:

iOS mobile devices

Android mobile devices and digital cameras connected in PTP (Picture Transfer Protocol) or MTP (Media Transfer Protocol) mode

In this update, an alternative to import media from these devices has been provided. You can now choose File > Import From Device to import media from the devices.

For more information, see Import from device on Mac OS 10.11.x.

Note: This is a Mac only feature and launches Apple Image Capture to bring files from devices into Bridge.

Other significant updates

We also reinstated Autostack Panorama/HDR feature. Given our focus was on stability and performance of Bridge, we have made significant updates to the core technology components. This will set the foundation for a technology platform to enable future development and modernization of Bridge.

Our team is very excited to bring this release as a stepping-stone for the work we have set out for 2016!

Articles: Digital Photography Review (dpreview.com)

 
Comments Off on Finally! Adobe updates Bridge CC for improved performance

Posted in Uncategorized


Roller Coaster for Cars: Steep Bridge in Japan is Almost Vertical

09 Feb

[ By Steph in Destinations & Sights & Travel. ]

steep bridge

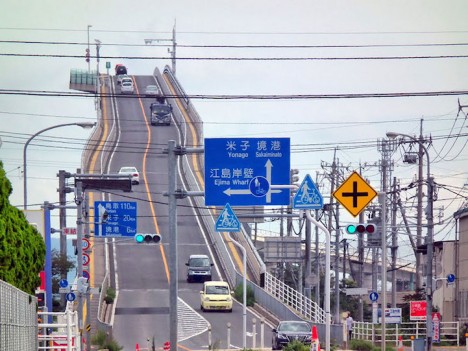
You’d likely feel more than a little trepidation approaching this bridge head-on, wondering how in the world your car is going to drive straight up a nearly-vertical surface. Spanning Lake Nakaumi between Matsue and Sakaiminato in Japan, the Eshima Ohashi bridge has a gradient of 6.1 percent on one side and 5.1 on the other. The third largest rigid-frame bridge in the world, this intimidating structure is the nightmare of anyone with a bridge phobia, especially since it runs a full mile over the water.

steep bridge 2 steep bridge 3

When you see it from the side, it doesn’t look quite as dramatic, but the angle leading up to the apex is no joke. Its extraordinary height enables even the tallest of ships to pass under it without the need for a drawbridge, allowing traffic to continue between the two cities without interruption. It’s certainly not for the faint of heart.

steep bridge 5 steepb ridge 4

Surpassing it in height is France’s MIllau Viaduct, which bests even the Eiffel Tower at over 885 feet from the ground. Still, imagine trying to drive over this thing on a foggy night, in the rain, or even worse, when the roads are slick from snow and ice. It seems like cars would just slip and slide right back down, which probably wouldn’t be as much fun as it sounds.

Share on Facebook


[ By Steph in Destinations & Sights & Travel. ]

[ WebUrbanist | Archives | Galleries | Privacy | TOS ]


WebUrbanist

 
Comments Off on Roller Coaster for Cars: Steep Bridge in Japan is Almost Vertical

Posted in Creativity


5 Starter Steps to Batch Processing using Adobe Bridge

31 Jan

Post-processing can be a minefield. Beginners especially can feel overwhelmed when confronted by amazing software, that can do almost anything, like Photoshop for example. However, everyone starts from somewhere, and not everything is terribly confusing. I am personally a fan of simplicity, when it comes to technology. Let me share with you a few simple steps on how to get started batch processing using Adobe Bridge.
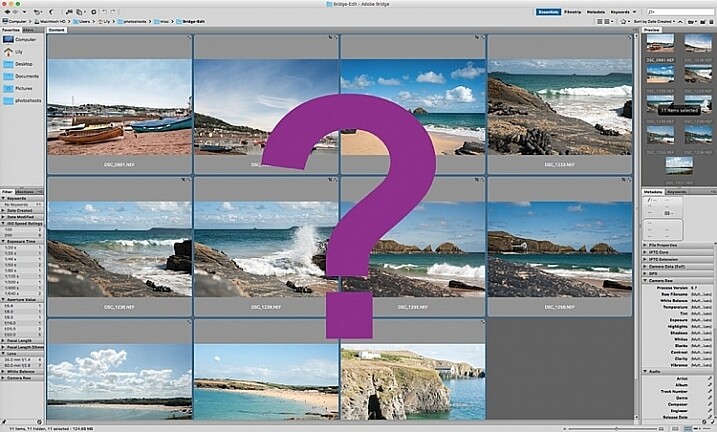
what-is-adobe-bridge_WEB

Editing in Bridge is super simple, and as easy as one – two – three. Open your file, edit your photo, save your file. I will walk you through it, and try to demystify the first step in post-processing, without touching Photoshop.

What is Adobe Bridge?

Bridge is part of Adobe’s Creative Suite, and is a media browsing application. It is an app that enables you to view your entire computer contents, manage and organize your digital files, and edit your photos without the need to import and file them in various catalogs elsewhere. For photographers specifically, Bridge simplifies the first step in the editing process, because within Bridge you can do the following easily, to name a few:

  1. Browse photos
  2. Rate photos
  3. Delete photos
  4. Rename, move, or copy multiple files at the press of a button
  5. Organize your files using various filters so you can perform your desired function in batches
  6. Watermark, copyright and manage metadata information
batch-editing-adobe-bridge-photography-tutorial

Adobe Camera Raw

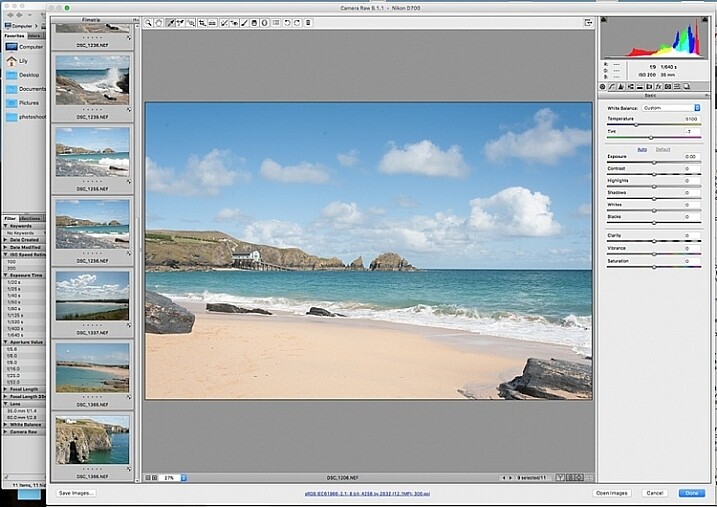
To edit photographs in Bridge, you need to have Adobe Camera Raw, a powerful plug-in that allows you to edit and enhance any photo, including JPGS. RAW files however, can only be opened, and read, in Adobe Camera Raw.

I would suggest that you shoot in RAW. Here is a good article about RAW vs JPGS which explains the benefit of shooting in RAW format. I shoot in RAW, and always edit from that format in Bridge, as my starting point. If you photograph in RAW, make sure you have downloaded Adobe Camera Raw, preferably the latest version, onto your computer before you can edit the files in Bridge.

A first word

This tutorial is a very basic suggested process of editing in Bridge, meant to aid your understanding if you have never used Bridge before. I do not claim it is the better way of editing nor the perfect way; it is one option, among many others available. Bridge is my personal preference over Lightroom, and I choose to use as much or as few of the functions in Bridge as I see fit for every image, or batch of images, that I edit. I like Bridge because, together with Adobe Camera Raw, it is straight-forward, hassle-free, and offers a non-destructive way of editing.

Loading your images

Before starting the batch processing, you need to load your images to a new folder on your computer.

My suggestion would be to download your images from your memory card, directly onto your computer. In my opinion, this is the safest, and most direct way, to copy over images from your memory card to your computer, without having to go through various software that potentially could complicate the copying process. Keep it as simple as possible to try and eliminate any malfunctions or errors right at the start. Use an external USB card reader to load your images into your computer, if it doesn’t come with a built-in one.

Put your images in a new folder clearly labeled so you know exactly where to find them. As an added step, when I copy a new set of images from a memory card on to my computer, I also immediately copy the same set to various external hard drives and cloud storage for back-up and safe-keeping. Always copy from the same memory card so you keep the transfer direct, and minimize potential errors. For example, if you copy your memory card images to a folder called Set A, do not then copy the images from Set A into another external hard drive folder; do not create this unnecessary step. Paste the same set of images from the memory card, directly where you want them stored on an external hard drive or on the cloud.

Once your images are safely copied, open Bridge. You will need to be subscribed to Adobe CC to have access to this. Subscriptions are now very affordable, compared to previous years when you had to buy a license of the very expensive full Adobe Suite just to use one software.
 batch-editing-adobe-bridge-photography-tutorial

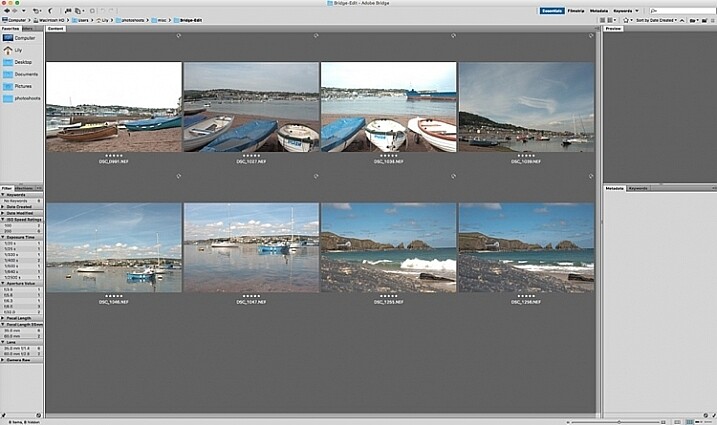
You will see the contents of your computer on the left side navigation menu. Find your folder, click on it and your images will be displayed on the main window. RAW files will be displayed as CR2 or CRW files for Canon cameras, NEF files for Nikon cameras and DNG for some other cameras (each manufacturer has a proprietary raw file format).

Select your RAW files, and open them by clicking the Camera Raw plug-in icon with the images selected.
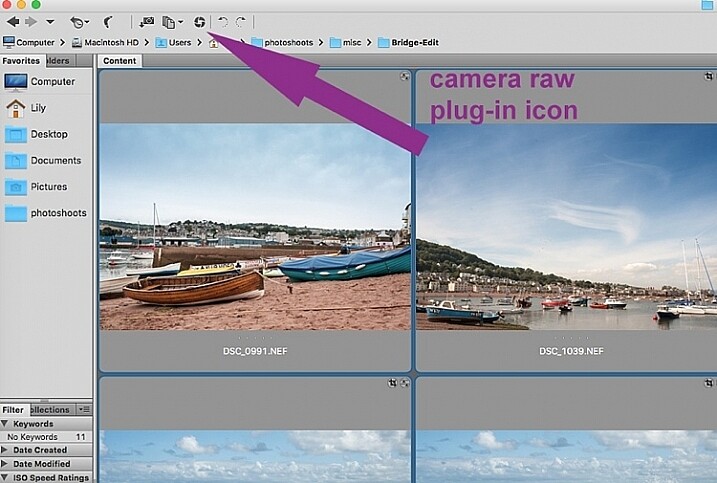
 batch-editing-adobe-bridge-photography-tutorial

As a RAW file is an unprocessed image containing all the information the camera sensor sees. It can appear very flat, and darker than what you may have seen on your camera’s LCD screen, which displays a JPG preview of your image, and as such has already been processed by the camera for preview purposes.

An important note to consider when batch processing, is that it is most effective when used on images that are photographed using similar light and settings. The main thing to remember is that you are able to apply global edits in a few steps to multiple images, but the reality is that you may still have to tweak each image as appropriate before you save it.
sync-settings_WEB

Batch processing

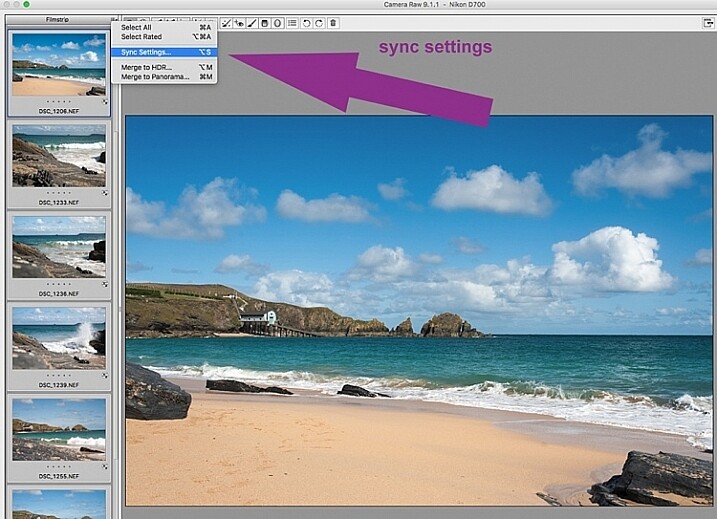
There are two ways of applying edits in batches. Below I make reference to selecting all images using cmd/ctrl+a, and making your adjustments by applying them to the images simultaneously – that is one way. The second way is to synchronize edits. To do this, use one image with all the adjustments made, then select all other images and click the synchronize button to apply the same adjustments to the rest of them.
 batch-editing-adobe-bridge-photography-tutorial

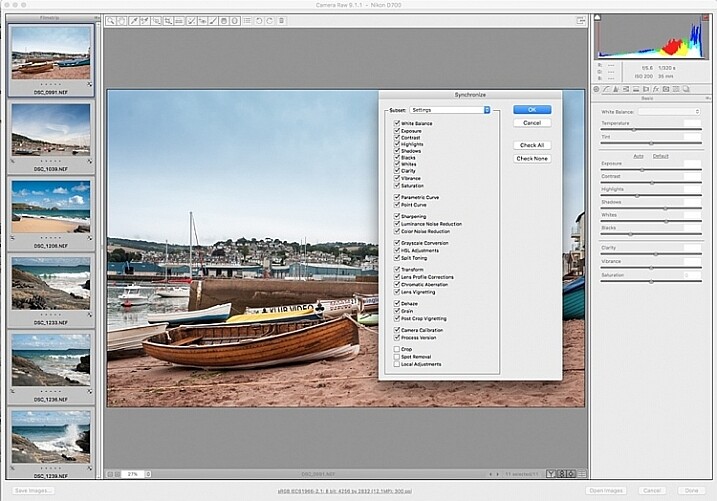
The idea behind batch editing is that you can apply a set of edits to multiple images, by only doing the adjustments once. To do this you can either select all the images you want to edit and make your adjustments while all the images are selected –  or you can edit one image first, followed by selecting all the images (making sure the edited image is the one highlighted with the blue box around it) then synchronizing the edits across all the images. A new window opens up with a series of boxes so you can check the settings you want to synchronize across the batch. I tend to uncheck the crop and local adjustments as those settings usually need to be specifically applied to each individual image.

Here is a key point to bear in mind when synchronizing your settings across the batches: It is important to note that you only want to do this with global adjustments that you want applied to the entire batch, and do it at an early stage of editing. If you use the synchronize function at the end of your edits, when you may have made various local adjustments to each individual image, any synchronizing action done then will overwrite previous adjustments (depending on what you select in the Sync settings popup box).

Step 1: Correct Lens Distortion and Chromatic Aberration
 batch-editing-adobe-bridge-photography-tutorial

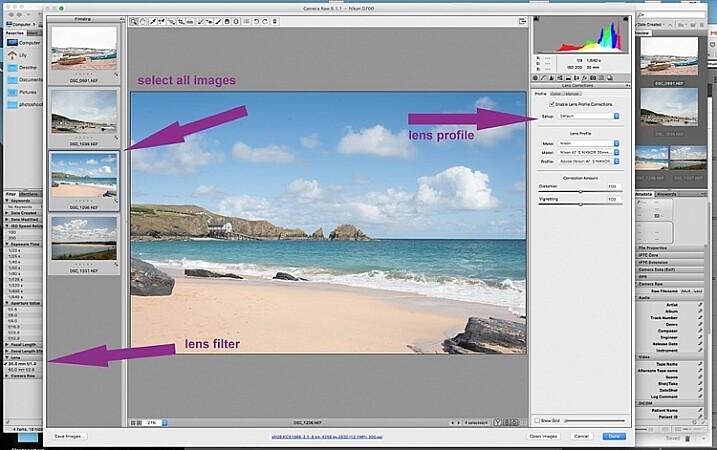
On the left hand navigation filter, choose Lens. A dropdown menu of the lenses used appears. I correct distortion on all images photographed around the 50mm focal length and under. By clicking on the specific lens, you are filtering the set so that only images photographed with that lens are shown in the thumbnail window. Select all the images by clicking cmd/ctrl+a . With the images selected, click the camera lens icon to open the Camera Raw plug-in and window. Select the images again by clicking cmd/ctrl+a, and go to the Lens Correction tab on the right hand navigation panel. On the Profile tab click the box that enables lens correction and choose your camera and lens details from the drop down menus. If your lens isn’t in the list, alternatively you can do this manually using the sliders on the Manual tab. Click done and your changes will automatically be saved.

Often with extreme lens distortions coupled, with straightening adjustments, you will need to crop your images. Type c (keyboard shortcut) and the crop box at the top will be highlighted. Hold down the crop icon to bring up the crop ratios. By doing this, your image will be constrained to the ratio you have chosenwhen you crop. Don’t forget to click done to save your changes.

Do this for all the lenses for which you want the distortions corrected. If you are only editing a batch photographed using one lens profile, you do not need to click done just yet. You can keep making further edits before clicking done.

Next correct any Chromatic Aberration. I only do this step if I know I have taken images in bright light using a very wide aperture such as f/2 or wider. The filtering and batch editing method is the same as above. However, I do this for each image individually at 100% view as each image would have various amounts of chromatic aberration and varyious color fringing.

Step 2: Correct your White Balance
 batch-editing-adobe-bridge-photography-tutorial

Once all the distortions on various lenses and focal lengths have been corrected, open your images again in the same way. Now you are ready to make batch edits.

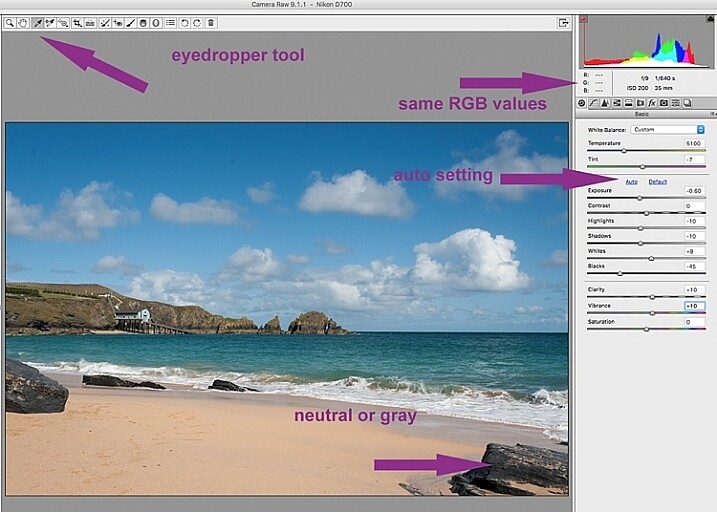
Once in Camera Raw, select a set of images that have been photographed in the same, or similar light. With the images selected correct the White Balance using the eyedropper tool. You need to find a neutral area (gray, or white) to click the eyedropper tool on and aim to get the RGB numbers to read the same, as much as possible. That way you know you are getting the most neutral color in the image. You can also correct White Balance by eye if you are confident enough to differentiate color temperature, although this will be less accurate than going with the RGB values.

You will notice that the White Balance changes on all the images you selected just by setting it on one image. Images that have been photographed in different light, or at varying times, will register a different White Balance. So, batch editing an entire set of images photographed in various places in this way, will produce irregular color results.

A solution to this is to use a gray card and have this set when photographing, or set your color temperature in-camera. By doing this the White Balance will be consistent throughout your images, for that time and setting. Here is a useful article on how to set your white balance in camera using a gray card. For more information on white balance and color temperature click here.

Step 3: Correct your exposure and make local adjustments
 batch-editing-adobe-bridge-photography-tutorial

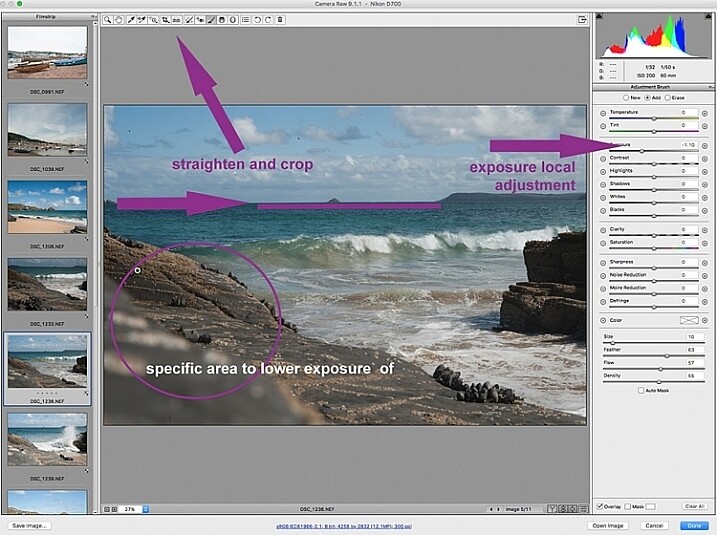
You may want to click Auto first, to see what Camera Raw’s suggested edits are, then start making your adjustments from there. To batch process, it is important to select sets of images shot in the same setting and light to make the most of this editing function. Batch editing images that have settings in opposite extremes will very likely add to your editing time, as you will need to go back and correct all the other images, thereby doubling your editing process. This is just one of the benefits of shooting in Manual mode where you have full control of your camera settings, rather than the camera making the decisions for you. If you are considering switching to Manual mode, in case you are still shooting in any of the other modes, see: How to Learn Your Camera’s Light Meter and Master Manual Mode.
 batch-editing-adobe-bridge-photography-tutorial

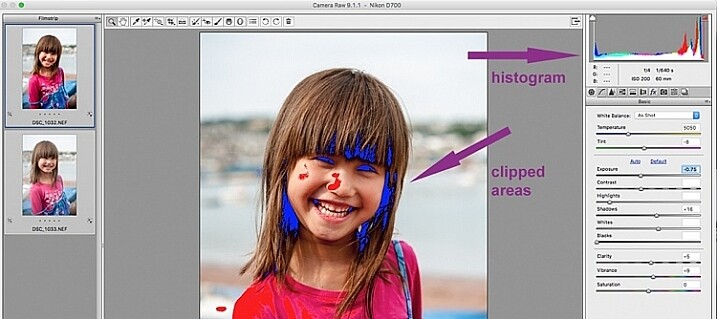
When making adjustments, it is important to keep an eye on the histogram, which is the coloured graph displayed on the upper right hand corner of Camera Raw. The histogram tells you if there is clipping occurring in the dark and light areas of your image. Clipping simply means that there is no detail left in that area, as the tonal values have fallen outside the minimum and maximum brightness boundaries, where detail can be represented in the digital image.

Type U and O together and the window will display any clipped bright areas in red. Type U and O together again to display clipped dark areas, and one more time to turn off the clipping warnings. You can then make adjustments by moving the sliders to eliminate the clipped areas. Remember to keep checking the histogram. You don’t want to clip either the blacks or the whites, you will see this on the histogram when the colours start climbing up on the left and right walls. Ideally you want the colours to be evenly distributed around the middle area until they are just touching the walls. Here is a link explaining: How to Read and Use Histograms.

Local adjustments

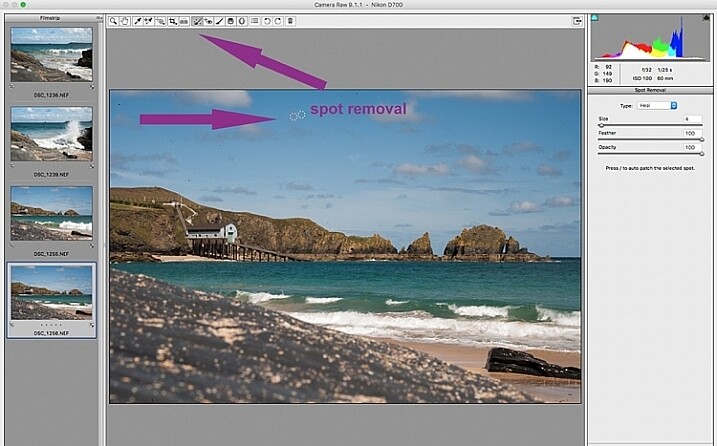
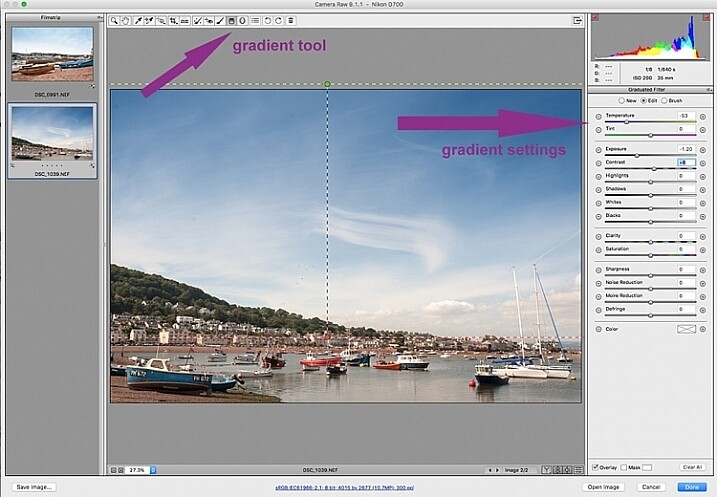
There are useful tools that you can use in Camera Raw, but which will not be beneficial in batch editing such as: spot removal and healing, adding gradients, straightening and cropping. However, you can edit smaller sets within the opened big batch, with ease using the same process. Regardless of the number of images, you can select consecutive images you want to edit in smaller groups, and apply specific batch edits to those images only, such as cropping and other local adjustments.
 batch-editing-adobe-bridge-photography-tutorial

 batch-editing-adobe-bridge-photography-tutorial

While I find local adjustments very useful, for instance brightening or darkening selected areas, warming up and cooling down specific parts of an image, and all the tools available on the adjustment brush panel, these tools need to be applied to each image individually, as necessary. Bridge and Adobe Raw can only go so far. If more fine tuning, and intricate edits need doing, you will need to take the image into Photoshop or a similar software to do so.
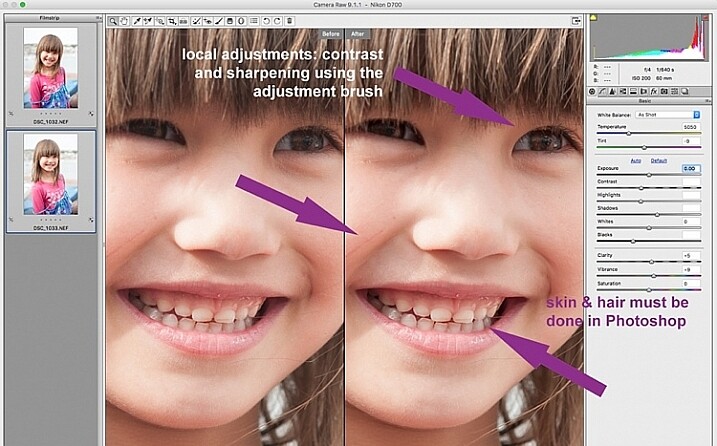
 batch-editing-adobe-bridge-photography-tutorial

Step 4: Remove Noise and Sharpen

Adjusting the sliders to remove noise in an image is essential for all images, more so if you are shooting at a high ISO. Noise in a digital image is composed of the grainy look that you see, and the red, green, and blue spots that show through on the image, especially in the dark areas. The luminance slider fixes the grainy issue, and the color slider removes the dots, so move both sliders until you remove the noise.

An image shot at a very high ISO such as ISO 8000 will need a different noise reduction value than an image shot at ISO 400. If this is the case with your set of images, you can go back and filter your images again as in Step 1, but using the ISO speed ratings this time, then proceed with batch editing. This process can be tricky, but is worth the extra step, especially when dealing with higher ISOs. It is essential to view the images at 100% when removing noise, so the effects of the sliders are visible. A word of caution: do not go overboard with the noise reduction and sharpening settings when doing global batch edits. The danger is that you may end up removal detail and color. The best way to ascertain the noise removal settings appropriate for an image, is to do it on every single image, due to the ISO and exposure variables which greatly determine the amount of noise in an image. But there is no reason why you can’t apply a gentle global noise reduction setting to your batch of images, and adjust from there individually as needed.

It is always good practice to sharpen all your images, ready for output. Sharpening values vary according to the detail, and information in the image. You can apply your chosen sharpening values globally if you are confident that the values are gentle, and general enough for all the images in the batch. A little sharpening is better than nothing. Some images however, may need specific, more aggressive, sharpening values, and this is where you need to apply the appropriate value to each individual image. Similar to removing noise, the best practice is to custom sharpen each image one by one.
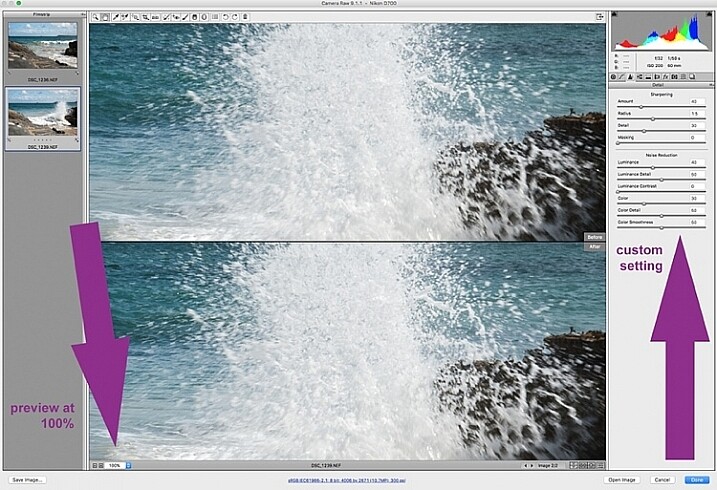
sharpen_WEB

Step 5: Save your images

Once you have made global batch edits to your images, I suggest you go through them one at a time, in the same Camera Raw window, and make final local adjustments for each one. Type cmd+alt+p to toggle between before and after previews. There are a variety of preview formats, so play around with the options given, to choose your preferred format.

Now it’s time to save your images. This is one of the features of using Bridge with Camera Raw that, for me, trumps all others. Select all your images again, and click the Save image button. A window opens up where you can specify where you want the images saved, or create a new folder for them. You specify the format you want them saved in, as well as quality. You name the files once only, and voila they are saved. Don’t forget to click the done button to store all your adjustments. If you close the window without doing so, all your adjustments will not be saved. Always make sure your images are in sRGB and are saved in sRGB color profile.

Summary

These are only very basic steps to get you started, Bridge and Adobe Camera Raw have so much more to offer. Play around, experiment for yourself, and find out how your workflow can be even more simplified. Editing in Bridge and Camera Raw does have its limitations, especially when it comes to fine edits on skin, and blemish and hair removals, but with their batch editing functionality, you can get you to a place where you’re ready for finer edits in Photoshop, much faster than opening each image in Photoshop as a starting point, and applying the same edits one at a time.
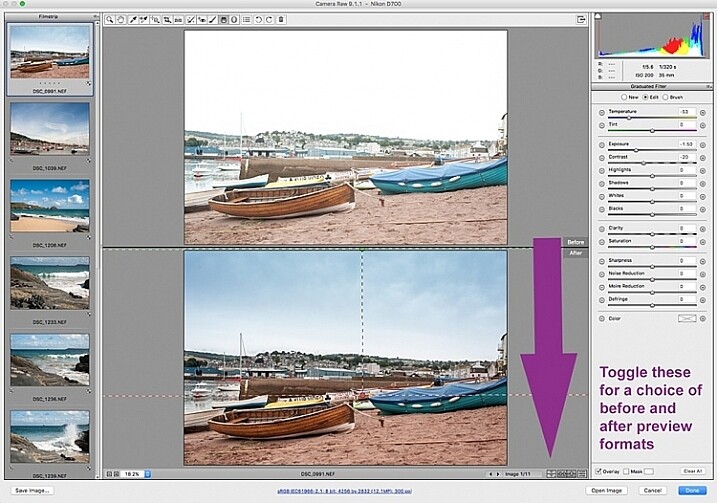
 batch-editing-adobe-bridge-photography-tutorial

There you have it – a few simple tips for batch processing. By saving your images in a different format, you will have your new set of edited images, while your RAW files are safe in the original folder. When you open these RAW files again they will show the adjustments you have made, but you can reset at any time if you want to re-edit from scratch. Your edited images are now ready to be further edited in Photoshop, should you want to do more creative and artistic edits, or if there are more edits necessary like head swapping, skin blemishes and hair removal as mentioned above. Bridge and Camera Raw are only the beginning, they gives you a good clean edited image to build on.

A last word

Batch editing is not for every photographer, nor for every photograph. Neither is batch processing necessary for every photography job that comes your way. But it is an option that can be easily learned, and might just save your sanity one day when you need to edit thousands of images within a short time-frame.

Here are the two images before and after editing in Bridge and Camera Raw.

landscape-after-before_WEB

landscape-after_1_WEB

landscape-after_WEB

Do you have other smart tips to share when batch processing in Adobe Bridge?

googletag.cmd.push(function() {
tablet_slots.push( googletag.defineSlot( “/1005424/_dPSv4_tab-all-article-bottom_(300×250)”, [300, 250], “pb-ad-78623” ).addService( googletag.pubads() ) ); } );

googletag.cmd.push(function() {
mobile_slots.push( googletag.defineSlot( “/1005424/_dPSv4_mob-all-article-bottom_(300×250)”, [300, 250], “pb-ad-78158” ).addService( googletag.pubads() ) ); } );

The post 5 Starter Steps to Batch Processing using Adobe Bridge by Lily Sawyer appeared first on Digital Photography School.


Digital Photography School

 
Comments Off on 5 Starter Steps to Batch Processing using Adobe Bridge

Posted in Photography


DIY Loft Kits Bridge the Gap Between Furniture & Architecture

09 Jan

[ By Steph in Design & Furniture & Decor. ]

loft kit 1

Add 160 square feet to your tiny, high-ceilinged apartment without consulting an architect or getting a permit thanks to DIY loft kits that fall somewhere between a renovation and the lofted beds you can snag at IKEA. A company called Expand Furniture makes the process of creating a mezzanine level as easy as installing a large piece of furniture, with models ranging from a bed platform to a entire extra room.
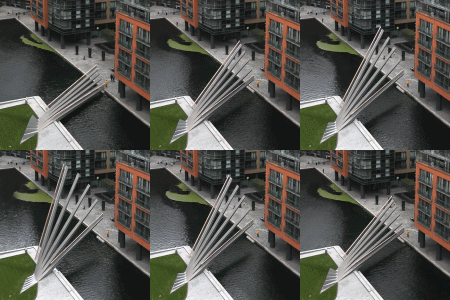
loft kit 2

loft kit 5

The three kits don’t come cheap, ranging from about $ 1,500 to over $ 4,000, but they’re still less pricey than permanent additions, and don’t require owning your apartment or getting your landlord’s permission to remodel. The DIY Loft Bed Kit has enough room for a mattress, nightstands and a bit of free floor space, and takes just four hours for two people to set up.

loft kit 3

loft kit 4

loft kit 6

The modular Vancouver DIY Loft T8 Kit is height- and width-adjustable, and you can add on all sorts of accessories, like stairs of varying steepness, skylights and a variety of guard rails. The priciest kit, the New York DIY Loft T15, is large enough to be used as an entire elevated bedroom or office. All of the kits ship flat-pack from North American warehouses.

loft kit 7

loft kit 9

desk

table

Expand Furniture also offers a range of impressive transforming items for compact spaces, including murphy beds, pop-up coffee tables and bookcases that flip around to reveal either a fold-down work surface or a mattress, all in one slim unit. The website is full of fun stuff for small-apartment-dwellers to fantasize about purchasing, if only they had $ 8,000 to drop on a king-sized bed hidden behind a sofa.

Share on Facebook


[ By Steph in Design & Furniture & Decor. ]

[ WebUrbanist | Archives | Galleries | Privacy | TOS ]


WebUrbanist

 
Comments Off on DIY Loft Kits Bridge the Gap Between Furniture & Architecture

Posted in Creativity


Grave Footings: Modern Bridge Built on Thousands of Headstones

08 Jan

[ By WebUrbanist in Travel & Urban Exploration. ]

graveyard coastal bridge foundation

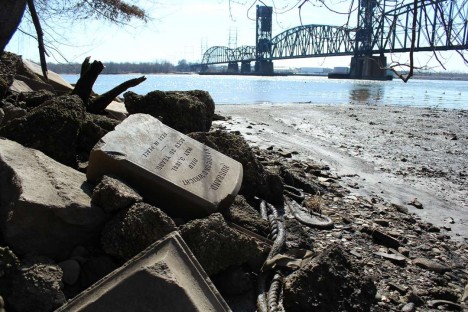
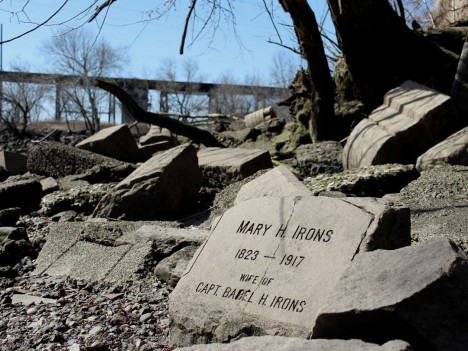
When the tide is low in the Delaware River, an unlikely sight emerges from the water: gravestones in various states of decay, serving to bolster the columns of a bridge spanning above.

graveyard coastal ivew

The Betsy Ross Bridge is a modest continuous-truss structure most people drive across without giving it a second thought to the graveyard remnants below. Its otherworldly source materials, however, can be seen both along the riverbanks in the foundations of the bridge itself.

gravestone banks riprap stone

The Monument Cemetery in Philadelphia held the remains of 28,000 people before it was condemned by the city and given over to Temple University. The land was turned into a parking lot in the 1950s, 8,000 bodies moved to new marked graves and 20,000 unclaimed corpses shifted to a mass burial site.

gravestone foundation water

The limestone and granite grave markers, however, represented a significant and useful resource, well suited to erosion-reducing riprap and column-footer foundations for and around a nearby bridge connecting New Jersey and Philly. Some were ground into rubble or have since eroded, but on the surfaces of many of these stones remain names, dates and other details still visible to those who would seek to unbury their past (images by K. Scott Kreider).

Share on Facebook


[ By WebUrbanist in Travel & Urban Exploration. ]

[ WebUrbanist | Archives | Galleries | Privacy | TOS ]


WebUrbanist

 
Comments Off on Grave Footings: Modern Bridge Built on Thousands of Headstones

Posted in Creativity


Chinese Skywalk: World’s Longest Glass Bridge Spans Two Cliffs

07 Oct

[ By WebUrbanist in Destinations & Sights & Travel. ]

glass suspension bridge

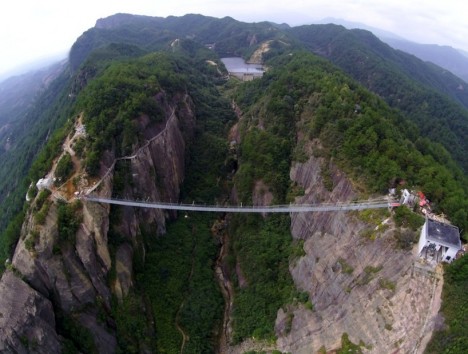
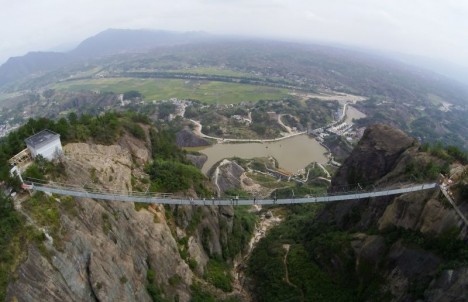
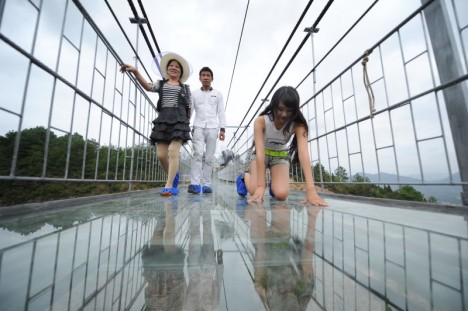
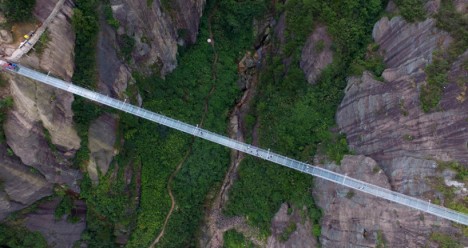
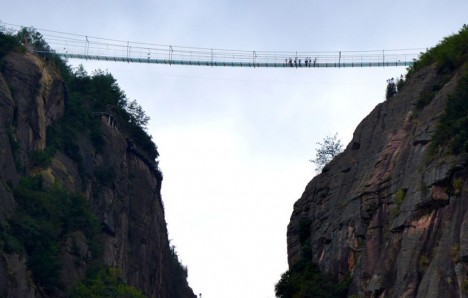
If you thought Twin Peaks was suspenseful, test your mettle on the new glass-bottomed Brave Man’s Bridge connecting two cliffs in the Hunan province of China and spanning nearly 1,000 feet.

glass panel bridge below

glass china walkway

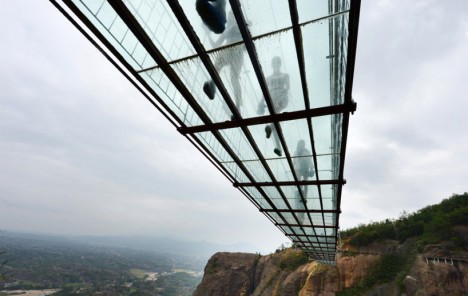
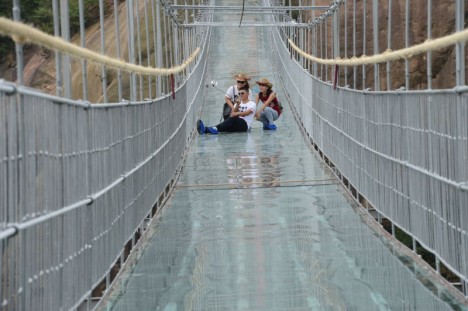
Located in the Shiniuzhai National Geological Park (images by Sina), the bridge employees a new type of glass 25 times stronger than the ordinary variety, achieving its structural purpose despite being just 1 inch thick.

glass kneeling walks

glass bridge above

Framed in steel, the converted bridge previously held wooden walking platforms, but to compete with the rise of glass walkways around the world these were swapped out for glass equivalents.

glass park

glass bridge side

While there are other similarly glass-bottomed bridges arcing out over canyons or crossing natural expanses, this is the longest glass suspension bridge to date. Its engineers have assured the public that it is safe, even if feisty tourists jump on the panels.

Share on Facebook


[ By WebUrbanist in Destinations & Sights & Travel. ]

[ WebUrbanist | Archives | Galleries | Privacy | TOS ]


WebUrbanist

 
Comments Off on Chinese Skywalk: World’s Longest Glass Bridge Spans Two Cliffs

Posted in Creativity


Crossing the Divide: 10 Totally Atypical Bridge Designs

26 Aug

[ By Steph in Architecture & Public & Institutional. ]

bridges infinite

Bridges aren’t just a means of passing from one place to another along a linear path; they might offer a place for strangers to converge, provide a mostly decorative function or go nowhere at all. These highly unusual bridge designs aren’t packed with cities or vertical gardens, but they do turn conventional bridge typologies on their heads, whether they’re made entirely of compressed glass sheets, built by robots or held aloft by helium balloons.

3D-Printed Steel Bridge for Amsterdam

bridges 3d 1

bridges 3d 2

bridges 3d 3

Amsterdam startup MX3D aims to build a 3D-printed metal bridge for the center of the city, incorporating complex geometries and employing the help of multi-axis industrial robots equipped with 3D printing tools and developed software. Designer Joris Laarman says, “I strongly believe in the future of digital production and local production, in ‘the new craft,’ This bridge will show how 3d printing finally enters the world of large-scale, functional objects and sustainable materials while allowing unprecedented freedom of form. The symbolism of the bridge is a beautiful metaphor to connect the technology of the future with the old city, in a way that brings out the best of both worlds.”

Cirkelbroen Bridge by Olafur Eliasson

bridges circkelbroen 1

bridges cirkelbroen 2

bridges cirkelbroen 3

Stretching across a canal in Copenhagen, the new Cirkelbroen Bridge by Olafur Eliasson provides a vantage point and meeting place for pedestrians. Five posts echo the masts of ships above circular platforms, honoring the location’s nautical history. “In my art, I work with transient materials – such as wind, fog or flowing water,” says Eliasson. “It has been wonderful to have the opportunity to make a structure such as the Cirkelbroen Bridge, which embodies this transience – the changing of the weather and how this helps to create the waterfront atmosphere – but a bridge which has a long, stable life ahead of it at the same time.”

Nomanslanding Bridge

bridges mobile domed

bridges mobile domed 2

bridges mobile domed 3

A dome on a fenced platform in the middle of the Rhine, this structure looks nothing like a conventional bridge, and it doesn’t work like one, either. A collaboration between five artists for an annual festival, ‘nomanslanding’ wasn’t made for the purpose of crossing the water, but rather uniting visitors from opposite shores in a symbolic gesture. The two halves retract into separate spaces or come together to form a united, chapel-like space of contemplation. “This walk-on installation is an attempt to bridge the divide separating us from strangers and to facilitate a meeting on common ground,” say the artists. “A space is created with a unique atmosphere in which people may reflect with each other on history, memories and experiences.

The Infinite Bridge

bridges infinite

bridges infinite 2

bridges infinite 3

Created for this year’s Sculpture by the Sea festival, the ‘Infinite Bridge’ by Danish practice Gjøde & Povisgaard Arkitekter offers an entirely new way to experience the coastal landscape, jutting out over the surface of the water. Positioned just barely above the surface, the bridge has the potential to either stand several meters over the water or disappear in it altogether depending on the tide.

Helium Balloon Bridge

bridges balloon 2

bridges balloon

If crossing this bridge makes you feel nervous that the whole thing might suddenly fly away, you’re not being paranoid. Held aloft by three massive helium balloons, the only thing keeping it from drifting into the sky are a few tethers. Artist Olivier Grossetête installed the surreal featherweight attraction in Tatton’s Japanese Garden in the UK. A previous work, ‘Pont Suspendu,’ actually elevated the bridge into the air above Château Ferry Lacombe in France.

Next Page – Click Below to Read More:
Crossing The Divide 10 Totally Atypical Bridge Designs

Share on Facebook


[ By Steph in Architecture & Public & Institutional. ]

[ WebUrbanist | Archives | Galleries | Privacy | TOS ]


WebUrbanist

 
Comments Off on Crossing the Divide: 10 Totally Atypical Bridge Designs

Posted in Creativity