Following a complaint and subsequent review by the Advertising Standards Authority (ASA) in the UK, Apple has changed the marketing for its $ 5,000 Pro Display XDR. Per 9to5Mac, the ASA asked Apple to remove the term ‘Far beyond HDR’ from its marketing materials for its flagship display, a request which Apple abided, at least in the UK. In the US, the phrase ‘Far beyond HDR’ remains live.
The phrase ‘Far beyond HDR’ has become a sticking point because some customers believe it’s misleading. The Pro Display XDR displays 99% of the P3 wide color gamut, and complaints have alleged that the term ‘Far beyond HDR’ suggests that the display shows 100% of the P3 color gamut.
On Apple’s US store, the term ‘Far beyond HDR’ remains present.
In response to the complaints, Apple has taken two steps. It has removed ‘Far beyond HDR’ from its UK website, as mentioned. Still, Apple has also added a footnote following the sentence, ‘A P3 wide color gamut provides a color palette capable of creating the most vibrant imagery.’ This footnote corresponds to small text at the bottom of the product page, which states, ‘Pro Display XDR supports 99% of the P3 wide color gamut.’ No such footnote currently exists on the product page in the US.
On the other hand, in the UK, the term ‘Far beyond HDR’ has been removed.
The ASA has also taken issue with Apple’s claim that its XDR display has a 1,000,000:1 contrast ratio. As of now, that claim remains on Apple’s website. 9 to 5 Mac reports that Apple is having independent tests completed, which Apple hopes will corroborate its contrast ratio claim.
As you can see in this screenshot from Apple’s US store, there’s no footnote about color space performance on the Pro Display XDR’s product page.
On the ASA’s website, the complaint against Apple is listed as informally resolved. Since the complaints were in the UK, they have no impact on Apple’s obligations in other markets.
When Apple first announced the Pro Display XDR in 2019, the California-based company made many lofty claims. Some of them can be verified, such as claims about color space and contrast ratio, while others are more difficult to confirm.
In the UK, however, the text in the ‘Show your truest colors’ section now includes a footnote that corresponds to the text, ‘Pro Display XDR supports 99% of the P3 wide color gamut.’ Click to enlarge.
For example, Apple says the Pro Display XDR is the ‘world’s best pro display.’ What does that even mean? It likely means something different to different users. For what it’s worth, reviews for the display have been generally very positive, with many claiming that the display features incredible build quality and fantastic performance.
Apple’s popularity and position mean that the company attracts a lot of attention, not all of it positive. The company is no stranger to complaints, investigations and general government oversight across the many markets it operates. It’s merely part of doing business, big business in Apple’s case. Does Apple’s Pro Display XDR go ‘far beyond HDR?’ Well, I guess that depends on who, or rather, where you ask.
The post Types of Photography that go Beyond the Scope of Human Vision appeared first on Digital Photography School. It was authored by Rick Ohnsman.
I recently saw a T-shirt for photographers which said, “I Can Freeze Time – What’s Your Superpower?” It got me thinking about all the things we can do with photography that take us beyond the scope of normal human vision. The time-space continuum isn’t sufficient here to discuss the how-to of all these different techniques, but instead, my intent is to at least expose (yes… a photographic pun) you to these various types of photography so you too can explore new superpowers at your command. Put on your tights and cape, and let’s go.
Einstein says…
Your head might explode if we got very deep into Albert Einstein’s theories, but one thing to consider as a photographer is his Theory of Relativity. He postulated that at the speed of light, time stands still. Do we as photographers really have the ability to freeze time? After all, the raw materials of photography are light and time.
When we make an exposure, we allow a measured quality of light to come into our cameras for a set period of time. The aperture controls that quantity of light. The shutter speed controls how long we allow that light to create an image on the sensor (or the film if you still use that stuff). ISO is simply how sensitive we choose to make the sensor to that admitted light.
Now, I’m no Einstein, not even a Bill Nye, but I think in some way, we really do have the ability to alter time with photography.
Take a quantum leap with me as we explore this.
Can we freeze time with photography? I froze the falling sand in this hourglass not with a fast shutter, but with the short duration of a burst from a Speedlight. 8 seconds f/22 ISO 100
Slivers of time
One of the main attractions of photography, even for those who are just snapshooters, is the ability to capture a moment. What the fallen giant photography company once called a “Kodak Moment.”
Every photograph captures a scene that never existed before that moment and ceases to exists afterward.
We record, and later can review, that sliver of time in a photograph. So in that sense, we really do have the ability to freeze time. Let’s look at some ways we do that.
A photo captures a sliver of time. The people in the photos on the table are long gone, but we can still see the sliver of time that the photo captured.
We can freeze time with a fast shutter speed. For the pepper – 1/3200 sec. f/4 ISO 400. For the motorcyclists – 1/1000 sec. f/3.2 ISO 100
Shutter speed
How long we allow the shutter to stay open is the slice of time we capture. For example, if we shoot at 1/30th of a second, that’s the sliver of time we capture. Shorten the shutter speed to something like 1/500th of a second and that’s the slice of time captured.
This is the reason we need faster shutter speeds to freeze faster-moving objects. Light from the moving object comes into the camera from one point at the beginning of the exposure and other points as the subject moves until the shutter closes.
Static objects don’t move, so nothing much changes during the exposure duration.
Fast-moving objects travel a greater distance during the exposure. We can determine what shutter speed is necessary to freeze the object. The objective here is to not have the object move appreciably during the exposure, such that it appears “frozen.”
Most of our cameras top out at around 1/4000th to 1/8000th of a second. That can freeze some pretty fast action. But what if you have really fast-moving objects you want to freeze? You can meet your increased need for speed with flash.
Flash duration
If you’re a fan of superheroes, you no doubt have heard of The Flash. His superpower is the ability to move at incredible speed – so fast that he’s imperceptible to bystanders. He does have the ability to essentially freeze time, at least relative to the speed of normal humans.
You, as a photographer, can come closer to freezing really fast-moving objects with your flash.
Your camera shutter might top out at 1/8000th of a second, but using the extremely short duration of a flash (ditto for Speedlights, studio strobes, any kind of stroboscopic light), you now up the game.
Rather than reduce the sliver of time with the shutter, you use a much shorter flash duration as the means of making your exposure. How much shorter?
When you -really- want to freeze fast action, use the short duration of a burst of flash. The raspberry – 1/60th sec. f/25 ISO 100 (but the flash at 1/16th power had a duration of just 1/16,000 sec.) The milk splash .3 sec f/8 ISO 800 – flash at 1/32 power for a duration of about 1/10,000 sec.
Look at the table below. This is for a Canon 580EX speedlight.
Different flashes will differ, but the constant is that the lower the flash power, the shorter the flash duration.
Note that at full-power, the 580EX has a flash duration of 1/250 sec. You can do better with just your camera shutter. But, at a setting of 1/128th power, we get some serious stopping power, a flash duration of just 1/20,000th of a second. That will freeze some really fast-moving subjects!
Before you get too cocky with your superpower of freezing time, I wanted to throw in what the big boys at the Massachusetts Institute of Technology (MIT) Media Lab have accomplished.
They have actually been able to take photographs at the speed of light, capturing the motion of photons (which move at about 186,282 miles per second, 299,792 kps, millions of times faster than even bullets).
The exposure duration, if that’s the right term for the MIT technique, is less than two-trillionths of a second!
Warping time
Freezing time is magic enough. But with photography, our superpowers don’t end there. Did you know you can also warp time, stretching it out or shrinking it down?
Let’s explore some other types of photography.
Making moving water look silky is a favorite photographer’s trick. We essentially stretch time with a slow shutter speed. Thousand Springs, Idaho at left – .3 sec. f/22 ISO 100. Sabbaday Falls, New Hampshire – 5 sec. f/20 ISO 200
Stretching time
When we take a long exposure photo, we allow light to come into the camera for an extended period of time. All photos are, as described, a “sliver of time,” but sometimes we can allow that sliver to become quite long.
To not overexpose the image, we must still find proper exposure with the camera’s combination of aperture, shutter speed, and ISO.
We can set our aperture to the smallest opening of our lens, perhaps f/22, maybe f/32 or even f/64 on large format cameras with special lenses. We can reduce our ISO to maybe 50. That will maximize our shutter time.
If those settings still let in too much light, we can reach for Neutral Density filters to cut the light further and allow even longer exposures. Now we can make exposures that last for minutes, maybe even hours, rather than fractions of a second.
Need to stretch time even further? Put on an ND filter so you can slow the shutter even more. Left – Convict Lake, California – 30 seconds f/13 ISO 100, Center – Boise River, done with a welder’s glass ND – 162 seconds f/8 ISO 400. Right – Oceanside Pier, California 30 sec. f/6.3 ISO 50
Slowing down your shutter gives you more time to play with the light and creates light-streak effects. It also allows time for “light-painting” as the image on the far right shows.
Of course, with special photo gear and know-how, you can get really radical.
The longest known photo exposures have a “shutter speed” of…get this – almost 3 years!
German photography artist, Michael Wesely, who does this kind of thing, says he estimates with the right setup, he could make an exposure that would last 40 years.
Another guy described as a “conceptual artist and experimental philosopher,” Jonathon Keats, has set up a camera he hopes will take a 1,000-year exposure.
A long exposure of traffic is a favorite photographer’s way to “stretch time” and make light streaks of moving objects. This is the Boise, Idaho skyline during “rush hour.” 15 sec. f/13 ISO 100
Shrinking time
How about we go the other direction and shrink time?
Can we make a photo which reduces what took a long time into a short viewing duration?
One way to do this with a standard digital camera is to use what we call time-lapse photography. A camera with an intervalometer will take a shot every so often, taking many individual images over an extended period. Then, combining the images into what essentially becomes frames in an animation. The long duration becomes a much shorter time-lapse video.
Time is shrunken down. What might have taken days to shoot, can be viewed in seconds.
If you’ve seen sequences of things like flowers growing or fruit rotting, this is the technique. Here’s my feeble attempt. I’ve forgotten how many individual shots it took to make even this very short 7-second video clip – but it was a bunch.
I can’t even begin to fathom what it takes to make a truly epic timelapse like this one.
Another option is to do this in an all-in-one, non-moving image. Taking multiple exposures and combining them into the same final composited image uses this technique. Take a look at the techniques I used in the following images.
You can show a sequence of motion with different techniques. The peppers image was done with strobed flash. The shot of the total eclipse was constructed from multiple images later composited in Photoshop.
Combining a multi-shot panorama with the capabilities of Microsoft ICE, you can make sequences like this.
Intentional Camera Movement – ICM
Another way to distort time, and your image, is to intentionally move the camera, and/or the lens during the exposure. A longer exposure will allow you to do things like swish-pans, zooms, changing focus, or “free-lensing.”
Intentional Camera Movement (ICM) like this vertical swish-pan, can produce very abstract effects. 1/20 sec. f/29 ISO 250
See the light
Humans see and, in normal use, our cameras are designed to capture the portion of the “Electromagnetic Spectrum” we call visible light. (For a deeper dive into this subject, take a look at my article – “How to Understand Light and Color to Improve your Photography.”)
We reference the Kelvin scale when we talk about photography in the visible light realm. Then we use white balance to adjust our cameras to do something our eyes and brains do naturally – adjust to the varying degrees of warm and cool light.
Foliage turns light, skies go dark, and colors get strange when photographing with a camera altered to be sensitive to the infrared spectrum.
We can’t change the portion of the spectrum we see, but our cameras can. You can have a camera altered so that is responsive to other wavelengths of light. This will take a little extra commitment to explore, as once your camera is altered for either infrared or ultraviolet use, it will no longer work for standard photography.
Some cameras may give you infrared capability without special conversion. Take a look at this DPS article.
What our eyes can see is only a tiny portion of the Electromagnetic Spectrum (EMS) called Visible Light. Cameras can be altered to “see” other wavelengths for infrared and ultraviolet photography.
Don’t want to convert your camera for infrared? Tweaking the colors and tones can help you create a pretty good monochrome approximation in Lightroom. There are some good “recipes” for creating presets available.
Cameras can go even further up and down the spectrum of light, though hobbyist photographers aren’t apt to do so.
Get into even shorter wavelengths of light and you can make X-ray images.
Go the other direction into long wavelengths, and you’re not using a camera anymore. Instead, you are perhaps cooking dinner in a microwave oven, clocking the speed of a baseball with radar, or even further, listening to the “light” which we know as radio waves.
Kirlian Photography
When seeking out new types of photography, why be limited to light to make a photo? With Kirlian photography, you can make a “photo” with high-voltage electricity. Shocking! – (Well, I hope not).
Want to give it a go? Here’s a link to a how-to.
Some claim that Kirlian photography, which uses a charged plate to make the image, reveals the Aura of living things, like this fingertip. Guess you’ll have to see for yourself.
HDR
Digital cameras keep getting better and better. However, they still can’t compete with the human eye and brain for capturing scenes that have an extreme range between light and shadow.
To work around this, photographers will take a series of images at different exposures. They then combine those with what is known as High Dynamic Range (HDR) software.
This is yet one more of the types of photography you can explore.
Seeking to expand the dynamic range of this image, I combined multiple exposures with Aurora HDR software.
Astro-Photography
Why limit your photography to earth?
Astrophotography is, as they say, out of this world.
Much more light-sensitive cameras, better lenses, more noise-free sensors, and noise-reduction techniques allow better long exposure images to be made.
We can produce digital camera images showing far more than we can see with our naked eyes.
The light from these stars in the Milky Way has traveled perhaps tens of thousands of years to reach my camera. Mind-blowing! Taken at Bruneau Dunes State Park, Idaho. 25 sec. f/8 ISO 12,800
Thinking about what we can capture with astrophotography begins to boggle your mind. When you take a photo of the night sky, you are literally looking back in time… a very long way back. You’re also looking a long way away… a very very long way. Literally to infinity and beyond.
The farthest star we can usually see with the naked eye is the faint V762 Cassiopeiae, just barely visible under dark skies and around 16,300 light-years away.
For most space objects, we use light-years to describe their distance. A light-year is the distance light travels in one Earth year.
So, that means the light entering your camera from that star took over 16,000 years to make the trip. One light-year is about 6 trillion miles (9 trillion km). So…(calculator out now…) this star is 9.78E16 miles away, or 97,800,000,000,000,000 or 9.8 quadrillion miles (15.77 quadrillion km) away. (Talk about focusing at infinity!)
Even light from astronomical bodies in the neighborhood, so to speak, takes a while to make the trip. Here are some examples:
Sun to Earth – 8 minutes 20 seconds
Moon to Earth – 1.3 seconds
Mars to Earth – 3 min. 2 seconds.
Jupiter to Earth – About 43 minutes.
Macro and Micro
There’s another whole world that awaits when you try macro photography. at left – 1/120 sec. f/1.8 ISO 50, Center – 1/13 sec. f/9 ISO 200, Right – 15 sec. ISO 50 – w/reversed lens.
Think too much about the expansiveness of the universe and you’ll begin to feel really tiny. So how about we look at some types of photography that will make you feel really large – macro and microphotography.
Using things like macro lenses, close-up filters, reversed-lens techniques, bellows, and focus-stacking, we can get really up-close-and-personal with the tiny world.
If you’ve never explored macro photography, take a look at the many ways to get into it. Some of which you can do on-the-cheap as you start out. There’s another whole world right at your feet.
Shoot multiple exposures focused at different spots, and focus-stack them with software to have all the depth-of-field you want. Images stacked with Helicon Focus.
Get into macro photography on-the-cheap with an old film camera lens and a reversing ring. image at right – 2.5 sec. ISO 200
Going even further into inner space, you can get a microscope and the proper adapters to attach your camera to it. Now things like amoebas and paramecium can be your models.
Human vision vs camera vision
If you were a legit superhero, you’d have some kind of special vision, right?
You’ve heard of Superman’s X-ray vision, but did you know, he also is said to have telescopic vision and can see much further than humans? He has incredible night vision and can see in the dark. Also, he has microscopic vision and can see right down to the molecular structure of things. And like the baby in The Incredibles, Jack-Jack, he also has laser vision and can shoot laser beams out of his eyes.
So big deal…your camera can do most of that stuff too.
I’m being silly, but suffice it to say, your camera views the world much differently than you.
A commonly held view is that a 50mm prime lens on a full-frame camera pretty much duplicates the field of human vision. That point is debated. The bottom line is that the human eye and brain are much more sophisticated than any camera. Although an eyeball bears similarities to a camera, when coupled to your brain, well… it’s just different.
Dandelion Ying-Yang – We see in color, but the camera can be made to see in monochrome and also reverse the tones to create a negative image.
That said, cameras do have some of the abilities of Superman.
Coupled with a wide-angle lens, their field of vision can be wider than yours. With a telephoto lens, they can see further. And, with a zoom, they can concentrate on some subjects, excluding others.
Mounted to a telescope or microscope, they can see into space or down to microscopic levels.
Their high ISO capabilities can make images in what to you would be almost total darkness. Add night-vision capabilities and they can boost very low light into an image you can see.
Thermal imaging cameras view the infrared heat coming off objects.
Move your lens during a long exposure for special effects. The lens was zoomed for the image on the left, 2.5 sec. f/25 ISO 100. The lens was turned from out-of-focus to in-focus for the fireworks – 6 sec. f/8 ISO 100
As for shooting laser beams…some cameras really do use them in focusing.
My previous cellphone, an LG G3, and my current LG V30 use lasers to focus the camera. Superman, Jack-Jack, and Buck Rodgers got nuthin’ on us.
Turn a panoramic shot into a “Tiny Planet” with Microsoft ICE.
Distorted vision
I’m not sure a superhero would brag about having distorted vision as a superpower, but creative photographers sometimes like it.
Things like crystal balls, prisms, Lens Baby lenses, tilt-shift lenses, fisheye lenses and all manner of other photographic accessories can be used to distort how an image looks.
You can also play with a photo on the computer to bend and distort it, make “tiny worlds” with editing techniques, sew multiple photos together to make panoramas or even 360-degree virtual reality images.
Be an explorer
Canon has a sponsored group of photographers they call “Explorers of Light.”
What I’m suggesting is you, too, become an explorer. Tap into your superpowers as a photographer to explore all types of photography.
Just making standard photographs is fine and certainly by itself will keep you busy learning for a lifetime. However, when it’s time to broaden your horizons, there are so many other things to try.
Now superhero, harness the speed of light, and go make some unique photos!
14-shots stitched together with Microsoft ICE create this panorama taken at Deadhorse State Park, Utah
Do you know any other types of photography that go beyond the scope of human vision? If so, share your thoughts and comments with us below.
The post Types of Photography that go Beyond the Scope of Human Vision appeared first on Digital Photography School. It was authored by Rick Ohnsman.
The post The Art of Black and White in Lightroom and Beyond appeared first on Digital Photography School. It was authored by Darren Rowse.
Day 10 of dPS Holiday Deals brings you the Art of Black and White in Lightroom and Beyond by Andrew Gibson.
Save 50% now
Can you recall some of the images that have affected you and stayed with you over the years?
It’s likely many of them are in black and white.
Monochrome exerts a power over the imagination – highlighting texture, contrast and shadow – which leaves a lasting impact on the viewer.
But there’s more to creating a powerful black and white image than just stripping the colour out of your favourite photos.
A popular writer on dPS for many years, Andrew Gibson will teach you how to create beautiful black and white photos in Lightroom and Silver Efex Pro 2.
The Art of Black and White in Lightroom and Beyond Video Course comprises 25 video lessons, accompanying PDF guide and 7 DNG files so you can follow along and try out the techniques for yourselves.
Whether it’s jaw-dropping landscapes, angular architectural photography, dramatic documentary-style shots, memorable travel pictures or personality-rich portraits you’re looking to capture, the art of black and white can elevate all of these.
Save $ 50 and get the guide now for only $ 49 USD (usually $ 99)
PLUS receive $ 43 worth of bonuses (10 Black & White Assignments ebook, PowerBlack Presets for Luminar, SuperBlack Presets for Lightroom).
Check it out before the next deal arrives in less than 24 hours.
PS – You can still save big on over 300 presets from dPS, save 62% per set or save $ 100 on the whole bundle. Check them out here.
We receive an affiliate commission when you purchase from our trusted partners.
The post The Art of Black and White in Lightroom and Beyond appeared first on Digital Photography School. It was authored by Darren Rowse.
Alex T. Thomas and Kathryn Bingham are photographers, friends and Tokyo residents who have been studying the language and exploring Japan for the past four years. They’re interested in relics of the country’s ancient past, exquisite Showa-era bathhouses called sent?s, elaborately-appointed roadside rest stops and everything in between.
On a recent trip from bustling Tokyo to the peaceful riverside town of Gujo Hachiman, the pair each brought along the Canon EOS M50. Take a look at the hidden gems they encountered along the way.
This is sponsored content, created with the support of Amazon and Canon. What does this mean?
Time-lapse photography is a different way to show the world around you. They are videos which are made up of a serious of still images and combined to look like a movie. The frame-by-frame gives a sped-up view of the world. People find them interesting to look at and if done well they are fascinating.
One of the hundreds of photos taken at Point Lonsdale while trying to get a time-lapse there.
There are a few ways of making time-lapse videos The obvious way is to do a video and speed it up, however, most are made from lots of individual still images. Using special programs, you can put them together and set the time for the video to run.
In this article, I’ll share my experiences with you testing out some time-lapse gear and settings so you can learn along with me.
Basic Time-lapse
Doing time-lapse photography is relatively simple. All you really need to do is set your camera up on a tripod and get it to take a photo every few seconds. Put the images on your computer, batch process them if you like, then run some software that will allow you to make them into a time-lapse. Here is an example.
?
That is a very simplified way of looking at it. Of course, there are many other factors, like what is moving in the scene, how quickly it is moving, etc.
As you experiment more you will learn how to work out what time is best and how many images you need. On average, you will need 30 images for every second of video you want. So if you want a one minute video you will need 30 x 60 = 1800 images.
Adding panning to your time-lapse
Over the years I’ve played around with doing time-lapses, such as I just described. It didn’t seem hard and I thought that adding some new equipment would be fine, That it would just work. I was wrong.
Recently I was loaned quite a few products from Syrp here in Australia to try out. It seemed like the ideal time to step up what I was doing with these. Perhaps get more serious about doing time-lapse photography.
I was loaned enough gear to do panning, tilting, and sliding. In the kit were two Syrp Genie Minis, the tilt bracket, the Genie and the magic carpet rails.
Photo by Syrp showing a kit with the magic carpet rails, Genie, and tilt bracket.
Initially I decided to try just the Genie mini. Start with the easy one.
One of the stills from the first attempted time-lapse.
Syrp Genie Mini – first attempt
My first attempt was at the Tesselaar Kabloom Flower Festival. There were fields of flowers and lots of clouds, the conditions were perfect time-lapse photography. For a successful time-lapse it is best if there is something moving in the image.
I moved around a bit to various places, but the very first series I shot had to be deleted. The exposure was okay, but none of the images were in focus. It was my first big lesson with doing them this way. I learned that you have to focus the image and then turn off autofocus, otherwise, the camera will attempt to refocus for each image.
The Genie and Genie Minis are all controlled by an app on your phone. It is fairly simple to use, but the arcs for shooting can be confusing.
Next, I worked out how panning worked and wide it should be. Several different arcs were attempted and when I got home and loaded the photos, the problems were clear to see.
?
The first one was okay, but that was probably more luck than skill. I didn’t really know what I was doing and just let it go for ages, with the camera taking a photo every two seconds. There were around 450 images total.
For the next few, I told the Genie Mini to run for 6 minutes, and for the camera to shoot an image every two seconds. This time it took 360 images. The area it was panning over was increased. When converted to the time-lapse it was jerky and the panning was too fast.
Solutions, if you are going to do a wide pan, you need to take a lot more photos than you think you will need.
Another one of the stills from the flower center.
Next attempt
I went down to a local area to try it out again, this time giving it more time. Unfortunately, I made a similar mistake.
As I was setting up, I had it in my head to do an image every 5 seconds and to set the pan to last for 20 minutes. This only gave me around 240 images for the video. It wasn’t enough, and the same problem occurred. Next time if I only want to do 20 minutes I should take a photo every two seconds. That will yield 600 images, which should make it a better time-lapse. That is what will be attempted next time.
A couple of other problems happened as well. While panning, the camera was not level for the whole scene. So, I need to work out how to make that happen. Practice will make it easier.
?
All the tutorials I’ve been watching say to use manual mode for exposure. However, this really only works for constant light. If you are shooting a scene where it is variable, then you may need to use aperture priority.
Working it out
There did come a point when I realized the smaller the arc the better. Not covering such a wide area was better. Making sure there was something interesting in the image as well, something moving.
The number of images and how far apart they are shot is another aspect that can be hard to work out. Taking a photo every 2 or 5 seconds is good for some scenes, but not others. However, it is a good place to start and as you do more time-lapse photography you will begin to understand what settings you need.
?
Most time-lapse series will result in a video of around 5-10 seconds. When you are compiling it, you need to think about how many images you will need.
As a general rule most are done with 30 frames per second, or 30 images per second. In theory then, for a 5-second time-lapse you will need 150 images. However, if you are adding panning to that, then it will depend on how far you pan. If you are covering a really wide area you might need a lot more images.
You have to make sure there is something interesting in the scene, and that there is movement.
Adding Tilting
Once you think you have worked out how to pan you can try tilting the image up and down as well as panning. I only tried this a couple of times, as the biggest problem I had was my camera is very heavy and the tilt bracket struggled with it. You could see that it was too much weight for the system.
I found that using the Genie Mini with it was a bit tricky and it would tilt the wrong way. The lens would hit the bracket if it went the wrong way. It was the most frustrating aspect.
Again, you have to be careful what you use this for. There needs to be a reason to tilt up or down. Waterfalls are a good choice for tilting. Maybe looking up at a building. Think about why you would do this beforehand.
Gliding along the Magic Carpet with the Genie
The magic carpet rails with the Genie on top will glide the camera along in a straight line. It can add a small amount of movement to your video to make it appear like the camera is moving.
The Genie was very complicated to use and after doing so once, I really didn’t want to use it again. It wasn’t as easy and intuitive to use as the Genie mini. I had been shown how to use it, but when I went to do it myself, I had trouble working it out. In the end, I only used it once.
?
It does add a nice effect to the final time-lapse, but I’m not sure it is worth the aggravation. Perhaps, if you really wanted to get into doing time-lapse photography seriously it would be worth spending the time learning how to get the best results.
However, Syrp have now upgraded it to the Genie II. It is supposed to be easier to use and can do a lot more. Though at $ 1599 USD, the price will put it out of the range of many photographers, myself included.
Syrp gear
For most of the time that I had the gear on loan, I used the Genie Mini the most. It was small enough that I could carry it around in my bag most of the time and it was easier to use. Using the phone to control it was never a problem.
It is something that will take a lot of getting used to, but for anyone starting out doing time-lapse photography it would be enough. The Genie Mini is what I would recommend. It isn’t cheap, for what it is, but not that expensive that if you really wanted to do time-lapse. The Syrp Genie Mini sells for USD$ 249.
In the end, by the time I had to give the gear back, I knew I wanted to do more time-lapse photography. So I have since purchased the Genie Mini. I like what I can do with it, it’s simpler to use and the price-point is doable for most people.
?
Storage and processing the time-lapse
Everyone recommends you take raw images for your time-lapse series, that way you can process them in Lightroom. The biggest problem is the size of the raw files. My D850 has raw files that are approximately 50MB each, so when you are taking a few hundred images, that requires a lot of space.
Thankfully, the D850 has the ability to change the size of the raw files, so I can use smaller ones for time-lapse. If your camera has this feature, then I suggest you do so. Once the images are processed and the time-lapse is done, you can delete the raw files as you will be unlikely to use them again.
Princes Pier is a popular place for photos, so it seemed like a good idea to try a time-lapse. This is one of the still images from the series.
Using Lightroom to process the images is good as you can edit one image, then sync the rest of them. This will help give all your images the same look. You can then export them to make the time-lapse.
I used Photoshop to build the time-lapse. However, there are many different programs available to try. Some will give you more control, however, Photoshop is quite basic. It’s a good place to start.
If you have trouble getting Photoshop to work it could be the sequence of images you are using. They have to be consistent, or Photoshop won’t load the images properly.
?
Getting into time-lapse photography
If this is something you want to try, then start with your camera on a tripod. Take photos every few seconds.
However, if you want to get some camera movement, then I would try the Syrp Genie Mini. Learn how to use it completely to get the best videos. If you decide to add more then you can look at doing tilting and gliding. Don’t confuse yourself by trying to learn it all at once.
Read more on time-lapse photography here:
How to Shoot and Create a Time-Lapse Video Using Lightroom
How to Shoot a Pine Cone Time-lapse: A Mini Tutorial
Time-Lapse Photography Equipment Guide to Getting Started
Discover the Wonder of Time-Lapse Photography
10 Pro Motion Control Time-Lapse Tips
Time-Lapse Photography – a Quick Guide to Building Your Movie
The post Time-Lapse Photography – Beyond the Basics appeared first on Digital Photography School.
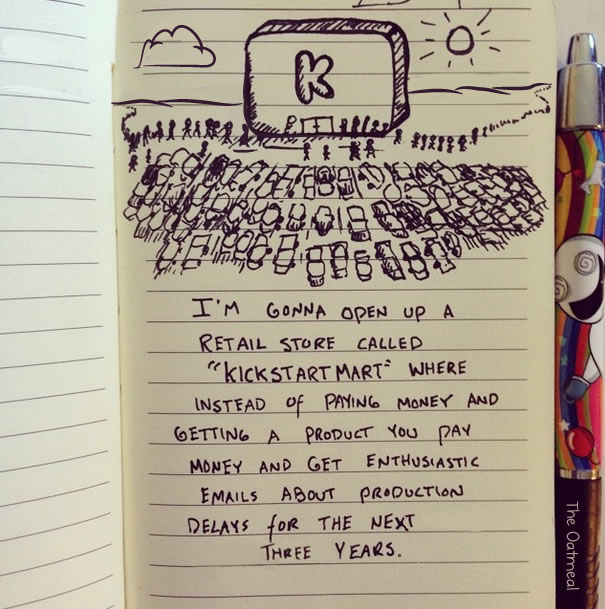
13 Questions You Should Ask
Before Backing A Crowdfunding Project
on Kickstarter, Indiegogo and Beyond
Crowdfunding projects via sites like Kickstarter and Indiegogo have been increasing in popularity and some would say hit the mainstream. No disrespect to my wife, but she’s not an early adopter and it wasn’t until recently a mini ice machine showed up at our door that I realized she knew and took part in Kickstarter. By contrast, I’ve been using Kickstarter since it launched 2009/2010 and Indiegogo since 2014. In that time, for all the bad press these sites sometimes get, I’ve had a really good rate of return on my pledges. Roughly 85% of the projects I’ve backed have been delivered to my door and as it turns out my rate of return monetarily has been 83 cents on the dollar (ie for every $ 1 spent I’ve lost $ 0.17). It would seem I’ve backed enough crowdfunded projects that I’d be considered a “super backer”, so I thought I’d share my evaluation process with you to increase the odds you back successful projects.
Do I Need This? / Suspension of Disbelief The first thing you’re likely to see when visiting a project on Kickstarter or Indiegogo is the video pitch. Invariably the product discussed will be the best thing since sliced bread, but before you impulsively back the project ask yourself:
1. Is this a product I really need and/or will I use more than X times to recoup my cost?
I can’t say I absorbed a lot in my college economics course, but I never forgot the discussion about the difference between wanting and needing a product. Be honest with yourself about whether you’re getting something that will be of use to you or if your money will be better spent on essential goods and services.
2. Is the product too good to be true? Or are the project organizers over ambitions?
One of the most entertaining aspects of evaluating crowd funded projects is to determine if they’re even possible. Does the product defy physics? (Ex. laser face razor) Figuring out if you’re being sold snake oil is an important part of evaluating a pitch. When in doubt, watch the pitch video a few days later so as to not get swept up by hype and allow yourself time to research the technology/concept behind the product.
Product or Platform Dependencies
3. Is the product dependent on other products to be compatible?
If so will this product be obsolete by the time the product ships? (ex. iPhone cases being released after the next generation phone is released, GoPro accessories, etc.) The biggest downside to accessory projects is that the product they’re an accessory for can change faster than the project can execute. Cell phone cases, cell phone lens add-ons and action cameras are all prone to this. For this reason, I rarely back these types of projects.
Is This Product Filling A Hole In The Marketplace?
4. Is there already something out there that is equivalent, proven and at a price point I should get instead?
If you like gadgets it’s pretty easy to lose sight of the larger marketplace as a whole when browsing crowdfunding sights. When you browse Kickstarter or Indiegogo your frame of reference will be all the projects on that site. One project may seem better in relation to another and when you find one that strikes a nerve your reference point will be set against other sub par projects. Ultimately the “good” project catching your eye may be solved by an equivalent product elsewhere… like Amazon, so do your homework. This is especially true for batteries, chargers and similar accessories.
5. Are there or have there been other crowdsourced projects that are similar and how did they fare?
Odds are the products you’ll find on crowdfunding sites will not be one-of-a-kind. Research to see if an equivalent project is on going and/or more likely to be delivered? If you find a similar product that was crowd funded see if it was successful, well reviewed, and/or delivered on time. If a similar project failed in the past investigate why and see if the project you’re considering is repeating the same mistakes.
6. Will this product obsolete itself or be obsoleted by a dependent technology?
Sometimes our immediate desires cloud our vision of the future. Some products and technologies cycle faster than upstart companies (ex. operating systems). If you’re backing software (app or desktop program) is it likely to be compatible in 6 to 18 months? Will the company/product you’re backing be faced with an incompatibility and have to pivot resulting in costly delays?
Likelihood of Delivery
7. When is delivery targeted and what roadblocks are likely to impede that goal?
Most projects are required to list “Risks and Challenges”. Don’t gloss over this section and weigh it heavily in your evaluation whether to back the project. Are all the risks and challenges being accounted for? Are some risks being taken too lightly? If these risks don’t match up to the proposed delivery date reconsider backing the project or communicate your concerns to the project team.
8. Will this project bust because of expensive materials or labor costs?
Some projects face an uphill battle simply because the project organizers lack an understanding of the cost of materials and labor or have initial quotes unexpectedly changed by vendors mid-project increasing overall costs. Of the many projects I’ve backed, this is one of the most common reasons a project fails.
9. Is there a prototype in existence and has it been reviewed by others?
Crowdsourced projects are essentially pre-order campaigns and most crowdsourcing sites require a prototype to be in place before taking pledges. If this is not the case for the project that has caught your eye it’s time to take a harder look and/or reconsider backing it.
Leadership & Experience of Project Organizers
10. Is it a known company or are the project organizers well known?
Is the company or project organizers known? Sometimes established companies use crowd funding sites as a preorder mechanism. Odds are if they already produce and deliver products you’re going to get what is promised to you. If it’s a lesser known company or team look into the credentials of those running the project you’re interested in. It should not be good enough that a social media or celebrity talking head is the face of the company. In the worst case scenario see if the people behind the project have a bad reputation.
11. Do the project organizers have experience in the area of their project (software, engineering, manufacturing, etc.)
Ideally, the person or team assembled for the project that has caught your eye has the appropriate background, skill(s) and network to complete the job. A good idea alone won’t get the job done.
12. Have they successfully completed a Kickstarter or Indiegogo project?
Has the company or team behind the project successfully completed other crowd funded projects? Is the project being run by a company that is already established? If the answer to either of these questions is yes, your odds of seeing the promised product go up exponentially. On the flipside, Google the team or team members to see if they’ve tried before and failed under a different company name. Was it delivered on time? If not how late was it?
13. Do they communicate effectively and frequently?
Never underestimate the power of good communication. It is important to make sure that backer concerns and expectations are addressed quickly. If project comments are addressed slowly or incompletely that is a big red flag. Also important is the ability of project organizers to address hard questions constructively as it may be telling how they’ll communicate when the project hits some rough patches.
Committing to the Project
If everything looks good to these questions, I strive to back projects at a pledge level that is the best value (ex. early bird pricing or multiple unit orders). Then I swing back in a few days to reevaluate the project. At that point, I either back out or mentally validate I’m making a wise purchase. Note: If you get cold feet about a project you can undo your pledge, without penalty, if the fundraising window is still open.
Risk
With all this in mind I usually only commit a monetary pledge I’m willing to lose, assuming the project is never executed and delivered. There is never a guarantee a project will be completed and most crowd funding sites insulate themselves legally from liability if a project is a bust. My track record to date is pretty good with 85% of my backed projects being delivered. Again only pledge or spend an amount that you’re willing to lose. In an ideal world, the organizers will have a great deal of experience with engineering and manufacturing, delivering quite quickly after their campaign ends. For those that are trying their hand for the first time, you’re betting they can navigate the process before their funds evaporate. It doesn’t always work out, but when it does it can be a lot of fun.
via The Oatmeal
Addressing The Skeptics
Given my earlier reported rate of return, it could be interpreted that every successful project I’ve backed really cost me 17% more. If I’ve lost 17 cents overall for every dollar spent that could be equated to a 17% premium paid for my successful campaigns. In the macro sense, you could look at it this way but consider my reported numbers cover a span of 7+ years. From year to year the amount I lost, per dollar spent, fluctuates depending on how bold/expensive my pledges were. As it turns out my overall average pledge in this time frame was $ 132.77. I’d like to think that most of this “premium” is recouped by grabbing the greatest discounted offers with early project pledges (aka early bird pledges). On the other side of the coin, one can make the argument that you’re backing projects for more altruistic purposes to help upstarts get started rather than opportunistically satisfying your consumer urges. In my case, I have backed several projects to help other photographers (photo books, conservation campaigns, etc.) so I’m not backing crowd funded projects just for material goods alone.
No matter how you slice it you’re going to have varying degrees of success, but hopefully, my process of evaluating projects helps you avoid scams and/or get the most out of your investment.
Related Reading
The 5 Biggest Crowdfunding Failures Of All Time (2017)
The Ugly Afterlife Of Crowdfunding Projects That Never Ship And Never End (2014)
The post How I Evaluate Crowdfunding Projects: Kickstarter, Indiegogo & Beyond appeared first on JMG-Galleries – Landscape, Nature & Travel Photography.
Have you ever been frustrated because you don’t seem to be able to photograph a scene the way it looks to you, with your vision? Maybe you can’t get a sharp image even though the scene is perfectly clear, or perhaps the camera fails to capture the beautiful variety of light in a landscape.
It’s possible that you’re having technical trouble in getting the most from your camera, but it might also be because the human eye and the camera aren’t the same, despite their compelling similarities. For instance, our eyes have a much broader dynamic range than any sensor or film, and our binocular vision gives us amazing depth perception.
But have you ever thought of the ways in which cameras can outperform the vision of your eyes? These aspects of your favorite tool are not obscure quirks, but commonly used techniques that broaden your perception of the world around you.
So let’s dive into the mysteries of the camera! Maybe realizing how photography expands your worldview will make you look at photography (and reality) in a slightly different way.
1. Capturing time
With the camera, you can capture time in different units than your eye does. This, of course, is done by choosing a shutter speed. There isn’t a direct counterpart to shutter speed in human vision, but that doesn’t mean we can’t take advantage of the camera’s ability to observe the passage of time beyond our own vision.
A long shutter speed of several seconds lets you see movement that isn’t discernible at all or in the same way by vision alone. Exposure: 1/3rd of a second, f/14.0, ISO 100.
Controlling shutter speed is also what makes light painting possible. Exposure: 134 seconds, f/5.6, ISO 100.
Using a really fast shutter speed lets you transform continuous motion that you see as a blur into a frozen instant. I thought I was photographing a bird sitting on a snowy branch, but all I got was a miniature snow flurry. Exposure: 1/500th, f/2.8, ISO 800.
2. Capturing light
Even though your eyes are better than cameras at distinguishing a wide range of light levels in the same frame, the camera can extend your observation of very dark and very light scenes. You can accomplish this by carefully balancing shutter speed, aperture, and ISO. Modern cameras allow for ever higher ISO levels, which increase the light sensitivity and allow you to capture images in really dark scenes.
If you’re lucky, you can see The Milky Way with your naked eye. Capturing it with a camera, though, allows you to see even more details of our galaxy. Exposure: 35 seconds, f/4.0, ISO 1600.
3. Field of view
The human field of view is static, about 190 degrees depending on the anatomy of your face. By using lenses, you can vary that field of view from slightly larger to much smaller.
A wide field of view, but still not as wide as that of most humans. Exposure: 1/13th, f/7.1, ISO 400.
A very small (narrow) field of view. This close-up, or macro, shows the tiny details of a fungus growing. Exposure: 1/25th, f/6.3, ISO 100.
4. Depth of field
Although you can’t control it, your eyes do have a changeable aperture called the pupil. It’s difficult to find information on exactly what kind of apertures the human eye can pull off. But whether the camera can do more or less, the effects of a small or large depth of field differ between eyes and cameras.
Examples of this are bokeh, which is achieved by a large aperture (small depth of field), and the starburst effects caused by a very small aperture (large depth of field).
Snow and ice crystals creating bokeh. Exposure: 1/100th, f/4.0, ISO 160.
Starburst over a snowy sea. Exposure: 1/500th, f/20.0, ISO 100.
5. Color
Although cameras have been designed to capture the same colors that we see, some can detect color in a very different way, including sensors used mainly by scientists to detect ultra-violet, infrared, or other parts of the non-visible spectrum.
The ability of some film to capture black and white offers us a new way to see the world, focusing on tones rather than colors. You can also make black and white photographs with a digital camera, though this is almost always a conversion from color to monochrome, either in-camera or in post-processing (there are a couple of monochrome digital cameras available on the market, but they are neither common nor cheap).
A monochrome vision – this photo was taken as a color image, then converted to black and white in post-processing. Exposure: 1/80th, f/4.0, ISO 1250.
Conclusion
Can you come up with more things that the camera can do but you can’t? Do you think your camera helps extend your vision – both literally and metaphorically? I’d love to hear from you and see some of your creations in the comments section below.
The post Beyond Human Vision – Seeing More With Photography by Hannele Luhtasela-el Showk appeared first on Digital Photography School.
The infamous Ryugyong Hotel in Pyongyang may have stolen the spotlight but North Korea can boast many other examples of unusual cutting-edge architecture.
The Korea Central Zoo (also known as the Pyongyang Central Zoo) was founded in 1959 but recently underwent an extensive makeover, re-opening in July of 2016. The zoo was and continues to be criticized for exhibits that include a chain-smoking chimpanzee and various breeds of dogs. Canines are forbidden to be kept as pets in the capital city, ostensibly for hygienic reasons.
We’re here to discuss architecture, however, and when it comes to the Central Zoo the highlight has to be the huge tiger-head entrance archway. Rather impressive, unless you’re an easily frightened child (or adult). At least the scaredy-cats can find some solace at the turtle-shaped Reptile Enclosure.
Handball Hall
Handball is kind of a big deal in North Korea and the North Korea women’s national handball team has competed at the Asian Women’s Handball Championship no less than six times since 1991 – though they’ve never finished higher than third. The team practices at the strikingly angular and not at all ball-shaped Handball Hall located on Chongchun Street in Pyongyang’s “city of sports” district.
We don’t have a date for the first photo but the image just above snapped by Flickr user Aaron Geddes (Gedsman) in March of 2016 displays some subtle differences.
International Cinema Hall
The International Cinema Hall isn’t in use very often as its main raison d’etre is hosting the Pyongyang International Film Festival every other year since 1987.
The sprocket-shaped building sits cheek-by-jowl to a golf course (you read that correctly) on the island of Yanggakdo, located in the Taedong River running through downtown Pyongyang.
Next Page – Click Below to Read More: Beyond Brutalism Cutting Edge North Korean Architecture
Exclucity: Unique GoPro Footage of Pyongyang, North Korea
Notoriously restrictive of the media, the North Korean government surprisingly granted the request of an outsider seeking to shoot a virtually unprecedented video: a continuous car tour of the …
(Images via: Shanghai Cultural China, Boston.com, Arch Daily)
When you’re awarded the highly coveted position of official host city to the world’s latest, greatest and inarguably grandest …
Kim Jong Il Leaves an Unusual Architectural Legacy
Started in 1987 and still not complete, North Korea’s Ryugyong Hotel is perhaps its most potent architectural symbol, and an odd legacy for an odd and secretive leader. The 105-floor, …
Good photography is really about telling stories, and that’s where all the lessons of composition, juxtaposition, lines, and focus fall short. Compelling images tell compelling stories, but the hard part is recognizing that story. I’ll tell you a story of how I missed the opportunity to do that, and look at some ways you can add more storytelling into your photography.
A bear story with a moral
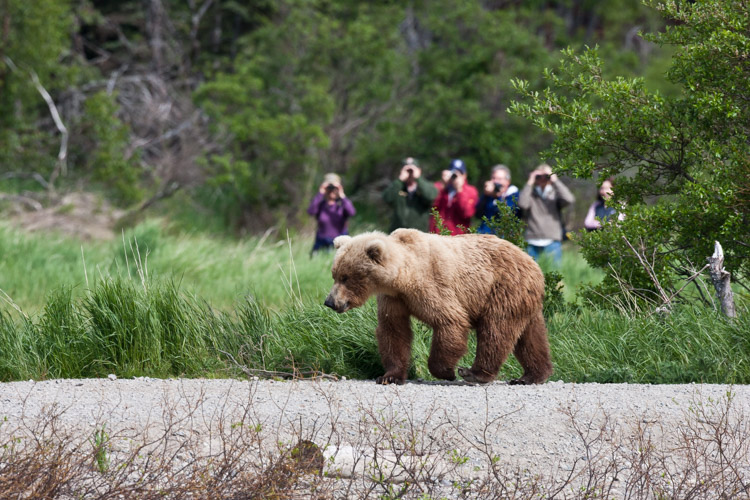
I was camped on a low tundra bench above a swift blue river in Alaska’s western Arctic. Our green canoes lay upside down next to the kitchen tent, and the willows along the river were flecked with the first autumn yellow. It was early when I crawled from my tent, stood and stretched. While still reaching skyward I saw another form rise from the tundra a stone’s throw away, a young grizzly giving me a curious look. I dropped my arms and turned just in time to see its sibling offering me a similar stare from a bit farther back. These bears were three-year-olds, spending their first summer away from their mother, ursine-teenagers, and just as troublesome. Unlike the many adult bears we’d encountered on our journey down the river, these two didn’t yet know to give humans a wide berth.
In Katmai National Park at the famous Brooks Falls tourists are inescapable. In this image, I embraced that part of the story.
Safety first
They backed off, after I shooed them with a wave of the arms, though not far enough. I woke my co-guide, and together we herded them away from camp and down onto the gravel bar below. One of the two young bears, rather than wandering off, decided to push my buttons and walked straight over. When off hiking or away from camp, you always give bears the right of way, but in camp, you can’t do that. Bears cannot learn that camps are places to explore.
Standing on the low bench, I knew that I could not let this mischievous youngster enter our camp. I stepped forward as he approached, right to the edge of the cut bank, and started speaking to the bear in a low steady voice. “I can’t let you up here, you have to back off. Back off. Now.” The bear paused in its approach, then stepped forward again. I raised a can of strong pepper spray, and held it up, ready to fire. The bear took another step forward, and then another until he was just eight feet away.
Hard lesson learned
And that’s when I felt a sudden moment of regret. Not for my behavior around this young, dumb bear, (in that, I knew I was doing the right thing) but for the fact that my camera lay in my tent. This beautiful (if troublesome) beast was so close I could count his whiskers. What a photo-op I was missing! But I pushed that aside, and spoke again, “One more step and you are getting it in the face. Don’t do it”, I said. “I’ll give you a count of three, then you are getting sprayed. One. Two…” before I could say three the young bear thought better of his situation, turned and ambled back to the river, swam across with his sibling, and disappeared.
Similar to the story I related above, this bear approached a group of photographers I was a part of on Admiralty Island, Alaska. He came very close, and I regret not taking a moment to show a wider shot with the group of us in the frame.
Think outside the frame – the moral
In retrospect, as I thought about the images I missed, I realized that it wasn’t the frame-filling portraits of the bear that would have been so spectacular about that moment. It was the story that went with it. Facing the bear down with a can of pepper spray, the bear testing us, and his eventual retreat. That’s where the compelling images were, not in the missed photos of the bear, but in the missed story that went with it.
If I had a camera in that moment with the bear, even if I’d been on the sidelines, I know I would have blown it and gone for the wildlife portraits, missing the much more interesting interaction that was taking place.
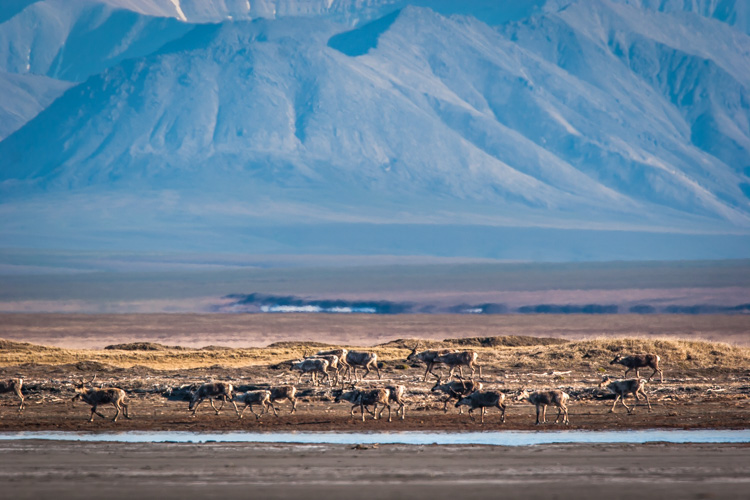
Here a herd of caribou is seen migrating across the coastal plain of the Arctic National Wildlife Refuge in Alaska. This image tells a more important story of movement, landscape, and perspective than a more typical portrait of just an animal would.
Learn from the best
Take a look at any issue of National Geographic. Many, even most, of images that are selected are storytelling images, not illustrations. The compositions are atypical, often showing the interaction of people or animals within the scene. Those photographers stepped back from a typical composition and explored their surroundings in a way that most of us, myself included, usually forget to do.
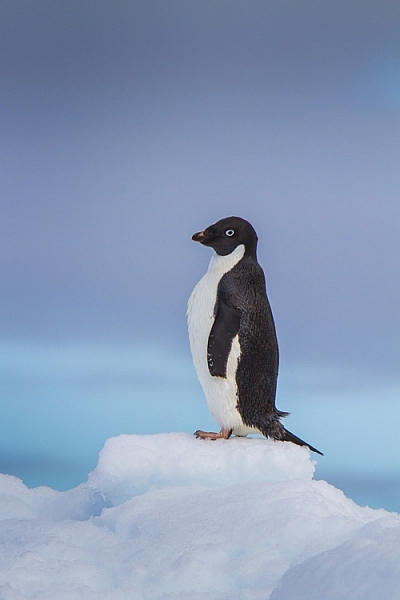
This image of an Adelie Penguin on an iceberg, I made in Antarctica. Getting close to wildlife is easy there, and the following image provides information to see just how easy.
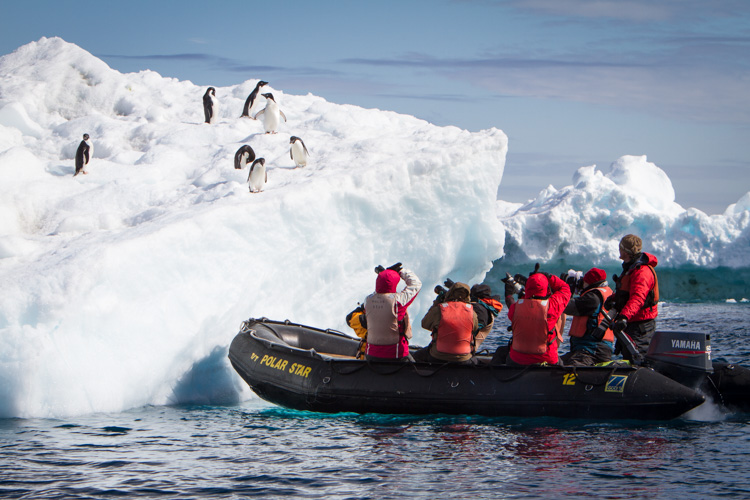
A zodiac pulled right up to an iceberg with Adelie Penguins.
Look around
This is an easy lesson to say, a much harder one to perform in the field because the real story is often easy to miss.
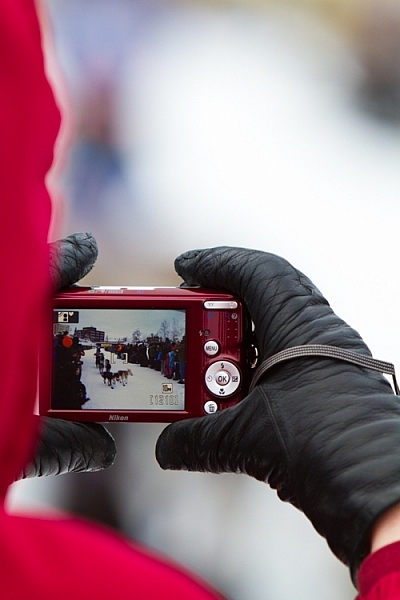
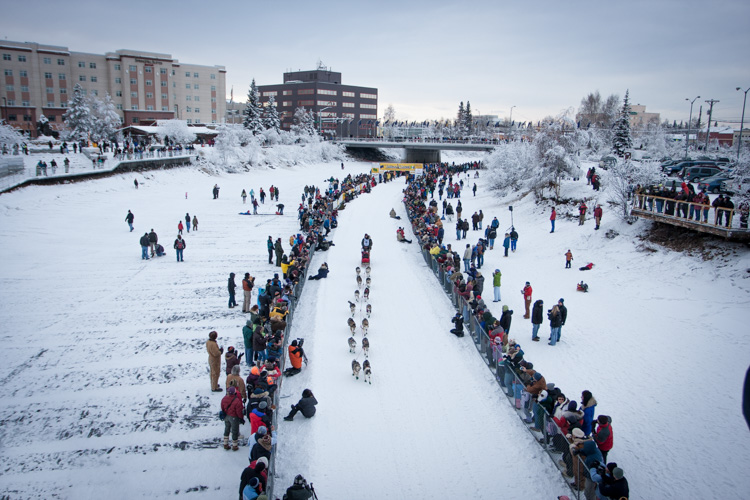
Another example: I was photographing the start of the Yukon Quest sled dog Race in Fairbanks, Alaska, where I live, a few years ago. I’d been concentrating on the passing dogs, the smiling mushers, and been studiously avoiding the crowds of people that surrounded me. At one point a spectator raised a point and shoot in front of my shot, I was irritated, but in that moment I was forced to pause. It clicked, and I realized that the real story was the crowd of mushing fans, out on a cold morning to watch the race. I changed my composition and made an image of the spectator’s camera. That shot is much more telling of the experience than any of my previous photos.
Here, the scene of the dog teams seen through a spectator’s camera is more telling of the experience of the start of the Yukon Quest.
This broad perspective is also an effective way to tell the story, showing the rows of spectators and the buildings of Fairbanks in the background.
Sometimes it’s a sudden realization like mine at the mushing race, but often, you have to put some effort into the real story. You need to break away from the scene you think you should be photographing, pause, and look around. Consider not just the scene, but the experience. What are you, or those around you, feeling, seeing, and doing?
Stay open to your surroundings
While being focused on your subject is vital to creating good images, it’s important not to close yourself off too much. Take the time to look around. Literally step away from your tripod, and turn 360 degrees while paying attention. What else is out there? Have you been missing anything as you’ve been staring through your viewfinder? What happens if you back up and show the surroundings?
While an image of a single bird, in this case, a Least Sandpiper is a nice portrait, it is more of an illustration than a story.
A large flock of shorebirds, when compared to the single-bird portrait, is more telling of the lives of the birds, and their epic migrations.
Think in terms of stories
That real story can be told within a single image, but there are also other strategies. Though an entire article is required to discuss the photo essay (5 Tips for Creating a Photo Essay with a Purpose), I do want to note that you can always think through your story using a series of images. This is also a good way to make the classic images you strive for while simultaneously capturing the storytelling ones as well.
Telling the real story is important not just for the quality of our images, but also for the quality of our experience. These storytelling images may not have the flash and glamor of a bear portrait or a sprinting sled dog, but it will help your viewers know the story, and that really is where the real excitement lies.


 via The Oatmeal


You must be logged in to post a comment.