Precisely one year ago, GoPro announced the Hero9 Black action camera. Today, GoPro has announced its successor, the Hero10 Black. While GoPro’s latest action camera looks familiar, a new GP2 chip inside results in significantly improved performance.
With its GP2 chip, the Hero10 Black features double the performance frame rates compared to 2020’s Hero9 Black. The increased processing power has other benefits. The Hero10 can upload a video to your phone or the cloud 30 percent faster than the Hero9. The Hero10 can plug directly into your smartphone for even faster uploads through GoPro’s Quik app, something not possible on the Hero9. The Hero9 introduced a front screen, although it was limited by poor framerate. Thanks to the GP2, the front display now runs at 30 frames per second despite being the same display.
Increased processing power gets more out of the 23.6MP image sensor. The Hero9 allowed users to pull 12MP still images from 4K 4:3 video. The Hero10 instead grabs 19.6MP stills from 5.3K 4:3 video. The Hero9 was limited to 5K 16:9 video, where the Hero10 records 5.3K 16:9 video, resulting in an additional megapixel when grabbing stills.
The GP2 chip helps with video framerates as well, which is perhaps the biggest boost offered by the increased processing power. The Hero10 Black records 5.3K/60p, 4K/120p and 2.7K/240p video. The Hero9 recorded 5K/30p, 4K/60p and FHD video at 240 frames per second.
Video is not only higher quality and faster, but it’s also more stable thanks to the inclusion of new HyperSmooth 4.0 stabilization software. The GoPro Hero10 includes three levels for its stabilization: off, standard, and boost. Boost results in cropping but promises the most stable footage possible. Standard doesn’t crop but won’t be quite as smooth as the boost setting.
The Hero10 uses the same batteries as the Hero9, but with higher-res video at faster frame rates, it does drain faster, per The Verge. During hands-on time, reviewer Becca Farsace investigated GoPro’s claims of improved tone mapping and noise reduction from the GP2 chip. Farsace found that low-light performance is improved.
While the GoPro Hero10 Black is available now for $ 499 ($ 399 with an annual GoPro subscription), some new features are being added on November 16, including Max lens mod support, additional resolutions, 24fps at all resolutions and GoPro’s SuperView lens at 5.3K at 30, 25 and 24fps. For more information, visit GoPro.
Samsung has announced a pair of new foldable smartphones, the Samsung Galaxy Z Flip 3 and the Galaxy Fold 3. The Flip 3 is a clamshell design, harkening back to a classic flip phone design. The Flip 3 is compact when not in use and gets taller when you flip it open. The Fold 3, on the other hand, has a more typical smartphone footprint, and then it unfolds like a book to offer a massive display. Let’s look at each of Samsung’s new folding phones in turn.
Samsung Z Galaxy Flip 3
When folded, the Flip 3 is 106.7mm (4.2″) diagonally. It’s nearly square and has rounded corners. It’s sleek. It’s also more usable than the prior iteration, thanks to a much larger cover screen. The cover screen is just under 50mm (1.9″) diagonally, although the viewable area is slightly less due to its rounded corners. The Super AMOLED display has a 260 x 512 resolution. It’s not a large display, but it’s large enough to allow users to see and interact with notifications and preview images taken with the dual rear camera.
Samsung Galaxy Flip 3
Speaking of selfies, due to the phone’s flip design, you can use what Samsung calls ‘flex mode’ to set up the phone, partially folded, to capture hands-free selfies. The dual rear cameras are both 12MP. The standard main camera has an F1.8 lens, includes optical image stabilization and can record HDR10+ video. The front camera is 10MP.
The main screen, which is usable when you flip the phone open, is a 6.7″ dynamic AMOLED 2X display with 2640 x 1080 resolution. The display has a 120 Hz refresh rate.
Samsung Galaxy Flip 3
The phone is powered by a Qualcomm Snapdragon 888 Octa-core processor paired with 8GB of memory. The phone is available with 128GB or 256GB of storage. Unlike the Fold 3, the Flip 3 is not compatible with Samsung’s S Pen.
Samsung promises that durability issues that have plagued earlier Samsung foldables have been rectified. The Flip 3 features more durable materials. Samsung writes that its new Galaxy Z Flip 3 is built using its strongest aluminum frame yet and that the phone’s front and back covers feature Samsung’s toughest Galaxy Z glass. The Flip 3 is also the world’s first water-resistant foldable smartphone and includes an IPX8 rating, meaning it can survive in 1.5m of freshwater for up to 30 minutes.
Samsung Galaxy Flip 3
The Galaxy Flip 3 is Samsung’s first foldable phone to start at under $ 1,000, with a $ 999.99 list price. The phone Z Flip 3 is available in phantom black, green, lavender, cream, gray, white and pink colorways and will begin shipping on August 27.
Samsung Z Galaxy Fold 3
The Galaxy Fold 3 has a more typical smartphone form factor…and then you open it up. When opened, the Fold 3 has a 7.6″ Dynamic AMOLED 2X display with 2208 x 1768 resolution. The display has a 120 Hz refresh rate. The cover screen is large, too, at 6.2″ with a resolution of 862 x 2268. By the way, unlike prior models, the cover screen is also 120 Hz.
Samsung Galaxy Fold 3
While the display is the star of the show, there’s quite a lot going on inside. The Fold 3 has the same Qualcomm Snapdragon 888 Octa-core processor as the Flip 3, although paired with 12GB of memory instead of 8GB. The Fold 3 also has a larger 512GB storage option in addition to the standard 256GB. Further, the Fold 3 is compatible with the Samsung S Pen.
Samsung Galaxy Fold 3
The Fold 3 is compatible with the S Pen due to Samsung using an 80% stronger protective film on the folding display. The cover screen is stronger, too, using Gorilla Glass Victus now for improved drop protection. Speaking of durability, the Fold 3 has IPX8 water resistance, like the Flip 3, and like Samsung’s other new folding phone, the Fold 3 includes better aluminum materials.
Samsung Galaxy Fold 3
Looking at cameras, both of Samsung’s new folding phones include a pair of 12MP wide (the main camera) and ultra wide cameras. The Fold 3 also adds a 12MP telephoto camera with an F2.4 lens. This is the same basic camera setup as in the Fold 2, but the new phone’s tele lens has optical image stabilization. There’s also a camera under the display. It’s only 4MP, but it should work well for video calls and meetings. In their hands-on, The Verge says the pixels on top of the camera are noticeable.
The Samsung Galaxy Z Fold 3 is available for preorder now in three colors, black, green and silver. The device starts at $ 1,800 and will ship on August 27.
The post 6 Times Photoshop Is Better Than Lightroom [Video] appeared first on Digital Photography School. It was authored by Jaymes Dempsey.
Lightroom is a fantastic editing program, but should you use it for every edit? Or is Photoshop sometimes the better choice?
In the video below, landscape photographer Mark Denney tackles these questions head-on. Denney explains how he incorporates Photoshop into his own workflow, and he lists the six times he always turns to Photoshop over Lightroom.
So if you’re wondering whether Photoshop is really necessary, I highly recommend you hear what Denney has to say. And when you’re done, leave a comment on this article letting us know whether you agree or disagree with Denney’s recommendations!
The post 6 Times Photoshop Is Better Than Lightroom [Video] appeared first on Digital Photography School. It was authored by Jaymes Dempsey.
Gimbal manufacturer Gudsen has updated its Moza Slypod electronic monopod, adding a longer extension, faster motion and better battery life. The Moza Slypod Pro is essentially a motor-driven monopod that allows videographers to create smooth slider and jib-style camera movements using automatically extending telescopic tubes.
The Slypod Pro can be controlled via the Moza App to extend the telescopic tubes at a given pace to allow mounted cameras to slide across the scene, towards or away from the subject, or to raise or lower the shooting angle. In this new version the range of movement has been increased, allowing a shift from start to finish of up to 53cm/21in, and the speed at which the camera can be moved has been increased to 40mm per second. A further improvement over the previous models is the 4 hour battery life, which can be supplemented with USB power via an external battery pack.
Made of carbon fiber, to keep the weight down, at 1460g it is still heavier than the previous Slypod and Slypod E due to the extra extension, and probably the bigger battery. It can support kit of up to 2kg for horizontal movement and 6kg when being asked to move vertically.
The Slypod can be linked to the Moza Aircross 2 gimbal to allow both devices to be controlled from the same app when the gimbal is mounted on the Slypod, allowing the camera to move in many more directions at the same time.
The Slypod Pro stores at 650mm and extends to a maximum of 1180mm, and comes with an Arca Swiss type mount instead of the Manfrotto mount used on the original Slypod and the E version. The company is launching the Pro version via a Kickstarter campaign that exceeded its very modest funding goal almost immediately. The campaign is offering the Slypod Pro for $ 459, with an estimated shipping date of May 2021. For more information see the Moza Slypod Kickstarter campaign page or the Gudsen Moza website.
Press release
MOZA Announces Launch of Slypod Pro – World’s First Electronically Adjustable Monopod
Imaging solutions experts MOZA, just announced the launch of Slypod Pro – an innovative electronically adjustable monopod for phone and camera photography. This impressive new monopod combines an electric slider & jib arm that lets users capture amazing photos at any angle and with smooth transition effects. Now, there is an affordable way for anyone to achieve professional results easier than ever. Slypod Pro is available now live on Kickstarter. https://www.kickstarter.com/projects/mozaslypodpro/moza-slypod-pro-do-wonders
This impressive new device is more than just a monopod. It’s a 3-in-1 monopod that combines an electronic slider & fully adjustable jib arm that lets users capture amazing photos at any angle and with smooth transition effects. As the world’s first electronic height adjustable monopod, Slypod Pro can be controlled with just one hand. Its motorized slider is internally geared and silky smooth, and extends out 530mm for a total length of 1460mm. It provides rock-steady support for perfectly smooth motion shots and compelling video.
With Slypod Pro, there are no more lost moments. The slider and jib arm can be placed at any angle and camera position. Previously impossible angles become easy to achieve for photos that come to life from new creative perspectives. Users can find the perfect shot by extending the slider in and out for compelling video and high camera angles.
Slypod Pro Redefines motion control when combined with the MOZA Master App other MOZA’s products such as the MOZA AirCross 2 gimbal to capture dynamic motion footage, and seamless cinematic shots with perfect stability.
“Collapsible monopods are a great option when it’s impractical to carry a bulky tripod. Combined with extensions and jib arms, they allow users to capture stable images at a variety of camera angles. At MOZA, our goal with Slypod Pro was to create the ultimate monopod, one that combines the smoothness of an electronic slider with a versatile jib arm for greater control and creativity. Fully electronic, Slypod can be operated with just one hand, or remotely by app. It gives users the features normally found in high-end photography gear, in a compact, portable and affordable option. Slypod Pro redefines the monopod so that you save time, streamline the photo process, and never, ever miss a shot.” Terry Guan, Founder Of MOZA
Sometimes the best photos happen without being behind the camera so the included MOZA Master APP works with smartphone to enable total control of the monopod to operate the motorized slider, perform precise movements at variable speeds and pre-program movements so users can concentrate on creativity instead of setup.
This full-featured monopod is durable and strong but made for portability. With a rigid carbon fiber body, and tri-legged support stand, it works on any surface. When it’s time to leave the studio and capture location shots, or during travel, the monopod collapses to a compact size that is lightweight, easy to carry and fits in a backpack.
SlyPod Pro supports most of the mainstream entry-level or pro-level photo and video cameras and other camera accessories for versatility and professional results and is available now on Kickstarter with special pricing for early adopters. To learn more visit the campaign here: https://www.kickstarter.com/projects/mozaslypodpro/moza-slypod-pro-do-wonders
Note/disclaimer: Remember to do your research with any crowdfunding project before backing it. Pledges to crowdfunding campaigns are not pre-orders. DPReview does not have a relationship with this, or any such campaign, and we publicize only projects that appear legitimate, and which we consider will be of genuine interest to our readers. You can read more about the safeguards Kickstarter has in place on its ‘Trust & Safety’ page.
The post Why Your Kit Lens Is Better Than You Think (With 18-55mm Examples) appeared first on Digital Photography School. It was authored by Andrew S. Gibson.
If you’re like most photographers, your first “serious” camera came with a kit lens, probably a standard, 18-55mm option.
But is a kit lens worth keeping? Is it capable of taking great images? Or should you immediately upgrade to a more expensive option?
That’s what I aim to address in this article.
I’m going to show how a kit lens, despite its shortcomings, can get you stunning images (and I give plenty of examples along the way!). I’m also going to give you a few quick tips for working with an 18-55mm lens.
Let’s dive right in.
Is a kit lens bad for photography?
Most kit lenses are, by nature, inexpensive (a polite way of saying cheap).
And that’s understandable – manufacturers are in competition with one another and they keep the prices of their camera bundles down by creating inexpensive kit lenses. A kit lens will get you started, and you can buy other, better-quality lenses when you outgrow it.
But if kit lenses are cheap, does that mean you should go out and buy a better lens straight away?
No, it doesn’t. No matter what anyone says, or how much you lust after expensive glass, your kit lens is a great way to get started with serious photography. If you’re in a position where you can’t afford to buy another lens, or you simply just don’t know which lens to buy, don’t sweat it. You’ll be surprised by what you can do with your kit lens once you know how to get the best out of it.
Don’t believe me?
Then check out this blog post by Jingna Zhang – a professional fashion and editorial photographer. She’s good, and she got her start with an EOS 350D and the 18-55mm kit lens that came with it. The quality of images she created with that camera and kit lens is very high. Take a look, and you’ll see what I mean.
Her article resonated with me because I got started with the same camera and lens combination. I didn’t know what lenses to buy for my camera, so I decided to stick with a kit lens and took it with me on a trip to South America.
I soon realized the lens wasn’t a great one; thankfully, it has been discontinued, and Canon sells a much better kit lens with its entry-level cameras.
However, despite the relatively poor image quality, some of the photos I took with that lens were good enough for publication. I illustrated my first published article, a piece in Practical Photography, with photos taken using the kit lens:
And several more of the photos were published in other photography magazines. My Canon 18-55mm wasn’t the world’s best lens, but it was good enough to get me started (and the Practical Photography article was a turning point for me because it helped me believe I could make it as a writer).
Getting the best out of your kit lens
So how do you get the best out of a kit lens? My approach is to think of it as two lenses in one.
If you have a kit lens that ranges from 18mm to 55mm (the standard kit lens focal length), then treat it as an 18mm lens and a 55mm lens in one body.
The 18mm is a moderate wide-angle lens that is great for landscapes, architecture, and environmental portraiture. The 55mm end makes for a short telephoto lens, ideal for compressing perspective when taking portraits or closing in on small details.
That doesn’t mean you can’t use the middle focal lengths, and there are times when you can’t avoid them. But by sticking with the short and long end of the lens, you will learn how those focal lengths behave.
After all, lenses are the “eye” of your camera system, and your photos will improve as you learn the characteristics of each focal length.
Some kit lenses also have another useful feature: image stabilization.
(Note that image stabilization is Canon’s term, while Nikon calls this vibration reduction.)
Image stabilization lets you take photos at slower shutter speeds than would otherwise be possible. So theoretically, you could hand-hold the camera, set the focal length of the lens to 18mm, drop the shutter speed, and take a photo without camera shake – even at 1/4s or even 1/2s.
That’s awesome for low-light shooting, and it lets you explore the creative potential of taking photos in the evening or at night.
Your kit lens as wide-angle glass (18mm)
The photos below were taken at the 18mm end of my kit lens.
You can see how I got in close to the subject, sometimes even tilting the lens backward to take advantage of the effect of the converging verticals.
Your kit lens as short telephoto glass (55mm)
These photos were all taken at the 55mm end of my kit lens.
They have a completely different quality, thanks to the compressed perspective and limited depth of field.
Shortcomings of kit lenses
As you now know, your kit lens is probably a better lens than you originally thought.
That said, kit lenses aren’t incredible, and they do have several shortcomings. At some point, you will bump up against these limitations.
(Running into limitations is not a bad thing. It simply indicates that you’re at the stage where a different lens will help you take better photos.)
These are the main drawbacks of kit lenses:
Limited focal length: You may find that even the 18mm end of your kit lens is not wide enough for the photos you’re after. In that case, it’s time to start thinking about buying a new (even wider) wide-angle lens.
On the other hand, if you find that the 55mm end doesn’t get you as close as you would like to your subject, then you need a telephoto lens. This may happen if you’re interested in photographing wildlife or sports, for example.
Slow autofocus: The autofocus on kit lenses tends to be slower and noisier than autofocus on more expensive lenses. If the autofocus performance of your kit lens is holding you back, it may be time to upgrade.
Narrow maximum aperture: Kit lenses are slow lenses. In other words, they don’t have a wide maximum aperture. The reason is simple: the wider the maximum aperture, the larger the lens body and lens elements required, which pushes up manufacturing costs. So kit lenses are made with relatively small maximum apertures to keep the price down.
The maximum aperture at the 55mm end of most kit lenses is around f/5.6. If this isn’t wide enough, you can buy a zoom that covers the same focal length with a maximum aperture of f/4 or f/2.8, or a 50mm prime lens with a maximum aperture of f/1.8 or wider. The wider apertures on these lenses will help you take photos in low light or use a shallow depth of field creatively.
Subpar build quality: Kit lenses tend to be pretty plasticky, so if you often knock your camera around or shoot in bad weather, then you may need a better-built option. The top lenses in each manufacturer’s range have metal bodies, metal mounts, and weatherproofing.
Why your kit lens is better than you think: conclusion
Kit lenses have a bad reputation, but they’re actually pretty great for beginner photographers.
So don’t feel you need to upgrade the moment you purchase a camera. Recognize that your kit lens can take stunning photos – as long as you know how to use it well!
And just have fun playing with your kit lens and experimenting.
Now over to you:
Do you use a kit lens? If so, what do you think of it? Are you pleased with it? Do you plan to upgrade? Share your thoughts (and images) in the comments below!
The post Why Your Kit Lens Is Better Than You Think (With 18-55mm Examples) appeared first on Digital Photography School. It was authored by Andrew S. Gibson.
The post The Rule of Odds in Photography (An Easy Trick for Better Compositions) appeared first on Digital Photography School. It was authored by Rick Ohnsman.
When you create a photograph, you’re hoping to manipulate the mind of your viewer.
While photos are simple, two-dimensional representations of reality, you – as the photographer – hope to let the viewer see what you saw, feel what you felt, and experience the world as you did.
And that’s what the rule of odds in photography is all about:
Tapping into the brain of the viewer to create a more pleasing composition.
So if you’d like to make better photos, read on!
The choice of three tulips for this shot was very purposeful. I tapped into the rule of odds!
What is the rule of odds in photography?
The rule of odds states that, whenever possible, a composition should have an odd number of objects, not an even number of objects. So an image should have three flowers rather than two, and five people rather than four.
Why?
The rule of odds taps into the brain’s propensity to create order.
You see, when viewing a group of objects, we unconsciously want to group them in pairs.
But when we’re faced with three, five, or seven objects in a photograph…
…we have a group that can’t be easily organized.
With an odd number of objects, one may become dominant. At the very least, the viewer will look longer at the image, moving between the individual elements.
That is the power of the rule of odds in photography:
It creates a composition that makes the viewer’s brain work a little harder and look a little longer.
Three repeating shapes play to the rule of odds. You can line them up…
…or arrange them to form an implied triangle, as with these three flowers.
Three, five, or seven objects can work well.
Once you move beyond these single-digit numbers, we tend to treat all of the objects as a group – even if they’re odd.
Five objects also adhere to the rule of odds!
Creating compositions with the rule of odds
Certain genres of photography give you, the photographer, complete power over your composition.
So you can arrange and compose your scene to include an odd number of subjects.
You can also arrange the odd number of subjects in pleasing ways; for instance, you can include strong compositional elements such as lines and triangles. In fact, these compositional tools are one more way to tap into the viewer’s brain as it works to find lines and patterns.
Often in still life compositions, we have the ability to arrange our subjects, choosing what, where, and how many objects are placed.
And that makes it easy to apply the rule of odds, as I did in the photo below:
When you set up a still life photo, you have full control over what to include and exclude. Here, the lantern, gloved hand, and pickaxe are the three key elements in this composition, so it follows the rule of odds.
Of course, it’s not enough to think only about the number of objects. You still need to think about natural pairs, because while a cup, a saucer, and a spoon might make a pleasing composition, a cup, a saucer, and a screwdriver would likely puzzle your viewer – even though it follows the rule of odds!
It was no accident that I chose a stem of flowers with three roses. And note the three objects in this light-painted still life: the violin, the sheet music, and the flowers.
Flowers can make great subjects for tapping into the rule of odds. If you are arranging the flowers in the scene yourself, think about using a group of three or five rather than an even number.
If you’re shooting flowers in nature, perhaps you can frame your shot to include an odd number of subjects. (You could also clone out a flower afterward.)
This was a matter of framing the shot to include just these three flowers.
In this case, I framed the shot to only include three leaves.
This triple-trunked tree was a perfect rule of odds subject.
The rule of odds for other subjects
Out in nature, perhaps shooting landscapes, you usually don’t have the option of moving around subjects.
Instead, spend time exploring your scene – and find compositions that take advantage of the rule of odds in photography.
When shooting outdoors, see what you can do to create compositions with an odd number of major objects, be it mountain peaks, trees, rocks, or clouds.
Note that you can still apply the rule during post-processing; if you have four elements instead of three, you can always clone one out, as I did in the image below:
The three posts worked well for this rule of odds shot, but four birds were on the front post. No problem; just clone one out! Do you agree that three is better than four?
Whether you’re composing in the field or editing on your computer, the rule will usually still apply. An odd number of objects will create a stronger image.
There was a whole flock of gulls perched on this fence, but cropping down to just these three let me follow the rule of odds.
This shot was mostly about the great reflections in the water, but the three geese worked with the rule of odds and enhanced the story.
Three or five? The top shot was the original composition. There are six rocks, but because two of them are closely grouped, you could consider them five objects. Still, I think the cropped version – with just three rocks – is better.
When you can’t move objects, such as in landscape photography, you can still take advantage of the rule of odds. Just keep it in mind when composing your shot.
The simpler shot at the right has just three objects. It works better than the shot at the left with four.
The same goes for architectural photography. Here, the five-in-a-row repetition works well.
We’re used to a first, second, and third place winner in sporting events. So not only did the rule of odds improve the composition, but it also helped tell a story!
The original shot contained six kayak racers. I cloned one out to drop the count to five.
Exceptions to the rule
Do photography for a while, and you’ll hear all kinds of “rules” – the rule of thirds, the reciprocal rule, the left-to-right rule, and all manner of other compositional and camera operation rules.
Of course, there are always exceptions to the rules. And there are times when it’s good to break the rules for an even better composition.
So when should you break the rule of odds?
First, when photographing people, you shouldn’t always stick to the rule. If you’re shooting a couple, then it wouldn’t make sense to have a third person (and this, in fact, would lend a new meaning to the rule of “odds”).
Of course, should that couple have a child, great; the group of three would make a nice rule of odds composition. Then, if the couple were to have another child, you’ll have to find a different way to pose them that works around the rule of odds.
Here’s another time to break the rule of odds:
If you’re taking a photo of Mount Rushmore. Who are you going to leave out to adhere to the rule of odds?
Therefore, the rule of odds should be like the rule of thirds. Use it when it works to enhance your composition, but don’t feel constrained by it if your subject just doesn’t permit its use.
It was just luck that this group consisted of five guys, but it was helpful for composing the shot.
Triple threat. There just happened to be three individuals in this group, and who was I to argue?
The odd one
Perhaps you’ve heard the song on Sesame Street, “One of these things is not like the others.” It’s a little game the show uses to teach children observational thinking.
Well, you can play a similar game with the mind of a viewer.
Simply seek out scenes and compositions where something in the image is odd, different, out of place, or doesn’t match.
Such images can be powerful. They engage the mind of your viewer, drawing attention to the odd object and making your viewer look a little longer at your photo.
Which of these things is not like the others? The nonconformist tree makes for a more interesting image.
Does the power of an “odd one out” image have anything to do with the number of objects in your photo? It might, or it might not. Perhaps it doesn’t conform to the standard definition of the rule of odds.
Still, it’s a powerful technique, and a great way to make captivating photos that engage your viewer.
Where does your eye immediately go in this shot? Yeah, I confess that I colored the one flower pink – but the point is that the odd one out immediately becomes the focus of attention.
The rule of odds in photography: Final words
When someone tells you your photos are odd, take that as a compliment!
Seriously, they aren’t likely to say that, but if you can find ways to embrace the rule of odds in photography, you will have another trick in your bag.
Not only is it hip to be square, but it’s also cool to be odd!
Now over to you:
What do you think of the rule of odds? Will you try it out in your compositions? Do you have any rule of odds photos that you’re proud of? Share your thoughts and images in the comments below!
What is the rule of odds?
The rule of odds states that an odd number of objects in a photograph (3,5,7, etc.) will be more engaging to the viewer than an even number of objects.
In what kind of photography is the rule of odds most easily used?
Probably still life photography, where you have full control over the number of objects in your shot and how they are arranged.
Can I use the rule of odds in landscape photography?
Yes, you often can! Even when you can’t move objects in your scene, you can carefully compose and frame your image to capitalize on an odd number of subjects. Sometimes, you can also crop your image in editing or add/remove objects to create an odd number of subjects.
What is the “odd one out” method of composition?
A good technique can be to look for things that break the norm or “stand out” because they’re different from the rest of a photo. Such objects will immediately draw the viewer’s eye and become the focal point in your photo. Think of a red flower in a field of yellow ones, a fork in a line of spoons, and maybe a baby chick in a carton of eleven eggs, and you’ll get the idea.
The post The Rule of Odds in Photography (An Easy Trick for Better Compositions) appeared first on Digital Photography School. It was authored by Rick Ohnsman.
The post How to Pose and Angle the Body for Better Portraits appeared first on Digital Photography School. It was authored by Alexis Arnold.
One of the best ways to make a living with photography is to photograph people. People need photographs of themselves for their businesses, conferences, publications, acting, and more.
Now, when a person comes to you to have their photo taken, they trust you to make them look good. That is really one of the biggest parts of your job as a photographer:
Make your subject look great.
When someone hires you to take their portraits or headshots, it’s important you understand how to pose them and how to angle their body toward the camera. With the right techniques, you will also be able to work more efficiently, which will benefit both you and your client.
After all, most people don’t like to have their photo taken, so you want the process to move along swiftly.
I have compiled clear examples of the slight changes you can make to create a more pleasing portrait. These photos are straight out of the camera; no post-processing or touch-ups have been done. The model in the photographs had professional makeup done before we shot.
(I recommend that you refer your female clients to a makeup artist so they can have their makeup done prior to the shoot. This will make a big difference in the final look.)
Okay, let’s get started.
This is the final (edited) image given to the client.
Shift their weight
With the first set of images (below), the model on the left is standing straight on (i.e., square to the camera). Her body weight is on both of her feet equally.
But as you can see with the image on the right, a subtle shift in her weight makes a big difference. All the model did was put the majority of her weight on her right leg – and this immediately created a subtle s-curve with her body.
The model is still facing the camera straight on, but already looks slimmer.
Lean forward from the waist
The model is still facing you straight on, but you can now have her lean forward from the waist.
With the photo on the left, the model is leaning away from the camera or backward, and it’s very unflattering. This angle creates a double chin and makes her look heavier. Anytime a client does this, you should correct them right away.
To make the photo better, just have your subject lean slightly forward from their waist (toward you).
As you can see from the photo on the right, when the model leaned forward, she automatically angled her head and shifted her weight. The pose is much more flattering!
Weight on the back leg
Now have the model shift her weight to her back leg.
In the examples below, the model shifts her weight to her left leg and brings her right leg forward. With the image on the left, you can see how, when she leans backward or away from the camera, the pose looks awkward and unnatural.
So when your subject shifts their weight back, have them either stand up straighter or have them add a bit of lean toward you (as seen in the photo on the right).
Cross arms
A very popular pose for business headshots is to have your model cross their arms (shown below). This projects a feeling of confidence and strength.
It can go wrong, however.
In the image on the left, the model angled her head backward. This mistake is more common in women, since they often tilt their head in photos.
Instead, communicate clearly with your subject to bring their chin forward and down slightly. This easy adjustment makes a big difference and is the shot your client will want.
Lean forward again
You can get a very nice close-up headshot with the crossed-arms pose.
The image on the left was shot wider to show you how and where the model has angled her body.
Ask your subject to lean forward from the waist. Most people will think this feels weird, so just let them know that it’ll look great in the final image.
Remember that most people are insecure about how they look, so always take time to reassure them that they look amazing!
Then either zoom in tight with your lens or step in closer to get a beautiful portrait.
Photograph on both sides of your model’s face
The example below shows the model’s “good side.” We all have one side that is better than the other. However, it is not usually visible to the naked eye, so please be sure to always photograph your model from the left and the right sides.
This is clearly shown with the model below. Her good side is when she angles her face to the right so her left side is more visible (below right). You can see more of her face, her neck looks better, both eyes are visible, the hair falls naturally, and her nose has a more flattering angle.
When repositioning your model, remember to shoot every pose from each side. Until you get good at recognizing your client’s good side just from looking at the image preview on your camera, always shoot from the left and the right.
Sitting poses
Let’s move on to portraits where your client is sitting down. Having your subject in this sitting position places you above them – so you will be shooting at a downward angle, which is very flattering for most people.
Pose your subject on the seat edge
First, have your subject sit on the edge of the chair. You do not want them sitting comfortably where they lean all the way back.
In the left image below, the model is sitting on the edge of the seat, feet on the floor and shoulders square at the camera. Even though the angle isn’t the best, if you crop in tight, you can still create a nice portrait with the focus on the eyes, as seen in the image on the right.
Consider crossing the arms and angling the face
With your subject still sitting in the chair, have them place their elbows on their knees.
Arms can be crossed or not; I suggest you play around with both options. This forces the subject to look up at you, taking away any issues with their neck.
Make the image better by having your subject angle their face slightly to the left or the right, as shown in the right image (below). Remember that these are tight crops, focusing on the eyes and the smile.
How to pose and angle the body for better portraits: Conclusion
It’s easy to see how a simple posing adjustment can result in better portraits.
A good rule of thumb to remember:
Have your subject angle one shoulder toward you, and have them place their weight on the back leg. This will immediately make them look slimmer.
Of course, now that you know how to pose for great results, the best way to improve is to get out and practice, practice, practice!
And have fun shooting!
(All images were shot in a studio with a 50mm lens, on a white paper backdrop, with one strobe light.)
Now it’s your turn:
How do you come up with poses when doing portrait photography? Do you have any additional posing advice? Share your thoughts in the comments below!
The post How to Pose and Angle the Body for Better Portraits appeared first on Digital Photography School. It was authored by Alexis Arnold.
The post 7 Tips for Taking Better Photographs of Cars appeared first on Digital Photography School. It was authored by Desmond Louw.
Taking photos of cars is such an interesting activity; it’s like doing science. Every time you shoot a car, you’ll learn something from it!
That’s why I would like to share some basic guidelines to get you started with car photography.
And by the time you’ve finished this article, you should be one step closer to getting gorgeous photos of cars!
1. Shoot at the right time of day
This is by far the most common mistake people make when shooting cars.
You see, the best time to do car photography is a few minutes after sunset (or a few minutes before sunrise). Use a tripod and get that perfect soft light on the paint.
This photo was taken for Top Gear a few minutes before sunrise:
2. Be on the lookout for reflections
You must carefully control what reflects in the car. Have a look around you, then look closely at the car and see what reflects off its surface.
A car (especially a new, shiny one) is like a mirror. So try to have an open space behind you, like a field. Also, try to avoid shooting with buildings or trees in front of the car. One of the most important things you want to show in your car pictures is the design lines of the car. But reflections can spoil these lines very quickly.
Also, be very careful not to include your own reflection in the photo. If you can’t avoid your own reflection, it’s best to put the camera on a tripod, set the timer, and move out of the shot. Just look at this photo I took of a dark shiny BMW 428i (below); behind me was nothing except the horizon. In fact, you can clearly see the horizon reflecting in the car:
3. Take driving shots
One very easy way to get a cool image is to shoot the car out of another moving car. (Please be super careful when doing this!)
For instance, try shooting the car out of a window while driving at 37 mph (60 km/h) with a shutter speed of 1/100s or so.
By doing this, you’ll get some nice movement on the road and on the wheels. You can even decrease the shutter speed further, though this will increase your chances of ending up with blurry photos.
This Audi S3 was shot before sunset; it was driving at 70 km/h (43 mph), and I used a shutter speed of 1/125s:
4. Pay attention to the color of the car
All types of paint react differently at different times of the day with different light. Most colors hate direct sunlight, but some colors actually handle direct sunlight really well.
Just look at this baby blue Beetle shot in the middle of the day:
5. Choose your background carefully
Make sure your background suits the car and the theme. Avoid including objects in the background that will distract the eye.
Things like dustbins, power lines, and other cars can kill a picture. For this Aston Martin shot (below), I used a simple background. The yellow paint matches the car’s color:
6. Pan for motion blur
A cool way to get some motion in your car photography is to stand next to the road and let the car drive past you.
Follow the car with your lens in one smooth action and set the shutter speed to 1/125s. You will be amazed by how easy this is!
This Ferrari was shot at 1/125s at 200mm. The car was driving roughly 37 mph (60 km/h):
7. Let the car interact with nature
Here’s another way to capture a photo that speaks to you:
Make the car interact with its surroundings.
Examples of this could be a car creating dust or a 4×4 driving over an obstacle. Look at this Chevrolet Trailblazer climbing over a rock:
And this G-Class AMG drifting on loose sand:
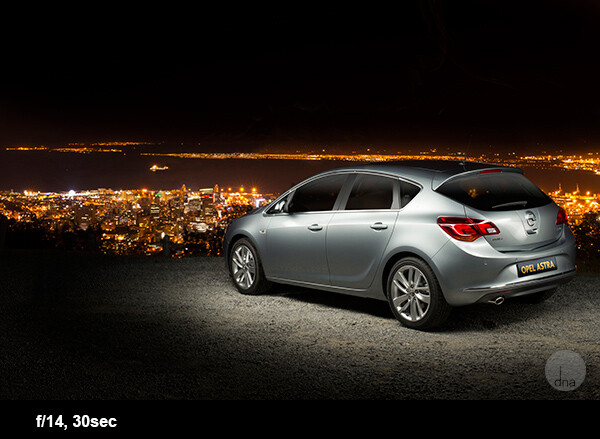
8. Shoot at night
Photographing cars at night might sound daunting, but you will be amazed by how easy and awesome it is! The biggest secret here is to find a spot where it’s completely dark; any streetlights or even a full moon could make life tricky.
Once you’ve found the right spot, set up your camera on a tripod. Set your ISO to 100, the shutter speed to 30 seconds, and the aperture to f/9.
When the shutter opens, take a strong constant light source and walk around the car, “painting” it with your light. A normal household flashlight works for this.
There are no rules here. Paint the car in different ways to get different effects, and you will be blown away by the results! Here are some examples of this technique:
This is an Opel Astra shot next to Table Mountain with Cape Town in the background.
This is a Dodge Charger with the skyline of Detroit in the background. The photo took me no longer than five minutes to set up and capture.
Tips for taking better photos of cars: conclusion
Car photography may seem difficult, but with these handy tips, you’re well-equipped to take some stunning car photos of your own.
So pick your favorite technique from the article, get outside, and start shooting!
Do you have any other car photography tips or favorite images you’ve taken of cars? Please share them in the comments below.
To learn related tips and techniques, check out these articles:
Light Painting Part One – The Photography
Showing Speed: Using Panning When Shooting Action
3 Tips for Creating Dramatic Images Using Motion
Do You Pack Up and Leave After Sunset and Miss the Fun of Night Photography?
The post 7 Tips for Taking Better Photographs of Cars appeared first on Digital Photography School. It was authored by Desmond Louw.
The post How to Use Leading Lines for Better Compositions appeared first on Digital Photography School. It was authored by Anne McKinnell.
Leading lines refer to a compositional technique where the viewer’s attention is drawn to lines that lead to the main subject of the image. A leading line paves an easy path for the eye to follow through different elements of a photo.
Usually, these lines start at the bottom of the frame and guide the eye upward and inward, from the foreground of the image to the background, typically leading toward the main subject.
Where can you find leading lines?
The easiest place to find a leading line is on a road. Roadways are inherently leading because they go somewhere, giving us a feeling of motion. The lines often point so far inward that they reach a vanishing point – the place where two or more lines converge at theoretical infinity.
The leading lines of the road converge to create a sense of infinity.
When leading lines, such as roads, connect the foreground to the background of a scene, they help create depth and dimensionality, which draws the viewer into the image.
Leading lines are all around us in cities and in nature. Your job, as the photographer, is to find them and arrange them in your photograph so that they lead toward something, even if that something is infinity.
The logs on the beach draw the viewer’s eye into the frame and lead up to the house.
When you’re setting up a shot, take a moment to examine the scene for its prominent lines. Clear your mind, relax your eyes, and notice where you’re naturally drawn to.
Pay special attention to human-made objects such as:
roads
fences
boardwalks
bridges
bricks
anything in a row, such as lamp posts
buildings
doorways
window panes
In nature, pay particular attention to:
rivers
shorelines
waves
sand dunes
trees
tall grass
cliffs
rocks
sunrays
The soft leading line of the river’s edge creates depth in the image.
What’s the best way to use leading lines?
Once you’ve identified your strongest lines, consider how you can use them to enhance your composition.
Depending on your intention, you might:
Create depth and perspective by positioning a strong line leading from the foreground to the background
Create a visual journey from one part of your image to another
Place your subject where the lines converge to give the subject more importance in the frame and draw the viewer’s attention directly to it
Make a cyclical composition, with the lines leading the eye in a circular motion and never out of the frame
Arranging the elements in the frame may involve the use of different lenses to change perspective. However, you can accomplish this simply by moving yourself so that the point of view you choose is purposeful.
The leading line of the path takes the eye directly to the maple tree.
How to use leading lines for better compositions: final words
Leading lines are the key compositional element that carries our eye through the photograph. They can be used to tell a story, to place emphasis, and to draw a connection between two objects.
Use leading lines creatively and with expressive purpose to help you tell your unique photographic tale.
The post How to Use Leading Lines for Better Compositions appeared first on Digital Photography School. It was authored by Anne McKinnell.
The post 6 Ways of Using Reflector to Take Better Portraits appeared first on Digital Photography School. It was authored by Dennis Drenner.
I’ve been making my living as a photographer for over 20 years, and I have accumulated thousands of dollars of gear in the process. I have the latest Canon DSLRs, a full complement of lenses, strobes, light stands, gels, filters, softboxes, tripods, and even some video and audio gear.
But the one thing that often makes the biggest difference in the quality of my portraits is a simple $ 20 reflector. I never leave home without one, and neither should you.
When shooting outdoor portraits, the first thing many photographers think about is the background – but first and foremost, the pros consider the quality of the light. They know, for example, that a portrait with nasty overhead lighting is not going to work, no matter how cool the background.
A reflector can help you salvage bad light, and turn okay light into something magical. You can use your reflector from below to fill in shadows, or from above to block distracting light. You can bounce the sun from a silver reflector to create a main light, or you can use a reflector with a black side to create deeper shadows. You can even sit on your reflector to keep your pants clean when shooting outside, or pop it open dramatically to dazzle young children.
Most of the photos in this article were shot with a 5-in-1 reflector you can buy for less than $ 20 USD. 5-in-1 refers to the fact that the reflector and cover can combine to give you five different options: white, silver, gold, and black sides, as well as a diffuser.
Here are six tips to help you use a reflector to transform your photos.
1. Use a reflector for fill light
The most traditional use of a reflector is to simply reflect light into the shadows. I took my wife, Karen, out into our local park to demonstrate this.
In the photo on the left (above), Karen is photographed in nice soft light, but there are still pretty deep shadows under her eyes and chin. In the photo on the right, however, she is holding a reflector at her waist. The shadows on her face are noticeably lighter and there is a subtle catchlight (a reflection of the reflector) in her eyes. If she were an older person with more textured skin, the contrast would be even more dramatic.
Of course, you may not always want to fill in the shadows in this way, but if you are trying to flatter someone it almost always helps.
You don’t even need an official photo reflector. Anything that reflects light will work. In a pinch, I’ve used everything from old newspapers to a nearby person wearing a white shirt.
2. Use a reflector as the main light source
This is one of my go-to reflector moves, and it’s an easy way to wow your friends and family.
You position your subject with the light hitting them from behind, then use a reflector to bounce the light back into their face. You will get nice soft light on your subject’s face, with a dramatic rim light on the back of their head. The only trick is positioning yourself so the light doesn’t go straight into your lens and create lens flare (unless you like that look, of course).
In the photo above, the sun is hitting the left side of my subject’s face and arm. The light from a reflector is bouncing some of the sun back to light up her face.
You may also notice the shallow depth of field in the photo above. If you are lighting with a reflector, you can jack up your shutter speed as much as you like to allow for a wide aperture (this photo was shot at 1/1250s at f/2.0 with a 50mm lens). If you were using flash to create this same effect, you would have to lower your shutter speed (to 1/250s or whatever matches your camera’s sync speed) to sync with the flash, requiring a narrow aperture and a greater depth of field (which will kill the whole look).
Yes, yes, some of you are no doubt thinking, “What about high-speed sync?” Well, yes, that could give you the same effect if you had the right equipment (and know how to pull it off). Or, you know, you could just use an old newspaper as a reflector.
For the example above, I positioned Karen against a tree and had her cousin, Claudia, reflect a spot of sunlight on her from about 10 feet away. At this distance, the light from the reflector looks more like it is coming from a grid spot or snoot (hard light) – in other words, it’s a focused and dramatic beam (notice the fall-off of light on her legs). It’s a cool look that you can recreate with a reflector, a few feet of aluminum foil, or your bathroom mirror. Your friends will be wowed and ask what fancy gear you used for the shot (and your family will ask what happened to the bathroom mirror).
For a slight variation on this technique, we moved the reflector slightly behind the subject (relative to the camera) to create a dramatic rim light on the face in a profile shot (see below).
3. Use a reflector to block light
Sometimes you’ll find yourself in beautiful, shady light under a tree, except for that pesky sunbeam that finds its way through the leaves to light up your subject’s left ear. When this happens, turn your reflector into a light blocker (sometimes called a flag or gobo).
A few years ago, I was doing a maternity portrait in a local park when a newspaper photographer snapped my picture while I was using my reflector as a gobo (shown in the image below). If you look at the reflector, you can see the bright spots of sunlight that it’s blocking (imagine how those spots would have ruined the final image if we didn’t block them!).
4. Use a black reflector to create more dramatic shadows
Sometimes, you actually want to deepen the shadows. I use this technique all the time in my headshot studio. Below is a photo of me with a white background. In the first shot, I have a silver reflector opposite the main light, sending light back towards my left cheek. In the second shot, the reflector has a black cover on it, gobbling up reflected light to leave a dark shadow on the cheek.
Except for the small change of literally flipping the reflector from one side to the other, the lighting setup is identical, but the effect is pretty dramatic. (For you studio lighting enthusiasts out there, my key light here is a large softbox, and there are two bare heads pointing at the background to make sure it is a nice, bright white).
This is the same technique used in the famous Steve Jobs portrait where he has his hand on his chin. In addition to creating a little drama, you can also use this technique to give someone a photographic face-lift by trimming pounds from the dark side of their face and under their chin.
5. Who holds the reflector?
You may be saying to yourself, “But I don’t have an assistant! Who’s going to hold the reflector for me?” I usually don’t have an assistant, either, but there is often someone nearby who is more than happy to help, be it a family member, passerby, intern, wedding guest, etc. Sometimes, you can even have the subject of the photo hold the reflector themselves. Of course, if you’re in the studio, or outside on a day without too much wind, you can just pop your reflector onto a light stand (like in the studio shots of me above).
In the photo below, I was shooting wedding portraits on a beach in the Florida Keys. My reflector assistant that day was one of the bridesmaids, who truly enjoyed helping her friends out with their portraits.
6. Reflectors in the environment
Once you get the hang of reflectors, you’ll probably start noticing reflected light everywhere. Ever see a white building getting blasted by the sun? Well, that’s nothing but a giant reflector! Depending on what’s around it, you may have found yourself a giant studio with no rental fee.
Mind you, anything that reflects enough light can work as a reflector. A brick building, a large truck, or a flock of seagulls flying by at just the right moment – it all works!
Using a reflector: final notes
Although they may not be as sexy as strobe kits, reflectors can often yield similar or superior results for your portraits and are cheaper and easier to use. I will leave you with a few more example photos, shot using nothing more than a reflector.
In the child portraits below, note that there is light behind the kids in both cases, but there is still beautiful light on their faces. Same goes for the athlete portraits.
As a final image, I leave you with a group of wedding guests who were so enamored of my reflector that they wanted a picture with it. Hopefully, you will soon have similar feelings toward your own reflector!
Do you have any additional reflector tips to add? Please share them in the comments below!
The post 6 Ways of Using Reflector to Take Better Portraits appeared first on Digital Photography School. It was authored by Dennis Drenner.


You must be logged in to post a comment.