RSS
 

Posts Tagged ‘Beginners’

10 Incredible Bird Photography Tips for Beginners

22 Sep

The post 10 Incredible Bird Photography Tips for Beginners appeared first on Digital Photography School. It was authored by Prathap DK.

What is the most important factor in getting your bird photographs noticed by a large audience? Is it the camera or the lens or the bird?

Bald Eagle Flying Away With A Catch

Imagine you have a Canon 1D X Mark III or a Nikon D5 and an 800mm lens. You have been to a place to photograph the magnificent bald eagles. Everything seems perfect! Isn’t it?

But what if you do not know what makes a good bird photograph? Do you think, just by shooting a burst of photographs, you’ll get the best results?

Definitely not. You may get snapshots, but not photos.

“There is nothing worse than a sharp image of a fuzzy concept.” – Ansel Adams

Today you will learn some of the core principles of bird photography. These will give you an understanding of what makes a good bird photo.

1. You don’t need expensive lenses for great bird photography

A great bird photograph does involve several factors, such as:

  • Quality and direction of the light
  • Composition
  • Knowledge about the bird and its activities
  • Background
  • Knowledge about the gear you are using
  • Proper settings
  • Proper exposure
  • Your position
  • 3 + 1 Ps (Patience, Perseverance, Practice + Passion)

You see, it takes a lot to become a good bird photographer. A decent APS-C or DX-format camera body with a telephoto lens of up to 300mm is more than sufficient to really get great bird photographs.

It is important to realize that bird photography is much more than just the camera or the lens. There is no denying the fact that the longer the lens, the easier it is to photograph birds that are skittish. But the lens itself cannot make a great bird photograph.

Also, if you do not have a longer telephoto lens, nothing stops you from taking a great photograph of birds like mallard ducks, geese, gulls, and herons that are easily approachable. If you cannot take a close-up of a bald eagle, nothing stops you from taking a unique photograph of a bald eagle in its habitat.

Everything boils down to how you view the situation. “Is the glass half empty or half full?”

2. Light and composition

Green Heron Standing TallPhotography is all about light. Light has a few characteristics that will make a photograph wonderful.

Early morning and late afternoon light is usually the best time for bird photography. The light during these times is soft. As a bonus, the birds are very active.

Soft light has some wonderful characteristics, such as:

  • It does not cast harsh shadows on the bird
  • It brings out a glow in the bird’s plumage
  • It creates a catchlight in the bird’s eye

Composing a bird photograph helps you convey your message in the best possible way. Bird photography composition is generally very simple. Following a few basic composition principles will help you make a difference:

  • Use the rule of thirds compositional technique to place the bird off-center
  • Use color contrast by aiming for a complementary background
  • Fill the frame with the bird
  • Use a clean background

3. Transport the viewer into the bird’s world

We see our world at five to six feet high, but birds see the world in few inches to few feet. To get a feeling of the bird’s world, get down on their level!

Go low and go slow.

Always try to photograph the birds on their eye level, except for birds in flight, of course. Getting down low has greater benefits that will overshadow any of your complaints, such as not wanting to bend down, lie down, etc. Some of the obvious benefits are:

  • You get more intimate photographs of birds since you will get eye contact
  • You will get pleasing blur both in the foreground and background
  • You make the bird less scared since you can hardly move
  • You will transport the viewer into the bird’s world

Goslings Crossing the Road

4. It’s all in the eye

Take a look at any photograph of a bird. What is the first thing you want to see?

It’s the eye, right?

We tend to make an eye connection with any living being. It is no different than with birds. The eyes are the windows to the soul. If there is no light in the eyes, then they look dull or lifeless. Birds look lively when there is light in their eye.

This light in the eye is called a catchlight.

Sparrow perching on a tree branch

By following a few guidelines you can easily get better bird photographs:

  • Always keep the bird’s eye in sharp focus
  • Check for a catchlight in the bird’s eye (this is easy to get if the bird is front-lit)
  • Make sure to photograph from the bird’s eye level

5. Fill the frame

In bird photography, we generally photograph an individual bird. When photographing individual birds, it is always a good idea to fill the frame.

Advantages of filling the frame with the bird are:

  • It is easy for the viewer to focus on the bird
  • It is easy to achieve a pleasing blur or bokeh effect in the background
  • It is easy to properly expose for the bird
  • It is easy to compose in the field

Juvenile Blue Heron Close Up

6. Tell a story

Storytelling in bird photography should not be confused with stories in books and newspapers. Storytelling is a way to express the time of the day, mood, place, or activity of the bird in a single photograph. Viewers should be able to picture themselves in the scene.

Simply put, a photograph of a bird plus its surroundings will give a better sense of story than just the bird filling the frame. Though the story may not always be true.

Great Egret in Misty Morning

Here are few tips you can follow while you photograph a bird in its habitat:

  • Make the bird an integral part of the photograph by including its natural habitat
  • Show the interaction of birds if there is more than one bird in the photograph
  • Indicate the weather conditions by including snow, rain, or mist
  • Take photographs during sunrise and sunset
  • Show season by including flowers in bloom, autumn colors, or snow

7. Capture their action and behavior

Birds are always in action. They hardly sit still. Capturing birds in action involves more effort and patience compared to photographing perched birds.

Here are a few tips for capturing birds in action:

  • Photograph early in the morning or late in the afternoon when birds are very active
  • Use burst mode to take several photographs during the action
  • Track the bird until focus is locked before pressing the shutter
  • Learn to anticipate the action either by observing or reading about birds

Juvenile Blue Heron with a Fish

Birds tend to ignore you when they are very hungry. It is very easy to photograph them in action during these times. But care should be taken not to disturb them and to maintain considerable distance.

Capturing a bird’s behavior is much tougher than any other aspect of bird photography. This is generally because birds become alert the moment they see you.

The alert bird is always trying to fly away, so you’ll rarely see its behavior. You can observe the actual behaviors of a bird when it is truly comfortable.

There are few ways to make a bird comfortable:

  • Use a natural place to hide, like a bush or tree or something that obscures you
  • Wait patiently until the bird ignores you
  • Visit the location several days in a row until the bird becomes comfortable with your presence or you get the right opportunity

Juvenile Great Egret Behavior

Remember to research and learn everything about the bird you are photographing. This will definitely make you a better bird photographer; also, you will enjoy knowing about the bird.

8. Capture their magnificent flight

The most interesting part of bird photography is capturing their magnificent flight. This is very tricky for beginners and pros alike. It is not easy to take flight photographs that will wow viewers.

Your success photographing birds in flight largely depends on the bird, as well as the technique that you employ. Smaller birds are generally very erratic in their flight and also a bit difficult to track, since they are generally small in the frame. But larger birds are slightly less swift and are not as difficult to track.

If you want to be successful with flight photography, start with larger, slower-moving birds. Learn all the field techniques to capture the perfect photographs of these birds.

Belted Kingfisher in Flight

Here are some simple tips that will help you capture those magnificent flight photographs:

  • Learn about the bird’s flight patterns
  • Know the bird’s landing and take-off patterns
  • If there is more than one bird, it is almost always the case that, if one flies, the rest will follow suit
  • Track the bird for a while and let the camera achieve focus before pressing the shutter
  • Use Aperture Priority so you do not have to worry much about the changing light conditions

9. The background makes the picture

This is one of my favorite questions: Is it the background or the bird that makes the picture?

Go through all your favorite bird photographs and see it for yourself.

Except for extreme close-up portraits of birds, every other type of bird photograph will look great when the background is clean and complements the bird.

Seagull the Eagle

It is very important to keep an eye on the background while taking bird photographs. Just follow these simple tips:

  • Avoid taking bird photographs when the background is too distracting
  • Avoid taking bird photographs when the background is plain and boring
  • Wait for the bird to assume a good position or change your position to get an interesting background
  • Choose maximum aperture values to throw the background slightly, or completely, out of focus

10. Practice with common birds

I urge you to practice photographing common birds. You might have understood by now that these techniques are not dependent on your camera, your lens, or the bird. I was using an 18-200mm lens for the first four years of my bird photography. I learned and practiced most of my birding techniques with common birds like seagulls, mallards, geese, and herons.

I spend most of my time photographing these common birds, and I challenged myself to make some unique photographs of them; this challenge has fueled my passion for a long time.

I put more importance on learning and practicing photography than on whatever gear I possess. I am very happy to say that I learned most of the photography basics here at Digital Photography School.

I hope my story so far is an inspiration to you to embrace the beauty of these common birds.

Wrap up

Barn Swallow Taking OffFocus your time and energy on learning all the core principles outlined above. Prove to yourself that you have the passion to go out and photograph birds every day, or as often as you can.

Remember that proper techniques will always outsmart equipment. Make every attempt to create amazing photographs of the common birds. Enjoy photographing birds. That is the secret to success.

The post 10 Incredible Bird Photography Tips for Beginners appeared first on Digital Photography School. It was authored by Prathap DK.


Digital Photography School

 
Comments Off on 10 Incredible Bird Photography Tips for Beginners

Posted in Photography


Nature and Wildlife Photography Tips for Beginners

08 Sep

The post Nature and Wildlife Photography Tips for Beginners appeared first on Digital Photography School. It was authored by Adam Welch.

If you have an interest in wildlife or nature photography, then there is a good chance you have seen an image at some point that has completely taken your breath away. Maybe it was a photograph of a sweeping landscape washed in the golden light of the dying afternoon sun, or a close-up of some small natural miracle that you had never noticed before that moment.

You might even have asked yourself, “How did they do that?”

Winter landscape

Well, the majority of those incredible photographs came about through a good deal of physical hardship, practiced patience, and a healthy amount of self-made luck.

Here are some tips to help you become stronger at wildlife photography and better at recording the natural world.

Do your homework before heading out

Be as educated as possible before you ever make a photo. Doing your homework is one of the most important, yet loathed, parts of wildlife photography. It never pays to walk into a situation and be completely clueless.

Though you can never be totally prepared for every challenge you will face (that’s part of the fun), you can educate yourself so that you safely make the most of your outing.

What gear to pack

Advanced gear is not a requirement. However, patience and perseverance are essential. You don’t need the latest and greatest zoom lens or space-age gadgetry in order to produce outstanding nature and wildlife photos.

At the same, you must also understand any limitations of your kit, so that you will have realistic expectations and avoid disappointment.

Deer

This photograph was made using the 28-135mm kit lens that came with my camera after I slowly and quietly crawled into range.

Gear up for what you’ll most likely be shooting. Packing for a photographic outing can cause a lot of anxiety. It’s easy to overpack due to fear of lacking a piece of gear.

Overpacking, though, can be even worse than underpacking. You become weighed down and uncomfortable. You find yourself not enjoying what you’re doing, which is one of the most preventable of all mistakes made by photographers.

Research the animals and scenes you are likely to encounter. Decide what gear most and least important to you. Make choices, commit to them, and then let it go. It will make packing a lot less stressful.

If you plan on photographing wildlife, such as birds and animals that scare easily, then pack your best zoom lens so you can keep distance between you and your subject.

Are you shooting landscapes or scenes where stealth is not a concern? You might consider taking along a wider angle lens to better capture your scene.

Ultimately, there is no secret formula and no true all-in-one lens to cover every situation. Be informed before you leave so that you can make the best use of whatever lens you have.

A good bag is worth its weight in gold

All the planning in the world isn’t worth much unless you can comfortably carry your essential tools with you. Find a camera bag that can carry the gear you need easily and is equally comfortable on your body.

Bags range greatly in price and quality, but you usually get what you pay for. For added peace of mind, you might consider a bag that is semi-weatherproof or water-resistant.

Here’s my go-to lightweight bag for wildlife photography, shown with and without the handy rain cover deployed:

Camerabag

Read reviews and find a bag that fits your body, your gear, and your planned outing. You will have a much more comfortable and enjoyable experience.

Speaking of comfort:

Shoes

Comfort items

Shoes: A good pair of hiking shoes or boots is one of the most important pieces of gear for any wildlife photographer. Grit, dirt, mud, water, insects, rocks, and creepy-crawlies; you need a pair of shoes or boots that can handle all of these elements.

Your shoes should be well-fitting and suitable for walking long distances. If your feet become uncomfortable, it won’t be long before you start thinking about cutting your trip short.

Prepare a checklist

It’s always a good idea to have a mental checklist before beginning any shoot. Before your outing, ask yourself the following questions:

  • Are any special permits or permissions required? Some national parks, state parks, and wildlife sanctuaries require special permits for access to certain areas, especially backcountry environments.
  • Where will I park my vehicle? This is very important. Believe me, if you park your vehicle in an unauthorized area, then you will be stuck with a sizeable fine. Or worse, you’ll return to find your vehicle has been towed.
  • Are there time restraints of any kind? Most natural areas and parks have hours of operation just like a business. You might arrive expecting to shoot a great sunrise, only to find out the location you chose isn’t accessible until after daybreak. Also remember that wild creatures and critters are usually most active in the early morning or late evening.
  • What are the expected weather conditions? This is a biggie. Know what to expect as far as the weather is concerned. Check the forecast the day of departure and keep tabs on it throughout the day if possible. Never risk endangering yourself or your equipment by venturing out unprepared for bad weather.
  • What are the times for sunrise and sunset? Again, be sure the places you want to capture a sunrise or sunset are accessible during those times. You need to also be aware of the sunrise-sunset schedule so that you can allow enough time to reach your location and set up your gear before it’s go time.
  • Are there any commonly photographed animals, landmarks, or structures? Research what is usually photographed around the area you plan to visit. Find a park ranger or staff member and ask about lesser-known spots that are less traveled by tourists. Knowing what’s popular will save you time and help you avoid shooting a scene the same way it has been done time and time again. Look for ways to be creative and set your work apart!

So, you’ve researched your location and have a good idea of what to expect. Here are a few basic tips that can help you after you’ve reached your destination.

Shoot RAW

Shootraw

If possible, set your camera to capture images in RAW format. RAW image files are basically unprocessed (one might say uncooked), straight from your camera’s image sensor. They contain a massive amount of pixel information when compared to JPEGs and take up a lot more memory card space. However, this additional information allows more latitude for adjustments in post-processing.

Use the lowest practical ISO

The ISO number of photographic film and image-sensors relates to their sensitivity to light. The boiled-down explanation is that, everything else being equal, the higher the ISO number, the less light that is required to make an image.

Unfortunately, with higher light sensitivity comes increased image noise. In most (but not all) situations, you will want to use the lowest ISO possible. That is not to say you should be afraid of bumping up the ISO. A fast shutter speed is often needed to capture the quick movements of wildlife, and increased noise is far less noticeable than a blurred image.

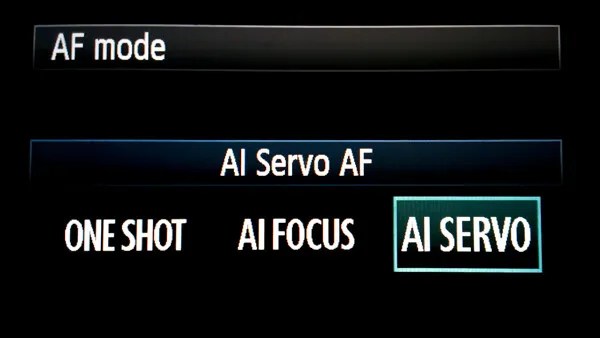
Use AF continuous (AI Servo) mode when photographing wildlife

Afservo

Autofocus (AF) can be your best friend or your worst enemy. When it comes to photographing most wildlife, however, autofocus is a great tool!

Animals and birds, especially the wild variety, are almost constantly on the move. They shift positions and move closer or farther away selfishly, with little regard for the photo you are so carefully trying to compose. This is when AF-Continuous and AF-Servo modes come in handy.

Though called different names depending on your camera’s make, these settings both accomplish the same objective: They keep a moving subject constantly in focus.

Place your selected focus point over your subject and half-press the shutter button to engage the AF. Focus will be tracked for as long as you follow your subject while maintaining pressure on the shutter button. Read your camera’s manual (you’ve done that already, right?) for detailed information concerning specific autofocus capabilities for your model, and how each mode can be selected.

Don’t forget the tripod

“I really didn’t think I would need my tripod” are words that usually begin a sad story about how a potentially great shot was missed. In most wildlife and nature photography situations, a tripod is always a good idea. It’s better to have access to a tripod and not need it than to need it and not have one available. Find the lightest and most compact tripod that is sturdy enough to handle your camera setup.

Learn so you can prepare. Prepare so you can photograph. Photograph so you can grow.

Photographing wildlife can be difficult, but it can also yield huge artistic, personal, and even spiritual rewards. So go out and have fun doing what you do, but don’t forget to put the camera down every now and then to enjoy the world around you.

“Nature never goes out of style.” – Unknown

The post Nature and Wildlife Photography Tips for Beginners appeared first on Digital Photography School. It was authored by Adam Welch.


Digital Photography School

 
Comments Off on Nature and Wildlife Photography Tips for Beginners

Posted in Photography


Landscape Photography: Complete Guide for Beginners; Equipment, Settings, and Tricks

26 Aug

The breathtaking landscape before you is just begging to be photographed. The only problem is that you don’t know how to do it. You try taking a few images, but upon reviewing them your disappointment sinks in. They don’t hold a candle to the real thing — and they certainly don’t look like those gorgeous landscape images that show up Continue Reading

The post Landscape Photography: Complete Guide for Beginners; Equipment, Settings, and Tricks appeared first on Photodoto.


Photodoto

 
Comments Off on Landscape Photography: Complete Guide for Beginners; Equipment, Settings, and Tricks

Posted in Photography


A Beginner’s Guide to Focus Stacking

25 Aug

The post A Beginner’s Guide to Focus Stacking appeared first on Digital Photography School. It was authored by Bruce Wunderlich.

Other than for special effect, photographers generally do not want out-of-focus images. But sometimes, regardless of which camera settings are used, not every detail of an image can be captured tack sharp.

The depth of field (DOF) can be so shallow that interesting aspects of the photos are without sharpness. A smaller aperture may be used to increase DOF, but moving the aperture farther from a lens’s sweet spot introduces lens diffraction into the image, again resulting in some fuzziness. Also, if stopping down the camera’s aperture, the shutter speed will need to be increased and blurry images may result. Increasing ISO to help with the exposure will introduce digital noise to the image.

So how do you shoot with the best aperture and shutter speed combination and get sharp images from the front to the back of an image? A technique that can help resolve this problem is called focus stacking.

Here’s some helpful info about this technique.

13 image Focus Stack

A 13 image focus stack.

What You Need

  • A tripod.
  • A DSLR camera capable of shooting in manual mode. It is possible to use a point and shoot camera, but it must have a manual mode and manual focus capabilities.
  • A depth of field app (which is helpful but not required).
  • Photoshop or another focus stacking software.

How to Shoot for Focus Stacking

Focus stacking is similar in principle to HDR photography. However, with focus stacking, images are captured with different focus points and later combined in Photoshop; this is in order to create an image with more DOF than would be possible with a single exposure. Landscape and macro photography are two genres of photography that benefit most from using this procedure.

But be warned: Calm winds and reasonably stationary objects are a must!

Before beginning to shoot, it is always helpful to know a lens’s sweet spot, defined as the aperture at which the lens produces its sharpest image. (It is usually found about two to three stops from wide open.) Experiment until this important setting is determined.

6 image Focus Stack

Landscape

There are two basic scenarios when shooting landscapes that may benefit from focus stacking.

The first is when the subject is a close foreground object with an interesting background, and you want both these elements to be in sharp focus.

The second is when using a telephoto lens (which typically has a shallow depth of field) and the subject covers multiple distances that may be brought into sharper focus.

(FYI: If shooting a landscape with a wide-angle lens, the DOF may be deep enough to capture a sharp image that doesn’t require focus stacking.)

Here is a little trick to find out if focus stacking will benefit an image when photographing a scene or subject:

After composing the image, set the focus point about one third into the image. Then, using Live View, enlarge the image and check to see if the foreground and background are sharp or blurry. If either image isn’t in focus as sharply as desired, the image could benefit from focus stacking.

Steps for Shooting Landscapes for Focus Stacking

  1. Place the camera on a sturdy tripod; this is a must!
  2. Frame the subject and compose the shot.
  3. Determine exposure for the scene and set the camera to manual mode to ensure that the exposure is constant for every image.
  4. Set the camera to Live View and aim the focus point at the nearest object you want in focus. Use the camera’s zoom (the plus button, not zoom on the lens) to preview the focus through Live View. Then switch to manual focus and use the focus ring to fine-tune for sharpness if necessary.
  5. Take the first exposure.
  6. Without moving the camera or adjusting any settings, move the focus point to an object mid-way in the image and refocus.
  7. Take the second exposure.
  8. Again, without changing anything, refocus on an object at the farthest point of the intended image.
  9. Take the third exposure. To capture landscapes, three images are generally all that is necessary to create sharp focus stacking images, but it’s completely fine to take extra images to make sure that the entire scene is covered. A rule of thumb would be to add more images for longer focal lengths. Be aware that extra images will take longer to process in post-production. If available, check the DOF with a Smartphone app in order to figure out how many images will be necessary to get every aspect of the photo in focus.
Using three images focus stacking. The first image was focused on the fence, the second was focused mid-way into the image, and the third was focused on the front of the house.

The first image was focused on the fence, the second was focused midway into the image, and the third was focused on the front of the house.

Macro Photography

Macro photography can benefit from focus stacking more than any other type of photography, because a macro lens has an extremely shallow depth of field.

So here’s what you do:

  1. Place the camera on a sturdy tripod – a must!
  2. Frame the subject and compose the shot.
  3. Determine the exposure for the subject, and set the camera to manual mode to ensure that the exposure remains constant for each and every image.
  4. Set the camera to Live View and aim the focus point on the nearest object you want to be in focus. Use the camera’s zoom (the plus button, not a zoom on the lens) to preview the focus through Live View. Then switch to manual focus and use the focus ring to fine-tune for sharpness, if necessary.
  5. Take the first exposure.
  6. Without moving the camera or adjusting any settings, move the focus point to a distance slightly farther away from the lens. Remember that DOF in macro photography will be measured in fractions of an inch, instead of in feet (as in landscape photography).
  7. Repeat step 6 as many times as needed to cover every aspect of the subject’s DOF. This could range from as few as six images to 30+ images. Make sure the entire subject is covered or the results may be unusable. If available, check a DOF app on your smartphone to figure out how many images will be necessary to get every aspect of the photo in focus.
By focus stacking the flowers only and leaving the background out of focus makes the flowers stand out in the final image.

Focus stacking the flowers only makes the flowers stand out from the background.

Image on right is a single image capture at 85mm focal length. Image on right is a 12 image focus stacked image. Each image had a DOF of less than one inch.

The image on left is a single image capture at 85mm focal length. The image on right is a 12-image focus stack. Each image had a DOF of less than one inch. Note the additional detail in the image on the right compared to the single image.

Tip: Take a shot with your hand in front of the camera before and after each series of images. When working with the images later, this will make it easier to tell where each series starts and ends.

Use you hand to mark the beginning of each series of images, this will make processing you images much easier.

Use your hand to mark the beginning of each series of images. This will make processing your images easier.

Processing the Final Images

Processing the files to achieve the final image may seem like the most difficult part of creating a focus-stacked image, but it’s really very simple to do in Photoshop. Here’s how:

  1. Open Photoshop
  2. Get each image on a separate layer. Under File, choose Scripts and Load Files into Stack. Click Browse and select all the images.
  3. Check the Attempt to Automatically Align Source Images box.
  4. Click OK and each of the images will open into a new layer in Photoshop.
  5. Open the Layer palette and select all layers.
  6. Under Edit, select Auto-Blend Layers.
  7. Check the box for Stack Images and Seamless Tones and Colors. Optionally, select Content-Aware Fill Transparent Areas, which will fill any transparent areas generated by aligning images in step 3. (Be aware that this will increase processing time. Generally, I do not choose this option; rather, I just crop the image slightly later, if necessary.)
  8. Click OK
  9. Flatten the image by selecting Layer>Flatten Image and save.

Focus-stacking-1

Note: If you are using a Lightroom and Photoshop workflow, after importing your images into Lightroom, instead of following steps two through five, you can simply add all your images into Photoshop as layers. Just select all your images, then go to Photo>Edit In>Open as Layer In Photoshop.

This will open all the selected images as layers. You will then have to align your images by selecting all the layers in the layer palette, then go to Edit>Auto Align Layers. Finally, continue at step six above.

Summary

It is nearly every photographer’s intention to capture the sharpest images possible, and focus stacking can be another tool to help you achieve that goal. The trick to this whole process is to take enough focused images to create a final photo that is in focus from foreground to background.

The results can be amazing once you get the hang of it; make sure to give it a try!

The post A Beginner’s Guide to Focus Stacking appeared first on Digital Photography School. It was authored by Bruce Wunderlich.


Digital Photography School

 
Comments Off on A Beginner’s Guide to Focus Stacking

Posted in Photography


Macro Photography for Beginners

18 Aug

The post Macro Photography for Beginners appeared first on Digital Photography School. It was authored by Barrie Smith.

The advent of digital photography swept away one of the most challenging problems in image capture: how to shoot macro without a pile of specialised gear. Now you can get down, dirty, and close in the image capture business, and make macro the digital way with a 100 percent success rate.

ngeblues by Alfian Ismail on 500px.com

I know I’m not alone when I say that macro photography is an absorbing activity: to be able to reach into ‘near space’ and record an image that is not easily visible to the naked eye is an attractive option. There is nothing more satisfying than to make a huge print of an insect, mineral specimen, or any small object that is normally so tiny to the naked eye and captured with the technique of macro photography.

To shoot macro in the days of film — aside from the requirement of using an SLR camera — you needed a few add-ons to take highly magnified images of extremely small subjects.

You could begin by slipping a diopter lens to the front of the existing standard lens, which would impart a degree of magnification; you could also install extension tubes between your normal lens and the camera body; you could also acquire a set of macro bellows and place them between lens and body; and finally, you could invest in a fairly expensive — and optically superb — macro lens that was dedicated to macro shooting. Another option was to fit a reversing ring that allowed you to mount the lens on backward, which improved the close-up resolution and allowed you to focus much more closely. But to be honest, it was a hassle — although you can still use these methods if using a DSLR to shoot macro.

These days, digital does it with a dash! With a digital camera — compact, mirrorless, or DSLR — even newbies are surprised by how easy it is to capture really, really big shots of tiny subjects.

In truth, you can make digital macro photography as basic or as complex as you wish it to be. Even with a budget camera, you can capture images of the tiny world before you, subjects as small as a matchbox, a match-head, or even tinier. The higher-priced compact digital cameras can do it even better, some offering macro shooting with a powerful zoom lens, so you can stand back a bit.

The other approach is to use a DSLR or a mirrorless model; it is surprising how powerful a macro camera circa-$ 1200 USD can become.

Grasshoper macro photography. Image by macropoulos

Image by macropoulos

What is macro photography?

First, an explanatory note for all those with a modicum of photo history and tech basics: the term macro used to refer to the capture of an insect or whatever that resulted in an image on the 35mm film frame (24x36mm) that ranged from 1:10 to 1:1 the size of the original subject. The term micro referred to a film image that was larger than 1:1; micro photography could easily give you a 35mm film image of an ant that was itself larger than the original ant.

A CCD or CMOS sensor can be as tiny as 3x4mm, so any definition term that applied in the film days is now obsolete. But the rules that apply in accomplishing successful and satisfying macro photography still stand.

Normal photography works in using a camera to record a sharp image by adjusting the lens-to-sensor distance to attain precise focus. For distant subjects at infinity, like landscapes, the lens is positioned at a minimum lens-to-sensor distance; to capture sharp images of closer subjects, like people, the lens-to-sensor is increased.

In macro photography, a sharp image of a tiny object requires the lens to be positioned much closer still, with the lens moved even further out than for normal photography.

Just about all compact cameras and some DSLRs have a selectable macro mode. In some cameras you can select the macro mode via an external control, while in others you must select it in the internal menu.

Think about it: no extra lenses, no macro tubes or bellows, no special lenses. What a wonderful world in which to shoot macro!

Flower macro photography. Image by macropoulos

Image by macropoulos

Tips for macro photography beginners

Being curious about how digital cameras can capture macro so easily, I investigated the subject. Here are my findings, gained by chatting to the tech expert at a major camera company.

Engage macro mode on a digital camera, and the system adjusts the lens elements to re-arrange them into an array that best suits close focusing. Quite a feat, as even simple camera lenses have a surprising number of lens elements to juggle.

Unfortunately, by engaging macro mode with the vast majority of cameras, you lose control of both the lens aperture (f-stop) and shutter speed.

Why is this so important?

The best macro photography — regardless of camera — requires that you use the smallest lens aperture to gain optimum image sharpness and depth of field. Using a small lens aperture means you need more light, so you need to extend the exposure time to make a correctly exposed photograph.

So you can’t reduce the lens aperture to a smaller, more favorable setting, nor can you slow the shutter speed to permit the use of a smaller lens aperture.

For the keen macro makers, I’ve discovered a few digital cameras that do allow the use of macro mode and lens and shutter speed adjustment.

With DSLR cameras, the macro operation is somewhat different. Select a macro mode and you activate a different chain of events: With any lens fixed to the camera, engaging macro mode on the camera commands the lens aperture to close to its minimum, therefore extending the depth of field and allowing you to move closer to the subject.

Shooting macro with a compact camera is easy, but you have to forgo a fair bit of control, and you need to understand that the demands of an amateur as far as resolution and color quality are less stringent than the pros.

The pro approach would be to use a purpose-built macro lens on a DSLR or mirrorless camera. Dedicated macro lenses are not cheap, but they are optimized to operate at closer than normal distances. With macro lenses, you are unlikely to experience problems such as color fringing and optical distortion; many macro lenses also compensate for the additional exposure necessary when racking out the lens to distances very different from those used in normal photography.

Read the second part of this series here: Macro Photography for Beginners, Part 2.

Flower macro photography example. Image by ecstaticist

Image by ecstaticist

The post Macro Photography for Beginners appeared first on Digital Photography School. It was authored by Barrie Smith.


Digital Photography School

 
Comments Off on Macro Photography for Beginners

Posted in Photography


10 Tips & Tricks to Make Your Instagram Images Look Beautiful For Beginners

29 Jul

Instagram has undoubtedly become one of the most popular image sharing sites. It is also a sweet spot for photographers and enthusiasts looking to get their pictures noticed. Of course, the popularity of Instagram has led to fierce competition. To help you stand out on this social media platform, I decided to share some Instagram photo tricks to make your Continue Reading

The post 10 Tips & Tricks to Make Your Instagram Images Look Beautiful For Beginners appeared first on Photodoto.


Photodoto

 
Comments Off on 10 Tips & Tricks to Make Your Instagram Images Look Beautiful For Beginners

Posted in Photography


Understanding Depth of Field for Beginners

28 Jul

The post Understanding Depth of Field for Beginners appeared first on Digital Photography School. It was authored by Bruce Wunderlich.

Depth of Field for Beginners

You may have heard the term depth of field (DoF), but if you are new to photography you may not yet be taking advantage of how DoF can enhance your photos.

A basic definition of depth of field is: the zone of acceptable sharpness within a photo that will appear in focus. In every picture there is a certain area of your image in front of, and behind the subject that will appear in focus.

Understanding depth of field in photography.

This zone will vary from photo to photo. Some images may have very small zones of focus which is called shallow depth of field.

Here’s a series of images with very shallow depth of field.

Others may have a very large zone of focus which is called deep depth of field.

Here’s a collection of images with much deeper depths of field.

Three main factors that will affect how you control the depth of field of your images are: aperture (f-stop), distance from the subject to the camera, and focal length of the lens on your camera. Here are some explanations and answers to other common questions concerning depth of field.

How does aperture control depth of field?

Aperture refers to the access given to light from the lens to the camera sensors. The size of your aperture (the diameter of the hole through which light enters the camera) controls the amount of light entering your lens. Using the aperture (f-stop) of your lens is the simplest way to control your depth of field as you set up your shot.

Large aperture = Small f-number = Shallow (small) depth of field
Small aperture = Larger f-number = Deeper (larger) depth of field

It may be easier to remember this simple concept: The lower your f-number, the smaller your depth of field. Likewise, the higher your f-number, the larger your depth of field. For example, using a setting of f/2.8 will produce a very shallow depth of field while f/11 will produce a deeper DoF.

The image on the left was captured at 250th of a second at F5.0 which resulted in a very shallow depth of field,

The image on the left was captured at 250th of a second at f/5.0 which resulted in a very shallow depth of field.  Because of this the background is out of focus allowing the subject to stand out. The image on the right was captured at 1/5th of a second at f/32 which created a deep depth of field and a sharper background.

How does distance control depth of field?

The closer your subject is to the camera, the shallower your depth of field becomes. Therefore, moving further away from your subject will deepen your depth of field.

How does the focal length of a lens control depth of field?

Focal Length refers to the capability of a lens to magnify the image of a distant subject. This can get complicated, but the simple answer is that the longer you set your focal length the shallower the depth of field. Example: Your subject is 10 meters (33 feet) away, using a focal length of 50mm at f/4; your depth of field range would be from 7.5 -14.7 meters (24.6-48 feet) for a total DOF of 7.2 meters (23.6 feet). If you zoom into 100mm from the same spot, the depth of field changes to 9.2-10.9m (30.1-35.8′) for a total of 1.7m (5.7′) of depth of field. But if you move to 20m (66′) away from your subject using the 100mm lens, your depth of field is almost the same as it would be at 10 meters using a 50mm lens.

Image of a swan hiding in the tall grass captured from about 5 meters with 300 mm focal length created a DOF only about 5cm.

This image of a swan hiding in the tall foliage was captured from about 5m (16′)  with a 300mm focal length lens. This combination of focal length and distance created a depth of field of approximately 5cm (2″).

What if I just have a point and shoot camera, or don’t know how to change those settings?

Even with a point and shoot camera, there are ways to control your depth of field. In the Scene Modes menu, look for a symbol of a human head, which is the setting for portraits. This will give you a narrow depth of field. In the same menu there is also a mountain symbol, which is a setting for landscapes, which will give you a deeper depth of field.

If you are a beginner with a DSLR there are some simple ways you can control depth of field and still use and automatic shooting mode. By choosing Aperture Priority mode you can set your aperture to get the depth of field that you want, and the camera will automatically set the shutter speed.

Can I set the depth of field exactly for each situation?

Yes, but because changing your aperture affects your shutter speed, the result may not meet the needs of your image. For instance, if you are trying to increase your depth of field by reducing aperture size you will also need to increase (slow down) your shutter speed which could make your image blurry. Understanding how all these settings work together can increase your control over depth of field.

Is depth of field equally distributed in front and back of my focus point?

No, it’s usually about one third in front and two thirds behind your focal point, but as your focal length increases it becomes more equal.

How will understanding depth of field improve my images?

Managing depth of field is one of the most important tools at your disposal, because having tack sharp images is one of the most important factors to getting that great shot. Knowing how to make the parts of your image you want sharp and the parts you want to be out of focus, is a great artistic tool to create great images.

Getting the right DOF for your shot can make the difference

Getting the right depth of field for your shot can make all the difference.

When should I use a shallow depth of field?

Using a shallow depth of field is a good way to make your subject stand out from its background and is great for portrait photography. Shallow DoF can also be useful in wildlife photography, where you want the subject to stand out from its surroundings. This is also useful because many wildlife photo opportunities are low light situations, and increasing your aperture size will give you more light. Shallow depth of field is also effective for sports photography where many times you want to separate the athlete from the background to bring attention to them. The result of this should also help give you a fast enough shutter speed to freeze the action.

This image captured at 300mm focal length and F/ produced a very shallow DOF. Because of this very shallow DOF it is important to set your focal point on the eye. Notice how the bird appears to pop out from the background.

This image captured at 300mm focal length and f/5.6 produced a very shallow depth of field. Because of this, it is important to set your focal point on the subject’s eye. Notice how the bird pops out from the background.

When should I use deeper depth of field?

In landscape photography it is important to get as much of your scene in focus as possible. By using a wide angle lens and a small aperture you will be able maximize your depth of field to get your scene in focus.

In this landscape captured at 50mm at F/16 Focus point was set at 8 meters which made everything from 4 meters to infinity in focus

This landscape was captured with a 50mm focal length at f/16. The focus point was set at 8 meters, which made everything from 4 meters to infinity in focus.

How can you determine depth of field?

There are several on-line sites that will provide depth of field charts for your camera and lenses. Also, there are a number of apps available for smart phone users that can calculate it for you while you’re in the field. Most cameras have a DoF preview button which will give you a preview as you look through the eye piece. (This is probably the easiest and most under-utilized method.) Using this button may cause your image to appear darker as you view it through the eye piece, but not to worry. Your image will be properly exposed as long as you have the correct exposure settings.

Can depth of field be adjusted to get everything in focus?

Yes, using what is called the hyperfocal distance. When you are focused at the hyperfocal distance, your depth of field will extend from half the distance to your focal point to infinity. Use a DOF calculator to find your hyperfocal distance. If you don’t have a DoF calculator, a good rule of thumb is to focus a third of the way into the scene. Using an aperture of about f/11 or higher with a wide angle lens will maximize your depth of field.

What about depth of field in macro photography?

Because most macro images are produced in low light and with a longer focal length, the depth of field is often very shallow. Adjust your lens to the smallest aperture that the light will allow. It may also be necessary to increase your ISO to allow you to properly expose the image and to maximize your depth of field. Still, in many macro images your DoF may be very minute. With this very narrow focus it becomes necessary to use a tripod, because even the slightest movement of the camera will move your macro subject outside your depth of field.

120 mm Marco at F8 still is a very shallow DOF with the lens only 15 cm from the focal point on the front flower.

This 120 mm macro even at f/8 still has a very shallow depth of field.

What is bokeh?

Bokeh (boh-ke) comes from the Japanese word meaning blur. This effect is produced by the out-of-focus areas in your image that are beyond the depth of field. Bokeh commonly refers to the pleasing circle shapes caused by the shape of the lens aperture. Usually created when shooting with your aperture wide open, such as f/2.8, bokeh can also be created with smaller apertures if the background is distant enough.

Learn more about how to get beautiful bokeh in your images here.

Bokeh in this image caused by the distance from the subject to the background which fell well beyond the DOF

Bokeh in this image was created by the distance of the subject to the background, which fell well beyond the depth of field.

To summarize controlling depth of field:

Increase depth of field

  • Narrow your aperture (larger f-number)
  • Move farther from the subject
  • Shorten focal length

Decrease depth of field

  • Widen your aperture (smaller f-number)
  • Move closer to the subject
  • Lengthen your focal length

Take control of your depth of field. Understanding how these adjustments control your it will greatly improve your photography. What questions do you have about depth of field? Please share your photos and comments.

Recommended Reading for Beginner to Intermediate Photographers

If you enjoyed reading this tutorial we’ve put together a series of comprehensive advice for photographers:

  • Ultimate Guide to Photography for Beginners
  • Ultimate Guide to Landscape Photography
  • Ultimate Guide to Taking Portraits and Photographing People
  • Ultimate Guide to Nature and Outdoor Photography
  • Ultimate Guide to Street Photography
  • Ultimate Guide to Getting Started in Lightroom for Beginners
  • Ultimate Guide to Fine Art Photography
  • Ultimate Guide to Photography Terms and Common Words

The post Understanding Depth of Field for Beginners appeared first on Digital Photography School. It was authored by Bruce Wunderlich.


Digital Photography School

 
Comments Off on Understanding Depth of Field for Beginners

Posted in Photography


Beginners Tips for Night Sky and Star Photography

21 Jul

The post Beginners Tips for Night Sky and Star Photography appeared first on Digital Photography School. It was authored by Phillip Van Nostrand.

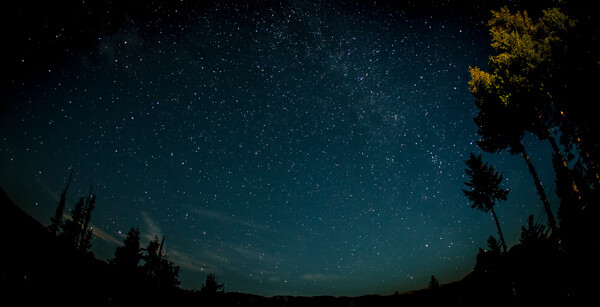
Star Photography

My favorite type of personal photography is taking night shots of the stars (long exposure pictures). I am often busy shooting pictures of people at weddings, or apartments, or models, and it’s important for me to make sure I take pictures for fun regularly. Taking pictures for no one other than myself is highly rewarding, soul filling, and fun! I also love taking travel photos and HDR photos, in this article we will take a close look at exactly how you can take your own epic star photographs.

star photography
30 seconds at f/2.8, ISO 1250

What you need to take jaw-dropping pictures of stars

To take your star pictures, you only need three things:

  1. a full-frame camera (for better ISO capabilities)
  2. a fisheye lens (for the widest view of the sky)
  3. a tripod (for stability during 15 second photos)

(Note: You can do this with a cropped sensor camera, without a tripod, and without a fisheye lens. It will just be a little harder and slightly less jaw-dropping)

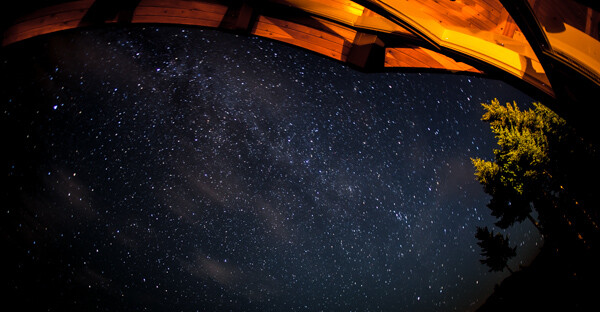
star photography
25 seconds at f/2.8, ISO 1600

Camera settings

You can nail this shot almost every time with these settings:  25 second exposure, f/2.8, ISO 1600

If your lens doesn’t open up to f/2.8 you can try 30 seconds at f/4 with ISO 1600.

Note: this kind of photography won’t work if there is a full moon out (or even a half moon). Don’t compete with large light sources, the stars will be over powered. The best location for star photography is way out in nature, away from city lights that cause “light pollution.”

star photography
13.0 seconds at f/2.8, ISO 1600

Why to use these settings

The most important component of these settings is the 25-second exposure. An exposure longer than about 25 seconds will start to show star trails. Photographing star trails is a legitimate type of photography on its own, but not the type of photography you are trying to do here. Since you are limited to about 15-25 seconds max shutter speed, you still need to let in more light.

The largest aperture you can find on a fisheye lens is f/2.8, and still, your picture might not be quite bright enough to look stunning. So this is where the ISO comes into play. On a full-frame camera like the 5D Mark III or the Nikon D800, you can bump the ISO up to around 2000 without seeing much noise.

You’ll learn how to reduce noise in Lightroom in the next section for a super clean photo.

star photography

Editing in Lightroom

I do extensive retouching in Lightroom after I take my photos. I’ll usually boost the exposure up by a stop or more, and I’ll use Noise Reduction under the Detail section to reduce any unwanted “noise” (those pesky extra white, red or blue pixels that show up when you push the ISO too high).

Here is a standard star photo of mine and the Lightroom settings I used to create it:

star photography
25 seconds at f/2.8, ISO 1600

Here are the Lightroom settings I used to edit the above photo:

star photography
star photography

1) You can see in the first panel that I bumped the whites up to +46 and brought the blacks down to -52. I really wanted to emphasize the stars against the dark sky and this is a good way to do that. Pushing the clarity up to +55 also helps define the stars against the sky, making them nice and crispy. I boosted the saturation to bring out any colors that are in the sky.

2) In the second panel, you can see that I sharpened up the image a bit, also to emphasize the stars. At the same time, I brought up the noise reduction to 33 to smooth out some of the noise that might show up, and I brought up the color to 25 for the same reasons.

Pro tips

star photography

Here is where you can have fun with the editing. Play around with the split toning sliders to make the colors in your sky appear magical. In the photo above you can see a little bit of turquoise in the lower part of the sky, and that comes from boosting that color in the Shadows of the Split Toning slider here:

You can also affect the color of the sky by playing around with the temperature and hue sliders to get some pretty magnificent looking star photos. Take a look at this one photo rendered three different ways:

star photography

Another pro tip that you may have noticed in all of the photo examples I gave here is this – shoot your stars in context. It really tells a great story to see a silhouette of a pine tree or a house in the background, and it shows the magnitude of the scene when you have an object in the foreground to compare to the stars.

Lastly, make sure you know which direction the Milky Way is. You can use an app like Sky Map to see exactly what stars are in the sky above you.

Have fun shooting, and please share your pictures below!

star photography

The post Beginners Tips for Night Sky and Star Photography appeared first on Digital Photography School. It was authored by Phillip Van Nostrand.


Digital Photography School

 
Comments Off on Beginners Tips for Night Sky and Star Photography

Posted in Photography


A Beginner’s Guide to Layer Masks in Photoshop

17 May

The post A Beginner’s Guide to Layer Masks in Photoshop appeared first on Digital Photography School. It was authored by Simon Ringsmuth.

dps-layer-masks-in-photoshop

Adobe Photoshop has so many buttons, tools, and options it can seem overwhelming and intimidating to beginner photo editors. Rather than diving into the deep end and trying to learn every possible tool all at once, I recommend a more measured approach. Pick one thing and learn that, and then move on to the next tool or technique. And learning Layer Masks in Photoshop is one of the most important and useful tools for any editor.

layer masks in Photoshop high school senior
High school senior, class of 2017. There is no number 17 on his shirt. I added it in Photoshop with layer masking. Nikon D200, 50mm, f/1.8, 1/90 second, ISO 200.

In 1994, Photoshop Version 3 introduced a concept that blew the doors off the image editing industry: layers. This allowed editors to stack multiple image elements on top of each other to form a complete picture. This is all well and good, but what if you put one layer on top of another layer and still want to see something on the layer below?

You could use the Eraser tool to remove part of the top layer, which is what I used to do when I first started using Photoshop years ago.

A much better solution is to use a Layer Mask, which lets you show and hide any part of a layer. Instead of using the Eraser tool, you use the Paintbrush (or other tools) to make any part of a layer visible, invisible, or transparent.

As an example, here’s a picture of a truck on a farm. It’s alright, but the sky behind the truck isn’t very dramatic.

layer masks in Photoshop truck on the prairie
Nikon D750, 95mm, f/2.8, 1/3000 second, ISO 100

What if I replaced the boring blue sky with this dramatic sunset? Surely that would be a much more interesting photo, and maybe help the farmer sell his truck too.

layer masks in Photoshop dramatic sunset
Fuji X100f, 23mm, f/16, 30 seconds, ISO 200

If the pictures of the truck and sunset are stacked in Photoshop, the truck is visible but not the sky. This is where Layer Masks in Photoshop can save the day! You can use a mask on the truck layer and then edit it to remove the sky. This would leave the truck visible but the sunset showing through.

layer masks in Photoshop
Layers are fundamental to the image editing process in Photoshop. Layers are on top are visible, whereas layers underneath cannot be seen unless some parts of the layers on top are visible.

To add a Layer Mask, click the top layer (in this case, the truck) and choose Layer>Layer Mask>Reveal All.

Alternatively, click the Layer Mask icon at the bottom of the Layers panel.

layer masks in Photoshop
The rectangle with a circle icon will add a layer mask to the selected layer.

At this point, nothing in the picture has changed because the entire layer is still visible, and nothing has actually been masked out. This is why the menu command is “Reveal All.”

The layer mask shows the entire layer to which it is applied. At this point, you can use any number of methods to remove portions of the layer you are working on.

layer masks in Photoshop
The white rectangle is your layer mask. Click on it to select the mask, and then you can start hiding portions of the layer which it is attached to (in this case, the Truck layer).

My preferred method to show and hide Layer Masks in Photoshop is to use the Brush tool. Press the ‘B’ key on your keyboard or click the Brush tool icon on the left-side toolbar. Then start brushing the portions of the layer that you want to make invisible, just as though you were using an eraser.

layer masks in Photoshop layer mask erasing
Brushing the layer mask will reveal whatever is beneath the layer. Here you can see how, after a few brushstrokes, the sunset layer is starting to show through.

Notice how any part of the mask that you erase is also reflected in the thumbnail. Black portions are where the mask has been eliminated, which is a subtle but useful indicator of the work you are doing on the mask.

layer masks in Photoshop
As you apply the brush to portions of the mask, the mask thumbnail is updated accordingly.

To completely remove the sky behind the truck, I used the Quick Selection tool to select the sky. Then I switched back to the Brush tool and brushed over the entire selected area.

layer masks in Photoshop layer mask demonstration with errors to fix
It worked! The original sky is gone, replaced with a dramatic sunset. But there are some errors that I still need to fix.

At this point, a Layer Mask probably seems much more complicated than just using the Eraser tool. If you want to erase part of an image, why over-complicate the matter with masks and brushes and selections? Layer Masks provide an enormous advantage in that you can un-erase whatever you want just as easily.

With the Brush tool selected, press the ‘X’ key to invert your brush, and you can now put everything you erased back. Use the ‘[‘ and ‘]’ keys to change the size of the brush, and the ‘Z’ key to zoom in on portions of the image to get the finer details.

layer masks in Photoshop modifying the layer mask
Invert the brush tool by pressing the X key to un-erase any part of the layer.

All the normal controls for brushes can be used when working with layer masks – opacity, smoothing, etc. This makes Layer Masks in Photoshop incredibly powerful and exponentially more useful than just using the eraser tool.

layer masks in Photoshop
It still needs some touch-ups, but it’s a lot better than before thanks to the flexibility of layer masks.

Layer Masks can do so much more than replacing the sky. They can be used to combine any number of images, layers, and effects.

I created the picture at the top of this article with Layer Masks in Photoshop in just a few minutes. It started with the picture below of a high school senior wearing a blue shirt. Since this young man graduated in 2017, I wanted to put a 17 on his shirt. Photoshop made it easy.

layer masks in Photoshop high school senior blank shirt
A high school senior, Class of 2017. A nice big 17 would look good on his shirt.

I started by using the Fyra font for the number 17. I set the color to white and used the Soft Light blend mode to make the number look like it was part of the shirt, not just sitting on top of it. The young man’s crossed arms presented a challenge, but one that was easily solved in seconds thanks to layer masks.

layer masks in Photoshop high school senior number 17 without mask
What to do about his arms? Layer Masks to the rescue!

With the base layer selected, I chose the Lasso tool and selected the portion of the picture containing the arms. Then with that selection active, I right-clicked on the image and chose “New Layer via Copy.” This created a new layer in my Layers panel, which I moved to the top of the list by clicking and dragging.

layer masks in Photoshop

With the new layer selected in my Layers panel, I went to the Layer menu and selected Layer Mask>Reveal All. This created a new masking layer, much like the truck and sunset example, that I could use to show and hide whatever portions of the arms I wanted to.

layer masks in Photoshop
Click the white box next to Layer 1 to edit the layer mask for the top layer.

With the new Layer Mask in place, the rest of the operation was fairly simple.

I zoomed in on the image to get a closer view by pressing ‘Z’ and then clicked on the arms. Then I pressed the ‘B’ key to select my Brush tool and used the [ and ] keys to get the right size. As I brushed out the part of the top layer I did not want, I pressed the ‘X’ key to switch back and forth between erasing and un-erasing. This makes it very simple to perform fine adjustments to your layer mask.

layer masks in Photoshop
Brush options such as Opacity and Smoothing can be used to perform edits to your layer mask with surgical precision.
layer masks in Photoshop fine adjustment to layer mask
With one hand on your mouse and another hand on the X key, you can quickly show and hide whatever part of your layer that you want.

Using layer masking instead of just erasing portions of an image means you can continue to manipulate your image as separate layers even after you have made your edits. Watch how the number 17 can be moved and resized without any additional editing or erasing. This is possible because the arms are a separate layer in front of the number, and the blue part of the arms layer has been erased or masked out.

layer masks in Photoshop transform layer

Reading through all these steps to learn Layer Masks in Photoshop might seem kind of overwhelming. If you follow along step by step, it’s a lot easier than it seems. Also, there are hundreds of ways to edit layer masks to create compositions you probably thought were previously unattainable.

If you have never tried using layer masks in Photoshop, I recommend giving it a try, and see where your creativity takes you. You might find that it opens up a door to entirely new types of artistic expression and editing possibilities.

Share your results with us in the comments below!

The post A Beginner’s Guide to Layer Masks in Photoshop appeared first on Digital Photography School. It was authored by Simon Ringsmuth.


Digital Photography School

 
Comments Off on A Beginner’s Guide to Layer Masks in Photoshop

Posted in Photography


9 Solutions for Common Camera Mistakes Beginners Make

28 Apr

The post 9 Solutions for Common Camera Mistakes Beginners Make appeared first on Digital Photography School. It was authored by Kevin Landwer-Johan.

dps-common-camera-mistakes featured image

One of the most common camera mistakes beginner photographers make is to not learn to use their new camera well. Photography is about the only art-form you don’t need to practice to get a half-decent result.

Woman with a DSLR camera illustrating common camera mistakes
© Kevin Landwer-Johan Nikon D800, 50mm f/1.4, 1/320 sec, f/2.8, ISO 500, Manual Mode, Pattern Metering.

You can pop a battery in your brand new camera, turn it on and set it to one of the scene modes and take a picture. Most often, the photo will be reasonably well exposed – not too light or too dark. You might be pretty happy with the results and initially think you don’t need to learn much to be able to take photos.

Buying your first musical instrument or learning to paint will be much more challenging. Most people can’t pick up a guitar and play a tune without having some understanding of music theory. Most people certainly couldn’t play a recognizable tune without practicing. To learn to use your camera well, you must also practice with it.

1. Out of focus

One of the most common camera mistakes is poor focusing. Out-of-focus photos can’t be fixed during post-production. The only solution is to make sure you get your main subject sharp when you are taking your photos. Check that your auto-focus indicator is precisely where you want it to be before you press your shutter button.

I prefer to use single-point focus rather than multi-point focus. This allows me to choose exactly what part of my composition will be the sharpest. This is particularly important when you use very wide aperture settings, as the depth of field is so shallow.

Rooster isolated by DOF for common camera mistakes
© Kevin Landwer-Johan. Nikon D800, 85mm f/1.4, 1/400 sec, f/1.4, ISO 100, Manual Mode, Spot Metering.

2. Poor exposure

Underexposed and overexposed photographs are disappointing. Pay careful attention to your exposure as you are setting your camera up to take a photo. Make sure your main subject is being well exposed. This can be challenging in certain lighting conditions.

Backlighting your subject can often mean the camera will underexpose it. You need to adjust your exposure settings so your main subject looks the way you want it to. This may be different than how the camera’s exposure meter determines it to look.

novice monks meditating - common camera mistakes
© Kevin Landwer-Johan. Nikon D800, 35mm f/1.4, 1/125 sec, f/3.2, ISO 1000, Manual Mode, Pattern Metering.

3. Wrong white balance

Getting the wrong white balance means your photos will have an unnatural-looking color cast to them. The most practical fix for this is to use the auto white balance setting on your camera. This is the only auto setting I use most of the time because it’s most often correct.

Using manual white balance it’s very easy to forget to alter it. Even when you do, the setting you choose may not be the best when the light changes slightly. Using auto white balance can help you overcome one of the most common camera mistakes.

Mountain sunrise for common camera mistakes
© Kevin Landwer-Johan. Nikon D800, 105mm f/2.8, 1/250 sec, f/8, ISO 400, Manual Mode, Pattern Metering.

4. Motion blur

Using a faster shutter speed is the solution to unwanted motion blur in your photos.

Learning what shutter speed to use when photographing moving subjects is important. A person walking will not require such a fast shutter speed as a person running fast will.

Be aware of the relationship between your shutter speed and the speed of movement you want to capture. This will help you alleviate this problem.

Asian woman on a city walkway with motion blur - common camera mistakes
© Kevin Landwer-Johan. Nikon D700, 50mm f/1.4, 1/6 sec, f/16, ISO 100, Manual Mode, Pattern Metering.

5. Camera shake

Some people can handhold a camera at slower shutter speeds than others. Once the shutter speed is so slow you are experiencing blurring in your images, you need to make some choices. Either adjust your exposure controls so your shutter speed is faster, or use a tripod.

Male photographer
© Kevin Landwer-Johan. Nikon D7100, 35mm f/1.4, 1/80 sec, f/5, ISO 200, Manual Mode, Pattern Metering.

6. ISO is too high

One of the other common camera mistakes I see people making is using an ISO setting that is too high. Using a very high ISO, you will see digital noise, lack of contrast, and flatter colors in your photos.

The solution is to keep your ISO as low as possible. This will mean you get the best technical quality photos with the best color, contrast, and the least noise.

7. Dead battery

Always make sure you charge your batteries before you head out with your camera. Carrying fully-charged camera batteries is always a good idea. You never know when you might come across some fabulous event or happening that you want to photograph. Save yourself the disappointment of a dead battery by having some extra ones in your camera bag.

Woman at an out door shopping mall taking a photograph.
© Kevin Landwer-Johan. Nikon D800, 35mm f/1.4, 1/400 sec, f/2, ISO 100, Manual Mode, Spot Metering.

8. Card full

Being busy taking photos and all of a sudden not being able to is very frustrating. This is what can happen when your card is full. Make sure to off-load images on your card and format it after each photo session. This will mean you always have the maximum amount of space on your card.

Having some extra cards with you is a good backup strategy too. Finding your card full half-way through the day is so disappointing when you don’t have a spare.

You can always start deleting photos from your card. This is slow and you might make a mistake and delete a good image. Doing this in-camera, the process is irreversible and your images will be lost.

Thai drama action - common camera mistakes
© Kevin Landwer-Johan. Nikon D800, 105mm f/2.8, 1/250 sec, f/4, ISO 6400, Manual Mode, Pattern Metering.

9. Always on Auto

Always having your camera on one of the auto or scene settings is another of the most common camera mistakes I come across.

Most people who take our photography workshops come with their cameras on Aperture Priority because it’s easy. This is not a good reason to use this setting, and they are not happy with their photos. They know they are not getting the most from their camera.

The solution I encourage them to use is switching to manual mode and sticking with it. There’s no point in using manual mode only occasionally. If you do, you are unlikely to ever master it. If you commit to it, you will pick it up in no time. You will also begin to think differently about your photography in regards to light, exposure, and composition.

people in an old passage
© Kevin Landwer-Johan. Nikon D700, 20mm f/2.8, 1/100 sec, f/2.8, ISO 2000, Manual Mode, Pattern Metering.

Conclusion

Not all common camera mistakes result in ruined photos, but they can. Being aware of how you are setting your camera and the choices you make will help you overcome these problems.

Slow down and be mindful of what you are doing. Plan your photo session, and make sure you are well prepared for anything that might come up. Know your camera well, like a best friend.

The post 9 Solutions for Common Camera Mistakes Beginners Make appeared first on Digital Photography School. It was authored by Kevin Landwer-Johan.


Digital Photography School

 
Comments Off on 9 Solutions for Common Camera Mistakes Beginners Make

Posted in Photography