RSS
 

Posts Tagged ‘Beach’

Beach Please: Abandoned Surf Cincinnati Waterpark

28 Aug

[ By Steve in Abandoned Places & Architecture. ]

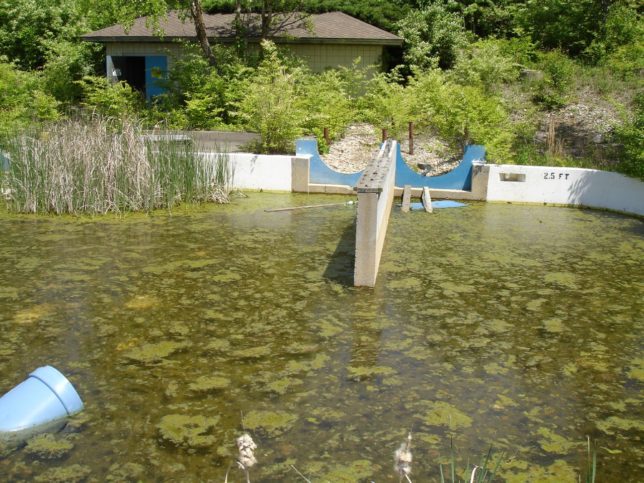
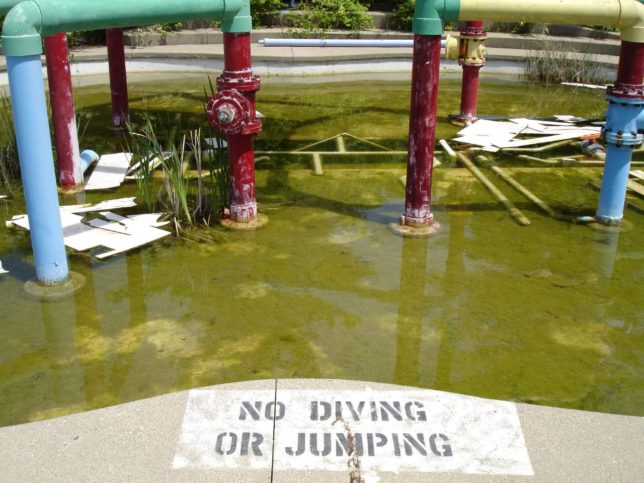
Wave goodbye to Surf Cincinnati, an abandoned water park and banquet hall complex that once entertained overheated Ohioans but now only breeds mosquitoes.

Cincy You’ve Been Gone

Plastic glass, jumbo shrimp, Surf Cincinnati? It may sound oxymoronic but the Surf Cincinnati water park conjured up a batch of bodacious beach blanket bingo in a place roughly equidistant from either ocean coast. A generation of wave-riding wannabe’s enjoyed the park’s many liquid-infused attractions until events conspired to shut the fun down at the end of the 2002 season.

Slip Slidin’ Away

Surf Cincinnati seemed to have it all when it opened in 1984. Situated on the border of Butler and Hamilton counties in far southwestern Ohio, the park complex boasted a huge wave pool, several kid’s pools, a winding “lazy river”, and an assortment of wild water slides built into the site’s rugged geological contours.

Six Feet Under

Water sports weren’t the be-all and end-all at Surf Cincinnati, however. Those who preferred their recreation on the drier side could partake in miniature golf or go-kart racing. When it came time to unwind, two spacious banquet halls (and later, a popular watering hole called “Caddies”) served up refreshments of the edible and drinkable persuasions. Sounds like a can’t-lose concept, right? Wrong…

Next Page – Click Below to Read More:
Beach Please Abandoned Surf Cincinnati Waterpark

Share on Facebook


[ By Steve in Abandoned Places & Architecture. ]

[ WebUrbanist | Archives | Galleries | Privacy | TOS ]


WebUrbanist

 
Comments Off on Beach Please: Abandoned Surf Cincinnati Waterpark

Posted in Creativity


6 Scenarios to Try for More Interesting Beach Photography

12 Aug

The post 6 Scenarios to Try for More Interesting Beach Photography appeared first on Digital Photography School. It was authored by Jeremy Flint.

Coastal adventures are a spectacular way to explore with your camera and to soak in the sea views and fresh sea air. There are so many amazing beaches and miles upon miles of coastline around the world or closer to home to entice photographers to the sea. Beautiful seascapes can vary from wide open clifftop vistas to picturesque harbors, tranquil ocean views, secluded coves, and even fishing villages. Here are 6 scenarios to try for more interesting beach photography:

1. Monumental views

Coastal adventures 01

Sailing boat at sea

Firstly, take in the bigger picture when capturing your seascapes.

Seek out and find those great sweeping ocean views that cover a wide expanse of sea. Be sure to use a wide-angle lens to photograph the scene too. By photographing the sea and sky, you can add another element to the scene to improve your photos.

An interesting sky also adds texture and atmosphere to the sea view and creates interesting beach photography.

2. Interesting patterns

Coastal adventures 02

Cornwall, England

During your adventures at the coast, look for interesting patterns and textures to photograph. You will find many details such as shells, patterns in the sand, and interesting rocks. Rockpools can be great subjects to focus your camera on to make dramatic beach photos.

Consider how your image may be affected by the tide and decide what you most want to achieve with the look of your photos. Shooting at high tide or low tide can alter the appearance of your image. At high tide, for example, some attractive rocks may look even better with the swell of the ocean circling them as opposed to when the tide is out, and the rocks separate from the sea. Try to time your visit to coincide with your photo objective. Alternatively, visit a location and plan a return visit when the tide levels are suitable.

3. Secluded coves

6-scenarios-to-try-for-more-interesting-beach-photography

Cornwall, England

Finding and photographing a secluded cove is a great way to spend your adventures capturing coastal scenes.

When photographing these wonderful locations, find a suitable vantage point from higher up, such as on a ledge or from beach level. Take care when photographing the sea and be careful when standing near cliff edges or moving over slippery rocks – they can be treacherous.

Another thing to be aware of is the tide times, which are very important for your own safety. If you can coincide your visit when the tides are receding this is usually a favorable time to prevent being trapped by the incoming seas or being caught out by a rogue wave.

4. Find hidden gems

6-scenarios-to-try-for-more-interesting-beach-photography

Cornwall, England

Think beyond the familiar landmarks when photographing the coast. There are endless opportunities and locations for you to discover.

One of the best ways to find new places is to explore the coast on foot. Instead of heading for the nearest beach, venture out for a long walk along the coastal paths. You never know what you might see. Behind every turn and headland, there are often hidden gems to discover. These may include secret beaches that have seen few visitors. Perhaps you will find sea caves lying beneath the clifftops which have been formed by the sea eroding the land over time.

5. Coastal shores

6-scenarios-to-try-for-more-interesting-beach-photography

Cornwall, England

Coastal shores can offer some of the most dramatic and best photo opportunities for seascapes. Crashing waves and moody skies after a storm can be great for your coastal photos.

How you capture your coastal adventures depends on the type of image and mood you want to evoke.

The coast can look very different throughout the day. You could either go there in the late afternoon to capture the suns rays striking the cliffs or visit during the day when the beach is busier and more active with people.

Visiting at different times of the day will give you the chance to capture a wide variety of shots to include in your collection.

6. Sunsets

6-scenarios-to-try-for-more-interesting-beach-photography

Land’s End, Cornwall, England

Photographing Sunsets by the sea are one of the most popular things to capture – and for a good reason. The coastline often looks its best at this time of day when the colorful glow is spectacular. Views of the sea get transformed into wonderful vistas with great light. Sand dunes and rock ledges can look great with the sunset light shining on them.

Shooting into the sun is another great way to capture the sunset during your coastal adventures.

Conclusion

Use these tips to capture more interesting beach photography and seascape images. Next time you are visiting the coast remember to look out for great ocean views, interesting details, secluded coves, hidden beaches, coastal vistas, and dramatic sunsets and share your images with us below.

What do you enjoy about beach photography?


6-scenarios-to-try-for-more-interesting-beach-photography

The post 6 Scenarios to Try for More Interesting Beach Photography appeared first on Digital Photography School. It was authored by Jeremy Flint.


Digital Photography School

 
Comments Off on 6 Scenarios to Try for More Interesting Beach Photography

Posted in Photography


How to Take Better Beach Portraits at Anytime of the Day

30 Jul

The post How to Take Better Beach Portraits at Anytime of the Day appeared first on Digital Photography School. It was authored by Jackie Lamas.

Golden hour is famous for being the most ideal lighting for portraits, especially at a beach location. Unfortunately, sometimes, the golden hour isn’t an option. Therefore, it’s essential to know how to photograph portraits at any time of the day. That way, you can always create beautiful photos for clients.

Know where the sun is at all times

First, you’ll need to know where the sun is at all times. The easiest way to do this is to use an ephemeris (I personally use this one). This is a tool that can help you see where the sun will be at any time during the day.

Here you can see where the sun will rise from, set, and the times when these will be happening during the day.

Before, or even while you’re scheduling your session, you can quickly check this tool to see the sunrise, midday, and sunset times.

An ephemeris can give you the details on the direction the light is coming from at a particular point in the world. Simply plug in the location of your session, and you can see all of the important details.

Here we can see where the sun will be on this particular day at the same time on the opposite coast in Mexico from the previous photos.

This is really helpful since no beach is alike and the direction of light differs from one side of the world to another. For example, in California, the sun sets behind the beach. Whereas on the east coast, the sun sets in the opposite direction.

Here we can see where the sun will be on this particular day at the same time on the opposite coast in Mexico from the previous photos.

Also, different beaches may face differently and therefore it’s good to know where the sun will be during your session.

Morning light

Morning light on a beach is magical. It has a whole different color temperature than that of the golden hour and can provide a nice soft glow if you have your session early enough.

The light is a little bluer, and depending on the beach where your session is taking place, the sun can rise overlooking the ocean or peaking through the trees. For example, a beach on the east coast like Cancun can mean during your session in the morning you’ll catch the sunrise behind the beach.

Alternatively, on a beach in California, you’ll catch the sun hitting the water from the land side. This will give you that beautiful yellowish-blue glow if your session is before 9 o’clock in the morning.

On the left we see the sun rising behind the bay and at right is after the sun is nearing midday.

Use a simple reflector to bounce light back onto your subject if you feel the sunrise light causes shadows. This is especially useful if sunrise is behind the water at the beach.

Midday light

Midday light at a beach is pretty harsh and therefore it’s good to have some kind of additional lighting equipment to help with shadows. You can use an external flash, popup flash, or a reflector.

Seeing the shadows in front of your clients means the sun is behind them. This family is lit with an external flash mounted on-camera pointed directly at them.

You can also go without an additional light source. However, it’s good to underexpose your photos a bit so you can bring up the shadows in your editing software. Otherwise, you’ll end up with really blown out skies. Of course, this all depends on your style of photography.

Using the sand as a natural reflector helps to bounce light back onto your clients as we can see in both of these photos.

When the sun is at it’s highest point during the day, it might be a good time to take your clients under the shade of some trees nearby or opt to have more playful photos of the family. Have your client’s walk, run, splash in the water, build sandcastles, or just have a bit of fun together.

The sun is at it’s highest at different times around the world, so make sure to check the ephemeris for your exact location to know the time.

Same session, same beach, one photo with flash and one photo without.

Once the sun passes the highest point, it will be at a bit of an angle as it starts to go down for sunset. This is the sweet spot of photographing during midday sun at the beach!

Flash was used to correctly expose the photo and fill in shadows caused by the sun.

When the sun is at a bit of an angle, you can pose your clients with the sun behind them to alleviate having the sun in their eyes. This means you’ll be in the sun, but it’s better than having your clients facing the sun. This avoids causing shadows, uneven lighting, and squinting. The sand can also work as a natural reflector, bouncing light back into their faces.

After midday light

After midday light can be different in the winter than in the summer given that daylight savings can change the amount of light you have left. Either way, the sun sits lower to be at an angle behind your clients. All while still hitting the sand to reflect some light into your client’s faces.

During this time, depending on the angle of light, you can get some really interesting light. It gets more golden by the hour as you approach sunset.

Still, if you find yourself at a beach where the light is still harsh during this time, try and angle your clients away from the sun. You can also try and use your external lighting to help fill in some light.

Golden Hour (Sunset)

Actual sunset only lasts about 5-10 minutes. However, golden hour is just that – about an hour before the sun dips behind the horizon, which means the angle of the light is pretty low and directional. It can mean flooding your photos with lots of that pretty golden light. However, it also makes it difficult to capture your clients evenly lit against the background.

This is especially troublesome if the sun sets behind the water. It can be difficult capturing the beautiful colors of the sunset while also lighting your clients.

Using a flash or external light source pointed directly at your clients can help light them while capturing the sunset behind. You can also underexpose your photo a bit to bring up the shadows later without compromising the sunset.

Try silhouetting your clients behind with the sunset light to offer a different look to the final images.

Golden hour is also a perfect time to turn your clients toward the setting sun to get that beautiful golden color cast on their skin tones and in the overall look of the photo.

Blue hour (After sunset)

Blue hour is the 20-30 minutes (sometimes less time) after the sun has completely gone from view. Blue hour is nice to photograph in because of the beautiful sunset colors like blue, orange, pink, and purples that come out after sunset. The lighting is a bit darker, so you might need a tripod.

During the blue hour, you can get some additional light on your clients by facing them where the sun has set.

During this time you can attempt some slow shutter speed photos while your clients hold still. Getting the movement in water can create a more fine art approach to beach photos!

During any time of day try these ideas:

Cloudy days are perfect for photographing at any time during the day. However, you might not get the sunset as bright as on a clear day.

It doesn’t matter the time of day, it’s good to get variety in your portraits during beach sessions. For that try some of these ideas:

  • Rock formations/caves as backgrounds and also shelter from harsh light.
  • Trees can provide shade as well if the light is harsh and the day is particularly hot.
  • Around town can also serve as a nice background for photos while you’re waiting for the midday sun to angle a bit.
  • Up high can also serve as a nice way to keep clients out of harsh sunlight. For example, a balcony in their hotel room, a higher terrace with some shade that overlooks the ocean, etc.
  • Photographing more lifestyle-type photos with the family playing, getting in the water, and just having a “beach day”.

If you are waiting for the sun to go down a bit, you can take some portraits near trees that aren’t directly on the beach. This also adds variety to the final images.

Conclusion

Photographing at the beach during golden hour isn’t the only time that you can create one-of-a-kind and amazingly beautiful images for your clients.

Taking cover in caves or using rock formations as backgrounds can also help keep your client out of direct sunlight.

It is incredibly beneficial to learn to photograph at the beach at any time of the day. Moreover, it can mean the difference between a client choosing you and another photographer.


better-beach-portraits

The post How to Take Better Beach Portraits at Anytime of the Day appeared first on Digital Photography School. It was authored by Jackie Lamas.


Digital Photography School
 
Comments Off on How to Take Better Beach Portraits at Anytime of the Day

Posted in Photography


Miami Beach police use camera blimp to get around drone surveillance ban

15 Jan

The Miami Beach Police Department found a loophole to circumvent Florida’s 2015 ban on police drone surveillance — a tethered, relatively immobile blimp with a camera attached to the underside. Officially called a ‘tethered aerostat,’ the helium-filled vehicle was used to monitor the approximately 15,000 people who attended the Capital One Beach Bash over the New Year’s holiday.

In 2015, Florida passed the Freedom From Unwanted Surveillance Act, which banned the use of drones for police surveillance. In a letter to the city commission on January 3, City Manager Jimmy Morales explained the police department’s use of the camera blimp, citing necessity due in part to ‘the legal restrictions on police departments under Florida law and because of limited battery life and flight time’ associated with drones.

Morales went on to call the blimp ‘a new technological solution for aerial monitoring,’ one the police department felt was necessary due to “the emergence of new threats of terrorism seen around the world in such large gatherings…”

A Miami Beach Police Department spokesperson told the Miami New Times the department doesn’t believe its tethered aerostat violates state law. Use of a lighter-than-air vehicle for aerial surveillance has proven controversial, however, with critics saying there is little difference between a stationary floating camera and a remote-controlled flying camera.

The region’s law enforcement has repeatedly demonstrated interest in camera-based surveillance, including the Miami-Dade Police Department’s attempt in 2017 to deploy a wide-area surveillance system involving Cessna planes equipped with cameras. That plan, which was abandoned following heavy criticism, would have monitored the entire county using technology developed by the U.S. Air Force for use in combat zones.

Articles: Digital Photography Review (dpreview.com)

 
Comments Off on Miami Beach police use camera blimp to get around drone surveillance ban

Posted in Uncategorized


Friday Feature: Framing, timing bring juxtaposed beach scenes to life

10 Nov

Friday Feature: Framing, timing bring juxtaposed beach scenes to life

Three Men © Moises Levy

Framing and composition are two of the most basic tools in every photographers arsenal, but they can also be some of the most powerful.

In his recent of photographs, Mexico City photographer Moises Levy shows how simple black and white photographs on the beach can be turned into wonderfully juxtaposed images with the help of perfect timing, great composition, and clever framing.

In speaking with DPReview about the ongoing series, Levy said “Human condition is the main subject of my photography. I use several resources to express my ideas in photography like perspective and scale. My images are intimate too — I believe being close to my subject helps me to create powerful images.”

Levy says he works with only one camera and one lens at a time — either his Leica or Fujifilm with a 28mm r 35mm lens.

“I prefer to create anonymous subjects and for that I like to work with backlight to create high contrast black and white images in a more graphic sense,” Levy tells DPReview. “I also like to shoot very minimal and clean images and for that I use very low angles in places with almost no distractions, like beaches and open spaces.”

You can keep up with Levy’s work by checking out his website or following him on Instagram, Flickr, and Facebook.


Photographs by Moises Levy, used with permission.

Friday Feature: Framing, timing bring juxtaposed beach scenes to life

5 Guys © Moises Levy

Friday Feature: Framing, timing bring juxtaposed beach scenes to life

Action 5 © Moises Levy

Friday Feature: Framing, timing bring juxtaposed beach scenes to life

Action 8 © Moises Levy

Friday Feature: Framing, timing bring juxtaposed beach scenes to life

Action 11 © Moises Levy

Friday Feature: Framing, timing bring juxtaposed beach scenes to life

Arch © Moises Levy

Friday Feature: Framing, timing bring juxtaposed beach scenes to life

Ave en tres palos © Moises Levy

Friday Feature: Framing, timing bring juxtaposed beach scenes to life

Beer Man © Moises Levy

Friday Feature: Framing, timing bring juxtaposed beach scenes to life

Chapuzon © Moises Levy

Friday Feature: Framing, timing bring juxtaposed beach scenes to life

Communication © Moises Levy

Friday Feature: Framing, timing bring juxtaposed beach scenes to life

Fisherman Net © Moises Levy

Friday Feature: Framing, timing bring juxtaposed beach scenes to life

Fly © Moises Levy

Friday Feature: Framing, timing bring juxtaposed beach scenes to life

Ghost © Moises Levy

Friday Feature: Framing, timing bring juxtaposed beach scenes to life

Giraffes 1 © Moises Levy

Friday Feature: Framing, timing bring juxtaposed beach scenes to life

Horses 2 © Moises Levy

Friday Feature: Framing, timing bring juxtaposed beach scenes to life

Horses 1 © Moises Levy

Friday Feature: Framing, timing bring juxtaposed beach scenes to life

Jump 1 © Moises Levy

Friday Feature: Framing, timing bring juxtaposed beach scenes to life

Jump 2 © Moises Levy

Friday Feature: Framing, timing bring juxtaposed beach scenes to life

Kid © Moises Levy

Friday Feature: Framing, timing bring juxtaposed beach scenes to life

Kiss © Moises Levy

Friday Feature: Framing, timing bring juxtaposed beach scenes to life

Looking For Turtles © Moises Levy

Friday Feature: Framing, timing bring juxtaposed beach scenes to life

My Dog And I © Moises Levy

Friday Feature: Framing, timing bring juxtaposed beach scenes to life

On Place 1 © Moises Levy

Friday Feature: Framing, timing bring juxtaposed beach scenes to life

Perro Garza Y Hombre © Moises Levy

Friday Feature: Framing, timing bring juxtaposed beach scenes to life

Play © Moises Levy

Friday Feature: Framing, timing bring juxtaposed beach scenes to life

Resting © Moises Levy

Friday Feature: Framing, timing bring juxtaposed beach scenes to life

Running 1 © Moises Levy

Friday Feature: Framing, timing bring juxtaposed beach scenes to life

Shadow And Fisherman © Moises Levy

Friday Feature: Framing, timing bring juxtaposed beach scenes to life

Soul © Moises Levy

Friday Feature: Framing, timing bring juxtaposed beach scenes to life

Trapped 2 © Moises Levy

Friday Feature: Framing, timing bring juxtaposed beach scenes to life

Volley © Moises Levy

Friday Feature: Framing, timing bring juxtaposed beach scenes to life

Ball Head © Moises Levy

Friday Feature: Framing, timing bring juxtaposed beach scenes to life

Game 1 © Moises Levy

Articles: Digital Photography Review (dpreview.com)

 
Comments Off on Friday Feature: Framing, timing bring juxtaposed beach scenes to life

Posted in Uncategorized


Tips for Using Flash for Beach Portraits

09 Aug

The beach is a beautiful location for any type of portrait session, however, you might find yourself competing with the sun if it sets behind the ocean. For this, you’ll need the use of reflectors and perhaps even a flash unit. Don’t be intimidated by using flash, it can instantly create beautifully lit portraits where you are able to see the sunset and its incredible colors.

Using Flash for Beach Portraits - family portrait on the beach

Use flash to fill in light during beach sessions.

Manual Mode

While TTL flash mode is okay for most scenes, during your beach portraits, you’ll want to have full control over your flash.

In TTL, the flash meters the light and gives enough power to light the scene, resulting in different flash outputs each time you take a photo. In manual mode (on the flash), however, you are able to set the power of the flash and maintain consistent output while you are photographing your client.

portrait of an elderly couple - Using Flash for Beach Portraits

Manual Mode on your flash can help you get the exact amount of light for different times of the day.

This means that in manual flash mode, you have full control over your flash and its output power. During your session, you can switch from different outputs to get the right mix of fill flash and ambient light so that both your client and background are evenly lit.

Using Flash for Beach Portraits - portrait of a couple

TTL Mode

TTL uses the internal meter on the flash to determine how much power it will fire when you take a photo. This also means that the power output can vary from photo to photo, which makes it less consistent than manual mode.

portrait of young family by the water - Using Flash for Beach Portraits

Use TTL to let your flash meter how much light your scene needs.

However, TTL is a great place to start because you can control the flash compensation but don’t necessarily have to worry about setting the exact power output.

For example, you can have your flash in TTL mode and put it at +1/3 to get an extra boost of light out of your flash. Or you can put it at -1 to tone down the power output (and underexpose the flash as compared to the ambient light).

wedding couple on the beach - Using Flash for Beach Portraits

The photo on the right doesn’t have flash fill. The photo on the left does. Use flash to fill in shadows especially during sunset.

It’s also great to use when you need to photograph quickly or don’t have a lot of time to set up your flash. TTL is especially useful during weddings or portraits with children.

Check the manual for your flash to see how to switch quickly from TTL to manual and back. This can be really useful when you have a mix of moving subjects, like children, and posed portraits, like a couple.

When to use your flash at beach sessions

It all depends on how much ambient light you have and if you are going to be competing with the sun, or lighting your subjects during a sunset. Perhaps you’ll need the flash to act as a fill light.

maternity photo on the beach - Using Flash for Beach Portraits

Competing with the sun is where the flash units are most useful. Midday sun can be harsh on a beach and can cause the backgrounds to wash out. First, get your exposure of the background. Then attach your flash onto your camera, or wireless trigger, and set the power to 1/4 power. Take a few test shots and adjust the flash so that you get the right amount of light that you need.

couple's portrait on the beach - Using Flash for Beach Portraits

Use your flash to fill in shadows and compete with the harsh light of the sun.

Using high-speed sync will allow you to operate the flash at a higher shutter speed. This means that you are able to photograph your clients at 1/300th of a second or faster and still have the flash fire and affect the image.

This option is mainly so that the flash acts as a fill light to the already existing light. Perfect for really bright days or if your clients are in a shady area and the beach is brightly lit.

wedding portrait on the beach - Using Flash for Beach Portraits
In the event that it is overcast, the flash acts as a fill light and can get rid of the high contrast that overcast days create. This helps to avoid washout of the background while still lighting your subjects. Overcast days also create shadows on the face (dark eyes) and a little pop of light can really create a difference.

family photo on the dock - Using Flash for Beach Portraits

Flash can be useful for overcast and cloudy days at the beach.

During sunsets, set your camera around 1/250th to 1/400th (set your flash to high-speed sync if you go over the sync-speed of your camera) shutter speed so that you are able to capture the colors of the sunset. Once you have the right settings for the sunset, set your flash to around 1/16th power and adjust your aperture accordingly as you photograph your clients to let in more light or less light until you have the look you are going for.

family in white on the beach - Using Flash for Beach Portraits
NOTE: It’s important to note that if you are using flash while you’re in the water at the beach, watch out for any reflections that the water might make from the light of the flash. This can create weird reflections on your client’s legs or other parts of their bodies.

Differences between flash positions

On-Camera

At beach sessions, especially during sunset and brightly lit scenes, you will have to position your flash straight at your clients so that it lights the whole scene evenly. Angling the flash will not allow enough light to fall onto the body of your clients and can create a division of light in your photograph.

bridal party photo of the ladies - Using Flash for Beach Portraits

Use the flash on the camera to spread light evenly onto all your subjects.

However, this doesn’t mean that you can experiment with the flash at different positions. Trying different angles will also give you a better look at what will work best for the type of session you’re having.

Use a bounce modifier to diffuse the light and light your clients evenly. You might need to increase the power of your flash so that you can get enough light.

couple at sunset - Using Flash for Beach Portraits

On-camera flash can work well when the sun is setting in the background.

Off-camera

Using your flash off-camera at beach sessions can give you more versatility and can create different types of lighting effects.

For example, a couple walking along the shore is lit with the flash perpendicular to the camera can give you perfect lighting on the couple with shadows that fall off into the background.

wedding couple on the beach - Using Flash for Beach Portraits

Off-camera flash at a 45-degree angle from the camera can give you shadows and more drama to the photo.

This creates more drama within the photo. Also allows you to be further away from the clients during the session while keeping the light the same. For this, you’ll need wireless triggers to remotely trigger the flash and a tripod or assistant to help with moving the light where you want.

wedding portraits by the ocean - Using Flash for Beach Portraits

Experiment with different angles and reflections of the water. Use a modifier to change the light and give you more range.

Using your phone flash or flashlight

Flash units and wireless triggers can be a little costly when you’re first starting out so your phone flash or a flashlight can give you that pop of fill light that you need to get a great photo.

couple in white - Using Flash for Beach Portraits
When you use either, the closer you are to your client, the sharper the light will hit them and be less spread throughout. The farther you are, the more dispersed the light is but it’s also less intense. You could use more than one phone flash or flashlight so you get more light.

Practice makes perfect

Practicing using your flash at the beach during different lighting situations can help you to get an idea of where to start when you do have a client session.

Taking the time to practice will help to get familiar with the power output of your flash and what look you like best. Then when you are at a paid session you aren’t taking too much time trying to get it right.


When you’re out practicing, take notes of what power output you used on which photos. Unfortunately, the metadata for flash only lets you know if the flash triggered, not the power output or if you used flash compensation.

With a little time and a lot of practice, you’ll be able to set your flash just by looking at the light.

Large groups like this, the flash is very subtle, however still useful in filling light across the entire frame.

Conclusion

wedding couple

Use flash to fill in on really bright days so the background doesn’t wash out.

Using a flash, whether on the camera or off, can be extremely useful during beach portrait sessions because the light is so harsh and you’ll need some fill light at some point.

At your next session, practice and experiment with different flash power outputs and angles for drama. Use your flash at midday to get rid of shadows or during sunset to be able to capture that beautiful setting sun in the background.

The post Tips for Using Flash for Beach Portraits appeared first on Digital Photography School.


Digital Photography School

 
Comments Off on Tips for Using Flash for Beach Portraits

Posted in Photography


Messages in the Sand: 12 Great Guerrilla Ads at the Beach & the River

07 Aug

[ By SA Rogers in Design & Guerilla Ads & Marketing. ]

The beach is one big billboard for companies looking to surreptitiously market their products, from Game of Thrones to Jim Beam, which would be annoying if most of these guerrilla installations weren’t so fun. Plus, some of these site-specific seaside installations are the work of mysterious anonymous artists, or organizations raising awareness for issues like sea turtle protection and skin cancer avoidance.

Game of Thrones Dragon Washed Up on a British Beach

A 40-foot-long dragon skull seemingly washed up on Charmouth Beach in Dorset, England in the spring of 2013, likely only puzzling onlookers who aren’t familiar with the HBO series Game of Thrones. Still, it’s a pretty fun example of guerrilla marketing, especially since this area is known as the ‘Jurassic Coast,’ where lots of dinosaur fossils turn up. It took three sculptors over two months to design, sculpt and paint the skull. Who could resist climbing inside?

Jim Beam Creates the World’s Largest Cooler at Bondi Beach

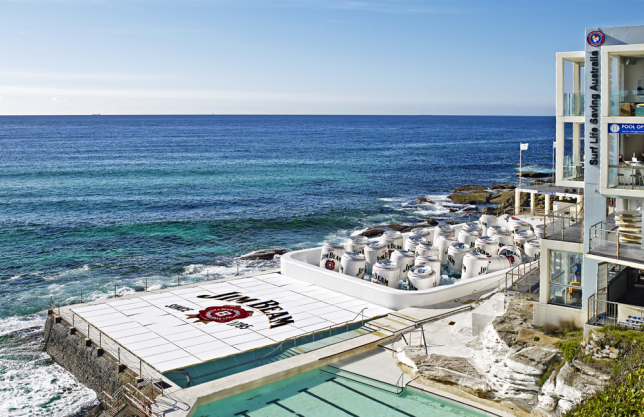
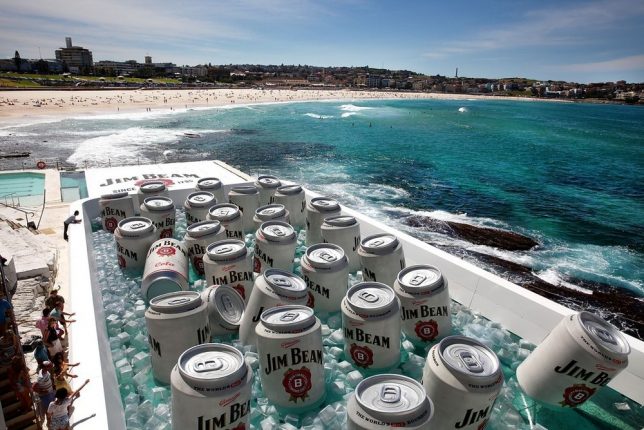
Jim Beam and the ESKY cooler company teamed up to temporarily transform the Bondi Icebergs Pool into the world’s largest cooler for the filming of a commercial. The cooler was filled with about half a million gallons of water, over 500 giant ice cubes and 33 supersized Jim Beam cans.

King Kong Footsteps at the Santa Monica Pier

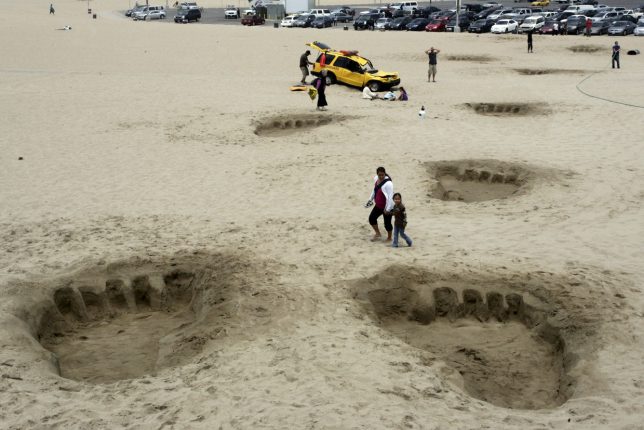
Giant footsteps and a smashed lifeguard truck appeared to signal total chaos at the Santa Monica Pier in June 2010, signaling the opening of the new Universal Studios Hollywood theme park attraction, King Kong 360 3-D. This ambient advertisement by the firm David&Goliath was a accompanied by a ‘news report’ on YouTube. Does this make anyone else miss the old King Kong ride? RIP, King Kong Encounter, which burned down in 2008.

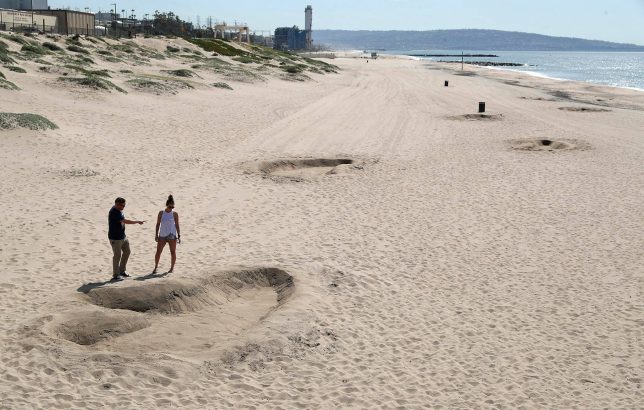
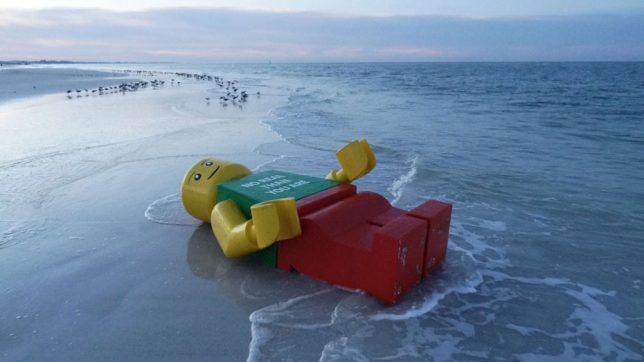
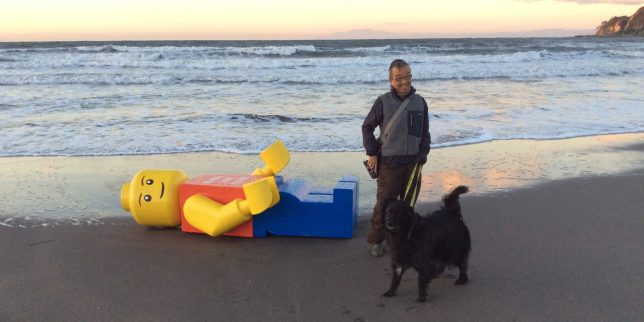
Unexplained Giant Lego Man

A life-sized Lego Man washed up on a Florida beach with the somewhat nonsensical message ‘NO REAL THAN YOU ARE’ printed on its chest. Measuring about 8 feet tall and weighing 100 pounds, the ‘man’ was discovered on the Siesta Key beach. The Sarasota County Sheriff’s Office sent out a tongue-in-cheek press release reporting that they had taken the ‘man’ into custody, and found ‘Ego Leonard’ written on his back. Then, another one washed up in Japan. Turns out, Ego Leonard is the pseudonym of an anonymous Dutch artist, and his creations show up periodically on beaches around the world. Somebody should warn King Kong, so he doesn’t step on him.

Next Page – Click Below to Read More:
Messages In The Sand 12 Great Guerrilla Ads At The Beach River Banks

Share on Facebook


[ By SA Rogers in Design & Guerilla Ads & Marketing. ]

[ WebUrbanist | Archives | Galleries | Privacy | TOS ]


WebUrbanist

 
Comments Off on Messages in the Sand: 12 Great Guerrilla Ads at the Beach & the River

Posted in Creativity


No, you don’t need a $100 permit to take snapshots in Laguna Beach

23 Jun
Photo by Don Graham. Licensed under CC 2.0

The city of Laguna Beach has cleared up some confusion about its photography permit policy. A broad interpretation of one of its two photography permits created a minor uproar recently, as many people took it to mean that the city was requiring a $ 100 permit for anyone taking photos. It seems now that this wasn’t the intention.

As it stands, the city has two permits for two different types of photography: commercial and ‘non-commercial’; the latter has a $ 50/hr rate with a minimum of two hours required. This meant, as the policy was interpreted, that anyone taking photos – including personal photos – in Laguna Beach were required to buy a $ 100 permit.

The non-commercial permit category’s vague description resulted in quite a bit of public complaint, and the city has chosen to rename it as a result, leaving only talk about true commercial photography on its website’s related permit page. The category was never intended to cover casual personal photography, according to a city official speaking to OC Weekly. Rather, the ‘non-commercial’ permit category was created as a cheaper alternative to the primary commercial permit, giving photographers an option for ‘less complicated photo shoots such as engagement photos.’

The city’s website still specifies two different photography permits, but one with a new name: commercial and ‘professional still photo.’ The latter carries the same $ 100/2hr minimum as the former ‘non-commercial’ category, explaining that this option is for ‘single camera shoots such as engagement photos, wedding photos, family portraits, holiday cards, etc.’ Nothing about the permit policy except the ‘non-commercial’ verbiage has changed. However, it is now clear that personal, non-compensated photography doesn’t require a permit.

Via: OC Weekly

Articles: Digital Photography Review (dpreview.com)

 
Comments Off on No, you don’t need a $100 permit to take snapshots in Laguna Beach

Posted in Uncategorized


Video: insane drone footage shows Muscle Beach in the early a.m.

20 Jun

Drones are not easy to fly. As a novice drone enthusiast myself, I’ve become acquainted with the learning curve that comes with taking to the skies. As a result I’m always amazed by highly skilled drone pilots and their videos. But some videos go above and beyond simply inspiring: they make you question the very laws of physics and space.

The video above, filmed at Santa Monica’s famed Muscle Beach, falls into this category. It was posted by Vimeo user Robert McIntosh, whose page features a ton more awesome drone videos. A bit of research reveals that he shoots most of his footage with a 250 mm mini quadcoptor that is likely custom-built – with an action camera mounted to it. The small size explains its uncanny ability to squeeze through tight spaces mid-flight.

Sure, the sound effects in the video are a bit silly, but McIntosh’s flight skills and the resulting footage are nothing short of breathtaking – which makes me feel either inspired or intimidated. I’m not sure which.

Also, you can check out the original clip, before stabilization right here. There’s also a few outtakes near the end.

Articles: Digital Photography Review (dpreview.com)

 
Comments Off on Video: insane drone footage shows Muscle Beach in the early a.m.

Posted in Uncategorized


Photographer captures Miami Beach air show with Nikon 800mm and custom rig

07 Jun
Jim Winters with his TRIAXEZ rig. Photo by Pete Boden

The AF-S Nikkor 800mm F5.6 VR is an absolute beast of a lens. Shooting handheld with it for more than a few seconds is pretty much unbearable unless you’re a champion bodybuilder. Wanting it utilize it for aviation photography, Jim Winters built a rig to accommodate the lens and a camera body that he can use for hours.

His ‘triple axis’ TRIAXEZ rig includes a counterweight and 12V battery. The battery provides additional counterweight to balance the rig – an earlier evolution used lead pellets as counterweights – and also provides charge to the camera for long shooting sessions. Winters says he can even use it to charge his phone. The whole thing is easily transported to and from shooting locations thanks to a pair of wheels.

It’s a pretty clever piece of engineering, and the proof is in the images below, shot at the National Salute to America’s Heroes in Miami Beach over Memorial weekend.

Photo by Jim Winters

It looks like the rig is working well for Winters, but he’s envisioning ways to improve it. ‘Due to the weight of the rig assembled with lens and counterweight, I was experimenting with a single shoulder mounted rig. You would look through a POV set of glasses so that you don’t have to look through the camera body, nullifying the need for a counterweight.’ That’s a pretty enticing solution, but in the meantime, we think he’s done an excellent job of adapting his equipment to his needs.

See all of his photos from the Miami Beach show at his Team Nikon Miami website.

Articles: Digital Photography Review (dpreview.com)

 
Comments Off on Photographer captures Miami Beach air show with Nikon 800mm and custom rig

Posted in Uncategorized