RSS
 

Posts Tagged ‘Aurora’

7 Tips for Creating Natural-Looking HDR Landscapes Using Aurora HDR

27 Feb

Aurora HDR is one of the best and easiest photo editing programs available for quickly creating HDR images. With that said, it has a wide range of tools and filters to help you achieve your HDR goals. To help you sort through them all, this article will highlight seven tips for creating natural-looking HDR landscapes in Aurora HDR 2018.

1. Keep HDR editing of sunsets and sunrises to a minimum

Everyone knows that sunrise and sunset provide optimal landscape photography opportunities. Golden hour bathes everything in a beautiful, often colorful natural light. As a result, it’s best to take a more subdued editing approach to keep the scene as natural looking as possible, especially when dealing with HDR. Otherwise, you risk over-processing your image.

7 Tips for Creating Natural-Looking HDR Landscapes Using Aurora HDR

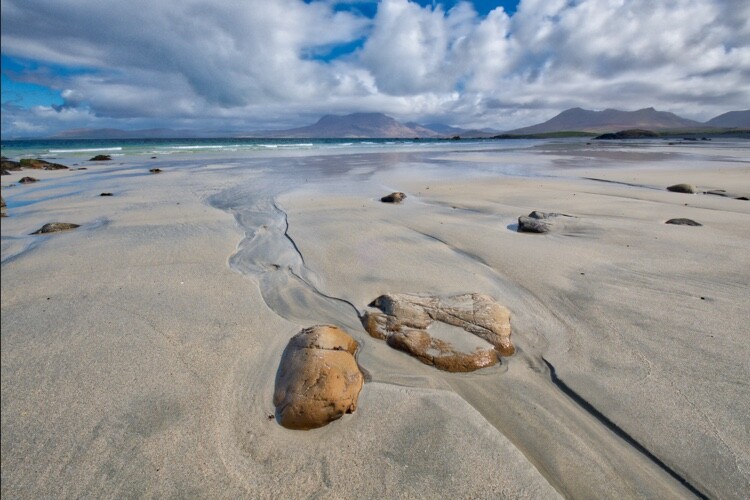
Original starting image (the middle exposure of a 5-image bracketed set). Image courtesy dPS Managing Editor, Darlene Hildebrandt.

NOTE: On that note, many of the tips below will include editing tools and sliders that have been pushed to their extremes. This is meant as a demonstration to show what you could do by using these tools at their maximum, but it’s not suggesting you should do this.

2. Intelligently bump contrast and color with HDR Enhance

7 Tips for Creating Natural-Looking HDR Landscapes Using Aurora HDR

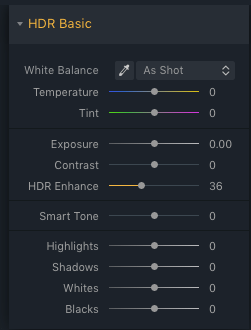
One of the first tools you should utilize is called HDR Enhance. Found in the HDR Basic panel, it’s a newer feature available in Aurora HDR 2018 and it serves as a replacement for the clarity slider. When activated, HDR Enhance brings out the details and textures in your image while minimizing any residual artifacts such as image noise that might be introduced in the process.

In the example below, the HDR Enhance slider has been pulled to the extreme for demonstration purposes. Notice how the contrast in the foreground and the distant rocks have increased significantly, and the color in the sky really pops.

7 Tips for Creating Natural-Looking HDR Landscapes Using Aurora HDR

HDR Enhance at 100.

7 Tips for Creating Natural-Looking HDR Landscapes Using Aurora HDR

But adding too much HDR Enhance is like adding too much clarity. The rocks and sand in the foreground have so much contrast and clarity that they look unreal, and the rocks and hills in the background now have a halo effect (generally considered undesirable).

To reduce these effects and thus make your landscape appear more realistic, tone down HDR Enhance significantly (or use the masking brush to apply or erase the effect wherever you choose). By having the slider at 36 as opposed to 100, there’s still a nice pop of details and color.

7 Tips for Creating Natural-Looking HDR Landscapes Using Aurora HDR

HDR Enhance scaled back to 36.

3. Bump up the contrast

To make your image appear less flat, bump up the contrast. Going to extremes results in lots of shadows, reducing details in any dark areas. It also saturates color in the sky and in the reflection on the water.

7 Tips for Creating Natural-Looking HDR Landscapes Using Aurora HDR

Contrast at 100.

By lessening contrast to about 20, shadows are still enhanced, but the details are better preserved. Note that the trees on the hill are still visible.

7 Tips for Creating Natural-Looking HDR Landscapes Using Aurora HDR

Contrast scaled back to 20.

4. Use Smart Tone to brighten up an image

7 Tips for Creating Natural-Looking HDR Landscapes Using Aurora HDR

Since increasing the contrast introduced more shadows to the image, brighten it up again by using the Smart Tone filter. Dragging the slider to the right brings more light to areas of the image that are dark, without dramatically affecting parts of your image that are already bright.

Below, you can see an extreme version of the Smart Tone slider in action. Notice how the shadowed areas are brightened, revealing lots of detail, particularly in the hill on the right. This is what you can do with Smart Tone, but it’s not necessarily what you should do since the image now appears very flat without any shadows or contrast, and the dreaded halo has appeared again.

7 Tips for Creating Natural-Looking HDR Landscapes Using Aurora HDR

Smart Tone at 100.

To appear more realistic, pull back Smart Tone to about 22. This gives a hint of detail to the trees in the right, similar to what a reflection on the water might cause. It also brightens that patch of sand to the right.

7 Tips for Creating Natural-Looking HDR Landscapes Using Aurora HDR

7 Tips for Creating Natural-Looking HDR Landscapes Using Aurora HDR

Smart Tone dialed back to 22.

5. Enhance Saturation, Vibrance, and Color Contrast

At this point, let’s turn our attention to the colors. Play with the Temperature slider in the HDR Basics panel to add some warmth to images like this sunset. Then scroll down to the Color panel and tweak the Saturation and the Vibrance sliders.

7 Tips for Creating Natural-Looking HDR Landscapes Using Aurora HDR

Depending on your image, you may need to bump these either up or down. Just avoid taking them to their extremes; generally, somewhere between 5-20 will be a good range. You can also bump up the Color Contrast slider, which controls the contrast between primary and secondary colors.

7 Tips for Creating Natural-Looking HDR Landscapes Using Aurora HDR

Saturation, Vibrance and Color Contrast boosted.

6. Use Image Radiance for an ethereal effect

7 Tips for Creating Natural-Looking HDR Landscapes Using Aurora HDR

Now we’re looking at a few finishing touches that you can add to your HDR landscape shots, and one option is Image Radiance. This adds a soft, dreamy glow to your photo, and it is best used on sunset or sunrise images. In this particular scenario, Image Radiance seems particularly important since it can contribute a soft, hazy effect typical of ocean shots.

Increase the Image Radiance slider to about 37. Doing this will introduce some shadows to your image, but that can easily be fixed with the Brightness and Shadows slider in the same panel. You can also adjust Vividness and Warmth here too if you see fit.

7 Tips for Creating Natural-Looking HDR Landscapes Using Aurora HDR

7. Add a subtle Vignette

7 Tips for Creating Natural-Looking HDR Landscapes Using Aurora HDR

The final edit that you might do to an HDR landscape image is to add a vignette. In the case of a sunrise or sunset, a vignette can be particularly helpful to add a subtle frame around the subject, drawing more attention to the focal part of the scene, the setting sun.

Within Aurora HDR, the Vignette panel is at the very bottom. You can control not only the size, amount, roundness, and feathering of the vignette, but also the inner brightness. As well you can adjust the placement of the vignette, meaning you can easily create a vignette that is not centered on the image – very handy if your subject is following the rule of thirds and is off-center.

When adding a vignette, note that the amount is a negative number for a dark (black) vignette and a positive number for a bright (white) one.

7 Tips for Creating Natural-Looking HDR Landscapes Using Aurora HDR

Final image with the vignette added.

Bonus tips

In addition, Aurora HDR also has tools for correcting Chromatic Aberration and Lens Distortion. It also comes loaded with several “Realistic HDR” presets that you can use to get started, and then just tweak the settings to your liking.

Over to you

There you have it, seven tips for processing landscape HDR photos in Skylum’s Aurora HDR. If you were inspired to create your own HDR landscapes, please share them in the comments below along with your post-processing tips and tricks.

Disclaimer: Skylum (formerly Macphun) is a dPS advertising partner.

The post 7 Tips for Creating Natural-Looking HDR Landscapes Using Aurora HDR by Suzi Pratt appeared first on Digital Photography School.


Digital Photography School

 
Comments Off on 7 Tips for Creating Natural-Looking HDR Landscapes Using Aurora HDR

Posted in Photography


How to do Single Image HDR Effects with Aurora HDR 2018

08 Feb

When creating an HDR or High Dynamic Range photo, you typically need three or more images taken at different exposures (bracketed) to create one stunning image. But given the high dynamic range of today’s digital cameras, do you still need to shoot bracketed images to achieve the HDR look? In this article, I’ll show you how you can achieve HDR effects from a single image using Aurora HDR 2018.

Results will also be compared with an image made the “real” HDR way. Which is best? You be the judge.

What is HDR?

First off, let’s break down what HDR is exactly. As mentioned earlier, HDR combines a series of images, each taken with a different exposure. The result is a dramatic photo with brightened shadows and darkened highlights. Thus, shadows and highlights are the two main features that will play the biggest role in creating an HDR photo from a single image.

Using this insight, you could take a single shot and apply HDR effects by playing with just a few features that affect the overall dynamic range of your image. To start, here’s a single image of a landscape scene, shot in RAW.

Note: the images used in this article are courtesy of dPS editor Darlene Hildebrandt. 

How to do Single Image HDR Effects with Aurora HDR 2018

1. Shoot in RAW

The very first thing you want to do with your single-image HDR image is to make sure it was taken in RAW format, not JPG. RAW files are larger in size than JPGs because they store much more image information.

This means that you can push lots of post-processing effects and even salvage parts of an image that would otherwise be unrecoverable. You could feasibly apply HDR effects to a JPG image, but the results won’t be as dramatic as they will be with a RAW file.

2. Adjust the Highlights and Shadows sliders

Since highlights and shadows tend to affect the overall brightness of an image, you’ll want to play with these sliders first. Pulling down the highlights can restore bright areas that appear washed out in an image while pulling up the shadows brighten up dark spots.

For example, the sample image above was opened in Aurora HDR 2018 and the highlights and shadows were pulled to their extremes, just for demonstration purposes. Check out the dramatic change that happens just by altering the highlights and shadows.

The sky now looks overly dramatic, and the foreground is really bright and practically free of shadows. Since HDR is largely done to taste, some might like this style as-is, while others might deem it too extreme. If you want a slightly less dramatic and more realistic photo, move the highlights and shadows sliders around to taste.

How to do Single Image HDR Effects with Aurora HDR 2018

3. Adjust the Blacks and Whites sliders

To sharpen up your image and make it less flat, play around with the image blacks and whites. In general, adjusting whites is preferable to bumping up the exposure since the latter will affect highlights more than shadows and mid-tones.

If needed, you can even brighten your shadows more by using the Dodge tool and darken highlights with the Burn tool (built-into Aurora HDR). While dialing in the blacks of the image, be sure not to clip (lose detail) your shadows too much by going too far with the Black slider.

HINT: you want them to clip a little, otherwise there will be no black in the image and it will be flat.

4. Finish off with HDR Enhance and Smart Tone

Finally, top it off by adjusting two of Aurora HDR’s most unique and impactful features: HDR Enhance and Smart Tone.

The first feature, HDR Enhance, adds details, clarity, and color adjustment to an image without creating typical HDR problems such as a halo effect. Meanwhile, Smart Tone is a mapping algorithm that automatically brightens your image while also reducing noise.

These two features can be tweaked individually to achieve your HDR style of choice.

How to do Single Image HDR Effects with Aurora HDR 2018

The Result

At this point, it’s worth noting that although Aurora HDR 2018 has many filters that you can apply to images, I didn’t use them all for demonstration purposes. Instead, I stuck to the main editing window on the right-hand panel (HDR Basic).

After tinkering around in Aurora HDR, these are my two resulting images. The first is a single shot with balanced exposure and HDR editing effects applied. Next is a regular 3-bracket HDR image. Which image do you prefer?

Aurora HDR single Image

Here is the original unedited RAW file for comparison.

single image Darlene

Single-Image HDR Effects

How to do Single Image HDR Effects with Aurora HDR 2018

Full HDR from 3 bracketed exposures. Notice how much more tonal range is in this image than the one above.

Single Image HDR Photo – Example #2

This second example shows the single image HDR effect in an urban environment. Below is the starting RAW image before any post-processing was applied.

How to do Single Image HDR Effects with Aurora HDR 2018

Original raw image.

The above image was opened in Aurora HDR and the Highlight and Shadow sliders were pulled to their extremes. Again, you don’t (and shouldn’t) keep the highlights and shadows sliders at their extremes, but this is just a visual demonstration of how dramatic of an effect they can have. It’s also a good idea to see how far you can go, then scale it back a bit in each direction.

Notice how the image has brightened up considerably and you can now see lots of detail in the buildings, especially the “Meet the Producer” sign.

How to do Single Image HDR Effects with Aurora HDR 2018

Notice in the image above that there is a halo effect around much of the building. To fix that, simply adjust those highlight and shadow sliders to your liking. Also play around with the HDR Enhance slider, which will preserve image contrast and clarity without exacerbating the halo effect.

Next, the Whites and Smart Tone sliders were adjusted brighten the image further.

How to do Single Image HDR Effects with Aurora HDR 2018

Below is the resulting single image with light Aurora HDR effects applied. For comparison, a 4-image bracketed HDR is also included below.

Aurora HDR single Image

Original again for comparison.

Aurora HDR single Image

HDR from a single image.

HDR from 4 bracketed images. The biggest difference here is a more seamless continuation of tones. You will get less haloing and less noise from this method than using a single image.

In Conclusion

There you have it – a quick tutorial on how you can create an HDR effect from a single image in Aurora HDR.

Have you experimented with making a single image look like an HDR shot? Please share your techniques and sample images in the comments below.

The post How to do Single Image HDR Effects with Aurora HDR 2018 by Suzi Pratt appeared first on Digital Photography School.


Digital Photography School

 
Comments Off on How to do Single Image HDR Effects with Aurora HDR 2018

Posted in Photography


How to Make 5 Different Looks using Aurora HDR 2018

31 Jan

Aurora HDR 2018 has plenty of tricks up its sleeve, and one of those is versatility. It’s not a one-trick pony when it comes to creating your HDR look. The range of different tools really allows you to create a huge variety of looks really easily. Part of that is knowing what your available tools do. The other part is just playing around and exploring your own creative side!

In this article, you’ll see five different looks in HDR and how you can recreate them – but on top of that, you’ll also get them in preset form to use yourself. You’ll also get to see some of the new Lens and Transform options inside Aurora HDR 2018.

Plug it in

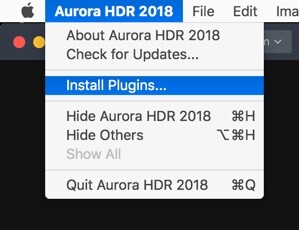
Aurora HDR 2018 doesn’t have a way to manage files, but can easily be used from other applications including Lightroom. In fact, you’ll even be able to process the files using Aurora’s built-in HDR processor, so you’re not trying to combine three already rendered files. To run Aurora HDR 2018 from inside Lightroom, you’ll need to run the standalone version first. From the Edit menu on PC or the Aurora HDR Menu on Mac, choose the Install Plugins.. menu item.

How to Make 5 Different Looks using Aurora HDR 2018

From the dialog that appears, choose the host applications that you want to use.

How to Make 5 Different Looks using Aurora HDR 2018

Back in Lightroom, once you’ve selected the bracketed exposures you want to edit, go to the File menu and from the Plug-In Extras menu, choose Transfer to Aurora HDR 2018.

How to Make 5 Different Looks using Aurora HDR 2018

Getting Started in Aurora

Aurora HDR 2018 will load up with your selected bracketed sequence. I’ve chosen these photos specifically because they have lens distortion and a crooked horizon, which you’ll see how to correct shortly.

Once the files have loaded, you can set about working with alignment and ghosting settings. You’ll see the sequence and the bracketing interval in the photos. To align the photos if you’re not on a tripod, click Alignment. To access the other settings, click the cog you see on the bottom left (see below).

How to Make 5 Different Looks using Aurora HDR 2018

If you’ve got photos with moving objects in them, such as waves, trees in the wind or moving people, turn Ghost Reduction on. Choose your preferred reference image, and how strong you want the reduction to be. Color Denoise helps remove noise but increases the time your HDR takes to render. Finally, turn on Chromatic Aberration Removal to automatically get rid of color fringing on your photo.

How to Make 5 Different Looks using Aurora HDR 2018

How to Make 5 Different Looks using Aurora HDR 2018

Lens and Perspective Corrections

In the Filters header, you’ll see two icons. The first is for Perspective corrections or Transform (including rotation) and the second for Lens corrections.

The little odd looking shape is for Perspective and the round one is Lens Corrections.

You can fix rotation here (or using Crop as well) by clicking the Perspective icon. Rotation of 24 and Scale of 50 correct this image nicely.

How to Make 5 Different Looks using Aurora HDR 2018

Transform sliders correcting perspective.

Your penultimate step before going to the individual HDR looks is to fix the bow in the horizon caused by the wide-angle lens. A setting of 18 looks good for this photo. It also reveals that 24 was too much in the previous step, which you can always fix by going back to Perspective correction. 19 looked better zoomed in.

Lens Correction fixing distortion caused by wide lenses.

As the photo is a little underexposed, boosting the Exposure before going to create your looks is probably a good idea. While you may need to change this for each look, an additional stop is a good start here.

How to Make 5 Different Looks using Aurora HDR 2018

#1 Photo-Realistic

For your first look, something photo-realistic is the best approach. You’re not trying to get anything gritty, or super desaturated, or over saturated here. We’ll get to that later.

For this look, use HDR Basic, Color, and HDR Denoise. In HDR Basic, smooth out the dynamic range by reducing Highlights and increasing Shadows. Smart Tone of 44 also helps it along. HDR Enhance (formerly Clarity) brings up some nice detail, 50 is looking well here. Your aim is to get the best looking photo you can before tweaking the look – this will be true of all looks.

How to Make 5 Different Looks using Aurora HDR 2018

The color is a little flat so in the Color panel, you can boost both Saturation and Vibrance to +20. Color contrast, which controls the contrast between the primary and secondary colors looks good around 20 as well. You’re not aiming for extremes here, just to get a good looking photo.

How to Make 5 Different Looks using Aurora HDR 2018

You’ve probably noticed the noise in the clouds at this point. This is where HDR Noise comes in. Setting this to around 25 softens up the noise.

How to Make 5 Different Looks using Aurora HDR 2018

And that makes your first look, a photorealistic HDR photo.

How to Make 5 Different Looks using Aurora HDR 2018

#2 Gritty HDR

With the basic look out of the way, it’s time for the more surrealistic to take over.

Start by using the History Panel to reset everything to your original starting point AFTER increasing the Exposure +1 and applying your Perspective and Lens Corrections. The History Panel records every action you take in Aurora HDR in chronological order, so simply select the last action after the ones you’d like to save, then begin the next edits. The History Panel will begin recording any edits from there leading to your Gritty HDR look!

Now it’s pretty flat and bleak, so you’re going to take it even further in that direction.

How to Make 5 Different Looks using Aurora HDR 2018

Set your HDR Enhance to +100 to get the bleak and gritty ball rolling. Smart Tone of -50 darkens the photo as well, and a hint of Vibrance (+15) gives color to the sky, while leaving the rest of the photo muted.

How to Make 5 Different Looks using Aurora HDR 2018

To complete your gritty look, go to the HDR Structure panel. In the top section, set Amount to 25 to begin to increase detail in the photo. Increasing Softness (+80) makes the detail more realistic, while Boost accentuates it (+75). The latter two sliders might seem at odds, but a quick play shows they complement each other rather than compete.

HDR Microstructure boosts micro contrast, while Softness makes it more realistic. By increasing Amount to 71 and Softness to 28, you’ll get even more detail. You may even like the noise that this processing adds to the photo. I think it’s a big part of the look.

How to Make 5 Different Looks using Aurora HDR 2018 - gritty HDR look

And now you have your classic gritty HDR look!

How to Make 5 Different Looks using Aurora HDR 2018

#3 Warm Ethereal

At the opposite end of the spectrum is a soft and ethereal look. There are two different variations you can have on this, and they depend on using Image Radiance or Glow (and combinations of each). So with a reset to your basic corrected photo, let’s begin again!

A good beginning would be for a warmer look, so set your Temperature in HDR Basic to 10. While Image Radiance does have a Warmth slider, Temperature is much more effective. This look is all about Image Radiance. Set your Amount to 75 to really give the image a glow. Smoothness affects the softness of the image, and in this case, you’ll probably agree, it’s a little too soft, so set it to -50.

Overall at this point, the photo is too bright, so a reduction in Brightness to -76 helps. Darkening Shadows also helps. Finally, for Image Radiance, an addition of +61 Vividness to boost the saturation, while Warmth just adds another hint of yellow tones in a more controllable way than with Temperature.

How to Make 5 Different Looks using Aurora HDR 2018

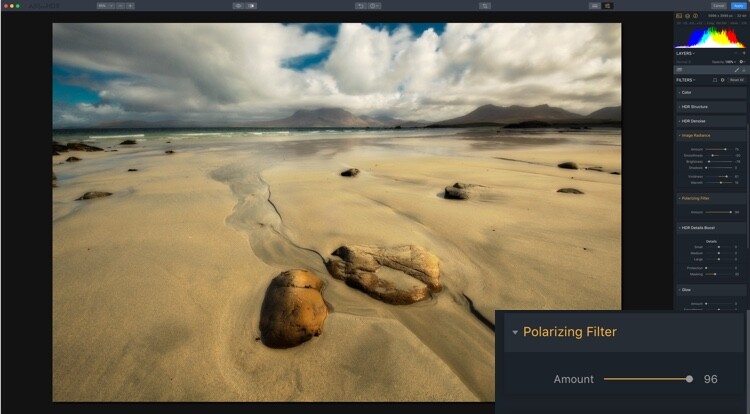
There’s a lot of warmth in the photo (in a good way), but you may want to add a little contrast of color into it. By using the Polarizing Filter, you can add more blue to sky, emulating a real circular polarizer.

How to Make 5 Different Looks using Aurora HDR 2018

The final thing for this look is for you to introduce a little global detail using HDR Detail Boost. As you can guess Small affects the fine detail, Large affects the global contours of the photo, while Medium controls the details between Small and Large.

To sharpen the global edges, you can push Large. This firms up the edges while retaining the softness that Image Radiance has created. Protection protects fine detail while Masking controls where the effect is applied with 30-70 being optimal.

How to Make 5 Different Looks using Aurora HDR 2018

So that’s your first ethereal look.

How to Make 5 Different Looks using Aurora HDR 2018

Warm Ethereal

#4 Soft Glow

Your second ethereal look uses Glow. Reset your photo again to the settings at the start of the looks. Because Glow works on the Highlights, it’s probably a good idea to reduce your Exposure down to 0.60. Now, go to Glow and set the Amount to 50. A fog settles over the photo. This would work better on a dark evening scene that a sunny day, but you get what it does.

Now that you know what Glow looks like, it’s time to get a little wacky. Start by setting your Smart Tone to -100, and HDR Enhance to 56. This reduces some of the Glow, so set that Amount to 94. You probably want to go a bit wilder with Color, so set Saturation at 50 and Vibrance much higher, at 70. A hint of Color Contrast gives even more of a boost at 30.

How to Make 5 Different Looks using Aurora HDR 2018

For the final part of this look, add +30 Amount from Image Radiance to enhance the glow.

And that’s look #4.

How to Make 5 Different Looks using Aurora HDR 2018

Soft Glow

#5 Nitty Gritty Black & White

And now for something completely different – a nice gritty Black & White. Again, begin with a reset. Now, in Color, turn the Saturation down to -100.

Before going for grit, you’ll need to get contrast right. A few tweaks will get it to a workable point. It’s not set in stone at this point though.

How to Make 5 Different Looks using Aurora HDR 2018

And now you get to go for grit! You can use all the tools from previous looks that gave more detail, so HDR Enhance, HDR Structure, and HDR Details Boost apply. Go wild. This is definitely one for your own taste. The settings used here were HDR Enhance 40, HDR Structure Amount 40, Softness 20 and Boost 50. HDR Microstructure is Amount 47 and Softness 50. HDR Details Boost has Small 31 and Large 50.

How to Make 5 Different Looks using Aurora HDR 2018

Here’s the final look.

How to Make 5 Different Looks using Aurora HDR 2018

Nitty Gritty Black & White

Presets

And here are the five presets for you to use:  HDR-5-Looks-Presets. Download the file and unzip it, then save it on your hard drive.

To install the Presets, open the standalone version of Aurora HDR 2018. From the File menu select Show Presets Folder. Drag the new presets folder (you must unzip it first) into that one. Restart the program to have the presets show up in Aurora HDR 2018 (look under User Presets).

Go out there and have a bit of fun with your HDR images, and post your results in the comments below.

Disclaimer: Macphun, soon to be Skylum, is a dPS advertising partner.

The post How to Make 5 Different Looks using Aurora HDR 2018 by Sean McCormack appeared first on Digital Photography School.


Digital Photography School

 
Comments Off on How to Make 5 Different Looks using Aurora HDR 2018

Posted in Photography


4 Tips for Creative HDR Styling with Aurora HDR 2018

27 Dec

Arguably the best software for making high dynamic range photos is Macphun’s (soon to be Skylum) Aurora HDR 2018. This image editor can be used as by itself or in conjunction with their popular Luminar photo editor (as well as a plugin for Photoshop, Lightroom, Aperture, and Elements). Within Aurora HDR are tons of photo editing tools including their popular presets (filters). But you don’t have to use Presets to creatively style your HDR photos.

Here are four tips beyond using presets for achieving creative images.

1. Make your images pop with subtle HDR enhancements

4 Tips for Creative HDR Styling with Aurora HDR

Before – the middle image of a 3-shot bracket.

Instead of going right for the Presets at the bottom of Aurora HDR, dive right into the HDR Basic panel on the right-hand side of the software. Start with the Contrast and HDR Enhance sliders to enhance textures and details in your photo. Then play with the Smart Tone to tame down the shadows that can be created by increasing the contrast.

Next, head to the Color panel right below HDR Basic and adjust the Vibrance and Saturation. Keep these color adjustments minimal if you’re going for a more subtle, realistic look. Based on the color edits that you make, you may also need to balance out the color temperature if your image appears too cool or too warm.

4 Tips for Creative HDR Styling with Aurora HDR

Add the HDR Basic and Color Filters.

4 Tips for Creative HDR Styling with Aurora HDR

2. Add a Polarizing and Graduated ND Filter Effect

Landscape photographers are well aware of the effects of the polarizing and graduated neutral density (ND) lens filters. If you aren’t familiar with them, here’s a quick rundown. A polarizing filter helps darken skies and minimize reflections and glares of light bouncing off of surfaces such as water or glass. Similarly, the graduated ND filter helps balance out exposures by darkening backgrounds that are much brighter than foregrounds. In essence, both of these filters are often needed to obtain the best landscape photos.

If you don’t have these filters or happen to forget them, Aurora HDR’s post-processing effects can produce very similar results. Simply click scroll to the Polarizing Filter panel and apply as much of the effect as you wish. In the example below, increasing the polarizer makes the blues really pop, especially in the sky.

Further down, you’ll find the graduated ND filter effect, known simply as Top & Bottom Tuning. This allows you to adjust the exposure, contrast, vibrance, and saturation of the top and bottom areas of your image separately. If you happen to have an untraditional horizon, click the Set Orientation button to fine tune the horizon’s rotation and make your graduated ND filter effect blend more realistically.

4 Tips for Creative HDR Styling with Aurora HDR

Polarizing Filter and Top & Bottom Tuning (ND filter)

Skylum Aurora HDR Creative Styling Tips

3. Replace the sky

4 Tips for Creative HDR Styling with Aurora HDR

Before – the middle image of a 5-shot bracketed set.

If you’ve ever photographed a sunset and wished the sky had been more colorful, you can actually make this edit rather quickly with Aurora HDR. All you need is a clear photo of the ideal sunset that you want to swap into your bracketed image. You can pull that ideal sunset image from your own archives, or use a stock photo like the one that I’m using from Pexels in the example below.

Start by running your brackets through Aurora HDR and making any desired adjustments to the resulting photo. Below, I’ve applied a Warm Skylight filter. Next, go the Layers section in the right-hand panel and click on the plus sign. Select “Add Image Layer…” This is where you can select your ideal sunset photo and import it as an image layer.

Once your new image has loaded, you can apply any filters or adjustments as desired. Next, click on the paintbrush icon next to the image layer. A small drop-down menu will appear with four options: Brush, Radial Mask, Gradient Mask, and Lumosity.

4 Tips for Creative HDR Styling with Aurora HDR

If your image has a straight horizon with no big obstructions, the Gradient Mask will easily mask your ideal sunset into your bracketed shot. But in my case, I have a big building in the way, so the Brush is my best bet. After clicking on Brush, a thin bar of options will appear on the top panel. This is where you can control whether you’re painting over the image, or Erasing (backtracking on any mistakes). You can also control the size, softness, and opacity of the paintbrush.

When I’m done painting in my new sunset sky, I’ll press the blue Done button. Check out the before and after images below!

4 Tips for Creative HDR Styling with Aurora HDR

4 Tips for Creative HDR Styling with Aurora HDR

4. Add a texture overlay

4 Tips for Creative HDR Styling with Aurora HDR

Before – the middle image of a 3-shot bracketed set.

Using a similar technique to sky replacement, you can add textured overlay layers to your photos for a more creative effect. All you need is a textured photo, such as the weathered paper image below. Simply import that image as a new layer. You can then selectively mask it by using the Brush, Radial Mask or Gradient Mask tools (explained above). Or you can apply the texture equally to the whole image by adjusting the opacity. The resulting image had a moody, vintage look to it.

Skylum Aurora HDR Creative Styling Tips

Over to You

Have you used Aurora HDR 2018 to enhance your images? What tools have you found to be the most useful for achieving more creative photos? Let us know in the comments below!

Disclaimer: Macphun, soon to be Skylum, is a dPS advertising partner.

The post 4 Tips for Creative HDR Styling with Aurora HDR 2018 by Suzi Pratt appeared first on Digital Photography School.


Digital Photography School

 
Comments Off on 4 Tips for Creative HDR Styling with Aurora HDR 2018

Posted in Photography


How to Process Real Estate or Architectural Photos with Aurora HDR 2018

21 Nov

If you’ve ever tried your hand at real estate or architecture photography, you know that these are two of the most complicated forms of photography out there. The challenge is due mostly to having to balance out shadows created by harsh or uneven lighting. Thus, it’s no wonder that High Dynamic Range (HDR) photography is one of the most-used techniques for capturing real estate and architecture photos.

Before I go any further, let’s make it clear that this article is not about defining what HDR photography is or debating its merits. There is a myriad of arguments for and against HDR, but let’s save those are for another article. For now, let’s talk about Aurora HDR 2018 and how it might help you capture and process better HDR images.

How to Process Real Estate or Architectural Photos with Aurora HDR 2018

Simple, intuitive interface

If you’ve made HDR images using other photo editing programs such as Adobe Photoshop, you’ve probably had trouble figuring out how to use the software. One of the best features of Aurora HDR is that it is very stripped down, presenting you with only a few essential options that you can select to create your image. This greatly reduces your learning curve and makes it easy to get started immediately.

Use as standalone or with other programs

Speaking of other photo editing programs, you can use them in conjunction with Aurora HDR. It’s very easy to do. When you install Aurora HDR 2018 you can set it up to work both as a standalone program, or as a plugin for Lightroom, Photoshop, and others.

You don’t need a tripod

Historically, you’ve always needed to shoot bracketed images with a tripod to make sure they’re all aligned before merging them into a single HDR image. Not so with Aurora HDR. Thanks to their handy Alignment feature, Aurora HDR can automatically align your bracketed images (more on this in #2 below). This means that you don’t necessarily need to capture brackets with a tripod.

Of course, your images should be relatively aligned beforehand, but you don’t need the pinpoint accuracy that you used to need with other HDR photo editing programs.

Macphun Aurora HDR Photo Editing

Getting started with Aurora HDR

1. Open Aurora HDR and load images

When you first open Aurora HDR, you’re presented with a straightforward dialogue box that offers you three options (as seen in the screenshot above).

a) Open Image – In the very center is a button labeled “Open Image.” You can click on the button to select your images, or drag and drop them.

b) Batch Processing – If you have multiple sets of bracketed shots that you want to process all at once, drag and drop them into the Batch Processing dialogue box! Aurora HDR is intuitive enough to sort through the batch of files for you and automatically detect and match up your bracketed images.

Aurora HDR Batch Processing

c) Open Sample Image – This is a blue hyperlink below the “Open Image” button that you’ll probably only use the very first time you’re getting your feet wet with Aurora HDR. It exists mainly for demonstration purposes.

2. Set additional settings

For now, let’s assume you chose to Open Images (or, in the demo screenshots below, Load Sample Images). After doing so, another dialogue box appears with just a few options. The Alignment option is visible, and the others pop up when you click on the “Additional Settings” button.

Aurora HDR Brackets

Alignment

As mentioned above, checking the Alignment box will make sure all of your bracketed images line up properly. This means that you could possibly hand hold your camera while taking bracketed shots. But if you’re shooting a paid job, I’d still recommend shooting on a tripod to make sure you get the right shots, in perfect registration.

Ghost Reduction

If you happen to have a moving subject in your HDR brackets, enable the Ghosts Reduction setting. This can minimize the effect of ghosting in which moving objects may appear translucent or ghost-like in your final image. For real estate and architecture photography, you’re unlikely to have moving subjects unless you’re incorporating people in your photo or you can see moving tree branches through a window.

Aurora HDR Options

Get to Ghosts Reduction, Color Denoise, and Chromatic Aberration Removal by clicking on the gear icon (seen here in orange).

Color Denoise

Reduces the low-light noise in color pixels that can sometimes occur when merging photos together. This option is automatically enabled (as seen above), but you can shut it off if you wish.

Chromatic Aberration Reduction

It’s not unusual for real estate or architecture photos to have chromatic aberrations. Luckily, Aurora HDR has an option for minimizing the appearance of the purple and green glow along your image edges that is a clear indication of chromatic aberration.

3. Merge your photos

After checking the settings, click on the blue Create HDR button, and wait for your images to merge. This is perhaps the only downside to Aurora HDR (or, the whole HDR process in general). It takes a minute or two for the images to be merged together, so sit tight!

4. Select a preset or edit with the tools

Once Aurora HDR is done merging your photos, you’ll be presented with a more robust workspace where you can edit your HDR image further.

At the very bottom of the screen are a bunch of presets that you can choose to automatically adjust your image to a certain style. The Basic presets are selected by default, but if you click on the yellow “Categories” hyperlink, a bunch more will appear. For real estate, the Architecture presets are particularly helpful. Once you select a preset, you can adjust the amount to lessen or magnify the effect to your taste.

If you prefer to manually edit the photo with or without presets, use the far right panel where you’ll find basic photo editing tools. Scroll down to find even more editing tools such as Adjustment Layers and Dodge and Burn (more on these below).

aurora HDR

Preset categories here.

Aurora hdr

Lessen the effect of a preset by lowering the slider.

5. Add Adjustment Layers

Another fantastic feature of Aurora HDR is the ability to easily add Adjustment Layers in order to make targeted, non-destructive edits to your image. This is extremely useful in real estate and architecture photography, as you often need to make color and tonal adjustments to your image without inflicting permanent changes on the pixels.

For example, the image below illustrates the addition of an Adjustment Layer that targets the blue tinge in the staircase and chairs in the middle of the image, with the goal of color correction. Adjustment Layers also exist in Photoshop, and they function very similarly in Aurora HDR. The best part is that it is much more intuitive and easier to find in Aurora HDR than they are in Photoshop.

Aurora HDR Adjustment Layers

Adding an Adjustment Layer for local color control in selected areas.

6. Dodge and Burn

If you’ve upgraded to the brand new Aurora HDR 2018 version, you’ll find a couple of essential real estate photo editing tools that are much handier to access: Dodge and Burn Tools! If you’re unfamiliar with dodging and burning, you can read up on these photo editing processes in this dPS article.

In short, dodging helps you brighten targeted areas of an image while burning lets you darken them. Both techniques are essential for real estate photography retouching. In the new version of Aurora HDR, these tools are easily accessible in the right-hand panel. Simply scroll down to the “Dodge and Burn” panel and click on “Start Painting.” This will activate a few settings right above your image.

Aurora HDR Dodge and Burn

Use the Dodge and Burn tools to do special localized tone control in your image.

In Conclusion

If HDR photography sounds interesting to you and you’re looking for an easier way to post-process your images, give Aurora HDR 2018 a shot! Its intuitive, clutter-free interface is relatively easy to learn and you can begin enhancing your real estate photos in no time.

Disclaimer: Macphun is a dPS advertising partner.

Aurora HDR Final

Final image edited with Aurora HDR 2018.

Aurora HDR Sample Images

Before – a single image of a series of brackets.

Before

01 Macphun Aurora HDR Photo Editing

Before

Before

01 Macphun Aurora HDR Photo Editing

01 Macphun Aurora HDR Photo Editing

The post How to Process Real Estate or Architectural Photos with Aurora HDR 2018 by Suzi Pratt appeared first on Digital Photography School.


Digital Photography School

 
Comments Off on How to Process Real Estate or Architectural Photos with Aurora HDR 2018

Posted in Photography


Video Tutorial: How to Make Realistic Images Faster with Aurora HDR 2018

18 Oct

As a landscape photographer who relies heavily on HDR to pull off much of my work, I’m always keen to learn about better ways of doing what I do. Most of the time my art tends to run towards natural looking images in contrast to the wild and crazy stuff of HDR’s reputation. The HDR software I use matters when I’m going for a more natural looking photo in my post-processing.

Going natural with Aurora HDR 2018

Aurora hdr 2018 cactus before after

You can see several examples of the natural-looking results I’m getting in from Aurora HDR in the accompanying video and the several before and after images included here in the article.

Aurora HDR 2018 delivers, even more, natural-looking photos than before

The latest version of Aurora HDR is fresh out of the factory and I’ve been in a tire-kicking session with it for a few days making several photos. As expected, it’s a worthy upgrade. Do you want to see what’s new and how it helps when you want to keep the look of your HDR photos on the natural side?

Before

After processing with Aurora HDR 2018.

Under the Hood of Aurora HDR 2018

The Macphun engineers have been very busy for many months re-building Aurora HDR from scratch. It’s like Walter White always says in Breaking Bad, “It had to be done.” In order to create a cross-platform Windows/Mac application, all new code was required. Big job.

The resulting product is something they can be proud of. The new HDR algorithm in Aurora HDR 2018 churns out very natural looking HDR images when it’s used correctly and with natural HDR being the goal. Of course, Aurora HDR 2018 is a perfect fit for my landscape photography work. It uses the most modern tone-mapping technology and an advanced image-processing engine, which makes very clean images, as you’ll notice in my examples.

Before

After processing with Aurora HDR.


Video tutorial: Keeping it natural and real in Aurora HDR 2018

All the new features, just added to Aurora HDR 2018 in this release, bring it ever closer to becoming the only app you’ll need to process your HDR images and keep them as natural looking as you want. When you watch the video you’ll see how I use some of the new major features packed into Aurora HDR 2018 when creating my natural looking HDR landscapes. Watch the demo video:

Embracing the faster workflow using Aurora HDR 2018

You probably love photography as much as I do. Getting new tools that really help me get to my intended vision faster, or easier, or just better in any aspect, are quite welcome. They make it even easier to love what I do.

Kudos to the completely rewritten HDR algorithm and the advanced image-processing engine in Aurora HDR 2018. I’m finding that it’s speeding up my workflow significantly. That’s because of how good my photos usually look immediately after tone mapping even without even doing anything else in Aurora.

If I were brand new to photography, I’d be totally happy leaving my photos in that initial tone-mapped state with no further processing. They are that clean!

Before

After

Back in the day (before Aurora HDR), it could take me up to a couple of hours to finish an HDR photo. Even then, it wasn’t all that natural looking much of the time. Thankfully, things are always evolving in exciting ways.

Ever since my foray into HDR photography eight years ago, my skills have improved. But I honestly have to credit the improvements in software, like Aurora HDR 2018, for dramatically reducing the time it takes me to finish a photo to just a few minutes while getting better, more realistic, results.


My intention is keeping my post-processing time to five minutes per image and striving for consistently higher quality photography. Aurora HDR 2018 is a big piece in my HDR workflow making that happen so it’s now a permanent tool in my HDR arsenal.

Be sure to watch the video, then I invite you to check out more Aurora HDR images in my SmugMug gallery.

Disclaimer: Macphun is a paid partner of dPS.

The post Video Tutorial: How to Make Realistic Images Faster with Aurora HDR 2018 by Keith Cuddeback appeared first on Digital Photography School.


Digital Photography School

 
Comments Off on Video Tutorial: How to Make Realistic Images Faster with Aurora HDR 2018

Posted in Photography


How to Make Natural-Looking HDR Images with Aurora HDR 2018

11 Oct

Aurora HDR 2018 is tremendously easy, fun software by Macphun, designed for processing HDR (High Dynamic Range) images. If you’ve been following popular contemporary photography for a while, you’ll know that dramatic HDR is no longer in style. It fell out of photography fashion as quickly as wine-lovers stopped drinking merlot. Knowing how to create natural-looking HDR images is a very practical tool to have in your wheelhouse though, so let’s take a look at how to do that with Aurora.

How to Make Natural-Looking HDR Images with Aurora HDR 2018 - ice cave

Realistic & Detailed Aurora HDR 2018 preset.

When do you need HDR?

If you’re shooting a location where there are very bright tones, along with very dark shadows, your camera probably won’t be capable of capturing exactly what your eye sees. If you bracket your images as you shoot, you can capture the entire dynamic range of the scene – every tone from very bright to very dark.

What is bracketing?

Bracketing means you shoot multiple images of the same thing, changing the exposure of each individual image. Most photographers choose to shoot between three and five images, though as few as two will work. Sometimes a situation requires seven or more. By bracketing your exposures this way, you generate the raw materials you need to use in Aurora HDR to create a final image that records all of the bright and dark tones your eyes saw.

How to Make Natural-Looking HDR Images with Aurora HDR 2018

My three bracketed images inside Lightroom.

Setting your camera up to bracket

First, attach your camera to your tripod, compose your scene and fine-tune your focus. Now, configure your bracketing. You can set the auto-bracketing feature (AEB) on your camera to shoot multiple images, approximately one to two stops of light apart, depending on the situation. The first image will be very light, or overexposed. The second image will be correctly exposed – or what your camera interprets as correct. The third image will be very dark or underexposed. Many photographers find three images to be effective, especially when they’re striving for a natural-looking HDR look but you can shoot as many as you think you’ll need.

How to Make Natural-Looking HDR Images with Aurora HDR 2018 - back of camera AEB on

Bracketing settings on a Canon camera.

NOTE: If you don’t have a camera with an auto-bracketing feature, don’t worry, you can bracket manually too. Create multiple exposures for each scene using your exposure compensation dial to increase and then decrease your exposure (make sure to use Aperture Priority and only change the shutter speed as altering the aperture will result in images that do not blend properly). It takes a little more time and patience while you are shooting but it’s worth trying if your camera doesn’t have an auto-bracketing feature.

How do you process the brackets?

After your shoot, upload your images to your computer just like you normally would. Aurora HDR runs as stand-alone software but if you’re a Lightroom user, it can be installed as a plug-in too.

Starting in Aurora HDR 2018

Double click the Aurora icon to open the software. Click the Open Image button.

Choose the folder where your images live and select them. Click Open.

How to Make Natural-Looking HDR Images with Aurora HDR 2018 - select files

The Aurora dialog box appears with your selected images. Click the Create HDR button.

Note: Tick off the “Alignment” checkbox if you think there was any movement of the camera between shots. The program will scan the images and attempt to align them. You can also click the little gear icon for additional settings like removing ghosting (subjects that moved from image to image).

How to Make Natural-Looking HDR Images with Aurora HDR 2018

Starting in Lightroom

Go to the folder containing the images you want to process in HDR. Click to select them. Right-click to bring up the menu. Select Export > Aurora HDR 2018 > Open Original Images. The Aurora dialog box appears with your selected images. Click the Create HDR button.

How to Make Natural-Looking HDR Images with Aurora HDR 2018

Note: If you made adjustments to your images in Lightroom, such as lens corrections, cropping, straightening, spot removal or noise reduction, instead of selecting Open Original Images, choose Use .TIFF with Lightroom Adjusters.

Aurora HDR’s Realistic Presets

Part of why I opened this article with the statement that Aurora HDR 2018 is both easy and fun is because of its presets. Along the lower part of the screen, just above the filmstrip, you’ll see a menu called Categories. Click on it to bring up the preset menu, then click on Realistic HDR.

How to Make Natural-Looking HDR Images with Aurora HDR 2018

My four favorite natural-looking Aurora presets live in this folder:

  • Realistic & Detailed
  • Realistic & Balanced
  • Realistic Bright
  • Realistic Neutral

These presets make my images look and feel the way the ice cave looked and felt when I was there. To me, recreating an image faithful to that memory is what natural-looking realistic HDR is all about.

How to Make Natural-Looking HDR Images with Aurora HDR 2018

Choose your favorite

The best way to choose your favorite Realistic HDR preset is to scroll all the way to the left on the filmstrip and then work your way right, clicking each one. As you select each preset, the larger image above the filmstrip will show you a more detailed preview of how each preset affects the look of your image. Once you find your favorite, it might look so perfect that all you might need to do is save it. Or, you might want to personalize the preset before you save. Here are a few tips on how to do that.

Modifying the Opacity

Let’s say that you love the Realistic & Detailed preset but it’s just a touch too much. The first – and easiest – way to modify its effect is to reduce the overall opacity of the preset. To do that, click on that preset in the filmstrip. Slowly shift the slider to the left, reducing the opacity, and lowering the effect (I often find that between 75-80 is the perfect amount). Save the image at this point if you are happy with it.

How to Make Natural-Looking HDR Images with Aurora HDR 2018

Another method of reducing opacity is layer-based. Look to the upper right corner of the Aurora HDR develop panel, just below the histogram. See where it says Layers? The Opacity adjustment slider for that layer is just below that. You can increase it or decrease it (each layer) there as well.

Fine-tuning the preset

If you’d like to use your chosen preset as a starting point, you can easily modify it. On the right-hand panel of the screen, in the editing panel, just below the Layers section, you’ll see a section called Filters. The first one is called HDR Basic which adds clarity, contrast, vibrance, and a bit of saturation. I’m calling this adjustment out specifically because it does so much to your image.

Just for kicks, push the HDR Enhance slider all the way to the right, so that it’s at 100. Your image is now the opposite of what most people consider natural-looking HDR. Next, adjust the slider to zero to get a feel for what this slider does to your image.

How to Make Natural-Looking HDR Images with Aurora HDR 2018

Realistic & Detailed Aurora preset, with HDR Enhance set to 100. Compare this to the lead image of the same ice cave, with the HDR Enhance set at 50. This image is quite a bit more contrasty, with sharper edges throughout.

Most of the Realistic presets are set below 50 for HDR Enhance. If you want to stay in a natural-looking range but your image needs a touch more pizazz, slowly move the HDR Enhance slider to the right until you reach the level that feels right to you.

Additional fine-tuning options

As you work your way through Aurora’s Filters, you’ll see additional options like Color, HDR Structure and Glow. The preset you’ve chosen dictates the setting of each Filter. But again, you can shift each slider individually to give your image more, or less, pop.

How to Make Natural-Looking HDR Images with Aurora HDR 2018

This HDR image was made from three exposures using the Realistic & Bright preset, set at an opacity of 80, with no other changes made.

To learn the effects of each tool, I suggest moving the sliders all the way to the right, so that the effect is at 100 and then doing the opposite, so the effect is at zero. Nine times out of ten I think the Aurora HDR design gurus have chosen the right level, and I leave the preset at its original amount. If you do choose to make a change just remember that if your goal is natural-looking HDR, a little Structure or Saturation can make a big shift in the appearance of your image.

Glow

Glow is an interesting option, giving images an almost Orton-like effect. While it’s a popular style option for many photographers right now, it’s not what I usually call natural-looking. In all four of my favorites, Realistic HDR presets, the Glow setting is set to 0. For ice cave images, 0 is the perfect amount but for some subjects, like this barn, a touch of Glow softened the natural look of this HDR image and made it feel more inviting.

How to Make Natural-Looking HDR Images with Aurora HDR 2018

This HDR image was made from three exposures using the Realistic & Bright preset, set at an opacity of 100, with Glow set at 15. Both are very small changes but compare this image to the one above. This one has a little more of a bright, dreamy feel while still looking natural.

While I probably sound like a broken record at this point, remember to move the slider just a touch to the right if you want your HDR image to have that natural, I-just-stumbled-on-this-gorgeous-vista-and-took-this-amazing-picture sort of look to it.

Top and Bottom Adjustment

The Top and Bottom Adjustment Filter is a “selective adjustment” meaning that, unlike global adjustments, it only affects parts of your image. If you have an image where the sky reads overexposed and is much brighter than the foreground, or conversely, where the foreground is dark and underexposed, adjust the image using this tool.

How to Make Natural-Looking HDR Images with Aurora HDR 2018 - top and bottom adjustments

This HDR image was made with the same three exposures using the Realistic & Balanced preset, at 80% opacity, plus a Top Adjustment of -5 Exposure, +5 Contrast and +15 Vibrance. I added a Bottom Adjustment of +10 Exposure and +5 Warmth. Of the three final HDR images, this one feels the most natural and faithful to the barn itself.

For this final version of the barn, after applying the Realistic & Balanced preset, at 80% opacity, I ultimately decided that the sky was a bit too light and the barn was a little too dark. I added a Top Adjustment of -5 Exposure, +5 Contrast, and +15 Vibrance. I also added a Bottom Adjustment of +10 Exposure and +5 Warmth. These adjustments help to enhance the sky and even out the overall exposure of the image.

Of the three, this version is my favorite. Which is yours?

Saving your image

Once you’ve completed all of your adjustments, it’s time to save your image. If you started in Aurora and want to create a JPEG or TIFF, select File > Export and then select the correct folder and rename the file as appropriate for your workflow.

If you want to create a native Aurora .mpaur2 HDR file, select File > Save and then select the correct folder and rename the file. This format saves the history (and any layers) as well and allows you to continue to go back in and make changes to your image.

How to Make Natural-Looking HDR Images with Aurora HDR 2018

Saving your image to your Lightroom Catalog

If you started in Lightroom, it’s a snap to save your image. After you finish processing your image in Aurora HDR, click the Apply button in the upper right corner of the interface. This saves and also catalogs your image in Lightroom. The new file name will end in AuroraHDR2018-edit.tiff.

How to Make Natural-Looking HDR Images with Aurora HDR 2018

Your Turn

Hopefully, you’ve been following along and processed a few images in Aurora as you were reading this article. Now take a minute to upload your best natural-looking HDR version. Share with the dPS community about how you created it using Aurora as well as any other tips or tricks you’ve discovered.

Disclaimer: Macphun is a dPS advertising partner.

The post How to Make Natural-Looking HDR Images with Aurora HDR 2018 by Lara Joy Brynildssen appeared first on Digital Photography School.


Digital Photography School

 
Comments Off on How to Make Natural-Looking HDR Images with Aurora HDR 2018

Posted in Photography


Review of Macphun’s Aurora HDR 2018

19 Sep

HDR, or High Dynamic Range, photography is a technique that has been around for decades but really started making waves in the modern digital imaging scene around 2005. It involves combining multiple exposures of a picture, usually taken with a technique known as bracketing, to create one final single image with bright parts that are not overexposed and dark parts that are not underexposed.

Review of Macphun's Aurora HDR 2018

In recent years the software required to do this has gotten more powerful, less expensive, and so much easier to use. With just a few clicks anyone can make beautiful HDR images. Aurora HDR 2018 is the latest arrival in this category, created by Macphun, a developer rooted in photography and digital image manipulation. It’s a program that caters to casual users who want a fun creative outlet while also meeting the demands of professionals who make their living from designing beautiful works of photographic art.

If you want a single program that can handle all your HDR needs no matter your skill level, Aurora HDR 2018 may be just the tool for you.

What is HDR photography?

HDR photography is all about getting the best of both worlds when taking photos, particularly of static subjects like landscapes or architecture. If you’re taking a picture with extraordinary bright spots like a sunrise or sunset, you can expose for the highlights (i.e. the bright spots) which mean the dark parts get really dark and underexposed.

Alternatively, you can expose for the shadows (i.e. the dark spots) which leave the bright parts extra bright and overexposed. HDR photos are created when a photographer takes multiple shots, usually three or more, of the same scene: one underexposed, one properly exposed, and one overexposed. Then software such as Lightroom, Photoshop, Photomatix, and others can be used to combine all the images into a single picture that has detail in both the highlights and the shadows.

Before and after image showing what is possible with HDR.

How Aurora HDR is different

Compared to other offerings on the market, Aurora HDR’s brilliance lies in its simplicity. It’s far easier to use and just as capable as other HDR applications, and also very competitive in terms of its pricing. (Unlike some other apps, it’s available as a one-time purchase instead of with a monthly subscription.) When you open the program you are greeted with one large button that lets you load a single image or multiple exposures of the same image, which is all you need to do to get started. If you dig just a bit deeper you will notice two additional options: Batch Processing and Load Sample Images.

The former is useful if you want to quickly apply specific HDR processes and presets to many images at one time. While this can be useful if you have several images to go through I don’t recommend it for beginning users.

Aurora HDR 2018’s bread and butter is the incredible degree of control it gives you over the entire process of creating a High Dynamic Range image. This is where most people will get the maximum value out of the software.

What’s New in Aurora HDR 2018

Whether you are new to the world of creating HDR images with Aurora or are a longtime user of this software, many of the changes in the 2018 version will bring significant improvements to your workflow. The program has been rewritten from the ground up to focus on things like speed improvements, better RAW image handling, and a more user-friendly interface.

There is now a History panel which lets you see all the edits you have made to an image, and functions very much like the same option in programs such as Lightroom, which many photographers already use. The 2018 version also adds a Lens Corrections Tool and a host of other minor but noticeable tweaks while keeping the bedrock foundation of powerful yet easy-to-use HDR tools for professionals and beginners alike.

The lens correction tool is a welcome addition to the 2018 version.

These types of improvements mean a lot to me as a longtime Aurora HDR user since it sends the message that Macphun is committed to developing its apps. I’ve been burned before by companies that stop iterating on software I have come to rely on, such as Apple’s Aperture editing program, but it’s clear that Macphun is not going to leave photographers high and dry.

They have been making software for over a decade and are now even releasing some of their more popular programs for Windows users as well, including Aurora HDR 2018. It’s nice to see this commitment to continual improvement from developers, and it’s one of the reasons I enjoy using Macphun software so much.

Aurora HDR 2018 is open for pre-ordering now and will be available for purchase September 28th. Get more info here.

Other new features in Aurora HDR 2018 include:

  • A Transform Tool
  • Dodge & Burn Filter
  • Image flip and rotate
  • HDR Details Boost Tool
  • Rewritten tone-map engine to deliver more natural initial results
  • HDR Enhancer
  • Improved HDR Structure
  • Additional Blend modes

Getting started with Aurora HDR

If you are new to HDR processing and don’t know where to begin, click on Load Sample Images and you’re off to the races. The program will show you thumbnail previews of three separate pictures: one underexposed by two stops, one properly exposed, and one overexposed by two stops. When the program combines all three it will essentially give you a stunning HDR photo that you can then tweak and edit to your liking using a myriad of controls, filters, and effects.

Using your own JPEGs instead of the sample images results in a similar process, with Aurora HDR 2018 loading thumbnails of your images before you confirm that you want to proceed with combining them.

While using a tripod is ideal for creating perfect bracketed photos, sometimes horizon lines and other elements within the picture may be slightly misaligned. Click the Alignment button to have the program automatically correct for that. Additional Settings gives you options such as removing chromatic aberration and moving objects that might have changed position between each shot.

Keen dPS readers might be wondering whether Aurora works with RAW files, and thankfully they are fully supported by the program as well. You can work with one properly-exposed RAW file or use multiple bracketed RAW files to get even more room to experiment when creating your HDR images. The 2018 version includes a complete retooling of the RAW handling engine which results in improved color rendition and accuracy, which is a welcome change from previous iterations of the software.

Tools and first impressions

Once you have your pictures loaded into the main interface, creating a stunning HDR image can be as simple or as complex as you’d like. This is another aspect of Aurora HDR that I really enjoy. I have used other programs and workflows to do the same basic task of combining multiple exposures into a single image, none are as simple and yet as powerful as this program.

The interface might seem overwhelming at first but after a few minutes, I felt right at home. The non-destructive nature of the editing meant that I soon felt free to experiment with all sorts of different presets, sliders, and options without ruining anything.


Workflow

From a workflow standpoint, Aurora HDR 2018 is designed to be quick, efficient, flexible, and familiar to those who have used other image editors.

When I edit photos in Lightroom I usually head straight for the sliders on the right-hand side to tweak parameters like white balance, exposure, clarity, and sharpness. Aurora HDR 2018 gives you many of those same options. However, I have found that it is more efficient to start with a preset and then edit from there, much in the same way that Lightroom allows you to click a preset such as Aged Photo, Bleach Bypass, or Antique Black and White.

Using these presets in Lightroom just applies pre-determined values to various sliders like saturation, grain, clarity, and color which you are then free to change as much as you want. Aurora HDR 2018 works in exactly the same way. Choosing a preset like Foggy Morning, Realistic Dreamy, or Sleepy Forest results in nothing more than changing the values of Tools sliders on the right-hand side of the screen which you are then free to alter as desired.

Review of Macphun's Aurora HDR 2017

Some of Aurora HDR presets previewed at the bottom of the screen inside the program.

Aurora plays nicely with most other image editors on the market including Lightroom and Photoshop. You can easily use it as a plug-in which means you can do all your normal work in Lightroom, then quickly send an image over to Aurora HDR for additional editing, and save it right back to Lightroom when you’re done.

Aurora HDR presets

If you have ever used Instagram’s photo filters you will feel right at home in Aurora HDR. In a way, you can think of the program like an extraordinarily powerful version of that rather basic social sharing app.

Once your photos are loaded you can click on a preset (each of which shows a small preview of how your final image will look) and then save your photo with no additional work or hassle required. The presets are even subdivided into categories like Basic, Dramatic, Landscape, and a few that were designed with input from professional photographers like Trey Ratcliff, Captain Kimo, and Serge Ramelli.

I must admit I don’t actually use Instagram filters because I find them to be distracting and unhelpful for my own style of photography, but I rather liked using Aurora HDR’s presets even though some were a bit too over-the-top for my taste.

You can take things one step further if you like, and create your own custom presets which can also be applied to any HDR image. This has come in handy for me on several occasions when I wanted to combine options from a few existing presets, tweak the values of a preset, or just create my own from scratch.

Simple interface

On the right side of the interface is a list of all the various tools used by Aurora HDR to control the parameters of your image. Some of them like Color, Tone Curve, and HSL will feel right at home if you have used Lightroom, Photoshop, or other image editors as these contain the same basic sliders you would expect.

When you click on a preset at the bottom of the screen the name of the tools used by that preset are highlighted in orange, which I found to be highly useful during the editing process. Since I knew immediately which values were being changed I could then use that as a starting point for my own experimentation which often led me down a rabbit hole of creativity that I didn’t expect but always enjoyed.

The only issue I had when experimenting with presets and sliders is that the program does tend to slow down when processing your changes, though this is much less noticeable in the 2018 version. While you still get a preview of what your edits will look like I did encounter several times when the “Image Processing…” alert would show up in the lower-left corner a bit more often than I would have liked.

Before and after mode

As you make changes, whether through presets or changing the values in individual Tools sliders, you can easily see how your work is progressing by using the Before/After view which I found to be handy. Clicking on this option gives you a vertical bar that you can slide back and forth to reveal the original image on one side and your changes on the other. You can also hold the \ key to quickly see the complete original and then release it to return to the current version with your edits.

Before and After slider in action showing how your edits are affecting the image.

It’s this sort of editor-centric workflow design that I really appreciated about Aurora HDR 2018. It makes the whole process of creating and editing an HDR image as straightforward as possible and easy to understand. I have used some programs where I felt hopelessly lost as if I had to change my own mindset and wrap my head around how the program wanted me to function.

With Aurora HDR it feels like the program was designed to meet my needs and my style. I never had one of those all-too-common moments of panic when I couldn’t remember where a critical button or tool was located or figure out how to replicate something I did a week ago.

Professional features and masking

Once you dig deeper into Aurora HDR 2018 you will find tools that appeal to even highly demanding artists who want precision control over their creations. A collection of edits such as applying a preset and then tweaking additional Tools sliders can be saved as a Layer, and then additional Layers can be added on top of it similar to Photoshop.

Masks

Masks can also be used on layers. You can even apply them with a brush tool which I found extraordinarily useful if there was a preset or set of edits that I just wanted to apply to a single portion of an image. If you want to get really specific with your editing you can even apply masks based on ten discrete levels of luminosity (luminosity mask), which means your adjustments will be implemented only on the brightest or darkest portions of the image instead.

Layer masks can also be applied as radial or linear gradients which can be very useful depending on the type of HDR image you are creating. And just like Photoshop and other image editors, your changes are non-destructive so you can revert back to any editing state any time you choose. You can also return to your edits if you save your file in the native Aurora HDR format before exporting to JPG, TIFF, or another file type.

Review of Macphun's Aurora HDR 2017

Blend modes

New in Aurora HDR 2018 you can also change the layer blend mode. Here it is applied to a layer that is applying selective darkening and lightening to specific areas of the image using the new Dodging and Burning Tool.

The Dodge and Burn Tool has been used to lighten the little cottage and bridge and part of the hill, and to darken the sky and parts of the reflection in the water.

Use the little Eye Icon to turn the effect on and off to see a Before and After.

New in Aurora HDR 2018 – Blend Modes! The default is Normal. Notice with this image the colors have become more saturated after dodging and burning.

By switching to Luminosity Blend Mode the colors are preserved and appear more natural.

Batch processing

One final arrow in Aurora HDR’s rather considerable quiver, which I briefly mentioned earlier, is the ability to quickly apply presets and other defined values to a batch of images. This saves you an enormous amount of time if you have dozens or even hundreds of photos that you want to edit at the same time, using the program’s built-in presets or your own custom ones.

I do wish the Batch Processing option allowed users to specify parameters on a tool-by-tool basis to combine presets with other options like Structure and HDR Denoise, but the workaround is to create your own custom preset and just apply that in Batch mode. Of course, this method doesn’t give you the sort of fine-grain control you would get from editing each HDR image individually, but the trade-off can be worth it in terms of overall time saved if you have a large number of images.

Conclusion and rating

During my time using Aurora HDR I was impressed with the simplicity of its interface as well as the sheer depth of HDR tools at my disposal. Macphun has clearly invested a great deal of time creating and refining Aurora HDR to appeal to demanding professionals and curious hobbyists alike. Having used previous versions of this program I found this iteration to be a welcome refinement in many areas.

In terms of value, it’s a phenomenal piece of software that doesn’t require a subscription and will serve HDR photographers very well. The one quibble I still have with Aurora HDR 2018 is that it’s a bit on the slow side when implementing some presets and manipulating certain sliders. But that was a minor issue with an otherwise stellar program.

Aurora HDR 2018 isn’t for everyone, and unless you specifically work with HDR images you might be frustrated that it doesn’t have features like Dehaze and Red-Eye Removal that you may be accustomed to using in other image editors. But then, it doesn’t claim to be an all-in-one editing program and instead abides by the age-old mantra of, “Do one thing, and do it well.” If HDR photography is what you’re into, then Aurora HDR will serve you very well indeed.

Disclaimer: Macphun is a dPS advertising partner.

The post Review of Macphun’s Aurora HDR 2018 by Simon Ringsmuth appeared first on Digital Photography School.


Digital Photography School

 
Comments Off on Review of Macphun’s Aurora HDR 2018

Posted in Photography


How to Photograph the Aurora Borealis – Nature’s Night Light

14 Sep

The Valkyrior, the “Dance of the Spirits,” polar lights, Goddess of the dawn, the mythical firefoxes of Lapland, the Northern Lights, Aurora Borealis. By any name, Aurora has intrigued, scared, excited, and fascinated humans since the dawn of time.

Named after the Roman goddess of dawn, Aurora, and the Greek name for the north wind, Boreas, in Northern latitudes, they are known as the Aurora Borealis (or the Northern Lights), in Southern latitudes (e.g., Antarctica, South America, New Zealand, and Australia), the Aurora Australis (or the Southern Lights).

How to Photograph the Aurora Borealis - Nature's Night Light

These phenomena are commonly visible between 60 and 72 degrees north and south latitudes, which place them in a ring just within the Arctic and Antarctic polar circles. Aurora sightings, while occasionally seen at lower latitudes are not as common. Thus, making the trek to extreme Northern or Southern latitudes is a necessity if you want greater viewing opportunities along with greater success in photographing the Aurora.

If you are interested in learning more about exactly what the Aurora are, where they come from, and what produces the various colors that often accompany an Auroral display, there are countless books you can read and websites that one may search for this information.

How to Photograph the Aurora Borealis - Nature's Night Light

This article will provide you with insider tips on how to successfully photograph the Aurora. Return home with lasting memories and images of one of life’s most amazing experiences.

Okay, I am ready to photograph my first Aurora – now what?

Observing and photographing the Aurora is subject to local weather conditions, patience, geographic location, dark sky venue, patience, minimal ambient light, patience, being in the right place at the right time, patience and some luck.

How to Photograph the Aurora Borealis - Nature's Night Light

You see a central theme developing here, patience. If you are not willing to spend time in the field, sometimes in extremely cold weather, your opportunity for both bragging rights and capturing that awesome image, will be severely limited.

When all is said and done, you are at the complete mercy of the Sun, Earth, solar winds, nature and space. The Aurora is not a man-made light show, the cosmos rule here.

So, beyond patience, what does it take to capture that jaw-dropping image of this wonderful phenomena?

Location, Location, Location

Your first challenge is getting yourself to the right location in either the Southern or Northern hemisphere that will maximize your potential and opportunity to see the Aurora.

The best Northern hemisphere latitude is within the Auroral zone – between latitude 65 to 72 degrees. In the Northern hemisphere, you will need to head to destination cities laying on or slightly above the Auroral zone (also referred to as an Auroral oval, is centered about the magnetic poles) and north of the Arctic Circle.

How to Photograph the Aurora Borealis - Nature's Night Light

You will stand a good chance of viewing the Aurora, if you head to Tromsø, Norway, Yellowknife, Northwest Territories, Canada or Bettles, Alaska. Other excellent choices are Svalbard, Norway, Jukkasjärvi, Sweden, Kakslauttanen, Finland, Kangerlussuaq, Greenland and Reykjavik, Iceland. This is only a representative list as there are many Northern latitude cities, which make good Aurora viewing destinations.

Under the right conditions, you can see the Aurora Australis from Ushuaia, Argentina, Tasmania, Australia, Stewart Island, New Zealand and the Southern tip of South Africa, all destinations more easily accessible in the Southern hemisphere.

Estote Parati (Be Prepared)

Photographing the Aurora by its very nature requires heading out at night. Here are some things to watch out for and prepare.

  • Be aware of your surroundings, especially if you are visiting unfamiliar territory, a foreign country, or even your own neighborhood park.
  • Take extreme caution when walking in deep snow, ice, and across frozen bodies of water. You may not be able to see or identify potential hazards.
  • Team up with someone as excited about viewing and photographing the Aurora as you are or who is just willing to sit in a nearby warm car, in case you need support. Always ensure you head out with a full tank of gas.
  • Conduct visual reconnaissance during the day, identify potential ground hazards, layout a destination path and test snow and ice conditions en route to your evening’s photographic destination.
  • Let someone know your planned photographic destination(s) and anticipated return time, especially if you are headed out on your own.
  • Don’t count on your mobile phone working if you are far from service towers or in a foreign country.
  • At all times consider your intended shooting location and ensure that you comply with all local laws regarding access to properties (private and public), lakes, bridges, etc.

How to Photograph the Aurora Borealis - Nature's Night Light

Dress for Success

Dressing for the location, season, and weather conditions are essential both for your safety and for the ability to remain outside for an extended period of time in potentially body-numbing temperatures.

  • Wear many wicking, warm, and insulating layers and consider clothing appropriate for the local geographic and weather conditions.
  • Protect your entire body from exposure to what will probably be the coldest temperatures you may ever experience.
  • Carry a fully charged torch/flashlight (although wearing a headlamp frees up your hands).
  • Outfit your torch or headlamp with a red light or filter. The red light allows you to easily see where you are walking yet, preserves your night vision so you can easily and quickly operate your camera.
  • Pack chemical hand and foot warmers. Take more than you think you will need because you will need more than you think.
  • Use extra hand warmers to keep your camera batteries warm. This helps to extend their useful life in extremely cold conditions.
  • Invest in a really good pair of boots, e.g., affordable military surplus Bunny boots are rated to -60F (-51.11C) in cold, dry climates.
  • Bring a warm (non-alcoholic) drink and a snack, it may be a long night.

How to Photograph the Aurora Borealis - Nature's Night Light

Camera Equipment

You really don’t need much technical equipment to photograph the Aurora but there are some essential kit items you simply cannot do without.

Camera

A camera with interchangeable lenses will be best, but in principle, any camera can be used, even your mobile phone. Handholding your mobile phone, attempting to capture a shimmering, undulating Aurora, will not produce the same quality image that you can get with a digital camera, supported by a sturdy tripod, using a remote shutter release. This, however, should not stop you from capturing that moment and preserving the memory.

Be sure to keep your camera dry and avoid contact with snow or moisture. When walking about, it is always a smart idea to place your camera in a large zip lock plastic bag. Should you trip, slip or accidentally drop your camera (numb fingers will do that to you) in the snow, your camera body will stay dry and protected from the elements and the lens free from moisture, grime, etc.

DPS Aurora Article Image 7

Lens

To take in as much of the sky as possible and a bit of interesting foreground, using a wide or super wide-angle lens (focal length between 10mm and 24mm, with an aperture of f/1.2-2.8) will give the best results overall. In reality, almost any lens will work, keep in mind, however, your images will look different than those you see posted on the web, taken with wide or super wide-angle lenses.

Prior to your first shot, focus your camera at a distant point, back off slightly from the infinity setting and then turn off the autofocus feature on your lens. Given the dark sky, you don’t want your camera and lens trying to automatically focus on an ever-changing, moving Aurora. Locking in on manual focus, set slightly south of infinity, will give you well-focused images.

If the temperature warrants a brief duck into your car for a “warmup,” leave your camera and tripod safely outside. Bringing your camera into a nice warm car and then back out again into frigid arctic temps, will cause lens fogging, condensation, and other nasties to potentially damage your camera.

Read more on shooting in tough conditions here: How to Take Care of Your Camera in Cold Weather.

DPS Aurora Article Image 8

If you notice lint, dust or any other foreign material on your lens, NEVER blow on it. Your warm breath will instantly fog the lens. Depending on the ambient temperature outside, even small traces of moisture vapor in your breath may crystallize and freeze your lens, rendering it useless until it defrosts. Use only a lens brush pen or dry microfiber lens cleaning cloth.

Sturdy Tripod

To avoid blurring your picture due to camera movement, shaky hands, or unsteady footing on snow or ice, a sturdy tripod is essential. If you will be photographing in arctic conditions, be certain that your tripod is up to the task. Plastic tripod legs will snap in extremely cold temperatures.

Here are a few tripod options to check out:

  • Product Review: Polaroid Carbon-Fiber Travel Tripod and Varipod
  • Benro FGP18C SystemGo Plus Travel Tripod with B2 Ball Head – Review
  • Induro PHQ-3 Head and CT-214 Tripod [REVIEW]
  • Review of the K&F Concept TC2534 Lightweight Carbon Fiber Tripod

Remote Shutter Release

A remote shutter release, designed to be used with your camera, provides important benefits in obtaining that memorable photo of the Aurora. First, it will be invaluable in its contribution to creating sharper images by reducing camera shake, which occurs naturally when you depress the shutter release. Secondly, for longer exposures, which may be necessary depending on changing atmospheric conditions and your ISO setting, you can hold the shutter open without physically touching the camera’s shutter release button.

Memory Cards

Pack extra memory cards, having formatted them prior to going outside. Backup and clear your memory cards prior to your next outing. Extra cards are essential if you do not have a means to download each evening’s images to a backup device. Plan to use a single card each evening you head out. If you shoot all of your Aurora images on a single card, and that card fails, for whatever reason, well – enough said.

DPS Aurora Article Image 10

Spare Batteries

Photographing in cold temperatures drains batteries very quickly, photographing in arctic temperatures drains batteries exponentially faster. Always pack extra camera batteries. Running out of fully charged batteries when the Aurora is on full display is heartbreaking, especially when proper preparation would have prevented this situation.

Keep all extra batteries in an interior pocket of your jacket, close to your body. Trapped body heat, created by your insulated jacket and multiple layers of clothing will help keep the batteries reasonably warm, holding the charge longer.

Airtight Waterproof Dry-bag

Tough, waterproof and airtight, a dry-bag is essential. It protects your camera’s sensitive internal optics and circuitry from moisture and condensation buildup that occurs due to the extreme fluctuation in temperature when you bring your camera inside after a long evening photographing outside in sub-zero temperatures. Lens fogging and damage to your camera itself may occur if you don’t let your camera acclimatize gradually to the warm inside temperatures.

DPS Aurora Article Image 11

Prior to going inside for the evening, slip your camera into the dry-bag, roll and seal it tightly and then bring the bag and your camera inside. While there is no official rule as to the length of time your camera should remain in the dry-bag, a good rule-of-thumb is to let the camera sit in the bag for two to four hours. That’s plenty of time to acclimatize to the much warmer indoor temperature and for you to remove multiple layers of clothing and secure a warm beverage of choice.

Include several small bags of silica, moisture absorbing dry-packs in the dry-bag prior to sealing it. The silica protects against mildew, corrosion, fogging and condensation, which might damage your camera’s sensitive electronics.

Taking that Memorable Aurora Picture

While the mechanics of taking a picture of the Aurora are not complex, there are a few guidelines that will enhance your success of taking that amazing and memorable picture.

DPS Aurora Article Image 12

1. Select and shoot in the RAW format – this will provide you with the maximum amount of digital information needed to create a final image.

2. Remove the protective clear, polarizing or UV filter on your lens prior to going out to photograph the Aurora. The UV filter will likely cause concentric rings to appear in your final image.

3. Set your camera to M (manual) and turn off the camera’s flash settings.

4. Dial the lens focus ring to infinity and back off slightly.

5. Turn OFF any autofocus capabilities associated with your lens. You don’t want the autofocus feature of your lens attempting to continually refocus on the quickly moving, shifting Aurora.

DPS Aurora Article Image 13

6. Open up the aperture as wide as possible. This is when the f-number is as low as possible, i.e. f/1.2 – f/2.8 or lower for many prime and pro lenses, or f/3.5 or f/4 for many consumer zoom lenses.

7. Set the shutter speed to Bulb. This allows you to use the remote shutter release necessary to keep the shutter open for longer exposures. Depending on the intensity and movement of the Aurora, you may need to hold the shutter open anywhere between three and 12 seconds. Check your image using your camera’s live view function (if so equipped). Too long of an exposure time will tend to blur both the Aurora and the stars as they move across the sky.

DPS Aurora Article Image 14

8. Determine the proper ISO setting. This is somewhat both a technical and a personal decision. Technical as it will depend on the type of camera you have and the camera’s inherent ISO range. Personal depends on how much noise you are willing to live with in your image, again as a factor of an increasingly higher ISO setting. Start off with an initial ISO setting of 800 and adjust as your personal preferences and the photographic conditions warrant.

9. Bring and use a sturdy tripod. You want sharp Aurora images and to keep your camera as still as possible. If you don’t have a tripod, you can use a beanbag, flat rock, or another solid surface. Do not touch the camera until it is done exposing, and shield it from the wind if you can.

DPS Aurora Article Image 15

10. When possible, include a contrasting foreground. The Aurora by its very nature looks best when photographed to include a foreground, which provides scale, context, and perspective. A suitable foreground can be a tree, a building, fellow photographer, a car, etc.

11. Consider joining a professional tour if (a) this may be your first trip to the Arctic or (b) you are headed to a new international destination. Most professional “Aurora hunting” tour operators have many years of seasonal experience are very familiar with the local area, best viewing venues, are eager for you to see and photograph the Aurora and know where you can tread both safely and legally.

DPS Aurora Article Image 16

Ah…The Amazing Aurora

Being present during Aurora’s magical dance fills the observer with wonder, awe, and excitement and the experience often leaves one speechless. Capturing the Aurora in a photograph preserves that experience for a lifetime.

I hope that you may be fortunate enough to be at the right place, during the right months, at the right time, to observe and photograph Aurora’s magical dance.

DPS Aurora Article Image 19

For most of us, getting to the dance is not easy. But once there, none of the logistics, long flights, cost, or cold, make a difference. You are witness to the most spectacular light show orchestrated by Mother Nature.

The next time you gaze into the night sky, be assured that the Aurora is there dancing the night away…just waiting for you.

The post How to Photograph the Aurora Borealis – Nature’s Night Light by Al Marcella appeared first on Digital Photography School.


Digital Photography School

 
Comments Off on How to Photograph the Aurora Borealis – Nature’s Night Light

Posted in Photography


Aurora HDR 2018 pre-orders go live ahead of September 28 launch

13 Sep

Macphun has started taking pre-orders for Aurora HDR 2018, giving both Windows and Mac users a chance to purchase the software ahead of its launch later this month. The pre-order period will run from September 12-27 and includes a special lower price of $ 89 for new customers versus the regular $ 249 rate. Existing Aurora HDR customers can update for $ 49.

The Aurora HDR 2018 pre-orders are bundled with four free bonuses: a travel photo training video by Matt Granger, five sets of HDR Brackets by Pros, a 3-month membership to Zenfolio, and an HDR training video by Trey Ratcliff. According to Macphun, these bonuses have a value of $ 150.

Head to the Aurora HDR 2018 site to pre-order. The software will be available starting on September 28.

Via: CanonRumors

Articles: Digital Photography Review (dpreview.com)

 
Comments Off on Aurora HDR 2018 pre-orders go live ahead of September 28 launch

Posted in Uncategorized