RSS
 

Archive for August, 2019

Atomos and Panasonic to co-develop Raw video for the Panasonic S1H

29 Aug

In a brief press release, Atomos announced that it’s working with Panasonic to bring Raw video recording via HDMI to Panasonic’s new S1H camera. According to the company, Raw recording will be supported using its Ninja V HDR monitor/recorder.

Atomos previously announced a collaboration with Nikon to support ProRes Raw recording from the Nikon Z6, which Nikon indicated will be available later this year. Curiously, today’s announcement from Atomos doesn’t specify what Raw format it intends to support on the S1H. We reached out to the company for clarification but were told it’s unable to provide additional information at this time.

According to Atomos the Raw update will be free to Atomos users, though it’s unknown whether there will be any cost associated with the upgrade on the Panasonic side. No timeframe for availability was provided.

Atomos and Panasonic announce 35mm full-frame RAW video over HDMI from the Lumix S1H to Ninja V

MELBOURNE, Australia, Aug. 28, 2019 /PRNewswire/ — Atomos is excited to announce co-development with Panasonic of RAW over HDMI from the brand new Lumix S1H to the Atomos Ninja V 4K HDR monitor-recorder. The RAW update will be available free on the Ninja V when released by Panasonic.

“We are very proud of continuing to develop new ground-breaking technology with a company of the caliber of Panasonic. We are both highly committed to the democratisation of filmmaking for creators, and the ability to transmit RAW over HDMI from the S1H to a Ninja V is a major leap forward in this endeavour,” said Jeromy Young, Atomos CEO.

As the world’s first full-frame mirrorless camera capable of 6K internal video, the Lumix S1H combines the quality of professional cinema-grade video cameras with the size and photo capability of a mirrorless, making it the perfect companion with the Ninja V.

“The leading brand of external monitor-recorders is definitely Atomos. Both companies have a very good relationship and we have been providing 4:2:2 10bit HDMI output recording for the Lumix GH series for years. We are very proud to be developing RAW output via HDMI with Atomos for the S1H,” said Panasonic at their launch event in LA.

Added Young: “Our advancements in screen technology now allows creators to accurately monitor RAW video in real-time as it would be viewed in the home or cinema for perfect preservation of creative intent. Our pristine custom Atomos HDR screens are second to none in colour accuracy and representation of brightness from RAW signals. When combined, these advantages create a dream workflow for filmmakers.”

The new Lumix S1H will be shown working with the Ninja V at the upcoming IBC show in Amsterdam from 13 September at the RAI Hall 11.D25, more information on the combination will be available during the show.

Articles: Digital Photography Review (dpreview.com)

 
Comments Off on Atomos and Panasonic to co-develop Raw video for the Panasonic S1H

Posted in Uncategorized


The Highline Ballhead Review: The Best Bargain Ballhead in 2019?

28 Aug

The post The Highline Ballhead Review: The Best Bargain Ballhead in 2019? appeared first on Digital Photography School. It was authored by Rick Ohnsman.

The Highline ballhead is billed by its creators, Colorado Tripod Company, as “ultralight,” with an “increased range of motion.”

But does the ballhead live up to the hype?

That’s what this Highline ballhead review is all about. I recently received a ballhead of my own, and I’ve been putting it through its paces.

In the next few sections, I’m going to take you through my experiences with the Highline ballhead. And I’ll let you know if it’s something you should consider purchasing.

(Spoiler alert: It’s a bargain worth checking out.)

Highline ballhead review

Two views of the Highline ballhead.

The Highline ballhead overview

First things first:

Where does this new ballhead come from?

The Highline ballhead is produced by the Colorado Tripod Company (CTC). The CTC caught the attention of photographers when they announced on Kickstarter they would be producing the “world’s first titanium tripod system.”

For the purposes of this article, I will focus on the aluminum version of the Highline Ballhead, as that is the product I received for review. However, a titanium version is available from CTC.

As for the specs:

The Highline ballhead is has a 70 lb (32 kg) load capacity, though the ballhead itself weighs just 16 oz (0.45 kg). The head is cut out of aluminum. The ball itself is 1.89 in (4.8 cm) in diameter.

My first impressions of the Highline ballhead

The Highline ballhead makes a great impression from the get-go.

Opening the box, I found a quality neoprene drawstring bag with the Colorado Tripod Company logo printed on it. Inside the bag was the ballhead, as well as a plastic zip bag containing two Allen wrenches for working with the hex-head screws on the head. The bag also contained an adapter so the head can be mounted on tripods with 1/4-20 screws (without the adapter, the head mounts on the larger 3/8-16 screw used by most tripods).

highline ballhead out of box

I was impressed with the quality right out of the box.

I was immediately struck by the appearance of the ballhead, both in the quality of the parts and the beautiful gunmetal-gray finish. The design is clean and uncluttered, the knobs well-placed and sized for easy operation. All the components are metal; you won’t find a plastic piece on the entire ballhead.

My first thought?

This is a well-designed and well-built piece of photo equipment.

The CTC describes the Highline as a traditional ballhead but with some special features. Striking is the large 48mm hollow ball and the ability of the locking mechanism to provide a 54-pound load capacity, much greater than most tripod heads of this size.

The CTC indicates the Highline head is made for photographers with large camera equipment. I mounted my Canon 6D and my Canon 70-200 lens, but the head had no problem at all holding it right where I wanted.

highline ballhead with camera and lens

With a DSLR (the Canon 6D here) and a large lens (the Canon 70-200), the Highline was more than up for the job.

Photographers want a tripod head that can lock in place with little droop or movement. The Highline satisfies this requirement, even with a full-sized DSLR and large lens.

This is how things look when the camera is mounted from the photographers POV:

highline ballhead review

Note the clamp-lock knob at the top left, main ball adjustment knob on the left side, and the pan-lock knob at the rear. The drag adjustment knob is at the front and is not seen in this shot.

Camera mounting, knob placement, and performance

CTC engineers designed the Highline so the camera can be held and controlled with your right hand and the tripod head knobs worked with your left hand.

The largest knob is used to release and tighten the ball. Its large size and knurled grip makes it easy to use, even with gloves.

On the rear of the head is the smaller pan-lock knob. This knob releases the head to be rotated around its vertical axis, such as when doing panorama shots. The base of the head is also marked out in degrees, which is helpful for pano shots.

On the opposite side of the head is the drag control. Adjusting this knob changes how freely the ball can be moved. This is a great aid in setting up the feel and control of motion while compensating for the size of the camera and lens used.

Once the camera is mounted and the drag knob is adjusted, you’re free to use the large knob for moving/locking the ball position.

At the top of the head is the clamp and camera mount plate. I was very pleased to see an Arca-Swiss type mount being used. This has become a standard mount in the photo world, so you don’t need to worry about mounting incompatibilities.

The mounting screw has a D-ring on it for tightening without tools. Open the clamp knob fully and tip the plate into the clamp, then tighten the knob most of the way. The camera can be moved forward and back, but will not fall out of the clamp. Balance the camera and then fully tighten the clamp knob.

d-ring for tightening

The monogramming was a nice touch. And note the D-ring for tightening the mounting screw when you don’t have tools.

What to like about the Highline ballhead

The Highline ballhead is a great piece of photo equipment, so there’s a lot to like.

As I’ve mentioned above, the Highline ballhead features excellent build quality, fit, and finish.

The control knobs perform smoothly, are easy to grasp and operate, and the mechanism allows the ball to move smoothly and lock exactly where you want it without any droop.

drop slot on head

Using the large drop slot, shooting straight up or straight down is very easy.

For a head its size, the Highline is also quite light. Even the aluminum version comes in at 18 oz (510 g). And the titanium version of the ballhead shaves 40% off that weight, coming in at just under 12 oz (340 g).

portrait orientation

The Highline had no problem locking and holding the camera just where I wanted in portrait orientation.

The head also performs beautifully even with a good-sized DSLR and big lens. My current tripod is an aluminum MeFoto Globetrotter Classic, but while the MeFoto stock head isn’t bad for the money, it feels a little wimpy. Switching out the MeFoto head for the Highline made a world of difference: The Highline head worked great with the same camera/lens combo and fit very well on the Globetrotter tripod.

In fact, I will be using this combination as my new everyday camera support system. (Or at least until I consider the CTC Centennial tripod!)

Finally, the price is the best part of the Highline ballhead.

Though I can’t say I’ve tried every comparable ballhead out there, I’ve never found a better ballhead at this price point. The aluminum version of the Highline sells for just $ 129.00 USD. I consider that a screaming deal for a product of this quality.

Note that the titanium version of the Highline ballhead is $ 499.00 USD. If shaving six ounces off the weight is important to you and the cost is no object, go for it.

As for me?

I’m gonna be quite happy with my aluminum Highline!

What’s not to like about the Highline ballhead?

The Highline ballhead is nearly perfect, but falls short in a couple of areas.

What don’t I like about it?

First, I prefer a lever lock to the Highline’s twist-knob lock. However, the twist-knob lock should be fairly easy to switch out. And I spoke with Eric Ellwanger of CTC; Eric said CTC is already working on their own lever-lock clamps and should offer them as an option for new ballhead buyers before long. If CTC makes one with the same quality shown in the Highline head and at a decent price, sign me up!

(For those who have already purchased a head, CTC will allow those users to send in their clamps for a rebate if they’d like to switch to the lever-lock style.)

Another small nit: CTC touts the large elongated slot on the right side of the Highline head as a great feature, because it allows the camera to be flipped over into portrait configuration and gives extended motion. But I, like many other photographers, have mounted an L-bracket to my camera to allow easy switching from landscape to portrait orientation. I like that the L-bracket allows me to keep the center mass of the camera over the center of the tripod regardless of orientation. It also better supports panorama work, keeping the nodal point of the camera more centered over the rotation axis.

ballhead in portrait orientation

I still prefer using an L-bracket, which keeps my camera centered over the center axis of the tripod. Because the Highline clamp is an Arca-Swiss type, my L-bracket mounts with no problem.

In other words, for photographers like myself, the elongated slot is a bit redundant. It’s not a big issue, but I thought I’d bring it up.

What is the availability of the Highline tripod head?

The Highline was originally a Kickstarter product. This means that the first orders go to Kickstarter backers, which potentially limits availability for consumers. However, CTC says they are about caught up with Kickstarter orders and are now taking orders on their website as well as Adorama Camera.

If you check the CTC website, you may see that the Highline heads are available to purchase. Alternatively, the heads may be on backorder. Regardless, CTC says their machines are running 24/7 now. So if you want a Highline ballhead, place your order on Adorama or on the company website, and you will be billed when it ships.

Highline ballhead review: conclusion

There’s nothing I like better than a quality product at a great price, and the Highline tripod ballhead absolutely delivers.

Also, note that CTC is working on two other versions of the Highline: a smaller version and a larger version. I can see a smaller version being more practical for smaller mirrorless or bridge cameras. As for a larger version, I have trouble imagining a camera that needs more stability than what the current Highline ballhead can provide!

So if you’re in the market for an excellent ballhead at a bargain price, go have a look at the Highline tripod head.

It may be the right product for your needs.

The post The Highline Ballhead Review: The Best Bargain Ballhead in 2019? appeared first on Digital Photography School. It was authored by Rick Ohnsman.


Digital Photography School

 
Comments Off on The Highline Ballhead Review: The Best Bargain Ballhead in 2019?

Posted in Photography


Canon EOS M6 II initial review: What’s new and how it compares

28 Aug

$ (document).ready(function() { SampleGalleryStripV2({“galleryId”:”0757003519″,”isMobile”:false}) })

Sample photoSample photoSample photoSample photoSample photo

The Canon EOS M6 II is an enthusiast-targeted 32.5MP APS-C mirrorless camera built around the company’s EF-M mount. In many respects it’s a more compact mirrorless variant of the EOS 90D DSLR that was announced simultaneously.

Physically, it closely resembles the original M6 but brings a host of speed and feature upgrades. These include a higher resolution sensor, the ability to capture 4K video and a mode that shoots bursts of Raw files at up to 30 fps.

Key features:

  • 32.5MP Dual Pixel AF CMOS sensor
  • 14 fps continuous shooting
  • 30 fps Raw Burst mode (with AF Tracking and pre-shot buffering)
  • UHD 4K video at 30p and 25p with no crop / full width
  • 3.0″ rear touchscreen flips up by 180° or down by 45°
  • Optional electronic viewfinder
  • USB 2.0 port with Type-C connector

The EOS M6 Mark II will be available in a series of kits. The official body-only price will be $ 849. Adding the retracting 15-45mm IS STM lens and EVF (pictured) will boost the price to $ 1099, while an 18-150mm IS STM and EVF kit will set you back $ 1349.


What’s new and how it compares

The M6 II brings 4K video and 30 fps Raw bursts. We look at the new features and how it stacks up against its peers.

Read more

Body, handling and controls

The M6 II gains some direct controls over its predecessor and features the latest iteration of the Canon menu system. There’s also a good degree of customization available.

Read more

Sample gallery

We had the chance to shoot with the M6 Mark II and have some sample images to show what it can do.

Read more

Initial impressions

The M6 II has a couple of nice improvements over the original version, but it’s the state of the EF-M lens range and the future of the EF mount that change out perspective the most.

Read more

Articles: Digital Photography Review (dpreview.com)

 
Comments Off on Canon EOS M6 II initial review: What’s new and how it compares

Posted in Uncategorized


5 Tips for Shooting Waterfront Cityscapes at Blue Hour

28 Aug

The post 5 Tips for Shooting Waterfront Cityscapes at Blue Hour appeared first on Digital Photography School. It was authored by Joey J.

When you hear the term “cityscape photography,” what kind of image comes to your mind? It could be those photographed from elevated viewpoints or light trail of city traffic. To me, nothing beats the beauty of waterfront cityscapes – especially those photographed at blue hour.

waterfront-cityscapes-at-blue-hour

Hong Kong skyline (18mm, f/10, 199 seconds, ISO100)

Gyeongbokgung Palace (Korea) (24mm, f/8, 30 seconds, ISO100)

Gyeongbokgung Palace (Korea) (24mm, f/8, 30 seconds, ISO100);

waterfront-cityscapes-at-blue-hour

Shanghai skyline (18mm, f/11, 164 seconds, ISO100).


In order to capture stunning waterfront cityscape photography, there are a few key points to get right.

Shooting Waterfront Cityscapes at Blue Hour

1. Good sky and light

Michael Freeman, the author of Capturing Light: The Heart of Photography, has this to say.

“In almost all photography it’s the quality of light that makes or breaks the shot.”

This is very true with waterfront cityscape photography as well. If you want your photo to look good, only shoot on a (mostly) clear evening (dark clouds are our nemesis!). The quality of light on sunny evenings is much nicer than that of cloudy evenings, which can be easily noticeable in the resulting photos.

2. Sunset direction

Over the years of shooting cityscapes at blue hour, I’ve come to realize one thing affects the results rather significantly – where the sun has set. If the sun has set towards the direction you’re shooting, you typically see beautiful twilight hues leftover from the fading sun, which makes your blue hour photos extra special.

Image: Singapore skyline (18mm, f/5.6, 409 seconds, ISO100). The sun went down on the right edge of...

Singapore skyline (18mm, f/5.6, 409 seconds, ISO100). The sun went down on the right edge of the frame, adding a beautiful gradient of colors ranging from reddish-orange to deep blue.

On the contrary, your cityscape photos at blue hour will look dull and monotonous if the sun sets behind you (i.e., you’re shooting towards the sky that is 180-degrees opposite of where the sun has set).

In such a scenario, the quality of light is inevitably affected. The sky lacks the beautiful hues you typically see in the sun-setting side of the sky. With the sky like that, your photos won’t get much better no matter how hard you try editing in post-production.

Image: Shanghai (China) skyline (18mm, f/13, 163 seconds, ISO100). Despite shooting on a clear eveni...

Shanghai (China) skyline (18mm, f/13, 163 seconds, ISO100). Despite shooting on a clear evening, the sky looks noticeably dull, as this is the sky that is 180-degrees opposite of where the sun went down (the sunset occurred behind me shooting).

3. Long exposure

What I particularly like about waterfront cityscapes is it lets me create silky smooth water effects by doing a long exposure. As seen in the photo below, such smoothed-out water adds a dreamy feel that is very distinctive to long exposure photography. It’s the very reason I fell in love with waterfront cityscapes.

Image: Marina Bay (Singapore) (35mm, f/11, 194 seconds, ISO100).

Marina Bay (Singapore) (35mm, f/11, 194 seconds, ISO100).

By default, the limited available light at blue hour allows your shutter speed to naturally get longer, especially with the use of a small aperture like f/13. That said, without using a neutral density (ND) filter, the shutter speed probably won’t go beyond several seconds. This isn’t long enough to achieve a silky smooth water effect that you see in the photos above.

Image: Marina Bay (Singapore) shot with 2 seconds of exposure (at f/13) without using any neutral de...

Marina Bay (Singapore) shot with 2 seconds of exposure (at f/13) without using any neutral density filter. This is way too short to a create silky smooth water effect.

If you don’t own an ND filter yet, get yourself one! There are different densities available (2, 3, 6 and 10-stops are popular), but I’ll recommend a 6-stop ND filter (especially if you’re only getting one), as it hits a sweet spot for photographers shooting waterfront cityscapes.

Let’s say that you get a base shutter speed (when no filter is attached) of 2 seconds, which is quite a typical scenario around 10 minutes before the end of dusk (check your local dusk time at gaisma.com).

As seen in the photo above, 2 seconds of exposure hardly smooths out the water, but by attaching 6-stop ND filter, the exposure gets extended to 128 seconds (2 minutes 8 seconds). Each “stop” of ND filter approximately doubles the exposure time (2 seconds > 4 seconds [1-stop] > 8 seconds [2-stops] > 15 seconds [3-stops] > 30 seconds [4-stops] > 64 seconds [5-stops] > 128 seconds [6-stops]), which is long enough to create silky smooth water effect.

Image: Neutral density (ND) filters help extend shutter speed lengths by reducing light entering the...

Neutral density (ND) filters help extend shutter speed lengths by reducing light entering the camera lens.

I own 3 and 10-stop ND filters as well, but the 3-stop is too mild (2-second exposure can be extended to 15 seconds only) while 10-stops is way too strong (2-second exposure can be extended to a whopping 34 minutes, 8 seconds).

I have found 2 to 3 minutes of exposure is enough to create a silky smooth water effect. You could go longer like 5 to 6 minutes (I won’t go beyond 7 minutes, as long exposure noise starts to creep in), but it won’t change much beyond 2 to 3 minutes.

4. Reflections on water

Colorful reflections of city lights reflected on the water are one thing that gives your blue hour photos a “WOW” feeling. That said, this doesn’t always happen. Even when you shoot the same city view from the same spot for two evenings in a row, you may get completely different results when it comes to the clarity of reflections on the water.

To achieve good photographic results, like in the first photo below, the water has to be relatively still. If the water surface is rough, you hardly get any reflections (the second photo below). Unfortunately, this isn’t something we can control, so we need a bit of luck here.

waterfront-cityscapes-at-blue-hour

Marina Bay (Singapore) (TOP: 18mm, f/13, 142 seconds, ISO100;

waterfront-cityscapes-at-blue-hour

19mm, f/13, 162 seconds, ISO100).

5. Having thin clouds

While long exposure works best with water, it also works well with clouds, too. This might not be as important as other points above, but if the sky has some clouds, long exposure helps get them rushing across the sky. It adds interesting movement to your photos, as seen below.

waterfront-cityscapes-at-blue-hour

Singapore skyline (18mm, f/10, 257 seconds, ISO100).

Alternatively, if you want a greater effect, try evenings with more clouds. That said, if too cloudy, your photos will look just flat and ugly (as the quality of light is severely affected) or might come out crazy like the photo below. I prefer a clear sky with no clouds or just a little bit of thin clouds.

waterfront-cityscapes-at-blue-hour

Singapore skyline (20mm, f/5.6, 412 seconds, ISO100).

Conclusion

I hope these tips help you capture epic waterfront cityscape photos at blue hour! Looking back, my love for waterfront cityscapes comes from earlier days shooting sunny beachscapes, which was the primary reason I got into photography a decade ago.

Over the years, my interest has shifted from sunny daytime beachscapes to cityscapes at blue hour, but I’m still in love with water! I frequent cityscape photography spots located at the waterfront locally as well as on trips abroad.

Lastly, if you have any questions or info to share about shooting waterfront cityscapes at blue hour, feel free to do so in the comments below.


waterfront-cityscapes-at-blue-hour

The post 5 Tips for Shooting Waterfront Cityscapes at Blue Hour appeared first on Digital Photography School. It was authored by Joey J.


Digital Photography School

 
Comments Off on 5 Tips for Shooting Waterfront Cityscapes at Blue Hour

Posted in Photography


How to Choose the Perfect Photography Background

28 Aug

The post How to Choose the Perfect Photography Background appeared first on Digital Photography School. It was authored by Kevin Landwer-Johan.

Choosing the perfect photography background is as important as choosing your subject. A background is usually best if it helps enhance your main subject and complements it.

First, you need to consider your subject and your intent for taking photos of it. Then, consider how your subject works with the background. Are your subject and background conflicting? If they are, you must then use some method of controlling the background.

How to Choose the Perfect Photography Background Pink Dahlia

© Kevin Landwer-Johan

Some subjects will look great in a photograph against their natural backdrop. A pink flower against foliage, for example. Others you’ll have to work with to make them stand out or to better relate to their surroundings. This depends on your intent.

What’s your intent for the subject?

Do you want your main subject to be the focus of the viewer’s attention? If so, you must manage your technique in making the photograph so that your subject is most obvious.

Isolating your subject can be achieved in many ways. Some of the main ways to accomplish this are:

  • Place it against a plain background
  • Make sure there’s enough tonal or color contrast between your subject and the background
  • Use a shallow depth of field to blur your background
How to Choose the Perfect Photography Background Used Coffee Cups

© Kevin Landwer-Johan

In this example, the coffee cups are on a plain black background. Lack of detail and high contrast ensures the main subject stands out.

Alternatively, you may decide to incorporate your background into the meaning of your photographs. Placing your main subject in context with its surroundings can often add depth of meaning.

A typical example of this is an environmental portrait. This style of photography uses the background and surroundings to add narrative to the image.

how-to-choose-the-perfect-photography-background

© Kevin Landwer-Johan

In this portrait of a copper craftsman working on his art, the environment helps build a story. His father looking on, the tools and other items on the shelves behind, are all an essential part of the portrait.

My intent was to tell a story illustrating his occupation. If I’d photographed him against a plain background, the photograph would contain very little narrative.

How point of view determines background

Naturally, where you choose to stand will determine what is behind your main subject.

When you find an interesting subject, don’t only photograph it from one perspective. Move around it. See how it looks if you stand on the other side. The background may be completely different.

Even a slight change in your position can alter what will be visible in the background. Move to your left or right. Shift your view up or down a little. How does this change the relationship between your subject and background?

Image: © Kevin Landwer-Johan

© Kevin Landwer-Johan

Coming at a low angle to make this landscape, I’ve included the ice boulders, mountains, and glacier in the background. The composition gives context to the ice in the foreground. If I had stood in the same place, looking down at the ice boulders, there would have only been rocks in the background.

Moving closer or further away from your subject also determines what’s in view behind your subject. Changing your lens focal length does too but in different ways. Moving closer with a wide-angle lens has a very different result than standing in the same spot and zooming in.

Always experiment to see what will be included and excluded.

How contrast determines background

If your main subject is darker or lighter than the background, this can determine the significance of the composition.

A dark subject against a light background looks very different than a lighter subject against a dark background. Generally, a dark background helps isolate a subject. It can also allow for more detail to be visible in the subject.

Image: © Kevin Landwer-Johan

© Kevin Landwer-Johan

how-to-choose-the-perfect-photography-background

© Kevin Landwer-Johan

Choice of exposure can affect this, as in the photos above of the tree. Both were taken a few minutes apart. All I did was to expose for the tree in the first image and let the sky become overexposed.

In the second photo, I exposed for the sky to show the detail in the clouds. In both images, the tree is isolated, but the feel of the photos is very different.

Controlling depth of field to determine background

Depth of field control is a good way to manage your background. Choosing how much or how little is in focus allows you to manage your intention.

By completely blurring a background, you effectively isolate your subject. Partially blurring the background leaves some idea of what’s in the background. But it doesn’t have to be distracting.

how-to-choose-the-perfect-photography-background

© Kevin Landwer-Johan

In this close up of the detail on an old bicycle, I waited until the person on the other bike rode past. My settings were such that it’s obvious it’s a bike in the background.

If I’d chosen to take the photo with a shallower depth of field, the passing bike might have blurred completely. Then it would not have added anything to the photo. If I’d had everything in sharp focus, the passing bike would have been distracting.

Learn to control how much or how little of your composition is in focus. This is an essential tool in determining your background.

Image: © Kevin Landwer-Johan

© Kevin Landwer-Johan

Conclusion

Making intentional choices about the background is essential to making strong photographs. I am often surprised when I’m teaching photography workshops how little attention people pay to the background.

It’s easy to become transfixed on a wonderful subject. Focusing on other aspects of photography like exposure, you must remember to look at the background as well.

Be intentional. Include only what you want to see. Limit or exaggerate the amount of background detail depending on what you want. The amount of control you have over the background will determine the strength of your photographs.

Do you have any other tips for choosing the perfect photography background? Share with us in the comments!


how-to-choose-the-perfect-photography-background

The post How to Choose the Perfect Photography Background appeared first on Digital Photography School. It was authored by Kevin Landwer-Johan.


Digital Photography School

 
Comments Off on How to Choose the Perfect Photography Background

Posted in Photography


DPReview TV: Canon EOS M6 II and EOS 90D first look

28 Aug

DPReview TV brings you our first-day impressions of Canon’s new EOS M6 Mark II and EOS 90D, straight from Canon’s launch event.

Get new episodes of DPReview TV every week by subscribing to our YouTube channel!

EOS M6 Mark II sample gallery from this episode

$ (document).ready(function() { SampleGalleryV2({“containerId”:”embeddedSampleGallery_3890485237″,”galleryId”:”3890485237″,”isEmbeddedWidget”:true,”selectedImageIndex”:0,”isMobile”:false}) });

Canon 90D sample gallery from this episode

$ (document).ready(function() { SampleGalleryV2({“containerId”:”embeddedSampleGallery_7051572497″,”galleryId”:”7051572497″,”isEmbeddedWidget”:true,”selectedImageIndex”:0,”isMobile”:false}) });

Articles: Digital Photography Review (dpreview.com)

 
Comments Off on DPReview TV: Canon EOS M6 II and EOS 90D first look

Posted in Uncategorized


Which would you choose? Shooting the Canon EOS 90D and EOS M6 Mark II in Atlanta

28 Aug

Introduction

Small camera with a big lens, being filmed with a big camera with a moderately sized lens, all photographed with a big camera with a moderately sized lens.
Out of camera JPEG with the Canon EOS 90D.
Canon EF-S 18-135mm F3.5-5.6 @ 42mm | ISO 100 | 1/640 sec | F4.5

Due to the basic fundamentals of how the ol’ Internet works, if you’re into digital cameras, you’ve likely already heard of Canon’s newly released crop-sensor duo. We all know that the EOS 90D and EOS M6 Mark II both have 32.5MP sensors, fast burst shooting and crop-free 4K video. The former is a DSLR and the latter comes sans mirror.

But during my time spent sweating through my cotton v-neck at Canon’s Atlanta pre-launch event for the two cameras, I found more than few novel differences that aren’t necessarily obvious from a quick spec-sheet or design-ethos rundown. It’s not quite as simple as ‘EVF vs. OVF,’ ‘big grip vs. small grip,’ and so on.

‘Have it your way’

Lenses aside, the EOS 90D and EOS M6 Mark II should produce identical image quality.
Out-of-camera JPEG on the EOS 90D
Canon EF-S 18-135mm F3.5-5.6 @ 135 mm | ISO 100 | 1/80 sec | F14

As I began to think through this article, I couldn’t help but mentally write ‘Whether mirrorless or DSLR, Canon lets you have it your way,’ before remembering that we already had an article with an awfully similar title. Good grief, how much of the English language is doomed to cliché thanks in part to the thinning of popular culture among the rise of infinite and disparate sources of web-based entertainment? Anyway, I digress.

In keeping with the afore-linked tradition, Canon continues to give us the ingredients for broadly comparable image quality in two very different configurations. From a business perspective, it makes immense sense, at least in the United States. Here, DSLR cameras continue to be popular and Canon’s mirrorless presence has, well, room to grow.

I was prepared to prefer the EOS M6 II over the 90D, but that isn’t exactly what happened

And I have to admit, even as a former high-end DSLR user, that I’ve enjoyed the advantages that mirrorless cameras have brought to the market. Good touchscreen interfaces can make up for fewer physical controls, an electronic viewfinder makes it easy to check images in playback under bright daylight, and my back continues to thank me for a generally lighter overall kit.

So I was prepared to greatly prefer the EOS M6 II over the EOS 90D on this pre-launch event. But that isn’t exactly what happened.

First, bursts

Fast burst speeds mean it’s more likely I’ll have a decent image from a pan – so long as I don’t fill the buffer up first.
Out-of-camera JPEG with the EOS M6 Mark II
Canon EF-M 18-150mm F3.5-6.3 @ 76mm | ISO 100 | 1/250 sec | F9

I generally think of myself as a car guy, but even so, I didn’t realize that the lifecycle of a drift-car tire is best measured in seconds, not minutes. And with those very fast (10-14 fps) burst speeds, both the EOS 90D and EOS M6 Mark II have buffer life that measures in at far fewer seconds of life than even drift-car tires.

So although the burst rates on the spec sheet may communicate that these cameras can replace your older double-grip sports DSLR, the reality is that you’ll run out of buffer and miss shots unless you dial your speed back, your image quality back, or both. At least the new C-Raw option (which gives you 30-40% smaller Raw files) won’t have a huge impact on image quality for most users, and extends the buffer noticeably.

But buffer depth isn’t all. Yes, let’s delve into EVF vs. OVF.

Viewfinder experiences

The add-on EVF on the EOS M6 Mark II is good, but fast-action aficionados will likely still prefer the OVF on the EOS 90D.
Out-of-camera JPEG with the EOS 90D
Canon EF-S 18-135mm F3.5-5.6 @ 135mm | ISO 100 | 1/60 sec | F14

The optional electronic viewfinder on the EOS M6 II doesn’t come with the largest magnification on the market (Canon does not disclose the actual figure), but it does offer a good refresh rate and great contrast. At 14 fps on the M6 II, you get a slideshow of the previous images – drop to 7 fps, and you get a live view between shots. I found 7 fps to get me plenty of keepers, plus I was able to easily follow fast-moving cars, and not-so-fast-moving models. And, I was able to use Canon’s Face + Tracking mode: an option only available in live view on the EOS 90D.

The EOS 90D’s iTR tracking accuracy is leagues ahead of the older EOS 80D

Switching over to the optical viewfinder on the EOS 90D, I exclusively used Canon’s iTR tracking through the viewfinder. It’s not as robust as Canon’s Dual Pixel AF in live view – there’s a much smaller AF area, for starters – but I found accuracy and tracking tenacity to be leagues ahead of the older EOS 80D, probably thanks to Canon’s new metering sensor. We’ll be taking a closer look in our full review.

The 90D’s new ‘face detection’ option in the viewfinder is honestly hard to evaluate, as it was hard to tell if it was tracking a face simply because I placed my initial AF point over it and it was tracking color or depth, as opposed to really recognizing a face. There were times when I placed my initial AF point over a face, initiated tracking, and the system jumped to an adjacent face. I’d wager that, at this point, the system just isn’t as reliable as Dual Pixel’s face and eye detection in live view.

Video-centric, stills-centric

Full disclosure – I didn’t shoot any video with these cameras, but I did work alongside a man shooting video with these cameras. We were hoping to have him trade back-and-forth between both the 90D and M6 Mark II while shooting our DPReview TV episode, but fun fact, the 90D is the only camera of the two with a headphone port. Rather than risk losing entire takes due to bad audio, we opted to use the 90D for almost all of our video shooting so we could monitor the microphones Chris and I were using.

For stills shooters, 32.5MP should be plenty for almost any purpose.
Out-of-camera JPEG using the EOS 90D
Canon EF-S 18-135mm F3.5-5.6 @ 35mm | ISO 400 | 1/60 sec | F4.5

Audio features aside, the 90D also has a crop mode that improves detail capture in video, and of course, the fully articulating touchscreen which many video shooters prefer over the tilting screen mechanism on the 6D Mark II. This makes it by far the more useful video camera of the two – despite the fact that it comes with a mirrorbox that is totally unnecessary for video capture.

Meanwhile, the EOS M6 Mark II has a 30 fps Raw Burst mode, which is distinctly aimed at stills-photography shooters. Additionally, its short flange-back distance encourages the adapting of non-native lenses, and there’s not a mess of glass and hinges obstructing the sensor if one did want to launch their way into capturing moving pictures.

Most perplexing is that neither camera shoots 24p video at any resolution

But most perplexing for us on staff is the fact that neither camera shoots 24p video – at any resolution. For the average consumer, and indeed, most people who are looking at cameras around this price point for shooting video, it isn’t a deal-breaker. But it’s also simply a software choice – if the camera can record 30p footage, it can certainly record 24p footage. So for those looking at (particularly regarding the M6 II) a small, easily mountable secondary camera for a larger production, you’ll have to pony up the extra cash for a higher-end Canon camera (or a cheaper camera from another brand) that does natively offer this.

The wrap

Out-of-camera JPEG with the EOS 90D
Canon EF-S 17-55mm F2.8 @ 20mm | ISO 1000 | 1/80 sec | F4

So, which did I really end up preferring? In case it isn’t obvious by now, I like each camera for different reasons.

The EOS M6 Mark II is very quick, but the DSLR still has an advantage in terms of absolute immediacy, helped in no small part by the optical viewfinder. But I just can’t trust viewfinder autofocus the way I can trust Dual Pixel AF. Turns out, though, the bigger and weightier EOS 90D made panning much easier for me, and I consistently got more keepers at lower shutter speeds than I could on the M6 Mark II – and at F9 and up, absolute autofocus accuracy is pretty moot.

But perhaps most telling, I largely prefer the overall selection of images I got from the 90D. Of course there’s no real quality difference – but I used the 90D during the second half of the day and the EOS M6 Mark II during the first half, so maybe I was just more warmed up photographically.

For most other people… the EOS M6 Mark II is probably the better choice

In the end, the EOS 90D is really best suited for those with larger hands and larger lenses, or those traveling in inclement environments, thanks to its tougher weather-sealed body. For most other people, though, the EOS M6 Mark II is probably the better choice. Thanks to its small size (which belies its huge capability), you’re more likely to carry it with you and make more photographs with it as a result. And that’s what really counts.

Oh, and the EOS M6 Mark II is $ 250 US cheaper regardless of what kit option you choose. So, that counts too.

Articles: Digital Photography Review (dpreview.com)

 
Comments Off on Which would you choose? Shooting the Canon EOS 90D and EOS M6 Mark II in Atlanta

Posted in Uncategorized


Zaha Hadid Architects Make Flood Protection Look Elegant in Hamburg

28 Aug

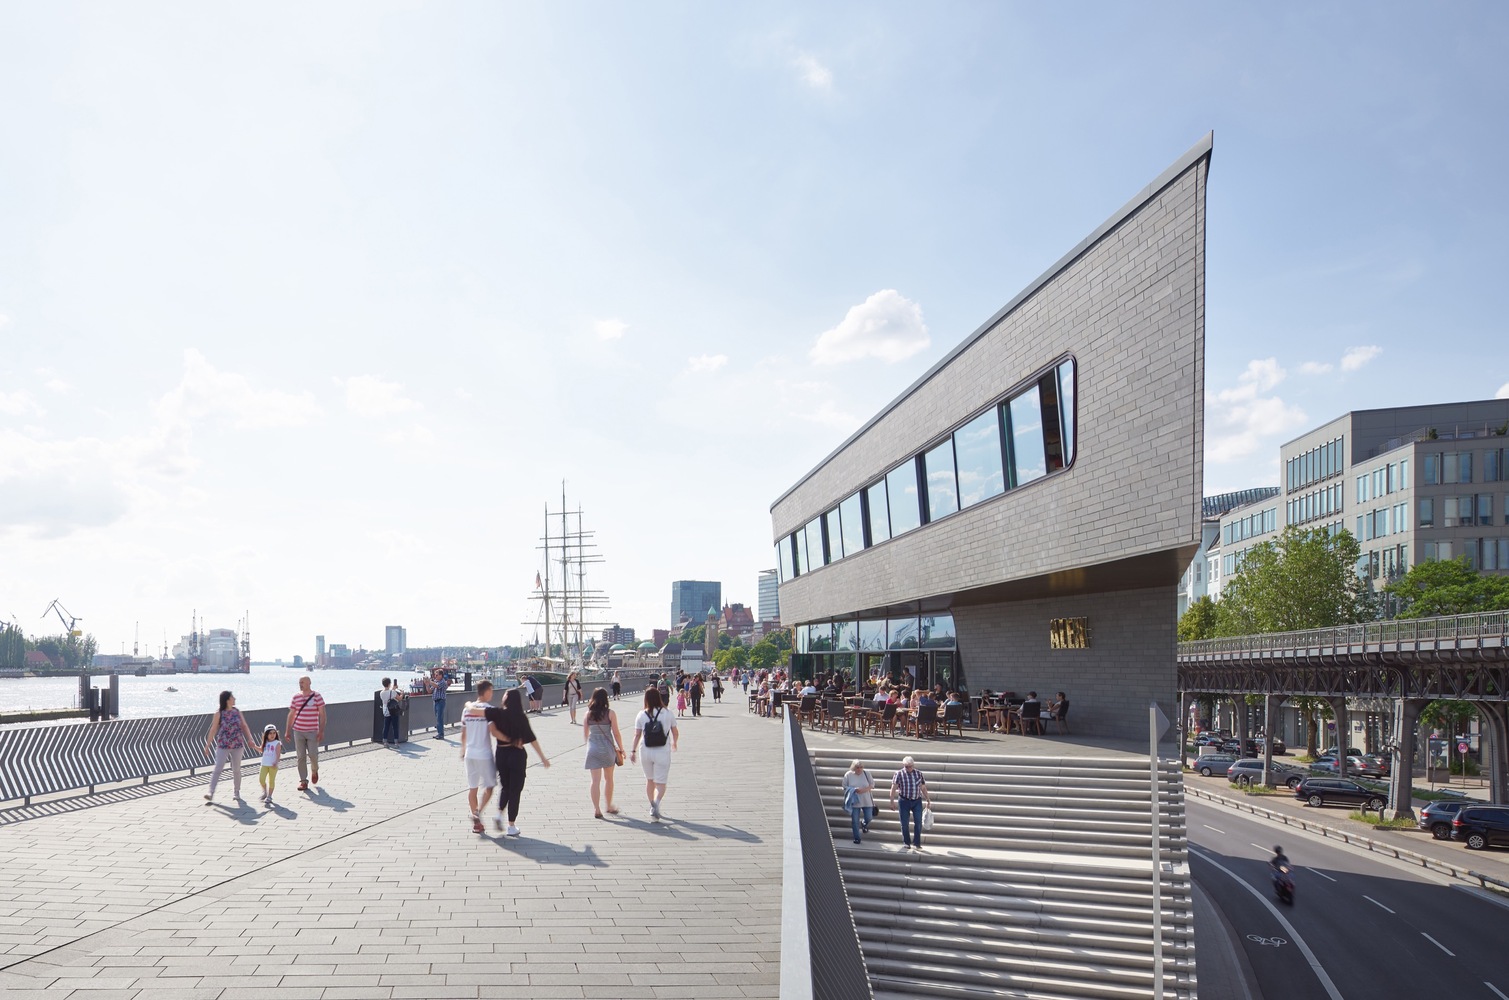
As urban planners grapple with the need for creative flood management systems in cities around the world, Zaha Hadid Architects provides an interesting example in Hamburg.

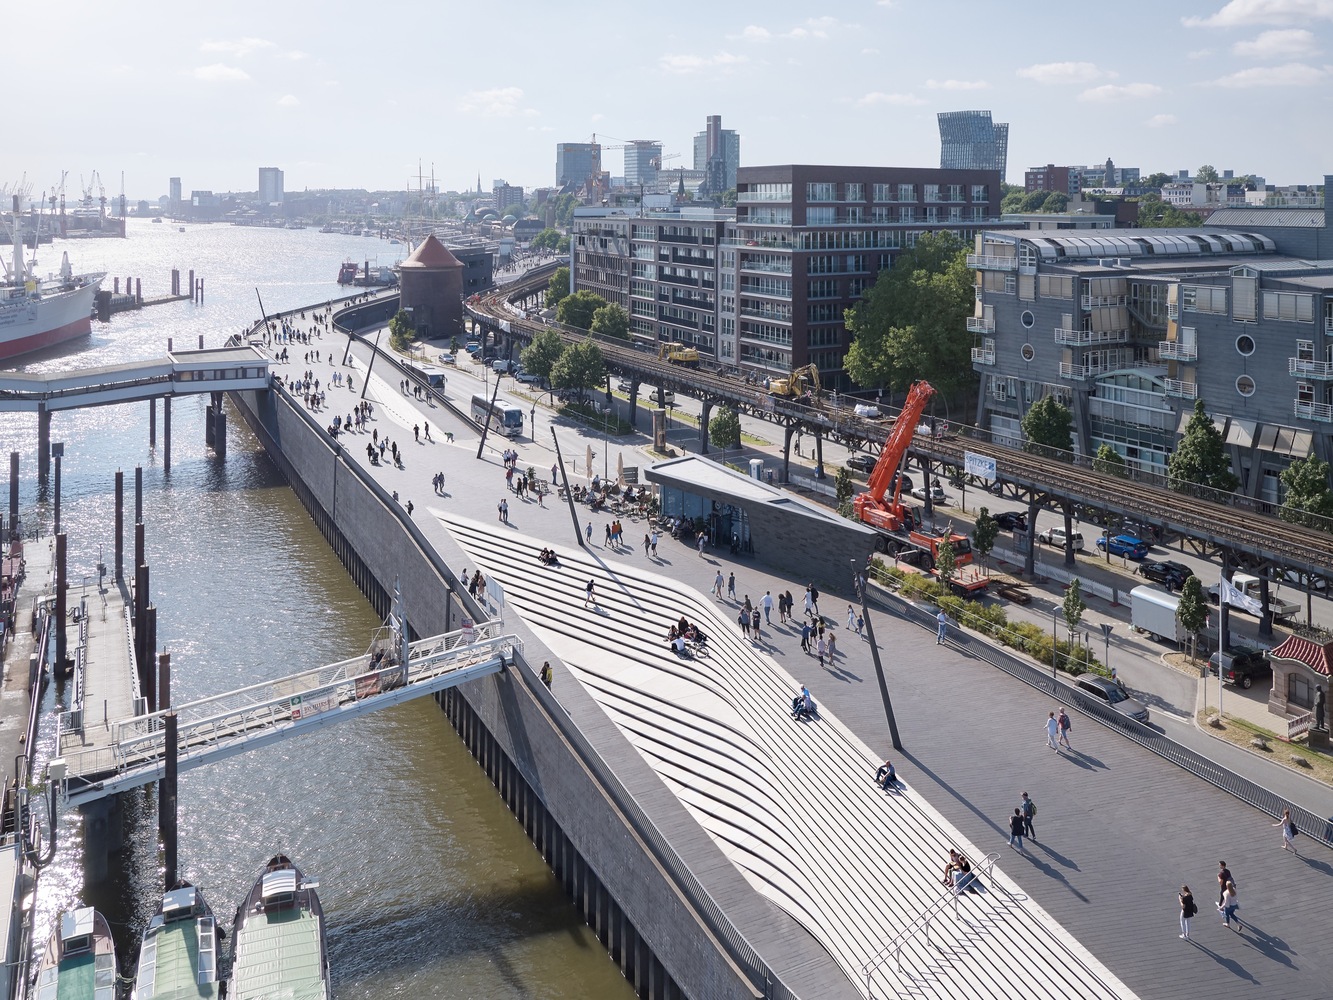
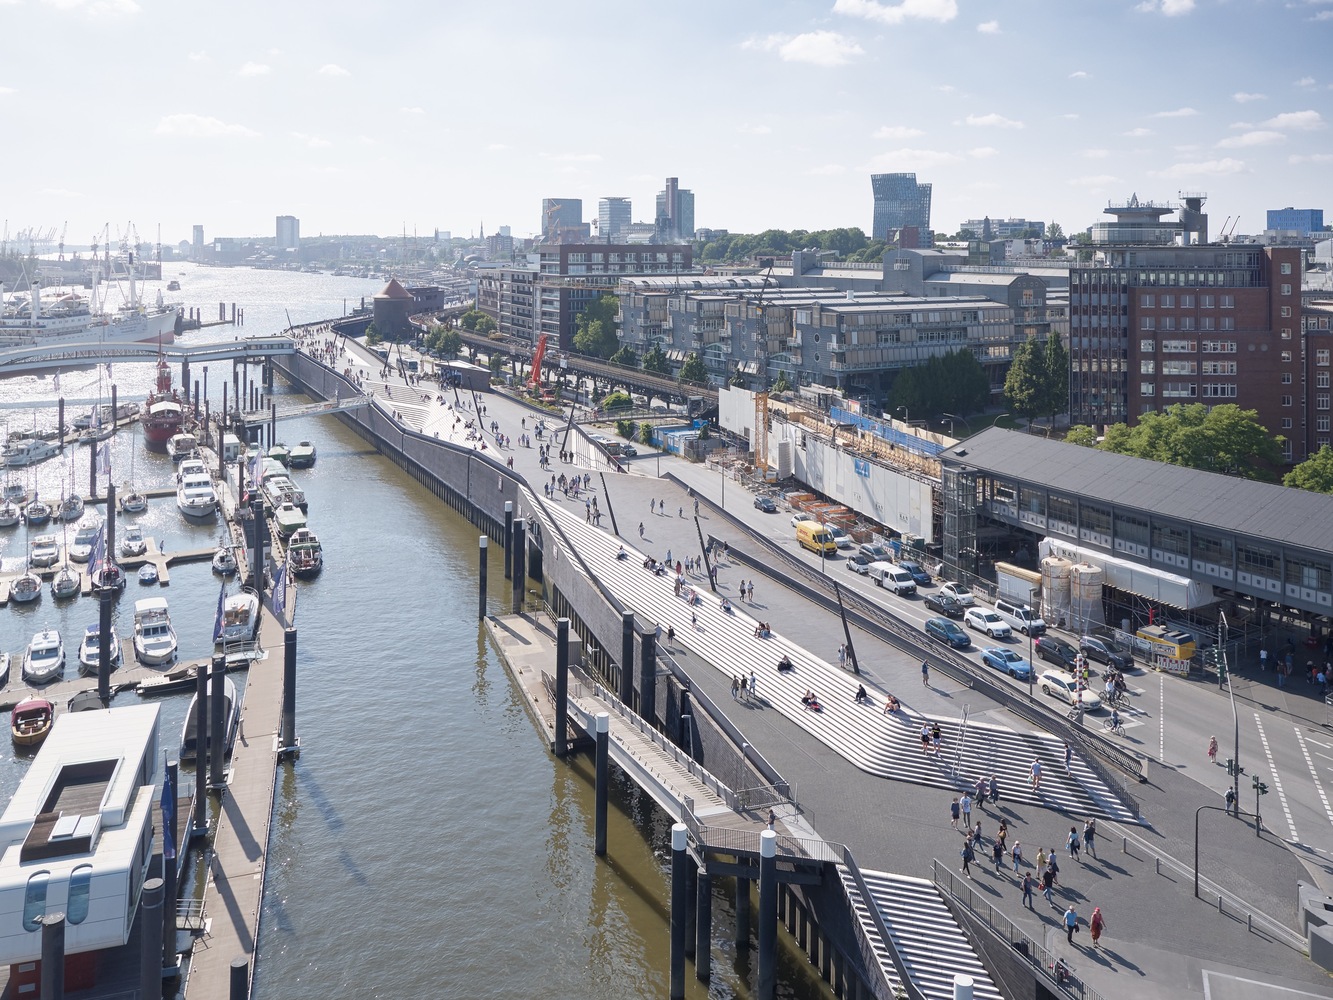
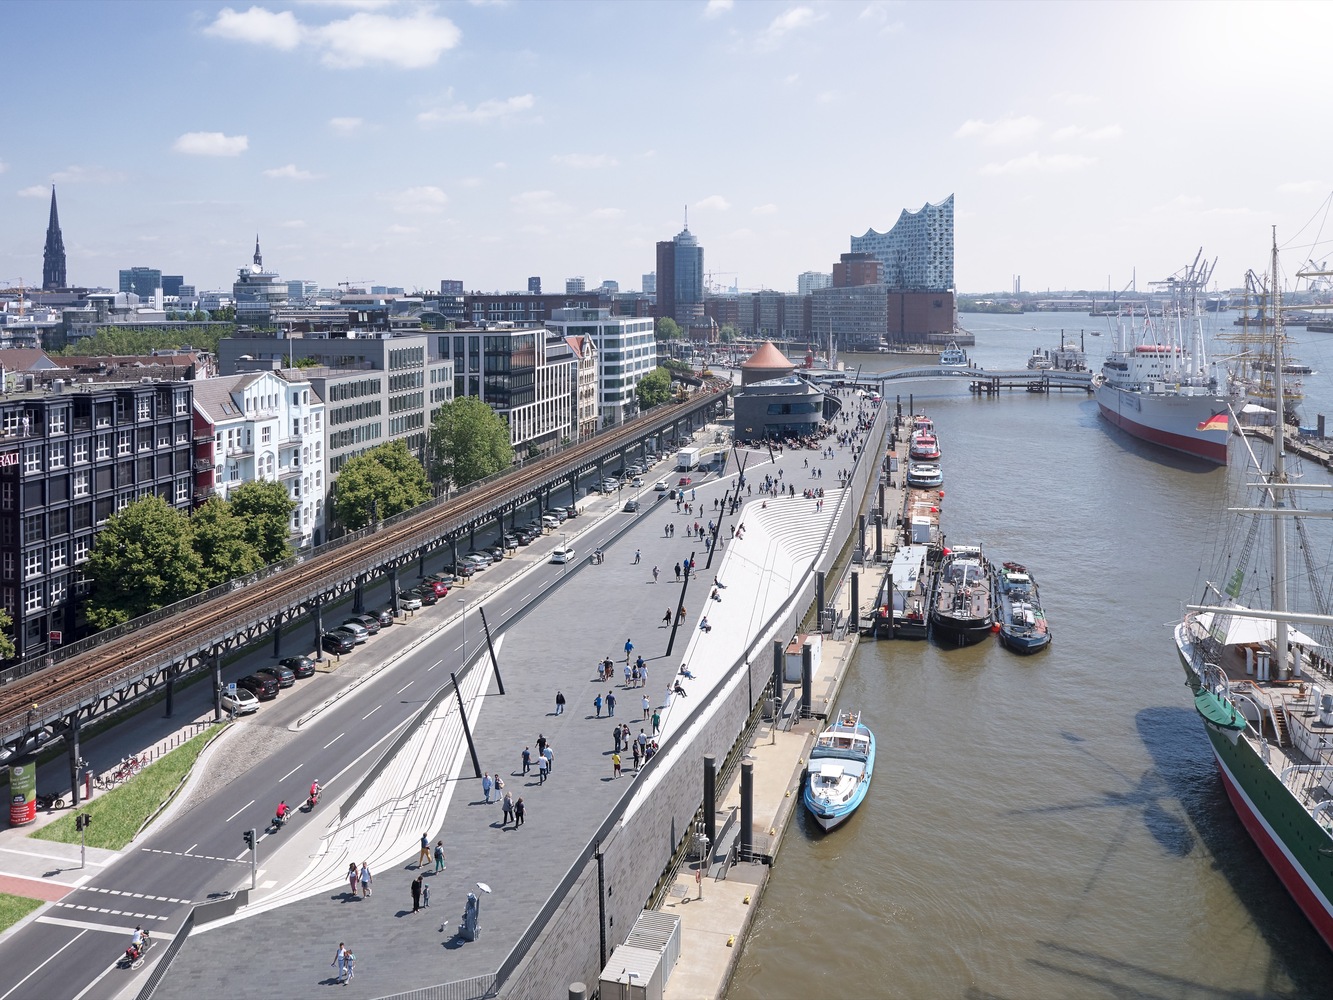
Located along the Elbe River, the new Niederhafen River Promenade offers two functions in one: a flood wall and a riverfront promenade. Set in a popular tourist area alongside one of the city’s most important public spaces, the new promenade offers views of the Elbe, links to adjacent neighborhoods and lots of room for pedestrians, food stalls, cafes and street performers, with shops and public utilities set into the structure at street level on the side that faces the city.

The barrier at Niederhafen was first built in the 1960s in the aftermath of severe storm surge floods that caused 315 fatalities and destroyed the homes of 60,000 residents, but according to modern calculations, it was no longer high enough to be effective. In addition to raising the total height of the barrier by .8 meters, the overburdened supporting elements of the structure needed to be replaced. The city announced a competition to design a redevelopment, awarding the project to Zaha Hadid Architects.

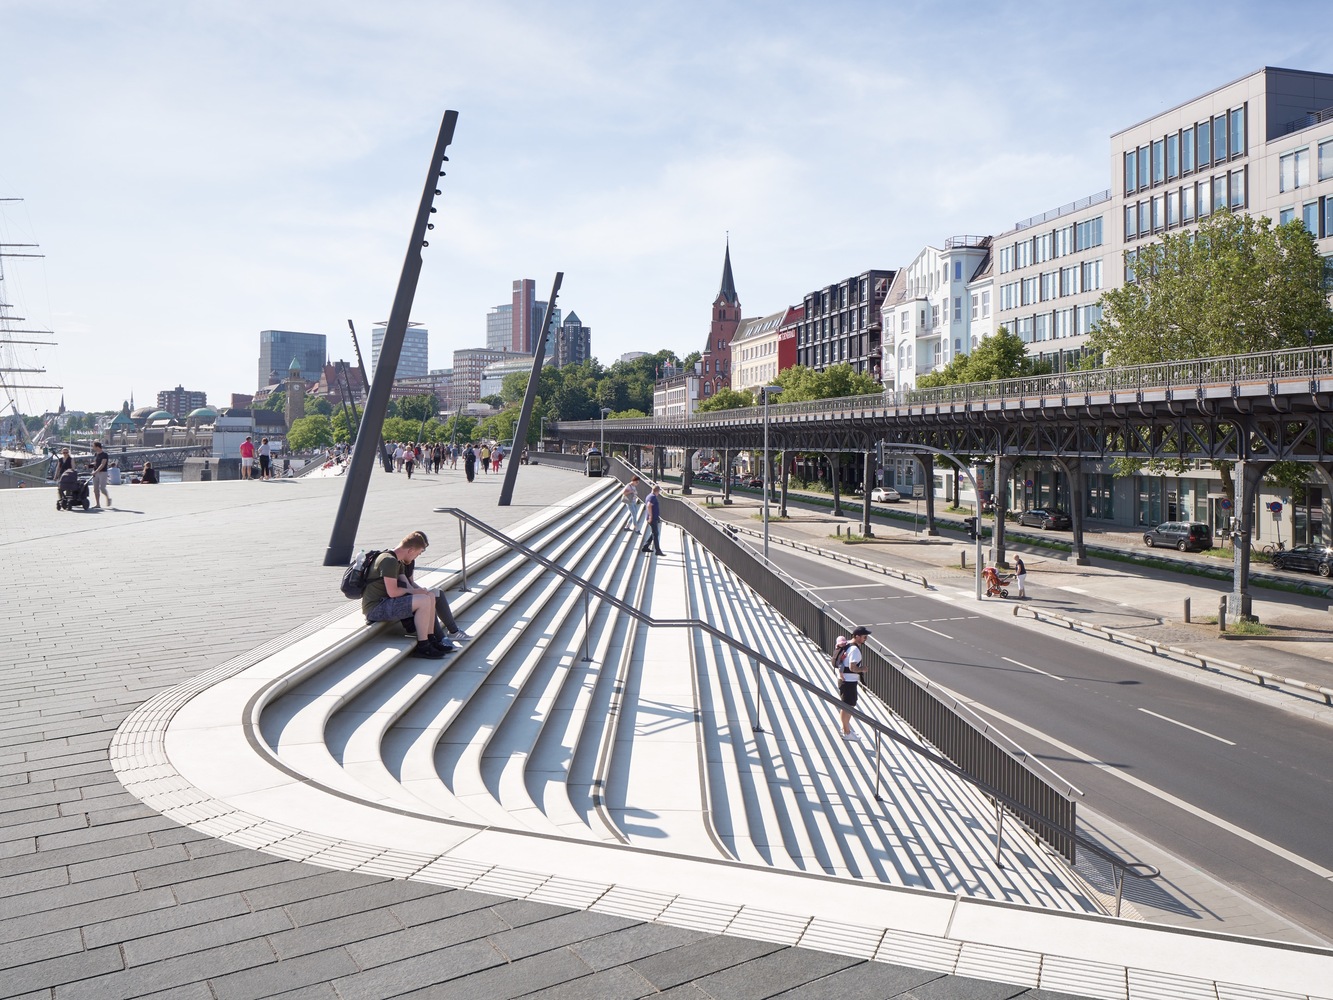
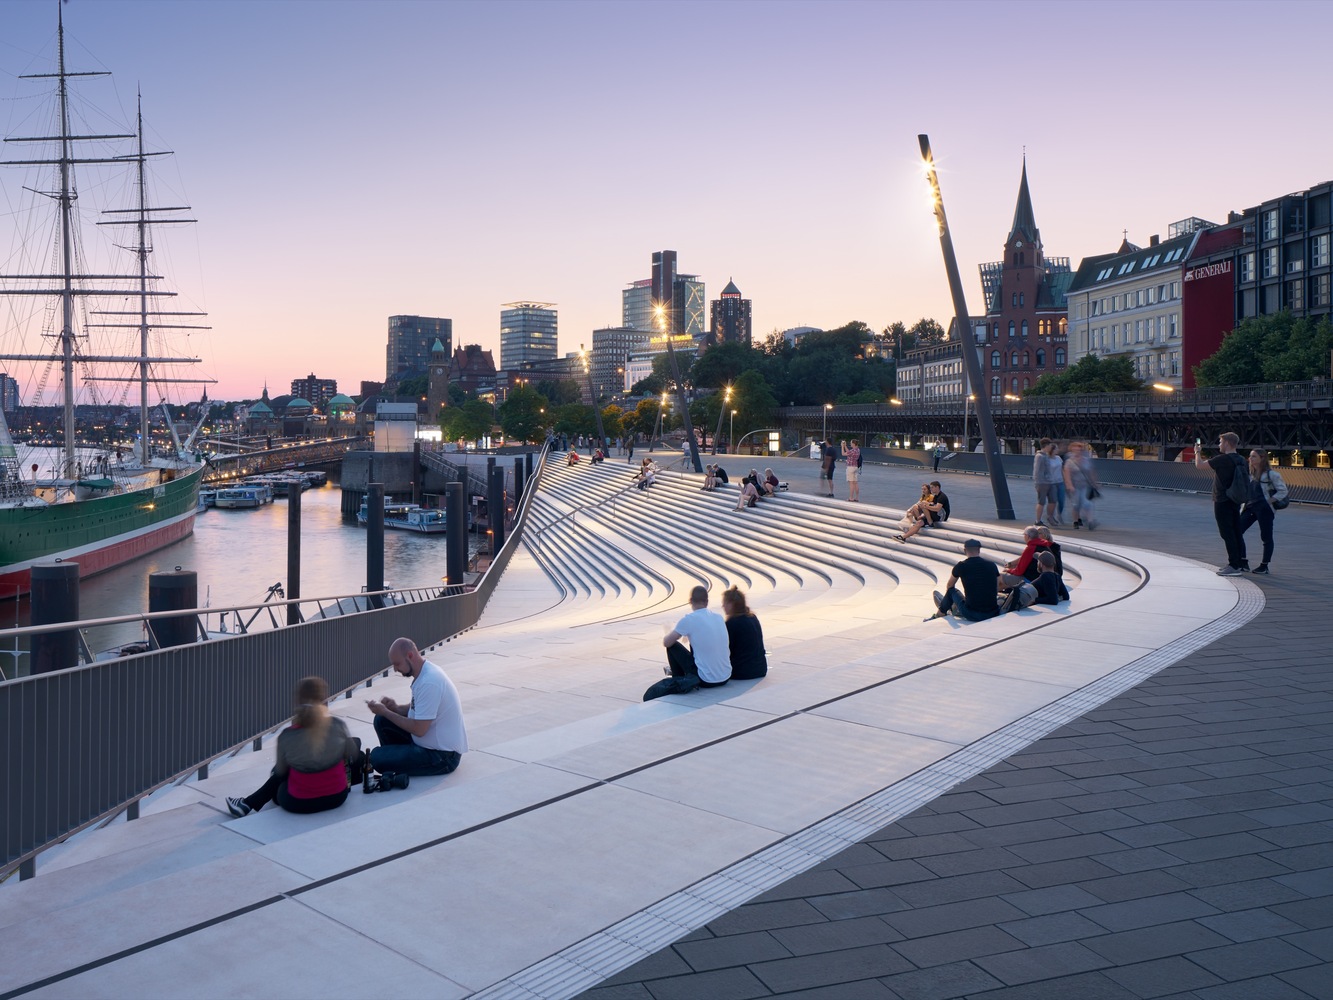
Standing 8.6 meters (28 feet) high on the eastern side and 8.9 meters (29 feet) high on the western side, the barrier is now tall enough to protect the city from maximum winter storm surges and extreme high tides. The architects carved sculptural staircases into the sides at various points, creating angular amphitheaters that encourage people to linger and enjoy the views and “generating an oscillating sequence in the river promenade as it repeatedly widens and narrows.”

“Dedicated cycle lanes at street level run the length of the flood protection barrier. Wide ramps at Baumwell and Langdungsbrücken connect the river promenade with street level and provide accessibility for all. A third central ramp enables service vehicles to access the promenade and Überseebrücke.”

“The river promenade is divided into two sections with different spatial qualities. The zone to the west is at a larger scale, offering wide views downstream of all shipping activity on the river. To the east, the port’s marina creates amore intimate atmosphere with a long ramp alongside the amphitheater leading visitors down to the water’s edge.”

Of course, concrete flood walls aren’t right for every city, especially those where aquatic wildlife habitats have been destroyed and need to be restored. Some cities are working on plans to do just that, like Chicago’s “Wild Mile.” Read more about how “urban rewinding” can help make cities more flood resistant.

Photos by Piet Niemann via Zaha Hadid Architects


WebUrbanist

 
Comments Off on Zaha Hadid Architects Make Flood Protection Look Elegant in Hamburg

Posted in Creativity


Transforming Quadrant House: Rotating Terrace Follows the Sun

28 Aug

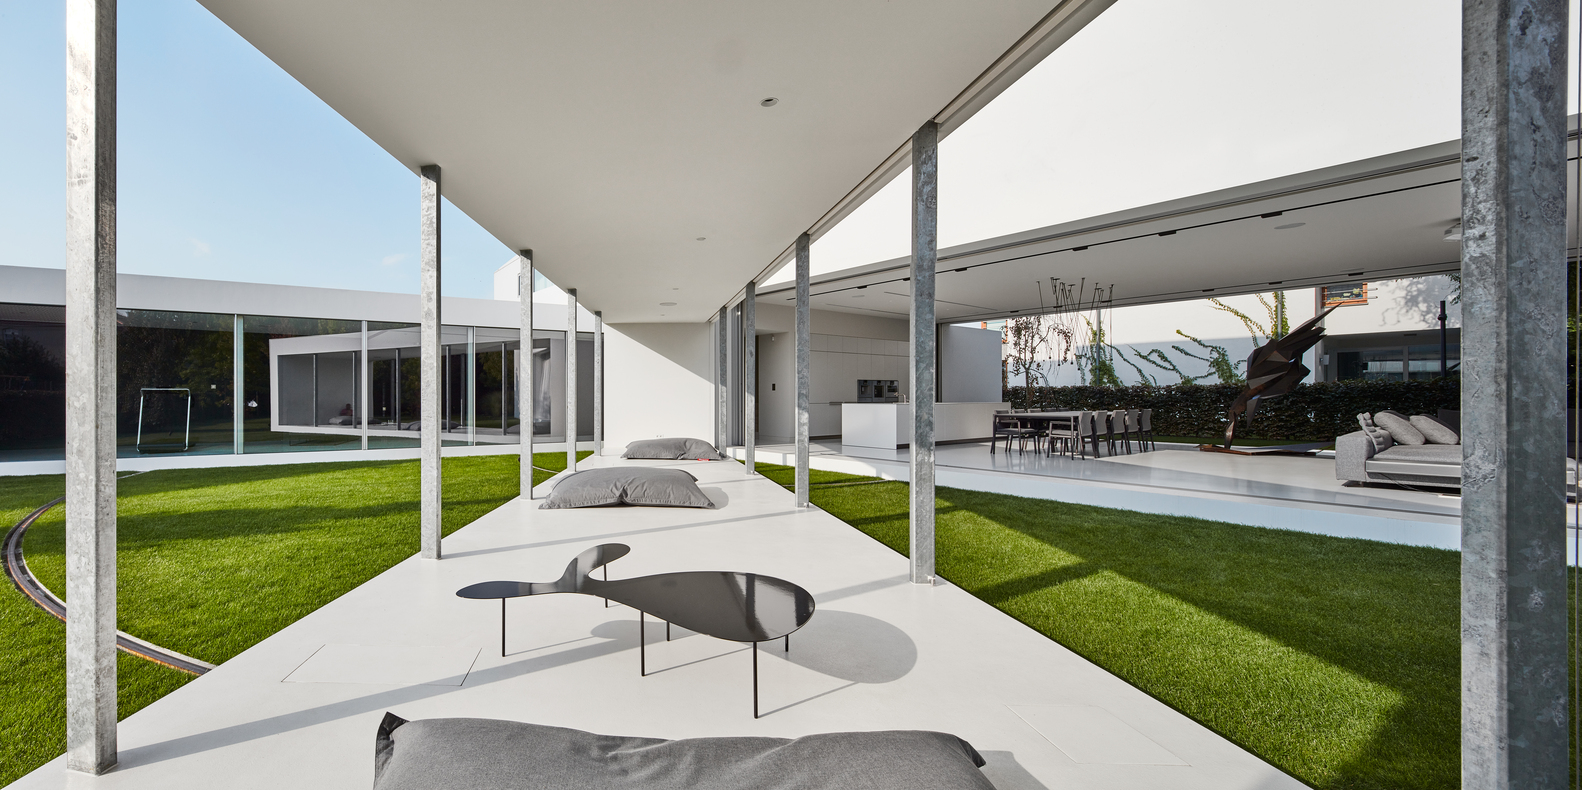
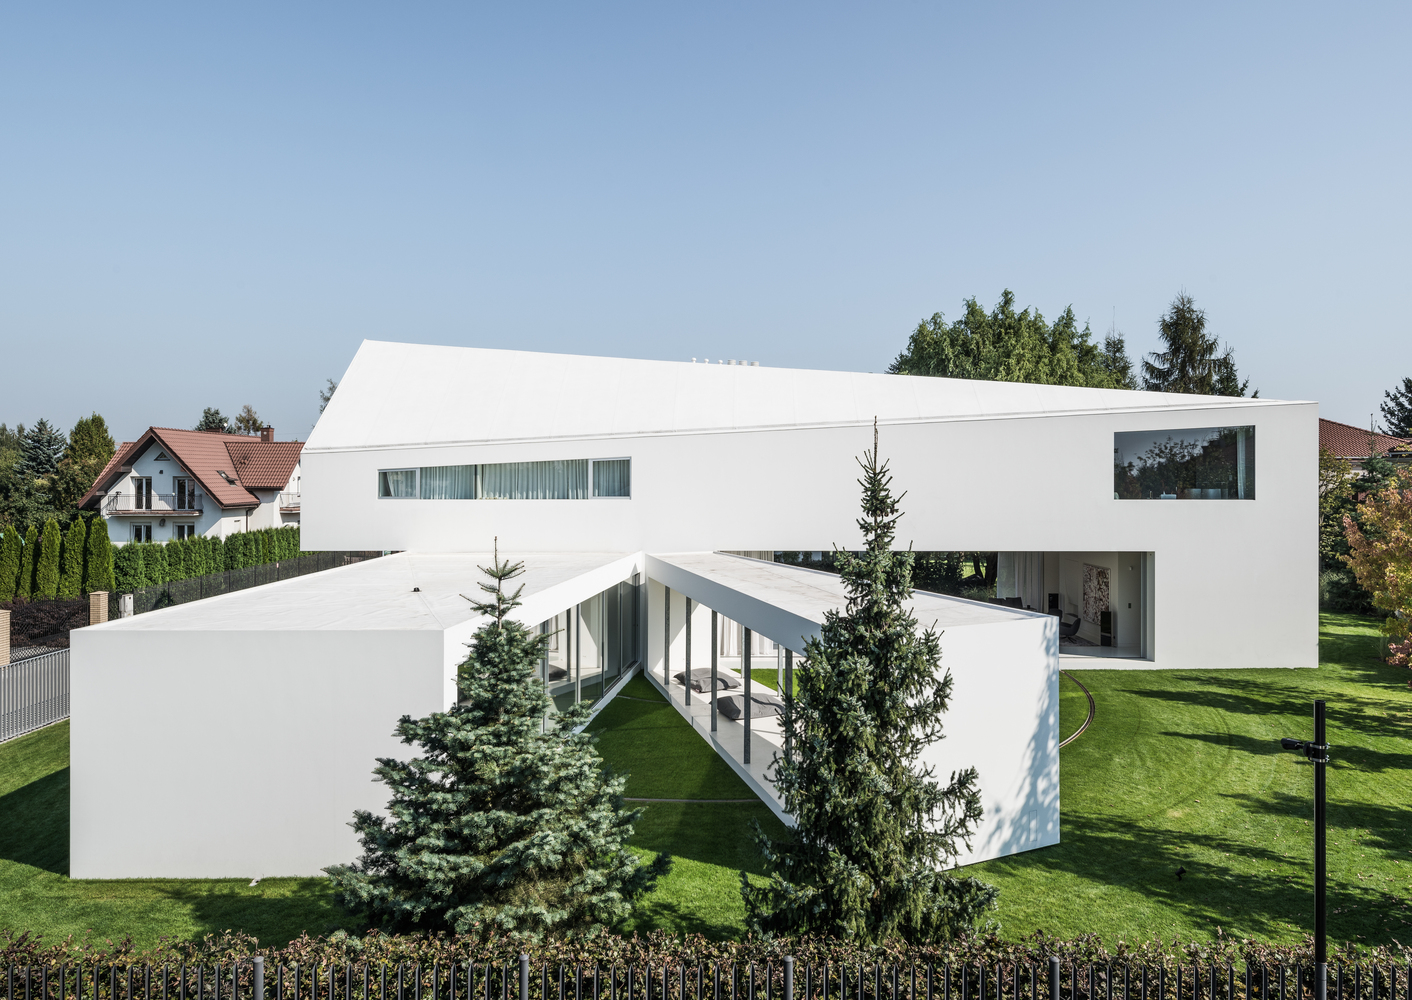
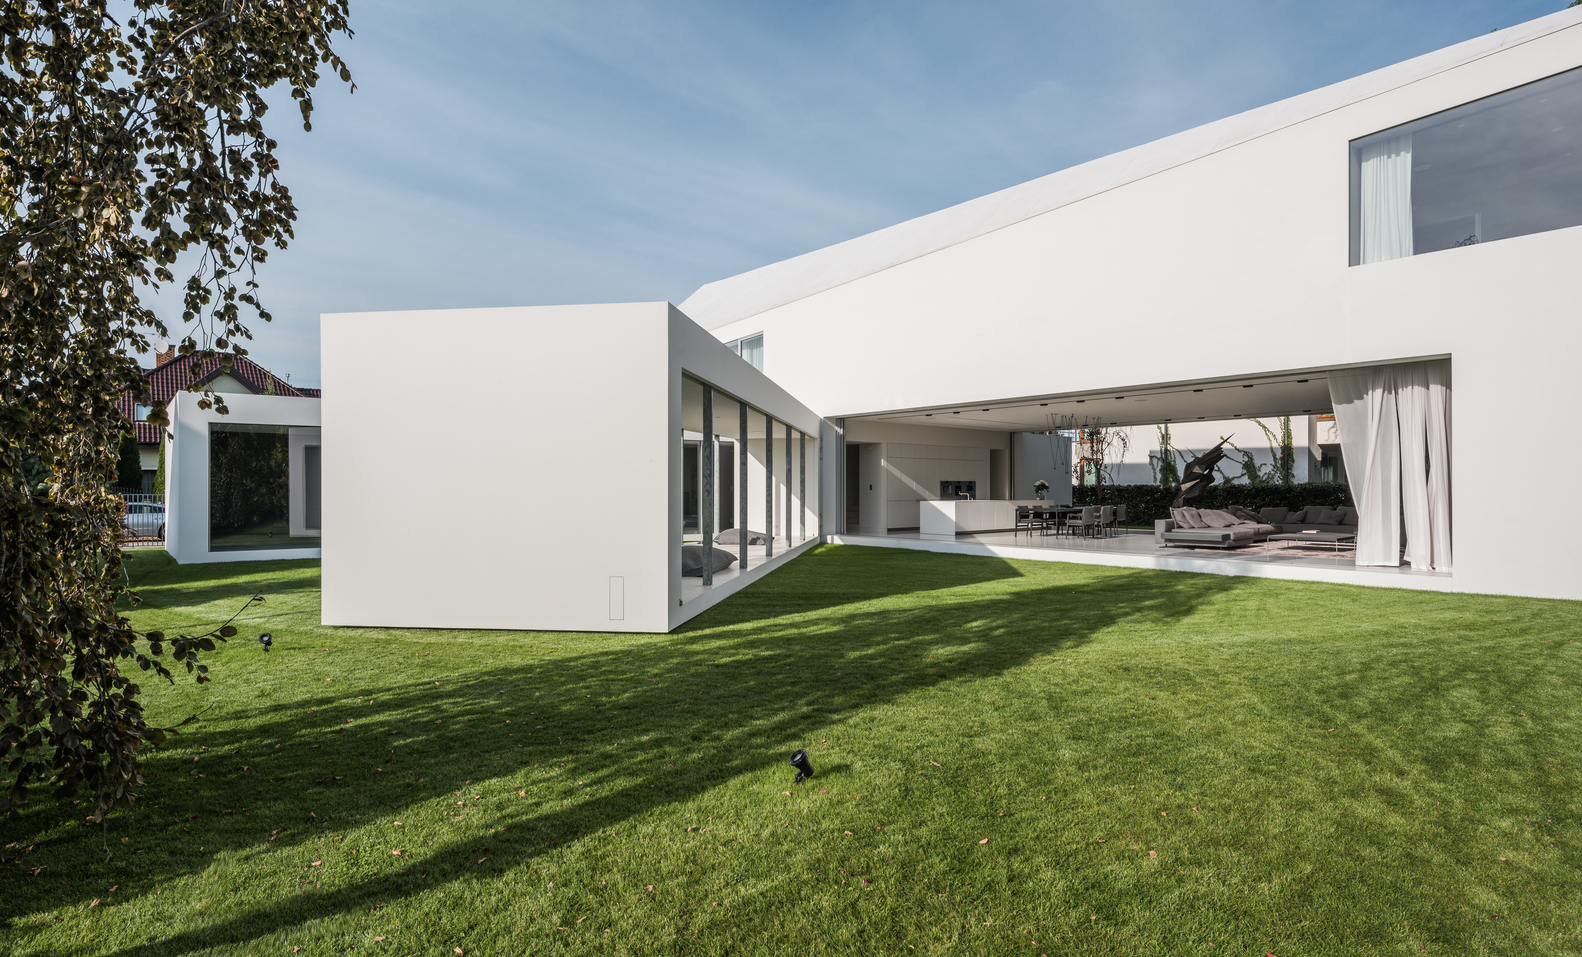
More than anything, the owners of a new transforming house in Poland wanted constant, direct access to sunlight. They commissioned the local firm KWK Promes to realize their unusual vision, and the result is definitely one of a kind.

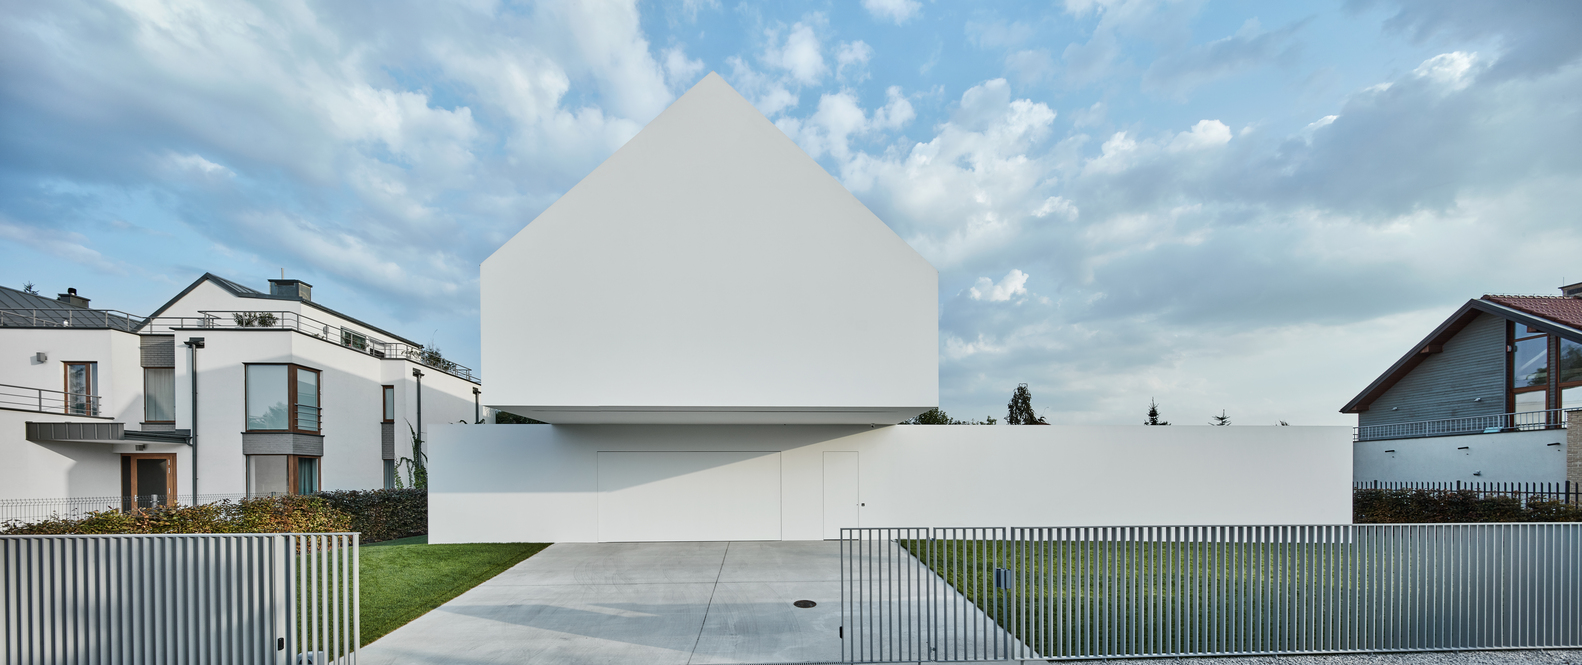
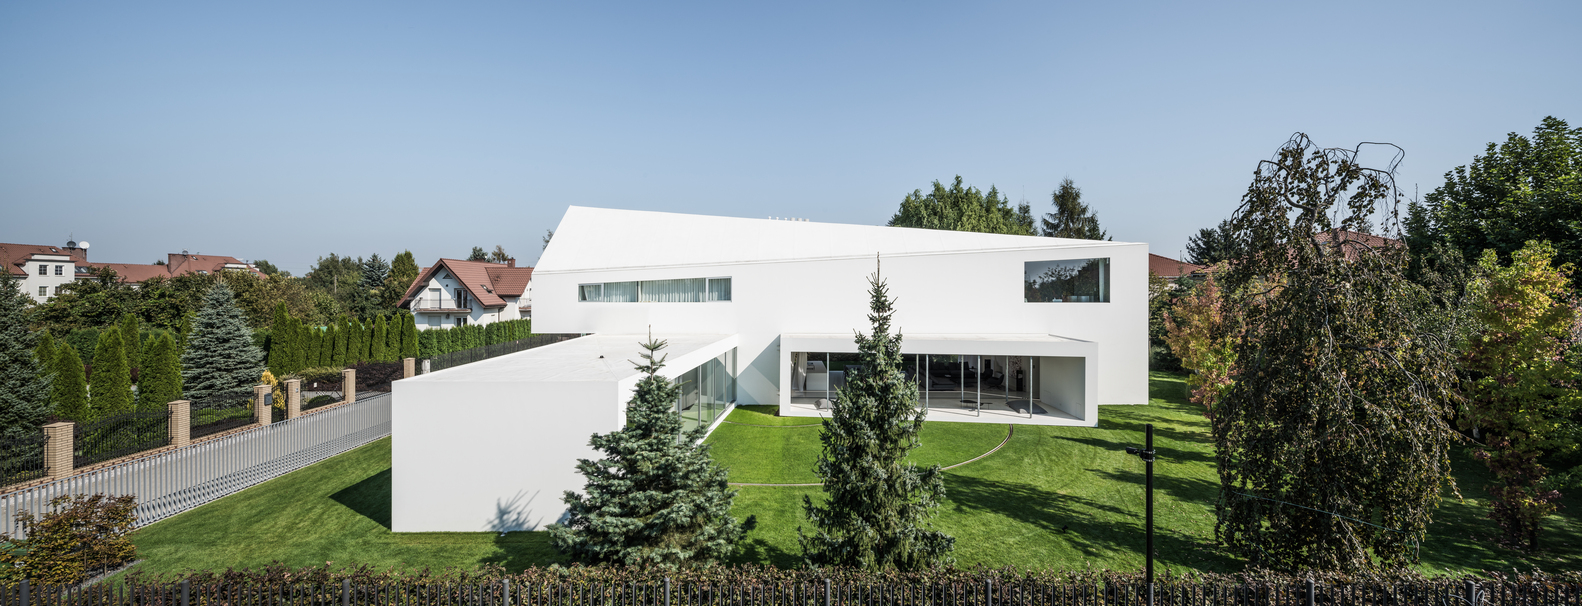
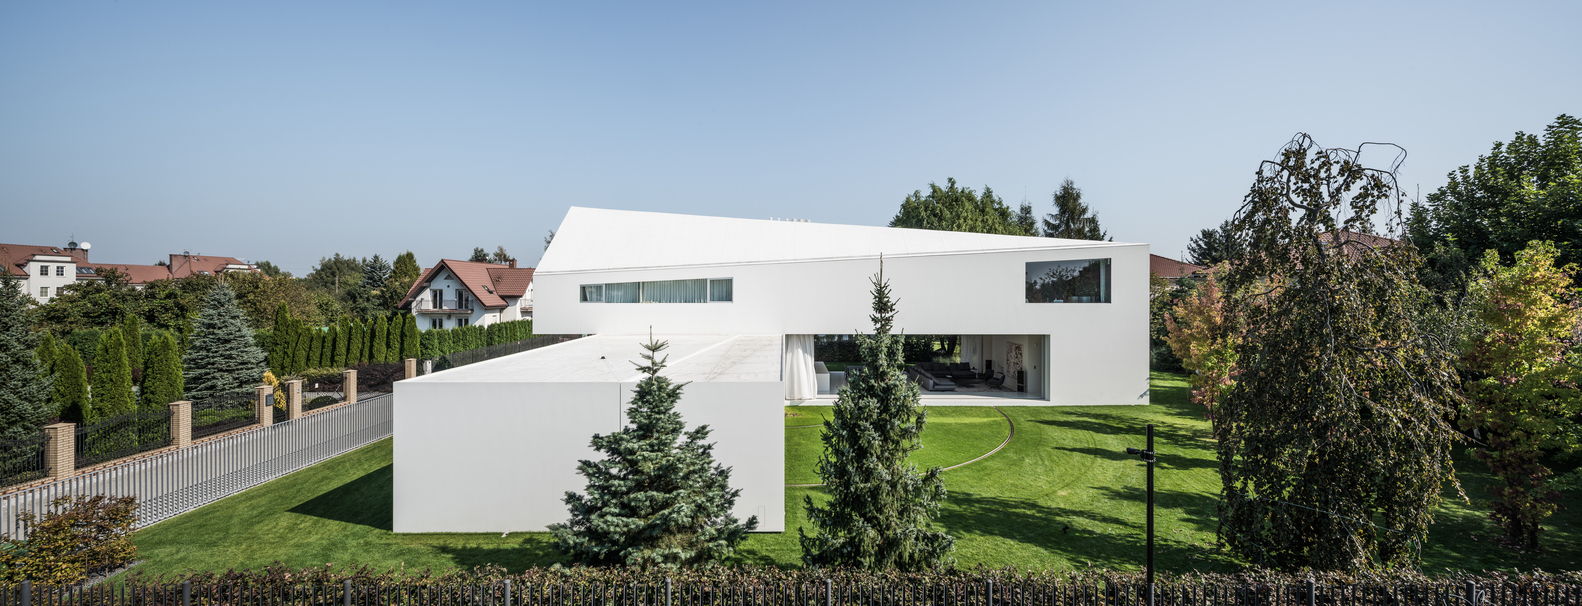
“Quadrant House” sits on a grassy suburban plot surrounded by trees. The name comes from both the word referring to the quarters of a circle and a historical instrument used to determine the angle of the sun’s elevation in astronomy. Even without a moving element, the house stands out from its neighbors with its stacked white volumes, blind facades facing the street.

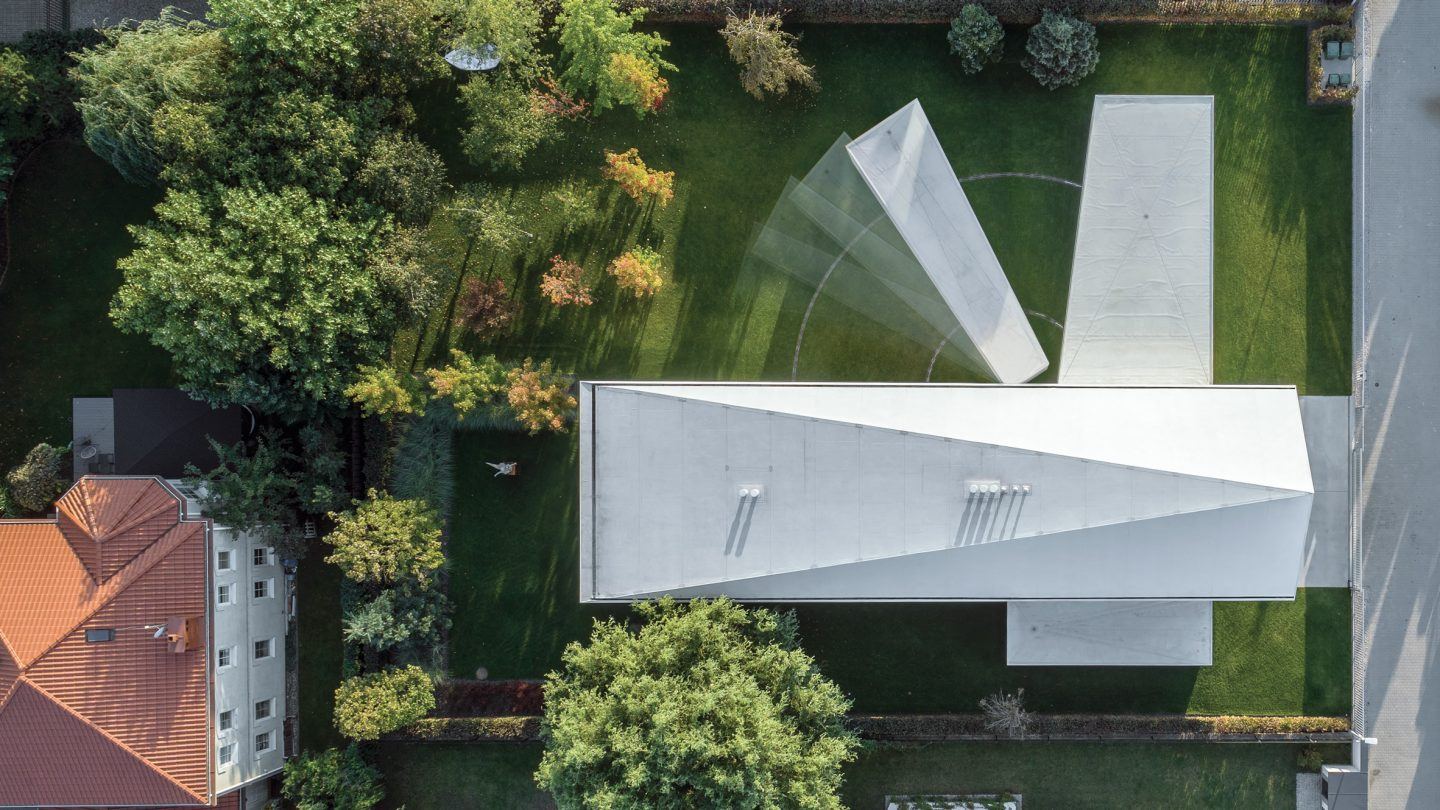
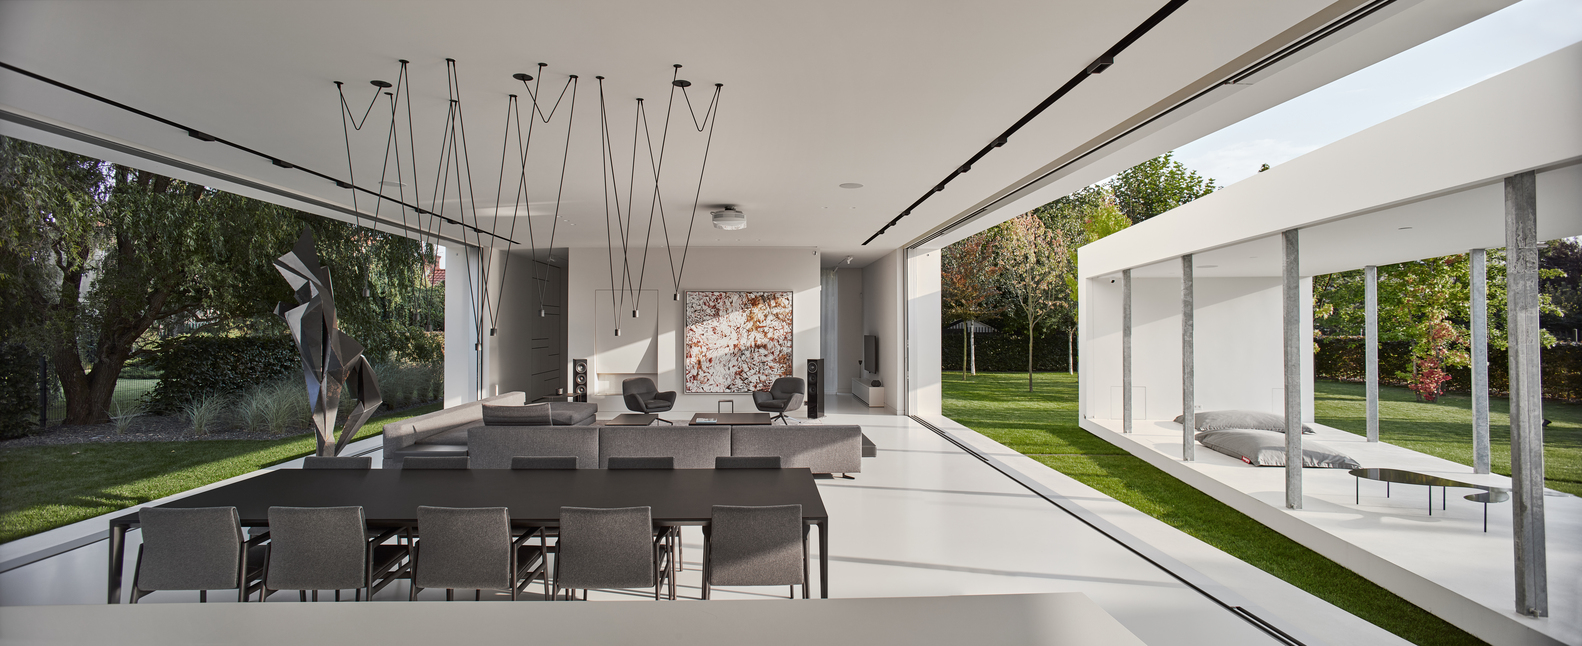
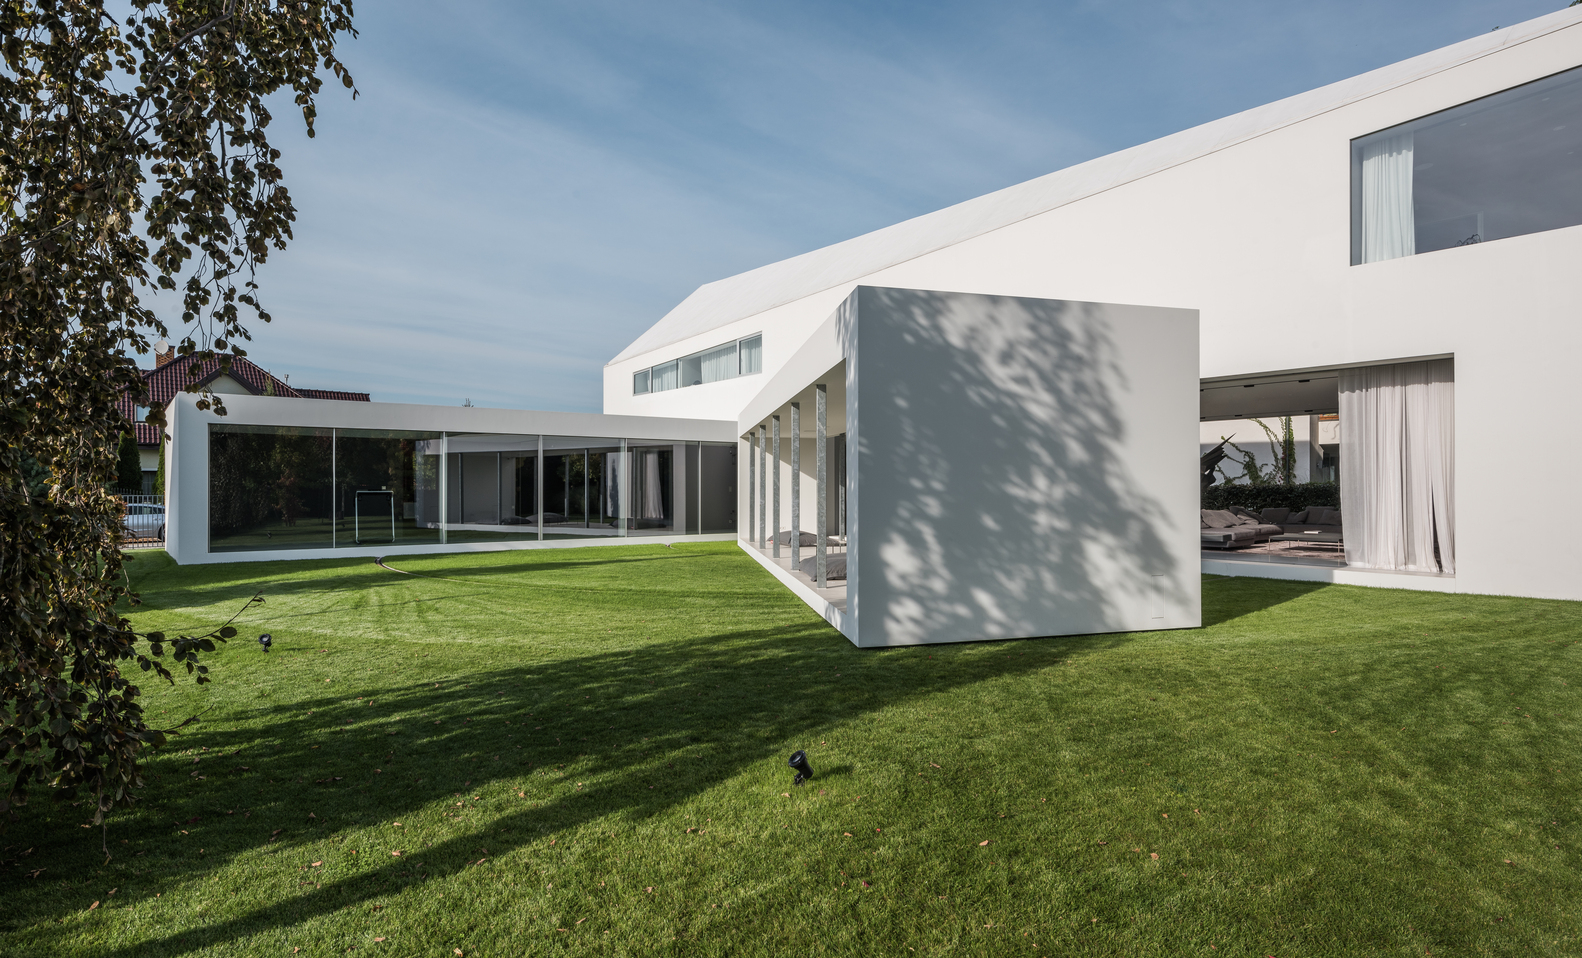
But of course, the star of the show is definitely that kinetic terrace. When it’s flat up against the side of the house, it almost doubles the living space. Moving silently and automatically, the volume swings out a full 90 degrees, allowing more or less sunlight to reach the indoor living room as desired. Sliding glass panels make it possible to open this entire section of the home to the outdoors.

“Clients wanted most simple, sunny and relaxing house, somehow reacting to the movement of the Sun. They also liked our Safe House, its changeability and mechanisms that create relations with the surroundings. The starting point was a regular shape unbuilt site, located in the suburbs among the average single-family housing. We placed a rectangular solid on it, corresponding to the wishes of investors in terms of the functional program.”

“Then we turned the part belonging to the ground floor to get as much privacy as possible from the side of the road. In the ‘cut’ space was located a living room, roofed floor and open to the garden – a similar solution can be found in Living Garden House, where the night zone is on the floor and the day zone becomes part of the garden – the boundaries between architecture and the landscape are blurred.”

Though they hoped for a flat roof, local code requires a gabled shape. The architects found a compromise by angling the gable toward the street-facing facade so that its back edge tapers down toward the yard, giving it a flat appearance from that angle, at least.

And if you’re wondering whether it might actually be dangerous to have a section of your home automatically changing positions according to the movement of the sun across the sky, don’t worry – the architects thought of that. Sensors make sure nothing is in the way of the movable volume, stopping the motion when obstacles are present.


WebUrbanist

 
Comments Off on Transforming Quadrant House: Rotating Terrace Follows the Sun

Posted in Creativity


Panasonic Lumix S Pro 24-70mm F2.8 to ship in October for $2200

28 Aug

$ (document).ready(function() { SampleGalleryV2({“containerId”:”embeddedSampleGallery_1553724933″,”galleryId”:”1553724933″,”isEmbeddedWidget”:true,”selectedImageIndex”:0,”isMobile”:false}) });

Panasonic has announced its fourth L-mount lens: the Lumix S Pro 24-70mm F2.8. The company is making no small claims about it: promising superior bokeh and sharpness. To that end, the 24-70mm uses 18 elements in 16 groups, including three aspherical lenses, four extra-low dispersion lenses and one UHR (ultra-high refractive index) lens.

As with the other ‘S Pro’ lenses, the design is certified by Leica (though the lens isn’t branded as Panasonic/Leica, since Leica designs its own L-mount lenses).

Panasonic also touts the lens’s high-speed autofocus. The system is powered by both linear and stepping motors, and a focus clutch allows for quick switches between auto and manual focus. The lens is dust and splash-resistant, as well as freeze-proof to -10°C (14°F).

The 24-70mm F2.8 should will offer video shooters benefits such as silent focusing, and Panasonic claims that the lens exhibits minimal focus breathing.

The Panasonic Lumix S Pro 24-70mm F2.8 will cost $ 2200 when it ships in mid-October.

Press Release

Panasonic Launches a New L-Mount Interchangeable Lens for the LUMIX S Series Full-frame Digital Single Lens Mirrorless Camera

LUMIX S PRO 24-70mm F2.8 (S-E2470)

Newark, NJ (August 27, 2019) – Panasonic is proud to introduce a new interchangeable standard zoom lens, the LUMIX S PRO 24-70mm F2.8 (S-E2470) compatible with the L-Mount system for the LUMIX S Series Full-frame Digital Single Lens Mirrorless Camera. Developed with high-quality professional performance in mind, the LUMIX S Series of cameras and lenses together achieve uncompromised photographic expression..

The LUMIX S PRO 24-70mm F2.8 (S-E2470) is a large-aperture standard zoom lens that boasts high descriptive performance across the entire zoom range. Optical performance is remarkably high, passing stringent LEICA standards.

The rugged dust- and splash-resistant* design withstands harsh conditions and ensures versatile use for landscapes, snaps and portraits with its 24-70mm focal length. The LUMIX S PRO 24-70mm F2.8 features stunningly high resolution and high contrast at each focal length point, with a filter diameter of 82 mm and an 11-blade circular aperture diaphragm. The full-range F2.8 high-speed aperture provides smooth defocus gradation from the focus peak to the neighboring area of the image to achieve a beautiful bokeh effect as well as a rich perspective.

Comprised of 18 lenses in 16 groups, three aspherical lenses and four ED (Extra-low Dispersion) lenses effectively suppresses both axial chromatic aberration and chromatic aberration of magnification. The aspherical shape of the lenses corrects astigmatism, achieving high resolving performance. Furthermore, a UHR (Ultra-High Refractive Index) lens achieves uniform image quality from the center to the edges of the image while downsizing the lens unit.

A double focus system combining linear and stepping motors achieves sensor drive at a maximum speed of 480 fps. This realizes fast, high-precision AF, ensuring the user never misses a photo opportunity. Focus clutch mechanism adoption enables instant AF/MF switching and accurate manual focusing. The LUMIX S PRO 24-70mm F2.8 also excels in video recording performance with a mechanism that suppresses focus breathing, a common problem in all interchangeable lenses designed for still image photography.

By 2020, Panasonic will design and develop 10 or more Lumix S Pro and other lenses, further expanding the S Series lens lineup. More than 45 interchangeable L-Mount lenses are or will be available from Panasonic, Leica Camera AG and Sigma, demonstrating an almost limitless spectrum of new creative possibilities.

The LUMIX S PRO 24-70mm lens will be available in October for $ 2199.99.

*Dust and Splash Resistant does not guarantee that damage will not occur if this lens is subjected to direct contact with dust and water.

Panasonic S Pro 24-70mm F2.8 specifications

Principal specifications
Lens type Zoom lens
Max Format size 35mm FF
Focal length 24–70 mm
Image stabilization No
Lens mount Leica SL
Aperture
Maximum aperture F2.8
Minimum aperture F22
Aperture ring Yes
Number of diaphragm blades 11
Optics
Elements 18
Groups 16
Special elements / coatings 3 aspherical + 1 UHR + 4 ED elements
Focus
Minimum focus 0.37 m (14.57)
Maximum magnification 0.25×
Autofocus Yes
Motor type Linear Motor
Full time manual Yes
Focus method Internal
Focus notes Has double focus system made up of linear and stepping motors
Distance scale No
DoF scale No
Physical
Weight 935 g (2.06 lb)
Diameter 91 mm (3.58)
Length 140 mm (5.51)
Materials Magnesium alloy
Sealing Yes
Colour Black
Zoom method Rotary (extending)
Power zoom No
Zoom lock No
Filter thread 82 mm
Hood supplied Yes

Articles: Digital Photography Review (dpreview.com)

 
Comments Off on Panasonic Lumix S Pro 24-70mm F2.8 to ship in October for $2200

Posted in Uncategorized