RSS
 

Archive for June, 2017

Italian Nikon distributor sets world record for largest human camera

27 Jun

Nikon is keeping the 100th anniversary party going with a new one-of-a-kind feat: assembling the world’s largest ‘human camera’. Italian distributor Nital and Media Italia put on the event, and over a thousand volunteers answered the call to don black, grey, white and red t-shirts. On June 17th, the human camera components were assembled into the unmistakable shape of a Nikon DSLR.

In case there was any doubt, a judge from the Guinness World Records was on hand to declare that it was indeed the largest human camera ever created. In any case, it seems like about a thousand people had a decent time and got a free t-shirt and hat out of the deal.

Articles: Digital Photography Review (dpreview.com)

 
Comments Off on Italian Nikon distributor sets world record for largest human camera

Posted in Uncategorized


Cull Your Photos Carefully – 5 Steps to Follow Before You Hit Delete

27 Jun

When to keep and when to hit delete on an image can be a tough decision to make sometimes. In this article I’ll give you five things you consider before you hit delete to help you with the process of how to cull your photos.

The emotional attachment lessens with time

I was shooting high on a mountain pass this past winter. Low clouds and scattered sun danced across the snow-covered slopes, blown by a chill wind from the north. The view below came and went as fog blew past, opening and closing the scene like curtains. Enthralled, I snapped photos, the stark mountains, the pale sun, the glowing patches of light on the snow. “These shots are going to be awesome.” I thought to myself.

Cull Your Photos Carefully - 5 Things to Consider Before You Hit Delete

A few hours later, I opened my computer and downloaded the images. And I could see then, that they were awesome. I sat and I stared, certain that these were some of the best of the trip. The way the light played across the mountains, the storm-light on the rock and snow slopes. Yeah, these were great.

A week later, as I was putting together images from the trip, I revisited those photos. Huh, I thought, I could have sworn those were better. I mean, they were decent, but not extraordinary. What happened?

Cull Your Photos Carefully - 5 Things to Consider Before You Hit Delete

I had distanced myself from the images for a time, and was able to separate myself emotionally from the experience of making them. I’d been able to view those shots almost as though someone else had made them. As a result, many more of those photos ended up in the delete pile than I would have expected at first glance.

But time away from your photos is just one thing to can do as you try to segregate the keepers from those to delete. Here are the five things to keep in mind as you cull and assess your images.

Cull Your Photos Carefully - 5 Steps to Follow Before You Hit Delete

Step #1 – Check the technical Details

After importing the photos of a recent shoot into my Lightroom Catalog, look at each image quickly, at full-screen size, and assess each for any technical faults.

Is the image out of focus (check at 100% or 1:1 view)? Is the composition obviously wonky? What about exposure, is the exposure so wrong that you can’t correct it? If the answer is “Yes” to any of these questions, immediately delete the image (or flag it as a reject by hitting X) and move on to the next.

Cull Your Photos Carefully - 5 Steps to Follow Before You Hit Delete

The trick in this first step is not to try and go beyond the technical details. This is not the time to try and gauge overall image quality. This is the time, merely to delete the obvious screw-ups.

Step #2 – The second round

If I’m eager to spend some time with my photos, or I’ve got a deadline, I’ll go back through them quickly a second time. Lightroom, and many other catalog programs, give you the ability to flag images with different colors, and/or rating codes.

Scrolling through the images, I’ll color code the good and bad standouts. Images that I like get coded green, purple or blue (the color relates to my own filing system), while images that I don’t particularly like, for one reason or another, get flagged red.

Cull Your Photos Carefully - 5 Steps to Follow Before You Hit Delete

Red flagged images are imperfectly sharp, have clear composition issues or other technical problems, while the green images are selects and the un-marked images are ones to hold onto for future consideration.

Some images do not get flagged at all. These are usually images to which I’m ambivalent. They are good enough not to get the dreaded red flag, but not so good that I want to highlight them immediately.

At this point, I’ll start post-processing my favorites, but I don’t delete anything. Not yet.

Cull Your Photos Carefully - 5 Steps to Follow Before You Hit Delete

A screenshot of my Lightroom Catalog after a shoot of this Rufescent Tiger Heron in Argentina. Of the 26 images, I selected two as keepers, one vertical, and one horizontal image.

Step #3 – Let them rest

Immediately following a shoot, we get emotionally caught up in our images, for better or for worse. If a shoot went well, like my experience on the mountain, you may have the feeling that your images are better than they actually are. If it went poorly, you may feel like they all suck, when in fact, they may not.

The solution is to give the images some space. Pull back for a few days, don’t look at them, don’t edit them. Put your new photos out of sight, and give yourself some emotional distance from the experience of making your images.

After a few days, a week, or even longer, you can have another go.

Step #4 – Consider how your images will be used

As you dive back into your collection, think for a moment about how an image will be put to use. If you are shooting for a client, then you may already have a good idea of the kind of images you needed to make. For example, the conservation groups I work for usually provide me a brief on the project. In that document, they will note specific types of images or video they need or want. As I’m pulling selections for them, I’ll consider their needs, and put special effort into finding and editing images that match.

Usually, there are no clients telling me which images are best. Without anyone guiding me, I lean toward variety.

Cull Your Photos Carefully - 5 Steps to Follow Before You Hit Delete

Variety includes more than framing, but also panoramic compositions like this one.

When I first started shooting seriously, I saved almost every image. I was too attached to each one. Later, as my image catalog and hard drives began to swell, I became heartless with images, deleting all but one or two from a series, even good alternatives to my selects. Now, I’ve settled somewhere in between because I don’t always know how an image will be put to use, so I like to have some variety available.

Magazine editors will often be looking for images with big areas of negative space which can be used for text placement. Large size wall prints require images that are immaculately sharp and high resolution. Illustrative shots, often sold for stock, or for small use in publications, need to be tight with only the bare minimum of room around the subject. While editing, I plan for these eventualities and select four or five images, in a variety of compositions, from any given scene, but not more.

Keep some variety of shots

As an example, below are my five selects from an encounter with a Brown Bear in southeast Alaska. Each of the five images have been published in national magazines. Each time, the editor wanted the image for a different layout, some involving text, some as a simple stamp-size illustration. The bottom line is you never know what is going to appeal to different viewers, so retain some diversity from within your shoots.

Cull Your Photos Carefully - 5 Steps to Follow Before You Hit Delete

Throw Away Your Photos Carefully - 5 Things to Consider Before You Hit Delete

Throw Away Your Photos Carefully - 5 Things to Consider Before You Hit Delete

Throw Away Your Photos Carefully - 5 Things to Consider Before You Hit Delete

Cull Your Photos Carefully - 5 Steps to Follow Before You Hit Delete

Don’t get caught up in what you think is the best image from a series. Rather, give thought to how you might want to use images from the shoot in the future. Red code (or however you tag your images) the faulty ones, or near-duplicates, but retain some variety.

Step #5 – The final cut

By this time, your collection of images will be a checkerboard of red and green. The red images flagged for deletion, the greens (and other colors) set aside as “keepers”. If you are like me, you’ve made enough duplicate, failures, and screw-ups that the reds wildly outnumber the greens and unlabeled images.

Throw Away Your Photos Carefully - 5 Things to Consider Before You Hit Delete

This image lay in my Lightroom for years before I finally noticed that it was pretty decent.

Before I hit delete, I give each image one more look, just to make sure I’m not cutting something that I might want to keep. Sometimes if an image is unique, even if it’s not what I think of as “good”, I’ll decide to hold onto it.

Throw Away Your Photos Carefully - 5 Things to Consider Before You Hit Delete

This image was taken Mexico in 2010. I found it a month ago, lingering on a hard drive. I had completely forgotten about that sunset over the Caribbean. Hard drive surprises can be great, but I recommend being more organized than I was at the time.

More than once, I’ve scrolled back through my Lightroom Catalog and stumbled on an image that, for one reason or another, I never gave a close look. At the time I created it, I must have considered it unremarkable, but didn’t consider it bad enough to delete. Years later, I’ve found some gems in those un-flagged images.

Bottom Line

Selecting keepers from a series of images is not always as straight forward as what is “good” and what is “bad”. Consider each image carefully, and use your delete key, but don’t get too enthusiastic pushing that button. Deleted images can never be recovered.

The post Cull Your Photos Carefully – 5 Steps to Follow Before You Hit Delete by David Shaw appeared first on Digital Photography School.


Digital Photography School

 
Comments Off on Cull Your Photos Carefully – 5 Steps to Follow Before You Hit Delete

Posted in Photography


The Earth as a Canvas: 25 Monumental Works of Land-Based Art

27 Jun

[ By SA Rogers in Art & Installation & Sound. ]

Treating the Earth like a canvas and natural objects like rocks, sticks, sand and ice as art materials, we alter the natural environment to reflect ourselves and our own artistic impulses – even if only temporarily, until these works of land-based art are erased by nature itself.

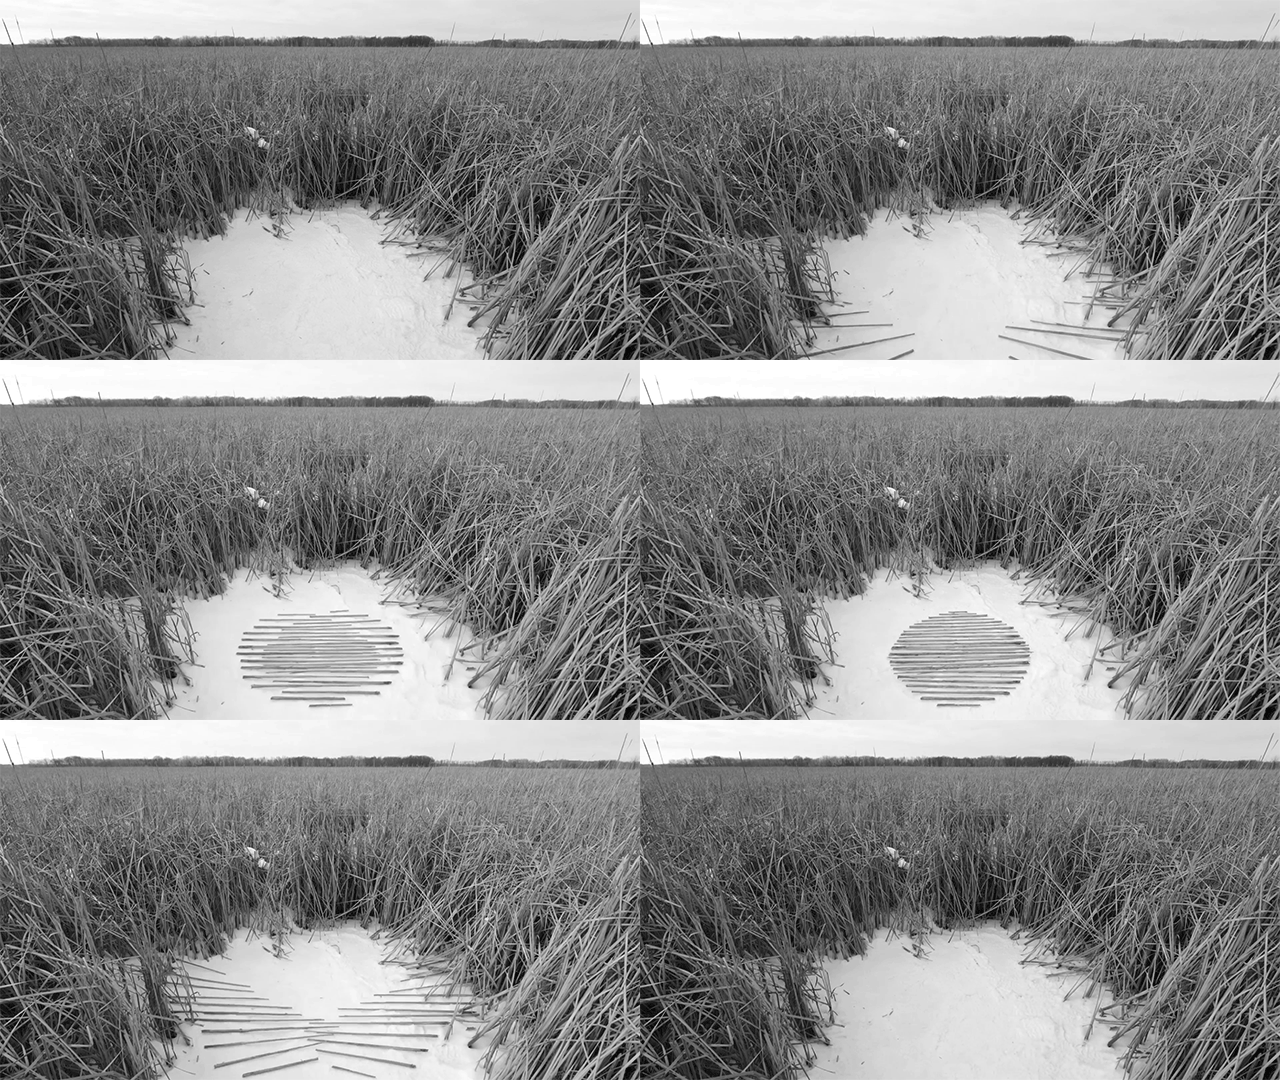
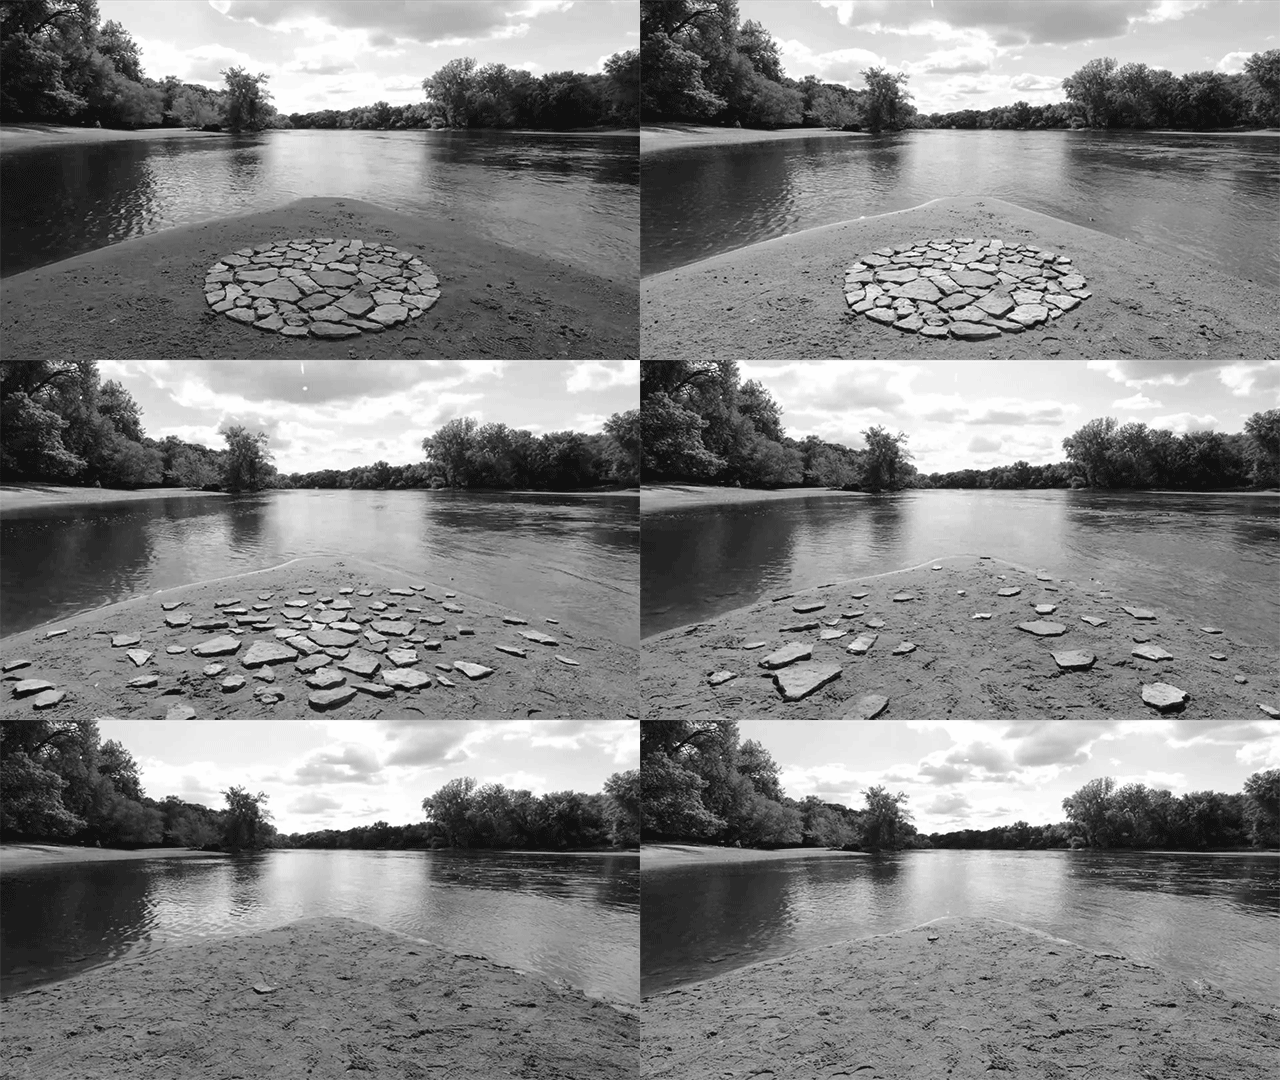
Animated Land Art by Paul Johnson

For his ‘Earthworks in Motion’ series, artist Paul Johnson takes inspiration from such legendary land artists as Andy Goldsworthy and Jim Denevan, using some of the same techniques but crafting them into stop-motion animations filmed in parks and nature preserves around Minneapolis/St. Paul, Minnesota.

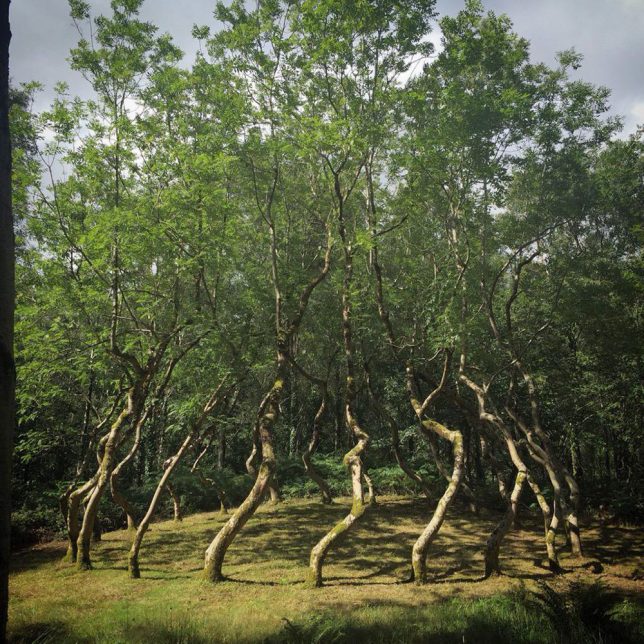
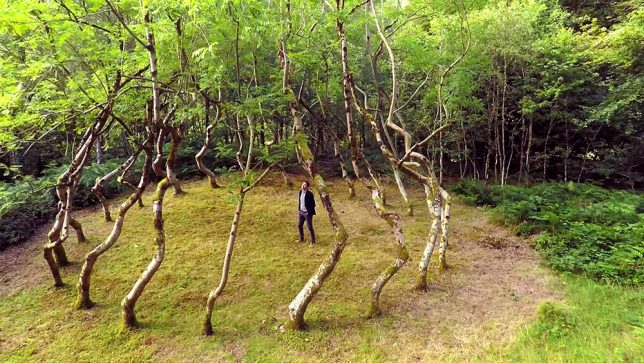
Ash Dome by David Nash

In 1977, sculptor David Nash secretly planted and trained a circle of 22 ash trees to grow into a shape resembling a vortex on an area of land in Wales. 40 years later, they’ve grown enough for the shape to be discernible. Nash says that at the time, during the Cold War and other unrest, planting something that couldn’t be properly enjoyed until the 21st century seemed like a leap of faith.

Van Gogh’s ‘Olive Trees’ Planted in a Field

Vincent Van Goh’s masterpiece painting ‘Olive Trees,’ completed in 1889, comes to life – literally – in a Minneapolis field as artist Stan Herd uses nature as his canvas and paints. The piece was viewable from the air during autumn 2015 and then mowed down in concentric circles reminiscent of Van Gogh’s painting strokes.

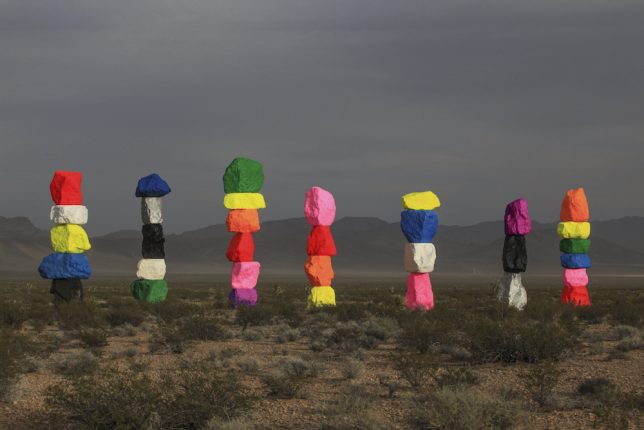
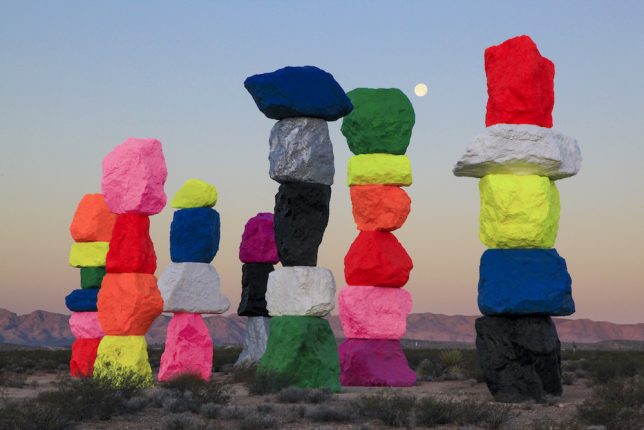
Seven Magic Mountains by Ugo Rondinone

Each of Swiss artist Ugo Rondinone’s ‘Seven Magic Mountains’ made of stacked limestone stands between 30 and 35 feet tall painting in dayglo yellow, red, pink, silver and other colors. They’re set just south of Las Vegas as a monumental work of land art, installed in May 2016 and due to remain in place until May 2018, so there’s still time to see it in person.

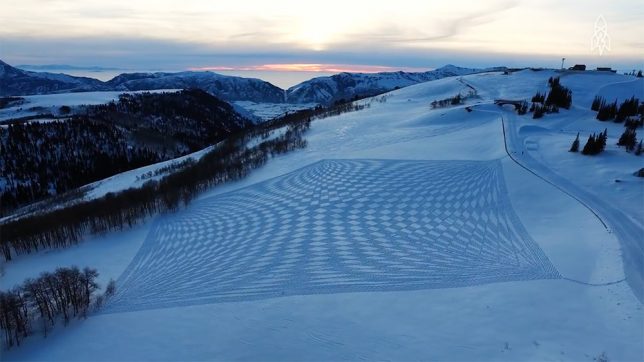
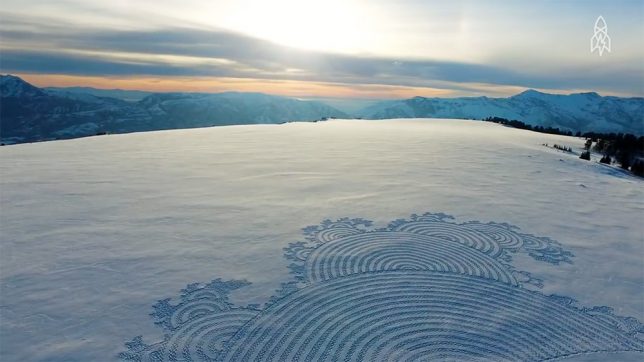
Snow Murals by Simon Beck

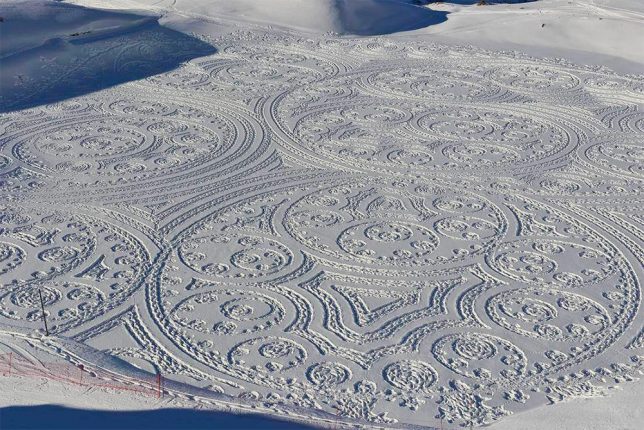
Simon Beck uses snowshoes to manually imprint dazzling patterns and shapes into snowy fields, photographs them from above and then allows them to be blown away, covered by more snow or trampled. It can take up to 5,000 steps an hour for 10 hours at a time to complete an average piece.

Next Page – Click Below to Read More:
The Earth As A Canvas 25 Monumental Works Of Land Based Art

Share on Facebook


[ By SA Rogers in Art & Installation & Sound. ]

[ WebUrbanist | Archives | Galleries | Privacy | TOS ]


WebUrbanist

 
Comments Off on The Earth as a Canvas: 25 Monumental Works of Land-Based Art

Posted in Creativity


Adobe acquires Mettle SkyBox suite of VR plug-ins

26 Jun
Adobe has acquired Mettle, the makers of the popular SkyBox suite of 360-degree-video and VR editing tools for Adobe Premiere Pro and After Effects. Mettle founder Chris Bobotis takes on the role of director, professional video at Adobe.
The SkyBox suite will no longer be available for separate purchase but existing SkyBox customers will continue to have the same contact and support process through Mettle. The suite will be integrated into Adobe Creative Cloud by the end of the year. Until then Adobe CC subscribers will be able to access the SkyBox tools by sending an email to dvaplugin@adobe.com. You should inlude your Adobe ID and first and last name as it appears on your account. Adobe then will get back to you within a week.

Adobe says that many of its users have been relying on the SkyBox Suite of plug-ins from Mettle for VR transitions, titles, and effects and it therefore made sense to make the plug-ins available to all subscribers through Creative Cloud.

“We believe that making virtual-reality content should be as easy as possible for creators. The acquisition of SkyBox plugins and Mettle technology allows us to deliver a more highly integrated VR editing and effects experience to the film and video community by the end of the year,” said Bill Roberts, Adobe senior director of professional video product management. You can read the full announcement on the Adobe Blog.

Articles: Digital Photography Review (dpreview.com)

 
Comments Off on Adobe acquires Mettle SkyBox suite of VR plug-ins

Posted in Uncategorized


6 Ideas for More Creative Landscape Photography

26 Jun

In the following article, you will learn how to do creative landscape photography using a variety of different techniques.

The level of technical skill in photography these days is amazing. A quick Google search for any given location will show well-composed photos, taken during the correct lighting conditions, and edited to perfection. The number of people capable of taking these perfectly crafted photos is also increasing, and therein lies the problem. The number of people with similar photos diminishes all the others when placed together. What’s the solution to this? If you still want to take a photo of a particular landscape consider other creative approaches to photographing it.

So what’s the solution to this? If you still want to take a photo of a particular landscape consider using some other creative approaches to photographing it. Read on for six ideas to help you do better and more creative landscape photography.

6 Ideas for More Creative Landscape Photography - long exposure

This photo has used a long exposure to flatten the water. It’s also the same image used for the 360-degree panoramic image below.

#1 – Infrared Photography

Infrared photography is great fun to experiment with and has been around along time. This particular form of photography uses, as the name suggests, infrared light to capture images. Now you can’t see the infrared spectrum with your eyes, but your camera sensor or special infrared film can.

When using a digital camera you will either need to adjust the White Balance in camera or use post-processing to bring out the signature infrared look (note you can also get an old camera body converted especially for capturing infrared images). What is the infrared look? These photos have dark black skies, bright white foliage and often they have still water caused by a long exposure. In order to take this type of photo with a digital camera you will need a filter or a reconditioned camera.

6 Ideas for More Creative Landscape Photography - infrared

Infrared is a lot of fun if you’re prepared to put the time into learning this technique.

#2 – Aerial Photography

One of the best angles in photography is a high angle looking down, this can lead to some great creative landscapes. The advances in drone technology have seen many people take amazing photos from the sky, though the consumer-level drones still don’t produce the highest quality still images. There are a few options if you want to try out aerial photography yourself.

  • Airplanes – Yes get the window seat of your plane, and take photos from the sky. Ensure you have a high shutter speed, remember you’re plane is moving fast so you need a fast shutter speed to get a sharper image.
  • Drones – The consumer drone will get you great angles, and images with good enough quality for online sharing, but not for printing. The professionals use larger drones that allow their dSLR to be attached to them.
  • Hot air balloons – It’s a great experience to take a hot air balloon ride, and the photos can be incredible. Even more extreme is attaching a camera to a weather balloon, and sending it up almost into space!
6 Ideas for More Creative Landscape Photography - aerial photo

A great angle if you can get it is overhead for a creative landscape. This photo was taken from a hot air balloon, but a drone would also get an angle like this.

#3 – Refraction

The concept of refraction to use light bent through a glass object is essentially how your lens puts an image onto your camera sensor. You can create this effect with spherical glass objects, or even ones filled with water. The image inside the refracting object will be upside down, and a vast amount of the scene behind the ball will be captured.

This is an interesting way to capture a creative landscape because the image inside the ball the image has the characteristics of a fisheye lens. Using a lens with a long focal length will compress the scene.

6 Ideas for More Creative Landscape Photography - refraction

This scene of St Paul’s Cathedral was captured inside a crystal ball, using the refraction technique.

#4 – Shoot a 360-Degree Panorama

This creative landscape idea utilizes post-processing to create a tiny planet effect. The effect is similar to the refraction idea, in that you are creating a globe, however, the look is very different.

To create this photo you will need a panoramic landscape image. If you’re a purest, then the panoramic landscape will be created by rotating the camera through 360 degrees. Once you have your panorama it needs to be reformatted into a square image, flipped upside down, and then the polar coordinates filter should be applied in Photoshop. To find this filter go to filter > distort > polar coordinates.

6 Ideas for More Creative Landscape Photography - 360-degree pano

This photo was turned into a tiny planet. It has the feel of a 360-degree panoramic photo.

#5 – Long Exposure

The different types of images that are possible with long exposures will lead to a burst of creative landscape photography. All you need is a tripod, and a camera capable of taking long exposure photos. The effect of long exposure is to make things move. The main subjects are car light trails, water, and cloud movement. Now, of course, astrophotography is also long exposure, but you’ll learn about that next.

  • Car light trails – These are produced by taking photos that are generally five seconds or longer. An overhead angle from a bridge or tall building is often best for shooting car trails, but photos from street level also look nice.
  • Water – Anywhere there is moving water, a long exposure can look nice. When photographing waterfalls the white water becomes like silk, with exposures over two seconds. The sea and its waves can be flattened by using long exposures over 10 seconds.
  • Cloud movement – Clouds moving across the sky make for a dreamy look in your photo, to achieve this you’ll need lots of clouds, with some clear sky. The faster the clouds move the easier it is to capture this movement. A sturdy tripod is important here, clouds move faster on windy days, so you need the camera to be still.
6 Ideas for More Creative Landscape Photography - long exposures

It’s a lot of fun to play creatively with traffic light trails in a photo. The photo of Big Ben in London is a popular one.

#6 – Astrophotography

One of the most popular forms of photography for those interested in landscapes is astrophotography. The latest cameras help you capture starry skies, with better noise performance at high ISO levels. Recent excursions to the deserts of Dubai and the coastline of southern England revealed a phalanx of photographers interested in this kind of photography. The most popular types of astrophotography are capturing the Milky Way, or showing the rotation of stars around the pole.

  • The Milky Way – Positioning the Milky Way in your frame can create a dramatic and creative landscape photo. This is the subject of a whole different article. The basics are to shoot at the constellation of Sagittarius between March and October in the northern hemisphere. Use the largest aperture you have, with exposures generally being 25 seconds long, and an ISO of 6400 or greater.
  • Star trails – The aim here is to point your camera at the north or south pole, and capture the earth’s rotation during a long exposure. The photo can be an ultra long 15-minute exposure or a series of shorter ones. The best method is to take multipl30-secondnd exposures, and then stack them together. StarStax is a good piece of software that will help you create this type of photo.
6 Ideas for More Creative Landscape Photography - Milky Way

Shooting the Milky Way is hard to photograph, so the chance of your photo being more unique is higher if you can do it.

Which creative landscape will you make?

There are many creative landscape photography ideas, which one will you choose to try out? There are other ideas we’d love to hear about as well, how did you make a creative scene your own?

In this article, I stuck strictly to still photos, but experiments with video allow for time-lapse or cinemagraphs as well. Please share your examples of the above styles that you’ve done, and tell us why and how you create your shot.

The post 6 Ideas for More Creative Landscape Photography by Simon Bond appeared first on Digital Photography School.


Digital Photography School

 
Comments Off on 6 Ideas for More Creative Landscape Photography

Posted in Photography


The Miggö Pictar is a pricey camera grip for iPhone photographers

26 Jun

Miggö Pictar
From $ 99 | www.miggo.com

Many photographers would probably agree that the image quality of smartphone cameras has improved rapidly over the past few years and in many cases now rivals the output from some conventional digital compact cameras. However, even if the image quality of the smartphone camera in your pocket is all you need, there is still one area in which conventional cameras offer undeniable advantages over smartphones: ergonomics.

Multi-touch smartphone displays are great for general use and navigation of mobile devices, but many photographers prefer physical buttons and dials for setting camera shooting parameters over virtual controls on a screen.

Enter the Miggö Pictar camera grip. It attaches to your iPhone and provides a number of customizable physical controls, plus a tripod mount and a cold shoe connector. The Pictar is available in two versions. One is compatible with the iPhones models 4s, 5, 5s, 6, 6s, SE and 7 and will set you back $ 99. The other fits the larger iPhone Plus models, including the latest iPhone 7 Plus flagship, and is $ 10 more expensive.

I’ve been using the Pictar grip with an iPhone 7 Plus for a few days. Here are my impressions.

Features, ergonomics and build quality

Attaching the Pictar to your phone is straightforward process. You ‘click’ the phone in place where it is safely held thanks to a spring-loaded mechanism. Once attached to the phone and connected to the Pictar app the grip offers most essential controls that you would expect on a conventional camera.

The Pictar’s chunky rubberized grip allows for comfortable and secure holding.

The shutter button supports half-press for focusing and locking exposure and two dials at the back of the grip are by default configured for dialing in exposure and changing the shooting mode. A front dial acts as a zoom ring, pressing it switches to the front camera. This configuration makes sense but if you don’t like how things are set up by default, the Pictar app allows for an impressive amount of customization. You can have a different setup for each shooting mode and even create custom profiles.

The Pictar offers a range of controls and features you would normally find on a digital compact or interchangeable lens camera.

Thanks to its rubberized grip the Pictar is comfortable to hold, even with only one hand, and most of the controls can be easily reached. Only the front dial is in a slightly inconvenient place which means you have to loosen your grip slightly when using it. That’s not much of a problem when you hold the phone and grip with both hands but makes for slightly unstable shooting in one-handed use. On my test unit the front dial is also a little stiff, making it difficult to dial in the desired zoom factor with precision.

The grip’s open design allows for attachment of most add-on lenses that don’t need a phone case but you cannot charge your iPhone while the grip is in place. A cold-shoe mount lets you use lights or microphones with your phone and at the bottom of the grip you’ll find a standard tripod mount.

Two dials on the back allow for quick adjustment of shooting mode and parameters.

Two major drawbacks of the Pictar are build quality and power supply. It’s made of quite cheap-looking plastic which stands in stark contrast to the iPhone’s premium materials. The buttons feel quite flimsy as well and the spring mechanism makes creaking noises when the iPhone is being attached. I have had no particular quality issues during my relatively short test but it remains to be seen how the Pictar will stand up to longer travels or intense daily use over time.

Power is supplied by a 1/2AA battery which Miggö says should last between 4 and 6 months. I had no issues with battery life during my testing but those batteries aren’t cheap and, depending on where you are, not always easily available. In this day and age even the cheapest devices seem to be USB-rechargable, and it’s a shame that the Pictar doesn’t offer this feature.

Pictar App

The Pictar camera app displays all essential shooting information. A histogram, virtual level and framing grid can be activated in the settings.

To use the grip you have to download and install the dedicated Pictar app first. Instead of Bluetooth it communicates with the phone via ‘ultrasonic OS’. Essentially, the grip sends out ultrasonic frequencies that are picked up by the iPhone’s microphones with a unique frequency for each function. According to the Pictar makers, this drains less battery on both devices. Everything worked well during our test and all of the grip’s physical controls were responsive and reliable at all times.

The app’s user interface is simple and well-designed. It shows all important camera settings and gives you the option to display a grid, histogram and virtual horizon. You can set focus and exposure points on the display and in some modes one shooting parameter is adjusted on a virtual slider but otherwise most settings are modified via the grip’s physical dials and buttons.

The customization options for the physical controls are almost endless.

The mode dial lets you switch between Auto, Manual and Shutter Speed and ISO priority modes. There’s also a Macro mode and a Sports modes, which biases toward using higher ISOs for faster shutter speeds, and a filter mode which allows for some live image manipulation. A video mode is included as well, but manual control is limited to exposure compensation.

Unfortunately the Pictar app does not offer the option to shoot images in Raw format, and there is no button to switch between the iPhone 7 Plus dual-camera lenses but you can assign that function to the front button if you want to. Unlike on a conventional camera a press of the shutter doesn’t take you back to the capture screen from review mode or when using another app.

Conclusion

In my experience there are two types of mobile photographers: purists who like mobile photography for its inconspicuousness and want to keep their device as compact and portable as possible, and those who like to use any gadget they can get their hands on to enhance their smartphone’s camera capabilities or feature set.

If you belong to the latter group and also like to have manual control over your shooting parameters the Pictar grip could definitely be for you. The dials and buttons offer quicker adjustment than most on-screen controls and the tripod and cold-shoe mounts will be appreciated by most more serious photographers.

On the downside, the Pictar does feel a little cheap for a $ 100 device. We’d also prefer USB-recharging to relatively obscure 1/2AA batteries. Raw support in the camera app would have been nice, too, especially when considering the photographically minded target users. That said, quite a few buyers will probably get the Pictar for its attractive retro-look alone.

What we like:

  • Good ergonomics and comfortable grip
  • Easy to use
  • Customizable configuration
  • Well-designed app

What we don’t like:

  • Cheap plastic material
  • Requires fairly obscure 1/2AA battery
  • Slightly stiff front dial makes precise zooming difficult
  • No Raw support in camera app

Articles: Digital Photography Review (dpreview.com)

 
Comments Off on The Miggö Pictar is a pricey camera grip for iPhone photographers

Posted in Uncategorized


10 Amazing Photography Tricks You Can do at Home with Everyday Objects

26 Jun

Here is a quick video showing you 10 photography tricks or projects you can try at home using everyday objects. You may have some of these things lying around your house, if not most are inexpensive to buy.

Try some of these ideas:

  • Make it snow indoors
  • Use a magnifying glass for fun effects
  • Create your own light flare
  • Try some refraction using water drops or a glass

Have any others? Please share your ideas in the comments below.

The post 10 Amazing Photography Tricks You Can do at Home with Everyday Objects by Darlene Hildebrandt appeared first on Digital Photography School.


Digital Photography School

 
Comments Off on 10 Amazing Photography Tricks You Can do at Home with Everyday Objects

Posted in Photography


How to Tell a Story With Your Street Photography

26 Jun

Street photographs on the surface may seem like they are independent of one another and can only go so far at telling a story, unlike say photojournalism. In some cases, this can be true, but there actually is a lot of crossover between documentary and street photography. Your street photographs can certainly tell a story.

How to Tell a Story With Your Street Photography

If you look at the individual books or even the entire bodies of work of photographers like Martin Parr, Trent Parke, Garry Winogrand, or Josef Koudelka, you can see that these photographers had a point of view. They were able to tell real stories with their photography.

How do you tell stories with street photography?

But how do you do this? If you are just starting out with street photography, you’re most likely focused on taking good shots and not on overarching themes. You never have to start trying to show comprehensive themes in your work, many great photographers don’t. But if you want to, plan on developing this over time.

The reality is that there is nothing more important than consistent time spent shooting. But while you are developing, here are some tips to help you get there.

*The photos used in this article are all part of a series called Luxury for Lease, which is about the disconnection, hyper-gentrification, conformity, and consumerism that has noticeably increased in New York since 9/11.

1. Create collections in Lightroom and group your images based on ideas and themes

How to Tell a Story With Your Street Photography

When you’re out shooting you want a clear head. Be open to whatever happens, so you give yourself the best chance to get lucky. Sometimes, if you’re too focused on one thing, you will miss everything else around you.

But during the editing phase is when you can really start to figure out what you are shooting. This is where you can develop your voice. Look through your photos, choose your favorites, and start to put them together. Pick out your images that seem to have some similarities in content, tone, or look.

They don’t have to perfectly relate, just in some way. Brainstorm, try a lot of things, and just have fun with it.

How to Tell a Story With Your Street Photography

I use Collections in Lightroom to do this. Collections allow you to put images into a folder without moving them physically on your hard drive. It is a great way to build portfolios of your work and to build and change around stories and ideas.

Over time, these stories will develop. Sometimes they will turn into nothing and you will scrap them, but other times they will morph. Sometimes the seed will develop into a fully formed idea over years of shooting, and the end result will be something that you couldn’t have imagined at the beginning.

That’s the fun part, and it will help you to think critically while you are out shooting. It will add a new layer to your abilities as you are photographing since you will begin to notice things that will fit into your projects.

2. Study the work of other photographers

How to Tell a Story With Your Street Photography

I can’t state the importance of this enough. It is hard to truly fathom the power of this type of photography unless you look at the work of photographers who have lived it for decades. Sometimes seeing what others have been able to do, particularly when looking at how diverse the ideas and styles are, will help you to form your own ideas. You may pick a characteristic from one photographer and a different attribute from another photographer and blend them both into your style.

Some photographers that I recommend you look up for street photography are; Robert Frank, Martin Parr, Trent Parke, Garry Winogrand, Josef Koudelka, William Eggleston, Todd Hido, and Daido Moriyama. Although, there are so many others that I could have mentioned here.

3. Go to the same areas consistently to shoot

How to Tell a Story With Your Street Photography

I like to think about style as consistency in what you shoot versus just how those photographs look. Yes, there is a large element of how your photos look that go into your style, but it’s more than that. It’s about the feeling behind the images.

By repeatedly shooting in the same areas, you will allow this consistency to rise to the surface. You will begin to understand the place better and give yourself more time to come across the right images. Most likely you will know the area well since you can only really photograph consistently in places that are close to where you live – so you will have a nuanced understanding of the place already.

Try to show a feeling for what the area is like under the surface. Capture the feeling of being there. Is it happy or sad, are there fun aspects or stressful characteristics? What makes the area interesting (or not interesting)? There is so much you can do with this.

4. Capture emotions and gestures

How to Tell a Story With Your Street Photography

This is street photography 101, but you can portray so many ideas and feelings based on the expressions on people’s faces or the gestures in their bodies. When putting together a cohesive body of work, this will be a way to add some powerful emotion to push a story forward. Try to understand what people are feeling and attempt to capture them as they show those feelings.

5. Look for images with something going on beneath the surface

How to Tell a Story With Your Street Photography

This is a tip that is hard to explain exactly how to do. Look for images where there is something going on beneath the surface. What that is you don’t exactly have to answer – it could be left for the viewer to decide.

These images will begin to show themselves more often as you start following the other tips in this article. In addition, the more you photograph in the same place and start to understand the place, the more these images will begin to pop out.

6. Think about yourself

How to Tell a Story With Your Street Photography

There are some photographers who show something about themselves in their images. This feeling makes their work that much more powerful. Happy photographers often take happy images, depressed photographers often take depressed images. Some photographers who seem happy on the surface, use their photography to express emotions that they are holding inside. Think about what emotions you are feeling and use them. The more you know yourself, the more you can let that shine through.

Josef Koudelka is one example – he grew up behind a wall so to speak during the Soviet invasion of Prague in 1968. He eventually got out, became a stateless person, wandering and traveling, and he spent much of his life photographing travelers. He has also been working on an ongoing project on the Israeli-Palestinian Walls and on the bleak landscapes that have been influenced by contemporary man. He grew up behind a wall and he was drawn to photographing walls. You can see in his images, even in random places and at random times, that the subjects he was drawn to were the ones that showed his inner feelings.

Putting it all together

This may all seem difficult to do, particularly if photography is your hobby. Don’t get me wrong, it is hard. But if you photograph frequently enough and think about all of this, you can really see your work transform in just a few years. The more you are in tune with it, the faster it should come, and it is very enjoyable to see.

So go out and keep shooting!


If you’d like to learn more about Street Photography, then please check out my ebook The Essentials of Street Photography.

The post How to Tell a Story With Your Street Photography by James Maher appeared first on Digital Photography School.


Digital Photography School

 
Comments Off on How to Tell a Story With Your Street Photography

Posted in Photography


New IKEA Smart Home Fixtures Compatible with Google, Apple & Amazon

26 Jun

[ By WebUrbanist in Design & Fixtures & Interiors. ]

Furniture giant IKEA is making its new low-cost smart home fixtures voice-controllable can connect with ease to systems including Google Home, Apple HomeKit and Amazon Alexa.

The company has been pushing in the direction of making homes smarter for some time, with furnishings able to wirelessly charge phones, for instance. But with TRADFRI, they are taking the next step, providing low-cost options that can be operated through a variety existing connected-home systems.

“With IKEA Home Smart we challenge everything that is complicated and expensive with the connected home. Making our products work with others on the market takes us one step closer to meet people’s needs, making it easier to interact with your smart home products,” says Björn Block, Business Leader for IKEA Home Smart.

Smart lights, motion sensors, dimmers, door locks, all with additional layers of remote control, are slowly transforming everyday interiors into interactive design spaces. The barrier to entry is also intentionally low: the cost is one factor, but the solutions are also plug-and-play, requiring no complex knowledge or specialized coding. Their latest releases are set to be in stores later this summer or early this fall.

Share on Facebook


[ By WebUrbanist in Design & Fixtures & Interiors. ]

[ WebUrbanist | Archives | Galleries | Privacy | TOS ]


WebUrbanist

 
Comments Off on New IKEA Smart Home Fixtures Compatible with Google, Apple & Amazon

Posted in Creativity


Siberia Space: Russian Town Tints Its White Winter World

26 Jun

[ By Steve in Architecture & Cities & Urbanism. ]

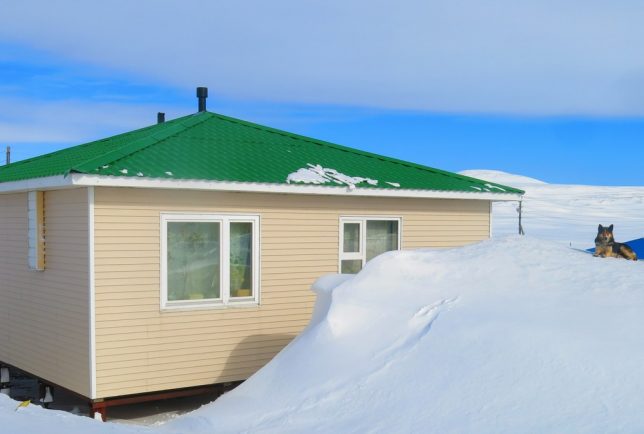
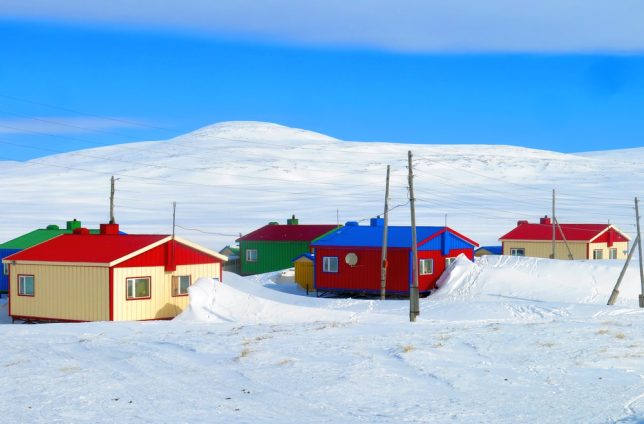
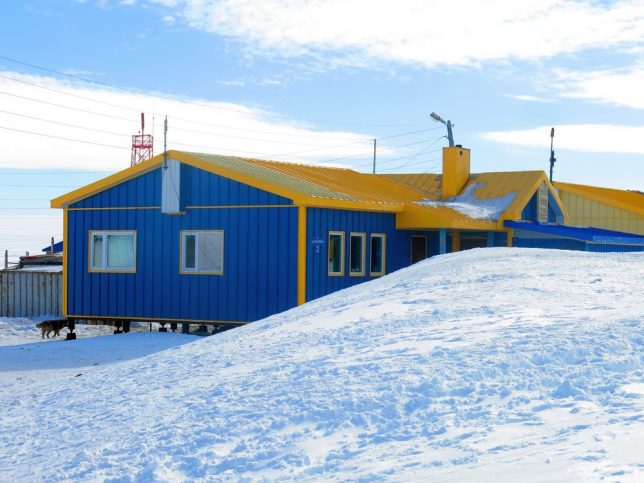
The tiny Siberian town of Ust-Yansk counters the pervasive whiteness of long & snowy winters by cladding its buildings in a rainbow of contrasting colors.

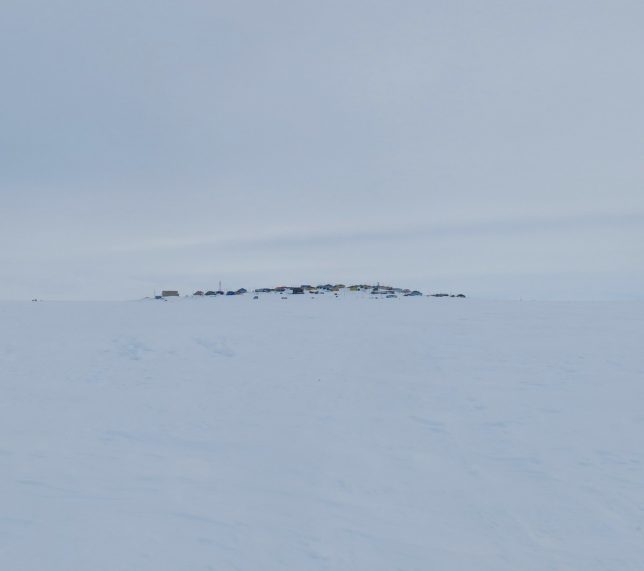
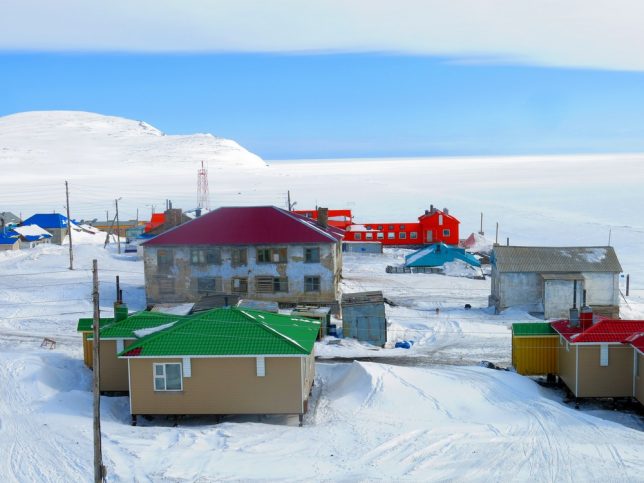
To say Ust-Yansk is isolated is an understatement: the nearest sizable town (Deputatsky, pop. 2,983) lies 302 miles (486 kilometers) to the southeast. Ust-Yansk itself boasts a population of just 317 (as of 2010, down from 341 in 2002). Both towns are located in Russia’s Sakha Republic, a sprawling Siberian territory slightly smaller than India but with just a thousandth of the latter’s population. The photo above shows Ust-Yansk from the distance of about 1 kilometer or about 6/10th of a mile.

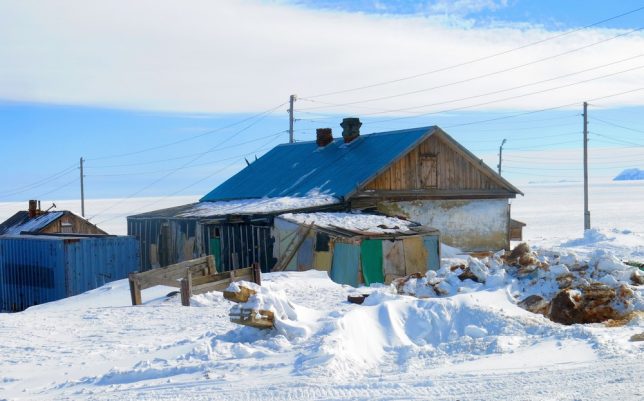
Never a wealthy locality, Ust-Yansk fell on hard(er) times in the 1990s when the fall of communism left Russia’s backwater districts pretty much to their own devices. In Ust-Yansk’s case, those devices consisted mainly of mining, reindeer herding and fishing – activities requiring decent weather to function to their potential. Being that Ust-Yansk lies deep in northern Siberia, the weather is usually anything BUT decent. To quote the Wikipedia entry on Deputatsky, “Winters are prolonged and bitterly cold, with up to seven months of sub-zero high temperatures.” Nice. The unrestored buildings above, photographed by blogger BASOV-CHUKOTKA, look about as miserable as their inhabitants must have felt.

The East Is Red, Blue, Yellow, Green…

Snow falls early and often in Ust-Yansk, and when it falls it stays – like most tundra towns built on the permafrost, Ust-Yansk’s buildings rest on stilts to prevent heat from melting the frozen ground beneath. This type of construction can be expensive, however, but after the turn of the century rising oil prices flooded Russia’s coffers with bright, shiny rubles and towns like Ust-Yansk began to reap the benefits.

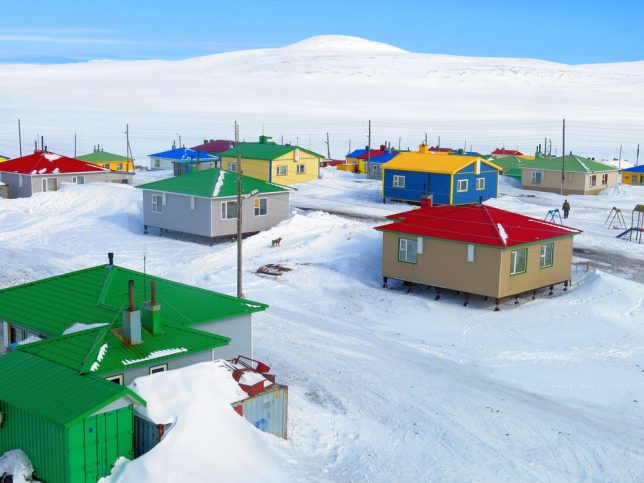
New construction and renovation transformed Ust-Yansk into a more livable town but what really stands out in these photographs taken in May of 2017 are the wealth of colors! From rich primary hues to more delicate pastel tints, Ust-Yansk brilliantly refutes the popular image of Siberia as a dreary place fit only for marginalized indigenous tribes and prisoners of the soviet Gulag. Well, it’s a start at least.

Next Page – Click Below to Read More:
Siberia Space Russian Town Tints Its White Winter World

Share on Facebook


[ By Steve in Architecture & Cities & Urbanism. ]

[ WebUrbanist | Archives | Galleries | Privacy | TOS ]


WebUrbanist

 
Comments Off on Siberia Space: Russian Town Tints Its White Winter World

Posted in Creativity