RSS
 

Archive for July, 2015

LumoPro LP742 LightSwitch Speedlight Case doubles as light modifier

30 Jul

LumoPro has announced the LP742 LightSwitch Speedlight Case and Modifier. The case is made from padded ballistic nylon and is able to accommodate most speedlights on the market. LightSwitch can also be transformed into three types of light modifiers: a reflector, bounce card, and flag. The case features a double-zipper design and a velcro strap on the back. Read more

Articles: Digital Photography Review (dpreview.com)

 
Comments Off on LumoPro LP742 LightSwitch Speedlight Case doubles as light modifier

Posted in Uncategorized


5 Incredible Storm Photographers and Their Best Images

30 Jul

I’ve been a landscape and travel photographer for nearly six years now. While I will always love standing in front of an amazing landscape at sunset, nothing on earth can compare to the feeling I get when standing in front of a massive supercell with 40-50mph winds at my back, watching it twist and churn, as it tries to lower itself to the ground. It’s the most intense and pure mixture of awe, fear and respect for mother nature that I’ve been able to find to this day.
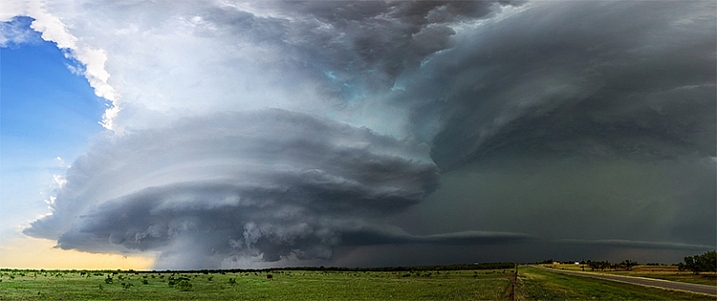
henrietta-storm-james-brandon

© James Brandon. Henrietta, TX Supercell
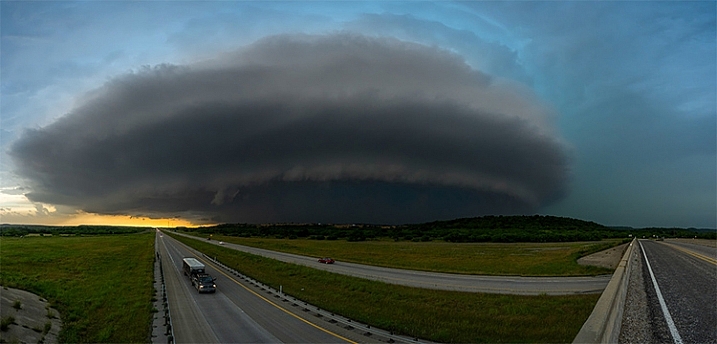
ranger-tx-supercell-james-brandon

© James Brandon. Ranger, TX Supercell

I’m just now wrapping up my third season of chasing these incredible storms (you can check out some of my storm images above) and over the past three years I’ve been fortunate to meet some incredible chasers; some of whom are even better photographers. So here’s a collection of four of the best chaser photographers out there (along with a few of their best images). Be sure to check out their websites and links to see more of their amazing work!

Mike Mezeul II

Mike has become one of my best buds over the past few years, we even lead workshops around the world together now (you can find more info on that through the link to my site in my bio). He took me on my first chase and to this day I chase with him about 99% of the time. He’s been doing this stuff for upwards of 15 years now, and is just as good at putting us in position for a storm to develop, as he is at photographing them. In fact, the last time we chased we drove out to west Texas and he put us within 30 minutes of storm that exploded into a supercell.

Check out more of Mike’s work at his website and be sure to follow him on Instagram as well!
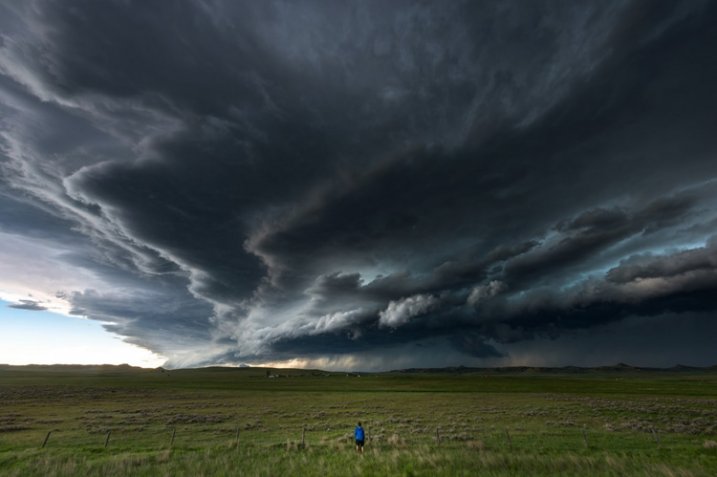
storm-chasing-article-4

A storm chaser stands in front of an approaching supercell thunderstorm just north of Gillette, Wyoming in May of 2014. © Mike Mezeul II
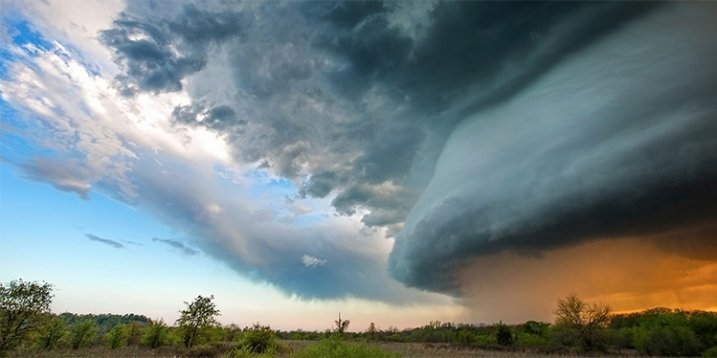
"Ardmore Supercell" © Mike Mezeul II

“Ardmore Supercell” © Mike Mezeul II

“A tornadic supercell thunderstorm sweeps across the plains at sunset near Ardmore, Oklahoma.”
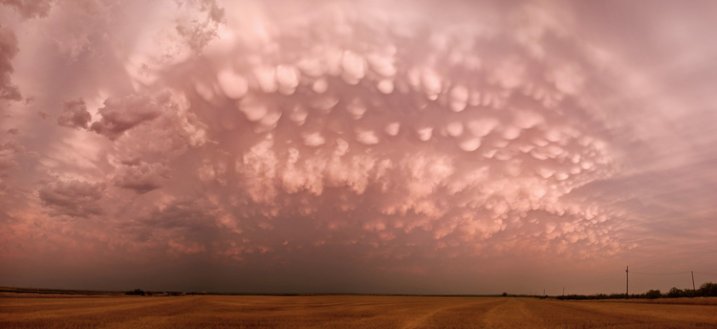
storm-chasing-article-5

“Pink Mammatus” © Mike Mezeul II

“Mammatus clouds glow a vibrant pink over west Texas after severe weather rolled through the area.”
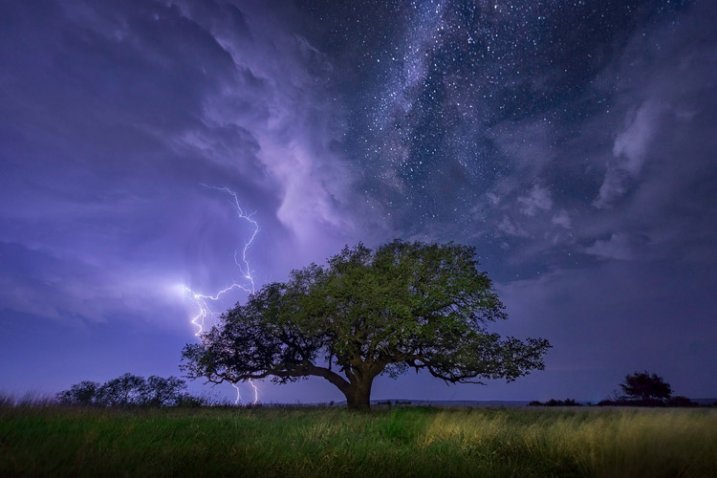
storm-chasing-article-13

“Awakening” © Mike Mezeul II

“A cloud-to-ground lightning bolt strikes over Albany, Texas as the Milky Way shines above.”

Mike Olbinski

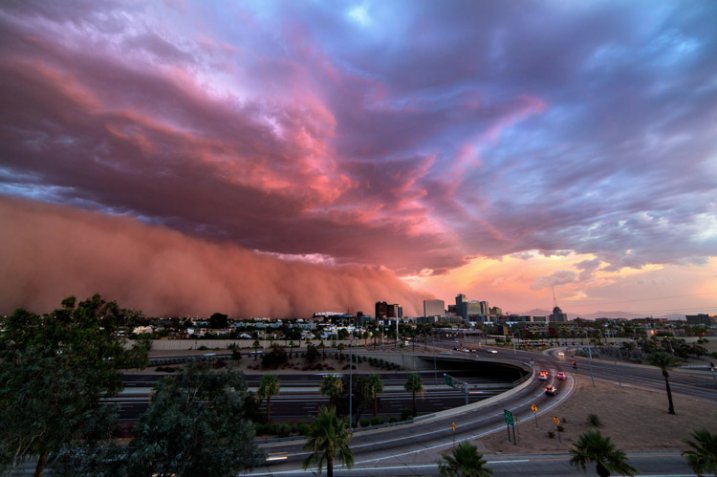
I’ve known Mike online for about the same time as I’ve been a professional photographer. We met back in the HDR Days, and I remember being amazed when he got into storm photography. Then, one of his images of a haboob decsending on Phoenix went absolutely viral overnight and he was officially on the map as a storm photographer. But that wasn’t it, he hit gold again a couple years later with his Booker, TX timelapse which you’ve likely seen on TV and even movies. Coincidently, I just met Mike in person for the first time a few weeks ago while out chasing in west Texas. He’s an incredibly nice dude and fantastic photographer. I’ll be joining him soon to photograph Monsoon season in his home state of Arizona. Can’t wait!

Check out Mike’s work at his website and on 500px and read his article here on dPS: How to Photograph Lightning – the Ultimate Guide
storm-chasing-article-9

“Phoenix Haboob” © Mike Olbinski

“A gorgeous dust storm and low level clouds roll into downtown Phoenix on July 3rd, 2014. Always amazing to see a scene like this, but toss in a little sunset color and it blew my mind.”
storm-chasing-article-12

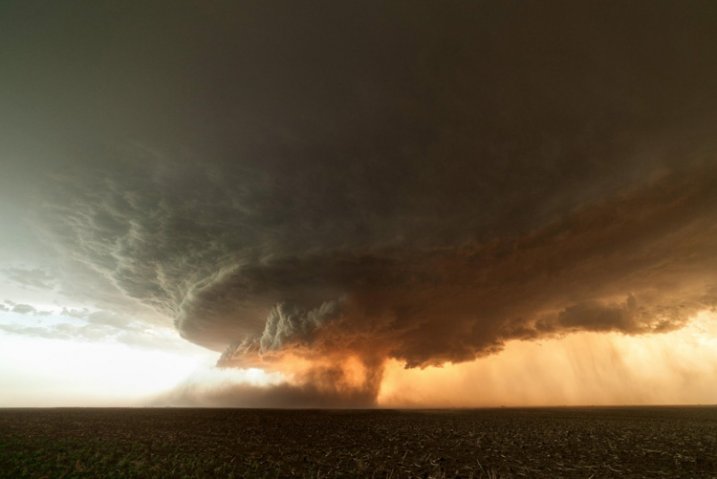
“Storm of the Apocalypse” © Mike Olbinski

“A view of the Booker, Texas supercell which was one of the most amazing sights I have ever seen. You can see the crazy timelapse of this storm below.”
storm-chasing-article-11

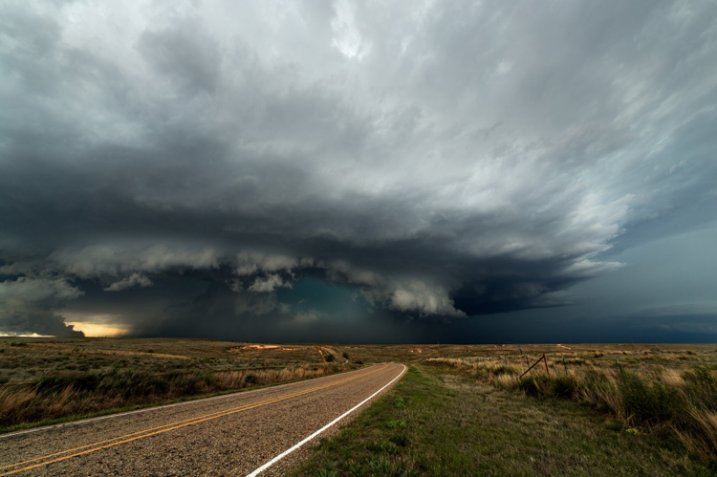
“Alanreed Supercell” © Mike Olbinski

“This storm earlier spawned a brief tornado near Groom, Texas. It moved to the east/northeast across the rolling farmlands…I caught up to it once again here just north of Alanreed. The hail core and structure was magnificent to behold.”

Marko Korosec

Marko is an incredibly talented photographer and chaser from Slovenia. I was turned on to his work through a friend, and when I began scrolling through his images on 500px, my jaw began to drop lower with every image. He seems to be on just about every major photogenic storm there is, and that’s a feat in and of itself. Capturing these storms as well as he does is a whole other feat. I haven’t met Marko in person yet, but I’m sure it’s only a matter of time before we run into each other out on the road beneath a storm.

You can follow Mark on his website and 500px.
"Sunset Supercell " © Marko Korosec

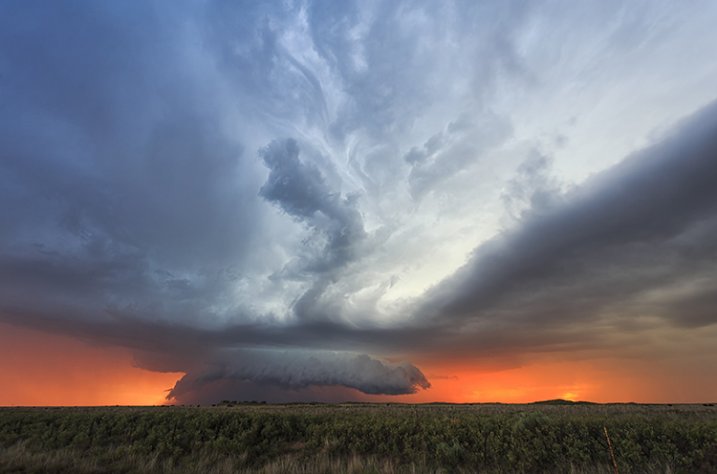
“Sunset Supercell ” © Marko Korosec

“Nicely striated supercell at colorful sunset near Bledsoe, New Mexico on May 29th, 2015″
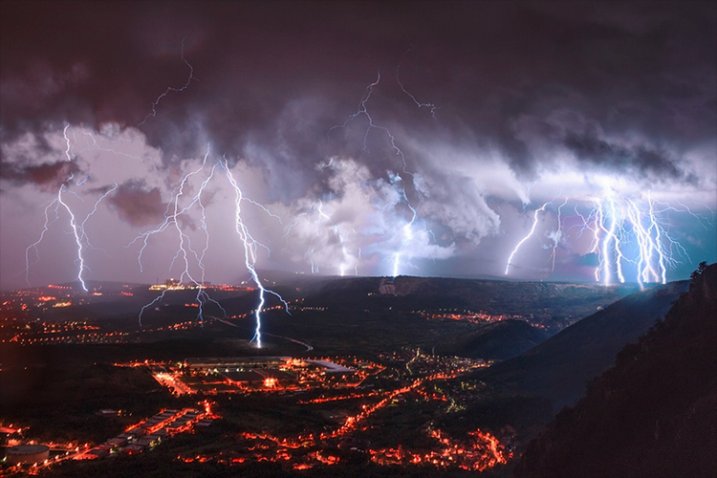
"Electric Night" © Marko Korosec

“Electric Night” © Marko Korosec

“A lightning barrage during the cold frontal passage over the city of Trieste, Italy on October 14th, 2014.”
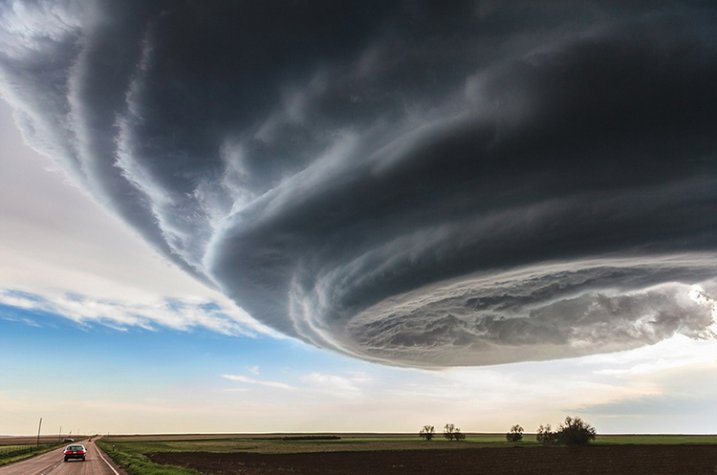
"Independence Day" © Marko Korosec

“Independence Day” © Marko Korosec

“Spaceship shaped supercell storm near Julesburg, Colorado on May 28th, 2013″

James Langford

I met James Langford out on the road during one of my first chases with Mike and have since run into him while chasing several times. James is just an all around nice dude. If he’s not chasing on his own, he’s usually “now-casting” (forecasting for a chaser from home) for someone who is. He’s got an incredible collection of storm images as well as some jaw-dropping time-lapses.

You can follow James at his website and Facebook.
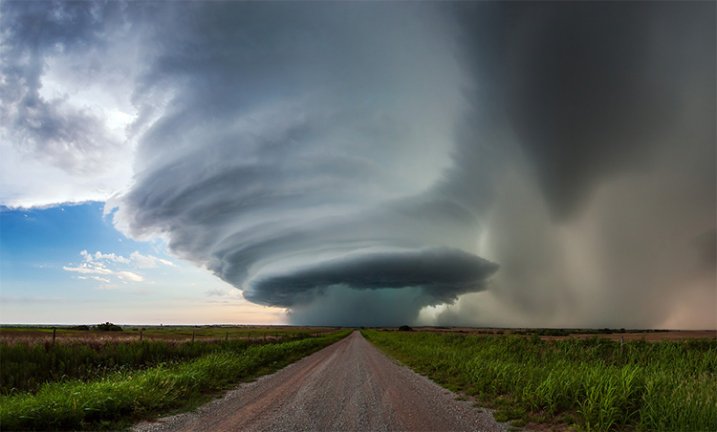
langford-1

“Perfect Symmetry” © James Langford

“This was captured in western Oklahoma. Experiencing the power and beauty of thunderstorms is something that is really hard to translate into images.  This particular storm was one of the most beautiful I had ever seen.  It moved very slowly the whole time we photographed it, and the structure and colors were incredible.”
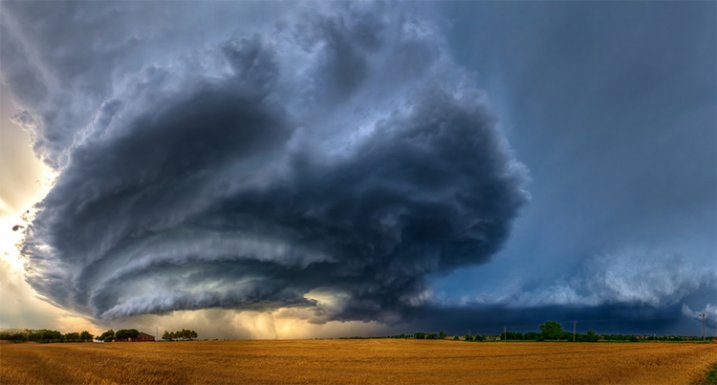
langford-2

“The Beast” © James Langford

“Capture near Piedmont, Oklahoma, this incredible storm in Central Oklahoma had hail the size of grapefruits and a small tornado around the time this image was created.  I’ve never seen structure and colors quite like this and it ranks as one of my favorite images of all time.”

Kelly DeLay

I met Kelly a couple of years ago through Mike Mezeul. He had a great 2015 season capturing both the Hico supercell and the twin tornadoes in Colorado that went pretty viral. You can view more of his work at his website Clouds365.com and his 500px page.
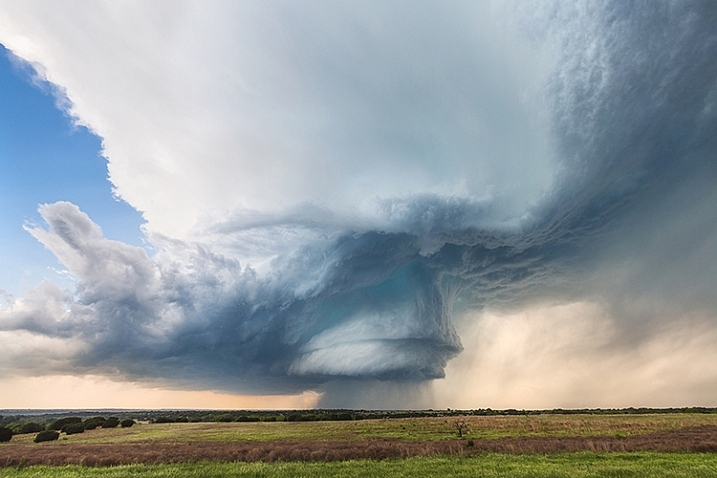
© Kelly DeLay. Hico, TX Supercell

© Kelly DeLay. Hico, TX Supercell

“Visually, has to be one of my favorite storms ever. This was a very discreet storm and as you can see the rotation was quite evident. The hail core was quite impressive as well, producing baseball sized hail that knocked out a few storm chaser’s windshields.”
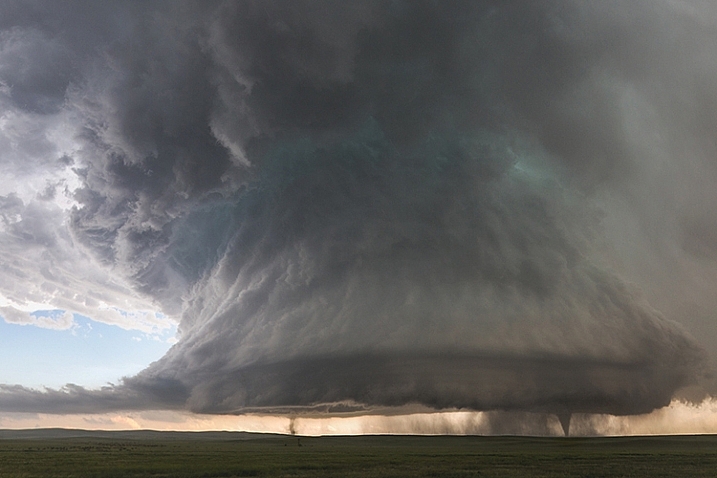
© Kelly DeLay. Sister tornadoes - Simla, Colorado

© Kelly DeLay. Sister tornadoes – Simla, Colorado

“My most favorite image of my career. I did describe it as a “shot of a lifetime”. For years I wanted to capture a discreet supercell (no other storms around) with a tornado underneath. I was very surprised to see not just one, but two tornadoes both spinning in the opposite direction.”
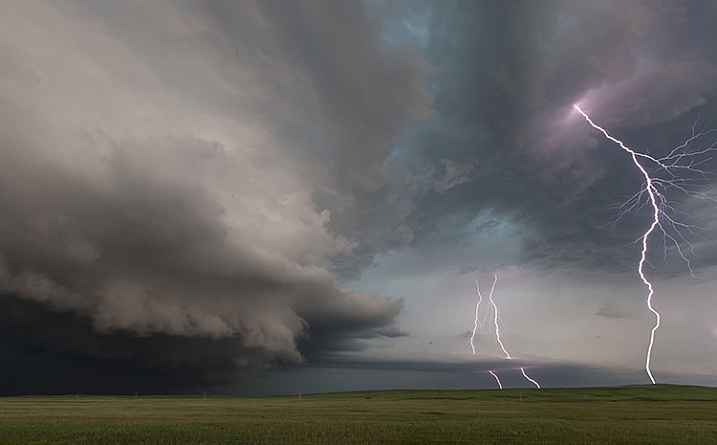
© Kelly DeLay. Belle Fourche, South Dakota

© Kelly DeLay. Belle Fourche, South Dakota

“The lightning field was so intense preceding the core, you would see a flash nearby and immediately hear a BOOM. Thats close! Feeling a little safer near Belle Forche, South Dakota I got out and captured a few shots. Again, all you would see is a quick flash. Amazed to look at the back of my screen to see this.”

For more storm photography see:

  • 7 Things I’ve Learned from Photographing Storms
  • How I Shot And Edited It – Stars, Storm and Basecamp, Nepal
  • 33 Blustery Bad Weather Images
  • How to Photograph Lightning – the Ultimate Guide

googletag.cmd.push(function() {
tablet_slots.push( googletag.defineSlot( “/1005424/_dPSv4_tab-all-article-bottom_(300×250)”, [300, 250], “pb-ad-78623” ).addService( googletag.pubads() ) ); } );

googletag.cmd.push(function() {
mobile_slots.push( googletag.defineSlot( “/1005424/_dPSv4_mob-all-article-bottom_(300×250)”, [300, 250], “pb-ad-78158” ).addService( googletag.pubads() ) ); } );

The post 5 Incredible Storm Photographers and Their Best Images by James Brandon appeared first on Digital Photography School.


Digital Photography School

 
Comments Off on 5 Incredible Storm Photographers and Their Best Images

Posted in Photography


The Secret to Great Photography Portfolio

30 Jul

Secret to a better portfolio 4147

If you’ve been around the photography world for a short time, you probably have at least a basic grasp of the technical skills. You know how to manipulate depth of field with aperture, where to focus in a portrait, and how to compensate your exposure for extremes in shadows and highlights. Even knowing things like that, you’ve probably stumbled across some incredible portfolios or magazine spreads and asked, “How did they do that?” Or even “What’s their secret?”

The secret to a great photography portfolio is simple. It isn’t even a secret at all, although it’s not often talked about in photography communities. Simply put, the secret is:

Master the technical skills until they’re automatic, then go out and endlessly make photographs, a lot of photographs. Only a handful should ever be shown to anyone.

Photography is easy; at least the technical side. Yes, that’s a quite a contentious statement, but I’m not the one who said it. It was David Bailey being interviewed by Rankin and answering the question, “What makes a good photographer?” His answer was:

“You can learn to take pictures in three months. You can learn to draw in three months, but only technically. It’s where you go from there.”

Secret to a better portfolio 2266

The critical point is that it’s not the technical skills that make good photography. They’re vital ingredients but it’s how they’re put together with your subject to create an end result that is most important.

Think of it like cake. If you’re digging in to a piece of cake and you actually notice any of the individual elements of eggs, flour, butter or sugar, something’s gone horribly wrong in the baking process.

What comes after the technical skills?

There are two elements to consider when thinking about what to do next:

  • First, creating a lot of images and showing only a few.
  • Secondly, giving your subject comprehensive coverage.

Create many, show few

In an article, that I read a few years back, a National Geographic photographer said that they use to go through 1500 rolls of film to create a single set of 10 to 20 images for an article.

Secret to a better portfolio 4641

To translate that, assuming they used 120 film in a 6×9 medium format camera; that yields eight frames per roll of film. That’s 12,000 photographs. Also assume that those photographers would have bracketed one or two stops on either side. (Bracketing is the practice of taking a normally exposed photograph, then taking two more – generally one overexposed, one underexposed. This was useful in the days of transparency film which offered very little in terms of exposure latitude.) That brings the number to 4000. Finally, say 50% of those weren’t good enough to show the editor.

That leaves 2000 photographs that most people would probably be more than happy to have taken. The final spread used about a dozen of the very, very best or 0.6% of all of the images taken.

To apply this concept to your own portfolio, you have to learn how to be ruthless. If it isn’t your very best, scrap it. It can be hard work, especially considering the emotional connections we, as photographers, have with our work, but if you can learn to turn that off then your portfolio will be better for it.

Comprehensive coverage

Secret to a better portfolio 3347

Back to dissecting National Geographic, my favourite article is one that covers the glamorous topic of caffeine. This one is a large spread and is made up of 23 photos.

Breaking it down: nine images are environmental portraits, six are classical reportage, six are still-lifes, and two are landscapes.

The set of photos also covers five countries and five US cities; all within 23 photos.

To cover every possible aspect associated with caffeine, the photographer for that piece documented several facets of the human element of the topic, from production workers, to scientists in labs, as well as the consumers. The landscape images in the article showed the environmental impact of caffeine.

Hopefully you’re starting to see what comprehensive means in this context. Of course, very few people have the kind of resources to approach a subject so thoroughly, but if you take the extra time to consider and follow through on other possible aspects of your subject matter, you may be surprised with the results.

Icing on the cake

Secret to a better portfolio 4944

To return to the cake metaphor: when you’re at a bakery, you only see the shop floor, with the well presented finished products. You don’t see the chefs slogging through hours of batter and hot ovens. You don’t see the logistics of bringing chefs and ingredients together in the right place. You just see cake.

Hopefully, you now have a little more insight on what may have gone on behind the scenes, albeit a simplified interpretation, when you look at a photo that you admire, and what steps you can take to push yourself in that direction.

Just remember: get the technical skills mastered and out of the way, then go wild.

googletag.cmd.push(function() {
tablet_slots.push( googletag.defineSlot( “/1005424/_dPSv4_tab-all-article-bottom_(300×250)”, [300, 250], “pb-ad-78623” ).addService( googletag.pubads() ) ); } );

googletag.cmd.push(function() {
mobile_slots.push( googletag.defineSlot( “/1005424/_dPSv4_mob-all-article-bottom_(300×250)”, [300, 250], “pb-ad-78158” ).addService( googletag.pubads() ) ); } );

The post The Secret to Great Photography Portfolio by John McIntire appeared first on Digital Photography School.


Digital Photography School

 
Comments Off on The Secret to Great Photography Portfolio

Posted in Photography


29. Juli 2015

29 Jul

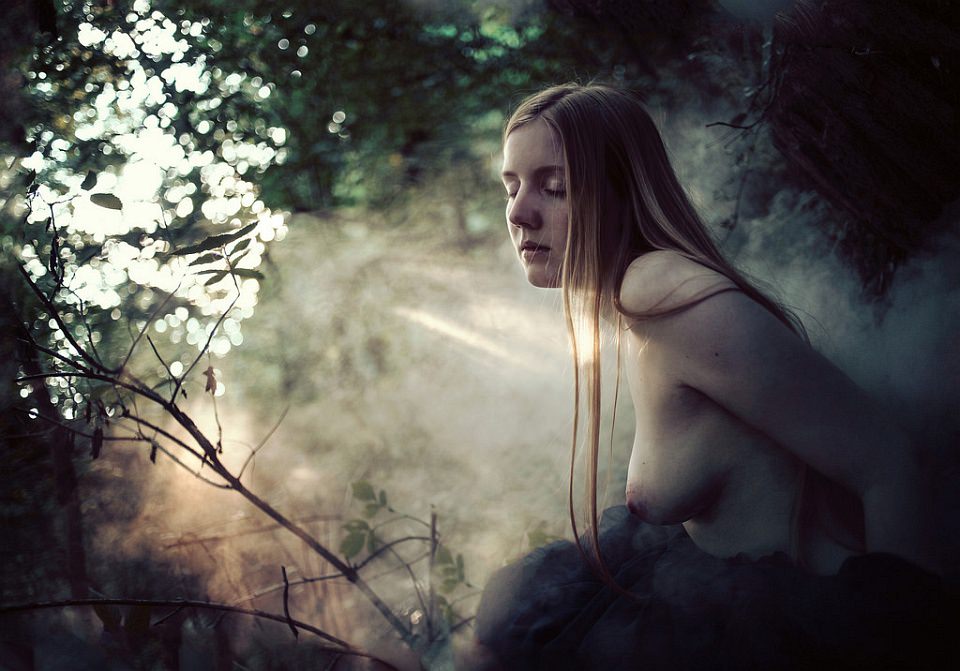
Das Bild des Tages von: Elisabeth Mochner / Modell: Leonie Orbred

Frauenakt in der Natur mit Nebel und sanften Lichtstrahlen.

Im Ausblick: Ein Flugzeugfriedhof, das Tote Meer und Tiere als Fotografen.
kwerfeldein – Fotografie Magazin | Fotocommunity

 
Comments Off on 29. Juli 2015

Posted in Equipment


Photo History Club: Pop Art Photography

29 Jul

I believe one could argue that the general population as a whole has historically had a messy, sometimes turbulent, relationship with art. As artists throughout time have sought to interpret their different realities and experiences as a human being, the end results we call “art” have, at times, ventured into increasingly esoteric realms. That is to say, difficult to understand Continue Reading

The post Photo History Club: Pop Art Photography appeared first on Photodoto.


Photodoto

 
Comments Off on Photo History Club: Pop Art Photography

Posted in Photography


Intel and Micron create 3D XPoint: a smaller, faster, more secure memory technology

29 Jul

Chip makers Micron and Intel have announced a new form of computer memory that promises faster, more reliable storage than current technologies, in a smaller space and at similar prices. The technology could reduce the distinction between memory and storage within computers and provide a faster, more stable way of storing large Raw and video files. Read more

Articles: Digital Photography Review (dpreview.com)

 
Comments Off on Intel and Micron create 3D XPoint: a smaller, faster, more secure memory technology

Posted in Uncategorized


Modular Record: 3D-Printed Chinese Villa Assembled in 3 Hours

29 Jul

[ By WebUrbanist in Architecture & Houses & Residential. ]

3d printed home fast

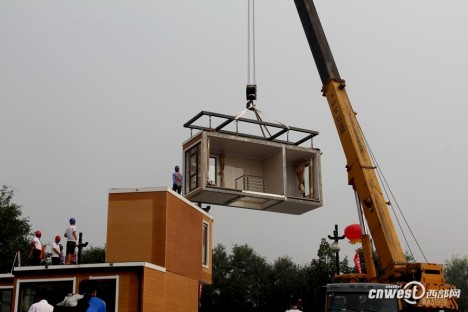
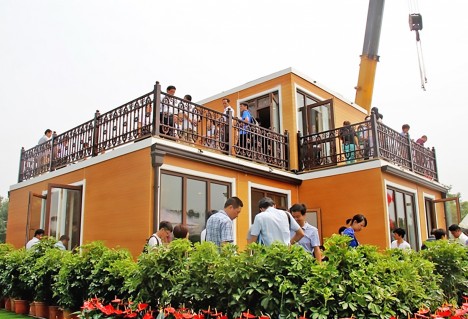
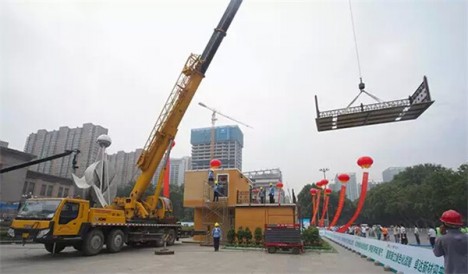
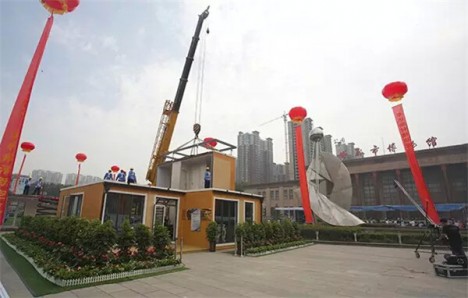
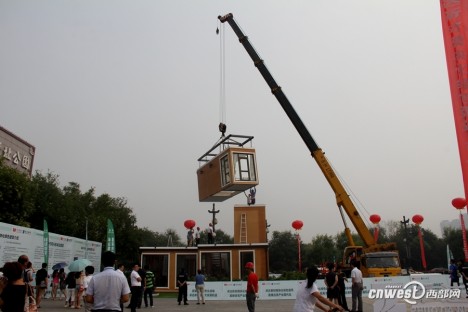
In this latest attempt at one-upmanship in the realm of rapid construction, a company in China has built a two-story villa from six modules, putting the 3D-printed pieces together on site with conventional equipment in under three hours.

3d printed villa design

In a country already boasting the world’s first 3D-printed apartment complex and 10 3D-printed houses assembled in a single day from scrap materials, this latest contender is located in the historical city of Xi’an. A product of the ZhuoDa group, the building boasts robust earthquake-proof construction and impressive affordability thanks in part to cost savings associated with the methods employed (around $ 40-50 per square foot). 90% of the construction is completed off-site, the components then shipped by truck to their destination.

3d printed home interior

Part of the strength of the structure is tied to its modular construction – each of the 6 constituent architectural subunits is structurally independent, able to survive stress and shifts relative to the whole.

3d printed house assembly

The core material used in the 3D-printing process has been kept secret, but the company has indicated this new custom composite is sourced from industrial and agricultural waste, is fireproof and waterproof, and is free from harmful substances such as formaldehyde, ammonia, and radon.

3d home rapid build

On the day of the build, the living room was put together, then the bedroom, kitchen and bathroom, all on the first floor. Next, the terrace, bedroom and utility rooms on the second floor were assembled. The result is a rapid construction process that reduces air and noise pollution for neighbors.

3d printed speed house

A prefabrication time of just 10 days for the core modules also compares favorably with typical on-site construction times ranging up to 6 months for a structure of comparable size, quality and durability (the estimated lifespan of the structures is 150 years). Variable finished looks will allow homebuyers to customize their individual houses, selecting mixtures for surfaces that simulate the textures and appearance of exotic and expensive materials including jade, wood, granite or marble.

Share on Facebook


[ By WebUrbanist in Architecture & Houses & Residential. ]

[ WebUrbanist | Archives | Galleries | Privacy | TOS ]


WebUrbanist

 
Comments Off on Modular Record: 3D-Printed Chinese Villa Assembled in 3 Hours

Posted in Creativity


Adobe announces final Camera Raw update for CS6 owners

29 Jul

It’s a sad day for owners of Adobe’s Creative Suite 6, as the company announces its upcoming Camera Raw 9.1.1 update will be the final version available for the software. Read more

Articles: Digital Photography Review (dpreview.com)

 
Comments Off on Adobe announces final Camera Raw update for CS6 owners

Posted in Uncategorized


28. Juli 2015

29 Jul

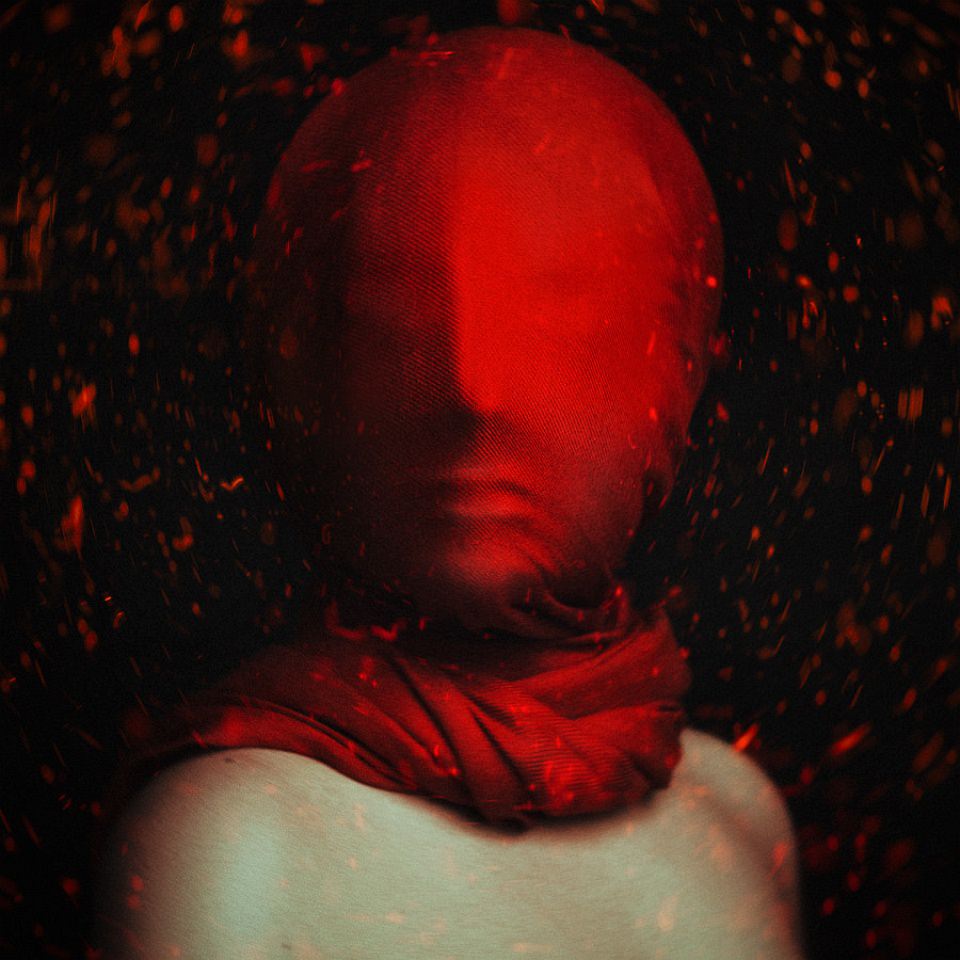
Das Bild des Tages von: Babak Fatholahi

Mensch mit einem roten Tuch eng um den Kopf und von roten, flirrenden Lichtern umgeben.

Im Ausblick: kontroverse Fotobücher, Surfer-Portraits und Vintage-Bilder.
kwerfeldein – Fotografie Magazin | Fotocommunity

 
Comments Off on 28. Juli 2015

Posted in Equipment


10 Items You Need for Your Night Photography Kit

29 Jul
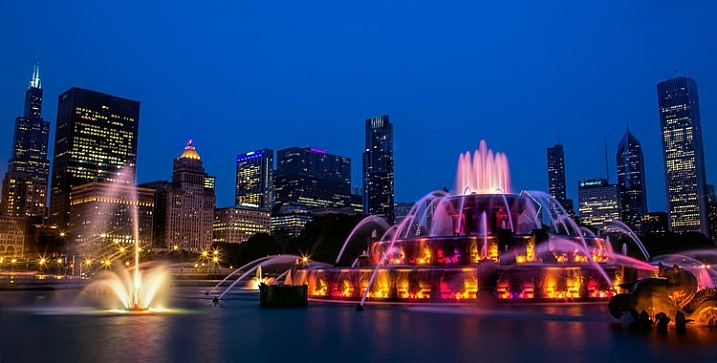
Night Photographers Toolbox - Buckingham Fountain in Chicago

Buckingham Fountain, Chicago (Shutter Speed: 10 seconds; Aperture f/18; ISO 100; focal length 21 mm)

Louis Pasteur famously said that “chance favors the prepared mind.” This statement definitely applies to photography, as there is always an element of chance, with the odds of success growing with preparation. The quote seems particularly applicable to night photography, which has unique requirements for exposure and stability. Preparation is everything.

Your odds of getting a great night photograph are greatly improved if you have taken the time make sure you have the tools needed to get the job done. In this article, you’ll learn the tools of the trade for the night photographer. You many not need all of these, but you will find most of them helpful – and some essential – for getting great pictures at night.

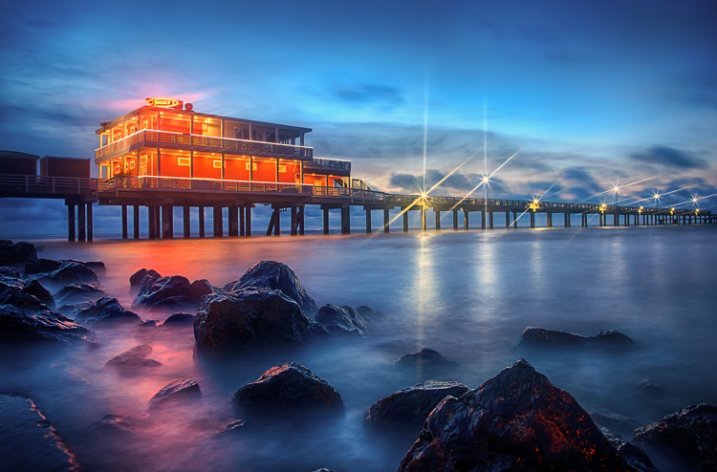
Night Photographer's Toolkit - Galveston fishing pier photo

Fishing Pier, Galveston, Texas (Shutter Speed: 3 image bracketed HDR of 5, 13, and 30 seconds; Aperture f/16; ISO 200; focal length 24 mm)

1. The Right Camera

It is perfectly obvious that you will need a camera for your night photography. But not just any camera will do. The adage that “the best camera is the one you have with you” does not apply to night photography. The first part of making sure you have the right camera is ensuring that it gives you the right amount of control. You will need one that:

  • Is capable of Raw capture, so that you can get the best image quality possible and keep digital noise to a minimum
  • Has manual controls, including manual exposure settings and manual focus, as sometimes it will be too dark for your camera’s auto-focus to work
  • Has Bulb mode for taking super-long exposures.

Beyond that, you will need a camera with good low-light performance. How do you tell that? It isn’t really that simple, and there is no particular specification you can check. Even if your camera is capable of shooting at high ISOs, that doesn’t necessarily mean that your pictures will look good at those levels. In other words, it doesn’t matter if your camera is capable of shooting at ISO 25,600 if pictures shot at ISO 1600 are full of digital noise.

Fortunately, there has been some testing done of cameras and their low light performance. Check out the testing done by DxO mark and DP review (check the review on their site for your particular model) to make sure your camera measures up.

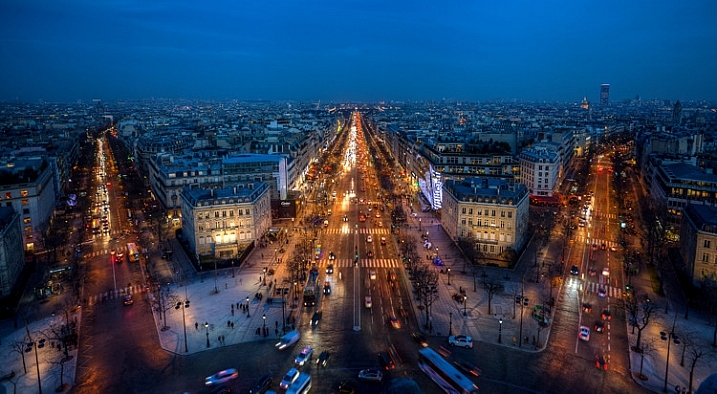
Night Photographers Toolkit - Champs Elysees from the Arc de Triomphe

Champs Elysees from atop the Arc de Triomphe, Paris (Shutter Speed: 3 image bracketed HDR of 1/4, 1/15, and 1 seconds; Aperture f/5.6; ISO 200; focal length 17 mm – note that these settings were used only because tripods are not allowed here)

2. A Small Flashlight

The next thing you’ll need is a flashlight. This will serve many purposes, one of which is helping you see your camera’s controls. That said, you should become extremely familiar with your camera before heading out, such that you can use the controls without even looking. You might even test yourself in a dark room before going.

In any case, having a flashlight with you will help with a variety of things, whether it be finding something in your bag, setting up your tripod, dealing with straps and other attachments, etc. There is no end of uses for a small flashlight, and flashlights are cheap, so you should definitely stash one (or perhaps a few) in your bag.

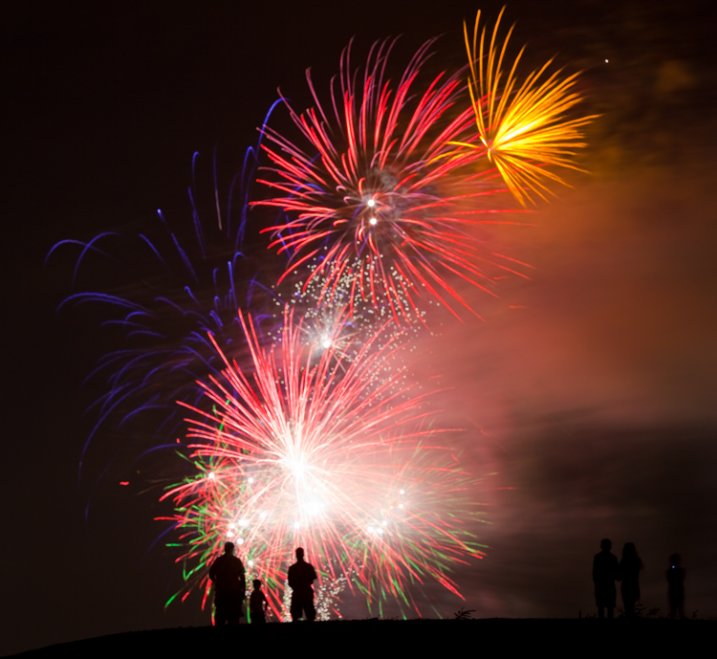
Night Photographer's Toolkit - fireworks picture

Fireworks in Southlake, Texas (Shutter Speed: 8 seconds; Aperture f/14; ISO 100; focal length 135 mm)

3. Spare Batteries

The long exposures that are inherent in night photography drain your camera battery at an alarming rate. In addition, when photographing at night, quite often you will be shooting using Live View, which will cause batteries to drain even faster. If you are dealing with cold temperatures, the battery power will be further limited. Therefore, night photography always calls for spare batteries.

Even if you have a battery grip with two fully-charged batteries, bring a couple of spares. Don’t take any chances. There is no getting around dead batteries – it means your night is over.

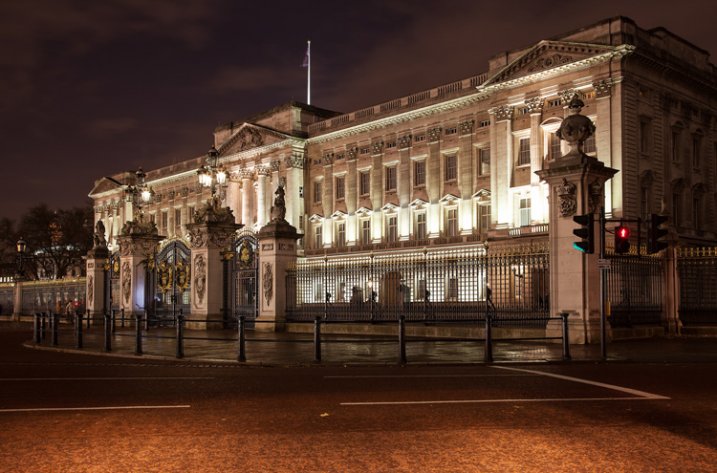
Night Photographer's Toolkit - Buckingham Palace picture

Buckingham Palace, London (Shutter Speed: 3 image bracketed HDR of 1.3, 5, and 20 seconds; Aperture f/8; ISO 400; focal length 35 mm)

4. Tripod

It is probably already obvious that you will need a tripod for your night photography, in order to keep the camera steady during the long exposures necessary due to the low light conditions. But what kind of tripod?

Most will recommend that you buy a very expensive, large, carbon-fiber tripod to keep your camera as steady as possible. To be sure, those sorts of tripods work great. In fact, if you aren’t going to do much walking – and you can afford it – you should definitely invest in a tripod like that.

Oftentimes, however, night photography involves a lot of walking around. Lugging around a big tripod when you are walking for miles is difficult, and limits your mobility as well. Why not start out with a lightweight, smaller, cheaper tripod? Check out something like a Me-Foto travel tripod or a Manfrotto BeFree. Unless you are using big, heavy lenses, they will hold your rig steady and are supremely portable. They don’t cost that much either. If you later decide you need a bigger, more substantial tripod (and you might) one of these smaller models will still make a great travel tripod.

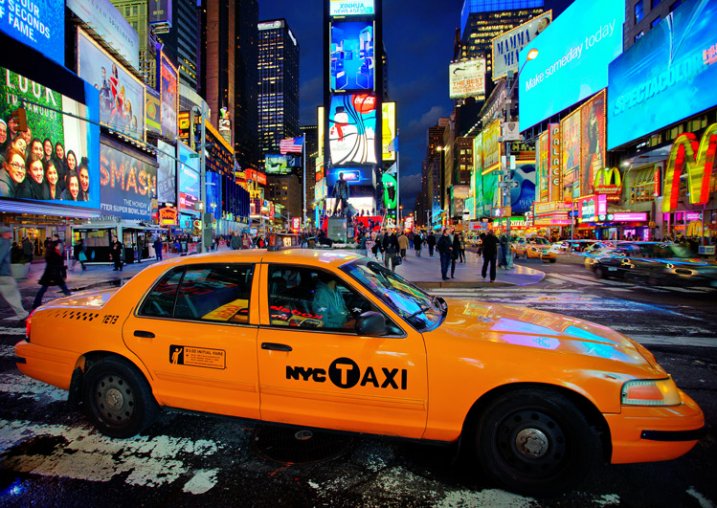
Night Photographer's Toolkit - Times Square picture

Times Square, New York (Shutter Speed: 1/100 seconds; Aperture f/4; ISO 800; focal length 17 mm – note that I used these settings only because I was forced to hand hold during this picture)

5. Remote Shutter Release (or intervalometer)

The idea behind a remote shutter release is that you are able to trigger the shutter without touching the camera, thereby avoiding shaking the camera during the exposure. They are a necessity for many photographers – especially night photographers.

The good news is that these are relatively cheap (really cheap if you don’t buy the Canon or Nikon models). What’s more, while they used to be nothing more than a way to click the shutter, there are models available now with many additional features, such as:

  • Timers and Exposure Length: These are useful when shooting in Bulb mode, which does not have a timer for shutter speed.
  • Intervals: Most models provide for shooting at intervals, which will also allow you to do time-lapse and star trails photography.
  • Delay: They will allow you to set delays (besides the 2 and 10 second delays built into most cameras).

6. Lens Hood

Night photography often involves harsh lights coming from different directions. Light hitting the front lens element from the side can lead to unwanted lens flare. A lens hood is designed to avoid this problem.

Many lenses came with a hood, but some do not. If your lens did not come with one, you can order one from the manufacturer or pick one up at a camera store. They are not too inconvenient to carry because you can store them on the lens by attaching it in a reverse position when you are not using it. When it comes time to shoot, turn the lens hood around to its proper position.

In addition, remember that a lens hood may do more to protect your lens than a UV filter. They protect the lens in the event that it is dropped or you bump into something.

7. Neutral Density Filters

googletag.cmd.push(function() {
tablet_slots.push( googletag.defineSlot( “/1005424/_dPSv4_tab-all-article-bottom_(300×250)”, [300, 250], “pb-ad-78623” ).addService( googletag.pubads() ) ); } );

googletag.cmd.push(function() {
mobile_slots.push( googletag.defineSlot( “/1005424/_dPSv4_mob-all-article-bottom_(300×250)”, [300, 250], “pb-ad-78158” ).addService( googletag.pubads() ) ); } );

The post 10 Items You Need for Your Night Photography Kit by Jim Hamel appeared first on Digital Photography School.


Digital Photography School

 
Comments Off on 10 Items You Need for Your Night Photography Kit

Posted in Photography