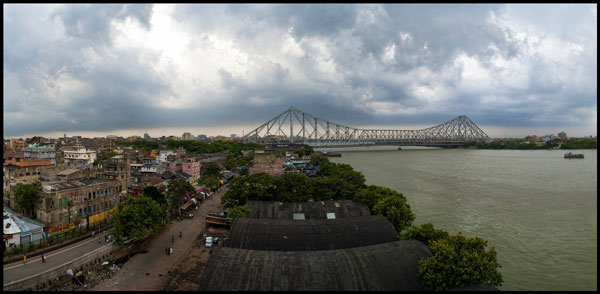
While visiting an art gallery or a photography exhibition, at times you may have noticed certain landscape photographs have extremely elongated fields of view. They seem quite impossible to have been photographed with a standard camera. If you wonder how such elongated photographs are made, you are not alone. I had my first encounter with a panoramic image of the Himalayan mountain range being displayed at Das Studios in Darjeeling, a Himalayan resort town in West Bengal, India. That photograph had a huge impact on me and it led me to searching for ways and means to photograph panoramic images.
During my initial search I figured panoramas were probably made with highly specialized cameras and lenses. But, to my surprise I found that panoramic photographs can be made with any kind of camera at your disposal. All you need is a camera, preferably one capable of shooting in Manual mode. Yes, with certain cameras and Smartphones you can get Apps for recording a panorama in a sweep but I never found the results quite satisfactory. Shooting your own panorama gives you the creative freedom and a sense of satisfaction.
How to shoot a panorama
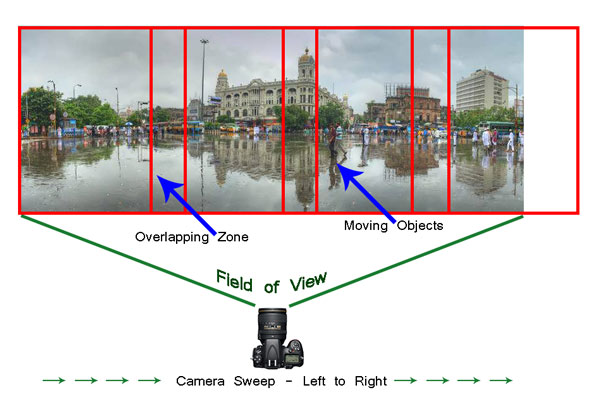
A panorama is a combined set of individual photographs, in which two adjacent photographs have at least 20% overlapping areas. These two, or more, overlapping photographs are “stitched” with the help of software to produce extremely elongated fields of view. The overlapping is required as the software is able to understand the common areas in two adjacent photographs and hence can eliminate duplication of a scene by stitching the same into a single photograph.

Before shooting a panorama, you need to plan out well. Here is a list of guiding factors for creating your own panorama.
#1 Shoot in Manual Mode
Since a panorama is shot over a large field of view where lighting conditions can be different, it is imperative to shoot in Manual mode with Manual Focus. This will ensure all the photographs shot have an exact exposure value and focus throughout all the images. Shooting in Automatic, Program or Semi-Automatic modes (like Shutter priority or Aperture priority) will result in different exposure values for each photograph, which in turn may cause the final merged photograph to have varied exposure and color casts in different parts of the photograph.
#2 RAW or JPEG
While you generally want to shoot in RAW, it is preferable to switch to JPEG for panoramas. Shooting in RAW is absolutely fine, but since the photographs will not be edited individually (we will see this at a later stage) and to reduce shutter lag, shooting in JPEG is preferred. A word of caution – as we will be shooting in JPEG make sure the exposure values are correctly adjusted.
#3 Tripod or handheld?
If the weight of your tripod is not a factor, carrying it is always preferable. However on a bright day you can very well rely on your own hands. A steady posture, or using your camera bag or any sturdy object available to rest the camera on, will save you the weight of carrying a tripod.
#4 Horizontal or vertical
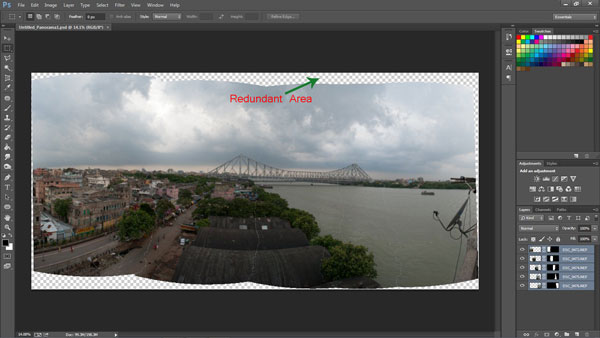
We are generally accustomed to shoot in Landscape (horizontal) mode. Shooting in Landscape is fine but the resulting panorama will be short in height, since Landscape photographs will be stitched together. Additionally, during the stitching process there will be a lot of redundant or blank areas (you will see later during the post-processing) which need to be cropped out. This will further reduce the height of the panorama. To overcome this issue you may choose to shoot the panorama in Portrait (Vertical) mode. This will help in achieving a greater image height which can be cropped out as per requirement, say for printing or aesthetics.
#5 Be fast
Be very quick in shooting since light conditions change fast. Additionally if you are shooting a cityscape, a populated beach or a scenario where there is movement, be cautious. If you are not shooting fast enough, you will find moving objects (e.g., people, cars, bikes) will be duplicated across the frames. You would not want to see the same object twice across the panorama.
# 6 Plan it out well
Stand at the selected spot and plan the number of shots in advance. This will help you in keeping a control of the number of shots rather than shooting randomly. Be sure to do a mock round without actually shooting.
When you are ready, start shooting from left to right. Make sure you have at least 20% overlapping areas in two consecutive photographs. An visual estimate will suffice. Look through your viewfinder and shoot. Do not look at the individual photographs on your LCD screen until you finish shooting. Before leaving the scene turn on the LCD screen and review the photograph series. If you are not happy, shoot again.

Stitching your panorama
The sext step is stitching your panorama. There are plenty of panoramic stitching software available on the internet. I will put a list of links to some of the best software at the end of this article. The stitching process is similar across software but as of now we will use the standard photo editing tool – Adobe Photoshop. The stitching process in Adobe Photoshop is fully automated.
Since you may have shot more than one panorama series, for the purpose of identification it would be easier to store each series in a separate folder. You may have shot in JPEG or RAW but make sure you do not edit individual photographs.
Steps to stitch a panorama:
- Open Photoshop
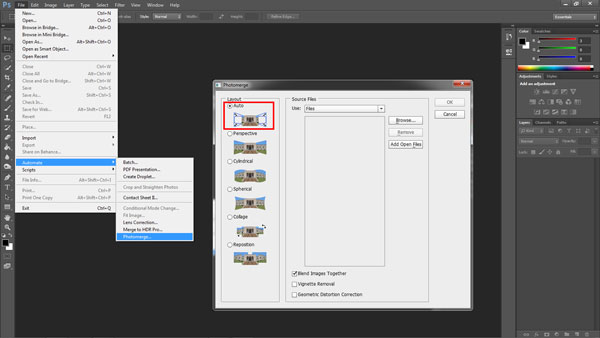
- Click File > Automate > Photomerge
- “Auto” is the default Layout option. Photoshop analyzes the source images and applies either a Perspective, Cylindrical, and Spherical layout, depending on which produces a better Photomerge. Choose “Auto” if it is not selected by default.
- Check “Blend Images Together”
- Next Click “Browse” and locate the separate Folder where you have put in your panorama series. Select the series and click “Ok”

- Depending on the number and size of the photographs, it may take a while for Adobe Photoshop to stitch together the images.
- After the stitching process is completed you will find a roughly shaped panorama (with a few redundant spaces). Refer to the image above
- Right click on a Layer in the Layers panel and click Merge Layers
- The next step is to use the Crop Tool to trim out the redundant portions of the panorama
- After the final touches you are done with your very own first panorama

Links to panorama stitching software:
- AutoStitch
- pTGui
- Hugin
- Autopano
- Microsoft Image Composite Editor
If this is the first time you are creating your panorama, I would love to receive your feedback or to share your panorama in the comments below.
The post A Step By Step Guide to Making Your First Panorama Photo by Soumya Shankar Ghosal appeared first on Digital Photography School.