RSS
 

Posts Tagged ‘Making’

New FTC rule will penalize companies making false ‘Made in USA’ claims on their products

12 Jul

On July 1st, the Federal Trade Commission (FTC) issued a new rule that will penalize companies making false or misleading claims about where their products are manufactured. As a result, marketing departments slapping the ‘Made in USA’ label on their products, and advertising them as so, will need to prove that they are ‘all or virtually all’ made in the United States.

This change could affect certain brands in the photography world, including drone manufacturer Autel, who proudly claims certain drones of theirs are ‘Made in the USA, with foreign and domestic parts and labor’ – many of those components being manufactured in Shenzen, China, the same region where DJI, who has received criticism and even been blacklisted for its ties to the Chinese government, produces its popular UAVs.

Even if this new ruling prevents Autel from saying its products are ‘Made in the USA’ on any level, their CEO Randall Warnas told us ‘this has not been something that [Autel has] needed for [its] success, and will be fine however the ruling turns out.’

Autel’s Evo II Dual drone, which it claims is ‘Made in the USA, with foreign and domestic parts and labor.’

There’s an important distinction to be made when labeling a product ‘assembled in America’ as opposed to ‘made in America,’ as this thorough article written by Jeremiah Karpowicz of Commercial UAV Expo explains. Historically, the FTC has struggled to uphold its standards, without being able to dole out consequences. But this latest ruling could change that.

In light of the ruling, we contacted both Autel and DJI for comment. DJI chose not to comment on the matter, but Warnas said:

‘The FTC is doing the right thing by making “Made in USA” mean something, and more clarity on how this can be accomplished is appreciated. Globalization over the past few decades has been accelerated with the Internet and cell phones that keep information at our fingertips at all times. As the world shrinks, we will surely encounter more blurring of these lines that the FTC is trying to address.’

The North American Free Trade Agreement (NAFTA) initially took effect in 1994. Congress had given the FTC authority to penalize fraudulent ‘Made in the USA’ claims but it would take effect after the Commission issued an official rule. That last part never came to fruition as it turned out to be a bipartisan issue – some in Congress thought those making these fraudulent claims shouldn’t be fined.

‘The final rule provides substantial benefits to the public by protecting businesses from losing sales to dishonest competitors and protecting purchasers seeking to purchase American-made goods,’ said Commissioner Chopra.

The FTC released a notice of proposed rulemaking on June 20th and received over 700 comments—most of them in favor of of the FTC enforcing their ‘Made in the USA’ standards. Commissioners Rohit Chopra and Rebecca Kelly Slaughter, joined by Chair Lina Khan, issued a statement outlining the implications of this new rule. Small businesses, who otherwise may not be able to afford legal recourse from imitators who manufacture products outside the U.S., but claim that they’re ‘Made in the USA,’ will have an advantage now that the Commission can seek civil penalties up to $ 43,280 per violation.

‘The final rule provides substantial benefits to the public by protecting businesses from losing sales to dishonest competitors and protecting purchasers seeking to purchase American-made goods,’ said Commissioner Chopra. ‘More broadly, this long-overdue rule is an important reminder that the Commission must do more to use the authorities explicitly authorized by Congress to protect market participants from fraud and abuse.’

In order to legally display a ‘Made in the USA’ label on a product, businesses must adhere to the following three components:

  1. Final assembly or processing of the product occurs in the United States,
  2. All significant processing that goes into the product occurs in the United States and
  3. All or virtually all ingredients or components of the product are made and sourced in the United States.

It’s unclear whether these new guidelines would prevent Autel from continuing to claim its products are ‘Made in the USA.’ Autel didn’t confirm whether or not this will change any of its plans going forward, but it will undoubtedly make Autel and others think more critically about applying the ‘Made in USA’ label going forward when global parts are used to manufacture the hardware, considering there’s now a financial penalty hanging over their heads.

The Made in the USA Labeling Rule, which will be published in the Federal Register, can be viewed here.

Articles: Digital Photography Review (dpreview.com)

 
Comments Off on New FTC rule will penalize companies making false ‘Made in USA’ claims on their products

Posted in Uncategorized


Film Fridays: Making and using a cardboard camera – adventures in pinhole photography

23 Oct
Photo: Sroyon / 35mmc.com

Pinhole photography is often associated with ‘intro to photography’ -type classes, because it simplifies the process of recording an image down to bare bones. But there is both an art and a science to creating a well-functioning pinhole camera. Specifications like hole diameter and the light-sensitive material’s distance and angle-of-view to the pinhole make a huge difference.

So, how does one elevate the pinhole camera from DIY beginner project to serious creative tool? With a little bit of technical know-how and a whole lot of trial-and-error. Join 35mmc’s Sroyon on their adventures in the world of cardboard cameras.

Read: Making and using a cardboard camera – adventures in pinhole photography

About Film Fridays: We recently launched an analog forum and in a continuing effort to promote the fun of the medium, we’ll be sharing film-related content on Fridays, including articles from our friends at KosmoFoto and 35mmc.

Articles: Digital Photography Review (dpreview.com)

 
Comments Off on Film Fridays: Making and using a cardboard camera – adventures in pinhole photography

Posted in Uncategorized


Tips For Making Someone Comfortable in Front of the Camera

04 Sep

The post Tips For Making Someone Comfortable in Front of the Camera appeared first on Digital Photography School. It was authored by Kevin Landwer-Johan.

For many photographers, making someone comfortable in front of the camera is a huge challenge. It’s often so difficult that they shy away from photographing people altogether. Or they only photograph people candidly with a long lens.

Much has been written about camera control, composition, and other aspects of photography. These things require no relationship skills.

But when you photograph people, making your subject comfortable is often essential.

Woman holding chilli pepper as a prop for making someone comfortable
© Kevin Landwer-Johan Nikon D700 | 105mm | 1/320s | f/3.2 | ISO 400

When a person does not like having their photo taken, it shows in their expression. Your camera captures this. That’s why you need to help your subject overcome their anxiety about being photographed (which is particularly difficult for shy photographers).

Here are fifteen tips for making someone comfortable in front of your camera.

Tip #1: Provide instructions before the photo session

Prepare your subject before the photo shoot. Talk about what they will wear. Suggest the best time of day.

Take into account the timing. Will they be needing to rush away to another appointment? Having plenty of time is helpful.

Woman with Northern Thai Sausage
© Kevin Landwer-Johan Nikon D700 | 105mm | 1/10s| f/4.5 | ISO 100

Tip #2: Prepare ideas for what you want to do

Turning up to a portrait session with no ideas is not a good way of making someone comfortable. Talk with your subject prior to the photo session and share some of your ideas.

Talk with them about what they want. Tell them your ideas for the portrait session, and ask if they have anything specific in mind.

Be positive, even if you don’t like what they are suggesting. If you follow through with their suggestions, it will help them feel included. They’ll then be more likely to relax and enjoy themselves.

Woman cutting a man's moustache making someone comfortable
© Kevin Landwer-Johan Nikon D800 | 105mm | 1/200s | f/14 | ISO 640

Tip #3: Choose a good location where your subject will be comfortable

You may use a certain location because you love it. But your subject may not like it at all. Check with them first.

There’s no point picking a place to photograph that will make your subject uncomfortable.

Often, it’s best to find somewhere away from where other people will be. If your subject is uncomfortable being photographed, they will not want to do the session in a location where others can see the process.

Ballet Dancing young woman - making someone comfortable
© Kevin Landwer-Johan Nikon D700 | 105mm | 1/160s | f/2.5 | ISO 500

Tip #4: Be early to your photo session

Arrive at the location of your photo session plenty of time before your subject does. Scope out the location. How is the lighting? What will be in the background? Figure out the best combination of these things and some places to position the person you’re photographing.

This may not seem relevant to making someone comfortable, but it is. The more you can sort out these issues in advance, the more you’ll be able to give your attention to your subject when they arrive.

Close up of woman with an elephant - making someone comfortable
© Kevin Landwer-Johan Nikon D800 | 35mm |1/2500s | f/2 | ISO 640

Tip #5: Have your gear set up and ready

Make sure your camera equipment is set and ready to use. Are your camera batteries charged? Do you have enough space on your cards? Will you need to use your flash or a reflector?

Know what exposure mode you’ll use. Set up your camera as much as possible before the person you’re photographing even arrives.

Having your gear set and ready to use allows you to concentrate more on your subject and on other aspects of photography. Making someone comfortable requires you to pay more attention to the subject than to your camera.

Hmong Amputee sitting outside his home
© Kevin Landwer-Johan Nikon D700 | 35mm | 1/125 | f/4.5 | ISO 800

Tip #6: Take time to connect with your subject

Be there for your subject and let them know it. Don’t rush in and start taking photos immediately. Spending time having a conversation will help them relax and build confidence in you.

Focus the conversation on them and keep it positive. Don’t discuss how difficult it was to find parking, and don’t discuss politics. These topics are not uplifting and will not help make someone comfortable.

Show you are interested in who they are. Asking people questions shows you care about your subject and will help build their confidence.

Woman with a melting ice creammaking someone comfortable
© Kevin Landwer-Johan Nikon D800 | 105mm | 1/200s | f/9 | ISO 100

Tip #7: Coach your subject

Explain to your subject that when they’re stressed, this will show in the photographs. You know they need to relax and why, but they may not know this. You need to take some time to explain it to them.

People often don’t look the same way in a photograph as they do in the mirror. Even if they’re stressed and see their reflection in a mirror, it’s different than the way they will look when being photographed if they are not relaxed. They will not like what they see in the photos. It’s vital that you overcome this, and explaining your reasons will often help matters.

If you get the sense that a person is uncomfortable being photographed, talk to them about it before the photo session. Then remind them again before you start taking photos. Give them time to think about what you’ve said and continue your conversation. It’s almost like giving someone a mental massage to help their mind relax.

Looking down at a woman on the sidewalk
© Kevin Landwer-Johan Nikon D700 | 50mm | 1/10s | f/11 | ISO 100

Tip #8: Remind your subject how good they look

Frequently commenting on how good a person looks will help them have confidence and feel more relaxed. Be careful to be genuine. Notice moments when your subject is more open and carefree. These are the times to compliment them as you are taking their photographs.

Tell them how happy you are with the photos you are taking. Talk to them about their smile and how good their hair looks. Mention positive aspects about the clothing they have chosen. Talk about how nice they look in a certain pose.

Don’t overdo the compliments or you’ll start to sound fake. Keep it balanced and be gentle but honest if something doesn’t look right.

Mad Scientist Rubber Gloves
© Kevin Landwer-Johan Nikon D800 | 35mm | 1/125s | f/9 | ISO 100

Tip #9: Fix hair and clothing

You can almost always find some aspect of a person’s hair or clothing that needs a little tweaking. Even when you can’t see anything out of place, tweak anyway!

Paying attention to these details and putting them right does two things. It’ll make your photos better, and it will help make your subject comfortable. They will feel good that you’re paying attention to them and you’re focused on making them look good.

Woman taking a photo with her phone - making someone comfortable
© Kevin Landwer-Johan Nikon D800 | 105mm | 1/125s | f/2.8 | ISO 500

Tip #10: Start with a long(ish) lens

Put a little distance between your camera and your subject. Getting too close may not be comfortable for them. Using a 105mm or 135mm lens will provide a convenient distance.

Don’t use a monster of a lens. This can be intimidating. It’s one reason I am not a fan of 70-200mm f/2.8 zooms; they are so bulky and can be off-putting.

A little further into the photo session, you can consider coming in closer with a 50mm or 35mm lens. The person you’re photographing will need to feel good about you being this close. If they are comfortable at closer distances, your photos will be more intimate than ones taken with a long lens.

Senior Akha Man portrait on a black background - making someone comfortable
© Kevin Landwer-Johan Nikon D700 | 135mm | 1/125s | f/4.5 | ISO 320

Tip #11: Show your subject the photos you’re taking

The monitor on the back of a digital camera is a great tool for making someone comfortable. When you show them how good they’re looking, it’ll build their confidence.

This young woman was surprisingly uncomfortable when I came to photograph her and some of her friends. She was part of a drama group, and I’d observed her confidence on stage in front of a crowd. But the self-assurance was missing when she was in front of my camera for the first time. Once I’d taken a few good photos, I showed them to her. She was impressed, so she immediately relaxed and enjoyed the photo session greatly.

Asian Woman Jumping - making someone comfortable
© Kevin Landwer-Johan Nikon D700 | 35mm | 1/400s | f/5 | ISO 400

Tip #12: Slow down

Take time to do what you do well. Don’t be in a rush. Work carefully. Check your camera settings. Review your photos and make changes when you need to. Don’t work so fast you miss when you are making mistakes (because they will happen).

Plan for the photo session to last more time than you think it will. If you have extra time at the end, buy the person you’re photographing a coffee. This might be another opportunity for a few more nice pictures of them.

Close up portrait of a man
© Kevin Landwer-Johan Nikon D800 | 35mm | 1/100s | f/4 | ISO 100

Tip #13: Provide some form of distraction

Use props or another person to help draw attention away from yourself and your camera. When someone is nervous about being photographed, it can help when they are distracted. They are more likely to look relaxed and natural when they are not paying attention to your camera.

When photographing a bride at a wedding, I’d often get the groom to stand just behind me and have him talk to his bride. There’s no way I’d get the same look from a bride as when she’s looking at her groom.

For this photo, I asked the subject to pretend to talk on her phone, as I thought this might help. It worked very well. Later she told me that she had actually called a friend and was talking to her, so she was totally distracted.

Asian Businesswoman Phone Call
© Kevin Landwer-Johan Nikon D700 | 105mm | 1/640s | f/2.5 | ISO 200

Tip #14: Genuinely have fun!

Have a nice manner and be positive; this will help you inject some fun into the photo session. When people are happy and relaxed, you’ll certainly get better photos of them.

Come up with some things that you can talk about or funny stories you can tell. Try to laugh together when things don’t go exactly as planned. If you have a positive attitude, this will rub off on the person you are photographing.

Two Thai girls in the studio
© Kevin Landwer-Johan Nikon D800 | 50mm | 1/125s | f/9 | ISO 200

Tip #15: Be confident and your subject will be confident in return

Confidence in what you are doing is vital. Don’t be brash and boastful. Don’t bamboozle people with your photography knowledge or with how good your camera is. Just use your camera with certainty. If you are stressed and nervous yourself, the person you are photographing will feel uncomfortable.

Being quietly confident in what you’re doing, even if you’re a shy photographer, will help your subjects relax. Your mood and attitude will be reflected back to you by the people you are photographing.

Woman and Elephants
© Kevin Landwer-Johan Nikon D700 | 105mm | 1/100s | f/11 | ISO 400

Conclusion

Making someone comfortable is as important as getting your camera settings correct. So often I see portraits of people where it’s obvious they were not relaxed. As a photographer, it’s your mission to ensure the person you’re taking pictures of looks good. Much of this depends on how relaxed and confident the subject feels.

And I am not satisfied with the portraits I take unless my subject is, too.

Let me know in the comments below which of these tips you find the most helpful. Please also share other techniques you use for making someone comfortable when you are photographing them.

The post Tips For Making Someone Comfortable in Front of the Camera appeared first on Digital Photography School. It was authored by Kevin Landwer-Johan.


Digital Photography School

 
Comments Off on Tips For Making Someone Comfortable in Front of the Camera

Posted in Photography


Google Images launches ‘Licensable’ badge, making it easier for users to identify creators and license images

01 Sep

In collaboration with Shutterstock, Google has announced the launch of licensable images on Google Images. This feature entered beta testing earlier this year and is now fully launched and integrated into Google Images, hopefully benefiting photographers. With the new ‘Licensable’ badge on Google Image search results, viewers can immediately identify which images can be licensed for varying uses and better understand the usage rights of individual images.

Shutterstock worked closely with Google to ensure the licensable images feature works effectively. Of the new features, Shutterstock’s VP of Content Operations, Paul Brennan, says:

‘Google Images’ new features help both image creators and image consumers by bringing visibility to how creators’ content can be licensed properly. We are pleased to have worked closely with Google on this feature, by advocating for protections that result in fair compensation for our global community of over 1 million contributors. In developing this feature, Google has clearly demonstrated its commitment to supporting the content creation ecosystem.’

When an image has specified license information on a website, the image can be displayed with the Licensable badge on image thumbnails in Google Images. This badge indicates to viewers that license information is available for the image and then provides a link directly to the license in the image viewer. From here, someone can learn how the image can be licensed and used.

Here you can see the ‘Licensable’ badge on the bottom left corner of images. When clicking on an image and accessing the image viewer, Google Images displays the creator, where the image can be licensed and also license details for the selected image. Image credit: Google

For Google to be able to discover and index images on a website, the images must be accessible without an account or by logging in. You must also follow Google’s Webmaster Guidelines and Google Images Best Practices. In addition to these existing steps, the new Licensable badge requires structured data or IPTC photo metadata to follow Google’s new guidelines. You can learn more about these requirements here.

Close-up image of the new image viewer in Google Images. Click to view larger. Image credit: Google

With the introduction of the Licensable badge, search results in Google Images can now be filtered to only display images that include licensing. Further, the dropdown Usage Rights filter has been streamlined, such that it now includes only options for ‘All’, ‘Creative Commons licenses’ and ‘Commercial & other licenses’.

It has long been far too easy for people to search for images on Google and use them without a license or permissions. Today’s changes to Google Images will hopefully reduce image misuse. At the very least, assuming a photographer has taken the steps to ensure their images are properly badged and filtered on Google Images, it will now be much easier for Google Images users to view creator information and licensing requirements.

Articles: Digital Photography Review (dpreview.com)

 
Comments Off on Google Images launches ‘Licensable’ badge, making it easier for users to identify creators and license images

Posted in Uncategorized


Sony ZV-1 ‘content creator camera’ focuses on making vlogging easy

27 May

$ (document).ready(function() { SampleGalleryV2({“containerId”:”embeddedSampleGallery_5061417147″,”galleryId”:”5061417147″,”isEmbeddedWidget”:true,”selectedImageIndex”:0,”isMobile”:false}) });

Sony has announced the ZV-1, which it calls a content creator camera. It’s built around a 1″-type 20MP stacked CMOS sensor and a 25.5-70mm equiv. F1.8-2.8 lens similar to the on in the RX100 III, IV, V and VA, but it uses a fully articulating touchscreen and reworked ergonomics to allow for selfie-style operation. In essence, the ZV-1 gives you the hardware of an RX100 VA redesigned to make vlogging and facing-the-camera shooting easier.

The ZV-1 includes a number of features and modes intended to make vlogging easier. These build on Sony’s very dependable Eye AF capabilities, to give confidence that your footage will be in focus while you concentrate on talking to your audience. There’s also a directional three-capsule mic setup built into the top of the camera to help isolate what’s being said from ambient noise.

There’s a ‘background defocus’ mode that automatically opens up the aperture to its maximum setting, accessed from a button on the top of the camera, and an AF mode that will prioritize nearby objects if that you hold up in front of the camera, rather than continuing to focus on your face. And there’s also a front-mounted tally light, to indicate when the camera is recording.

The specs are broadly consistent with recent RX100-series models, including 4K UHD video at up to 30p, 1080 capture at up to 120p and high-speed upscaled video at up to 960p. There’s no built-in viewfinder or headphone socket, but the ZV-1 does have a ‘multi-accessory’ hot shoe on which to mount an external mic.

The ZV-1 will be available from early June with a list price of $ 799 (CAD$ 999). In the US there will be a promotion that drops the price to $ 749 if you buy before June 28th. Sony is also discounting its VCT-SGR1 Bluetooth shooting grip if you buy it with the ZV-1, until June 28th in the US and June 25th in Canada. Pricing in the UK and Europe is set at £700 and €800.

Go hands-on with the Sony XV-1Press release

Sony Electronics Introduces the Digital Camera ZV-1, A Newly Designed Camera for Video Content Creators

New Video-Forward Design and Compact Body Packed with Advanced Imaging Technology and Easy-to-Use Functionality

SAN DIEGO – May 26, 2020 –Sony Electronics Inc. today has announced the new pocket-sized digital camera ZV-1 (hereafter referred as “ZV-1”) – a lightweight, compact “all-in-one” style solution. Designed from the ground up for content creators and vloggers, the ZV-1 combines easy-to-use features with uncompromising imaging technology, making this the perfect tool for any content creator at all skill levels.

“Sony’s new ZV-1 was purpose-built to meet the needs and demands of today’s video creators,” said Neal Manowitz, deputy president of Imaging Product and Solutions Americas at Sony Electronics. “We are always listening to our customers, and this camera is the result of direct feedback from our extended community. Featuring an innovative design plus many new technologies, settings and modes, it will allow creators to make content in ways they have never been able to before.”

The ZV-1 features a 1.0-type stacked Exmor RS® CMOS image sensor with DRAM chip and 24-70mm[i] F1.8-2.8 ZEISS® Vario-Sonnar T* large-aperture lens creating beautiful background bokeh (background blur), allowing the subject to stand out from the background. The camera locks on to and tracks subjects with high accuracy and speed using Sony’s leading-edge autofocus system. The ZV-1 also includes the latest-generation BIONZ X™ image processor with front-end LSI delivering high resolution as well as low noise for superior image quality. It also combines this exceptional imaging technology with high-quality and versatile audio options. The ZV-1 is Sony’s first compact camera with a side-opening Vari-angle LCD screen, making it easier to compose your shots in selfie mode while connecting external audio accessories. To meet any video need, the ZV-1 contains advanced video features including 4K movie recording[ii] and in-body image stabilization.

Meeting the Needs of Today’s Content Creators

Quickly Switch Between two modes of Background Bokeh
The ZV-1 offers a simple solution to easily switch between two levels of background bokeh while recording. Using the new Background Defocus function, users can rapidly adjust the optical aperture between more and less background defocusing blur without losing focus on the subject. Located on top of the camera, this Bokeh button is easily accessible and makes selfie shooting operation a breeze.

Focus on the Subject You Want

The ZV-1 makes it easier than ever to shoot product reviews and similar video content. Gone are the days of placing a hand behind an object to prompt the camera to bring it into focus thanks to a new Product Showcase Setting, which allows for quick and smooth focus transitions between the subject’s face and the object placed in front of the lens.

Building on the leading-edge technology developed for ?™ (Alpha brand) and RX series cameras, this new compact camera includes advanced autofocus (AF) allowing it to lock on and track subjects with high accuracy and speed while recording. For maintaining focus on the intended subject or subjects in busy environments, Real-time Eye AF[iii] and Real-time Tracking AF for video allows the ZV-1 to seamlessly switch focus between multiple subjects while controlling the AF speed and tracking sensitivity.

Prioritize Your Face

Extreme changes in lighting, like walking outside on a sunny day and suddenly moving from a bright location into shade, are no problem for the ZV-1 thanks to the new Face Priority autoexposure (AE) function. It detects and prioritizes the subject’s face and adjusts the exposure to ensure the face is depicted at an ideal brightness in any environment. This AE technology also suppresses an abrupt change in exposure if the subject quickly turns away from the frame to eliminate unexpected blown-out or extremely dark shots. In addition, the camera features a new advanced color science that has been re-engineered to optimize skin tones for any subject in both still and video modes.

Crystal Clear Audio

High quality content requires clear, excellent audio quality, and the ZV-1 is well-equipped to produce just that with reliable and versatile audio options. The ZV-1’s onboard mic features Sony’s latest Directional 3-capsule Mic which was designed for forward-directional audio capture, allowing for clear capture of the subject’s voice while minimizing background noise, especially when operating in selfie mode. For added flexibility, the ZV-1 also features an industry standard mic jack (3.5mm) and Multi Interface Shoe™ (MI shoe) making it easy to connect a wide range of external microphones. The ZV-1 is also supplied with a wind screen[iv] accessory that fits on the MI shoe to minimize wind interference.

Design and Functionality Optimized for Vlogging

The ZV-1 was designed with content creators and vloggers in mind. This compact, lightweight (approx. 294g / 105.5mm x 60.0mm x 43.5mm) camera is the first Sony compact camera with a flip-out, tiltable LCD Screen, allowing creators to simplify their setup by utilizing the MI shoe for optional external mics without the need of an additional mounting bracket.

Comfortably operate the ZV-1 with one hand thanks to the easy-to-hold comfortable grip and a large movie REC button located on the top of the camera for quick access to video recording, as well as a recording lamp on the front of the camera that indicates if the camera is actively recording.

The ZV-1 also includes advances in image stabilization, ensuring steady video even when shooting hand-held while walking. When recording in HD (Active mode), optical and electronic stabilization methods are combined to reduce shaking up to 11 times[v] that of standard SteadyShot™ image stabilization. When shooting 4K video using Optical SteadyShot (Active mode), there is improvement in stabilization effect of up to 8 times[vi] that of standard SteadyShot. The ZV-1 is also compatible with the GP-VPT2BT Shooting Grip with Wireless Remote Commander, offering additional stability and comfort combined with cable-free Bluetooth® connectivity.

Class-Leading AV Features

Despite the small form factor there are a multitude of pro-level movie making capabilities, including:

4K movie recording with full pixel readout and no pixel binning in high bit rate XAVC S™ codec. [vii]

  • Industry standard 3.5mm microphone input
  • Hybrid Log-Gamma (HDR) [viii] / S-Gamut3.Cine / S-Log3, S-Gamut3 / S-Log3
  • Interval Shooting[ix] for stunning time-lapse videos[x]
  • Super Slow Motion[xi] recording at up to 960fps[xii]
  • Compatibility with ‘Movie Edit add-on[xiii]’ from the “Imaging Edge™” mobile application for image stabilization while editing[xiv] Highlight ability to edit aspect ratios for IG etc.

Live Streaming with the ZV-1

Transform the ZV-1 into a webcam by connecting it to a PC[xv] via USB, which allows content creators to interact with their followers in real-time while also utilizing the advanced imaging technology and unique features of the ZV-1. Sony’s new PC software will be available in July 2020.

New Vlogger Accessories Kit

Sony will also be introducing a Vlogger Kit (ACCVC1), which includes a GP-VPT2BT Shooting Grip with Wireless Remote Commander and 64GB Ultra High Speed Media Card. The grip is compatible with a variety of Sony cameras[xvi].

Pair this kit with an external microphone (sold separately), such as Sony’s Stereo Microphone (ECM-XYST1M), for a convenient and simple vlogging setup.

Pricing and Availability

The Digital Camera ZV-1 will be available in June 2020 for a special introductory price of approximately $ 749 USD through June 28, 2020. After that, the price will increase to approximately $ 799 USD. The ZV-1 will be available in Canada for approximately $ 999 CAD.

The ACCVC1 Vlogger Kit will be available in June 2020 with a special introductory offer of $ 50 off when purchased together with ZV-1 (at participating retailers) through June 28, 2020 in U.S. and June 25, 2020 in Canada, and can be purchased separately for approximately $ 149 USD and $ 199 CAD.

[i]Angle of view (35mm format equivalent)

[ii] 4K (QFHD: 3840×2160) Extended continuous video recording is available when setting Auto Power OFF Temp. function to High

[iii] Real-time Eye AF for animals is not available movie shooting

[iv] Audio input itself is via the camera’s internal mic but attaching the wind screen to the mic suppresses wind noise

[v] Image stabilization angle at the wide-angle end of the zoom range. When active mode is on. Relative to angle of view with optical image stabilization on standard mode.

[vi] Image stabilization angle at the wide-angle end of the zoom range. When active mode is on. Relative to angle of view with optical image stabilization on standard mode.

[vii] A Class 10 or higher SDHC/SDXC memory card is required to record movies in the XAVC S format. UHS-I (U3) SDHC/SDXC card is required for 100Mbps

[viii] Connect this product to an HDR (HLG) compatible Sony TV via a USB cable to display HDR (HLG) movies

[ix] Wi-Fi is not operational during interval shooting

[x] Time-lapse movie creation is possible on a PC

[xi] Audio recording is not available. A Class 10 or higher SDHC/SDXC memory card is required

[xii] In NTSC mode. Menu allows switching between NTSC and PAL modes

[xiii] Please use the latest version

[xiv] Availability of video transfer and playback varies depending on smartphone in use. Membership to Imaging Edge account and app on smartphone required with connection to Wi-Fi. See Imaging Edge terms and conditions/privacy policy for details.

[xv] Windows® 10

[xvi] Compatible with RX100 VII, Alpha 6100, Alpha 6400, Alpha 6600, Alpha 7 III, Alpha 7R III, Alpha 7R IV, Alpha 9, Alpha 9 II. Firmware must be updated on camera to ensure compatibility.

Sony ZV-1 specifications

Price
MSRP $ 800/£700/€800
Body type
Body type Compact
Body material Aluminum/composite
Sensor
Max resolution 5472 x 3648
Image ratio w:h 1:1, 4:3, 3:2, 16:9
Effective pixels 20 megapixels
Sensor photo detectors 21 megapixels
Sensor size 1″ (13.2 x 8.8 mm)
Sensor type BSI-CMOS
Processor Bionz X
Color space sRGB, AdobeRGB
Color filter array Primary color filter
Image
ISO Auto, 125-12800
Boosted ISO (minimum) 80
Boosted ISO (maximum) 25600
White balance presets 9
Custom white balance Yes
Image stabilization Optical
Uncompressed format RAW
JPEG quality levels Extra fine, fine, standard
File format
  • JPEG (Exif v2.3, DCF v2.0)
  • Raw (Sony ARW v2.3)
Optics & Focus
Focal length (equiv.) 24–70 mm
Optical zoom 2.9×
Maximum aperture F1.8–2.8
Autofocus
  • Contrast Detect (sensor)
  • Phase Detect
  • Multi-area
  • Center
  • Selective single-point
  • Tracking
  • Single
  • Continuous
  • Touch
  • Face Detection
  • Live View
Autofocus assist lamp Yes
Digital zoom Yes (3.8x)
Manual focus Yes
Normal focus range 5 cm (1.97)
Macro focus range 5 cm (1.97)
Number of focus points 315
Screen / viewfinder
Articulated LCD Fully articulated
Screen size 3
Screen dots 921,600
Touch screen Yes
Screen type TFT LCD
Live view Yes
Viewfinder type None
Photography features
Minimum shutter speed 30 sec
Maximum shutter speed 1/2000 sec
Maximum shutter speed (electronic) 1/32000 sec
Exposure modes
  • Auto
  • Program Auto
  • Aperture Priority
  • Shutter Priority
  • Manual Exposure
Scene modes
  • Portrait
  • Sports Action
  • Macro
  • Landscape
  • Sunset
  • Night Scene
  • Handheld Twilight
  • Night Portrait
  • Anti Motion Blur
  • Pet Mode
  • Gourmet
  • Fireworks
  • High Sensitivity
Built-in flash No
External flash No
Flash modes Auto, Flash On, Slow Synchro, Rear Sync, Flash Off
Continuous drive 24.0 fps
Self-timer Yes
Metering modes
  • Multi
  • Center-weighted
  • Highlight-weighted
  • Average
  • Spot
Exposure compensation ±3 (at 1/3 EV steps)
AE Bracketing ±3 (3 frames at 1/3 EV steps)
WB Bracketing Yes
Videography features
Format MPEG-4, AVCHD, XAVC S
Modes
  • 3840 x 2160 @ 30p / 100 Mbps, XAVC S, MP4, H.264, Linear PCM
  • 3840 x 2160 @ 30p / 60 Mbps, XAVC S, MP4, H.264, Linear PCM
  • 3840 x 2160 @ 25p / 100 Mbps, XAVC S, MP4, H.264, Linear PCM
  • 3840 x 2160 @ 25p / 60 Mbps, XAVC S, MP4, H.264, Linear PCM
  • 3840 x 2160 @ 24p / 100 Mbps, XAVC S, MP4, H.264, Linear PCM
  • 3840 x 2160 @ 24p / 60 Mbps, XAVC S, MP4, H.264, Linear PCM
  • 1920 x 1080 @ 120p / 100 Mbps, XAVC S, MP4, H.264, Linear PCM
  • 1920 x 1080 @ 120p / 60 Mbps, XAVC S, MP4, H.264, Linear PCM
  • 1920 x 1080 @ 100p / 100 Mbps, XAVC S, MP4, H.264, Linear PCM
  • 1920 x 1080 @ 100p / 60 Mbps, XAVC S, MP4, H.264, Linear PCM
  • 1920 x 1080 @ 60p / 50 Mbps, XAVC S, MP4, H.264, Linear PCM
  • 1920 x 1080 @ 60p / 28 Mbps, MP4, H.264, AAC
  • 1920 x 1080 @ 60p / 28 Mbps, AVCHD, MTS, H.264, Dolby Digital
  • 1920 x 1080 @ 60i / 24 Mbps, AVCHD, MTS, H.264, Dolby Digital
  • 1920 x 1080 @ 60i / 17 Mbps, AVCHD, MTS, H.264, Dolby Digital
  • 1920 x 1080 @ 50p / 50 Mbps, XAVC S, MP4, H.264, Linear PCM
  • 1920 x 1080 @ 50p / 28 Mbps, MP4, H.264, AAC
  • 1920 x 1080 @ 30p / 50 Mbps, XAVC S, MP4, H.264, Linear PCM
  • 1920 x 1080 @ 30p / 16 Mbps, MP4, H.264, AAC
  • 1920 x 1080 @ 25p / 50 Mbps, XAVC S, MP4, H.264, Linear PCM
  • 1920 x 1080 @ 25p / 16 Mbps, MP4, H.264, AAC
  • 1920 x 1080 @ 24p / 50 Mbps, XAVC S, MP4, H.264, Linear PCM
  • 1920 x 1080 @ 24p / 24 Mbps, AVCHD, MTS, H.264, Dolby Digital
  • 1920 x 1080 @ 24p / 17 Mbps, AVCHD, MTS, H.264, Dolby Digital
  • 1280 x 720 @ 30p / 6 Mbps, MP4, H.264, AAC
  • 1280 x 720 @ 25p / 6 Mbps, MP4, H.264, AAC
Microphone Stereo
Speaker Mono
Storage
Storage types SD/ SDHC/SDXC, Memory Stick Pro Duo/ Pro-HG Duo
Connectivity
USB USB 2.0 (480 Mbit/sec)
USB charging Yes
HDMI Yes (micro-HDMI)
Microphone port Yes
Headphone port No
Wireless Built-In
Wireless notes 802.11ac + Bluetooth
Remote control Yes (wired or smartphone)
Physical
Environmentally sealed No
Battery Battery Pack
Battery description NP-BX1 lithium-ion battery & USB charger
Battery Life (CIPA) 260
Weight (inc. batteries) 294 g (0.65 lb / 10.37 oz)
Dimensions 105 x 60 x 44 mm (4.13 x 2.36 x 1.73)
Other features
Orientation sensor Yes
Timelapse recording Yes
GPS None

Articles: Digital Photography Review (dpreview.com)

 
Comments Off on Sony ZV-1 ‘content creator camera’ focuses on making vlogging easy

Posted in Uncategorized


Photography deals, discounts and freebies for making the most of being stuck inside

28 Mar

As the number of newly-diagnosed Coronavirus cases continues to increase, so do the strict orders to stay home. For some, this means an increase in free time along with a decline in disposable income. Across the photography community, multiple retailers, software manufacturers, teachers and more are offering discounts, extended trials or freebies to help pass the time and (hopefully) make your dollars go a little further in this time of economic downturn.

We’ve rounded up just a few of the offerings from around the photography world and are sharing some of our favorites below. Keep in mind not all of these specials are specifically made in response to the COVID-19 outbreak, but we’ve included them below, unaffiliated, to ensure as little goes unseen as possible.

This will be a living list, so as we come across more deals and freebies, we will be adding them to the collection, which is split into two categories: ‘Deals and discounts’ and ‘Classes, courses and webinars.’ If you know of any we’ve missed, please share them in the comments below and we’ll be sure to add them to the list.

Deals and discounts

Adobe

In addition to granting free access to its Creative Cloud suite for qualifying students and educators alike, Adobe is also giving everyone two months of free Creative Cloud to help creatives affected by the ongoing pandemic. PetaPixel has shared a thorough guide on how to get your two free months.

Affinity

Serif has increased the length of its free trial to 90 days (from 30 days) for its entire Affinity suite and is offering all of its apps, both desktop and mobile, for 50% off. This includes Affinity Designer, Affinity Photo and Affinity Publisher. Additionally, Serif has pledged to ‘engage more than 100 freelance creatives for work, spending the equivalent of our annual commissioning budget in the next three months.’ Serif says more details on that initiative will be announced soon and has in the meantime shared a letter regarding this news.

Adorama

As always, Adorama has a number of special offers and discounts across various photo gear, as well as a ‘Deal of the Day’ that kicks off with a new product at 10am EST everyday.

B&H

B&H too has its own ‘Deal Zone’ that features ‘unbeatable specials.’ Not everything is photo-specific, but you can count on at least two or three photography-specific deals going on every day.

DaVinci Resolve

While not exclusive to the COVID-19 pandemic, DaVinci Resolve 16, an inline video editor akin to Adobe Premiere Pro, is free to download for Linux, macOS and Windows computers. Whether you’re looking to cut your Adobe subscription to bring down your monthly bills or simply want to try something new, it’s hard to beat the price of nothing and the app itself is a treat to use, as we’ve been over before.

DxO

DxO is slashing prices by up to 30% off through March 31st, including the recently-released DxO PhotoLab 3.2 update as well as its Nik Collection. With the discount, PhotoLab 3.2 and the Nik Collection cost $ 99.99 each, compared to the usual $ 129.99. You can also try out both programs for 30-days with free trials.

ON1

ON1 is currently offering 50% off Photo RAW 2020.1, bringing the normal $ 99.99 price down to just $ 49.99. ON1 is also offering 50% off its ‘Gold Package’ version of Photo RAW 2020.1, which includes the program, 50 fine art texture overlays, the ON1 Foundations video course, a one-year SmugMug Portfolio membership (normally a $ 180 value), as well as a pack of presets, LUTs and ‘styles.’ You can find both the standard download and the ‘Gold Package’ download at ON1’s online store. The deals end March 31, so you only have a few days left to snag this deal.

Skylum

Skylum is currently offering Luminar 4.2 and Aurora HDR as a bundle for $ 149, a $ 39 savings over the usual price. In order to see the deal, visit the Aurora HDR product page, click ‘Buy Now’ and scroll down to see the bundle with Luminar 4.

Classes, courses and webinars

Professional Photographers of America

As we covered earlier this week, Professional Photographers of America is currently offering its library of more than 1,100 courses for free. Usually these classes are limited to paying PPA members, but to help photographers and creatives affected by the COVID-19 pandemic, PPA has temporarily opened them up for all.

Advanced Aerial Photography with Vic Moss

In a webinar scheduled for this Thursday, March 26th, at 4:00 PM MST (6:00 PM EST), Drone U’s Vic Moss shares important lessons learned through his 30-plus years of experience as a photographer and 6-plus years operating drones.

‘Drone U has decided to offer some free courses and webinars during this time to give people an outlet. Many of us are cooped up and still need a creative outlet. Now is a good time to hone our skillsets, so Drone U thought we’d do this. We’re all in this together, so let’s get through it together,’ Moss tells DPReview.

Here are a few concepts that will be covered:

  • The exposure triangle and how the three parts work together (ISO, f-stop, shutter speed)
  • Megapixel vs. resolution: how are they different? Or are they?
  • The basics of composition
  • How to use the histogram to enhance your images
  • HDR and some basic editing concepts

While the webinar will be available for replay after it’s recorded, the live session offers attendees the opportunity to ask questions. Register here.

Introduction to Aerial Videography: Creative Direction for Drone Filming

This course is offered for free through Skillshare. All you need to do is create a free account to access a 2-month trial that can be canceled (it would be wise to set a reminder if you’re not interested in becoming a full-time member). Drew Roberts and Nathan Labruzza of Los Angeles-based Wild Rabbit Aerials, have created footage for major car companies including GMC, Ford, and Toyota, a Super Bowl ad for SodaStream, and footage for numerous feature film productions.

The duo walks through the basics of aerial cinematography including how to get started from the ground up. They share some hard-learned lessons from their years of experience, how they conduct the simplest to most complex shoots and run through the post-production process. Register for this course through a free Skillshare account here.

Various Beginner + Intermediate Photography Courses

Brit + Co, a lifestyle and DIY-based site, is offering all of their courses, which usually range from $ 27 – $ 107 each, for free through March 31st. Simply use the all-caps promo code ‘SELFCARE’ without the quotes at checkout. Click on ‘Have a Coupon?’ and you’ll automatically be registered without having to use your credit card or PayPal account.

Relevant courses include ‘How to Become a Wedding Photographer,’Phone Photography: Capturing Your Travels,’Family Photography: Capturing Your Little Ones, and their ‘Wanderlust Photography Bundle’ which gives an introduction to travel photography and walks you through using photo editing apps. ‘Some of us can’t work and are catching a serious case of cabin fever. All of us want to stay inspired, creative, and take care of ourselves,’ reads the official blog post introducing the initiative.

Adobe Premiere Pro, Lightroom, Photoshop, and After Effects Tutorials

YouTube hosts millions of free tutorials from creators around the globe. As with any major platform that goes largely unmoderated, save for removing objectionable content, the quality of information offered can vary. Justin Odisho has consistently created high-caliber content around showing creatives how to use Adobe products.

Adobe Premiere Pro is inarguably an industry standard when it comes to video editing software. In a series of 187 videos, Odisho walks you through everything from color correction to creating effects. Lightroom, Photoshop, and After Effects users will also find a wealth of information to master their respective crafts.

Kelby One

Scott Kelby’s Kelby One program is also offering free weekly webinars and memberships to some of its most popular classes. In a notification on the Kelby One website, it reads ‘We hope these resources help during this trying time as you work from home or self-quarantine for safety.’

Articles: Digital Photography Review (dpreview.com)

 
Comments Off on Photography deals, discounts and freebies for making the most of being stuck inside

Posted in Uncategorized


Video: a BTS look at what goes into making a camera weather-resistant

17 Mar

Dave Etchells, founder and Editor-in-Chief of Imaging Resource, has shared a video and accompanying blog post that dives into the topic of weather-resistance in cameras. In both the video and blog post, Etchells shows off the bespoke system he’s built for testing the claims of manufacturers and chats with a leader at Olympus to get an inside look at what goes into the manufacturing process behind weathersealing a camera.

A close-up shot of the dripper used in Etchells’ current testing rig.

Etchells’ bespoke system, which he says it’s taken him ‘literally hundreds of hours’ to build over the past three years, was conceived after the weather-resistance of the Nikon D850 and Sony a7r III proved to be the tie-breaker for Imaging Resource’s 2017 Camera of the Year Award. In his own words, he wanted to build a ‘test system that would let me rigorously control all the variables, built around an array of timers, pumps, custom-made drippers (coming in what I’ve been calling version 1.5 of the system) and other components.’

His desire for all of this work is explained in two parts:

‘First, to give manufacturers a way to meaningfully market and compete with each other on the basis weather sealing. More than just that though, I want to push them to up their game across the board, making good weathersealing more common for consumers and pros alike.’

To see what goes into the process of weathersealing a camera, Etchells partnered up with Olympus and took a trip to Olympus’s R&D headquarters in Hachioji, Japan, where he met with Takao Takasu, the Imaging Product Development manager for Olympus Corp.’s Research and Development department.

A screenshot from a promotional video showing how Olympus tests its cameras for water-resistance.

After a brief intro, the 12-minute video starts with an interview with Takasu-san, who provides a history of weathersealing inside Olympus camera systems. After that, the video transitions into a walkthrough that shows nearly every weathersealing component inside Olympus cameras, from small gaskets around buttons and dials to protective meshing used throughout lenses.

Both the video and article are a wealth of knowledge on the matter and go to show the lengths to which Etchells will dive into the details to share his knowledge and the insight of his industry contacts with the photography community.

Articles: Digital Photography Review (dpreview.com)

 
Comments Off on Video: a BTS look at what goes into making a camera weather-resistant

Posted in Uncategorized


Making Sense of the Exposure Triangle – ISO, Aperture, and Shutterspeed Made Simple

26 Feb

The post Making Sense of the Exposure Triangle – ISO, Aperture, and Shutterspeed Made Simple appeared first on Digital Photography School. It was authored by Jackie Lamas.

making-sense-of-the-exposure-triangle

Ever hear other photographers talking about shooting in manual mode, and using terms like ISO, aperture, and shutter speed and have no idea what they’re talking about? Then this article is for you. While making sense of the Exposure Triangle may seem overwhelming, you’ll learn everything there is to know so that you can get shooting in manual mode quicker!

Image: Canon 6D, 28mm, f/5.6, 1/250, ISO 400

Canon 6D, 28mm, f/5.6, 1/250, ISO 400

Everything in photography has to do with light

All three settings, ISO, aperture and shutter speed are collectively called the Exposure Triangle. They work together to allow more or less light to enter the camera depending on the light that you see with your eye in a given situation.

making-sense-of-the-exposure-triangle

For example, the brighter the light outside, the less you need to enter your camera to record the image. The less light around you, the more light you’ll need the camera to capture in order to make the image visible.

Each part of the Exposure Triangle works together to create a good exposure while controlling the camera fully to suit your creative direction.

What is ISO?

When making sense of the exposure triangle, you first need to understand ISO. ISO is the light sensitivity of the camera’s sensor.

So, think of this as your eye. When it’s really bright outside, your eyes tend to be less sensitive and need to strain less to focus, see, and look at the world around.

Image: When it’s particularly bright outside, like in this photo, use a lower number ISO.  Cam...

When it’s particularly bright outside, like in this photo, use a lower number ISO.  Camera settings: f/5.0, 1/800, ISO 200, 85mm shot on Canon 6D.

On the other hand, when you’re in a dark location with little to no light, your eyes strain and become more sensitive to any lights in the scene, helping you see better at night as well.

The same thing happens to a camera’s sensor. The more sensitive, the more light you’ll be able to pick up. The less sensitive, less light will enter the camera.

making-sense-of-the-exposure-triangle

ISO is measured in numbers ranging from 50 to 25,600 on some models. There is usually a button on your camera that is labeled ISO. This is where you’ll be able to change the ISO depending on the lighting situation.

Image: Here, we used auto mode to get an idea of the exposure we would need to take a photo of these...

Here, we used auto mode to get an idea of the exposure we would need to take a photo of these stuffed animals setting the ISO at 100.

The ISO also affects the quality of the image, so be careful when you’re using higher ISO numbers. They tend to record a lot of digital noise (or grain points) that you see when zoomed in.

Image: As you can see in this photo, using a high ISO added more light than we needed.

As you can see in this photo, using a high ISO added more light than we needed.

Using a higher ISO can help you in low light situations when you want to keep a relatively fast shutter speed to avoid camera shake. However, you need that boost in light to help expose correctly.

Image: When you use a high ISO, your camera is more sensitive to light and causes digital noise – li...

When you use a high ISO, your camera is more sensitive to light and causes digital noise – little points on your image that make it look grainy.

Aperture

When making sense of the exposure triangle, you need to understand aperture next. Aperture, is the opening and closing of the lens. Measured in F-numbers, it affects both the amount of light entering the camera, and the depth of field in your image.

making-sense-of-the-exposure-triangle

Camera settings f/2.5, 1/100, IS0 400, 50mm. In order to get the baby’s hand in focus and nothing else, we had to use an open aperture of f/2.5.

The depth of field is how much is in focus from foreground to background. A lower f-number will open your lens and let more light in, but it will also give you a narrower focus range (a shallow, or small depth of field). While a higher f-number will close your lens, and lessen the light entering, it will give you a wider focus range (a wide, or large depth of field).

making-sense-of-the-exposure-triangle

This is especially important to keep in mind when taking portraits so that you can determine how much you want in focus.

For an individual portrait, any f-number between f/2.8 and f/5.6 works great. You still have your subject in focus but you do get some bokeh (blurry background due to a low f/number).

making-sense-of-the-exposure-triangle

Here we have a more open aperture and therefore less is in focus.

For groups of people, you’ll want a high f-number like f/8 or f/11 because, at a lower f/number, you have less depth of field. This means your plane of focus is narrower. If you have people standing outside the plane of focus, they will be blurry. Therefore, in order to have everyone in focus, a high f/number is best because it gives you a wider plane of focus.

making-sense-of-the-exposure-triangle

Here we are using a closed aperture, allowing more to be in focus.

Again, opening and closing of the lens affects how much light enters the camera. Eventually, in manual, you’ll have to compensate with one of the other two settings to make up for the lack of light or excess of light entering your camera.

Image: To capture the bird and the landscape surrounding it, we used an aperture of f/9. Other camer...

To capture the bird and the landscape surrounding it, we used an aperture of f/9. Other camera settings are ISO 400, 1/250, at 28mm.

Use Av or A mode on your camera to play with aperture. The camera will set the shutter speed for you to maintain correct exposure. However, you’ll be able to see a noticeable difference in your depth of field and in light entering your camera.

Shutter speed

When making sense of the exposure triangle, shutter speed is the next thing you need to know. Shutter speed dictates the length of time that the shutter is open.

Image: To get a silhouette, you’ll need a fast shutter speed. This image has a shutter speed o...

To get a silhouette, you’ll need a fast shutter speed. This image has a shutter speed of 1/1000, f/16, ISO 400, 28mm.

Shutter speed is measured from seconds to fractions of a second (slow to fast shutter speeds). The slower the shutter speed, the longer it stays open to capture light. The faster it opens and closes, the less light is captured to make your photo.

making-sense-of-the-exposure-triangle

For example, on a really bright afternoon, use faster shutter speed in order to create a good exposure. In a low light situation, like a nighttime scene or a dark cafe, a slower shutter speed can help capture enough light to make the photo.

making-sense-of-the-exposure-triangle

In these two photos, we only changed the shutter speed and kept the other camera settings the same. You can see a significant difference in light.

Keep in mind, the slower the shutter speed, the more chance of camera shake occurring. Camera shake is an accidental blur due to the camera shaking, either in your hands, or due to some other force.

At slower shutter speeds, usually 1/125th of second or slower you are more likely to get camera shake. At faster shutter speeds this isn’t a problem as the camera opens and closes too quickly to register the shake.

making-sense-of-the-exposure-triangle

Using a slow shutter speed can give you interesting images with movement. Camera settings f/6.3, 1/13, ISO 400, 50mm.

Shutter speed also allows you to show movement in your photos or freezes moments. Slow shutter speed will show more movement, for example, a child running or playing. While a faster shutter speed will freeze the moment or action that you’re capturing.

Manual Mode

Manual mode is where you have to set all three adjustments manually, therefore, giving you complete control of the light and look of your photo.

Think of these three as a pulley system, all working together. When one is moved, one or both of the other settings must also adjust and compensate.
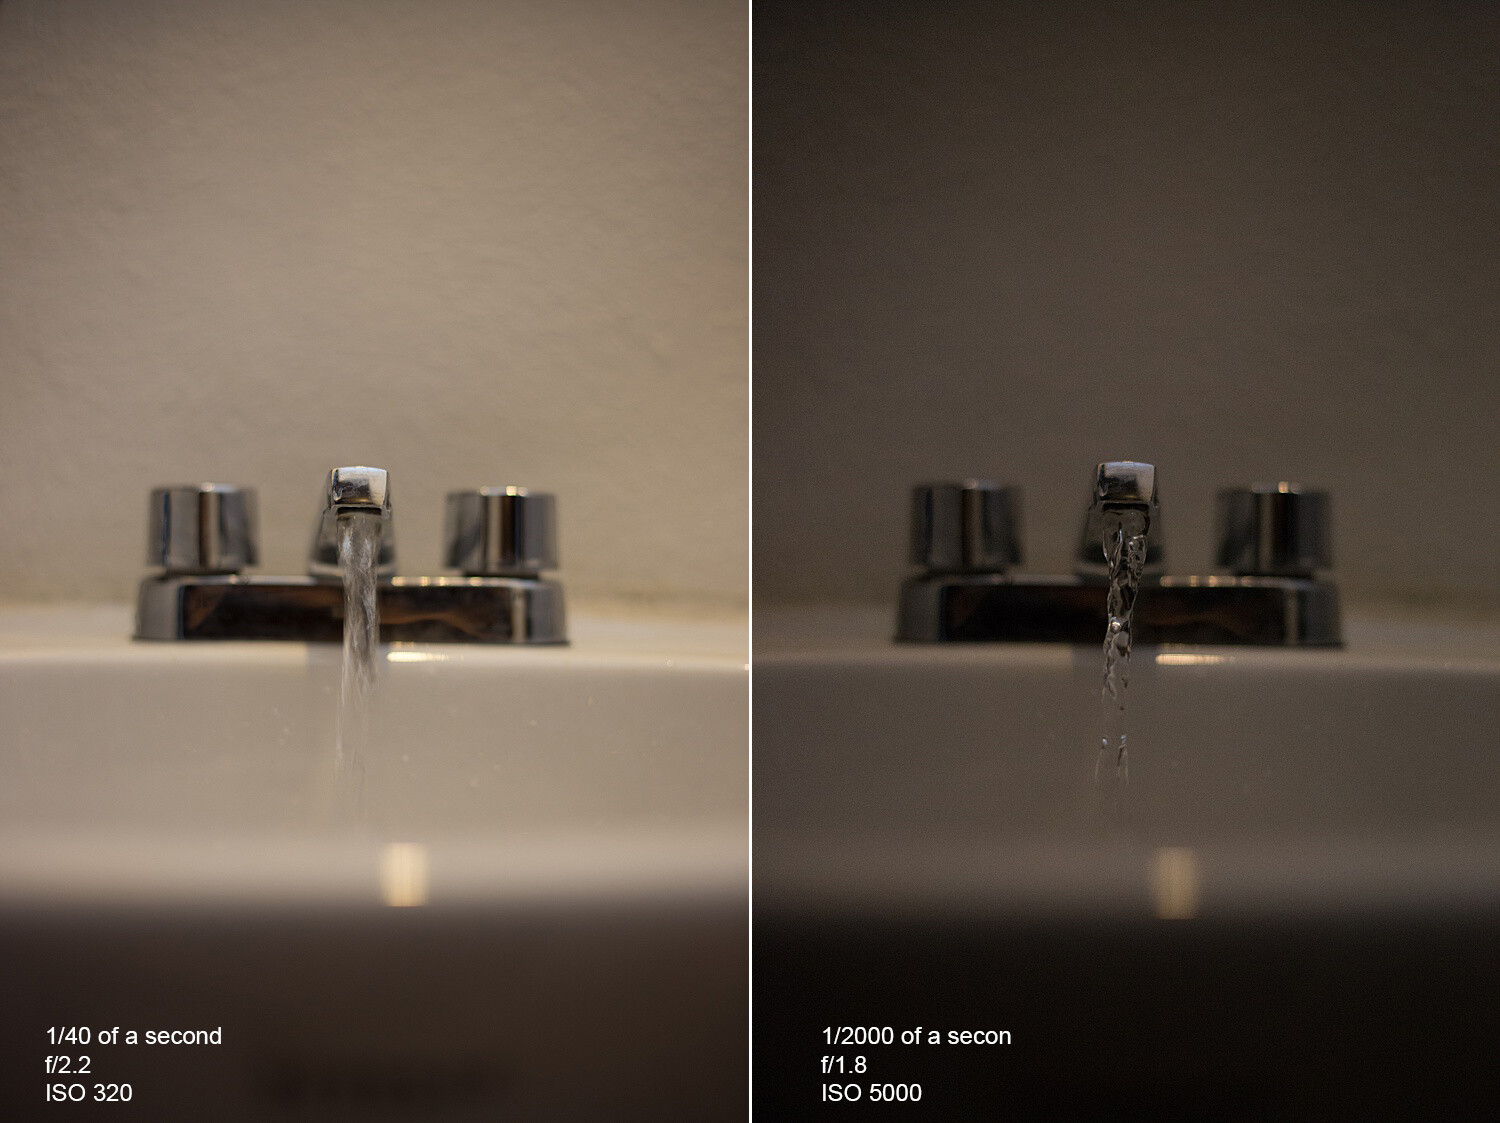
making-sense-of-the-exposure-triangle

The photo on the left has a slow shutter speed, an open aperture, and low ISO. The slow shutter speed and open aperture help light enter. It also allows the camera to pick up the movement of the water.

In the photo on the right, we get more of an action shot of the water. This is because we have now changed the ISO to 1/2000 sec – a pretty fast shutter speed. With this fast shutter speed, we had to compensate for the loss of light from the fast shutter speed. So, we added light by using a higher ISO and a more open aperture. Even so, it wasn’t enough to get a correct exposure as the photo is a little dark.

The best way to get started in manual mode is to think about what kind of photo you want to make. Are you shooting still life? Is there enough light? Do you want to control your focus range? Is this a portrait? All of these things can help you to determine where to start.

making-sense-of-the-exposure-triangle

For example, you’re taking photos of your kid’s soccer game in the early evening, and there is still a lot of light left, but it’s not harsh. You want to freeze the action of the game, and so you’d start by setting a fast shutter speed first.

If you’re taking a portrait of someone, then you’d start with the aperture in order to control your depth of field. Then you’d adjust the other two settings accordingly.

Image: Camera settings f/5.6, 1/100, IS0 400, 53mm.

Camera settings f/5.6, 1/100, IS0 400, 53mm.

For landscapes, you’d likely start with aperture and shutter speed. You may need a small aperture (eg f/11) to capture a wide plane of focus. Depending on whether there is water in your landscape, you may want to freeze the water or give it a silky look by slowing your shutter speed right down.

Knowing what you’re shooting and type of light will give you a starting point

Also, in manual mode, there is a built-in light meter. This meter looks like a tiny ruler either at the bottom of the live view or inside the viewfinder. It helps you determine if your photo is too bright (metering to the right), or too dark (metering to the left).

When the line is in the middle, or at zero, you’ve got what the camera considers a perfectly-exposed photo.

making-sense-of-the-exposure-triangle

The ruler at the bottom of the live view, or through the viewfinder, can help you expose your photos correctly. To the right of the ruler your photo will be brighter, and to the left, it will be darker.

Aim to keep it in the middle as you practice in manual mode. Sett one of the adjustments and then move the other two to add or take away light accordingly until the meter is in the middle.

It’s all about practice and really getting to know what each setting does on its own before switching to full manual. This can feel overwhelming, so try using one of the other modes, like Tv/S or Av/A modes first. Doing so may give you a better understanding of the settings and more control over your photos.

making-sense-of-the-exposure-triangle

Camera settings f/22, 30 seconds, ISO 200, 28mm.


Image: Camera settings f/10, 1/640, ISO 400, 50mm.

Camera settings f/10, 1/640, ISO 400, 50mm.

Conclusion

The technical side of photography can sometimes seem overwhelming and it seems like there is always something new to learn before feeling confident. Making sense of the exposure triangle will set your creativity free and give you full control of your camera.

The post Making Sense of the Exposure Triangle – ISO, Aperture, and Shutterspeed Made Simple appeared first on Digital Photography School. It was authored by Jackie Lamas.


Digital Photography School

 
Comments Off on Making Sense of the Exposure Triangle – ISO, Aperture, and Shutterspeed Made Simple

Posted in Photography


Video: Making cyanotype prints from 120-year-old glass negatives found inside a time capsule

26 Feb

Photographer, YouTuber and self-proclaimed weird lens aficionado Mathieu Stern is back at it again, this time with an interesting new video showing how he developed a number of 120-year-old photographs he found hidden within a time capsule in a family home.

In speaking with DPReview, Mathieu says he ‘found a box dating from around 1900 judging by the objects and the technic of the photos found inside.’ To help bring the negatives to life, Mathieu decided to develop the images using a time-appropriate method of making prints, cyanotype.

The six-minute video first walks through the discovery process of the time capsule and the items within. From there, Mathieu shows the process he used to create the cyanotype prints and concludes the video with an overview of all the images he found.

It’s an unassumingly touching video that shows how seemingly simple snapshots can oftentimes have some of the most profound emotions behind them.

You can find more of Mathieu’s work on his YouTube channel.

Articles: Digital Photography Review (dpreview.com)

 
Comments Off on Video: Making cyanotype prints from 120-year-old glass negatives found inside a time capsule

Posted in Uncategorized


Creative Water Photography – A Step-by-Step Guide to Making Water Monsters

22 Jan

The post Creative Water Photography – A Step-by-Step Guide to Making Water Monsters appeared first on Digital Photography School. It was authored by Ramakant Sharda.

creative-water-photography-making-water-monsters

Have you ever watched an alien movie and wondered how they created those monsters? You’d need a very powerful computer, animation software, and some special skills to create an animated or moving monster. However, you can easily create a series of still monsters by using water. I’ll show you how some creative water photography can enable you to create your own water monsters. It’s simple to do, with great effect!

So let’s get started!

creative-water-photography-making-water-monsters

1. What you need to make water monsters:

To do your creative water photography, you will (obviously) need a camera. You can use any DSLR or Mirrorless camera. In fact, you can use a point-and-shoot camera if it is capable of firing an external flash.

A standard lens, like a 24-70 mm, is good, as you don’t want your splash to go out of the frame. You also don’t want water splashes on your camera.

In addition to a camera, you will need an external flash and a cable or wireless trigger to fire the flash. Then you’ll need a large diffuser. You can use the translucent part of a five-in-one reflector, or you can use a butter paper sheet and paste it on a wooden frame. A reflector is a better choice here, as you don’t need to make a wooden frame, and it also won’t get damaged if some water spills on it.

You’ll need a light stand to affix the flash and a tripod for the camera.

If you have a portable water tub, you can do this shoot in a room. However, if you don’t have one, you’ll have to do it outside.

Also, you’ll need to wait until night, as you can’t do this shoot in daylight.

You’ll also need an assistant to throw the water so you can click the beautiful water monsters.

Creative Water Photography – A Step-by-Step Guide to Making Water Monsters

2. Setup:

The setup is pretty simple.

If you are shooting your water monsters indoors, place your water tub in the room and hang the diffuser behind it.

Set the flash a little bit farther away from the diffuser. If you have a round studio light reflector, use it. It’ll give you a nice, round light effect. If you don’t have one, that’s okay. You can just use the flash.

Fix your camera on the tripod and place it far from the water tub. You don’t want water splashes on your expensive camera, so you’re going to use it on full zoom. If you don’t have a 24-70mm lens, you can use a 100mm lens and place the camera farther.

See the image below to view the setup.

creative-water-photography-making-water-monsters


3. Camera and other settings:

Now you have done that, let’s talk about settings.

Place a stick at the center of the water tub and manually focus on it. Don’t forget to set your camera on manual focus after that.

Now you need to finish your camera settings and flash settings. First, we’ll do flash settings.

Change your flash to manual mode and set the power to 1/32. We’re doing this because when the flash is on lower power, it produces the shortest burst of light, which helps to freeze the subject. You can’t go above 1/32 power, as then you’ll start getting motion blur.

Now set the camera to manual mode.

Set your ISO to 100, aperture to f/16, and shutter speed to 1/200 sec or whatever your camera sync speed is. These are the settings I used in all my shots, and they’ll work for you, too.

An aperture of f/16 will give you enough depth of field, and the entire splash will be in focus. Make sure you’re shooting in RAW, too, as this will help in post-processing later.

If you are firing your flash using a radio trigger, set it up. Or if you are using a cable to fire it, attach the cable.

Now your setup is ready, so let’s talk about the workflow and start creating these beautiful water monsters.

creative-water-photography-making-water-monsters

Workflow:

Earlier, you placed a stick in the tub of water. Now remove it and replace it with something like a glass so that your assistant knows where the focus point is and throws the water accordingly. Also, tell your assistant about the area where your frame is so they won’t throw the water outside the frame.

Now all you need to do is press the shutter when your assistant throws the water.

They can throw the water in different ways. For example, they can fill both hands with water and throw it upside. Just make sure their hands don’t enter the frame.

Your assistant can use a mug or glass to throw the water, or they can throw it using two or three cups together.

Different methods of throwing water will give you different results.

Even if you use the same method of throwing, you’ll get different pictures every time.

Take at least 100 photos – the more, the better.

creative-water-photography-making-water-monsters

Post-processing:

Post-processing is quite simple.

First, select good photos from the pictures you’ve taken. If you have clicked 100 pictures, you’ll get 10-12 good photos.

Now open the RAW files in “Camera Raw” and change the white balance to 3000. It’ll convert your gray picture to a blue tone.

If you’re an advanced photographer and you can set custom white balance settings in your camera, set it to 3000 kelvin before the shoot. Then you won’t need to do it in post-processing.

Creative Water Photography – A Step-by-Step Guide to Making Water Monsters

Now you just need to clean up some extra water droplets, crop if needed, and sharpen it. Your water monsters will be ready.

When you’ve finished editing the photos, check out the other images one more time. You’ll find some images that you can merge and use to make something unique. For example, I made this butterfly using three images.

creative-water-photography-making-water-monsters


So, let’s do some creative water photography and make these amazing water monsters!

We’d love to see your results, too, so please sharing them in the comments.

Also, if you run into any problems, just comment on this post, and I’ll help you solve them.

Creative Water Photography – A Step-by-Step Guide to Making Water Monsters

The post Creative Water Photography – A Step-by-Step Guide to Making Water Monsters appeared first on Digital Photography School. It was authored by Ramakant Sharda.


Digital Photography School

 
Comments Off on Creative Water Photography – A Step-by-Step Guide to Making Water Monsters

Posted in Photography