RSS
 

Posts Tagged ‘Won’t’

Adobe won’t support older operating systems with its next major Creative Cloud update

29 Aug

If you’re not one to update your computer gear often, you might want to reconsider. Adobe has issued a notice future releases of Creative Cloud programs will no longer support older versions of MacOS and Windows operating systems.

‘As we prepare for our next major release of Creative Cloud, we wanted to share some information on updated operating system requirements,’ says Adobe. ‘To take advantage of the latest operating system features and technologies, the next major release of Creative Cloud will not support Windows 8.1, Windows 10 v1511 and v1607, and Mac OS 10.11 (El Capitan).’

Adobe notes all past and current versions of Creative Cloud applications will continue to work on the aforementioned operating systems. Creative Cloud Desktop — the management application for all Creative Cloud apps — will continue to be supported on Windows 7 or later and MacOS 10.9 (Mavericks) and later.

According to Adobe, ‘focusing [its] efforts on more modern versions of Windows and Mac operating systems allows [it] to concentrate on developing the features and functionality most requested by members, while ensuring peak performance that takes advantage of modern hardware.’

Articles: Digital Photography Review (dpreview.com)

 
Comments Off on Adobe won’t support older operating systems with its next major Creative Cloud update

Posted in Uncategorized


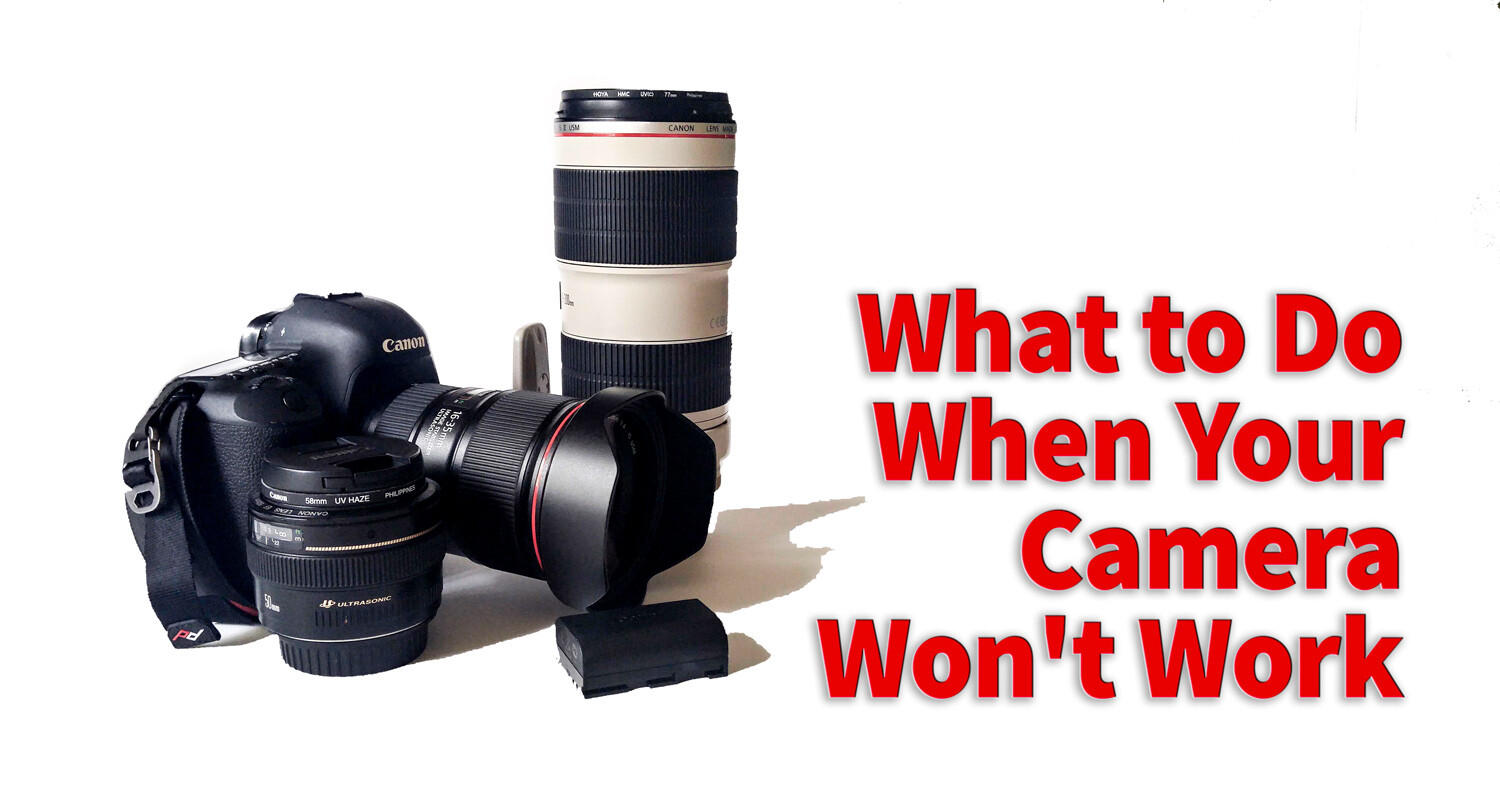
What to Do When Your Camera Won’t Work and You Wanna Scream

29 Jul

You love your camera and care for it with due diligence. You (hopefully) clean the sensor and wipe down your lenses, being careful to keep them dry and avoiding high humidity. But what happens when no matter how careful you’ve been, your camera won’t work and starts to act funny? What if that dear, dear equipment of yours stops working the way you try and expect? Then what?

Easy Fixes

There are some fairly common problems that you can fix yourself. They involve a little bit of fiddling with your camera, but you don’t always need to run to your local camera store for repairs. So before you go running to the experts consider these options if your experience the following issues with your camera.

1) The lens won’t focus

  • Check that the autofocus is turned on – This is a fairly easy fix most of the time. The first thing you should always do is check to make sure you have the lens’s autofocus turned on. There have been a few times when I didn’t realize that I had pushed the switch to manual focus and I can’t understand why the lens won’t work. Always, always check this button first.
  • Try removing the lens and reattaching it. Sometimes when changing lenses you may not quite connect the camera and lens properly. In this case, the camera and lens can’t communicate and the camera can’t send a message to the lens to start the autofocus adjustments. Make sure you hear a click and the lens is attached tightly to the camera body (if not it can also fall off!).
  • Try using compressed air or a blower. It may be that there is some dust that is interrupting the proper workings of your camera use a blower to clean out the attachment area for both lens (metal contacts) and the area on the camera.
What to Do When Your Camera Won't Work and You Wanna Scream

Try using a blower to clean the attachment area for your lens. Just remember don’t ever touch the little gold squares with your fingers. They can corrode and then your camera cannot communicate with the lens. I will apologize for the camera shake on this image. It’s not easy holding a camera while shooting using a blower tool.

  • Take out your trusty user manual and see if the there’s a troubleshooting section. Most camera user manuals will have a section where you can find solutions to common problems.
  • You’re too close – Every lens has a minimum focusing distance. If you get too close to your subject, the lens will not be able to focus. For example, if the minimum focusing distance for your lens is 18″ and you try to do a macro shot of a flower and get right into about 8″ away from it – you lens physically cannot do that job. Try adding a close-up filter or using extension tubes to solve this issue.

2) Memory Card Errors

  • Check it’s not locked – If your camera won’t allow you to take or to delete photos it may be because you’ve not removed the write protect on your card or you’ve locked it. If the memory card is locked you can move the switch to unlock it. Sometimes the switch will break off. This is an easy repair. Place a piece of tape over the space where the switch should be and the card will once again be unlocked.
  • Format – If nothing is working, it may be time to consider formatting the card. You will lose all pictures currently on the card (download them first) but this may be the only way to get the card working again.
What to Do When Your Camera Won't Work and You Wanna Scream

Here you can see the little switch on the SD card. If you can’t write to the card check here.

3) Weird Exposures

It can happen sometimes, you read the exposure correctly, and somehow everything comes out way too bright or too dark. The first thing to check is your exposure settings.

  • Perhaps you’ve got exposure compensation turned on. This means that the camera will alter the value selected when the camera is set in various automatic modes (with some models it even applies in Manual Mode, like most Nikons). Check to make sure you haven’t accidentally turned on exposure compensation.
What to Do When Your Camera Won't Work and You Wanna Scream

Oops, yep definitely did not look at camera settings when I shot this. Always check those when you consistently get a weird exposure.

  • Also, check what metering mode the camera is set to use. Often, issues can be caused by using Spot Metering mode if you are not careful and understand how to use it. If in doubt, use Average or Evaluative Metering Mode as a safe fall-back.
  • Check you haven’t activated Auto Exposure Bracketing (AEB) by mistake. This is a common accident and you may not even realize it’s happened, but auto bracketing will take a series of images both under and overexposed that could be throwing off your exposures. If one shot is dark and the next is too bright this could be the culprit, check your bracketing settings.

Know when it’s time to put your camera to rest

There are times when there’s nothing you can do. Your camera is just like other tools and eventually, it will wear out. So let’s talk about the signs that you may have a camera on its last legs.

  • The ISO grain on your camera has become way more sensitive. In this case, it’s time to consider a new camera. If your camera’s ISO 400 is starting to look grainy in good lighting then you may need to go shopping.
  • The shutter is very slow. A camera usually has a lifespan of maximum shutter actuations. Once your camera reaches its limits, there’s nothing you can do. You will know if you’re reaching the end when the shutter on your camera starts to become very slow and there is often a delay after you press the shutter button before it takes the photo.

The dark band at the top is a sign that your camera shutter isn’t functioning properly.

  • You’ve surpassed your camera’s limits – There’s another factor that has nothing to do with the proper workings of the camera. Sometimes you may outgrow the capabilities of your equipment. I used a Canon 50D for years. But then when I became much more serious about my photography, and I needed something with a higher megapixel count I knew it was time to put my lovely camera to rest. Sometimes we need better equipment. It’s okay to accept this fact and move on. I know this sounds like you’re breaking up a relationship of sorts. Well, the truth is you are. Do what’s best for you and the goals you have for your photography.

Conclusion

So go ahead and tell us more about your camera. Give us some nice anecdotes about your frustrations with your gear. Tell us about the quick fixes you’ve found and tell us about your love-hate relationships with your older gear and why you moved on.

The post What to Do When Your Camera Won’t Work and You Wanna Scream appeared first on Digital Photography School.


Digital Photography School

 
Comments Off on What to Do When Your Camera Won’t Work and You Wanna Scream

Posted in Photography


Why Nikon and Canon should build mirrorless as a second system – but probably won’t

22 May

All rumors suggest that Canon and/or Nikon is going to get into the high-end mirrorless interchangeable lens camera market, in some way.

I don’t have any insider knowledge of this, or I wouldn’t be able to write this, but it looks pretty likely at this point. It also seems pretty likely to me that both brands will do everything to maintain compatibility with their existing lens mounts. Avoiding the need to design a whole new lens range, maximizing the value of the investment in the existing lineup and side-stepping the kind of anger that Canon generated when it abandoned its previous ‘FD’ mount (all the way back in 1987) are all major motivators.

Let’s imagine what would happen if they decided to make a system that sat alongside their existing DSLRs, rather than heralding their obsolescence

Planning for a future, F-mount compatible mirrorless camera might explain why all of Nikon’s recent lenses have finally abandoned mechanical aperture control from the lens mount, since it means they could be fully controlled by an adapter with electronic mounts.

So what’s the alternative? Let’s imagine they didn’t tie themselves to their existing lens mounts. In fact, let’s imagine what would happen if they decided to make a system that sat alongside their existing DSLRs, rather than heralding their eventual obsolescence.

What if they decided to make a system designed to be companion camera? A system that offers something your DSLR doesn’t do, rather than trying to mimic what it already does?

A small camera, designed for enthusiasts and pros to be used alongside a DSLR or in circumstances where you don’t want to lug a DSLR around. A street shooter’s camera, a carry-everywhere photographer’s camera. Let’s think about the potential benefits.

Canon’s EOS M range has drifted towards the kind of camera I’m talking about, but doesn’t have the lens range to match.

It’s not necessarily true that mirrorless promised to be smaller but, not least because it started with Four Thirds and APS-C sensors, that was one of the differentiators when MILCs first appeared. Yet the expectation that a mirrorless camera must replace a DSLR has resulted in an unfortunate convergence.

Demands (including from us) for more battery life, along with the need to handle and act as a like-for-like DSLR replacement has led to mirrorless cameras getting progressively larger. This has helped create a generation of cameras that are nearly as big as their DSLR rivals. And, with the exception of better video implementation and the mixed blessings of electronic viewfinders, little else to set them apart.

So what do you propose?

Essentially, I’m asking for a full frame, interchangeable lens Fujifilm X100. Ok, that might not sound much like an X100, but the common thread is of something relatively small, that by design, doesn’t try to do everything. A camera that will sit happily alongside your existing camera (mirrored or not).

You can cover a lot of styles of photography with a couple of short-ish prime lenses. After all, it works for Leica

As with everything photographic, it quickly comes down to a question of lenses. This is the key element to it not being a DSLR rival: don’t try to build a full lineup of lenses. I’d propose a camera with a limited number of lenses, starting with a 24mm, a 35mm a 50mm and a 90. And nothing longer than that.

This is because the size benefits that come from removing the mirror from between the sensor and the mount can only be realized with short focal lengths. Stick mainly to the shorter focal lengths and you can keep the camera and lenses smaller.

The lineup should be designed with the expectation that most people will only buy the one or two lenses that suit them. You can cover a lot of styles of photography with a couple of short-ish prime lenses. After all, it works for Leica.

Taking the long view

For me, telephoto lenses ruin mirrorless cameras. There, I’ve said it.

Telephoto lenses for mirrorless are just as long as their DSLR counterparts, so there’s no size benefit to throwing away your mirror. Worse still, these long, heavy lenses demand that mirrorless cameras develop the bulky, bulbous grips that SLRs have evolved since the 1990s.

Creating a limited, dedicated set of lenses relieves a lot of pressure. It means you don’t need to build an extensive, open-ended lens range from scratch. No tele zooms, no mid-price 24-70s. Hell, no zooms at all if you don’t want to. This is something every mirrorless maker has struggled to do, both in terms of the time it takes to flesh-out a new lineup but also because mistakes get made in any learning process. Every mirrorless system has at least one lens that either isn’t as optically good as you’d expect or that focuses much more slowly than you’d want.

For me, telephoto lenses ruin mirrorless cameras. There, I’ve said it

However, building a lineup of any size is better than building a camera with a full-depth DSLR lens mount in the name of backwards compatibility, since this condemns its users to carrying an empty mirror box around with them for eternity. And that’s a punishment with a level of pointlessness right out of Greek mythology.

Just produce a handful of great, dedicated primes that take full advantage of the new system without any compromises that come from maintaining compatibility with DSLRs. That way you don’t have to split your R&D resources trying to keep two full lineups up-to-date.

This also has the advantage that you can sell your camera to photographers with commitments to other systems, because you’re not forcing them to choose. But it still gives your existing, faithful users the benefits of full compatibility with your flash systems and other accessories, along with familiarity with your menus.

A small, self-contained system solely aimed at a subset of photographers, rather than trying to be all things to all men. A camera that complements, rather than competing with the existing lineup.

As I say, it’ll never happen. But it’d be nice, wouldn’t it?

As well as the desire to mesh with the existing lens lineups, the other reason we won’t see the camera I describe is because Fujifilm has already effectively invented it

Articles: Digital Photography Review (dpreview.com)

 
Comments Off on Why Nikon and Canon should build mirrorless as a second system – but probably won’t

Posted in Uncategorized


Report: Apple won’t release the next Mac Pro until 2019

07 Apr
Credit: Apple

Apple delivered some slightly disappointing news to professional users in an interview with TechCrunch this week. Speaking with the tech publication, Senior director of Mac Hardware Product Marketing Tom Boger revealed that the next version of the Mac Pro is not coming in 2018. It will be a 2019 product.

The current Mac Pro—colloquially referred to as the trash can Mac Pro because of its form factor—was released all the way back in 2013, and even Apple admitted that the design was a mistake. In April of 2017, Apple executive Craig Federighi told BuzzFeed News that the company had “designed ourselves into a bit of a corner” with the circular form-factor, and Phil Schiller promised users that Apple was “completely rethinking the Mac Pro” for the next generation.

Since then, we haven’t heard much, and professional users not content with the all-in-one form-factor of the powerful new iMac Pro were holding out purchasing it in the hopes that the next Mac Pro was right around the corner. It sounds like Apple knows this, and decided to be un-characteristically candid with the professional community through this TechCrunch interview:

“We want to be transparent and communicate openly with our pro community, so we want them to know that the Mac Pro is a 2019 product,” says Boger. “We know that there’s a lot of customers today that are making purchase decisions on the iMac Pro and whether or not they should wait for the Mac Pro.”

Professional creatives who are married to the Apple ecosystem—particularly high-end video producers—still have a choice to make: purchase an iMac Pro now, or wait a year (or more) for the next generation Mac Pro? But at least now they won’t have to worry that a new Mac Pro will come out a few days or weeks after they pull the trigger on their iMac purchase.

To find out more about Apple’s Mac Pro plans—including some interesting tidbits about the company’s secretive “Pro Workflow Team”—head over to TechCrunch to read the full interview.

Articles: Digital Photography Review (dpreview.com)

 
Comments Off on Report: Apple won’t release the next Mac Pro until 2019

Posted in Uncategorized


Sheriff’s Deputy who shot photographer won’t face criminal charges

03 Apr

On March 22nd, a grand jury decided that Clark County Sheriff’s Deputy Jake Shaw will not face criminal charges for injuring photojournalist Andy Grimm. Shaw shot Grimm after mistaking the photographer’s tripod and camera for a gun.

The incident took place in September of 2017. Grimm was shot by Deputy Shaw in New Carlisle, Ohio, while attempting to photograph the deputy during a traffic stop. The incident made national news in part because it was captured on Shaw’s body cam, which recorded the deputy telling Grimm that he’d mistaken the photographer’s camera and tripod for a firearm.

In December, Grimm, his wife, and KBA News filed a lawsuit against Deputy Shaw, the City of New Carlisle, and the Clark County Board of County Commissioners. The lawsuit, which seeks a minimum of $ 75,000 in damages, accuses Shaw of using excessive force and violating Grimm’s civil rights. According to initial reports, the Sheriff’s Deputy allegedly failed to warn Grimm before opening fire.

Further, the legal complaint claims Grimm has suffered physical and psychological issues since the shooting, as well as loss of wages during his recovery time, and that local law enforcement agencies have “retaliated against” KBA News over the ordeal, resulting in a “loss of business profits.”

However, according to the Springfield Sun-News, Clark County’s lawyers have argued that Deputy Shaw reasonably believed Grimm’s tripod was a firearm. The statement reads:

Defendants aver that it reasonably appeared to Deputy Shaw that Andrew Grimm possessed a firearm under the conditions facing him, in the course and scope of his employment, and in good faith, to make a split-second decision to discharge his weapon in order to protect the public and himself from perceived deadly harm.

Per initial reports, the shooting happened at night during a thunderstorm. Grimm claimed to have first flashed his vehicle’s lights and waved at Shaw, who was conducting a traffic stop, in order to alert the deputy to his presence. As well, Grimm previously stated that he started to set up his camera and tripod “in full view” of Shaw, though moments later he was shot, allegedly without warning.

The county says Grimm may have some responsibility in the shooting, saying that the photographer’s “own contributory and or comparative negligence and/or assumption of the risk may have caused or contributed to cause the injuries and damages of which he complains.”

On March 22nd, a grand jury accepted the county’s arguments, ultimately deciding that Deputy Shaw should not face criminal charges for the shooting. According to local news WHIOTV7, the Clark County Sheriff’s Office is conducting an administrative review of the shooting, which has also been investigated by the Ohio Bureau of Criminal Investigation. Deputy Shaw returned to work in October under a reassignment to the county jail.

Articles: Digital Photography Review (dpreview.com)

 
Comments Off on Sheriff’s Deputy who shot photographer won’t face criminal charges

Posted in Uncategorized


AT&T won’t sell the Huawei Mate 10 in the US over political concerns

12 Jan

Chinese device manufacturer Huawei was widely expected to announce its first distribution partnership for a flagship smartphone in the US with carrier AT&T at CES this week. However, the carrier pulled out of the agreement at the last minute for reasons that are not entirely clear, though there is some interesting speculation.

According to a report by the New York Times, it appears Huawei’s strong ties with the Chinese government and a fear of espionage have played an important role in the decision. This means that Huawei yet again won’t have an opportunity to compete eye-to-eye with its main rivals Apple and Samsung in the US, as its flagship device Mate 10 Pro will only be available to buy online, through retailers such as Amazon or Best Buy.

If you live in the US and are not so concerned about Chinese espionage, the Mate 10 Pro is definitely worth a closer look. With a 6-inch 18:9 OLED screen, Kirin 970 processor, 6GB of RAM, 128GB of storage, and its Leica-branded 12MP dual camera setup, it’s firmly placed in the high-end bracket of the market. That’s a lot smartphone for the $ 800 retail price.

Oh, and its camera is also one of the best among the current crop of flagship phones.

Articles: Digital Photography Review (dpreview.com)

 
Comments Off on AT&T won’t sell the Huawei Mate 10 in the US over political concerns

Posted in Uncategorized


Your Wacom tablet won’t work with macOS High Sierra until ‘late October’

26 Sep
Photo by Damian Patkowski

Apple’s newest macOS operating system, macOS High Sierra, launched today. But if you use a Wacom tablet to do your photo editing, you’ll want to hold off on hitting the upgrade button. It seems Wacom tablets won’t work with High Sierra until the end of October.

The disappointing news was broadcast in a tweet published by the main Wacom Twitter account that read, “We will release a Driver update late October for 10.13 High Sierra. The current driver is not compatible.” If you click on the more info link offered in that tweet, you get this slightly more detailed explanation:

Apple has announced 10.13 High Sierra will be released September 25th. Wacom is currently working on a new driver update to support the new operating system. The new Wacom driver will be ready by late October at the latest. Due to nature of the changes in High Sierra, the existing Wacom driver for 10.12 will not work. To continue to use your tablet uninterrupted, Wacom suggests not to upgrade to 10.13 until the new driver is released.

The news is particularly disappointing given that Apple announced High Sierra months ago, and gave developers access to that beta the very same day. And based on the wording of the announcement, the old driver won’t work at all, so upgrading to macOS High Sierra will leave you Wacom-less for at least a couple of weeks—if you rely on a Wacom tablet for your work, you’ll just have to wait.

Keep an eye on this link to know the instant Wacom releases their overdue macOS High Sierra driver.

Articles: Digital Photography Review (dpreview.com)

 
Comments Off on Your Wacom tablet won’t work with macOS High Sierra until ‘late October’

Posted in Uncategorized


RIP Final Cut Pro 7: The video editor won’t even open on macOS High Sierra

29 Aug
Photo by Jakob Owens

Apple has revealed that its aging-but-beloved video editing program, Final Cut Pro 7, will not be supported by macOS High Sierra. If they update Apple’s upcoming operating system, existing Final Cut Pro 7 users who want to continue using Final Cut for video editing will be forced to transition to Final Cut Pro X.

This puts video editors who use FCP 7 in a rough spot. If you don’t update to the latest macOS, you might expose yourself to security risks; if you do, you’ll be forced to adapt your workflow to Final Cut Pro X, which many professionals are less fond of. According to cinema5D, Apple has started to notify Final Cut users about the change in an email that informs users that they’ll need to upgrade to newer versions like Final Cut Pro X, Compressor 4 and Motion 5 ASAP.

“Older versions of Apple pro video applications — including applications in Final Cut Studio — will not launch on a computer running macOS High Sierra,” reads the email. “New versions of Apple pro video applications — including Final Cut Pro X, Motion 5, and Compressor 4 — are compatible with macOS High Sierra. You can purchase these applications on the Mac App Store.”

Final Cut Pro 7 users who are interested in making the transition to the newer version are being directed to this page. Apple has also published a 22-page whitepaper for Final Cut Pro 7 users who are switching to X.

Articles: Digital Photography Review (dpreview.com)

 
Comments Off on RIP Final Cut Pro 7: The video editor won’t even open on macOS High Sierra

Posted in Uncategorized


Panasonic’s new organic CMOS sensor won’t be in your next camera but it’s cool anyway

10 Feb
Organic chips, but not the kind with sea salt. On the left the sensor is used in plain old visible light mode. By changing the electric charge applied to the chip, visible and near-infrared light are captured simultaneously, shown on the right.

Panasonic has been developing organic sensors for a while now and has just announced a new breakthrough: an organic CMOS chip that can capture visible and near-infrared (NIR) light simultaneously without sacrificing resolution.

There are sensors available now that can image both near-infrared and visible light, but they sacrifice one out of every four pixels to NIR capture. As a result, resolution of the final image suffers. Panasonic’s new chip makes use of two organic layers: the top layer is sensitive to visible light and the bottom layer is sensitive to near-infrared light. By changing the voltage applied to the layers, it’s possible to choose whether the lower layer is active or not. This means it can switch between visible and visible+NIR imaging frame by frame, which is useful in machine vision applications where subjects may be moving quickly.

The image on the left is recorded with color imaging mode, the right shows the scene in NIR imaging mode. The new sensor could be used for night vision and surveillance.

Alternatively, it allows for the creation of security cameras that capture visible light during the day then switch to visible+NIR for a full-resolution ‘night vision’ mode after dark.

It’s great news too if your job relies on checking things that aren’t visible to the human eye, like checking things on an assembly line that are out of sight, but this sensor is unlikely to ever be used in a consumer digital camera. Still, it’s promising to see that Panasonic’s experiments in creating chips made of something besides silicon are paying off.

If nothing else, separating the capture medium from the readout mechanism makes it easier to implement a global shutter design, since the light-sensitive layer can be switched on and off independently, rather than being constrained by the (sequential) read-out process.

Articles: Digital Photography Review (dpreview.com)

 
Comments Off on Panasonic’s new organic CMOS sensor won’t be in your next camera but it’s cool anyway

Posted in Uncategorized


4 Value Speedlight Modifiers that Won’t Break the Bank

18 Sep

Cheap generally means nasty. But in this article, we’re going to look at four different light modifiers that give you a range of looks that definitely fit in the value category.
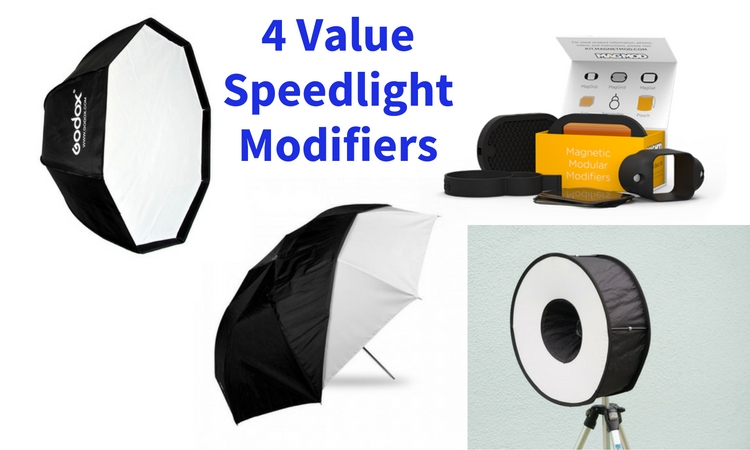
4 Value Speedlight Modifiers

#1 – The Godox 120cm Octagon Softbox

This modifier is a 48″ Octagon Softbox that uses an umbrella shaft to mount to a speedlight. The flash aims into the silver backing, meaning that it’s an indirect source. This gives one layer of softening, and because the flash faces away from the subject, there’s less of a hotspot that with a direct flash Octabox.

The single diffusion panel provides a second level of softness, making for a big beautiful light. There are plenty of similar looking Octaboxes on eBay or Amazon, but the Godox branded ones have one huge advantage: fibre glass rods. Usually the rods are u-shaped metal spines. These provide you with good strength while bending, but very little lateral strength. A blast of wind which knocks the softbox off or over will bend or break a metal rod. Fibre glass, on the other hand, has strength in all directions, making it more resilient.
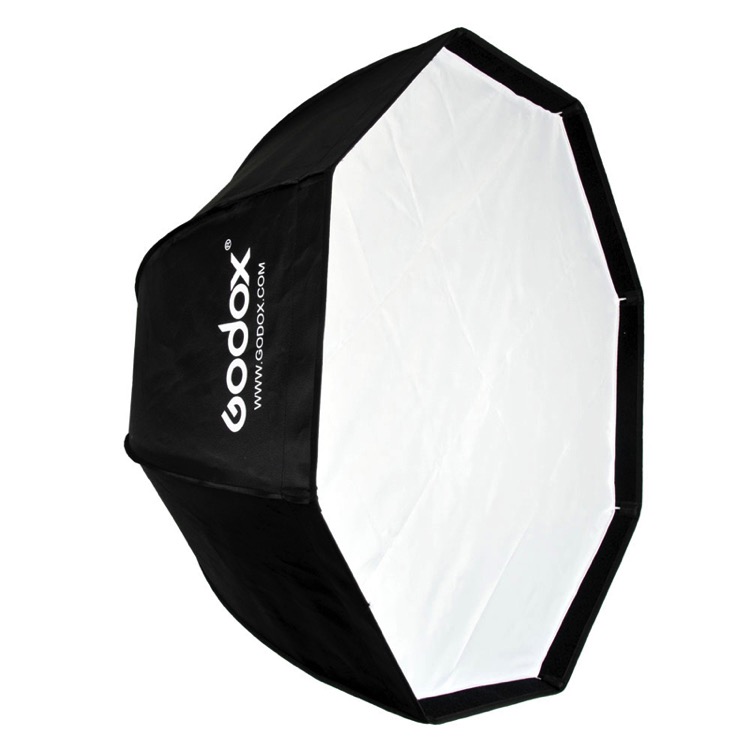
Godox 120CM Octabox speedlight modifier

Bonus: You can bend the closed Octabox to make it fit into a suitcase. This is easily my most used location light modifier because I can vary the softness and coverage using distance. As the softness of the light depends on the relative size on the modifier to the subject, close means softer, and farther away, the light gets harder. Being four feet in size, it’s super soft in close.

Here’s a typical setup I use with this modifier and the resulting photo. Shot as an example in the studio.

Value speedlight modifiers godox bts

Value speedlight modifiers godox image

Here’s a few more example shot on location:

Value speedlight modifiers godox 2

Value speedlight modifiers godox 3

Depending on the Octabox model you order, you can get it with a grid. This helps make the light more directional. By blocking the light going out the sides, it pushes the light forward. You may have situations where you need to stop spill (on the ground or background), and a grid really helps with that.

#2 – The Meking Ring Flash

There are a number of ring flash adapters for speedlights. None are perfect, but I really like this $ 30 modifier, the Meking Ring Flash. Firstly, it folds down really compact, so you can always have a modifier with you. Secondly, you get a really soft quality from this, providing a more flattering light. Thirdly, you’re not obliged to use it on camera, you can easily use it as an off camera light, either as a key light or as a fill.
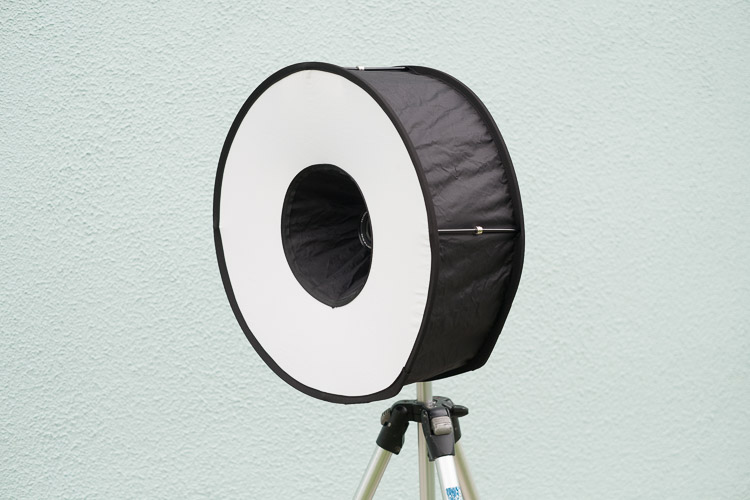
Value speedlight modifiers meking 1

To use it, expand the ring, then push the magnetic separators together, pushing the two sides apart. Finally, mount the ring softbox to your flash using the retained velcro strap.

Here are some examples of  the ring flash use. Notice the shadow that surrounds our model, as well as the classic donut cathchlights in the eyes.

Value speedlight modifiers meking 2

Below I’ve used the softbox off camera, in a hotel foyer. This is two separate photos combined into one image.

Value speedlight modifiers meking 3

#3 – Westcott Double Fold Umbrella

Umbrellas are the staple diet of most speedlight beginners. The Westcott Double fold umbrella offers a little more than a basic one. For a start, it can be used as both a bounce  and shoot-through umbrella.

Using it as a bounce umbrella allows the light to focus a little and is good when the scene is larger and you need the light to fill in but still be out of camera view. You’d use it as a shoot-thru to get really close to your subject for big, soft light. The black backing can stay half on (see image below) to prevent spill onto clothes, making this a really versatile, compact, light modifier.
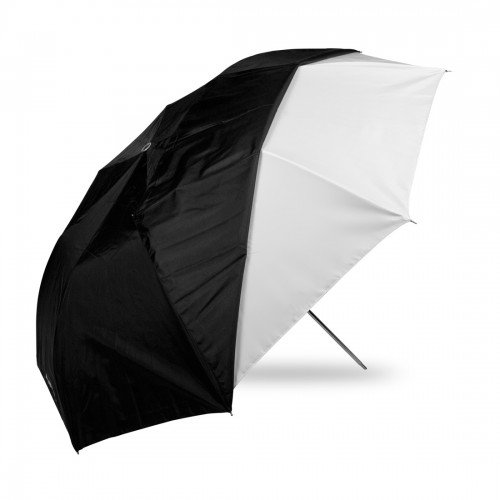
41G7gGhZ3YL

Here’s the standard bounce look. It’s similar in setup to the Godox (which is effectively a silver bounce umbrella with a layer of diffusion).

Value speedlight modifiers westcott 1

Turning the umbrella around, and removing half the black covering creates this look (below):

Value speedlight modifiers westcott 2

It’s much softer, but notice that the bottom part of the photo is darker. This is because the black covering is blocking light going to her body and clothes. It’s a great tip which comes from the inspirational Joe McNally, for when then clothes are distracting in a portrait. If it’s not clear, here’s what the umbrella setup looks like.
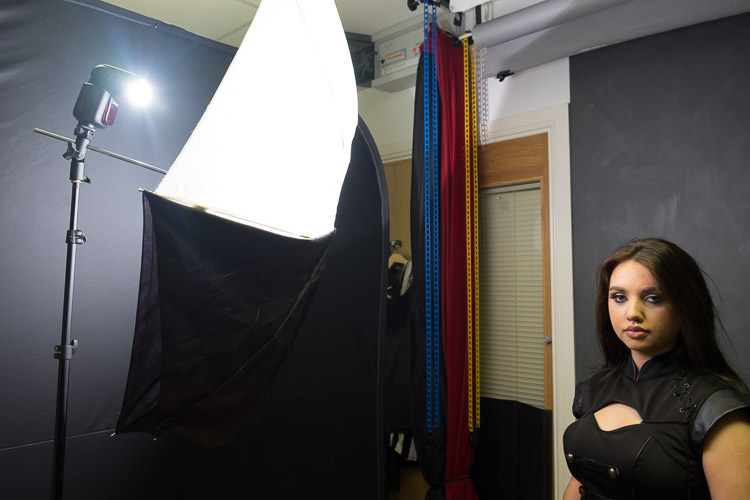
Value speedlight modifiers westcott 4

The final look from the umbrella is using it as a shoot-through. This means removing the black covering altogether.

Value speedlight modifiers westcott 3

As you can see, it’s really soft, and floods everywhere (especially compared to the bounce umbrella). Here’s the setup for this.
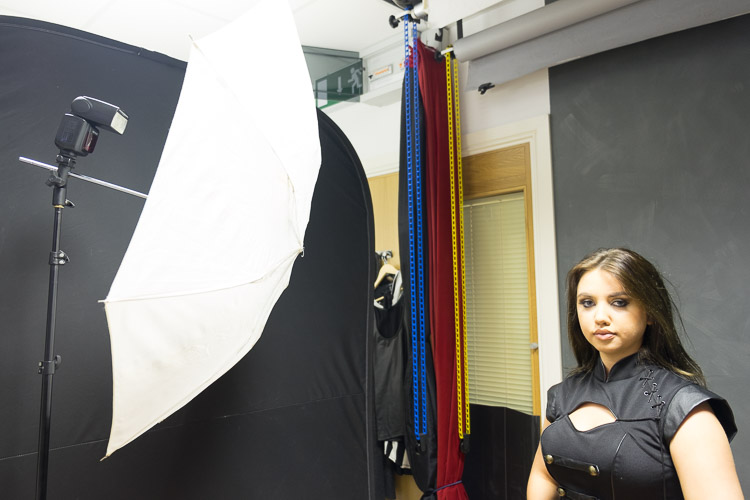
Value speedlight modifiers westcott 5

Notice light spills everywhere with this setup which may work for light or high key portraits. If you want more light control use it as a bounce umbrella with the black cover on.

#4 – MagMod Basic Kit

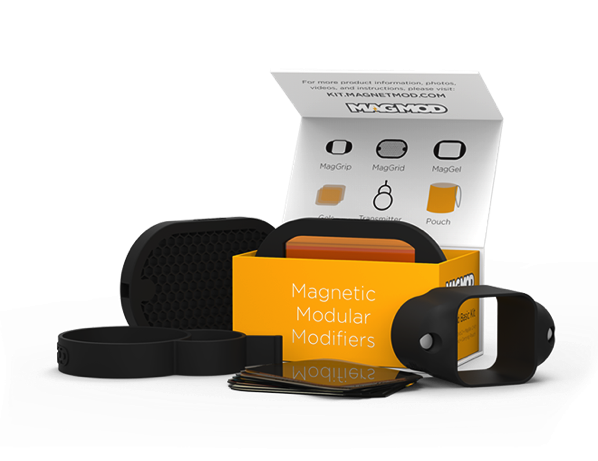
MagMod is a Kickstarter based company whose products use strong rubber and even stronger magnets to make attaching speedlight modifiers a thing of ease. Rather than use annoying velcro, you stretch the MagGrip around your flash to hold the modifiers. You can see a MagGel on a MagGrip in my article How to use Lighting Gels to Change Your Background Color and in the image below.
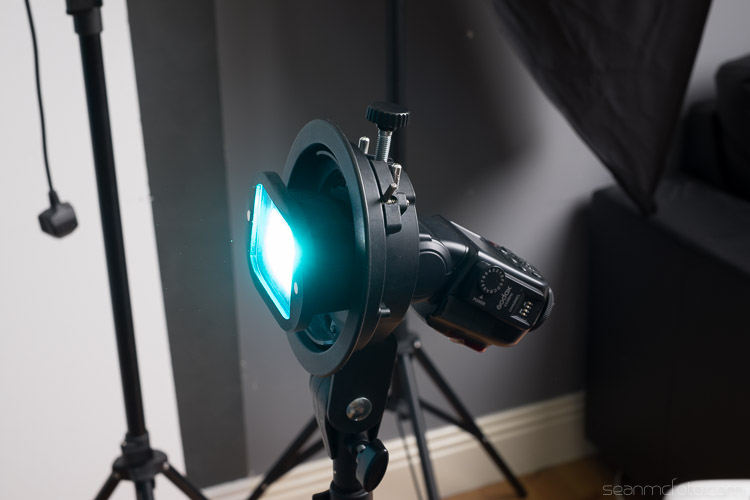
Changing-your-background-with-gels-magmod

There’s a whole range of MagMod accessories, but the basic kit comes with a grid and a gel holder, along with rigid gels for the holder. These rigid gels are a blessing. A regular gel is essentially a coloured sheet of acetate, so it folds and crumples easily. The rigid nature of the MagGels makes them easy to swap in and out of the holders. There are a variety of colors available. You get a basic set of color correction and ND gels with the kit, but there’s also the Creative and Artistic sets for a larger range of options.

The MagGrids are great for restricting light, letting you aim it with a huge degree of control.
Value speedlight modifiers magmod 0Here’s a shot done with a bare speedlight:

Value speedlight modifiers magmod 1

Here’s the same speedlight with a MagGrid attached. Notice how tight the light is around the model, more like a spotlight.

Value speedlight modifiers magmod 2

Here’s the Aqua MagGel from the Artistic series gels. I’ve set the white balance to daylight to keep the colour correct.

Value speedlight modifiers magmod 3

Combining the modifiers

The beauty of these light modifiers is you can mix and match them to make really creative light.

To achieve the image below, place your on flash on camera, with the Aqua MagGel attached. Next, put the Meking Ring Flash over it to create a soft aqua-colored fill light. Then, place a MagGrid on a second flash and aim it tight on the model’s head. The grid light washes out the gel from her face, but in the shadow areas, the gels fills in for a cool look.

It’s almost like the image has been post-processed for color, but it’s actually done in-camera.

Value speedlight modifiers magmod 4

Another look you can get is a high key portrait. First, set up the Westcott as a shoot-through umbrella on a boom, between you and the model. You’re shooting below the umbrella. For the background, set up the Godox Octabox facing the camera, behind your model. Use a reflector to bounce the light back up to the model for a perfect high key portrait.

Value speedlight modifiers mixed

All in all, this gear is under $ 200 (total if you buy them all) and will give you a good range of creative lighting setups. Even just one of them would make a great addition to your speedlight arsenal.

Do you have any other good value light modifiers you’d like to share? Please do so in the comments below.

googletag.cmd.push(function() {
tablet_slots.push( googletag.defineSlot( “/1005424/_dPSv4_tab-all-article-bottom_(300×250)”, [300, 250], “pb-ad-78623” ).addService( googletag.pubads() ) ); } );

googletag.cmd.push(function() {
mobile_slots.push( googletag.defineSlot( “/1005424/_dPSv4_mob-all-article-bottom_(300×250)”, [300, 250], “pb-ad-78158” ).addService( googletag.pubads() ) ); } );

The post 4 Value Speedlight Modifiers that Won’t Break the Bank by Sean McCormack appeared first on Digital Photography School.


Digital Photography School

 
Comments Off on 4 Value Speedlight Modifiers that Won’t Break the Bank

Posted in Photography