RSS
 

Posts Tagged ‘Wonderland’

Curated film subscription service launched by Analogue Wonderland

22 Sep

Online film retailer Analogue Wonderland has started a new curated film subscription service for those who enjoy trying different emulsions. The Analogue Wonderbox service promises to deliver six different 35mm films every two months so subscribers can expand their experience of unusual as well as regular emulsion types and brands.

Covering both color and black and white rolls, the service will offer negative and positive films, and users can expect extra goodies in the packages including offers on processing, merchandise and other free gifts. The idea of the service is to introduce film photographers to different emulsions but particularly to give those new to film, and those coming back to it, a taste of what is available.

The company says each week subscribers will be sent information on one of the films, with an explanation of what to expect from it as well as hints on getting the most from it. All subscribers will get the same films each time so they can discuss their results and post examples of their work. Each month the company will hold a competition for pictures shot on one of the films in the subscription pack.

Analogue Wonderland says that although some films will be cheaper than others the total value of each pack will add up to, or exceed, the cost of the service, and that the goodies, learning and community will make it even better value. There are over 100 films to get through, with a wide range of looks to be explored.

The subscription costs £50 (approx. $ 65) every two months, with shipping included for those in the UK. Shipping to Europe and the USA costs £12 (approx. $ 15). For more information see the Analogue Wonderland website.

Articles: Digital Photography Review (dpreview.com)

 
Comments Off on Curated film subscription service launched by Analogue Wonderland

Posted in Uncategorized


How to Capture a Winter Wonderland – Essential Tips for Photographing Snow

08 Feb

There’s nothing quite like waking up to the winter’s first snow covering the landscape. It’s an amazing transformation that affects everything from light and sound to mood. Whether you’re interested in nature photography, abstract photography, or portraits, winter is a fantastic time to do something different!

01 winter photography tips

Snow offers a lot to the willing photographer. The unique light, the brilliance of the white, the refreshed feeling you get when a fresh blanket of snow covers the ground, the low temperatures — the opportunities (and challenges) are endless. In this article, I hope to help you prepare with some essential tops for photographing snow so you can get started on your wintery outdoor adventure. So let’s get to it!

Before you set out

Before you grab your camera and run outside to capture your wintery landscape, there are some very important things to remember. First of all, you need to get dressed, and you need to do it well. Wear several layers of clothing rather than just one very warm layer. Put on shoes that will keep you warm and dry and don’t forget gloves and a hat!

02 winter photography tips

It’s important that you’re dressed warmly, but who said anything about your models?

When you’re certain you’ll stay warm for long enough to be able to enjoy the snow, make sure you grab some extra batteries. The cold weather will drain the camera’s batteries surprisingly quickly. Keep the extra batteries close to your body (preferably your torso), inside your clothing, to keep them from getting cold and discharging faster.

Now you’re ready to head out!

03 winter photography tips

Practical things to keep in mind while you’re rolling in the snow

Once you’ve stepped out the door, there are some things you should keep in mind to make your photography excursion as comfortable as possible for you, and as safe as possible for your gear.

Be sure to stay warm. Taking photos often means you’ll be standing (or lying) still for a long time. So if you’re getting cold, get up and move around a bit. Also pay attention to your toes and fingers, as they can get really cold even if the rest of you is warm and cozy.

04 winter photography tips

Use protection

It’s also important to protect your eyes. Especially if it’s cloudy it might seem like there isn’t actually that much light. But as snow reflects light very effectively your eyes can easily get damaged without you even noticing. This is called snow blindness and the best way to avoid it is to wear sunglasses.

Yes, sunglasses, in the winter, even when it’s cloudy! It sounds crazy, but ask anyone who spends a lot of the winter outdoors and they’ll agree. And, of course, you’ll also look cool.

05 winter photography tips

To protect your gear, it’s important to keep snow off of it. Once the snow melts, it can damage your camera, your lenses, as well as other electronics. Keep the gear you’re not using in a bag, and remove any snow from your camera before you go indoors. Also, if it’s snowing while you’re out photographing, be careful so it doesn’t get on your lens and end up as big blurry blobs in your photos.

Technical aspects and tips

So let’s get to the bit that’s actually interesting, the photography itself. There are some basic technical aspects to keep in mind while you’re photographing snow, but I’ll also bring up some ideas for how to enjoy your snow white photography to its fullest.

1. Overexpose

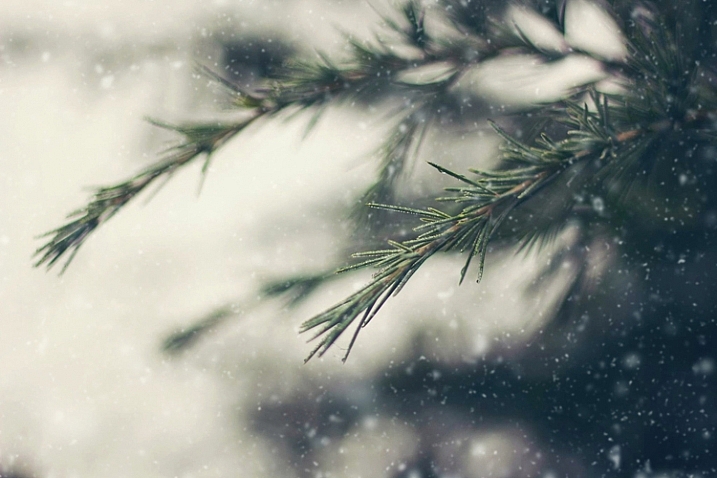
If the world around you is more or less completely white, and you’re not going for a drab kind of image, you need to overexpose by at least one stop. This will give you a photograph that looks more like what you saw with your bare eyes, as well as one that captures the magical atmosphere of winter.

11 winter photography tips

2. Pay attention to shutter speed

As always, you need to use your shutter speed intelligently to capture the scene the way you want to. In winter, it’s good to remember to use a very short exposure time if you want to freeze falling snow, and to play around with slower shutter speed if you’re trying to capture drifting snow moving across a landscape.

07 winter photography tips

3. Look for contrast

In a completely white world, you might have to look quite hard to find something to contrast with the snow. Contrast is interesting, though, so keep your eyes and mind open.

To add colour contrast, look for something colourful or wait for sunset when the blue of the shadows and the warm colours of the sun mingle. If you find moving water, contrasting the stillness of the snow with the rushing water can add a lot to your image.

08 winter photography tips

06 winter photography tips

09 winter photography tips

4. Try something different

Like any season, winter offers a diversity of photo opportunities. Snow can be a great way to create negative space in your image. It is a great way to really bring out your subject or to create a calm atmosphere.

10 winter photography tips

You can also try to go beyond the obvious to find the treasures that are hiding in your winter wonderland. Go from landscape photos to close-ups, from strong color contrast to black and white, from a classical winter landscape to a surprising take on the season…

Don’t let the weather stop you, and remember to have fun and tell an interesting story with your photos.

12 winter photography tips

Conclusion

What do you think is the best thing about photographing snow? Do you have any fun or informative experiences to share? I’d love to hear your thoughts and see your snowy creations in the comments below/

The post How to Capture a Winter Wonderland – Essential Tips for Photographing Snow by Hannele Luhtasela-el Showk appeared first on Digital Photography School.


Digital Photography School

 
Comments Off on How to Capture a Winter Wonderland – Essential Tips for Photographing Snow

Posted in Photography


Make it Snow with Pure Photoshop Actions Winter Wonderland Set

18 Nov

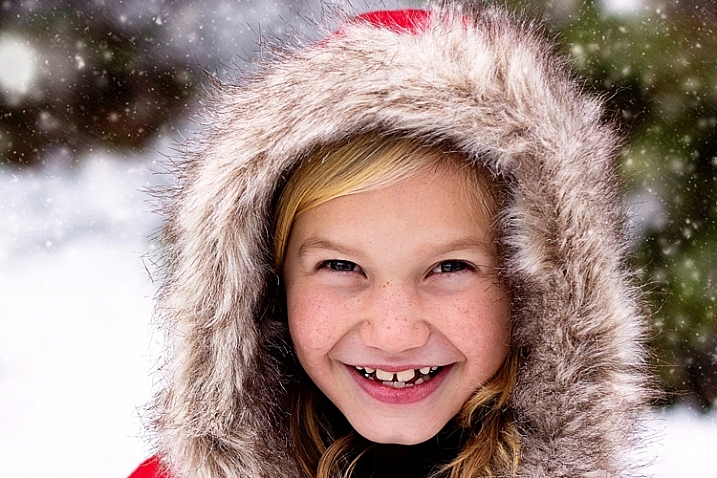
winter-wonderland-action-1

When it comes to post-processing, photographers definitely have opinions about Photoshop Action sets. Some photographers love them, others consider them cheating. For me personally, Actions are most valuable when they either (a) make the editing that I would do by hand more efficient and/or (b) offer something unique and fun that may be outside my normal editing style, but fits a particular session.

In this case, the Winter Wonderland Action Set by Pure Photoshop Actions (available for Photoshop CS and above, and Elements 6-11 for $ 25 regular price) fits a bit of both those criteria. It’s not something that I use every day, but it really is a fun action set to have on hand during the winter months!

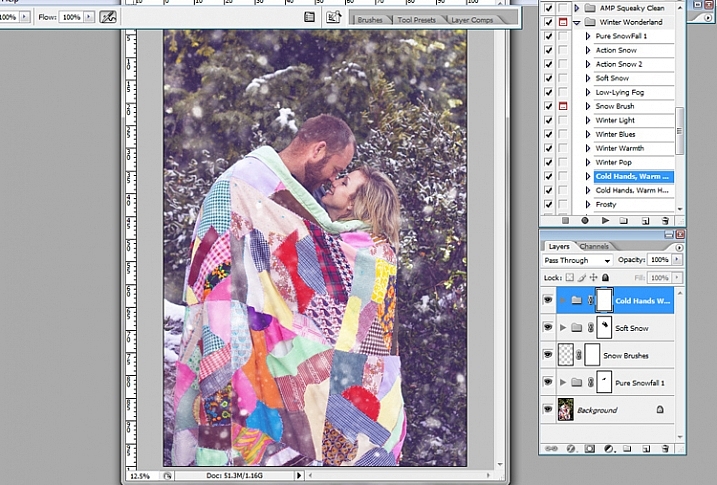
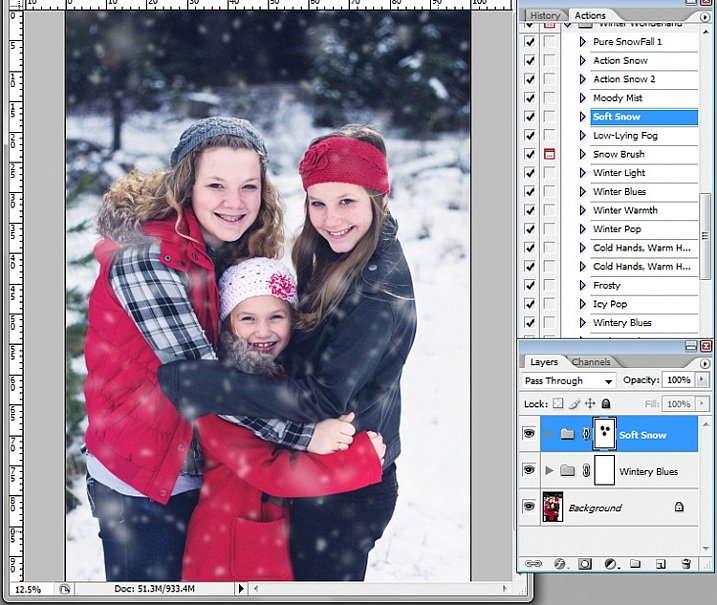
Essentially, the Winter Wonderland Action Set allows you to add snow with one click during post-processing. It includes several different kinds of snow, fog, and mist that can add a little something extra to your winter images. It also offers some tints and adjustments that allow you to tweak the final images towards your normal style of editing, whether you lean towards natural and clean, or a faded vintage look.

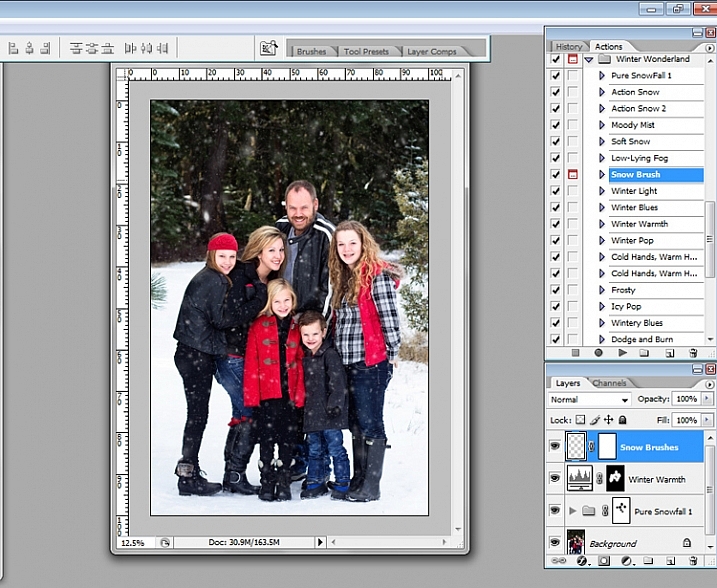
winter-wonderland-action-2

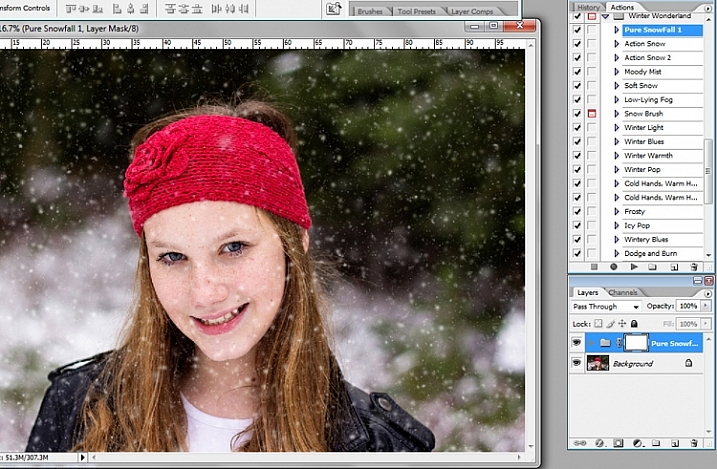
The first thing that I should mention, right off the bat, is that some of these actions run very slowly. The “Pure Snowfall 1” action in particular always seems to take several minutes to run. On the other hand, the “Soft Snow” action runs quickly every time. That said, even with “Pure Snowfall 1” taking several minutes to run, it’s still much faster than adding in individual snowflakes by hand, so it’s a win in my book.

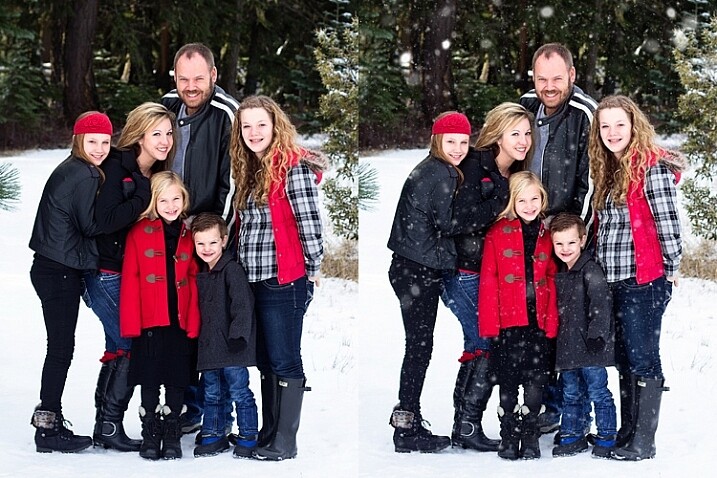
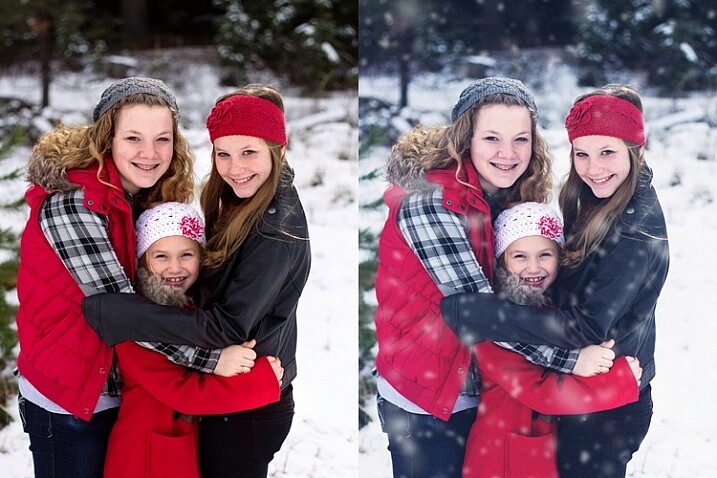
Original image on the left, final image using PPA Winter Wonderland on the right.

Original image on the left, final image using PPA Winter Wonderland on the right.

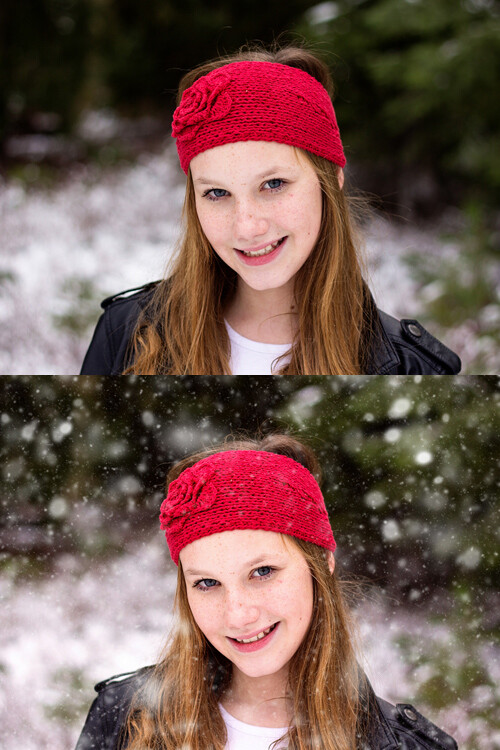
As with most action sets, you should be prepared to tweak Winter Wonderland to fit your particular image. Winter Wonderland adds masks to most of the actions after they’ve run, and I find that I use them quite often. The most common tweak that I make to the Winter Wonderland set is to remove the added snowflakes from the subject’s eyes, nose, and mouth. I prefer the “snow” to look as natural as possible, so I do tend to leave the snowflakes around the hairline, and sometimes even on the cheeks.

winter-wonderland-action-4

The actions in this set tend to do a pretty good job of varying the size of the snowflakes in order to give a more realistic foreground and background, but there is also a snowflake brush included with the set, which allows you to pick the overall size of snowflake you want, and then scatters additional snowflakes in that size randomly over the image.

Original image on top, final image edited with PPA Winter Wonderland on the bottom.

Original image on top, final image edited with PPA Winter Wonderland on the bottom.

My editing style tends to be pretty clean, so that is about where I usually stop with this action set. However, the set also includes a number of actions that allow you to achieve a subtle vintage feel to your final images, and I’ve also enjoyed testing those options out as well.

winter-wonderland-action-6

Original image on the left, final image edited with PPA Winter Wonderland on the right.

Original image on the left, final image edited with PPA Winter Wonderland on the right.

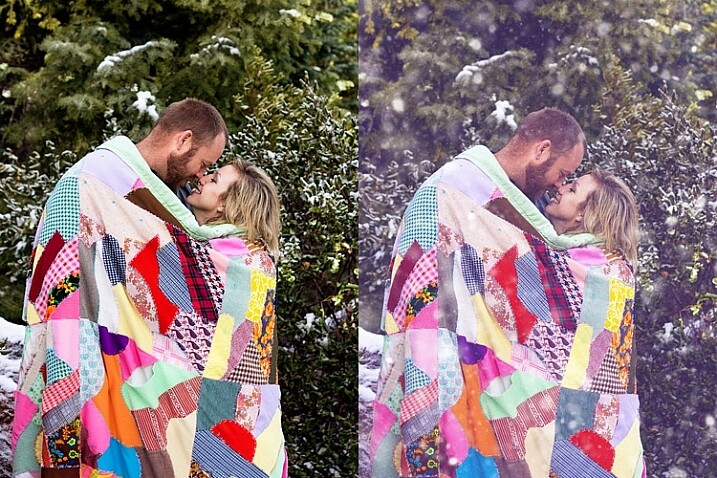
When I use the Winter Wonderland action set, my ultimate goal is that if I were to post the image on Facebook, the majority of my client pool would not readily be able to tell that the snow was added in post-processing. Of course, some of my photographer friends are likely to be familiar with this particular action set, and others may be familiar enough with Photoshop to know that something’s up, but my hope is to create images that look natural enough that they could easily pass as being real. So, in order to accomplish that goal, one of the key pieces is to only use images in which your model is dressed appropriately for snow, and there could feasibly actually be snow in that location.

This particular set of images is my favorite set that I’ve ever edited with Winter Wonderland, and I think that’s due in large part to the fact that there was actually snow on the ground during our session. So, it’s not too much of a leap for a casual viewer to see snow on the ground, and find it feasible that snow could be falling at the same time. On the other hand, if I were to run this same action set on an image taken at sunset during the summer months, it would likely look ridiculous…which would really only work if you’re going for a super campy “Christmas in July” themed session.

winter-wonderland-action-9

winter-wonderland-action-10

Original image on the left, final edited image with PPA Winter Wonderland on the right.

Although I’ve seen Winter Wonderland marketed almost exclusively towards photographers doing portraits or family photography, don’t underestimate this set for landscape and nature images as well. As long as the content, and coloring of your landscape or nature image, would be appropriate for a photograph taken in the winter, there’s no reason not to give it a try!

winter-wonderland-action-8

Just for the record, I purchased the Winter Wonderland Action Set on my own, and Pure Photoshop Actions has no idea that I’m writing this article. I have just enjoyed the Winter Wonderland set quite a bit, and thought that it was worth sharing (and reasonable price at $ 25) as we head into the winter months in the northern hemisphere.

Have you tried the Winter Wonderland Action Set? If so, what did you think? If not, is there an image you’re eager to try it on?

googletag.cmd.push(function() {
tablet_slots.push( googletag.defineSlot( “/1005424/_dPSv4_tab-all-article-bottom_(300×250)”, [300, 250], “pb-ad-78623” ).addService( googletag.pubads() ) ); } );

googletag.cmd.push(function() {
mobile_slots.push( googletag.defineSlot( “/1005424/_dPSv4_mob-all-article-bottom_(300×250)”, [300, 250], “pb-ad-78158” ).addService( googletag.pubads() ) ); } );

The post Make it Snow with Pure Photoshop Actions Winter Wonderland Set by Meredith Clark appeared first on Digital Photography School.


Digital Photography School

 
Comments Off on Make it Snow with Pure Photoshop Actions Winter Wonderland Set

Posted in Photography


Wonderland with Kelli

17 Aug

There is a spot in northern Utah that my friend and sometimes assistant Chelsey Ott discovered near her home. A small trail off the road and into some trees reveals an expansive opening of all sorts of amazing places and things to shoot.

 
Comments Off on Wonderland with Kelli

Posted in Uncategorized


Cyberpunk City: Reframing Tokyo as a Futuristic Wonderland

04 Mar

[ By WebUrbanist in Culture & History & Travel. ]

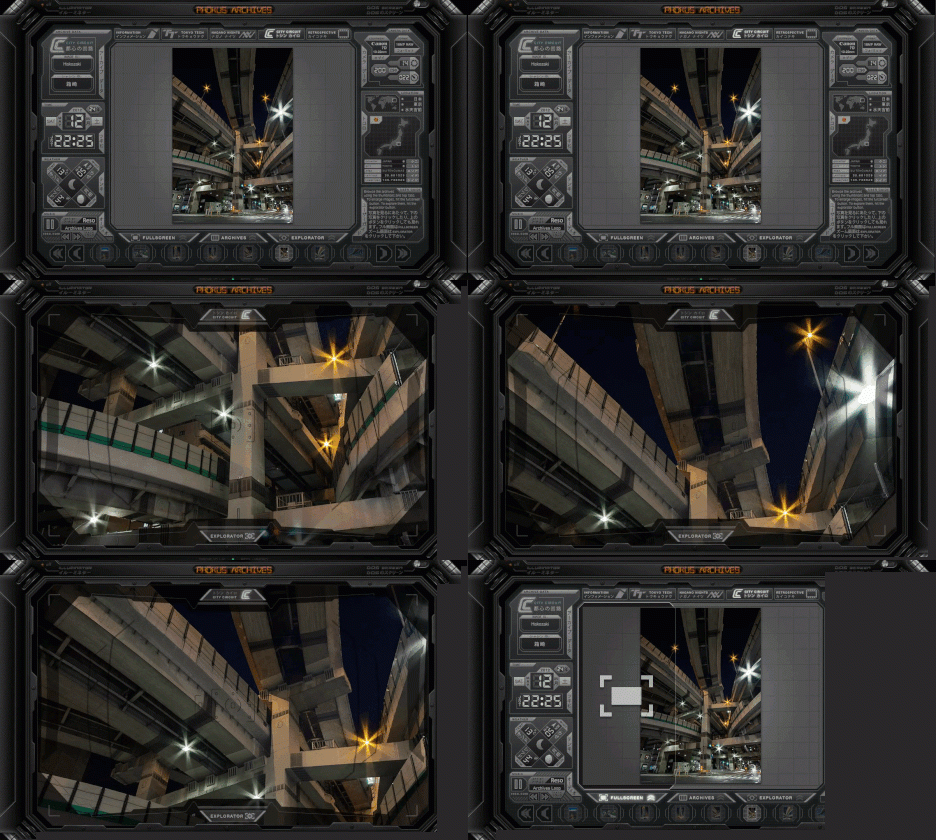
PhokusSelect_10

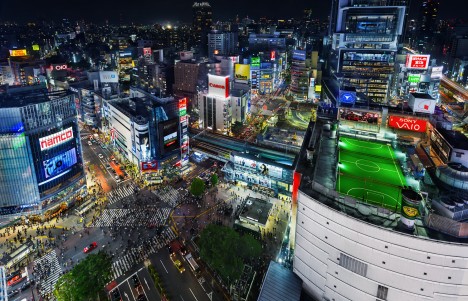
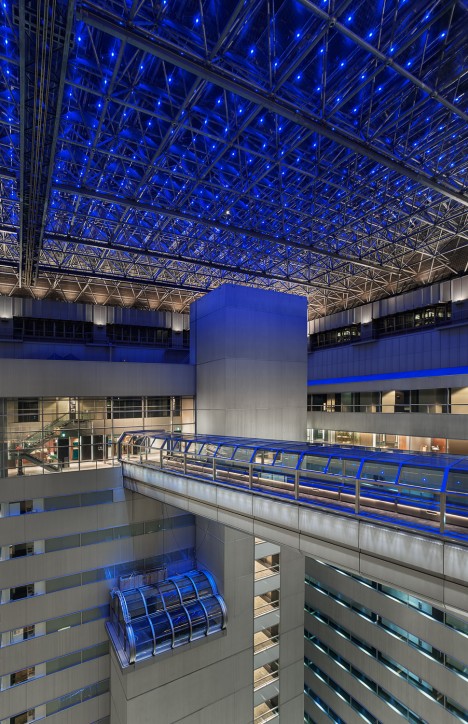
With a background and interests in skateboarding, anime and architecture, this photographer brings both a youthful imagination and an outsider’s eye to an area of the world famous for speculative fiction-worthy landscapes and high-tech cityscapes.

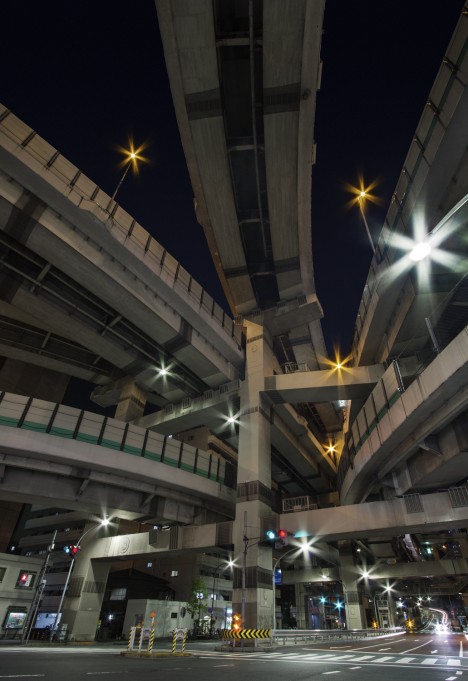
architecture japan interior

PhokusSelect_01

Sam Pritchard‘s interest in architecture evolved alongside his interest in Japanese cities and culture, which in turn helped inspire his recent Phokus Archives remodel (years in the making and with audio accompaniment by Reso). The child of an architect, he grew up seeing the built environment through the lens of a skateboarder and urban explorer in England. Meanwhile, he developed fascination with futuristic cityscapes through (often Japanese) video games and movies, from Sega, Nintendo and Atari to Akira and Ghost in the Shell.

high

architecture japanese bridge infrastructure

After spending time as an architectural photographer in London, Pritchard moved to Japan to follow up on his childhood fascinations and see what structures are really like in the fabled land of futuristic tech. The results were surprising: “Since living in Japan the reality of day-to-day life in isn’t really any more tech or futuristic than it is in any other developed city or country. But in my photography, I try to create the illusion that it is some kind of digital future world that lives up to my childhood expectation of the place.”

Next Page – Click Below to Read More:
Cyberpunk City Reframing Tokyo As A Futuristic Wonderland

Share on Facebook


[ By WebUrbanist in Culture & History & Travel. ]

[ WebUrbanist | Archives | Galleries | Privacy | TOS ]


WebUrbanist

 
Comments Off on Cyberpunk City: Reframing Tokyo as a Futuristic Wonderland

Posted in Creativity


Shooting Winter Wonderland: How to Take Great Snow Images

14 Jan

Shoot what you love. The Amazing Images Will Follow. That’s my motto. Above, you can see a shot of my daughters, Zoe and Tenley, on their first day of snow ever. Zoe wanted to hold the snow in her hands and blow it, Tenley agreed, and just as Zoe was blowing, Tenley reached up and whitewashed her face with the Continue Reading

The post Shooting Winter Wonderland: How to Take Great Snow Images appeared first on Photodoto.


Photodoto

 
Comments Off on Shooting Winter Wonderland: How to Take Great Snow Images

Posted in Photography


Winter Wonderland: Don Komarechka’s snowflakes

30 Dec

Photographer Don Komarechka likes to explore the world that we cannot see with our own eyes. Every winter he produces an incredibly detailed photo series on snowflakes, using a pair of black mittens as the backdrop and a high quality macro lens to reveal the unique crystalline structures in incredible detail. Read our Q&A and take a look at his photos. See gallery

Articles: Digital Photography Review (dpreview.com)

 
Comments Off on Winter Wonderland: Don Komarechka’s snowflakes

Posted in Uncategorized


Wonderland with Kelli

29 May

There is a spot in northern Utah that my friend and sometimes assistant Chelsey Ott discovered near her home. A small trail off the road and into some trees reveals an expansive opening of all sorts of amazing places and things to shoot.
Jake Garn Photography

 
Comments Off on Wonderland with Kelli

Posted in Uncategorized


Interactive Wonderland: Light Projection Art Animates Sydney

28 May

[ By WebUrbanist in Destinations & Sights & Travel. ]

light art city projections

A series of dynamic light art installations have begun to take over the largest city in Australia, turning tunnels into painted bouquets and the converting the sails iconic Sydney Opera House sails into a colorful storytelling canvass.

light art tree closeup

Part of this VividSydney event (running through June 9th), the MLC building begins its animated tale as a small stand of trees that entangle and intertwine to become a single huge trunk.  As the visual story unfolds, “leaves flutter in a virtual breeze. Before your very eyes, a colossal tree seeds, sprouts, and rapidly spreads.”

light art tree animation

The process is full of small and sudden surprises as well as slow-building suspense.“Like the dwellers and vehicles that bring energy and movement to a large city, beetles, bugs, centipedes and birds emerge out of the tree, scurry about their business, and then vanish again into the canopy. A symbiotic ecosystem is created [from] previously lifeless concrete and glass.”

Vivid Sydney 2014

light art opera house

vivid sydney aerial sails

Meanwhile, along the waterfront, this year’s ambitious all-new light art production for the opera house will “take the iconic building on a dramatic journey through time – from the birth of architecture and civilization through to the pinnacle of human and technological achievement.”

light art walking platforms

light art geodesic dome

light art bridge

vivid sydney ferry lights

Other illuminated installations can be found all around the city, lighting up everything from buildings and bridges to ferries and fountains. And light art is only one of its three dimensions. VividSydney “is a unique annual event of light, music and ideas, featuring many of the world’s most important creative industry forums, a mesmerising free public exhibition of outdoor lighting sculptures and installations, a cutting-edge contemporary music program and the spectacular illumination of Sydney’s iconic architecture.”

Share on Facebook


[ By WebUrbanist in Destinations & Sights & Travel. ]

[ WebUrbanist | Archives | Galleries | Privacy | TOS ]


WebUrbanist

 
Comments Off on Interactive Wonderland: Light Projection Art Animates Sydney

Posted in Creativity


How to Create a Winter Wonderland Holiday Photo

22 Dec

There is so much to photograph during the holidays from religious symbols, to beautiful outdoor lighting displays, a well decorated tree, and the gathering of family and friends. You might already photograph and print your own holiday cards or a personal calendar, and each year you might be thinking of new and unique ideas for next year’s images.

With the holidays soon over and all those displays being packed away until next year, many Christmas trees will soon be recycled. But before you recycle your tree, consider using it for a unique photography opportunity: an illuminated Christmas tree in an outdoor setting. It could be that new and unique photo for next year’s holiday card!

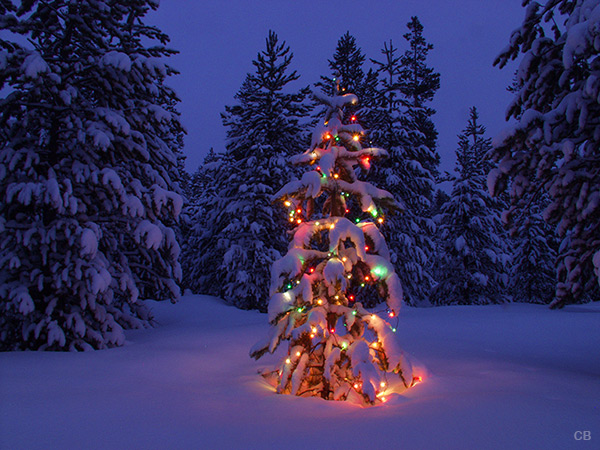
Winter wonderland holiday photo tree 14a

If you happen to reside in an area that enjoys wintery and snowy conditions, you have a setting ready to create an illuminated holiday tree similar to this one. But it is worth noting that even if you don’t live in a wintry or forested area you can still create a holiday light photo anywhere with a little imagination. A cactus in the desert, a shrub in your yard, a roadside mailbox, a rusty old car in a field, or anything you can attach lights to. You’re only limited by your imagination!

To create a winter wonderland holiday photo like the one above, here’s what’s needed:

Christmas lights for the tree

You can use regular tree lights that use AC power if you have a location to plug them into. I needed 3 long extension cords to reach my garage, for power to run these lights.

There are also battery power lights available that will work wonders if you prefer to photograph further out and away from power sources.

A tree

Ideally, it would be great to head into the forest and find the perfect tree sitting in the perfect spot. Just add the lights, and wait for snow. But finding the perfect tree, in the perfect place can be challenging. When you’re looking to create a well composed image, where the illuminated tree stands prominently in your composition, the search for that perfect tree can be elusive.

Instead, I have found it easier in most cases to bring my own tree and put it right where I want it, in front of a suitable background. Since we live on this property we often cut our own Christmas tree and once the holidays are over, I take the tree outside, still in its tree stand, and place it to fit my composition. I then adjust the lights and wait for snow, which is never long.

Exposure

Exposure for the scene can be a bit challenging because you are working with two constant light sources. It’s similar to photographing a city skyline where you have constant light that does not change, such as street lights and building windows, and you have constant light that does change: the setting sun and darkening ambient light.

For this winter tree photo you have the same: the tree lights, which remain constant in their brightness level, and the diminishing natural light. After the sun has set there is a ‘window of opportunity’ where these two light sources are closely matched for the perfect exposure: the darker background and the perfectly exposed tree lights.

I set f/16 as my aperture so the tree lights will have that ‘starburst’ or sparkle and then bracket my shutter speed throughout that ‘window of opportunity’ shooting period. I also drop my white balance down to 4000k (if your camera doesn’t offer White Balance adjustments by degrees Kelvin, choose Tungsten or Incandescent from the WB presets) to increase the blue tone of the overall picture, which enhances the feel of ‘cold and winter’. To ensure that I take advantage of that window of opportunity, I start photographing about 15 minutes after sunset and continually evaluate the exposure.

Winter wonderland holiday photo tree 20

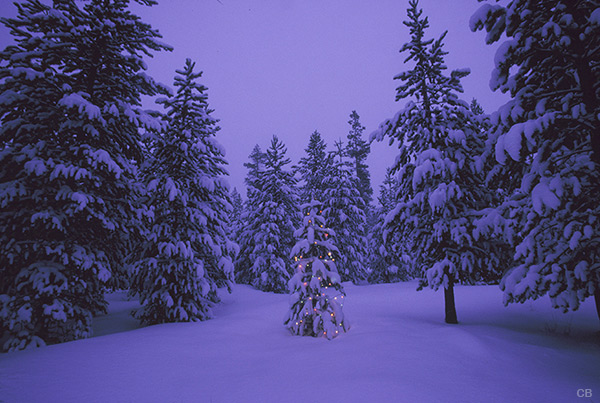
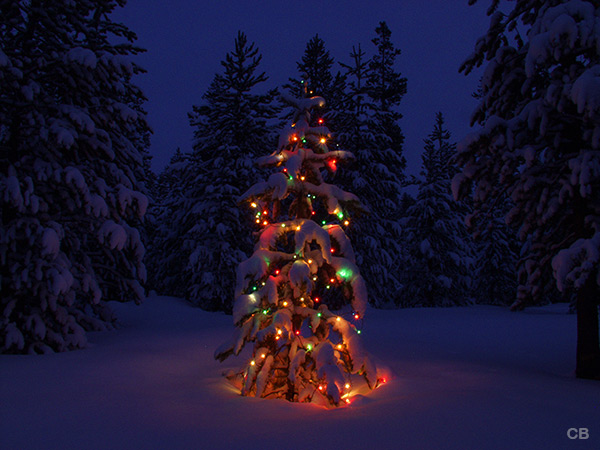
If the ambient light brightness level has not darkened enough the tree lights will not stand out as the image above shows. The lights are not bright enough in relation to the background and surroundings, so the solution is to wait a little longer. To achieve that cold winter feel the snow cannot be exposed as white or even slightly grey, but rather closer to middle grey. I often start using Aperture Priority mode with a -1 exposure compensation setting, and continue to use auto bracketing (AEB). Once the ambient light brightness level is perfect, the tree lights will glow brightly and not blow out against the background.

winter-wonderland-holiday-photo-tree-14a.jpg

ISO 100, f/16, 12 second exposure

This was my final image choice because the lights glow nicely, even those under the snow, and are not blown out, while leaving some glow on the ground level snow at the base of the tree. The exposure of 12 seconds at f/16 maintained great detail in the background as well.

The time to stop shooting is when the background becomes too dark in relation to the tree lights exposure, which will start blowing out as the shutter speed gets longer.

Winter wonderland holiday photo tree 17

The image illustrates just that. The tree lights are still exposed properly but the surrounding ambient light is border line too dark, as details in the darker area of the trees are beginning to merge. Of course, it is a matter of taste but for me at this point it is time to pack up and head indoors and review the images.

Plan ahead by testing

As you prepare to venture out and create a Holiday lighting image, a few steps before you leave will guarantee better results:

  1. A day or two before you plan your photo venture, place your lights outside, even around your home, plug them in and wait for sunset
  2. Set your aperture to f/16, place your camera on the tripod, and attach your cable release
  3. 15 minutes after the sun has set take your first picture and bracket your shutter speeds: normal (0), -1, and +1
  4. Wait another 10 minutes and take another set of three pictures
  5. Continue testing until you find the ambient light is to low and you determine that by looking at your Normal test exposures in the series and an image showing the lights blowing out against a very dark background
  6. Download your images and select the image you feel has great background exposure and perfectly exposed lights
  7. Once you find that perfect exposure, review the metadata for the shutter speed used and the time of capture. Then if you plan to shoot in the next day or two you will have a guide for the best time of day, and the best shutter speed, so you can head outdoors with a great starting point for the best exposure.

There are so many subjects that would work well with Christmas lights outdoors and to create something unique it pays to develop an idea first. Then decide on a suitable location that supports the subject rather than detracts from it. If you plan to head out into cold winter conditions be sure and dress warm, protect your gear, and most importantly, have a great time!


Editor’s note: this article is just in time for the Weekly Photography Challenge this week which is WINTER!  If you need more inspiration check out these 30 images of winter photography.

The post How to Create a Winter Wonderland Holiday Photo by Charlie Borland appeared first on Digital Photography School.


Digital Photography School

 
Comments Off on How to Create a Winter Wonderland Holiday Photo

Posted in Photography