RSS
 

Posts Tagged ‘Weapon’

This 12K NYC flyover video was captured with three 8K RED Weapon Monstro VV cameras

19 May

LA-based director and cinematographer Phil Holland of PHFX recently joined forces with Gotham Film Works to create something out-of-this-world. Using the first Shotover K1 Hammerhead Aerial Camera Array, Holland shot a flyover of New York City using not one, not two, but three 8K RED Weapon Monstro VistaVision cameras.

The result, once processed, is a 100MP motion picture made up of images “with a sensor size of approximately 645 medium format film.” Put another way, the 12K by 8K footage above is 48.5 times the resolution of 1080p.

Holland explains how the rig was used and the footage captured in a short behind the scenes blog post, where he also shared some BTS images that he is kindly allowing us to repost for you here:

$ (document).ready(function() { SampleGalleryV2({“containerId”:”embeddedSampleGallery_6193312206″,”galleryId”:”6193312206″,”isEmbeddedWidget”:true,”selectedImageIndex”:0,”isMobile”:false}) });

Holland’s BTS post covers camera and lens selection, before moving on to explain what it takes to rig something like this up.

“On a technical level there’s a lot that needs to happen in terms of proper spacing, finding the zero parallax point, lens selection, determining your overlap, rigging, payload balancing, etc.” writes Holland. “Every RED Weapon 8K VV Monstro has a JETPACK SDI Module attached to sync genlock, provide power, control the camera, etc. This is actually one of the first times I’ve ever seen this bad boy used to maximum intent. WIthout this module something like this would be very difficult to pull off.”

All of this allowed Holland to control the rig from a single “brain” and create “a quality stitch with pixel and frame accuracy.”

Check out the final video up top to see the stunning results for yourself, and then head over to Holland’s blog for even more details about how this beautiful creation was captured.


All photographs ©Phil Holland/PHFX and used with permission.

Articles: Digital Photography Review (dpreview.com)

 
Comments Off on This 12K NYC flyover video was captured with three 8K RED Weapon Monstro VV cameras

Posted in Uncategorized


Lightroom’s Secret Weapon: The Radial Filter and How to Use it

17 Oct

Back when Lightroom 5 was released, Adobe included an extremely useful tool called the Radial Filter. However, the name wasn’t particularly clear about what it could do, so many people still have yet to find how useful and powerful it can be. Further improvements were added in Lightroom 6, with the ability to further edit the effect of the tool with the Brush function.
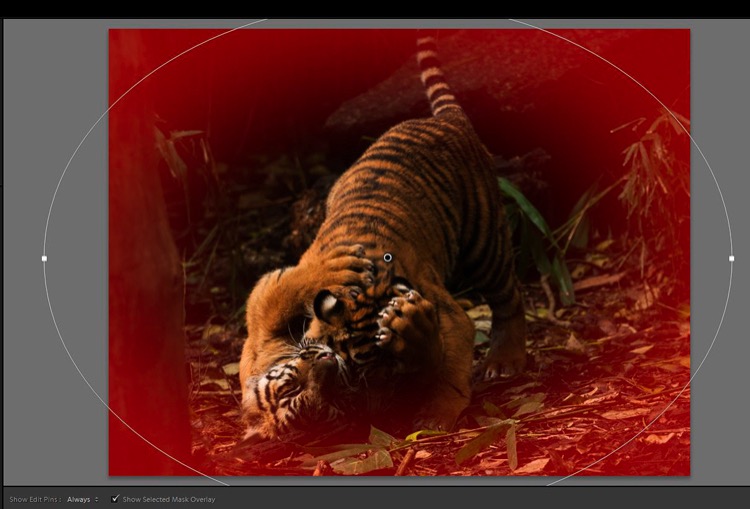
LR Radial Filter panel vignette beginning 7

Workflow process

A generally accepted practice when editing images, is that you do your global adjustments first. These are the ones that affect the whole image at once. Some examples of adjustments that you might use are:

  • Exposure
  • White Balance
  • Contrast
  • White or Black Point
  • Sharpness
  • Clarity
  • Shadows and Highlights

Once the global adjustments are done, then the local adjustments can be made. These are changes made to only a small part of the image. They may be to add final polish to the image or to fix some blemishes. These changes should be subtle and layered on with a delicate touch. It should not be obvious that they have been made, but when you are finished and compare the before and after image, there should be some improvement visible.

How the Radial Filter fits in

This is where the Radial Filter can be used, adding in areas of highlight or clarity to the key subject, brightening or darkening areas, or adding a custom vignette. Lots of little touches to take your final image to the next level.

My example image is a shot of a couple tiger cubs taken at Melbourne Zoo in 2010. It was very dark and shaded in their enclosure so the original RAW images are very dark. This image has been edited in Lightroom 6 to apply all the required global adjustments. It is now ready to have some localized tweaks added with the Radial Filter.
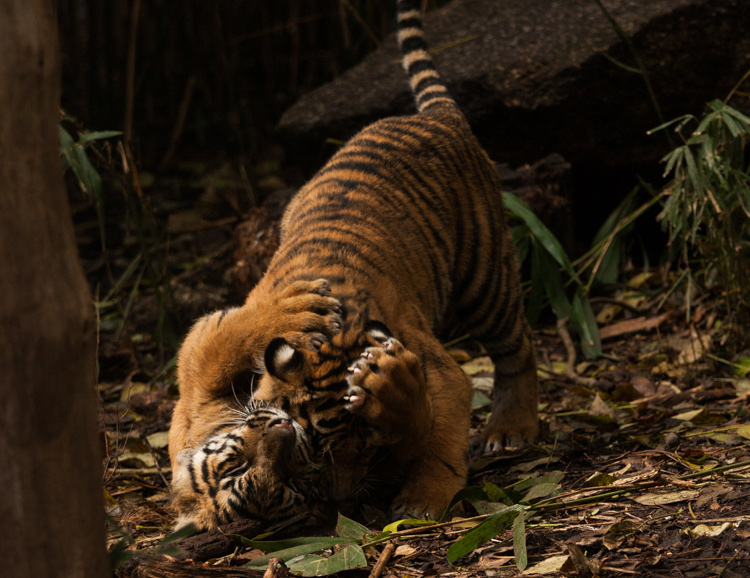
LR Radial Filter BASE IMAGE 1

WHERE TO FIND THE RADIAL FILTER AND HOW TO USE IT

The Radial Filter lives in the right panel of the Develop Module. Under the histogram are six shapes that link to different tools. The round circle with a dot in the centre at the fifth position from the left is the Radial Filter.
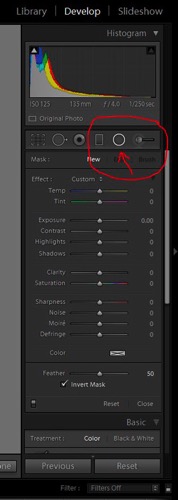
LR radial filter panel where to find 2

When you click on the button for the Radial Filter (you can also use the keyboard shortcut Shift+M to open the Radial Filter), a panel opens up with all the editing choices available for this tool.
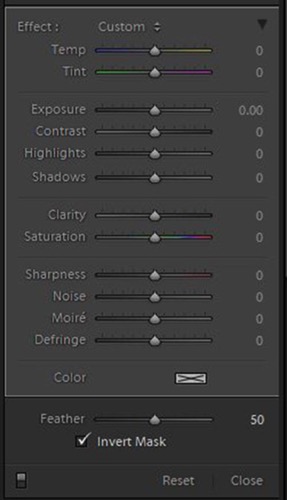
LR radial filter panel editing options 3

Adding and adjusting the filter

If you click on your image and drag the mouse out a bit, a roundish ellipse shape will form with a centre button and four control handles. Let go of the mouse when the shape is roughly the size you want it. The Radial Filter only offers a roundish ellipse shape but it has a lot of flexibility with changing the size and squashing it down to be a narrow oval shape instead of a circle.
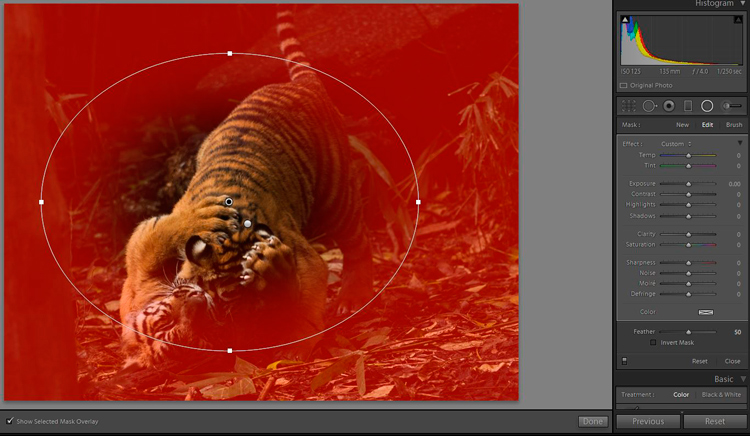
LR radial filter panel new one 4

Clicking and dragging on the centre button allows you to move the filter to the part of the image you want to edit. Use the control handles to change the size and also the shape of the ellipse.
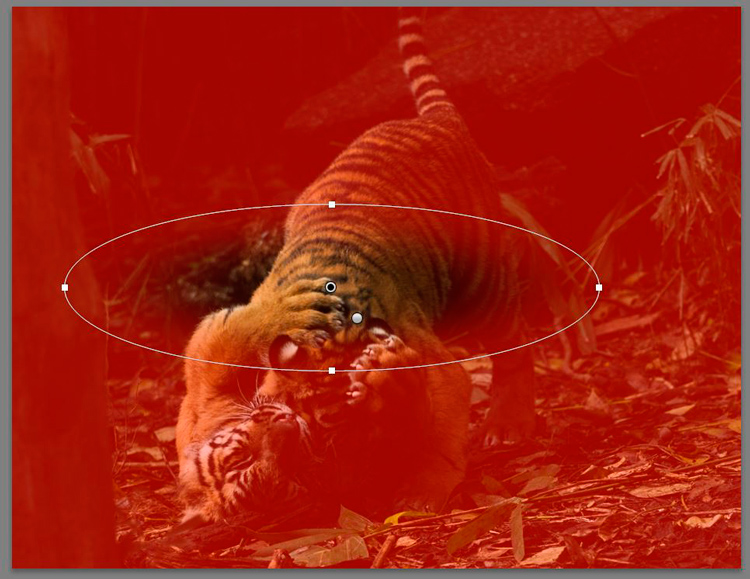
LR radial filter panel change tool shape 4a

Which area is affected

By default, Lightroom sets the editing area to OUTSIDE the ellipse. If you want to edit INSIDE the area, tick the Invert Mask box on the Panel.
LR radial filter panel move change size 5

The red colour shows up if you have Show Selected Mask Overlay ticked. It is handy to see where Lightroom will apply the effect and how much feathering you need to use.

NOTE: if you do not see a coloured overlay like the red one shown here, hit the O keyboard shortcut for “overlay”. Holding shift and tapping O will change the color of the overlay.
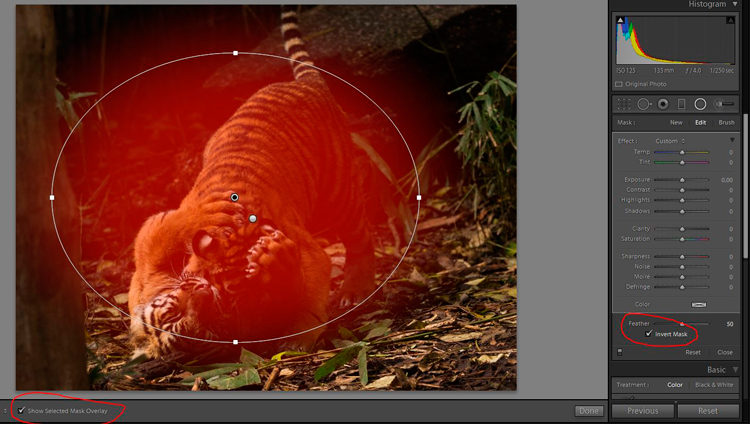
LR radial filter panel mask controls 6

Note: Always click Close or Done (or the keyboard shortcut Shift+M again) once you are finished editing a particular button so you can see the edited image clearly.

USING THE RADIAL FILTER TO EDIT AN IMAGE

In the example image the aim is to bring attention to the tiger cubs, adding some tweaks around the head and paws area (it’s not 100% sharp due to the low light and the movement while they were wrestling).

Add an off-centre edge vignette

First, we add a vignette to darken the distracting elements on the edge of the frame and bring the focus to the cubs.
Because they are not in the absolute centre of the image, the usual post-crop vignette tool will not work. This is where the Radial Filter is so useful, as you can add a vignette with the focus an off-centre subject rather than being limited to the middle of the frame.

The vignette needs to have Invert Mask NOT ticked, as the effect goes on the outside of the ellipse.

Add the Radial Filter and adjust the shape to be quite large – you can make the ellipse bigger than the actual image if necessary. Invert the mask and bring the exposure down just enough to darken the edges of the frame.
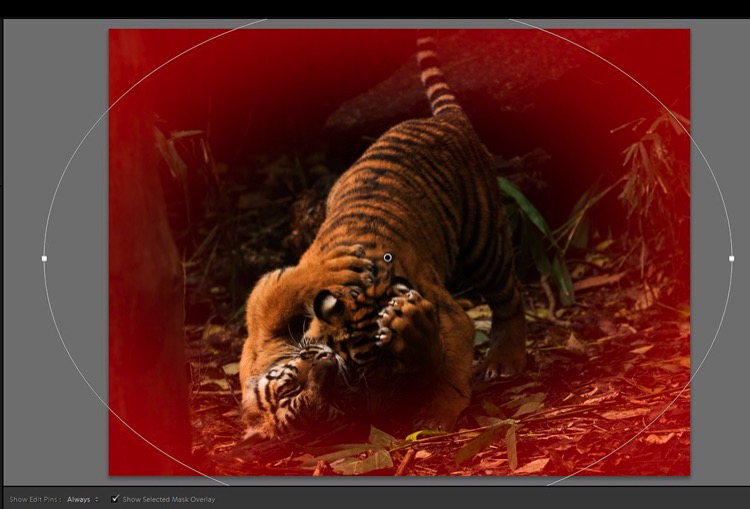
LR radial filter panel vignette beginning 7

Feather the filter

Lightroom has a default feather setting of 50 which is quite a lot, too much for this image, so adjust the feather down. Be careful not to go too far as a harsh edge will become visible.
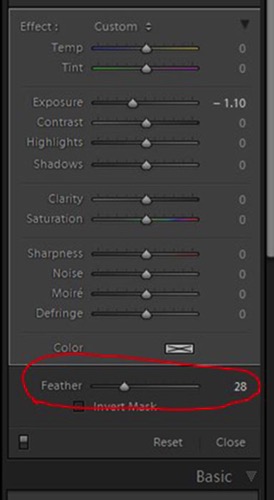
LR radial filter panel changfeather 8

The right-hand edge of the image still has a bright spot of foliage. So add another long Radial Filter and bring the exposure down a little bit.
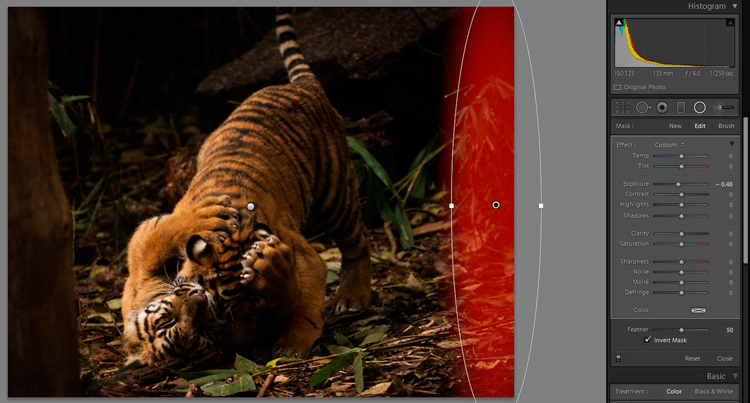
LR radial filter panel darken hedge 9

There are no set numbers of how much to edit with this tool, you will need to experiment and go with what feels right. The good news is these are all non-destructive edits (the image is not permanently changed) so you can remove them all and start again, or change the settings on one or all of them, as many times as necessary.

Tone control on select areas

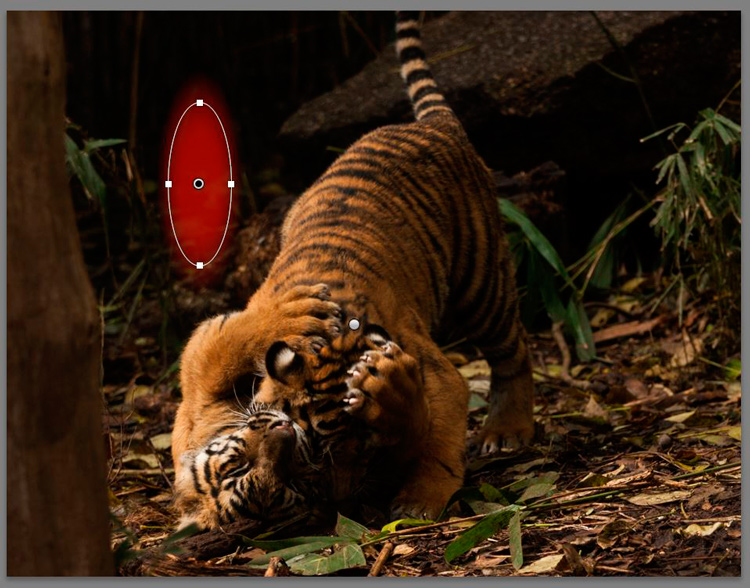
There is a bright spot of foliage on the left-hand side, just sticking out from behind the tree trunk. Create a new Radial Filter just big enough to cover the right area and shape with the control handles.

Invert the mask and bring the exposure down a bit. This time, click and drag on the bottom control handle and drag to the right until the ellipse tilts back to the left a bit and aligns better with the line of the tree trunk.
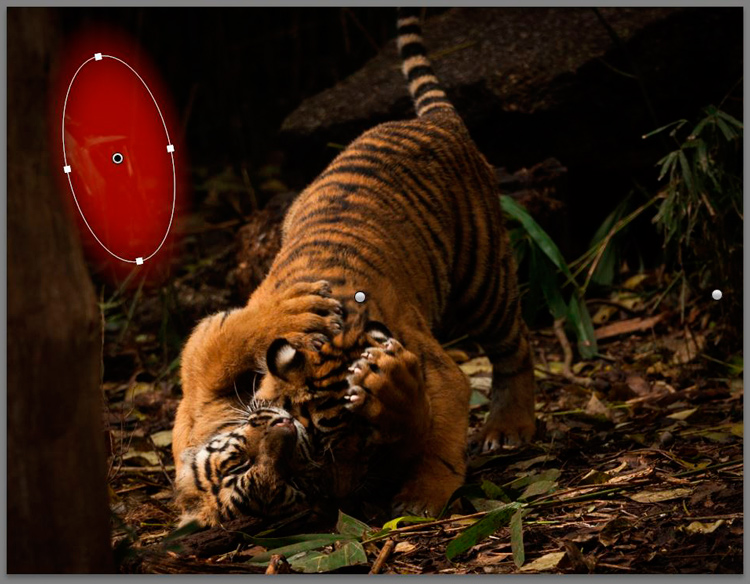
LR radial filter panel darken foliage tilt 10

Add focus on the subject

Now it is time to add some brightness and focus to the tiger cubs. Add a new Radial Filter to cover the area on the bright side of the head and paws and bring up the exposure a tiny amount. That is where the sunlight is naturally falling, so that is the area that needs brightening. Be careful to add light effects only to the lighter parts of the image as it can look a bit odd if a darker area is unnaturally bright.
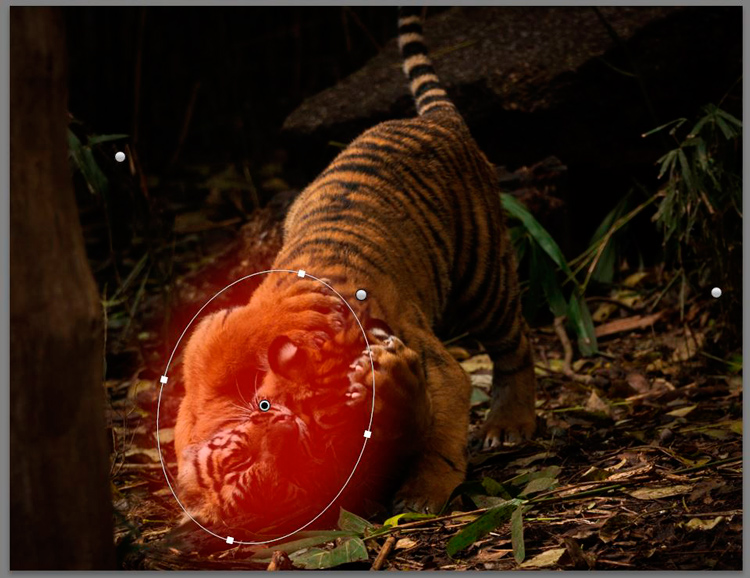
LR radial filter panel add brightness 11

Now is a good time to mention that you may have to make LOTS of little adjustments to cover areas with different shapes. It is fiddly and takes time, but you will get a better result if you take the time to edit that way.

Adding some clarity to the side of the face and paw in the sunlight is the next step. Create a new Radial Filter with size, shape and tilt to match the area and invert the mask. Add some clarity, and because this image is not quite sharp, just a little bit of sharpness. Be careful with these tools, as it is easy to go too far and get obvious effects.
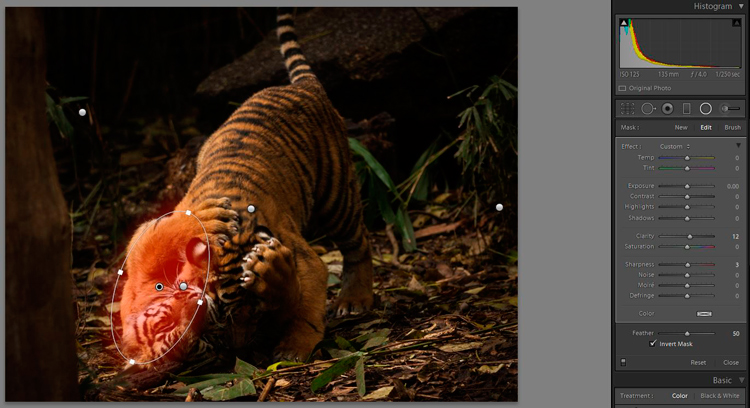
LR radial filter panel clarity sharpness 12

The vignettes have darkened the overall area in the middle a bit much so let’s add some brightness. Add a Radial Filter to cover the area around the cubs and tweak the exposure up a small amount. Also, increase clarity and saturation a very small amount.
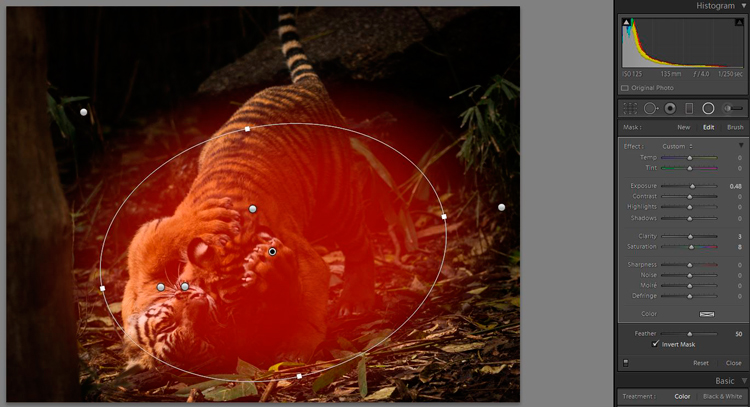
LR radial filter panel brightness circle 13

Before and after comparison

Let’s stop there and compare the BEFORE image with global adjustments only to the AFTER image with several specific applications of the Radial Filter.
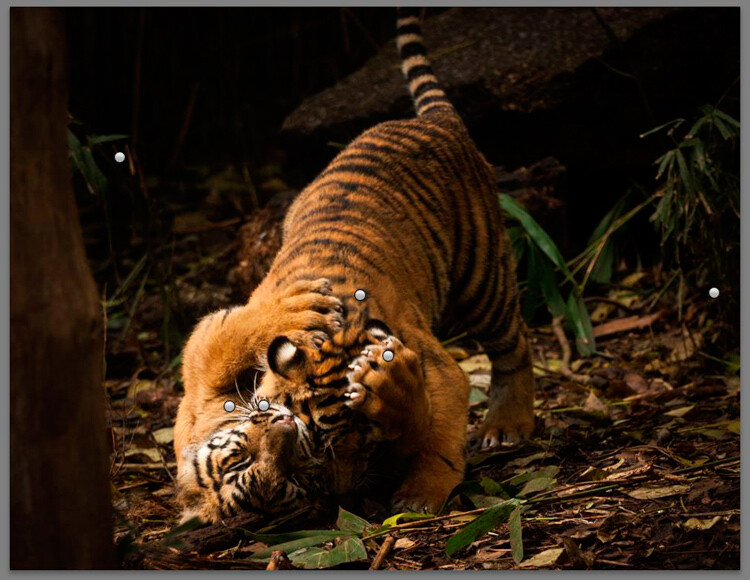
LR radial filter panel finished with dots 14

First, we have the finished image with all the dots for the different individual Radial Filters added.
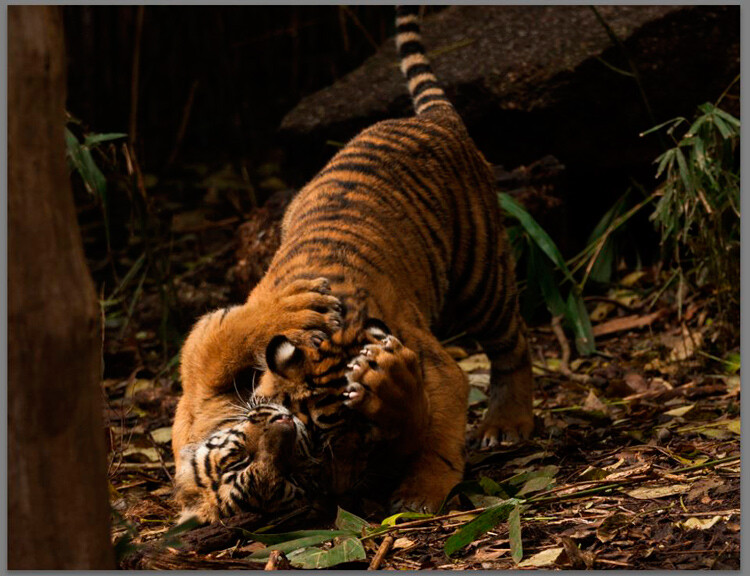
LR radial filter panel before comparison 15

Then we have the BEFORE image.

Finally the AFTER image with both global, and local edits applied with the Radial Filter.
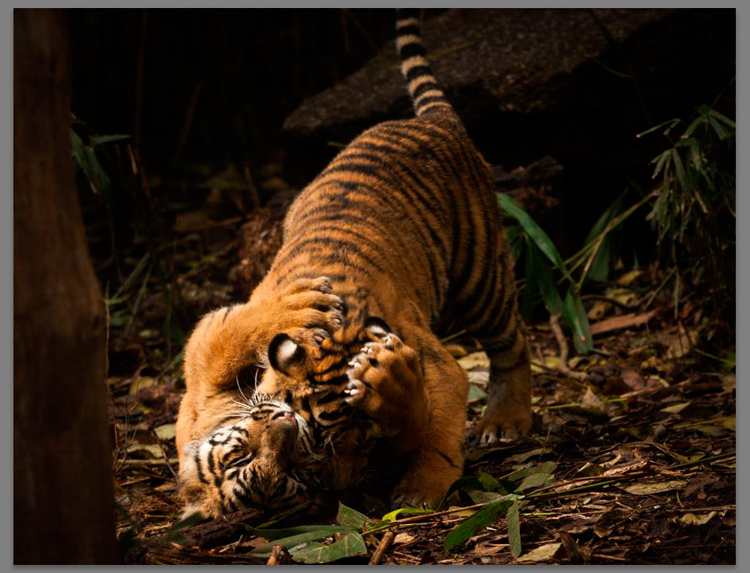
LR radial filter panel after no pins comparison 16

CONCLUSION

As you can see, careful use of the Radial Filter can add many small subtle changes to an image, and bring the focus to the subject. It can also be used to further enhance the subject and give it extra punch and vibrancy.

The Radial Filter is a very capable tool that can take a bit of time to get used to. The limited shape has some challenges to learn how to work with it to get the best effect but it gives you a lot of power and control too.

Do you have any other tips for using the Radial Filter? Please share in the comments below.

googletag.cmd.push(function() {
tablet_slots.push( googletag.defineSlot( “/1005424/_dPSv4_tab-all-article-bottom_(300×250)”, [300, 250], “pb-ad-78623” ).addService( googletag.pubads() ) ); } );

googletag.cmd.push(function() {
mobile_slots.push( googletag.defineSlot( “/1005424/_dPSv4_mob-all-article-bottom_(300×250)”, [300, 250], “pb-ad-78158” ).addService( googletag.pubads() ) ); } );

The post Lightroom’s Secret Weapon: The Radial Filter and How to Use it by Stacey Hill appeared first on Digital Photography School.


Digital Photography School

 
Comments Off on Lightroom’s Secret Weapon: The Radial Filter and How to Use it

Posted in Photography


Red introduces ‘Weapon’ camera with 8K sensor option

14 Apr

Red has unveiled its latest camera body and announced its next-generation 8K sensor. The Weapon body will be produced in magnesium alloy or carbon fiber and is available as an upgrade for users with the 6K ‘Dragon’ sensor. Anyone making the upgrade to the Carbon Fiber version will then be able to pay extra to get the forthcoming 8K sensor. Read more

Articles: Digital Photography Review (dpreview.com)

 
Comments Off on Red introduces ‘Weapon’ camera with 8K sensor option

Posted in Uncategorized


Reflectors: Your Secret Weapon for Amazing Portrait Photography

23 Oct

By: Oded Wagenstein

There is no doubt that using natural light in portrait photography can get you the best results.

However sometimes, as you all probably know, natural light does not do what he’s told. So here comes into action what I like to call my secret weapon in outdoor Portrait Photography.

It is cheap, easy to carry and especially does not frightens my subjects, who themselves can be a little intimidating at times.

Reflector

 
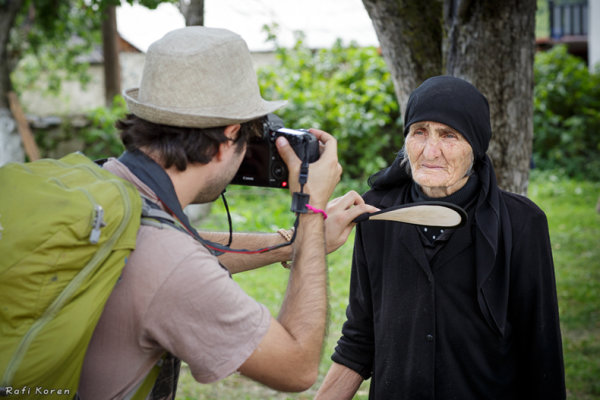
It is just that! It reflects light. There are hundreds of different types of reflectors, which differ in sizes and colors (i.e. white, silver, gold, etc.). A reflector is usually a reflective fabric, stretched over a bendy ring, allowing it to fold, and easy to carry.

With so many types of reflectors on the market, I cannot review them all. This mini-guide will focus on the main reflector I use for my work.

12 ” in size, and costs less than a movie theatre ticket.

I sometimes use other larger reflectors (mainly in cinematography productions), but this 12? reflector suits my needs in travel photography; mainly because it is small enough, allowing me to hold it with one hand and the camera with the other.

To Fill up Shadows:

We all love taking pictures at sunrise and sunset. But when dealing with the harsh mid-day light, a reflector is almost a must.

Fstop of 2.8, shutter speed@ 1/100 and ISO 200

Fstop of 2.8, shutter speed@ 1/100 and ISO 200

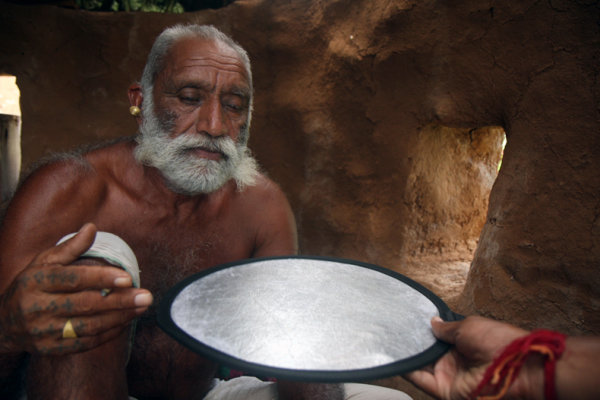
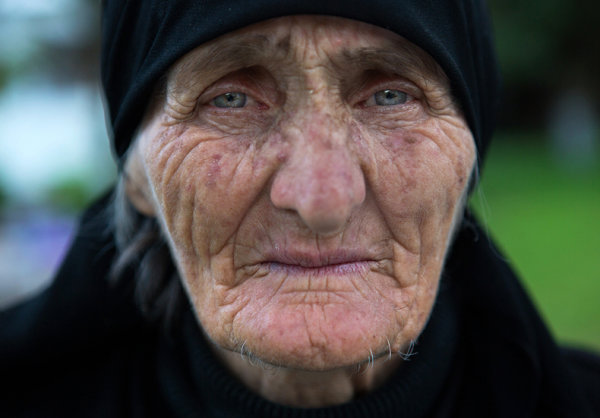
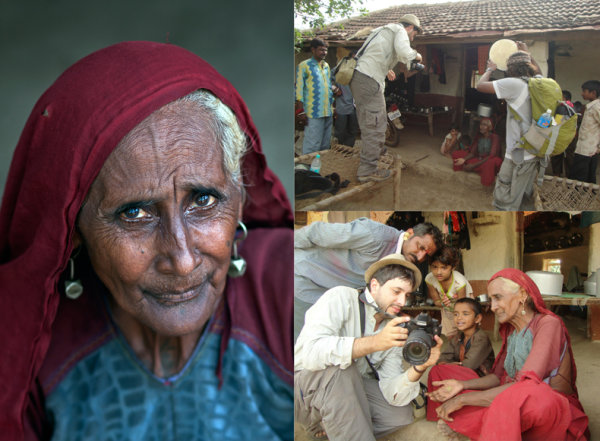
In the above picture, taken in the western Indian Rabari tribe, for the National Geographic Traveler magazine (Israeli edition), our model was sitting in a dark mud house. He was sick; therefore it was not an option to move him outside.  On the left wall of the house, there was a small window (as can beautifully seen illuminating in the background), My trusty camera assistant Hardik Pandaya, held a silver colored reflector below the subject ‘s face in order to fill any shaded areas such as under the eyes.

reflectors portraits 2

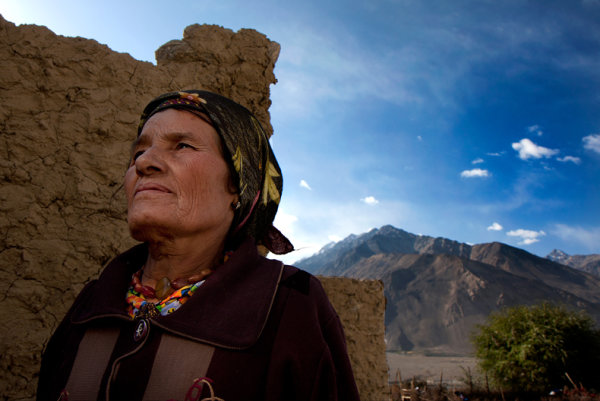
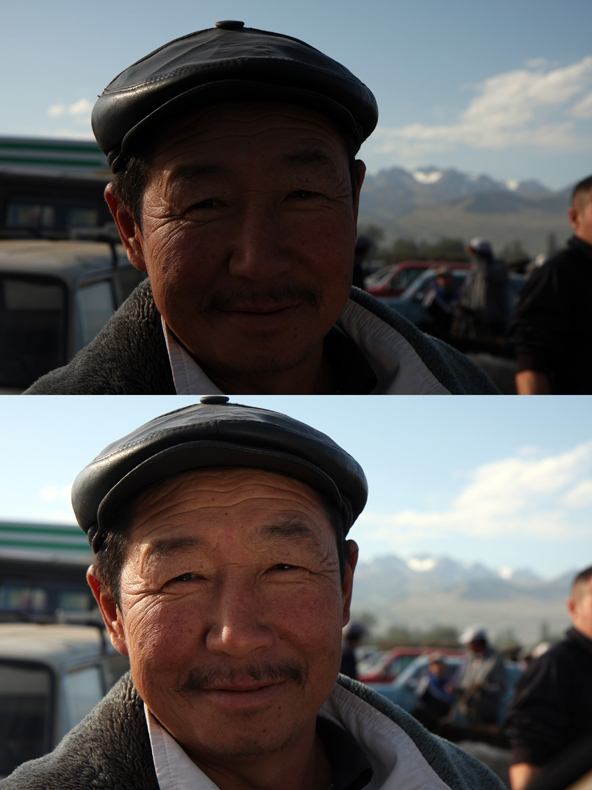
The above picture was taken on the border of Afghanistan and Tajikistan. Please note that although the woman is standing in the shade and the background is bright, the woman is not a black silhouette and the background is not burned out.  I measured the light from the background (using spot metering). In such a situation, without using a reflector, the character will turn out completely black (silhouette) but with a reflector held on my left hand, I was able to light up her face.

Fstop of 8, shutter speed@ 1/250 and ISO 100

Fstop of 8, shutter speed@ 1/250 and ISO 100

reflectors portraits 4

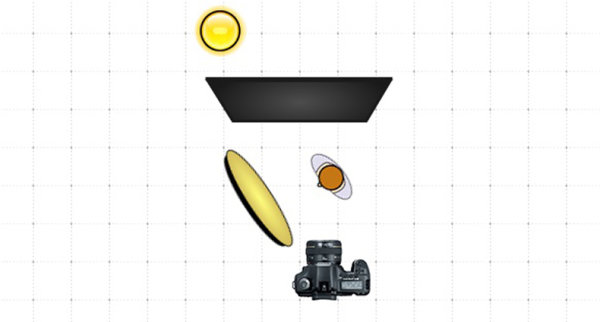
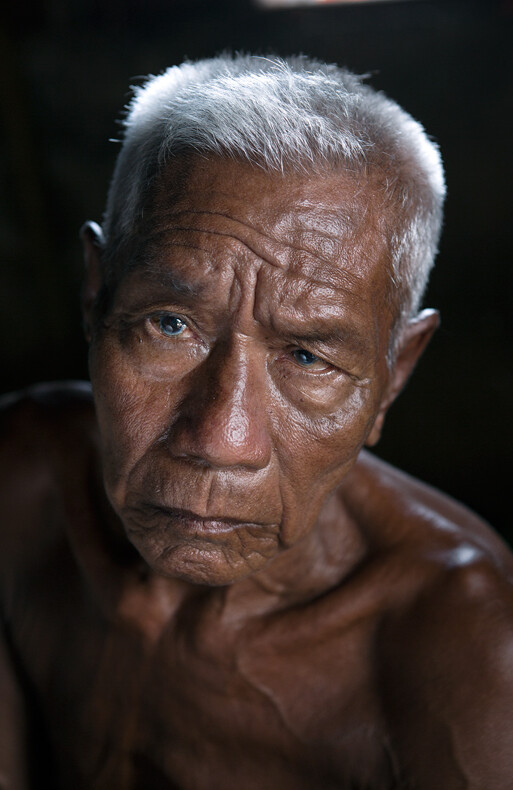
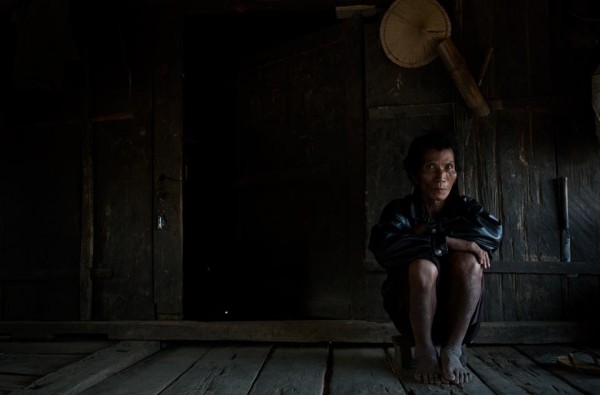
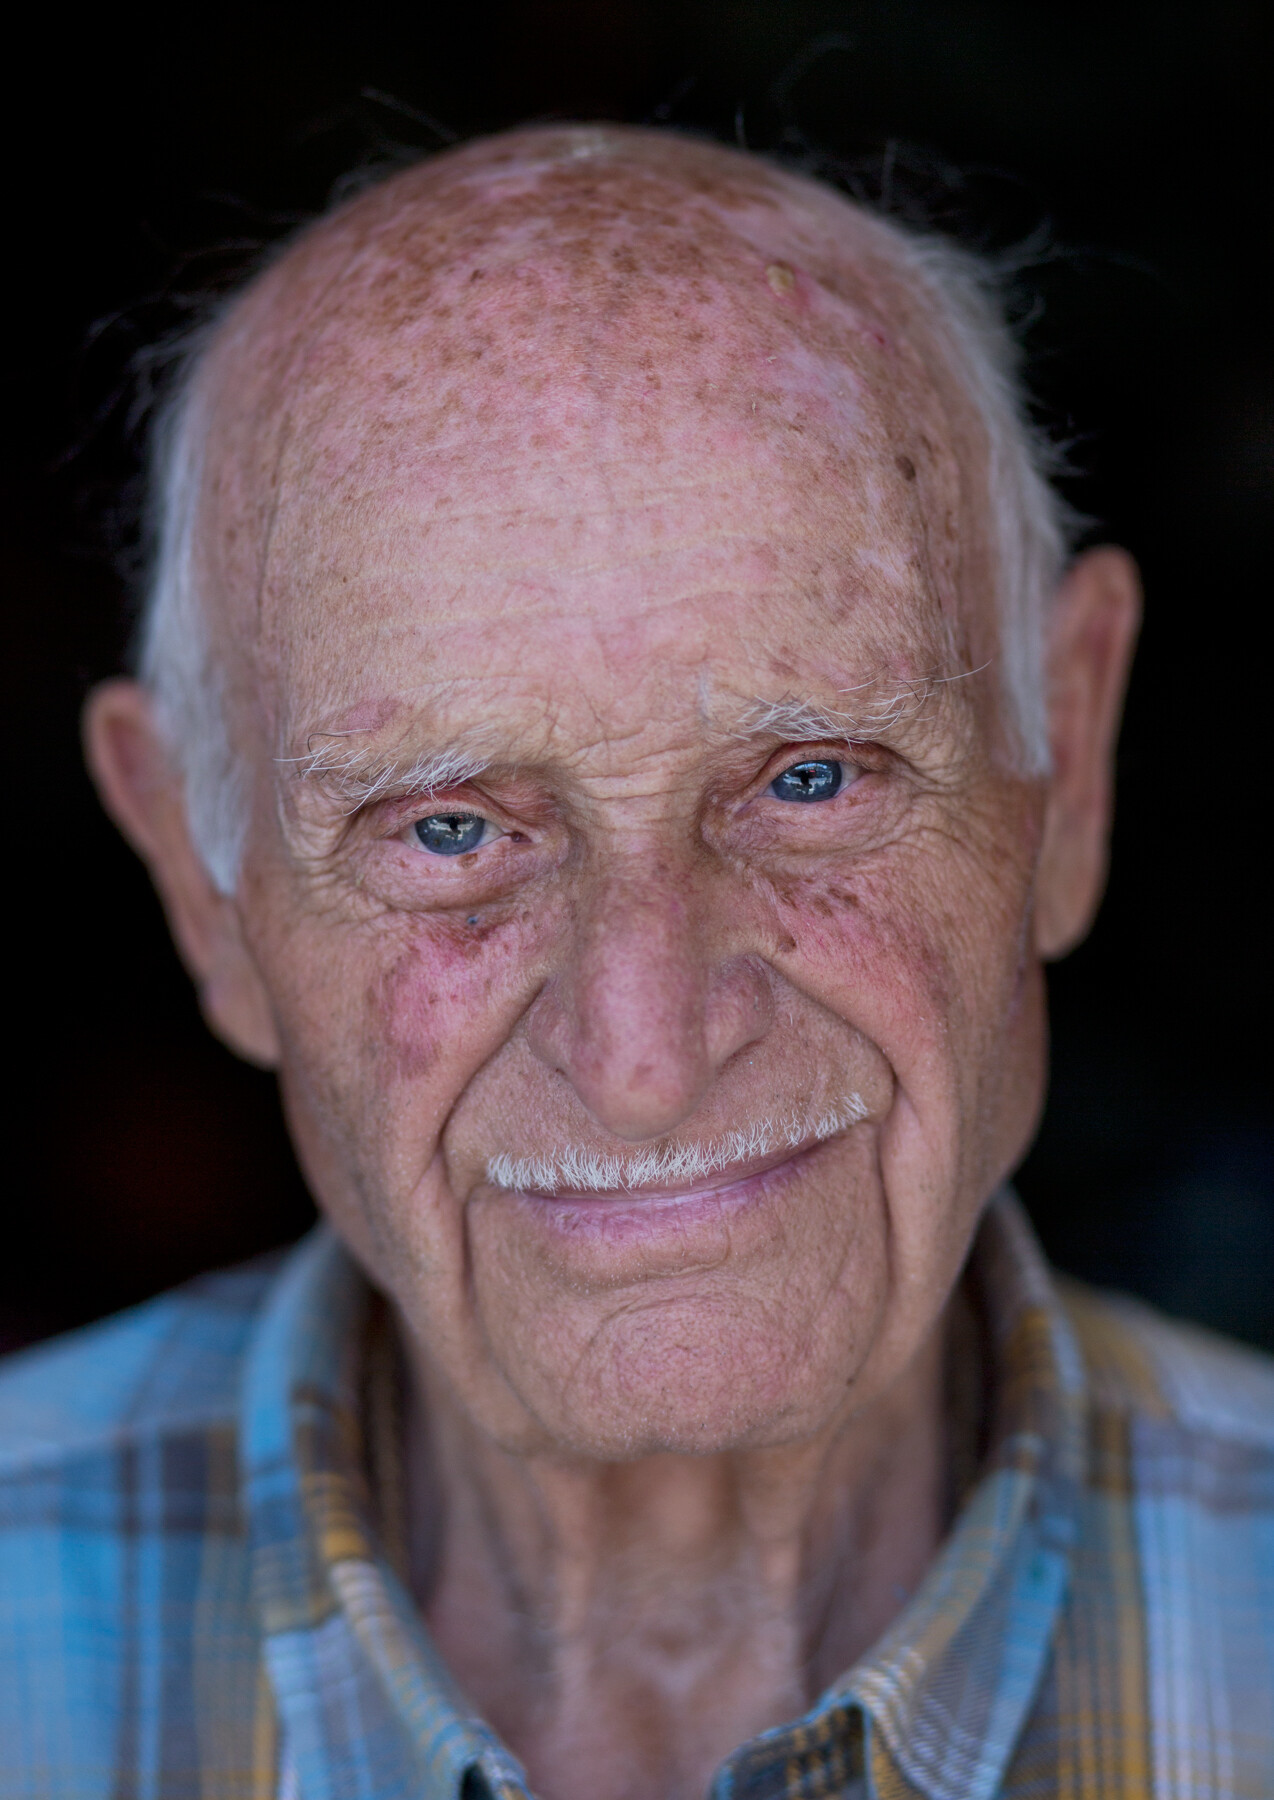
Below is 80 years old Getho. A fisherman from the small community of Sea Gypsy living in, Thailand. This image is a little bit complex in terms of lighting, because there are three sources of lighting here. Just like in the studio, my main light source (key light) was the house door (right side of the frame). The light was coming from a 45 degree angle, creating this dramatic volume on Getho’s face (you can read more about “sculpturing” with 45 degrees light in this post here).

In my left hand I held the small Silver color reflector, filling the shadows (fill light) on his face? and behind him was an open window for additional  light on his beautiful white hair (back light).

Fstop of 4, shutter speed@ 1/100 and ISO 320

Fstop of 4, shutter speed@ 1/100 and ISO 320

refectors portraits 6

Sometimes a reflector is the only option to shoot under strong sunlight, as you can see in this picture.

reflectors portraits 7

Choose the Right Color

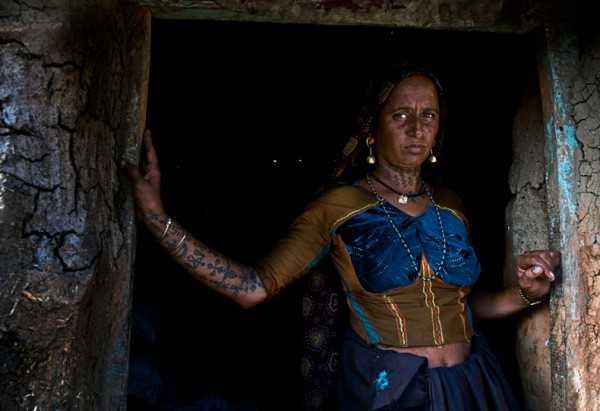
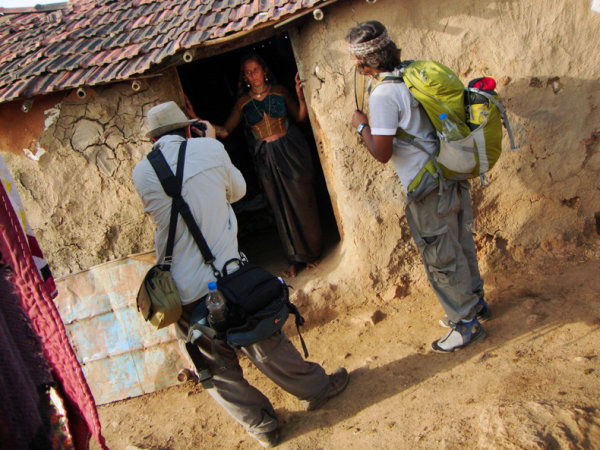
Most reflectors come in multiple colors. In this picture, taken in Western India for the National Geographic Traveler magazine (Israeli Edition), I wanted to preserve the golden- brown color which was dominate in this scene. So I asked Hardik to hold the reflector on its golden side giving the woman’s face a golden glow.

Fstop of 4.5, shutter speed@ 1/80 and ISO 100

Fstop of 4.5, shutter speed@ 1/80 and ISO 100

reflectors portraits 9

Choosing the right distance

It is important to keep in mind that the closer the light source is to the photographed subject, the stronger and less soften it will appear. Thus, a small reflector is easier to carry and hold; however it will be not as soft as a large reflector.

A “catch light” is an interesting spark in the eyes of the subject, “pulling” the audience to look straight at them. There are lots of methods to create a catch light in the subject’s eyes. For example using a flash or a flashlight. However, as we are discussing on the usage of natural light, a reflector can become a great tool for creating a catch light. Just place the reflector under the person’s face.

You can see some catch light examples here:

Fstop of 3.5, shutter speed@ 1/640 and ISO 250

Fstop of 3.5, shutter speed@ 1/640 and ISO 250

reflectors portraits 11

Fstop of 2.8, shutter speed@ 1/200 and ISO 100

Fstop of 2.8, shutter speed@ 1/200 and ISO 100

One of the most useful techniques, in order learn how to work with natural light in my opinion, is by observing the images of other photographers. Try to guess the direction of the light and the position and color of the reflector in the images below:

Fstop of 2.8, shutter speed@ 1/320 and ISO 3200

Fstop of 2.8, shutter speed@ 1/320 and ISO 3200

Fstop of 4.5, shutter speed@ 1/160 and ISO 100

Fstop of 4.5, shutter speed@ 1/160 and ISO 100

Fstop of 3.5, shutter speed@ 1/320 and ISO 1000

Fstop of 3.5, shutter speed@ 1/320 and ISO 1000

Fstop of 2.8, shutter speed@ 1/15 and ISO 200

Fstop of 2.8, shutter speed@ 1/15 and ISO 200

Fstop of 3.5, shutter speed@ 1/320 and ISO 160

Fstop of 3.5, shutter speed@ 1/320 and ISO 160

Fstop of 2.5, shutter speed@ 1/1000 and ISO 250

Fstop of 2.5, shutter speed@ 1/1000 and ISO 250

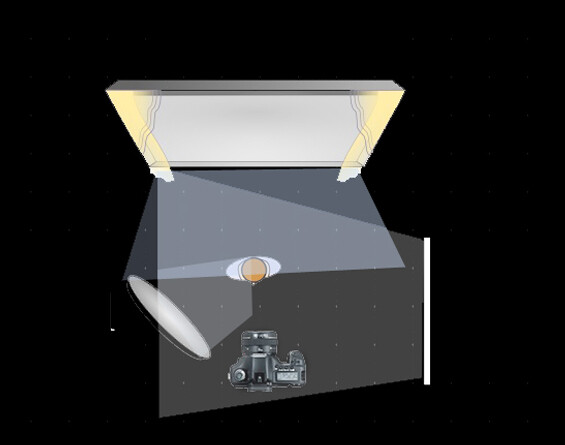
The diagrams were created by http://www.lightingdiagrams.com

Oded Wagenstein is a Travel photographer and writer. He is a regular contributor to the National Geographic Traveler magazine (Israeli Edition) and he is known for his intimate portraits from around the world. You can join his Portrait & Travel Photography Facebook page and continue to discuss on travel and people photography and get more amazing tips! –

Post originally from: Digital Photography Tips.

Check out our more Photography Tips at Photography Tips for Beginners, Portrait Photography Tips and Wedding Photography Tips.

Reflectors: Your Secret Weapon for Amazing Portrait Photography

The post Reflectors: Your Secret Weapon for Amazing Portrait Photography by Guest Contributor appeared first on Digital Photography School.


Digital Photography School

 
Comments Off on Reflectors: Your Secret Weapon for Amazing Portrait Photography

Posted in Photography


3D Studio MAX – Two Handed Weapon – Basic IK

09 Jul

This tutorial is in responce to several questions on how to link multiple parts of a biped to an object using a very basic IK object chain. www.hybrid-machinima.co.uk