RSS
 

Posts Tagged ‘Watermark’

How to Create a Watermark with the Pen Tool in Photoshop

02 Dec

The post How to Create a Watermark with the Pen Tool in Photoshop appeared first on Digital Photography School. It was authored by Ana Mireles.

Did you know that you can create a watermark with the Pen tool? Watermarking images is one of those issues that sparks strong feelings; some people love it and others hate it.

I think the success of a watermark is a matter of knowing when to use it and how to make it.

This article will show you how to create a watermark – using only the Pen tool in Photoshop!

Watermark your images using the pen tool in Photoshop

What is a watermark?

A watermark is a digital “signature” that you add to your photographs. It doesn’t have to be a literal signature, though – you can use a logo, your name, or just the copyright symbol.

The purpose of the watermark is either to protect your work or to advertise yourself. But you’ll want to make sure that your watermark isn’t too distracting. Otherwise, you are defeating the point of showing your work online.

What is the Photoshop Pen tool?

The Pen tool is one of the most useful features in Photoshop, yet it’s very underused because it’s mostly associated with making selections.

Since there are many selection tools that have easier learning curves, a lot of people don’t really get to know the Pen tool’s full potential.

While the Pen tool is in fact a very precise tool for making selections, the biggest advantage of the Pen tool is that you can work with paths. From a path, you can make vector masks, strokes, shapes, and even fonts.

Why should you create a watermark with the Pen tool?

There are different ways of creating a watermark in Photoshop. I believe that using Pen tool is the most efficient.

For one, a watermark created with the Pen tool will be vector art. You can enlarge it or shrink it many times and never lose quality.

That way, you can use it for all your needs. Also, paths remain editable for you to come back to and modify any time you want.

Shapes in Photoshop are also vector-based. But with the Pen tool, you have full creative freedom. You can draw anything you want and convert it into a shape or use it to trace a brushstroke.

As you can see, you can combine a series of elements and techniques that will allow you to create the perfect watermark. In the following guide, I’ll be showing you how to do it.

Let’s get started!

How to create a watermark with the Pen tool

To quickly create a watermark, just follow these simple steps:

Step 1: Open a new document

Open Adobe Photoshop and create a new document. The size and resolution are not important because you’ll be working with vectors, so you can always scale it later.

The only thing that you need to remember is to set the Background Contents option as Transparent.

Step 2: Make a sketch

This step is optional, but I find it very helpful. What I like to do is add a new layer (though it’s important that it’s transparent).

Turn a sketch into a watermark using the pen tool

With the Brush tool set to a bright color, I start by drawing how I want my watermark to look at the end.

Unless you are a very gifted designer, the drawing won’t look very good. This is what always happens to me, and it’s one of the reasons why using the Pen tool is better than using the Brush tool to ultimately create your watermark.

In any case, doing a rough sketch will give you an idea of the size and proportion of the elements you want to include.

Step 3: Trace a path

I’m going to add a black layer to make the work more visible for you. You can do this, too, if it helps you, but remember to delete it at the end.

Grab the Pen tool from the toolbox on the left or activate it with its keyboard shortcut (the “P” key).

At the top of the screen, you’ll see how the options change. Make sure your Pen tool is set to Path. Then just click to add the first anchor point.

Create a watermark using the pen tool in Photoshop
You can move the anchor points to modify the path by holding the Ctrl/Cmd key. You can also adjust the handles by holding the Alt/Option key.

Continue creating anchor points, following the shape that you’d like to create. To curve the path, just drag the anchor point until the handles appear. You can use the handles to adjust the curvature.

If this is your first time using the Pen tool, you can check out this guide. Don’t worry if it doesn’t come out perfect on the first try.

Paths are always editable, so you can correct any mistakes. You can make the entire design in a single path, or make separate ones.

Step 4: Stroke the path

Open the Brush tool and choose the settings that you want for the design that you’re creating. This includes the color, the size, the hardness, and the shape of the brush.

Then open the Paths panel. If it’s not active, you can access it from the menu: Windows > Paths.

Now, right-click on your working path and choose Stroke Path from the menu. Make sure you select Brush in the Tool dropdown menu, then hit OK. This will apply the settings that you have set on your Brush tool.

Create a watermark using stroke path

If you’re not happy with the result, just hit Undo and change the settings on your brush until you’re satisfied.

Disable or lower the opacity of the sketch layer for better visibility.

Step 5: Make shapes

Create shapes using the Pen tool in Photoshop

Sometimes, instead of strokes, you need to make shapes. For that, grab the Pen tool and change it from Path to Shape in the Options bar.

Here, you can change the fill or the stroke as you need. It is also possible to create complex designs with a single path by combining or intersecting multiple shapes. This can also be set up in the Options bar.

Step 6: Convert strokes to shapes

Convert strokes to shapes

If you go to the Layers panel, you’ll notice that the paths you converted to strokes are now rasterized. This means they are using pixels instead of vectors.

To change that, go back to the Paths panel and click on the corresponding path. Then activate the Pen tool and choose Shape:

how to create a watermark with the Pen tool in Photoshop select make shape

Step 7: Merge shapes and save

Once you’re done, delete all the rasterized layers, including the one with the sketch and the black background.

If you want, you can save a .PSD copy with all the layers before moving on.

Then select all the shapes, right-click, and choose Merge Shapes.

Then save your document as a .PNG, which will preserve transparency. This is important because other formats will fill the background with white.

Step 8: Watermark your photos

Create a watermark using the Pen tool in Photoshop

Open any image you want to watermark. Then go to File>Place Embedded. If you’re using Photoshop CS6, it will be called Place.

This will open a browser window. Choose your watermark file and click OK. This will open your watermark in Photoshop.

Resize it and position it to your liking. You can also reduce the opacity if you think the watermark is too distracting.

And that’s it! Remember that you can save this step as a Photoshop action to automate the watermarking process.

Other ways to create a watermark in Photoshop

I hope you enjoyed using the Pen tool to create watermarks. However, this is not the only way to do it. If you want to try different methods, check out any of these amazing tutorials:

  • How to Create Your Own Watermark using a Custom Shape in Photoshop
  • How to Automate Your Watermarking
  • How to Watermark Your Images Using Lightroom and Photoshop CC
  • How to Create Custom Brushes in Photoshop and use them for watermarking

The post How to Create a Watermark with the Pen Tool in Photoshop appeared first on Digital Photography School. It was authored by Ana Mireles.


Digital Photography School

 
Comments Off on How to Create a Watermark with the Pen Tool in Photoshop

Posted in Photography


How to Easily Watermark Your Images Using Lightroom

17 Apr

In this article, I’m going to show you just how easy it is to watermark your images using Lightroom.

With photography, it’s the simple things which often become the most important. Simple moments like the sun shining through that perfect wisp of cloud and plain objects shot with elementary techniques. Perhaps one of the simplest, and yet at the same time most important, additions you can make to your work is helping to protect it from unwanted uses while at the same time making sure people know who made your wonderful image.

How to Add Watermarks to Your Images Using Lightroom

Watermarks and logos (we’ll just use the term “watermark” for this article) help to keep your images from being used without your permission. Of course, nothing is bulletproof in the digital age but adding a watermark to your photos is one of the easiest ways you can impart a little security to your images before you send them out into the world.

Watermarks in Lightroom

Watermarks can be added to your images during the exportation process, but the watermarks you make and store in Lightroom are available anytime.

To access the watermark creation section dialog at any time in Lightroom, from your top menu bar go to Edit > Edit Watermarks (note: on Mac you need to go to Lightroom > Edit Watermarks).

How to Add Watermarks to Your Images Using Lightroom

Once in the watermark creation dialog, you have quite a few options for constructing your watermarks. The two main choices will be whether to create a text watermark or to import a graphic from somewhere else on our computer.

I’ll begin by showing you how to make a simple text watermark (which I use) and then move onto importing a graphic.

How to Create a Text Watermark

Making a text-based watermark right in Lightroom is extraordinarily easy. Essentially, all you need to do is type in the box provided and place the watermark where you want it to appear on your image.

For our example, let’s type in a simple watermark. Make sure the “Text” option is selected as the Watermark Style at the top right of the window.

How to Add Watermarks to Your Images Using Lightroom

Next, choose what font, color, style, and orientation you would like to use for the text. The orientation is less of an issue because you will be moving the watermark yourself later.

How to Add Watermarks to Your Images Using Lightroom

To shadow or not to shadow? This is just a drop-shadow to make the text appear more three-dimensional and I usually leave this option unchecked. If you choose to add a shadow, there will be some basic positioning and opacity options for you to adjust to suit your tastes.

How to Add Watermarks to Your Images Using Lightroom

Add a drop-shadow here.

Set the size

Now you will need to decide what size to make the watermark relative to your photo. Generally, keeping the watermark sized proportionately is best but you can also choose to “Fit” or “Fill” the text to the photo. Usually, the “Fill” option will be seldom used as it obnoxiously enlarges the watermark.

How to Add Watermarks to Your Images Using Lightroom

The Fill option is a bit too in your face.

Position the watermark

The “Inset” sliders control how far inside the frame the watermark will be positioned. I’ve found this is best left until the end so we’ll adjust this later.

How to Add Watermarks to Your Images Using Lightroom

The final set of options in the watermark dialog is the anchor point selection.

set the anchor points - How to Add Watermarks to Your Images Using Lightroom

Picture that center dot as being the middle of your photo. You can choose whichever location you prefer but I like to position my watermarks in the bottom right corner and also vertically orient them. Use the arrows to rotate your watermark.

How to Add Watermarks to Your Images Using Lightroom

Watermark rotated and placed in the lower right corner.

Before you save your new watermark, I want you to adjust the inset just a tad vertically to move it back from the edge of the image. This is where those inset sliders from earlier come into play.

Now is the time to make some final tweaks to the size and opacity of the watermark once it is fully positioned.

How to Add Watermarks to Your Images Using Lightroom

To save this for use later (more on this shortly) simply click “Save” and give your freshly-minted watermark a name.

How to Add Watermarks to Your Images Using Lightroom

How to Create a Graphic Watermark

You might not believe it, but using your own graphical watermark is just as easy as making its textual counterpart. To start, simply select the “Graphic” option at the top of the watermark dialog box.

How to Add Watermarks to Your Images Using Lightroom

Next, click “Choose…” and find the graphic you want to use on your computer. Keep in mind it will need to be either in a JPG or PNG file format.

For this tutorial, I made a quick 3D watermark in Photoshop. Once you’ve selected the file you want to use, Lightroom will do the rest. This is my graphic before it was nested into the image.

How to Add Watermarks to Your Images Using Lightroom - 3d graphic

And here it is after it has been placed and positioned. The text left in the box will have no effect since the Graphic Watermark option is selected.

How to Add Watermarks to Your Images Using Lightroom

From here you have many of the same options for opacity, positioning, and sizing as you did for the text watermark. Saving the graphic watermark is done exactly the same way as you saved the text watermark as well.

How to Apply Your Watermark During Export

Now that you know how to create and save your watermarks in Lightroom, it’s time to stick them onto your images during export which is also super easy.

Open the Export dialog box by choosing File > Export. Near the very bottom of the dialog box in the right-hand box, you’ll see the Watermarking drop-down menu.

Select the watermark you would like to apply. In this case, add the graphical watermark you saved earlier.

How to Add Watermarks to Your Images Using Lightroom

Click export and your image will be exported with your watermark lovingly placed!

Final Thoughts on Making Watermarks in Lightroom

Watermarks are a great way to sign and protect your photographs. While there are no real rules for applying your watermarks, I would urge you to adhere to the “less is more” mentality. Do not plaster your watermark obtrusively over your images like most of the samples in this tutorial, which were done for demonstration purposes only.

Make your photo the center of attention with your watermark as more of an afterthought. That being said, feel free to experiment with your own creative watermarks. As you’ve just seen, they are incredibly easy to apply in Lightroom.

The post How to Easily Watermark Your Images Using Lightroom appeared first on Digital Photography School.


Digital Photography School

 
Comments Off on How to Easily Watermark Your Images Using Lightroom

Posted in Photography


New Google research thwarts automatic watermark removal

19 Aug
Warped watermarks leave visible artifacts when removed automatically. Image: Google

Watermarks are widely used by photographers and stock agencies to protect their digital property in an online world where very little stands between an eager image thief and your photography. However, even complex watermarks might not be as secure as you’d think when the same pattern is applied to a large number of accessible images.

A research team at Google recently embarked on a two-part experiment. First, they developed a method of quickly,. effectively and automatically removing watermarks from a large set of images. Then, they found a way to thwart their own automatic system, creating a more secure way to watermark.

Automatic Watermark Removal

It’s a tedious task to remove a watermark manually, which can can take even image editing experts several minutes. Even for a computer it is very difficult to automatically detect and remove a watermark on a single image. However, if watermarks are added in a consistent manner to many images, automatic removal becomes much easier.

In the first step, an algorithm identifies which image structures are repeating in an image collection. If a similar watermark is embedded in many images, the watermark becomes the signal and images become the noise. At that point, a few simple image operations can generate a rough estimation of the watermark pattern.

In the second step, the watermark is separated into its image and opacity components while reconstructing a subset of clean images. The end result is a much more accurate estimation of the watermark pattern, which can then easily be removed from the marked images—no manual photo editing required.

Making More Secure Watermarks

As the vulnerability of current watermarking techniques lies in the consistency in watermarks across image collections, the research team at Google developed a method to introduce inconsistencies when embedding watermarks.

They found that simply changing the watermark position or random changes in its opacity do not improve security by much; however, slightly warping the watermark when embedding it in the image did the trick by producing a watermark that is very similar to the original but leaves very visible artifacts when removed by an algorithm. Estimating the random warp field that was applied to the watermark is simply too difficult for current algorithms.

According to the researchers, there is no guarantee that there will not be a way to break randomized watermarking schemes in the future, but randomized warping will make it fundamentally more difficult to automatically remove watermarks from image collections.

More detail and sample images are available on the Google Research Blog.

Articles: Digital Photography Review (dpreview.com)

 
Comments Off on New Google research thwarts automatic watermark removal

Posted in Uncategorized


Create Your Own Watermark using a Custom Shape in Photoshop

04 Dec
Transparent-watermark

Big transparent type copyright watermark that you would use send to clients for proofing.

I know there are many ways of creating a watermark. Using the Watermark Editor in Lightroom for example allows you to add your own text or graphic to your images. In general there is a lot of debate whether or not to add a watermark to images.

This article isn’t going to discuss the pros and cons of watermarking your images. Instead, I will demonstrate a step-by-step tutorial using the Custom Tool in Photoshop.

Whether you upload your images to the various social media platforms, or you want to send a client a high resolution image for proofing. This easy tutorial will show you how to create your own watermark using the custom tool in Photoshop.

For a while, my method was opening an image file where I had my own custom copyright information on a text layer. So that I could easily drag and drop this text layer onto a new image. This made more sense and took less time to add a watermark image rather than creating it every time. That is until one day, I couldn’t find the file!

Here are my four easy to follow steps to creating your own custom watermark using the Custom Tool in Photoshop. I prefer to use a custom shape over a custom brush. Shapes are vectors which means they scale up or down without losing quality.

Step 1 – Create a new document

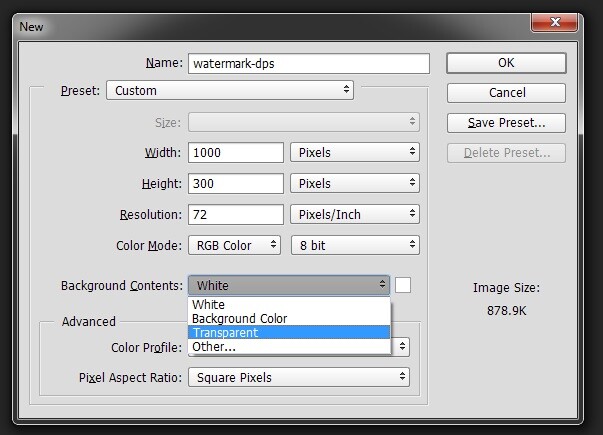
Open Photoshop and create a new document. Make it 1000 pixels wide, by 300 pixels high.

Step 2 – Add text

Press the letter D on your keyboard, to make sure your foreground color is black. Choose whatever font you like, then press T to select the type tool. Hold down ALT key on a Mac and press G (Alt+0169 on a PC). This brings up the copyright symbol, add a space and type your name and year.

Alt+G-type-your-name-and-year

Holding down the ALT key on a Mac and press G brings up the copyright symbol (Alt+0169 on a PC).

Step 3 – Convert the layer to a shape

Go over to the layers panel. Right click on the text layer and go down to Convert to Shape.

Convert-text-layer-to-shape

When you have typed your watermark. Right click on the layer and select Convert to Shape.

This icon appears in the thumbnail to show that the layer is now a shape layer.

This-icon-shows-the-layer-is-a-shape

This icon in the thumbnail layer tells you that this is now a shape(vector) layer.

Step 4 – Save as a custom shape

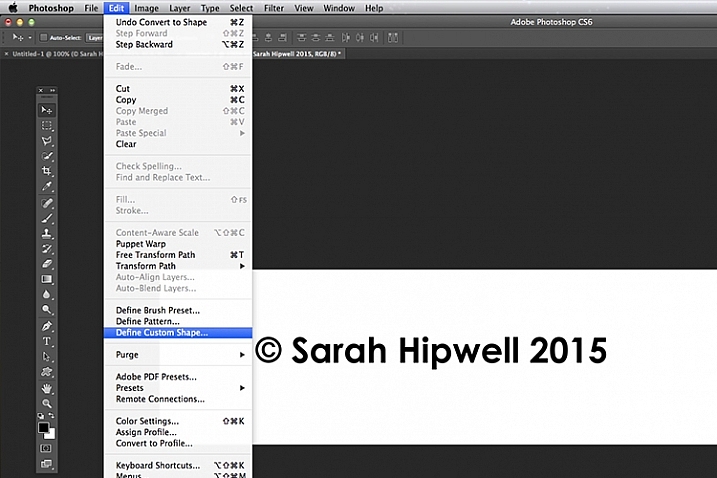
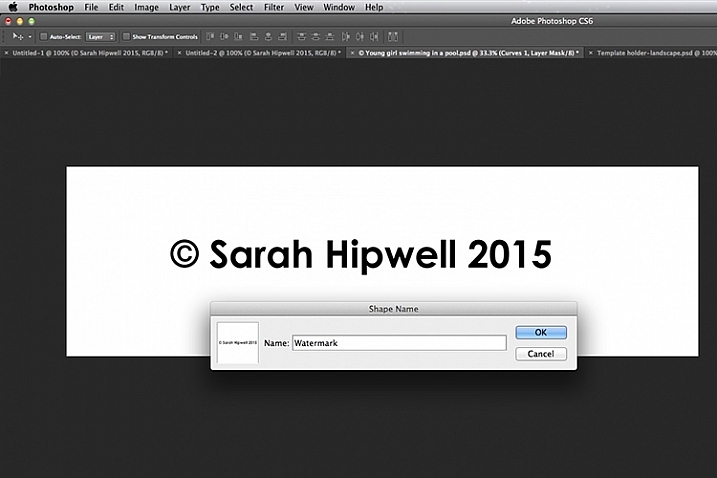
Go up to Edit menu and select Define Custom Shape. A Shape Name dialog box appears – type in Watermark and click OK. This now adds your type as a custom option in your Shape Presets Library.

Define-custom-shape-under-edit

This is how you save your watermark custom shape in the presets library to use again and again.

Shape-name-dialog-box

Give your watermark a name so that you can find it easily. Plus you may decide to have a few.

That’s it. It took just four steps to create your own custom copyright watermark. Let me show now how to access, and add it to your images.

Apply your watermark to images for online viewing

Open an image that you want to share on Facebook, Flickr, etc. Create a new layer in the Layers Panel. Choose the Custom Shape tool in the toolbar (press Shift+U)

Custom-shape-tool-highlighted-in-toolbar

This is where you find the Custom Shape Tool in the Toolbar.

Go up to the Options Bar and click on the thumbnail next to the word Shape. This brings up the Shape Presets Library dialog box. At the very bottom, you will find the shape called Watermark.

Watermark-shape-at-the-bottom-in-presets-library

Custom shapes will always appear at the bottom in the presets library.

Now press and hold the Shift key, click and drag the watermark shape across your image. The Shift key ensures the shape remains in proportion. Don’t worry about the size just yet. Place it in position – in this case, I placed the watermark bottom right.

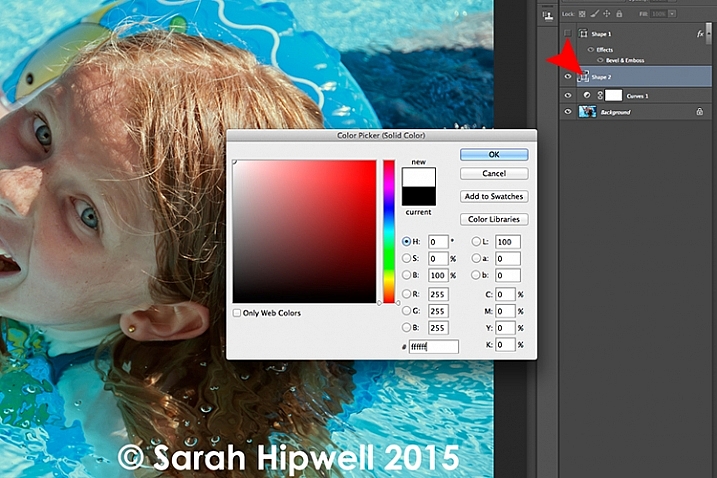
Now as the foreground color was set to black, I want to change the color to white. Go up to the Layers Panel and click on the Layer thumbnail and the color picker dialog box appears. You can choose whatever color you want here.

Changing-color-of-watermark-to-white

You can customise your watermark shape with any colour or style effect.

Go back up to the Layers Panel and reduce the opacity to your desired setting. I chose 40%.

Opacity-reduced-to-40-per-cent

Reducing the opacity allows for your watermark to be more discreet.

I now want to reduce the size of the watermark. Go up to the Edit menu and choose Free Transform Path (Cmd+T on a Mac). Holding down the Shift and Alt keys, drag any of the corners of the transform handles in towards the centre. This reduces the size while keeping the aspect in proportion. Press Enter or the Commit Transform button up in the Options Bar. Go up to File and Save for the Web.

Apply to high res images for proofing

Okay, so let’s say you want to send a higher resolution image to a client. Open up the image. Click on the Custom Shape Tool (Shift+U). The watermark shape is already selected, so hold the Shift key and click and drag right across the image. Leave the color as it is.

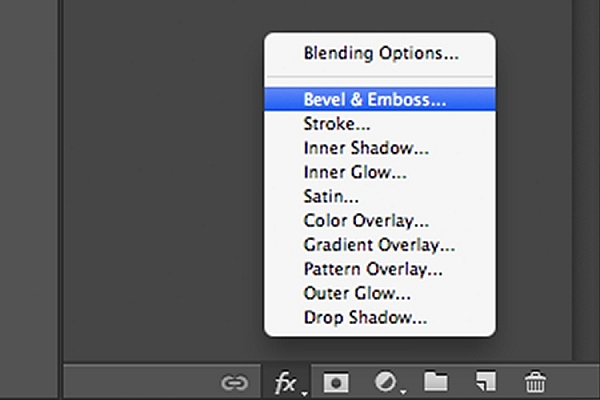
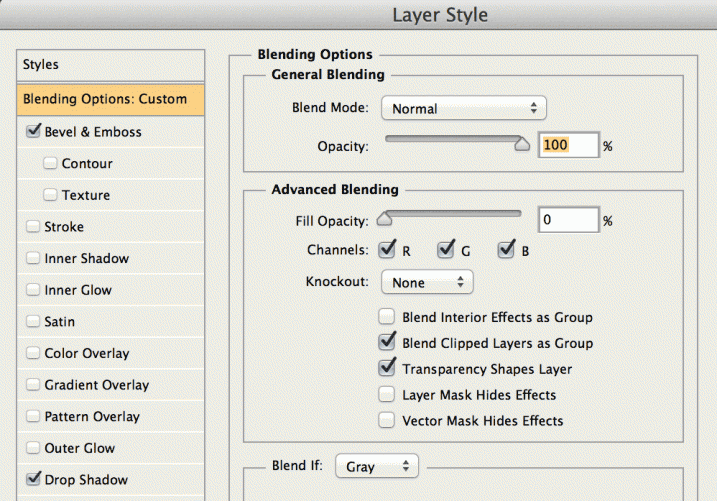
This watermark is going to be transparent. Click on the Add a Layer Style icon at the bottom of the Layers Panel and select Bevel and Emboss. The Layer Style dialog box appears. Increase the size to 8 pixels and change the direction to down.

Bevel-and-Emboss-layer-style

Layer styles can be found by clicking on this icon at the bottom of the layers Panel. Alternatively, go up to Layer menu and choose Layer Style.

Bevel-and-Emboss

The Bevel and Emboss is a good effect to add to your watermark if you want to make more transparent, while still protecting your image.

Next go over to the left and click on the Blending Options: Custom, which is directly above the Bevel and Emboss. Under Advance Blending bring the Fill Opacity slider down to zero and click OK. Go back up to Opacity in the Layers Panel and reduce to 68%.

Blending-Options-Custom-2

Reducing the Fill Opacity hides the colour and just leaves the effect.

Tip:

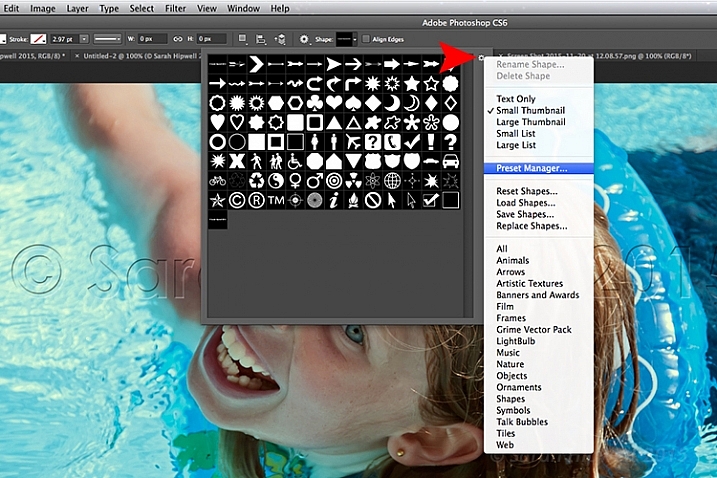
To place your Custom Watermark Shape at the top in the Presets Library, click on the thumbnail right of the word Shape in the Options Bar. The Shape Presets Library dialog box appears. Click on the gear icon and select Preset Manager, the Preset Manager dialog box appears with all the shapes. The Watermark shape is the very last one, click and drag it up to the top and click the Done button.

Location-of-Presets-Manager

By clicking on the gear icon, the pop-out menu where the Preset Manger is located appears.

Moving-watermark-shape-to-top-Presets-Manager

Here in the Preset Manager, you can rearrange the shapes inside of the dialog box. Just click on any shape and drag it where you want it. I moved the watermark shape to the top for easy access.

Do you use watermarks on your images? Why or why not?

What techniques do you use? Please share in the comments below.

googletag.cmd.push(function() {
tablet_slots.push( googletag.defineSlot( “/1005424/_dPSv4_tab-all-article-bottom_(300×250)”, [300, 250], “pb-ad-78623” ).addService( googletag.pubads() ) ); } );

googletag.cmd.push(function() {
mobile_slots.push( googletag.defineSlot( “/1005424/_dPSv4_mob-all-article-bottom_(300×250)”, [300, 250], “pb-ad-78158” ).addService( googletag.pubads() ) ); } );

The post Create Your Own Watermark using a Custom Shape in Photoshop by Sarah Hipwell appeared first on Digital Photography School.


Digital Photography School

 
Comments Off on Create Your Own Watermark using a Custom Shape in Photoshop

Posted in Photography


How to Watermark Your Images Using Lightroom and Photoshop CC

29 Jun

Watermarks, love them or hate them, are a way of protecting your images. Although, just because you have one on your image doesn’t mean it won’t be stolen. If you are like me, I do it as a deterrent.

There are many ways to watermark your images. In this article I’m going to show you how to add a watermark to your images using Adobe Lightroom and Photoshop CC.

Lightroom (6) CC

Lightroom makes watermarking your images very easy, there are a couple of ways of doing it. Once you have processed your images and are ready to export them, then it is also time to watermark them.

Exporting Your Images

Select the images you want to export and watermark. You need to make sure you are in the Library module, then click on Export.

The Export Window will come up. We aren’t going to go through how to export your images, there are other tutorials that will show you how to do that. For this purpose we are concerned with the section down near the bottom, so scroll down until you see Watermarking. Take a look at the following image.

watermarking-1

If it hasn’t been ticked, then check the box for Watermark. Next to that is a drop down menu click on that.

Simple Watermark

watermarking-2

If you’ve never watermarked anything before, then you could simply click on Simple Copyright Watermark and it will just put your name on the photos. Though you must be registered in order for Lightroom to know your name.

Another option under that drop down menu is Edit Watermarks, so let’s go through that option.

Edit Watermarks

In this section you can edit the text for the water, or what you want it to look like.

Before you can change the simple watermark you will have to make sure that at the top where it says Watermark Style, you have selected Text. In the image below you can see the window for the Watermark Editor and in the top right corner you can see Watermark Style.

watermarking-3

In the box underneath the image you can see the simple watermark, you can now select that and delete it, and write anything you like. The most common thing to do is put the copyright symbol, ©, with your name or business name after it. To make the copyright character on Windows simply press the Alt key and type the number 0169, on a Mac press Option+G.

There are various sliders in the Watermark editor as well, one allows you to change the opacity of the watermark. How opaque you make it is up to you. I like to make mine so that you can barely see it. A lot of people looking at images can find watermarks distracting, so it is something you should keep in mind when you are adding them to your images.

There are different things you can do to adjust the watermark, for example changing its position. There is also a size slider to make it bigger or smaller.

watermarking-4

Add a Logo or Unique Watermark

If you have a logo or a special watermark you can use this in Lightroom too.

In the same window that we have been using, go back to the top and select graphic. Directly underneath you will see Image Options where you can load your file. You can make the same changes in regards to size, opacity and location as you did with the text watermark.

watermarking-5

Saving the Watermark Preset

Once you have worked it all out, you don’t have to do all that every time you want to export images. You can save what you have done as a watermark preset, and give it a name (pull down the menu top left where is says “Custom” to find Save Current Settings as New Preset – select that to see the pop-up box below) . The next time you want to watermark an image, just look in the same drop down menu that you used earlier to edit the watermark, and you will find your saved preset there.

watermarking-6

Here you can see that I have called one of my presets: watermark-3.

Photoshop CC

There are also some simple ways of watermarking in Photoshop CC as well. It is a little different, but not harder.

Prepare your image as usual, then get it ready for its designated use and how you want to add a watermark to protect it. I resize every image I put online, that is my choice, it is up to you whether you decide to or not.

Easy Watermark

Once you are ready to save your image, read for use, one of the easiest ways of watermarking it is to simply use the text tool, located in the tool bar on the left of your workspace. The image below shows where it is located.

Click on the image where you want to put the watermark, and start typing. Remember you can also add the copyright symbol the same as you did using Lightroom.

You can change the size and colour of the text at the top, in the tool options bar below the main menu (or choose Window>Character to show the text adjustment panel). Select the text to change it. You can also move it around when it is highlighted as well. The opacity slider is above the layers panel on the right, you can change it to suit your preference.

watermarking-7

Making Your Own Logo or Watermark

You always have the option of making a custom watermark, which can be saved and used any time you need it, and can also be used in Lightroom.

To start, go to File in the main menu and click New (File>New). I usually make the size of the new image match my final image size, so the longest side is 1000 pixels. Make the width that size for this example. For the height, it doesn’t have to be that big, it just depends on what you are going to do. For this one it was 300 pixels. You will also need to make sure the Background Contents setting is set to transparent, see below.

watermarking-8

So you can see what you are doing, you could add a new layer. Do that from the new layer icon at the bottom of the Layers Panel, or go to the main menu at the top and select Layer>New>Layer and click OK. Once that is in place use the Paint Bucket Tool which is in your tool bar, it is under the Gradient Tool icon. We are going to make the layer black, so make sure the foreground colour is black. The foreground and background colour selection is also in the tool bar, down near the bottom. There are two squares, one black and one white (click D on your keyboard which defaults the colors to black in the foreground, white in the background). Click on your new layer and it should be filled with all black.

Select the text tool (T) and make sure that white is now the foreground colour (click X on your keyboard to switch the foreground/background colors so white is now on top). Click on your image and start typing. Like you did for the Easy Watermark you can highlight it, then change the size. Once you’ve done that, you can crop it further so just the text appears.

Double click on text layer, towards the right side, and you should get the following window, Layer Style.

watermarking-10

You can see I have checked Bevel Emboss, and the Contour option underneath. You can play around with the sliders, but just ticking those did enough for this purpose. Then the black layer is deleted. You can do that by dragging it to the rubbish bin (trash can) in the bottom right corner. You can also right click on the layer and find delete. The easiest way is to highlight the layer by clicking on it, and pressing delete on the keyboard.

It is very important when you save this file that you do so as a .png or a .psd, otherwise the transparent part of the layer will be made white and you will no longer have the watermark that you desired.

watermarking-11

That is an easy way of doing a watermark that you can save so you can use again, but you could make a logo or something similar as well. One thing that quite a few people do is add a signature, like below.

signature-watermark

There are a couple of ways of doing this, but the most common is using a tablet with a pen, I use a Wacom Intuos Pro. Do everything the same as you did for the last one, but instead of using the text tool, get your brush, make it small enough using the left square bracket key, then write your name.

If you find the surface too slippery, try putting a piece of paper over the top, it will help add some resistance. You can also try doing it with a mouse or touch pad. Again, save it the same way.

Easy Way of Adding Watermarks

One of the easiest ways to use the watermark you have just created is to open it, then select all (Ctrl+A on a PC and Command+A on a Mac), then copy it, (Control+C on a PC and Command+C on a Mac). Go over to your image and press Ctrl+V or Command+V to paste it; the watermark should now be in the middle of your image.

You can use the move tool (V), which is the first one in your tool panel, and move it to where you want, like you did with the Easy Watermark.

Hiding Your Watermark in the Image

With a simple watermark you can also put it into the image and sort of hide it. This is the method I use for many of my fine art images. I try to place it where it isn’t obvious, and where it could be more difficult to remove.

Once your image is ready, copy and paste your watermark onto your image. Now you need Transform it; Edit>Transform in the main menu, or by pressing Ctrl+T/Command+T. You will notice a framework around your image, as shown below.

watermarking-12

By clicking and dragging on the corners, or in the middle of the lines, you can change the size. Click and drag to make it bigger or smaller (hold Shift down to keep the proportions the same, otherwise it will stretch out of shape). If you want to rotate it, hover around just outside a corner and a small curve arrow will appear, then you can turn it around. You can also move it by clicking in the middle and moving it where you want. As I said, find somewhere to hide your watermark in the image, hopefully somewhere not too noticeable, as demonstrated in the image below.

watermarking-13

To apply the Transform Tool you can double click inside the box, press Enter or click it with the move tool. Then the opacity of the watermark layer is changed to help it blend, see below.

watkinsbaywatermarked-2

Once you get good using Transform, you can experiment with what else the tool does.

Using a Brush to Watermark Your Images

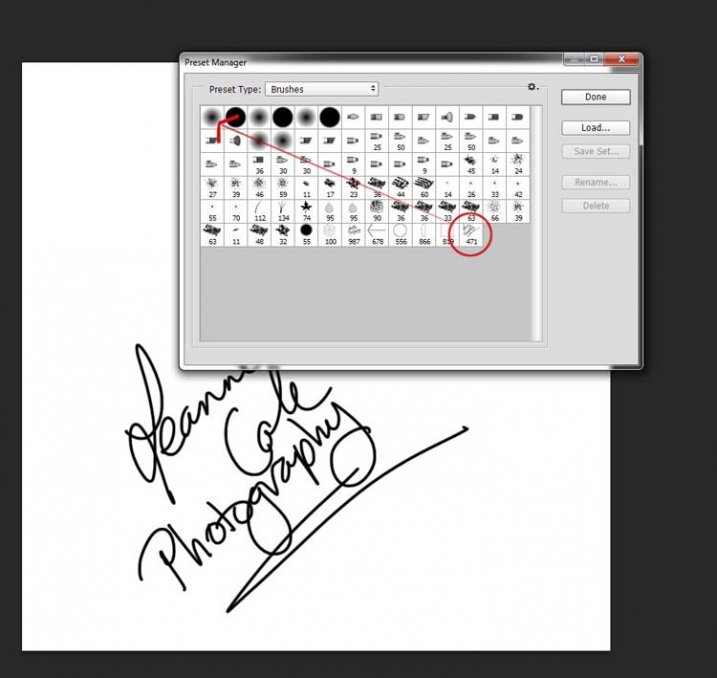
watermarking-14There is a very easy way of doing your watermark, but it takes a bit to set it up. Getting the watermark ready pretty much works the same as before, only this time you want a white background, and you need to use black to create it. Take a look at the image on the right.

Note: create your new file 2500 pixels wide as that is the maximum size for a brush. You can always make the brush smaller when you apply it to your image, but making it the largest size now will give you the best quality.

I created the signature with my Wacom Tablet, but you could also use a pen or black marker on a piece of paper and scan it, that will work just as well.

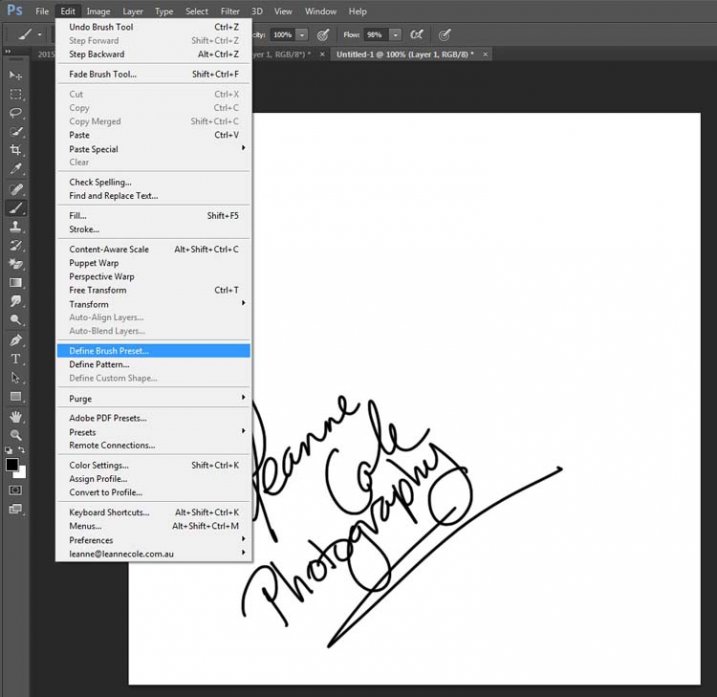
Once you have your signature, you can now make your custom brush. Go to the Edit menu and choose Define Brush Preset, and click on it.

watermarking-15

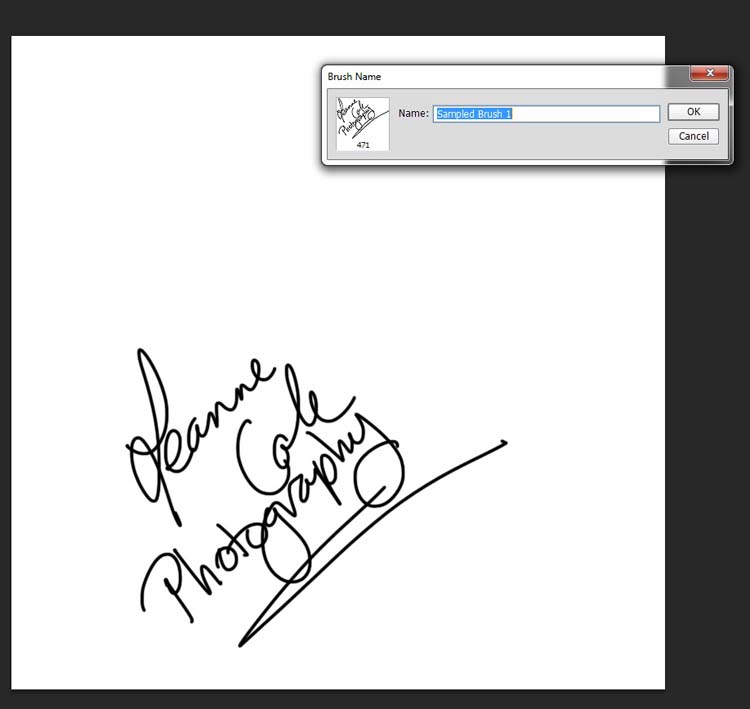
watermarking-16Next, you will see another window pop up window ,asking you to give your brush a name. You can name it what you like, perhaps something that will remind you what it is later; I called mine Brush Signature Watermark.

Now your watermark will work just like a brush, you can make it smaller or larger (remember if you made it 2500 pixels it will hold quality up to that size with out pixelating), you can also change the colour. It works exactly the same way as the normal brush does; use the square bracket keys to make it bigger or smaller. If you want to change the colour, click on the foreground colour and the Color Picker window will appear.

I would suggest adding your watermark to a new transparent layer, so you can also change the opacity as needed.

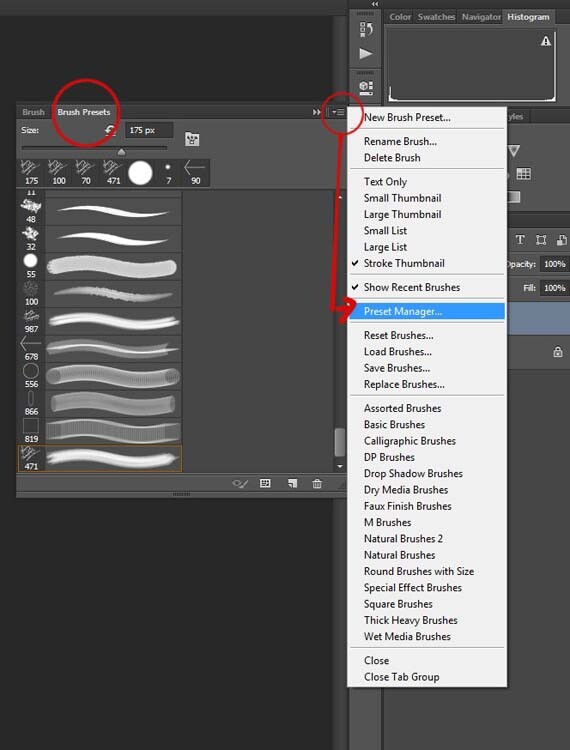
To find your new brush, go to your brush presets, they are over on the side of your layers panel, and click on the icon that looks like small lines at the top where a drop down menu should appear.

watermarking-18

Go down to Preset Manager and click. A new window will appear with all your brushes. Now you can click, and drag the brush you just created to a spot where it will be easier to find, like up to the top.

watermarking-19

You are now ready to use your new watermark brush any time you want.

As I said, you can change the size of it using the square bracket keys [ ] on your keyboard. You can change its colour by clicking on the foreground colour in the tool panel and selecting a new one. You can also add layer effects like a drop shadow, emboss, etc., you can even make the text itself transparent and only leave behind the shadow.

layer-effects

To make text “invisible” change the Fill Opacity Under Blending Options, in the Advanced Blending section to 0%.

It will look something like this and will blend into any area:

layer-effects-transparent

Here is one I played with:

watermarking-17

There are so many different ways to do a watermark and it is really up to you to work out which one will work best for you. Do you have any other tips for watermarks or methods  you use to make them? Please share in the comments below.

googletag.cmd.push(function() {
tablet_slots.push( googletag.defineSlot( “/1005424/_dPSv4_tab-all-article-bottom_(300×250)”, [300, 250], “pb-ad-78623” ).addService( googletag.pubads() ) ); } );

googletag.cmd.push(function() {
mobile_slots.push( googletag.defineSlot( “/1005424/_dPSv4_mob-all-article-bottom_(300×250)”, [300, 250], “pb-ad-78158” ).addService( googletag.pubads() ) ); } );

The post How to Watermark Your Images Using Lightroom and Photoshop CC by Leanne Cole appeared first on Digital Photography School.


Digital Photography School

 
Comments Off on How to Watermark Your Images Using Lightroom and Photoshop CC

Posted in Photography


How to Unobtrusively Blend a Watermark Into Your Photos

29 May

Is it worth to watermark your photos? This is the question every photographer asks himself before sharing photos online. Visual watermarks protect your ownership and copyright from online theft. Photographers use watermarks for self-promotion, recognition and advertising purposes. All photographs you share online should be attractive and cohesive. Watermarks (like large stamps or long texts) carelessly placed, distract from the Continue Reading

The post How to Unobtrusively Blend a Watermark Into Your Photos appeared first on Photodoto.


Photodoto

 
Comments Off on How to Unobtrusively Blend a Watermark Into Your Photos

Posted in Photography


3 Tips to Ruin Your Photo with a Watermark

22 Apr

Strange as it may seem: photographers, who should be highly creative persons with fine artistic taste tend to be bloody awful designers. But don’t get me wrong here. I’m not expecting someone to be able to design me an outstanding corporate logo just because he is a great photographer. But the massacre begins even at the level of watermarking their Continue Reading

The post 3 Tips to Ruin Your Photo with a Watermark appeared first on Photodoto.


Photodoto

 
Comments Off on 3 Tips to Ruin Your Photo with a Watermark

Posted in Photography


Create an Image Watermark in Photoshop

01 Feb

Create an Image Watermark in Photoshop

In a recent post I talked about using an image watermark in Lightroom to apply to your images. This post I’ll show you how to create the watermark image to use.

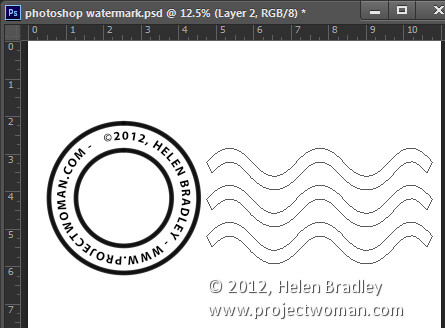
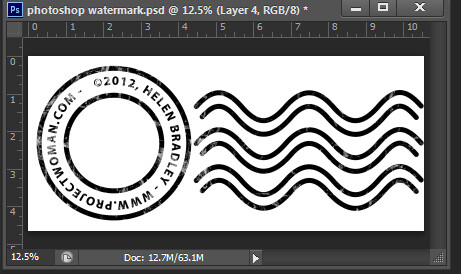
This watermark has two concentric circles with text between them and a set of wavy lines making it reminiscent of a post office stamp cancellation. The watermark also has a slightly grunge look.

To make it, start in Photoshop with a letter size image. I set mine to landscape orientation with a white background. This will make it easy to create a black watermark and I will be able to see it as I work.

Add a new layer by choosing Layer > New > Layer. This is a transparent layer on which you’ll place the circles.

Make a watermark image in photoshop step1

Start with the Ellipsis Tool which shares a position in the Tools with the Rectangle tool – it is a shape tool – don’t use the Elliptical Marquee Tool.

Make sure that the option on the Tool Option bar is set to Path and hold Shift as you drag a circle on the screen.

Make a watermark image in photoshop step2

When the circle is in position choose Window > Paths to view the Paths palette.

Select the Brush tool and select a brush. I used a Hard Round brush sized down to around 40 pixels.

Set the foreground color to black, click the Work Path in the Paths palette to select it and then click the Stroke Path with Brush icon at the foot of the Paths palette. This strokes the path with the current brush.

Make a watermark image in photoshop step3

Click the Path Selection Tool which shares a position in the Tools palette with the Direct Selection Tool. Click on the path and it will select the entire path.

If the transformation handles do not appear press Ctrl + T (Command + T on the Mac). Hold Shift and Alt (Shift and Option on the Mac) and drag inwards to create a circle which is concentric with the previous circle.

Make a watermark image in photoshop step4

Repeat the process of selecting the Brush, click on the path so it is selected and click to Stroke Path with Brush.

Make a watermark image in photoshop step5

Click the Path Selection Tool and, with this smaller circle selected, press Ctrl + T (Command + T on the Mac). Hold Shift and Alt (Shift and Option on the Mac) and drag a little outwards to create a circle path for typing the text along.

Make a watermark image in photoshop step6

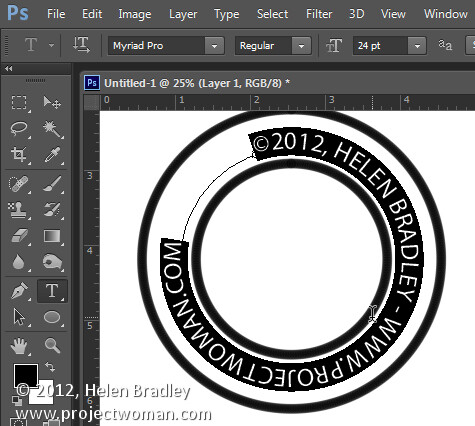
Select the Text tool and hold the mouse over this third path.

Look for the text tool to show as an I-beam pointer with a bent line through it – this tells you Photoshop will align the text along the path.

Click once to anchor the Text tool to the path. Select the text color – in my case I chose black – and select the font and font size – I used Myriad Pro – 24 points. Type the text to use – I typed:

© 2012, Helen Bradley – projectwoman.com –

To enter © hold Alt and type 0169.
?Make a watermark image in photoshop step7

With the text selected display the Character palette by choosing Window > Character and adjust the tracking to expand the text so it wraps all the way around the shape.

Make a watermark image in photoshop step8

You can draw your own lines for the cancellation lines using the Custom Shape Tool. First create a new layer then select the Wave shape and on the Tool Options bar make sure that it is set to Path.

Make a watermark image in photoshop step9

Drag to make your curved lines.

Make a watermark image in photoshop step10

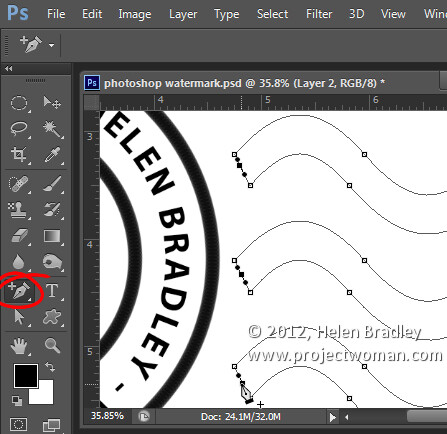
Select the Add Anchor Point Tool (it shares a position with the Pen tool) and click once in the middle of each end of the path to add a point.

Make a watermark image in photoshop step11

Target the Direct Selection Tool, click one at a time on the Anchor points you just added and press Delete – this breaks the 3 paths in half to make 6 paths. When the Anchor is selected it will show as a dark filled square.
Make a watermark image in photoshop step12

Select your Brush and black paint and select the path in the Paths palette and click the Stroke Path with Brush icon.

Make a watermark image in photoshop step13

Once you’ve done this you can add a grunge effect.

Start by hiding the background layer, target the top layer and press Control + Alt + Shift + E to create a flattened layer with transparency. Hide all layers but this top one.

If the lines aren’t dark enough duplicate this layer a few times and they will darken. Then merge all these duplicated layers

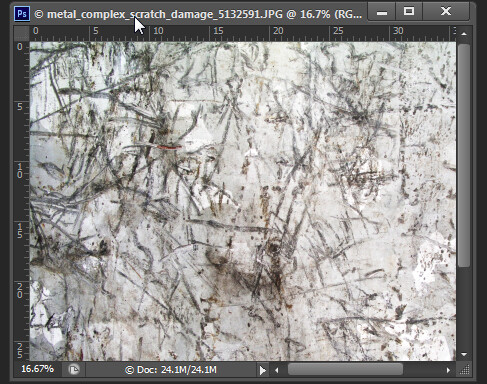
To add the grunge effect click Add a Layer Mask icon at the foot of the layers palette to add a mask to the layer. Locate an interesting texture image to use such as this one from www.mayang.com/textures.

Make a watermark image in photoshop step14

Make it the same size as your image by choosing Image > Resize, deselect the Constrain Proportions checkbox and click Window and click your copyright image file to use its dimensions. Click Ok.

Now return to your Copyright image, click the mask to target it and choose Image > Apply Image. From the Source box select the texture image (it won’t appear in the list if it isn’t the right size), and then set the other options to suit so you get a distressed look to your copyright symbol. Click Ok.

Make a watermark image in photoshop step15

Add a new layer and press Control + Alt + Shift + E to create a flattened version of the image on this layer but maintaining its transparency. Make all other layers invisible and crop the image close around your shape.

Then choose File > Save As and save it as a .PNG image to use in Photoshop or Lightroom as a copyright overlay.

If you select the top layer and press Control + I you’ll invert it to make a white version of the copyright image that you can then save as a second .png file.

Make a watermark image in photoshop step16

Make sure to also save your file as a .psd file if you think you might need to make changes to it – for example, to change the date – a .png file is flattened so it won’t be easy to edit – a .psd file will be much easier to update.

Post originally from: Digital Photography Tips.

Check out our more Photography Tips at Photography Tips for Beginners, Portrait Photography Tips and Wedding Photography Tips.

Create an Image Watermark in Photoshop


Digital Photography School

 
Comments Off on Create an Image Watermark in Photoshop

Posted in Photography