RSS
 

Posts Tagged ‘Waterfall’

4 Tips for Drop-Dead Gorgeous Waterfall Photography

13 Jun

The post 4 Tips for Drop-Dead Gorgeous Waterfall Photography appeared first on Digital Photography School. It was authored by Eric Leslie.

4 tips for gorgeous waterfall photography

Waterfall photography is a lot of fun – but coming home with the best shots can be a difficult task.

In this article, I’ll share four simple tips designed to take your waterfall photos to the next level. I’ll discuss the best gear, settings, and light…

…and by the time you’re done, you’ll be ready to capture waterfalls like a pro.

Let’s get started.

waterfall photography at sunset

1. A camera and a tripod is good enough

Photographers often claim that waterfall photography must be done with neutral density filters, but this is completely false.

All you need is a camera that can shoot in Manual mode and a tripod. Nothing more.

See, the biggest problem that waterfall photographers face is the light. When the sun is bright and overhead, you’ll end up with blown-out highlights and dark shadows that don’t look great. Plus, the light is harsh and flat, not flattering for landscape photography.

And sure, you can put a neutral density filter on your lens, which will block some of the light so you can do long exposures. But even the best ND filter can’t change the quality of the light, which should be your primary concern.

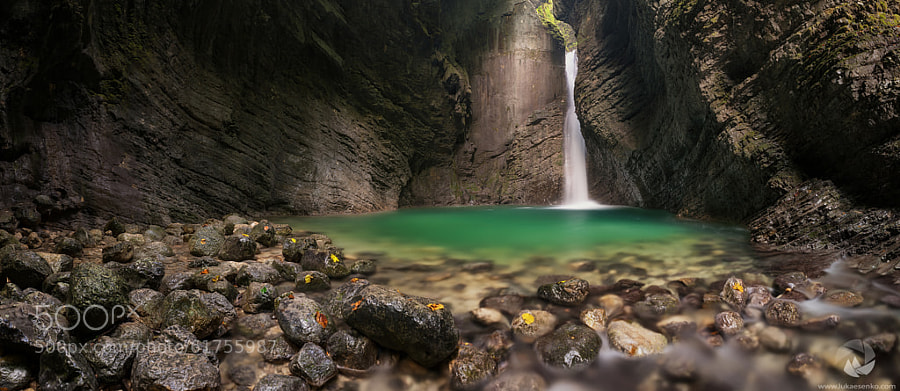
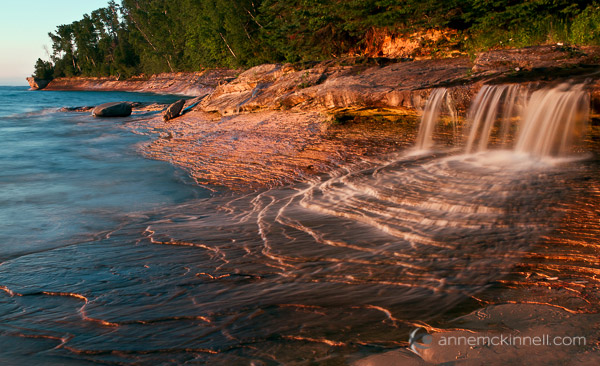
So instead of thinking about your equipment, focus on your timing. Show up at sunrise and sunset, when the light is soft and beautiful. You can also come toward the middle of the day if the waterfall is heavily shaded. Waterfalls are often in deep canyons, so as long as the sun is behind the mountains, you can achieve a long exposure with nice even light, with or without a neutral density filter.

In fact, you can plan ahead to maximize this. Think about it: if the waterfall you want to shoot faces east, the sun will start moving behind the falls in the afternoon. So an east-facing waterfall can be shot with beautiful shade in the late afternoon. You won’t need an ND filter; the shade will let you lengthen the shutter speed all on its own.

cloudy day waterfall

2. Choose a shutter speed based on your waterfall

What’s the best shutter speed for waterfall photography? I think the answer varies – like people’s taste in fast food.

Personally, I put waterfalls into two different categories. There are the falls that rage so hard they take your breath away. And there are the falls that are dainty and delicate.

In general, I don’t want my waterfalls to turn out as a blob of white water. So I set my shutter speed (and my other settings) accordingly.

waterfall photography by a bridge

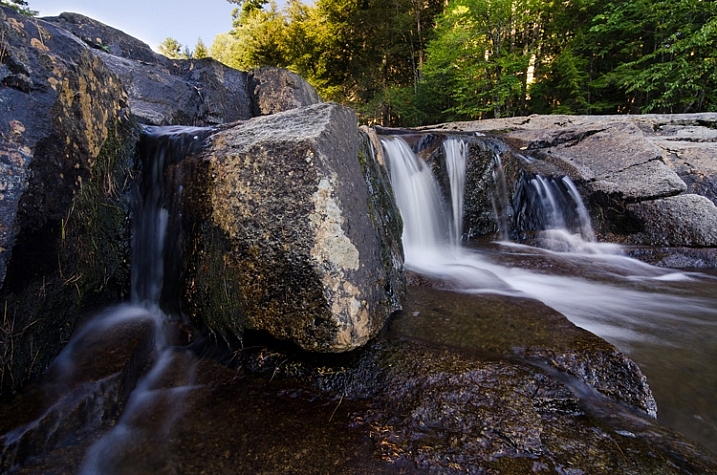
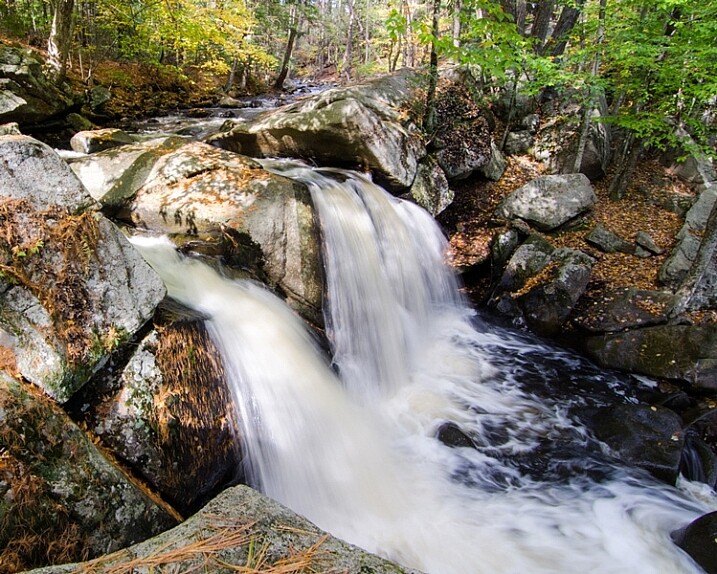
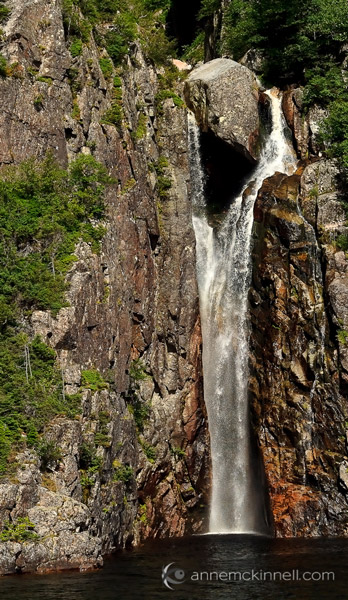
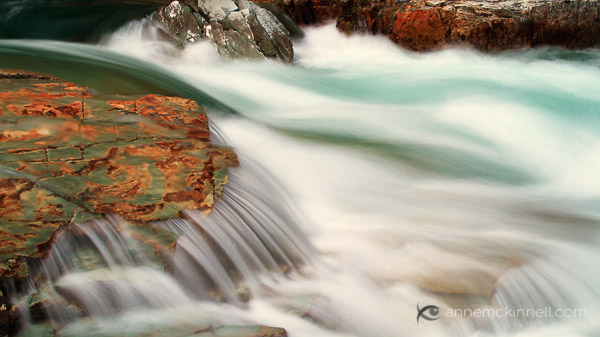
For big, roaring falls, I try to keep my exposure under a second. Anything between 1/4s to a full second will show the water’s motion and still retain lots of detail.

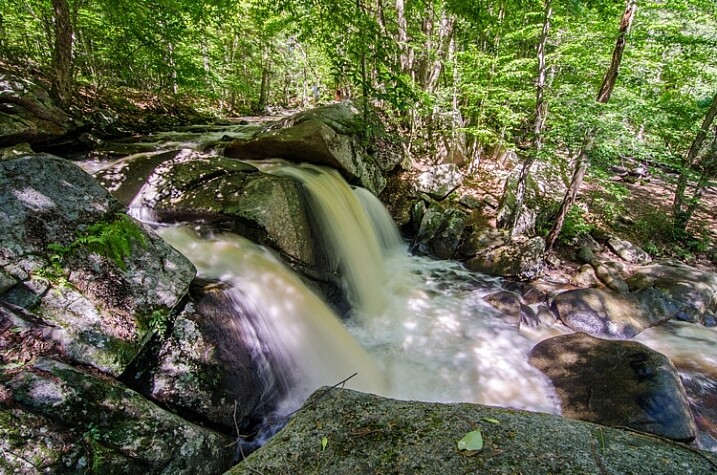
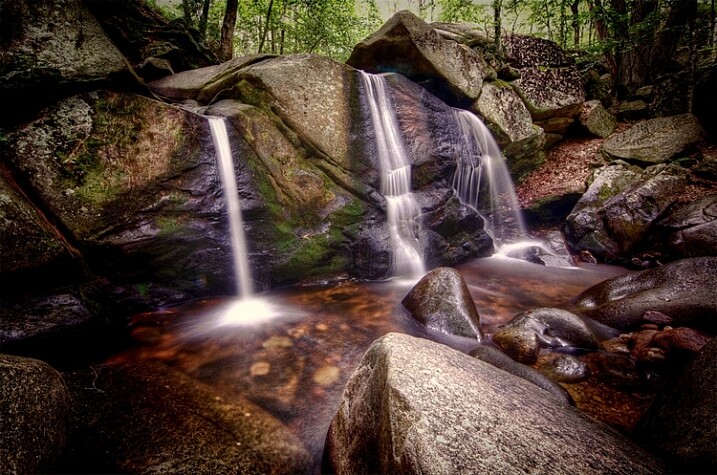
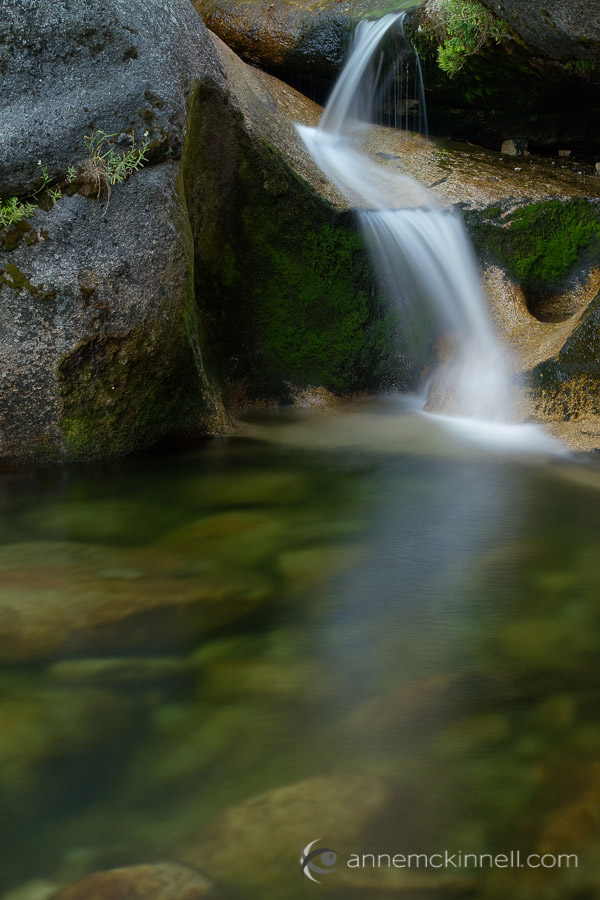
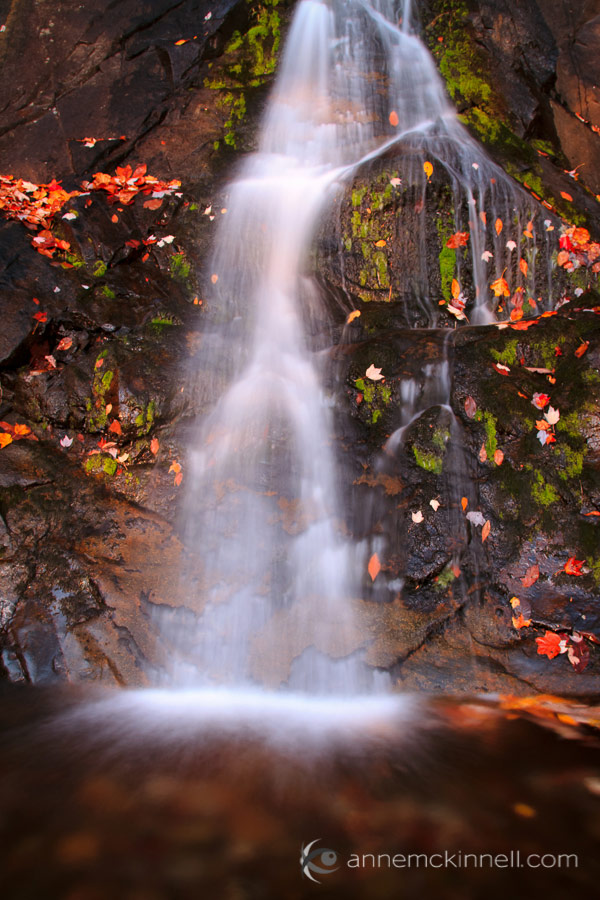
Small, stringy waterfalls just love putting on a show with longer exposures. These falls look great when you can go as long as possible. If you need to narrow your aperture to get a lengthy shutter speed, that’s okay; don’t be afraid of losing sharpness. Photography is always about compromises, and in this case, the slightest loss in sharpness will be greatly outweighed by capturing the water’s movement. For smaller waterfalls, I recommend an exposure between one and four seconds, so stop down to f/22 if you need it.

I usually start with the lowest ISO my camera offers (ISO 100). Then I set my aperture small enough to maximize focus, usually around f/8 or f/10. Finally, I dial in a shutter speed based on my camera’s meter.

Here, my goal is to create a good exposure while also ensuring beautiful water. So if the shutter speed isn’t in the right range, I’ll adjust the aperture or ISO to get the ideal result.

silky waterfall with snow

3. Take a second exposure to keep the foliage sharp

Have you ever tried to shoot a waterfall with a long exposure and noticed that the leaves on the trees and plants move with just the slightest breeze? And turn into a messy blur?

It happens all the time, and it’s not ideal. So here’s what you do:

After you’ve bagged your main shot of the waterfall, look around the edges of the photograph. See if the plants are soft and fuzzy. If they are, increase your shutter speed to 1/100s or faster (the goal is to freeze the moving plants). To keep a nice exposure, you can open up the aperture, but make sure you don’t lose your maximum focus. If you still don’t have a fast enough shutter speed, boost your ISO until you get the result you’re after.

Back home, take the two exposures and blend them together using layer masks in Photoshop.

autumn waterfall

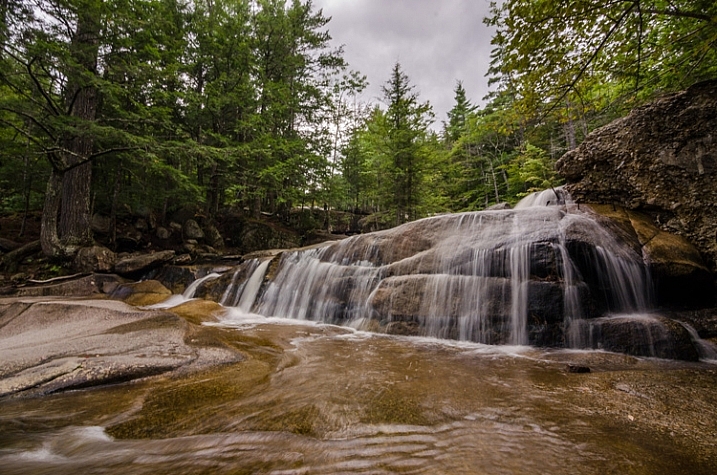
4. Head out when it’s cloudy

Cloudy days are incredible for waterfall photography. (And rainy days? Even better!)

Cloudy days offer all the benefits of shooting when the sun is low or when the waterfall is in the shade – except you have the freedom to shoot all day long without stopping.

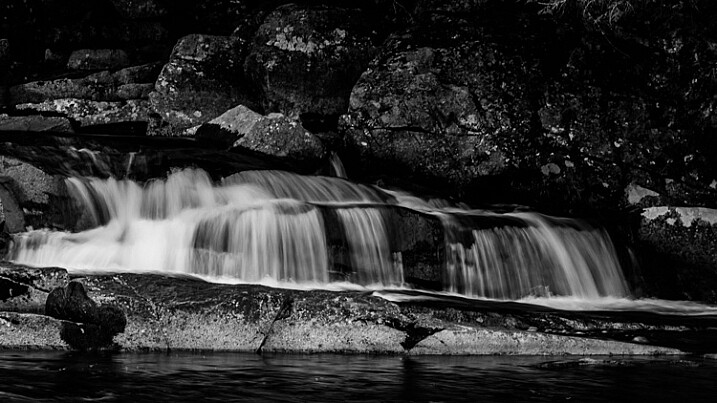
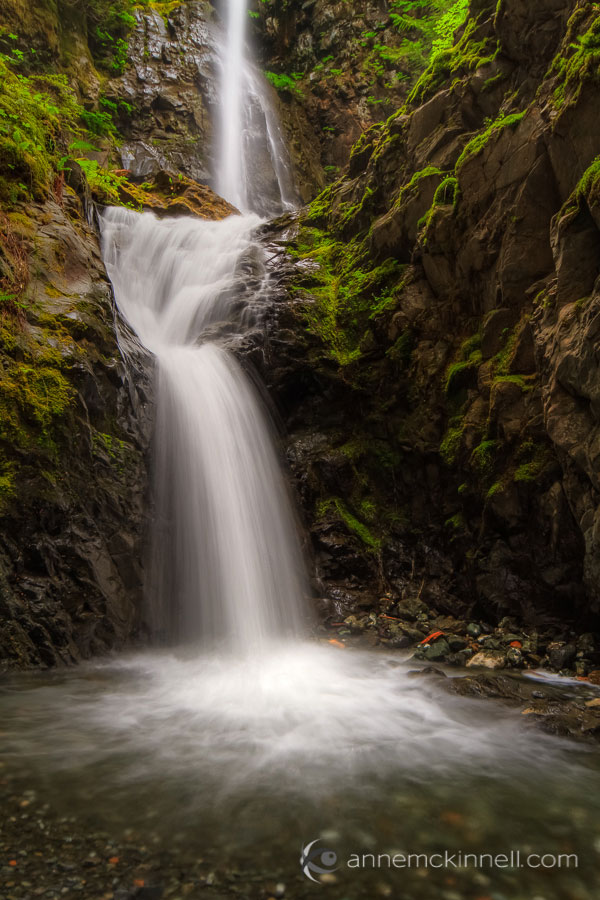
I also find you get much better color when it’s overcast, so mossy rocks and autumn leaves really pop. And you get a wonderfully dark, dramatic mood with lots of beautiful shadows:

heavy falls with blue water

One pitfall to avoid on cloudy days, though:

Including the sky. Cloudy skies are boring and drab and generally poor additions to a waterfall photo.

So if you can get up high to shoot down on the falls, do it; you’ll eliminate the sky for a more pleasing composition. You can also try shooting falls in heavily forested areas, or you can zoom in for a more intimate waterfall shot (one that keeps the sky outside the frame).

Worst-case scenario, you can frame out part of the sky then clone out the rest in post-processing. But this takes an annoying amount of time, which is why I highly recommend getting it right while out shooting.

Waterfall photography tips: final words

As with all things photography, shooting waterfalls takes practice and experimentation.

But if you remember these tips and persevere, you’ll get great shots in no time at all!

Now over to you:

What do you struggle with most in waterfall photography? Do you have any advice for readers? Do you have any waterfall images you’re proud of? Share your thoughts and photos in the comments below!

The post 4 Tips for Drop-Dead Gorgeous Waterfall Photography appeared first on Digital Photography School. It was authored by Eric Leslie.


Digital Photography School

 
Comments Off on 4 Tips for Drop-Dead Gorgeous Waterfall Photography

Posted in Photography


Officials warn Yosemite’s lack of water may spoil annual ‘Firefall’ waterfall event

16 Feb

Photographers hoping to attend this year’s ‘Firefall’ waterfall event at Yosemite may be disappointed. The National Park Service has published an advisory warning that Horsetail Fall, the site of the Firefall event, has ‘little to no water.’

The Firefall event takes place in late February every year, giving photographers the opportunity to capture the Horsetail Fall illuminated with sunlight. During this time, the water turns bright orange and resembles fire or molten rock pouring over the edge of El Capitan in Yosemite Valley.

The lack of water, however, threatens to ruin this event; without water, obviously, there will not be a stream of ‘fire’ to photograph. Assuming the Firefall does happen, it will be visible from February 13 to 27 this year. In order to prevent issues from heavy traffic during this event, Horsetail Fall will have daily restrictions from noon to 7 PM during the aforementioned dates.

Articles: Digital Photography Review (dpreview.com)

 
Comments Off on Officials warn Yosemite’s lack of water may spoil annual ‘Firefall’ waterfall event

Posted in Uncategorized


How to Shoot and Process Better Waterfall Photos

05 Mar

Everybody loves a good waterfall image with a long exposure, but in this article, I’ll show you how to capture more detail and motion in that fascinating tumble of whitewater. Water is the most powerful force of nature on our planet and there’s a simple technique you can use when photographing waterfalls that more effectively harnesses the fury and chaos of mother nature.

Tip 1 – Use a faster shutter speed

How to Shoot Better Waterfall Images - Comparison

While many photographers would consider 1/3″ (one-third of a second) a slow shutter speed, it’s typically a lot faster than many would use for shooting waterfalls. I’ll sometimes even use 1/6″ (like in the left image above) depending on the volume of water in my composition.

Shooting waterfalls using a 1/6″ to 1/3″ shutter speed captures far more detail and texture in the moving water. It’s still long enough to create motion blur but fast enough to capture the motion of individual water droplets as they blast through your scene.

I feel that these faster shutter speeds tell the story much better than a totally silky smooth white out because the added detail shows the true power of water as it carves through the landscape.

Tip 2 – Use a wider (faster) aperture if required

As a landscape photographer, I usually prefer to stop down to apertures like f/11 or even f/16 so that I can capture the maximum depth of field and sharpness. This is the ideal scenario if you’ve got enough light to work with, but what if there isn’t much available light and using faster shutter speeds just ends up giving you an image that’s way too dark?

There are two things you can do to deal with this problem. Firstly, I’ll open up the aperture to let more light into the camera. For the above images, I was shooting with the Zeiss Batis 18mm and was able to open up to f/2.8. This often gets me closer to the 1/6″ shutter speed while capturing an image that is still bright enough, even in low light conditions.

Tip 3 – Increase ISO as a last resort

Increase ISO as a last resort - waterfall tips

When it starts to get dark I can increase my ISO which makes my sensor much more sensitive to light and enables me to get away with faster shutter speeds in low light situations. Bumping up the ISO is the last resort as it introduces noise and degrades image quality drastically.

Tip 4 – Shoot an overexposed frame at f/11 with a low ISO

Overexposed waterfall photography

This overexposed shot captures bright shadow detail in the mossy rocks. I don’t care about the blown out white water. I’ll be erasing that later in processing.

My first three steps explain how I capture all of that lovely motion and detail by using faster shutter speeds. But I’ll also capture a super bright image with maximum depth of field at low ISO which I can use for the rest of the scene. This gives me great image quality for everything in the frame that doesn’t include white water.

I usually stop down my aperture to around f/11 (I used f/8 because my lens performs well at that aperture.) Then I watch my Live View display while increasing the shutter speed and overexposing the image until I can clearly see all of the shadow detail on my display. For this to work, I must have Exposure Simulation enabled on my camera (check the settings for yours).

When you try this you may find that the water is a completely blown out mass of pure white. That’s okay because you’ll be using the water from your darker, faster exposures when you blend these images together.

All we care about with this shot is capturing an image that clearly shows the surrounding area. In my shot, it’s the mossy rocks and cliffs around the waterfall that are the priority.

Putting it all together

There are a few options for blending multiple exposure images like this:

  1. HDR – Fastest, easiest but less realistic and not the best image quality.
  2. Luminosity Masks in Photoshop – Steeper learning curve but often results in the best image quality. Read more on that topic here.
  3. Manual Blending in Photoshop – Easier than learning Luminosity Masks and almost the same image quality.

Photoshop users have more options here and I’m going to assume that if you already know how to use Luminosity Masks you probably don’t need me to show you how to blend these exposures. With that in mind, I’m going to show you an easy way to blend these exposures very simply in Photoshop. Lightroom users might prefer to use the built-in HDR tool of Lightroom to blend exposures.

Waterfall Image Processing

Shooting an Over Exposed Waterfall Image for Shadow Detail

First of all, let’s look at the RAW files and talk about the camera settings I decided to use. This first exposure was shot with an aperture of f/8 for great depth of field and sharpness. I used a long exposure time of 13″ so this is obviously the overexposed frame I talked about earlier.

My next frame was shot at 2.5″ which was the shutter speed recommended by my camera’s light meter. Even though the light meter was telling me that 2.5″ was ideal, it’s still not fast enough for me to capture water detail because as you can see below, the water is just a mushy white blur. So I decided to shoot a couple faster frames even though I knew they’d be underexposed.

How to Shoot Better Waterfalls - Still too long of an exposure

ISO 50, f/8, 2.5 seconds. The exposure was still too long to capture detail.

The next frame was shot at 1/4″ which I achieved by opening the aperture to f/2.8. I would have much preferred to have stayed at f/8, but it was getting dark and I needed as much light as I could get. Even though it’s clearly underexposed and quite dark you can see it captured much more detail in the water.

Finally, for the next frame, I went for an even faster shutter speed of 1/6″ and this is the one I’ll use to blend with the first overexposed frame.

The ideal amount of motion blur for waterfall photography

1/6th of a second was the magic number to get detail in the water.

Step 1 – Process the overexposed image

Even though the water in this image is completely smoothed out, all I really want from here is everything BUT the water. I might choose to keep a few parts of the silky water movement but for the thicker sections of water, I’ll be getting rid of that mushy white stuff.

Processing Overexposed Waterfall Image in ACR

I’ll open this in Adobe Camera RAW and bring down the exposure slightly, brighten shadows by +18 and then brighten the blacks to +8. I’ll also punch the color vibrancy up to +8 and then hit Open Image to bring it into Photoshop.

Step 2 – Process the underexposed image

Processing of Underexposed Waterfall Image

The first thing I need to do here is to increase the exposure to +1.50. This brightens the image up but also kills some of the detail in the brighter sections of the white water. I’ll fix that by pulling the highlights down to -27 and the whites down to -17 then hit Open Image to bring it into Photoshop.

Step 3 – Stack and align the layers

I can easily stack the overexposed image on top of the darker one by clicking in the layers panel and simply dragging it to the tab for the underexposed image. Photoshop will drop a copy of that layer on top of the original.

Align the layers just in case there was any camera movement between shots by making sure both layers are unlocked. Hold down shift and click on each layer so that both layers are selected. Then go to Edit > Auto-Align Layers. I go with the default Auto and hit OK. In this case, nothing happened because there was no misalignment.

Step 4 – Selectively erase the overexposed water

The Photoshop Eraser Tool

This is the fun part where a bit of skill and judgment comes in handy. With practice, you’ll get better at choosing which parts to erase on your own waterfall images. My goal here is to get rid of any boring bits of overly silky water to reveal the more interesting motion blur of the layer underneath. Take your time and use a bigger brush than you think you might need. If you use a brush that’s too small you’ll be able to see the halo edges of your brushwork.

You don’t have to erase ALL of the white water, just the parts you find lacking in action and drama. Some areas may look better from the overexposed shot and others may look better from the underexposed shot. Finding the perfect balance is down to your artistic judgment.

Try switching the top layer on and off by clicking the eye icon next to the layer. This helps you to see if the changes you’ve made work towards creating a better image.

You can also change the opacity of the eraser brush so that the effect is less intense. For the top part of the falls, I’ll use an opacity of 50% so the effect is more subtle. If you prefer non-destructive editing and are already familiar with Layer Masks you could perform the exact same process. I just prefer the fast simplicity of this method and wanted to show you the easiest way to get a quick and effective result.

Step 5 – Fine-tuning the blending

To make the two layers blend more seamlessly I’m going to make the overexposed layer slightly darker. I choose Image> Adjustments > Brightness/Contrast and set the brightness to about -38. I can also brighten up the darker exposure slightly so that it gets closer to the brightness of the overexposed layer by going to Image > Adjustments > Shadows/Highlights and setting the Shadow Amount to 3%.

Shadows / Highlights - processing waterfall images

This result is a nice, flat looking image that has a great dynamic range with lots of texture, detail, and motion in the water. From this point, you can do whatever you like to the image, such as add contrast, play with colors, or dodge and burn – whatever it is you like to do with your nature images normally.

The benefit of using this method is that your water motion will be much more interesting and engaging to your viewers than just a silky smooth white out.

If you prefer, you can watch the whole thing on video, see below:

Final thoughts

How to Take Better Waterfall Photos

I just want to state that all of this is subjective. If you prefer waterfall photos that contain little to no detail in the motion of the water, good for you. By using the techniques I’ve outlined in this article you can get the best of both worlds and decide which combination of options works best for your image in post-production.

It’s always better to have more than you need than to regret not taking a variety of shots. I encourage you to play with different shutter speeds to decide which look is best for you. I hope this helps to improve your waterfall photography and please feel free to post any questions in the comments section below.

The post How to Shoot and Process Better Waterfall Photos by Gavin Hardcastle appeared first on Digital Photography School.


Digital Photography School

 
Comments Off on How to Shoot and Process Better Waterfall Photos

Posted in Photography


3 Tips for Waterfall Photography Beyond Just Using a Long Exposure

30 Oct

JacksonFalls-3

Of course, shutter speed plays an essential role in creating silky smooth waterfall photographs, but does it get a little too much attention in tutorial articles? I think so.

In this article you’ll learn about three other key elements to creating a successful silky smooth waterfall photograph, and when you put it all together, all you’ll need to do next is find a waterfall to photograph.

JacksonFalls-5

ISO 100 | 62mm | f/16 | 1/3

Composing waterfall photographs

Like many landscape photographs, composition plays a huge role in whether or not the final photograph you capture is more than just a snapshot. Even if you nail the shutter speed, have perfect lighting, and just the right amount of depth of field, a poorly composed image will still fall flat.

In the video below I take you through the thought process behind a waterfall photography session I went on last year. I try to drive home the point that getting the best composition of a scene involves more than just moving the camera, but also includes thinking about why the choices you make matter to the photograph itself.

When composing a waterfall scene you’ll have to take into account not just the waterfall itself, but the direction of water flow, the rocks and debris that make up the foreground, the trees in the background, and everything in-between. Next time you’re photographing a waterfall, try just moving the camera around, get high, get low, pay attention to what you see through the viewfinder, and take as many different photographs as you have time for.

Importance of light in waterfall photography

As with most photographs, light is key in setting a tone or mode of the scene, however with waterfalls it can arguably be even more important.

Not only does light determine the mood of the scene you’re photographing, but it may downright determine whether or not you can get a slow enough shutter speed on your camera for the silky smooth water that you want to create. On top of that, you’ve got to absolutely watch out for photographing on a sunny day or this might happen – look at all those hot spots!

trapfallssun-2

ISO 100 | 11mm | f/11 | 0.5 sec

There’s no amount of highlight recovery or post production magic that will bring this image back, and give it a more refined tone. The light simply makes the photograph feel harsh, and while the snapshot showcases the falls, it does little to make the photograph interesting.

Due to the nature of waterfalls often being off the beaten path, and being dangerous to get to, it can be difficult to photograph at sunrise or sunset if you’re not a seasoned hiker. Therefore, as a second best option, I’d highly recommend planning your waterfall adventures for cloudy day. At the very least this will reduce the occurrence of hot spots on the water, and at best it will give you a few extra stops of shutter speed to work with if you need it.

dianesbaths-2

ISO 100 | 11mm | f/14 | 0.4 secs

Don’t forget about water flow

When it comes to creating the silky smooth waterfall effect, the amount of water actually flowing through the waterfall plays an important role in the end result. A powerful current has more movement to it than a small stream, and as a result this high flow waterfall may not require an exposure as long to achieve the desired result.

Take a look at the following two photographs, they are from the same waterfall one year apart. the first image is during a drought resulting in a waterfall that had almost no water flowing over it, while the second image was taken after Hurricane Irene came through the area dropping more than 10 inches (25cm) of rain in some locations. As you can see, the two images offer quite a different view of this waterfall.

Trap-Falls

ISO 100 | 11mm | f/11 | 5 seconds

Trap-Falls-2011

ISO 100 | 11mm | f/11 | 0.5 secs

In most cases it’s probably better to photograph smaller waterfalls with a light flow of water when you’re looking to create the silky smooth waterfall effect, as it tends to work best with those. Often, high flow waterfalls, will simply overpower the look that you’re trying to achieve, and as a result are often better photographed at a faster shutter speed in order to freeze the motion, and showcase their power.

Overall, waterfall photography is a lot of fun, the experience of hiking to the waterfall is often just as rewarding as the photographs themselves, so be sure to enjoy the entire experience.

googletag.cmd.push(function() {
tablet_slots.push( googletag.defineSlot( “/1005424/_dPSv4_tab-all-article-bottom_(300×250)”, [300, 250], “pb-ad-78623” ).addService( googletag.pubads() ) ); } );

googletag.cmd.push(function() {
mobile_slots.push( googletag.defineSlot( “/1005424/_dPSv4_mob-all-article-bottom_(300×250)”, [300, 250], “pb-ad-78158” ).addService( googletag.pubads() ) ); } );

The post 3 Tips for Waterfall Photography Beyond Just Using a Long Exposure by John Davenport appeared first on Digital Photography School.


Digital Photography School

 
Comments Off on 3 Tips for Waterfall Photography Beyond Just Using a Long Exposure

Posted in Photography


Shooting Better Waterfalls: Five Tips for Improving Your Waterfall Photography

14 Apr

Cave Selfie

Perhaps there isn’t a more sought after and photographed subject than water. More specifically, waterfalls. When you really think about it, waterfalls are one of the most basic and simple things that we can find in nature. They are just streams or rivers that happened, by one geological occurrence or another, to find themselves flowing over some height of cliff or stone or other drop-off. Still, we remain captivated by the simple beauty and serenity that can come from being near, and photographing a waterfall.

That’s where we, as photographers, often slam face first into a huge creative and artistic wall. How can you make an interesting photograph of something that has already been so extensively covered by countless other photographers? While there is unfortunately no secret formula for all waterfall photo sessions, there are some very simple and useful tips that can help you create better, and more unique images, of these phenomenal natural occurrences. Let’s dive in (get it?) and get started on the path to better waterfall photography.

Have a plan

I always stress the importance of research and preparedness before any photographic excursion regardless of what the subject or goal might happen to be. This is especially true when you, the outdoor photographer, are readying yourself to photograph waterfalls. There is simply no denying that the more you know about a location, the better your odds will be of coming home with images that you are happy to claim as your own.

Conduct some quick research and find out what the main waterfall or waterfalls are in the area you plan to visit. Google (or another search engine) will be your absolute best friend in this regard. Try to find as many images as you can before you set out so that you can be inspired and have a head start on coming up with your own unique compositions that haven’t been tried with that particular spot.

Map

Also, if at all possible, print out a map of the area and highlight the waterfalls that you feel are the most promising for you on that particular day and focus on those first. Don’t waste time trekking into a place that probably won’t yield a good result. Know before you go, and you will make better use of your time and become a much more efficient shooter.

Use a tripod

The topic of using a tripod can sometimes scare you off just from the sheer repetition of the statement. For whatever reason it seems like this essential bit of knowledge is where most beginner photographers find themselves in a state of complete denial. Believe me, I know how uncomfortable, to downright physically painful and tiring it can be to carry a tripod on your person for an extended amount of time. Still, though not always convenient, a tripod will always help you in the long run to produce better photographs. There is simply no other way to limit camera shake without having a solid shooting platform – there just isn’t. You will need such a platform for the longer exposure times often used when encountering waterfalls. End of story.

Another fact that beginners, and even some seasoned photographers, fail to grasp is that the quality of the tripod plays an essential role in its overall use to you. You will need a tripod that locks securely and reliably, and can handle the weight of whatever camera rig you happen to be shooting, as well as the shooting conditions. I can’t tell you how many long exposure images I ruined due to drifting of the tripod head because all I had available was a suboptimal tripod.

The biggest gripe I hear concerning tripods is that the good ones are too expensive. It’s true that a quality tripod will not be cheap. However, it is just as true that you can still obtain one without being outrageously expensive. Shop around and find a tripod that has good reviews, fits your current needs, and will also grow with you as a photographer. Do you really need carbon fiber? Do you need the most advanced ball head? Ask yourself questions like that and your purchase will make less of a dent on your pocketbook. A good tripod will last you years and yield incredible benefits. It will literally pay for itself and be one of the best investments you will make.

Make the waterfall the secondary subject

Foreground Focus

This image puts the colors of the moss and the detail of the foreground as the first point of interest and less on the waterfall itself.

This tip may seem a little counter intuitive but stay with me. It’s fairly straightforward to walk up to the front of a waterfall and snap a quick photo to take home. That’s great if that’s all you want. But let’s face it, you wouldn’t be pouring through all the great content here on dPS if all you wanted was to make average photos. You want to shoot with a purpose, and make photographs instead of taking snapshots. One of the best ways to do this is to think about the subject differently than the average photographer, and waterfalls offer a great opportunity to do this.

When you arrive at a particular falls you should really study the scene. Give yourself a few minutes before you even start thinking about making an exposure. Watch how the water flows and interacts with the other pieces of the scene. It may be rocks, boulders, sand, trees or any number of artifacts found in such places. Don’t let the waterfall itself distract you from the other photographs that could be there.

After all, the waterfall is not the only thing you notice so why should it be the only thing you show your audience? Look for ways to include different parts of the scene and even have the falls take a back seat if that makes a stronger image. Pay attention to what is often overlooked by other photographers. If you do this you will almost always be able to present the waterfall in a way that has never been seen before.

Pay attention to color

Color is a great way to grab the attention of your viewers and pull them into a photograph. Never underestimate the creative power of color when photographing waterfalls. Water is an incredible thing because it not only reflects the different colors around the surface such as the sky and leaves, but also the colors that come from underneath as well.

Use Color

The first step to getting the most interesting colors from a scene is to always shoot in RAW if at all possible. Shooting RAW will allow the most information to be recorded by your camera sensor, which will in turn give you much greater latitude for getting creative later with your post processing. Experiment with creative white balance and see what happens. Enhance the vibrancy and saturations in some areas and decrease them in another. You will be surprised how much more lively and interesting a waterfall can become with simply letting your imagination run free, and by using color creatively.

On the flip-side of the color coin, is that some waterfalls work much better when photographed in black and white. I have often said that I prefer images that tell a story through black and white, unless the color of the scene can speak louder. If you find yourself shooting a waterfall that lacks a lot of native color then why not put your pre-visualization skills to work (you’re still practicing that, right?) and try to imagine how the image could appear in black and white? Look for contrasts between light and dark areas on rocks, and contrasts within the water itself. Are there any interesting textures or reflections?

Here’s an unprocessed RAW version of a waterfall. Notice there’s not much color to boast about.

Virgin Falls RAW

Here we see the same image after a little cropping and black and white conversion.

Virgin Falls Processed

Lastly, with this photo, the textures and light really made the image so I converted it to black and white as well.

Rocks and Falls

Never discount the power of a monochrome image. Black and white waterfall work can be extremely profitable especially when you’re shooting in the drab and often colorless winter months.

Don’t forget to protect your gear

This isn’t really a tip, but rather a lesson that should be learned and become second nature to the serious waterfaller. When shooting a waterfall of any large size and flow there will always be moisture in the air, whether it is visible to you or not. The shear force of the water impacting the terminus of the fall, with render small droplets into the air that will absolutely ruin your shot and potentially destroy your camera and lenses.

Without Water Drops

The air surround a thirty-five foot waterfall without flash.

Water Drops

Then with a flash firing to show the moisture in the air.

Always use some protective barrier to protect your camera and lens while you set up for your exposure, and for transport around the waterfall. This barrier doesn’t have to be fancy. Personally I use pre sized slip-on plastic container covers that you can pick up at virtually any grocery store. They are perfectly waterproof and fit snugly around my camera and are unnervingly cheap.

Protect Gear

The same goes for your lenses. Even if they are in your camera bag, always protect them from the moisture. Again, low tech is often your best option here. I simply wrap my lenses in a cloth and place them individually into resealable sandwich bags. The cloths will help to absorb any condensation that builds up from temperature changes and were a hard learned lesson for me. Lastly, minimize the amount of time you leave the cap off your lens, and always carry a good lens cloth for wiping the front between takes.

Shooting even small waterfalls can be very rewarding, and are a great way to just get out and enjoy nature. Learning to shoot them creatively, however, can be a little more challenging. That doesn’t mean that it has to be difficult or intimidating. Just remember these five simple tips and you’ll be ahead of the game when it comes to waterfall photography:

  1. Research and plan beforehand.
  2. Don’t desert your tripod.
  3. Think of the waterfall as part of a whole and not the only part of a scene.
  4. Learn to use color creatively or when to get rid of it altogether.
  5. Always protect your gear from the elements.

Now go out and do what you love to do!

googletag.cmd.push(function() {
tablet_slots.push( googletag.defineSlot( “/1005424/_dPSv4_tab-all-article-bottom_(300×250)”, [300, 250], “pb-ad-78623” ).addService( googletag.pubads() ) ); } );

googletag.cmd.push(function() {
mobile_slots.push( googletag.defineSlot( “/1005424/_dPSv4_mob-all-article-bottom_(300×250)”, [300, 250], “pb-ad-78158” ).addService( googletag.pubads() ) ); } );

The post Shooting Better Waterfalls: Five Tips for Improving Your Waterfall Photography by Adam Welch appeared first on Digital Photography School.


Digital Photography School

 
Comments Off on Shooting Better Waterfalls: Five Tips for Improving Your Waterfall Photography

Posted in Photography


Waterfall Photography Video Tips

21 Apr

To help you out with this week’s photography challenge of waterfalls, I found a few video tutorials to walk you through how to photograph a waterfall. I also shared a collection of stunning waterfall images to get you inspired, if you missed it you can see those here.

This first video shows you the two choices you have when photographing a waterfall. You can either freeze or blur the water. Watch as he walks you through the camera settings for both options.

In this quick tip Tony Northrup goes over such tips as using a sturdy tripod, using shutter priority mode, and using a Neutral Density filter to block some of the light so you can get longer exposures, and finding a unique camera angle.

In this last video the photographer goes over step by step how to get that nice milky looking water. He talks about using a Polarizing filter, a tripod, and back button focus to help you get everything else in the photo nice and sharp.

I hope those help you get a handle on some of the technical aspects of waterfall photography. Now get out there and get shooting for this week’s challenge!

The post Waterfall Photography Video Tips by Darlene Hildebrandt appeared first on Digital Photography School.


Digital Photography School

 
Comments Off on Waterfall Photography Video Tips

Posted in Photography


A Collection of Waterfall Photos to Spruce up your Weekend

19 Apr

A couple weeks ago I shared some stunning landscape photos and you had a weekly challenge of the same theme. Today I’m going to get more specific and focus in on one element of nature that’s super popular with landscape photographers.

Waterfalls!

I think this is one of those things that when you can master taking photos of a waterfall, ones that make you and your friends go “oh wow” then your photography has stepped up a notch to the next level. Come with me on this journey, and if you’re not there yet I’ll leave you with a few articles on waterfall photos you can check out at the end.

Photograph Hump Rock by Miles Morgan on 500px

Hump Rock by Miles Morgan on 500px

Photograph Morning at the Falls II by Derek Kind on 500px

Morning at the Falls II by Derek Kind on 500px

Photograph Triple Twilight by Alex Noriega on 500px

Triple Twilight by Alex Noriega on 500px

Photograph Hafragilsfoss by Max Rive on 500px

Hafragilsfoss by Max Rive on 500px

Photograph Open Canopy by Ryan Dyar on 500px

Open Canopy by Ryan Dyar on 500px

Photograph Spring waterfall by Jaewoon U on 500px

Spring waterfall by Jaewoon U on 500px

Photograph On the Move by Max Rive on 500px

On the Move by Max Rive on 500px

Photograph The Sunlit Kiss by Alister Benn on 500px

The Sunlit Kiss by Alister Benn on 500px

Photograph Seljalandsfoss Sunset by Michael Bonocore on 500px

Seljalandsfoss Sunset by Michael Bonocore on 500px

Photograph The Photographer by Scott  Smorra on 500px

The Photographer by Scott Smorra on 500px

Photograph When Heaven Touches Earth ... by Iurie  Belegurschi on 500px

When Heaven Touches Earth … by Iurie Belegurschi on 500px

Photograph Waterfall by Luka Esenko on 500px

Waterfall by Luka Esenko on 500px

Photograph Nauyaca by Mathieu Dupuis on 500px

Nauyaca by Mathieu Dupuis on 500px

Photograph midnight falls by Kevin Wenzler on 500px

midnight falls by Kevin Wenzler on 500px

Photograph ?  splash  ? by Ayie  Permata Sari on 500px

? splash ? by Ayie Permata Sari on 500px

Photograph Palouse Falls by Jason Hatfield on 500px

Palouse Falls by Jason Hatfield on 500px

Photograph Rockhopper Showering by Will Burrard-Lucas on 500px

Rockhopper Showering by Will Burrard-Lucas on 500px

Photograph Natural Window by Mohan Duwal on 500px

Natural Window by Mohan Duwal on 500px

Photograph Iguazu colours 4.0 sec. by Wave Faber on 500px

Iguazu colours 4.0 sec. by Wave Faber on 500px

Photograph Jaggedly Smooth by Dylan Toh  & Marianne Lim on 500px

Jaggedly Smooth by Dylan Toh & Marianne Lim on 500px

Photograph Well of Souls by Karezoid Michal Karcz  on 500px

Well of Souls by Karezoid Michal Karcz on 500px

Photograph My favorite place by Uwe Müller on 500px

My favorite place by Uwe Müller on 500px

Photograph Seljalandsfoss from Inside by Mike Reyfman on 500px

Seljalandsfoss from Inside by Mike Reyfman on 500px

Photograph Silk waterfall by yoshi ?? on 500px

Silk waterfall by yoshi ?? on 500px

Photograph Canyon Glow by Bill Ratcliffe on 500px

Canyon Glow by Bill Ratcliffe on 500px

Photograph Secret Falls by Jarrod Castaing on 500px

Secret Falls by Jarrod Castaing on 500px

Need some waterfall tips? As promised here’s some tips and articles that might help you out:

  • How to do Dreamy Landscape Photography with a Neutral Density Filter
  • Beginner’s Guide to Waterfall Photography
  • Photographing Waterfalls: 6 Tips To Get You Started
  • Picking A Waterfall Shutter Speed For The Best Look

Check ou the newest dPS ebook – Loving Landscapes A guide to landscape photography workflow and post-production – a brand new dPS ebook by the authors of Living Landscapes

The post A Collection of Waterfall Photos to Spruce up your Weekend by Darlene Hildebrandt appeared first on Digital Photography School.


Digital Photography School

 
Comments Off on A Collection of Waterfall Photos to Spruce up your Weekend

Posted in Photography


Nautical Architectures: Electrified Reefs to Waterfall Prisons

10 Jan

[ By WebUrbanist in Conceptual & Futuristic & Technology. ]

ocean artificial reef context

Like a speculative fiction novelist, Margot Krasojevic creates fantastical work that manages to combine real design challenges of our times with futuristic solutions. Whatever your position on their feasibility, these improbable concepts are daring and their renderings marvelous.

ocean reef abstract visualization

Krasojevic‘s previous rock climber resort proposed unusual accommodations only accessible to the extremely adventurous – those who could and would scale cliffs to stay there. In this newest pair of projects, she tackles another harsh and dangerous environment: the planet’s oceans.

ocean surface modeling structure

ocean reef topside model

ocean reef rendering exterior

One of these two projects, an Artificial Reef Station, serves a pair of radically different but essential functions, stimulating coral growth underwater while defending nearby shores from tsunamis.

ocean speculative floating architecture

ocean reef generative process

The first task, promoting coral, is accomplished via solar panels that introduce low-level electrical currents to the surrounding area (not enough to shock divers). This creates a field around the steel frame that condenses dissolved calcium carbonate out of seawater.

ocean plan overview scale

ocean reef with diver

The second goal, diffusing tsunamis, is achieved by virtue of the shape of the station. The organic breaks up incoming waves via complex geometries, themselves derived from chaos-driven mathematical models of wave behavior.

Next Page – Click Below to Read More:
Nautical Architectures Electrified Reefs To Waterfall Prisons

Share on Facebook


[ By WebUrbanist in Conceptual & Futuristic & Technology. ]

[ WebUrbanist | Archives | Galleries | Privacy | TOS ]


WebUrbanist

 
Comments Off on Nautical Architectures: Electrified Reefs to Waterfall Prisons

Posted in Creativity


Beginner’s Guide to Waterfall Photography

16 Dec

There are few things more majestic than a flowing waterfall, whether it’s on the Niagara river or the little stream behind your house. There are many ways to photograph these natural wonders, and I’ve compiled a few tips, tricks, and techniques to help you get waterfall images that do justice to their elegant beauty.

waterfall-photo-2b

Equipment Choices

The equipment you need will depend on what type of photo you want to make. But you probably won’t make that decision until you are on location, so here is what I usually keep in my camera bag if I’m planning on shooting a waterfall.

  • Tripod – As with most forms of landscape photography, a tripod is your best friend. It will allow you to compose your scene very precisely and give you the flexibility you need if you decide to shoot long exposures.
  • Circular polarizing filter – This is an essential piece of equipment when photographing water to allow you to remove reflections and glare from the water’s surface. You might not need this if the frame is filled with the waterfall, but you will want it handy if you decide to include a pool of water in the foreground. It will remove the reflection and allow you to see through the water to any interesting rocks underneath.
  • Neutral density (ND) filter – If you decide to shoot a long exposure and it happens to be the middle of the day when there is a lot of light, you will need this gray-tinted piece of glass placed in front of your lens. It blocks some of the light from hitting your sensor, allowing you to use a slower shutter speed. These are sold in varying strengths, and can be stacked for different levels of light absorption.
  • Lens cloth – Useful for cleaning water spray off of your lens or filter. I like to use little pieces of ShamWow for absorbing water drops. They are helpful for cleaning water off the rest of your camera too, and even your tripod legs when you are done.

waterfall-photo-1b

Camera Settings

The camera settings you use will depend on what kind of photo you’re after:

Silky waterfalls

To create that silky smooth blur popular with waterfall photography, you’ll want to use a slow shutter speed for a long exposure. With your camera mounted firmly on a tripod, set it to shutter priority mode (usually “S” or “Tv” on your camera’s mode dial) and set your ISO as low as it will go (usually 100). Then, select a shutter speed between one half second to four seconds to achieve a nice amount of blur.

waterfall-photo-5b

Experiment with different shutter speeds to get the amount of blur you want. The best shutter speed will depend on how fast the water is moving, so getting the shutter speed just right takes a bit of experimentation. If you cannot get a slow enough shutter speed for the effect you want, use a smaller aperture so that less light enters the camera. That will allow you to select a longer shutter speed. If you still need a slower shutter speed, that’s when you can use a neutral density filter to block some of the light.

Keep in mind that when using a long shutter speed, if there are any plants or trees in your frame they may have an opportunity to move if there is any wind, and then everything in the image will be blurry. For this type of a scene, it is usually better to photograph earlier in the day when there is little wind.

Freezing the motion

Especially interesting when photographing violent falls, this requires just the opposite technique – you want a fast shutter speed to capture a brief moment and suspend the water’s movement in the air. Use shutter priority mode and select a faster speed such as 1/500th of a second or faster.

waterfall-photo-3b

For this technique you wont need a neutral density filter and you might even be able to get away without using a tripod. If you are in a low light situation, to get a fast shutter speed you may need to use a larger aperture such as f/5.6 to let more light in, and you can increase the ISO to 200, 400 or as high as you need to go to allow a fast shutter speed.

Detail shots

Instead of getting a broad landscape style shot, you might want to close in on an interesting rock, plant, or other detail of your scene. For this, compose your shot (use a tripod if possible) and turn your camera to aperture priority mode – “A” or “Av” on your mode dial. This will allow you to have control over the depth of field, or how much of the picture is in focus from front to back.

The aperture value is shown as an f-stop. F-stop numbers are a little confusing because the smaller numbers represent a larger opening and vice versa. I find it helpful to think of it as a fraction. F/8 is smaller than f/4 because 1/8 is smaller than 1/4.

waterfall-photo-6b

Small apertures let less light in, but they increase the sharpness in the foreground and background. Large (or “wide”) apertures, on the other hand, mean that only part of the picture is in focus, while the rest becomes soft and out of focus.

Look at your scene and decide what you want in focus and what should be blurry. If you want to isolate your main subject, choose a large aperture (small f/number) such as f/4 or f/2.8 to make the background out of focus. If the background is important to the picture, choose a small aperture (large f/number) like f/16 or f/22 to make the entire scene sharp and clear.

Composition

There are many compositional techniques to employ when creating waterfall images. First and foremost, remember the rule of thirds and how your eye is drawn through the image. Use the leading lines inherent in flowing water to create visual pathways for the viewer to follow, remembering that corners are very strong entry and exit points in the frame. Pay attention to both the foreground and background, and don’t forget to pay attention to what’s around the water, as well as the falls themselves.

waterfall-photo-4b

Field techniques and summary

  • When you arrive at any scene, the first thing to ask yourself is, “What makes this place unique?”. Pay special attention to that quality.
  • Bracket your shots to make sure you get the best possible exposure – this means taking several pictures using different apertures and shutter speeds, and also making several different images using the camera’s exposure compensation (+/-) to brighten or darken each shot to a different degree. See your camera’s manual for specific instructions on how to use these features.
  • Shoot in the uncompressed RAW format to allow for more flexible fine tuning in post processing. RAW images must be processed with a compatible photo editing program, or software that was included with your camera.
  • Experiment – most of all, don’t get stuck making the same type of photograph all the time. Try to make a long exposure, a fast exposure, some detail shots, and try different perspectives so you come home with a variety of images from your photo shoot.

Gear mentioned in this article

  • tripods – link to some of the best, and most popular brands
  • neutral density filters – make sure to get the right filter size for your lens, or biggest one and a step down ring to your smaller ones
  • lens cleaning cloth

The post Beginner’s Guide to Waterfall Photography by Anne McKinnell appeared first on Digital Photography School.


Digital Photography School

 
Comments Off on Beginner’s Guide to Waterfall Photography

Posted in Photography


12 stunning photos of Godafoss – Waterfall of the Gods

31 Jul

Godafoss_final.jpg

Godalfoss – Waterfall of the Gods – is one of the most striking natural features of Iceland, a country famed for, well… striking natural features. My Modern Metropolis has published a gallery of 12 stunning images of Godalfoss, including a shot taken by dpreview contributor Erez Marom. Click through to feast your eyes, but be warned – it will make you want to take a trip to Iceland. 

News: Digital Photography Review (dpreview.com)

 
Comments Off on 12 stunning photos of Godafoss – Waterfall of the Gods

Posted in Uncategorized