RSS
 

Posts Tagged ‘vignette’

How to Create a Vignette in Photoshop

11 Feb

The post How to Create a Vignette in Photoshop appeared first on Digital Photography School. It was authored by Megan Kennedy.

how to create a vignette in Photoshop

Do you want to know how to create a vignette in Photoshop?

In this article, we’ll show you a step-by-step method to do just that.

And by the time you’re finished, you’ll be able to apply a vignette to any digital photograph quickly and easily.

Let’s get started.

a subtle vignette on a field of lavender how to create a vignette in Photoshop
A subtle vignette added in Photoshop.
Canon 5D Mark IV | Canon EF 100-400mm f/4.5-5.6L IS II USM | 1/125s | f/5 | ISO 100

What is a vignette?

In photography, a vignette is any shadowy darkness that appears around the periphery of an image.

Like this:

Exaggerated vignette example
An artificial, highly-exaggerated example of vignetting.

Now, vignetting can occur for a number of reasons.

For instance, optical vignetting is caused by the physics of wide-aperture lenses, which allows less light to reach the edges of the camera sensor.

But the type of vignetting we’re interested in for this article is artificial vignetting – where you create vignetting yourself using a program such as Photoshop.

Why create a Photoshop vignette?

Vignetting can be a contentious topic in photographic circles. Some photographers love vignettes, while others loathe them.

But as photography has evolved, applying artificial vignettes in Photoshop has become a useful compositional device. Vignettes are an enduring photographic technique that can add to the gravitas of an image by creating a sense of atmosphere, age, or depth.

How to create a vignette in Photoshop

There are quite a few ways to create a vignette in Photoshop, and in this article, I’m going to cover three of them.

These methods are simple, easy to apply, and will do a great job of creating a customizable vignette effect.

Method 1: The Lens Correction filter

If you’re looking for a quick way to create a vignette, then this method is a perfect choice.

To start off, open your image in Photoshop.

I’m going to use this lavender photo:

how to create a vignette in Photoshop a starter image of lavender

Step 1: Create a layer for your vignette

In Photoshop, it’s best to edit non-destructively; that way, you can always go back and adjust your original file if required.

So right-click on the Background layer in the Layers panel, then select Duplicate Layer.

In the pop-up window, rename the layer Vignette.

Step 2: Lens Correction filter

With the Vignette layer selected, click Filter in the Photoshop menu. Then select Lens Correction.

A new Lens Correction window will open. Click the Custom tab on the right-hand panel. Under the Vignette heading, adjust the Amount and Midpoint sliders until you’re happy with the vignette effect.

Then click OK.

how to create a vignette in photoshop lens correction

If the image looks a little dull after applying the vignette, you can give it a contrast boost with a Curves adjustment layer. You can also adjust the intensity of the colors with a Vibrance adjustment layer. Make edits until you’re satisfied, then call it a day!

final vignette using the Lens Correction filter
Keeping it subtle; the final result of the Lens Correction vignette method.

Method 2: The Gradient fill layer

This second method is a little more complex than the Lens Correction method, but it’s also more flexible.

Step 1: Set the foreground color to black

With your file open in Photoshop, the first thing to check is that the foreground color swatch is set to black.

To revert to the Photoshop default of a black foreground and a white background, press the D key.

Step 2: Add a Gradient fill layer

Next, click on the Layer menu and select New Fill Layer>Gradient. Click OK on the first pop-up window that appears.

There will be a second pop-up, the Gradient fill settings window. Make sure to tick the Reverse box. Set the Style to Radial and input the Scale to alter the intensity of the gradient (smaller numbers correspond to a more intense gradient). I usually enter around 300% to 350%.

how to create a vignette with a Photoshop gradient

Click OK.

Gradient Fill final image
The image after the Gradient fill layer has been applied.

Step 3: Experiment with opacity and blending modes

Once you’ve applied the Gradient fill layer, your image may look a little dark and flat. To blend the gradient effect more carefully, make sure the Gradient fill layer is selected and reduce the opacity of the layer via the Opacity slider.

Each image will be different, but I usually reduce the opacity of the Gradient Fill layer to around the 50% mark.

a reduced opacity version of the lavender image
The vignette effect is more subtle with the opacity reduced.

To further blend the Gradient fill layer with the underlying image, you can also work with Photoshop blending modes.

Click on the blend mode dropdown menu and see what works best for your image.

Finally, if your image is still feeling a little flat, make some adjustments with a Curves layer to boost the contrast.

Vignette with the Hard Light blend mode applied to a Gradient fill layer.
The final result, with a Hard Light blending mode applied to the Gradient fill layer and a contrast boost with a Curves adjustment layer.

Method 3: Using the Shape tool

Photoshop’s Shape tool has endless uses – including adding a vignette to a photograph.

And by working with an ellipse shape, you can easily create a versatile vignette.

Step 1: Create an ellipse

First, make sure your foreground color is set to black.

Then, with your image open in Photoshop, select an ellipse from the Shape Tool menu on the far left Photoshop toolbar. Check to make sure that the Fill swatch located toward the top of the screen in the Shape menu is set to solid black (if it’s not, then double-click and adjust the Fill color).

Once the color is set, drag the ellipse outline over your image to form an oval shape. When you release the mouse button, the shape will automatically fill with black.

How to create a vignette in Photoshop with the Shape tool

Step 2: Invert the ellipse

With your Ellipse layer selected, click on the Properties window and select the Subtract front shape icon located under the Pathfinder heading (see below). The shape will reverse, creating a black border around a now-transparent ellipse.

creating a reverse selection with the Ellipse tool

Step 3: Adjust the vignette with masks

Make sure the Ellipse layer is selected, then refer back to the Properties menu.

This time, click the Masks icon; it looks like a gray circle on a dark background (see below). The Masks menu allows you to adjust the Density and Feather of the Ellipse layer. I usually leave the Density at 100%, but I push the Feather adjustment to its upper limits (which softens the vignette effect).

Using masks to adjust the vignette effect
The Feather slider softens the edges of the vignette.

Step 4: Add finishing touches to your vignette

To increase the subtlety of the vignette, you can adjust the opacity of the Ellipse layer.

Experimenting with different blending modes is another effective way to adjust the impact of the artificial vignette.

And feel free to alter the dimensions of the vignette with the Transform options or tweak the contrast and saturation with layered adjustments.

how to create a vignette effect in Photoshop final result of Ellipse Tool vignette method
The results of applying a vignette with the Shape tool in Photoshop.

How to create a vignette in Photoshop: Conclusion

As you can see, applying vignettes to your photos in Photoshop doesn’t have to be hard.

In fact, it’s really very simple!

So open some of your favorite images in Photoshop. See how they look with vignettes.

Because a subtle vignette can make a big difference!

Photoshop vignetting FAQs

What is a vignette?

A vignette is a darkening around the periphery of a photograph. It occurs for various reasons in many photographic circumstances.

How do I add a vignette in Photoshop?

There are several ways to create a vignette in Photoshop. The methods listed in this article are simple and effective ways to apply a vignette aesthetic.

Where can I find the vignette tool in Photoshop?

Unfortunately, Photoshop doesn’t offer a vignette tool. However, you can easily create a vignette with the Shape tool, a Gradient fill layer, or a Lens Corrections filter.

How do I remove in-camera vignetting?

The easiest way to remove vignetting in post-production is to open the image in Photoshop and – with the image layer selected – click Filter>Lens Correction. The Lens Correction window will present various options for reducing unwanted vignetting.

The post How to Create a Vignette in Photoshop appeared first on Digital Photography School. It was authored by Megan Kennedy.


Digital Photography School

 
Comments Off on How to Create a Vignette in Photoshop

Posted in Photography


Understanding and Unlocking the Power of the Lightroom Vignette Tool

06 Feb

The post Understanding and Unlocking the Power of the Lightroom Vignette Tool appeared first on Digital Photography School. It was authored by Simon Ringsmuth.

The Lightroom vignette tool is like adding a bit of spice to your favorite meal. Without a bit (but not too much) garlic, basil, thyme, or other even salt, your food might taste bland. Add too much, and it can ruin the whole thing. In a way, the vignette effect does the same job. It adds a bit of spice, flavor, and panache, to give your photos that little extra push over the cliff. It turns them from mediocre to magnificent. If you want to unlock its full potential, it’s important to understand what it does and see how, when applied to different pictures, it can dramatically affect the final output.

You and the Lightroom Vignette effect: A match made in heaven.

About Vignettes

Vignette effects are nothing new to photography. The word itself has French origins. It refers to the wavy lines that would appear like vines (or in French, Vignes) drawn around page edges marking the beginning or end of a book chapter. Over time the word was adopted by artists and photographers to refer to the gradual fade or darkening of an image near its edges.
While vignettes can be distracting if implemented poorly, they can result in a pleasing artistic effect when applied like spices when cooking. The outcome is akin to laying a reverse darkened oval across an image so that the corners and edges of the picture are a little darker. This method also serves to draw the viewer’s attention to the center. You’re basically trying to achieve the Goldilocks balance where it’s not too much and not too little, but just right.

Understanding the Vignette Options

The first step in using Vignette is simply locating it. You’ll find it in the Effects panel on the right-hand side of the Lightroom Develop module. You’re presented with an option to choose a particular style along with five sliders that help you fine-tune the vignette to taste. All of this happens after your image cropping has been applied, so if you use a vignette and then re-crop your image the vignette changes to suit your new crop.

There are three options for the Style of vignette:

  • Highlight Priority – Ensures that the bright areas of the image blend more smoothly with the darker areas. The downside here is it can make areas of the image with a lot of colors appear a little strange.
  • Color Priority – The opposite of Highlight Priority, this style makes sure that color is preserved across the vignette. However, it can make the bright areas have some jarring shifts.
  • Paint Overlay – This is a blunt instrument. It just darkens the image where the vignette is applied, with no attention paid to highlights or colors.

If you’re not sure which of these to use, I recommend sticking with Highlight Priority. Both that and Color Priority produce similar results which are not unlike the Burn option in Photoshop (which itself mimics the process of selectively over-exposing parts of an image when developing film in a darkroom). These two also let you use the Highlights slider at the bottom which helps you recover some of the brighter portions of the image that are darkened with a vignette, whereas Paint Overlay disables the Highlights slider entirely.

Additional options:

In addition to the style of vignette, you have additional options that allow you to precisely control how the effect is implemented.

  • Amount – How much vignette is applied. Moving this to the left adds a dark vignette while sliding it to the right adds a white vignette.
  • Midpoint – The degree to which the vignette reaches the middle of the image. All the way to the left results in much more of the vignette reaching the center, whereas all the way to the right keeps the vignette at the most extreme edges and corners. If you’re not sure what to do, just leave this in the middle.
  • Roundness – All the way to the left makes the vignette into more of a rectangle. Leave it in the middle for an oval-shaped vignette. Slide it all the way to the right to make your vignette a circle.
  • Feather – How smoothly the dark areas blend with the light areas. All the way to the left results in a harsh edge and all the way to the right gives you a nice smooth blend.

If you don’t want to over-complicate things you can leave all these sliders at their default values and you’ll be fine. However, they are fun to experiment with over time to get just the right look you are going for.

Visual explanations

This tool is easy to explore on your own but looking at how it affects a black and white grid may give you a better understanding of what is happening. I used the Paint Overlay instead of Highlight or Color Priority because in a simple black-and-white grid Paint Overlay gives the clearest visual representation of how the vignette is applied. The left side of each is the original un-edited grid while the right side is the same image with a vignette applied. The settings used for each one are described in the caption.

Amount -50, Midpoint +50, Roundness 0, Feather +50

Notice how the vignette gradually fades from dark to light, with the center portion of the image on the right being the exact same brightness as the grid on the left with no vignette applied.

Amount -50, Midpoint 0, Roundness 0, Feather +50

With the midpoint set all the way to 0, the unaffected portion of the vignette is concentrated in the middle with the edges and corners being uniformly dark. This highlights the center portion alone but there is very little fade-out between that and the vignette.

Amount -50, Midpoint 0, Roundness 0, Feather +100

The midpoint here remains the same but there is now a more gradual fade-out to the darkened portions thanks to an increase in feathering.

Amount -50, Midpoint 0, Roundness 0, Feather 0

Reducing the feathering to 0 makes the vignette clearly visible with virtually no gradation in how it is applied. I would never use this on an actual photo, but it is useful to understand how the vignette function operates.

Amount -40, Midpoint +25, Roundness +100, Feather +30

Setting the roundness to +100 gives you a vignette that is a perfect circle instead of a more oval shape. It’s important to remember that vignettes are applied after cropping, so if you start with a square image then you will have a circular vignette even with the roundness value set to its default value of +50.

Hopefully, these graphics give you a better understanding of how the vignette effect works. However, to really see it in action, it helps to look at what happens when it’s applied to actual photographs instead of just a blank grid.

Vignette examples

Almost any photo-editing app will let you apply a vignette, but with the extensive tools available in Lightroom you can customize your vignette to do precisely what you want and shape your viewers’ perception of an image in a very specific way. If you control parameters like midpoint and feathering, in addition to the amount, you can create vignettes that impart certain overtones and even emotions and transform your humble images in to works of art.

No vignette applied.

The above image looks fine on its own, and the viewer’s attention is meant to be drawn to the droplet of water right in the middle, but there are other portions of the image competing for attention. Adding a vignette completely changes the mood of the scene and makes the viewer feel like they are in a much more intimate setting. Notice how, with the darkened corners, your eye gets immediately drawn to the center and not to the edges at all.

Highlight Priority. Amount -30, Midpoint +50, Roundness +20, Feather +40

Vignettes can be used to eliminate distractions in the edges of the frame as well, and in doing so draw the viewer’s attention to the subject in the center. In this image below, there is a fence on the top-right and a black climbing rope on the top-left. They don’t really add much substance to the image and instead can take your attention away from the rabbit in the middle.

One way to solve this is by adding a vignette. Through some tweaking of the parameters, the end result is an image that still contains the fence and the rope but makes them far less prominent while focusing your attention squarely on the bunny.

Highlight Priority. Amount -42, Midpoint +50, Roundness 0, Feather +70

I do a lot of family pictures for clients in my city, and one of the final touches I’ll add to most of my pictures is a simple vignette. It’s often very subtle, usually only -10 or -15, but depending on the Style (Highlight or Color Priority), I might need to add more and then tweak it with the sliders. Below is an image with no vignette applied. While it’s fine on its own, the subjects are competing with the bright edges and corners for your attention.

A Color Priority vignette helps maintain the integrity of the colors while darkening them a little, and then I brought back some of the highlights particularly in the top-right corner by adjusting the Highlights slider to 10.

Color Priority. Amount -53, Midpoint +55, Roundness 0, Feather +45, Highlights +10.

Positive values

One thing I didn’t mention in this article is positive Amount values, which make the edges of the frame brighter instead of darker. In my years as a photographer, I can’t think of a single instance in which I have used this option, and I don’t know anyone else who uses it on a regular basis either (editor’s note: it may be used it in high-key photography). You may find instances in which you want to make the outer portions of your image brighter instead of darker and, if so, then positive Amount values would do the trick. Just know that it’s easy to overdo it and the results can sometimes come across as a little cheesy and forced.

Conclusion

These examples and explanations are designed to give you a better understanding of what the vignette effect does and how it impacts an image. I encourage you to try it out for yourself. Use the different sliders and style options and notice how they affect the vignette which, in turn, can have a profound impact on your image as a whole. Just remember the cooking analogy: you don’t want too much vignette, nor do you want too little. Strive to get it just right, and your pictures could take on a whole new life.

Feel free to share your thoughts and comments below.

The post Understanding and Unlocking the Power of the Lightroom Vignette Tool appeared first on Digital Photography School. It was authored by Simon Ringsmuth.


Digital Photography School

 
Comments Off on Understanding and Unlocking the Power of the Lightroom Vignette Tool

Posted in Photography


Understanding and Unlocking the Power of the Lightoom Vignette Tool

05 Feb

The post Understanding and Unlocking the Power of the Lightoom Vignette Tool appeared first on Digital Photography School. It was authored by Simon Ringsmuth.

The Lightroom vignette tool is like adding a bit of spice to your favorite meal. Without a bit (but not too much) garlic, basil, thyme, or other even salt, your food might taste bland. Add too much, and it can ruin the whole thing. In a way, the vignette effect does the same job. It adds a bit of spice, flavor, and panache, to give your photos that little extra push over the cliff. It turns them from mediocre to magnificent. If you want to unlock its full potential, it’s important to understand what it does and see how, when applied to different pictures, it can dramatically affect the final output.

You and the Lightroom Vignette effect: A match made in heaven.

About Vignettes

Vignette effects are nothing new to photography. The word itself has French origins. It refers to the wavy lines that would appear like vines (or in French, Vignes) drawn around page edges marking the beginning or end of a book chapter. Over time the word was adopted by artists and photographers to refer to the gradual fade or darkening of an image near its edges.

While vignettes can be distracting if implemented poorly, they can result in a pleasing artistic effect when applied like spices when cooking. The outcome is akin to laying a reverse darkened oval across an image so that the corners and edges of the picture are a little darker. This method also serves to draw the viewer’s attention to the center. You’re basically trying to achieve the Goldilocks balance where it’s not too much and not too little, but just right.

Understanding the Vignette Options

The first step in using Vignette is simply locating it. You’ll find it in the Effects panel on the right-hand side of the Lightroom Develop module. You’re presented with an option to choose a particular style along with five sliders that help you fine-tune the vignette to taste. All of this happens after your image cropping has been applied, so if you use a vignette and then re-crop your image the vignette changes to suit your new crop.

There are three options for the Style of vignette:

  • Highlight Priority – Ensures that the bright areas of the image blend more smoothly with the darker areas. The downside here is it can make areas of the image with a lot of colors appear a little strange.
  • Color Priority – The opposite of Highlight Priority, this style makes sure that color is preserved across the vignette. However, it can make the bright areas have some jarring shifts.
  • Paint Overlay – This is a blunt instrument. It just darkens the image where the vignette is applied, with no attention paid to highlights or colors.

If you’re not sure which of these to use, I recommend sticking with Highlight Priority. Both that and Color Priority produce similar results which are not unlike the Burn option in Photoshop (which itself mimics the process of selectively over-exposing parts of an image when developing film in a darkroom). These two also let you use the Highlights slider at the bottom which helps you recover some of the brighter portions of the image that are darkened with a vignette, whereas Paint Overlay disables the Highlights slider entirely.

Additional options:

In addition to the style of vignette, you have additional options that allow you to precisely control how the effect is implemented.

  • Amount – How much vignette is applied. Moving this to the left adds a dark vignette while sliding it to the right adds a white vignette.
  • Midpoint – The degree to which the vignette reaches the middle of the image. All the way to the left results in much more of the vignette reaching the center, whereas all the way to the right keeps the vignette at the most extreme edges and corners. If you’re not sure what to do, just leave this in the middle.
  • Roundness – All the way to the left makes the vignette into more of a rectangle. Leave it in the middle for an oval-shaped vignette. Slide it all the way to the right to make your vignette a circle.
  • Feather – How smoothly the dark areas blend with the light areas. All the way to the left results in a harsh edge and all the way to the right gives you a nice smooth blend.

If you don’t want to over-complicate things you can leave all these sliders at their default values and you’ll be fine. However, they are fun to experiment with over time to get just the right look you are going for.

Visual explanations

This tool is easy to explore on your own but looking at how it affects a black and white grid may give you a better understanding of what is happening. I used the Paint Overlay instead of Highlight or Color Priority because in a simple black-and-white grid Paint Overlay gives the clearest visual representation of how the vignette is applied. The left side of each is the original un-edited grid while the right side is the same image with a vignette applied. The settings used for each one are described in the caption.

Amount -50, Midpoint +50, Roundness 0, Feather +50

Notice how the vignette gradually fades from dark to light, with the center portion of the image on the right being the exact same brightness as the grid on the left with no vignette applied.

Amount -50, Midpoint 0, Roundness 0, Feather +50

With the midpoint set all the way to 0, the unaffected portion of the vignette is concentrated in the middle with the edges and corners being uniformly dark. This highlights the center portion alone but there is very little fade-out between that and the vignette.

Amount -50, Midpoint 0, Roundness 0, Feather +100

The midpoint here remains the same but there is now a more gradual fade-out to the darkened portions thanks to an increase in feathering.

Amount -50, Midpoint 0, Roundness 0, Feather 0

Reducing the feathering to 0 makes the vignette clearly visible with virtually no gradation in how it is applied. I would never use this on an actual photo, but it is useful to understand how the vignette function operates.

Amount -40, Midpoint +25, Roundness +100, Feather +30

Setting the roundness to +100 gives you a vignette that is a perfect circle instead of a more oval shape. It’s important to remember that vignettes are applied after cropping, so if you start with a square image then you will have a circular vignette even with the roundness value set to its default value of +50.

Hopefully, these graphics give you a better understanding of how the vignette effect works. However, to really see it in action, it helps to look at what happens when it’s applied to actual photographs instead of just a blank grid.

Vignette examples

Almost any photo-editing app will let you apply a vignette, but with the extensive tools available in Lightroom you can customize your vignette to do precisely what you want and shape your viewers’ perception of an image in a very specific way. If you control parameters like midpoint and feathering, in addition to the amount, you can create vignettes that impart certain overtones and even emotions and transform your humble images in to works of art.

No vignette applied.

The above image looks fine on its own, and the viewer’s attention is meant to be drawn to the droplet of water right in the middle, but there are other portions of the image competing for attention. Adding a vignette completely changes the mood of the scene and makes the viewer feel like they are in a much more intimate setting. Notice how, with the darkened corners, your eye gets immediately drawn to the center and not to the edges at all.

Highlight Priority. Amount -30, Midpoint +50, Roundness +20, Feather +40

Vignettes can be used to eliminate distractions in the edges of the frame as well, and in doing so draw the viewer’s attention to the subject in the center. In this image below, there is a fence on the top-right and a black climbing rope on the top-left. They don’t really add much substance to the image and instead can take your attention away from the rabbit in the middle.

One way to solve this is by adding a vignette. Through some tweaking of the parameters, the end result is an image that still contains the fence and the rope but makes them far less prominent while focusing your attention squarely on the bunny.

Highlight Priority. Amount -42, Midpoint +50, Roundness 0, Feather +70

I do a lot of family pictures for clients in my city, and one of the final touches I’ll add to most of my pictures is a simple vignette. It’s often very subtle, usually only -10 or -15, but depending on the Style (Highlight or Color Priority), I might need to add more and then tweak it with the sliders. Below is an image with no vignette applied. While it’s fine on its own, the subjects are competing with the bright edges and corners for your attention.

A Color Priority vignette helps maintain the integrity of the colors while darkening them a little, and then I brought back some of the highlights particularly in the top-right corner by adjusting the Highlights slider to 10.

Color Priority. Amount -53, Midpoint +55, Roundness 0, Feather +45, Highlights +10.

Positive values

One thing I didn’t mention in this article is positive Amount values, which make the edges of the frame brighter instead of darker. In my years as a photographer, I can’t think of a single instance in which I have used this option, and I don’t know anyone else who uses it on a regular basis either (editor’s note: it may be used it in high-key photography). You may find instances in which you want to make the outer portions of your image brighter instead of darker and, if so, then positive Amount values would do the trick. Just know that it’s easy to overdo it and the results can sometimes come across as a little cheesy and forced.

Conclusion

These examples and explanations are designed to give you a better understanding of what the vignette effect does and how it impacts an image. I encourage you to try it out for yourself. Use the different sliders and style options and notice how they affect the vignette which, in turn, can have a profound impact on your image as a whole. Just remember the cooking analogy: you don’t want too much vignette, nor do you want too little. Strive to get it just right, and your pictures could take on a whole new life.

Feel free to share your thoughts and comments below.

The post Understanding and Unlocking the Power of the Lightoom Vignette Tool appeared first on Digital Photography School. It was authored by Simon Ringsmuth.


Digital Photography School

 
Comments Off on Understanding and Unlocking the Power of the Lightoom Vignette Tool

Posted in Photography


How to Add or Remove a Vignette Using Lightroom

11 Apr

You have likely seen photos on the internet which are well-exposed at the center, but the brightness starts reducing towards the edges. If you are not familiar with the name of this effect, it is called an edge vignette or image vignetting.

Interestingly, a vignette is an effect which occurs naturally but can also be achieved intentionally during the post-processing stage. Not everyone likes the vignetting effect in their photos, for some, it is a useful technique and for others, it is a disaster. Honestly, a well-done vignette can help draw viewer’s attention towards the subject placed in the center. You can use it to your benefit if you are a portrait, wildlife, or a wedding photographer.

How to Add or Remove a Vignette in Adobe Lightroom

But vignetting could also make your photos unappealing if you are a landscape, interior, or commercial photographer, as you would not want the edges of your photos to be too dark.

Causes of Vignetting

There are multiple reasons why the vignetting effect gets applied to your photos when using a digital camera. One of the main causes of vignetting is the use of wide aperture openings such as f/1.4 or f/1.8. But if you increase the aperture value by 2-3 stops, you can easily eliminate the vignetting effect in your photo.

Another cause of vignetting could be the use of a longer focal length, but as you go wider the effect starts getting less visible. Some low-end lenses are also more likely to have an edge vignette than their more expensive counterparts.

Using multiple lens filters or mounting low-quality lens filters can also result in strong vignetting, as they can block the amount of light entering through the lens from various angles. Did you know that even a third-party lens hood can result in a vignette? So make sure you buy the correct hood compatible with your lens to avoid any vignetting in your photos.

How to remove a Vignette using Lightroom

If your camera has captured a photo with the vignette effect due to one of the reasons mentioned above, you can easily remove it using Adobe Lightroom. This method is very impressive and the first time I used this feature in Lightroom I was happy with the fact that I can get rid of vignetting anytime I wish in the post-processing stage.

NOTE: You can use this technique of removing vignetting only if you are processing RAW files in Lightroom.

How to Add or Remove a Vignette in Adobe Lightroom

RAW file with a slight edge vignette captured in-camera.

How to Add or Remove a Vignette in Adobe Lightroom

Vignetting removed using “Enable Profile Corrections”.

As you can see in the screenshots above, the RAW format file had a hard vignette as this photo was shot using 50mm lens at f/1.8. In the second image, the vignetting has almost been removed with the help of one of the Adobe Lightroom’s handy features called “Enable Profile Corrections”.

This feature automatically detects the lens make, model, and profile, if it is available in the Adobe database. Lightroom has the lens profiles of almost every manufacturer, except for a few such as Samyang. This magical feature then corrects the vignette as well as distortion in your photo automatically. You can manually adjust them as well using the sliders. Isn’t that cool!?

To access this feature in Lightroom, you must be in the Develop module and the Enable Profile Corrections checkbox can be found under Lens Corrections tab on the right-hand side panel.

With just a click you can remove vignetting from your photo with Lightroom. Just make sure you are using the RAW format file only as this feature is not applicable for JPEGs.

How to add a Vignette with Lightroom

1) Using the Post-Crop Vignetting Feature

How to Add or Remove a Vignette in Adobe Lightroom

One of the easiest ways of adding a vignette to a photo is by using the Post-Crop Vignetting feature in Lightroom. You can find this tool located under the Effects drop-down menu. To keep it simple, you can start with moving the Amount slider towards the left (a negative number) in order to add the vignetting effect. Then you can adjust the Midpoint slider to define the spread of vignetting effect in the photo as per your desire.

The Roundness slider further allows you to define the shape of the vignette on the photo and the feather slider lets you define the falloff or how gradually it fades to the edges. The Highlights slider allows you to retain the highlights from the parts of the photo where you have applied the vignetting effect.

The only limitation of this approach is that you can not adjust the placement of the area where the vignetting effect starts. It only gets applied from the edges of the image moving towards the center (the vignette is centered).

2) Using the Radial Filter

How to Add or Remove a Vignette in Adobe Lightroom

The best thing about using the Radial Filter to add a vignette is that unlike the post-crop vignetting tool, you can change the position of the area where the effect gets applied. This means that you can select a particular area which remains unchanged as shown in the image above, and the vignette effect can be applied to the rest of the image.

As you can see in the image above, the Radial Filter tool gives you the freedom to play with much more diverse adjustments such as White Balance, Shadows, and Clarity. To start with you need to click and drag to select the area outside which you wish to apply the vignetting effect. Once that’s done you then can get started by adjusting the sliders.

Initially, you will have to bring down the exposure to darken the area selected, then you can play with the sliders to get the desired result.

Conclusion

Do you have any other alternatives for adding or removing vignettes in your images? Feel free to share them in the comment section below.

The post How to Add or Remove a Vignette Using Lightroom appeared first on Digital Photography School.


Digital Photography School

 
Comments Off on How to Add or Remove a Vignette Using Lightroom

Posted in Photography


3 Powerful Tips for the Perfect Vignette in Lightroom

08 Oct

The vignette is one of the most powerful ways to boost your photos. It reduces your photo’s brightness at corners and sides compared to the image center. It’s mainly used to highlight elements in the center even more. Besides, you can also use it to cover distracting details on the sides of your image.

As popular as it is, it’s just as common to not apply vignettes properly using Lightroom or Adobe Camera Raw. Let me show you three powerful tweaks to squeeze out 100% of its potential and present your photos in a better light!

1) How to decide which photo is suited for a vignette

The vignette shifts the focus to the center of your frame. That’s why you’ll ideally have a photo where your subject is placed in the middle. Otherwise, the vignette will make your subject darker and take away the spotlight.

To make the vignette even more powerful, it really helps to have the light in the center of the frame as well. Your subject is either lit up from the front or illuminated by some backlight. Of course, it depends on how strong you apply the vignette. If you use it lightly around the sides and corners, then the subject can also be a bit to the top, bottom, left or right of the frame.

3 Powerful Tips for the Perfect Vignette

Take a look at the two photos above. The one on the left has the subject on the far left. The vignette not only covers the subject, it also highlights the less important wall in the middle. The right photo, however, has the subject in the center. The vignette blends out the unimportant details of the office and highlights the person and the view in the center. Do you see how the vignette works much better in the example on the right?

Whether you are capturing buildings in a city, trees in the countryside or animals in the zoo, the same rule of thumb applies: place the most important element in the center.

2) How to make the vignette as smooth as possible

The best vignette in the world is the one you barely notice. That’s why you always need to make sure that the transition is as gentle as possible. Once you notice the transition from dark to bright, it’s not done right. Do you see the circle of the vignette in this photo?

3 Powerful Tips for the Perfect Vignette

The reason for this is generally that the feather slider is too far to the left side. As you can see in the screenshot below, it’s at 33. The more you go to the left, the more visible the transition will be.

Transition Bad - 3 Powerful Tips for the Perfect Vignette

Always make sure to move the feather slider to the right side. For most of my vignettes, I slide it all the way to 100. That way, you will achieve the smoothest transition for your photos.

Transition Bad - 3 Powerful Tips for the Perfect Vignette

Once you’ve applied the feather more generously, the vignette’s border will largely disappear. As a result, your vignette will blend more smoothly into the natural light of the scenery. In case the transition remains too strong, you can always reduce the amount a bit as well.

3 Powerful Tips for the Perfect Vignette

3) How to create a custom vignette

Although the post-crop vignette works best with subjects in the center, you will also use different placements. Luckily, you can always create a custom vignette that is tailored to your composition. The easiest way to do this is to use the Radial Filter.

The following photo could really need a vignette. That way, we could highlight the sunset and the silhouette even more. In order to create a custom vignette, open the Radial Filter (Shift + M) first. Then you decrease the exposure to a level between -0.20 and -1.0. In this case, I set it to -0.64.

Radial 3 Powerful Tips for the Perfect Vignette

Click on the subject in your photo, hold and drag the circle around your subject. Everything outside of the circle will become darker.

3 Powerful Tips for the Perfect Vignette

Remember the first tip how the transition always needs to be smooth? We will do the same for the custom vignette. With the feather slider, you can make the transition from dark (outside the circle) to bright (inside the circle) smoother. The further you slide it to the right, the gentler the transition becomes. For this photo, I changed it to 81 instead of 50.

Radial 3 Powerful Tips for the Perfect Vignette

When you compare the original photo (left) with the custom vignette (right), you can clearly see the difference. The light atmosphere in the right photo is more intense and the vignette guides the viewer to the subject.

3 Powerful Tips for the Perfect Vignette

Conclusion

I hope these three tips for better vignettes will you take your images to the next level. Of course, practice makes perfect. Play around with the sliders as much as possible to get a feel for the right amount. If you have any questions, let me know in the comments and I’m more than happy to help you out!

The post 3 Powerful Tips for the Perfect Vignette in Lightroom by Marius Vieth appeared first on Digital Photography School.


Digital Photography School

 
Comments Off on 3 Powerful Tips for the Perfect Vignette in Lightroom

Posted in Photography


4 Quick Ways to Add a Vignette to Your Images in Post-Processing

21 Feb

What is a vignette?

way-to-add-vignette-tutorial
The word vignette comes from the root word vine, which originally was taken to mean a decorative border on a page. In photography, this translates to a border around the edge of the image. This border is caused by a reduction of light from the center of the image, or a light fall-off. Light fall-off can be due to a variety of reasons: the amount of light hitting the sensor, the type of lens used, or an intentional addition in post-production. This article will focus on the latter.

In adding vignettes in post-processing, you have two choices: darker or lighter, and soft-gradual or hard-edge.

Why add a vignette?

way-to-add-vignette-tutorial

The addition of a vignette in post-processing comes down to your personal taste. It would also largely depend on your photography style, and the type of image you are editing. Generally speaking, high-key images do not need a dark vignette. If you want to add a vignette to bright images, most often a lighter one looks better, but I would still be very careful about adding one.

A vignette helps draw the viewer’s eye to the center of the image. This is particularly useful if the image has plenty of clutter, or distracting elements around the edges. Similarly, if the edges are pretty bare which makes the image look flat, a vignette adds an illusion of foreground, or another layer to the image, giving it more depth.

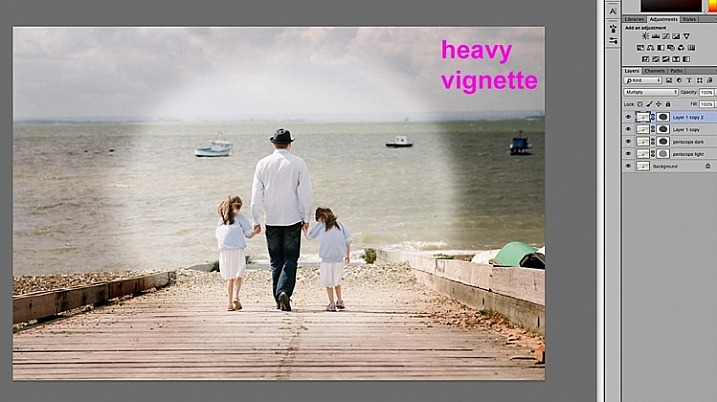
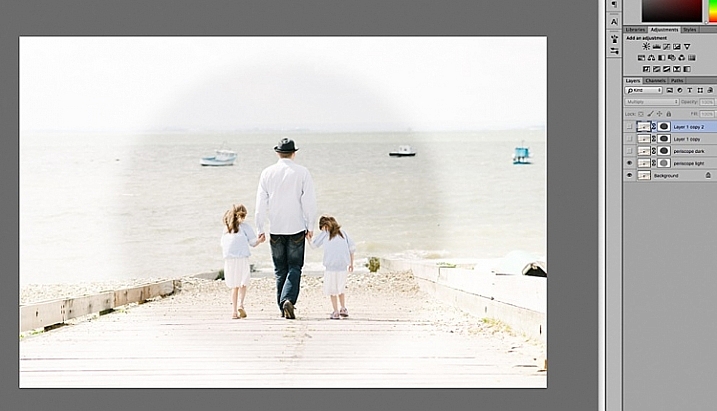
Be gentle and sparing when adding a vignette, it can enhance or ruin an image. What works often, and best, is a gradual and very subtle vignette, especially for portraits. More exaggerated vignetting may be required on some artistic images – the choice is yours. If you want to add a spotlight effect to an image, then adding vignettes can be essential. A hard-edged vignette, if done unintentionally, makes your image look like a view through a periscope and can burn your image, like a moth to a flame.

Here are four quick ways to add a vignette

In Adobe Camera Raw

The quickest and easiest way to add a gradual and gentle vignette in your image is via Adobe Camera Raw (this works in both Photoshop and Lightroom).  My previous article on batch editing with Bridge and Adobe Camera Raw explains how you can open your file in Camera Raw and make your initial edits.

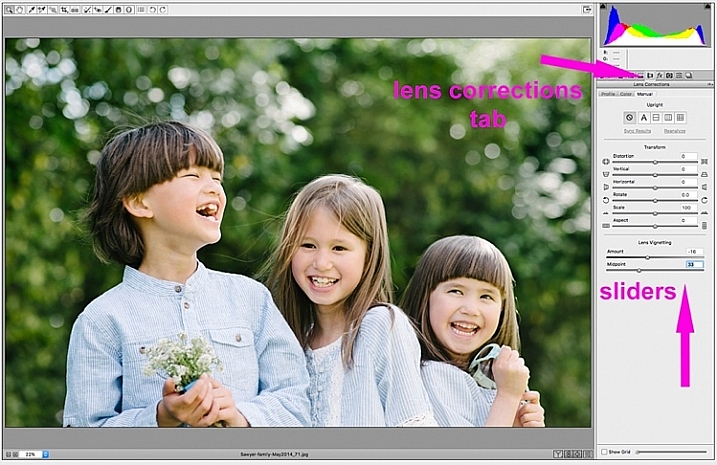
1. Using the lens correction tab

On the image below, you will see the lens vignetting slider under the lens correction tab. Move the sliders along to add, and remove vignettes to your image, according to taste.

way-to-add-vignette-tutorial

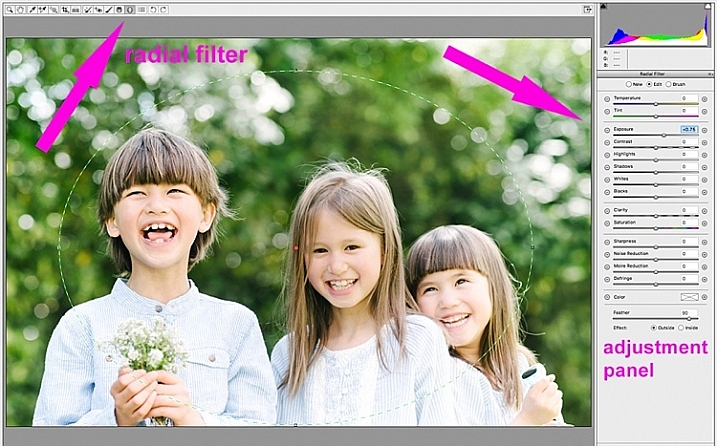
2. Using the radial filter tool

You can also add a dark or light vignette using the radial filter tool. On the adjustments panel, you need to specify where you want the vignette added – whether inside or outside the radius, then adjust the exposure to lighten or darken the vignette (with this method you can even add blur, lower highlight, or change the color of it if you like – anything on the sliders). This is a really handy feature in ACR because it acts like a layer mask, although you can’t easily do fine tuning with this tool like you can in Photoshop.

way-to-add-vignette-tutorial

Below is an image with a pretty dark and heavy vignette. In my opinion it’s too much, and takes away from the image, rather than enhancing it.

way-to-add-vignette-tutorial

Below is the same image with a bright vignette; this doesn’t look right to me at all.

way-to-add-vignette-tutorial

On this version below, I think the vignetting is just right, as it enhances the natural look of the photograph, which was my aim.

way-to-add-vignette-tutorial

In Adobe Photoshop

If you skip Adobe Camera Raw and open your file in Photoshop, there many ways to add a vignette. Below are the two quickest ways I have found. Before attempting to add a vignette in Photoshop, in order to perform non-destructive edits to your images, I recommend you learn to use layers and masks.

1. Using blend modes

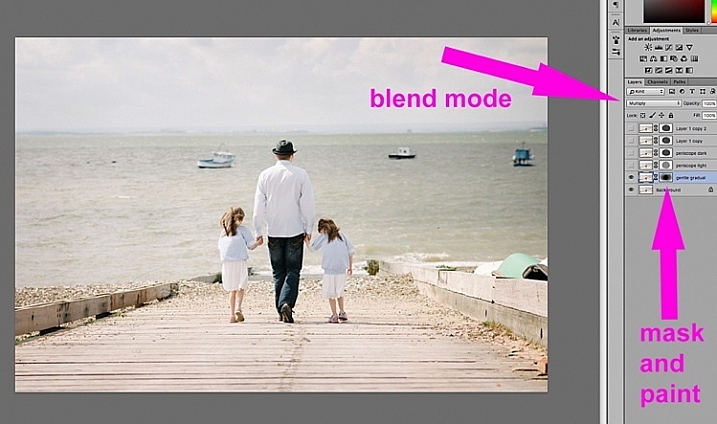
The first quick way  of adding vignettes in Photoshop that I found is by duplicating the background layer using CMD/CNTRL + J. You need to make all your adjustments on the layers above your background layer, in this case the duplicated layer, so that your original file is safe and untouched.

way-to-add-vignette-tutorial

With your duplicate layer selected, change the mode to darken or multiply to add a dark vignette, or to screen or lighten to add a light vignette. Now add a layer mask to the duplicate layer. If you choose to paint the vignette on, make sure the mask is blacked out. Select a big soft brush, using the brush tool set to a very low opacity, and paint with white on the vignette around the edges.

Alternatively, you can choose to remove the vignette instead of painting it on, which in this case would be my preference. With your duplicate layer superimposed on the background layer, add a white layer mask. Choose a big soft brush set to a higher opacity and start painting the layer mask black, starting from the middle and ever so gently radiating outwards until all the vignette is removed from the center, and only a touch on the edges is left. Adjust the opacity of the layer to suit your taste.

Below are two examples of exaggerated vignetting added in Photoshop using this method.

way-to-add-vignette-tutorial

way-to-add-vignette-tutorial

Manually painting, or removing the vignette by hand, gives you flexibility as to where to apply the vignette, how far in, and to what degree, depending on what’s required for each image.

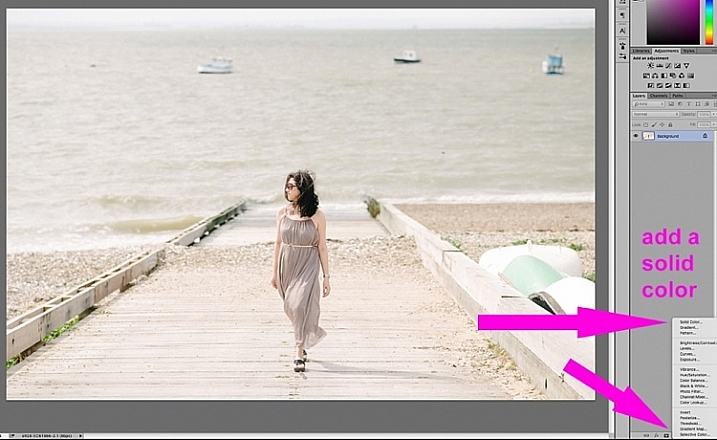
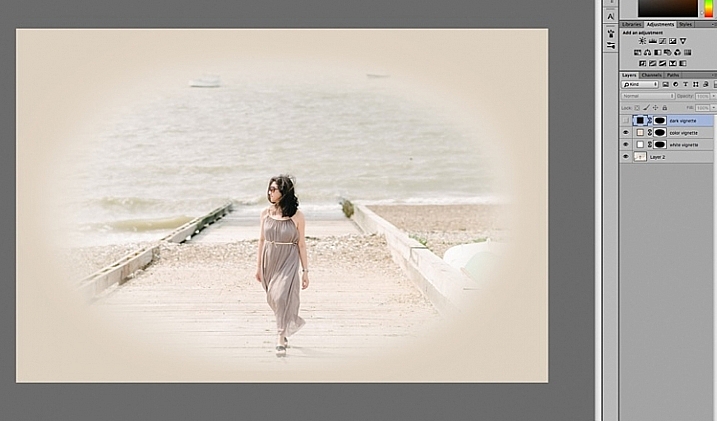
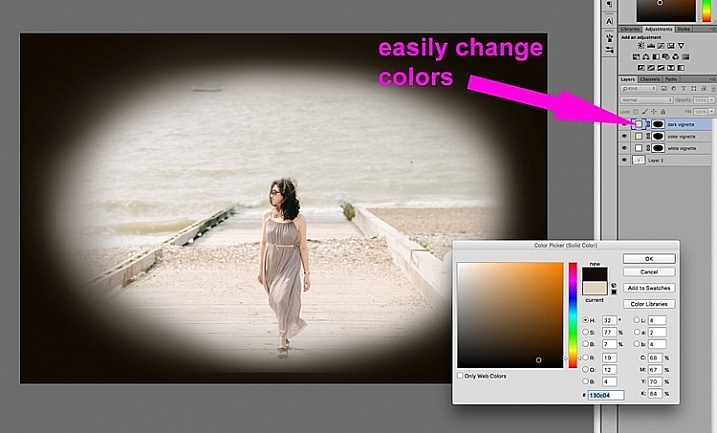
2. Using a solid color layer

Another quick way is to add a solid color. This method allows you to be more experimental, as it’s very easy to change the colors with a click of the eyedropper tool.

way-to-add-vignette-tutorial

The solid color will sit on top of your image, so all you will see is a flat rectangular block of color. You need to add a layer mask, and start removing some of the color beginning at the center and radiating outwards. Again, use a soft large black brush to remove the color. If you do this kind of vignetting, as in the two images below, it has to be intentional as these do not give you a natural look to the images at all. They may work for a scrapbook, or other specific purposes, but this is not the look I would give to my clients.

way-to-add-vignette-tutorial

On the image below, the vignette was added using the same solid color method as above. You can then play around with the blend modes to see what looks best.

biege - color-burn

This was done using the same solid color as above but Color Burn Blend Mode.

way-to-add-vignette-tutorial

This one is done with a black solid color added, masked, and Overlay Blend Mode with the layer at 80% opacity.

This one is done with a black solid color added, masked, and Overlay Blend Mode with the layer at 80% opacity.

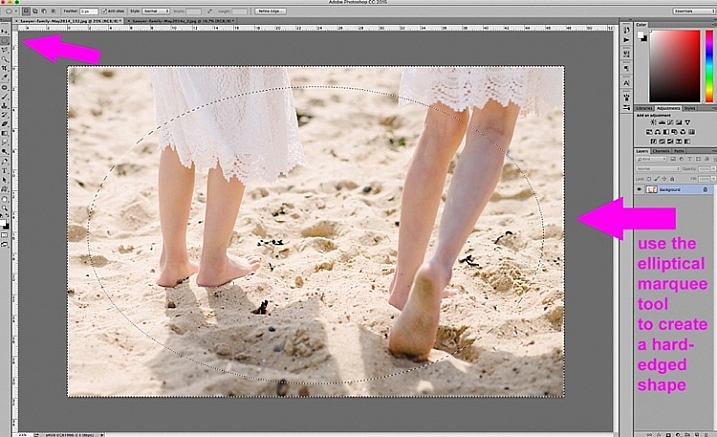
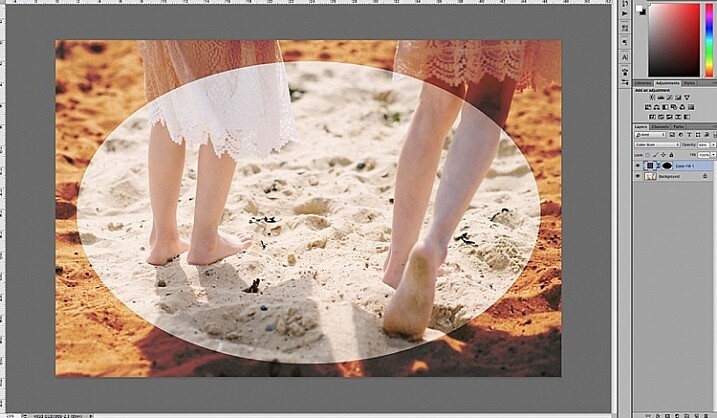
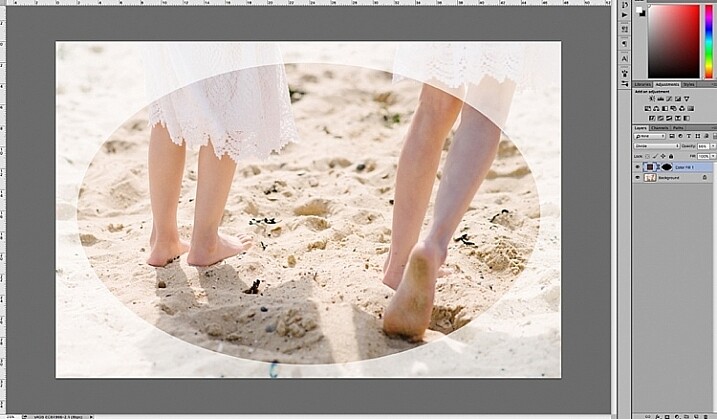
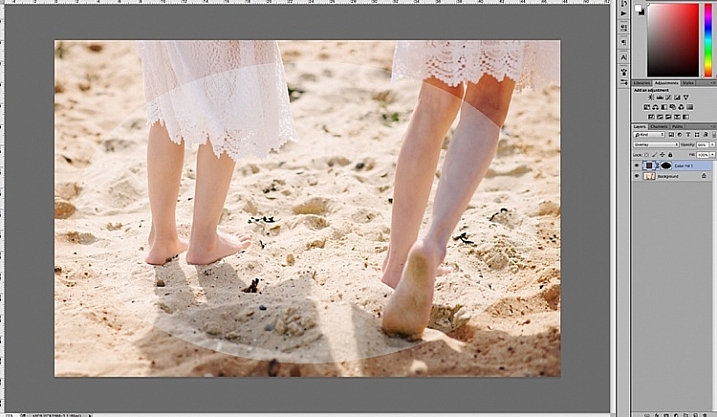
You can also make shapes as vignettes, using the marquee tool.  The elliptical marquee tool was used for the image below, creating a hard-edged vignette. Make your shape by dragging this tool on your image, and you will see marching ants around the shape you have just created. You must immediately invert it using CMD/CNTRL + shift + I so the outside of the shape will be selected and would now be the area surrounded by the marching ants (as below).

elliptical marquee

Click on the solid color icon and select a color. A new layer with your shape filled with the solid color will automatically be created. Select this layer and play around the the blend modes and the layer opacity. You will see below what the Divide, Color Burn and Overlay modes look like.

Color Burn Blend Mode

Color Burn Blend Mode

Divide Blend Mode

Divide Blend Mode

Overlay Blend Mode

Overlay Blend Mode

You will want to feather the mask on your color layer, or blend the edges manually using the brush tool so that you do not see the edge of the vignette so well-defined. I’ve left it like this for demonstration purposes so you can see what the vignette layer is doing.

Below is the final image with only a hint of vignette on the edges, just to take the edge off the brightness of the scene.

way-to-add-vignette-tutorial

I hope this tutorial has given you some new ideas on how to enhance your images using vignettes. Do you have other quick ways of adding vignettes to your images? Share them here.

googletag.cmd.push(function() {
tablet_slots.push( googletag.defineSlot( “/1005424/_dPSv4_tab-all-article-bottom_(300×250)”, [300, 250], “pb-ad-78623” ).addService( googletag.pubads() ) ); } );

googletag.cmd.push(function() {
mobile_slots.push( googletag.defineSlot( “/1005424/_dPSv4_mob-all-article-bottom_(300×250)”, [300, 250], “pb-ad-78158” ).addService( googletag.pubads() ) ); } );

The post 4 Quick Ways to Add a Vignette to Your Images in Post-Processing by Lily Sawyer appeared first on Digital Photography School.


Digital Photography School

 
Comments Off on 4 Quick Ways to Add a Vignette to Your Images in Post-Processing

Posted in Photography


Creating vignette effect in photoshop

07 Feb

There are several ways on creating a vignette effect, this video will show you 2 ways on doing it.
Video Rating: 5 / 5

 
Comments Off on Creating vignette effect in photoshop

Posted in Retouching in Photoshop