RSS
 

Posts Tagged ‘Viewers’

Composition Tips for Drawing the Viewer’s Eye Through Your Photographs

03 Sep

There are many different elements of photography that can affect how the viewer perceives an image. The more you learn to understand how various elements affect an image, the more you can learn to take control of them. Great photography doesn’t happen by chance, it’s crafted and pieced together. If you follow these composition tips they will have you do just that.

joshua tree at night brightness drawing the eye - Composition Tips for Drawing the Viewer's Eye Through Your Photographs

One of the most important elements of photography to understand is how the viewer’s eye is drawn through the image. You may think that when you view a photograph you see the whole picture as one. In one sense this is true, as you can absorb much of an image in a millisecond. At the same time, your eye moves through an image in a way that you’re usually completely unaware of.

The reason why it’s important to understand this concept is that if an image has a natural path for the eye to follow and a strong subject to focus on, it’s far more satisfying. An image that’s too busy and doesn’t have a clear subject isn’t as appealing and the viewer will not linger long.

As the photographer, you can be intentional about how you craft your image so that the viewer’s eye moves through it the way you want.

The Human Eye

Our eyes are bombarded by so many different sights every day that we have to be selective about what we look at and what we ignore. This is usually a subconscious decision that happens as our brains try to filter the information that is passed from our retinas. Much study has been done into what visual elements draw our attention, which is super helpful for those of us that create visual art.

Brightness

Controlling the brightness of various parts of your image is one of the most powerful ways to control the viewer’s eye. You can use this to your advantage in a couple of ways.

Including or adding brightness to areas of an image is a great way to draw the viewer’s eye to that element. The other side of this is to limit brightness or darken areas of an image where you don’t want to draw attention.

sunset over water - Composition Tips for Drawing the Viewer's Eye Through Your Photographs

How you add or subtract brightness to an image will depend a lot on your subject. If you have control of the light you can take control with the way you light the image. Even if you don’t have control of the light you may still be able to manipulate it somehow with neutral density filters or by framing the image differently.

Whatever your subject, you can always control brightness in post-production. Learning to dodge and burn is one of the most valuable skills you can have for controlling light in your photography. Even something as simple as a vignette can have a dramatic effect.

brick wall with birds in a window - Composition Tips for Drawing the Viewer's Eye Through Your Photographs

Contrast

Areas of high-contrast draw the eye more than anything else.

A dull, flat image with no contrast has very little visual appeal. If you really want to draw the attention of your viewers to a certain element of an image, try to find a way to add contrast to the element, or to the area surrounding it.

contrast lines drawing the eye in sand dunes - Composition Tips for Drawing the Viewer's Eye Through Your Photographs

There are many ways to do this. For example, you can overexpose the background to make it contrast with the foreground subject. Alternatively, you can underexpose the foreground to make a silhouette which contrasts with the background.

Again, you can also use post-processing techniques to further control contrast in your image to draw the eye. Adding contrast to areas where you want to draw attention, and removing contrast from areas that you don’t want to distract the viewer can go a long way to drawing the eye.

You can do this using basic tools in Lightroom like the Contrast and Clarity sliders. Control the areas you want to add or subtract contrast from others with the local adjustment tools.

contrast drawing the eye lady on a large sand dune - Composition Tips for Drawing the Viewer's Eye Through Your Photographs

Color

You’re probably aware of how powerful color can be in controlling the mood of an image. The feel of an image with bright colors is very different from an image with muted, desaturated colors.

But what you may not know is that the human eye is strongly attracted to bright colors. Have ever seen the old “selective color” images that convert an image to black and white while leaving one element in color? Fortunately, the trend is long-dead, but it shows how powerful color can be at drawing the eye.

color drawing the eye brightly colored parrots - Composition Tips for Drawing the Viewer's Eye Through Your Photographs

Adding color to an image isn’t always easy. You may be able to color elements of an image with colored gels if using flash.

Subtracting color from an image is often even more important if it’s distracting to the viewer. This is often the case when photographing people. Colorful clothing draws the eye away from the more subtle skin colors of faces. This is why portrait photographers often tell their subjects to wear plain black or white clothing.

Adding and subtracting color in post-production isn’t difficult, but takes practice and restraint. It’s easy to overdo it. You can do a lot with the local adjustment tools and the Vibrance/Saturation sliders in Lightroom. Remember, when it comes to adjusting the color or saturation of a photo, less is more, especially when skin tones are involved.

Sharpness

Have you ever noticed how a blurry image is very unpleasant to look at? Even if it’s only a little bit out of focus, your eye will detect it.

The human eye’s instinct is to adjust focus until what it’s looking at appears sharp. If it can’t find something sharp to rest on, you won’t like what you’re looking at.

sharpness drawing the eye small girl in colorful dress with blurry background - Composition Tips for Drawing the Viewer's Eye Through Your Photographs

You can use this to your advantage in your photography. You probably know that a shallow depth-of-field when photographing portraits creates a very pleasing look. This is because the eye is naturally drawn to the sharp face of the subject while avoiding the other elements that are out of focus. The most obvious way to control focus is using large apertures and a small depth-of-field, but it isn’t the only way.

You could try playing with slower shutter speeds and motion blur. Panning with a moving subject and a slow shutter speed can blur the background while keeping the subject acceptably sharp.

You can also add blur in post-production. Moving the Clarity slider to the left will soften the selected elements that you don’t want to draw attention to. You can also add sharpness to selected areas, but be careful about trying to save an out-of-focus image by increasing sharpness (it doesn’t work!).

sharp rocks in smooth water - Composition Tips for Drawing the Viewer's Eye Through Your Photographs

Take Control

As you learn these composition tips that can guide your viewers, you can start to take control of the process. Adding and subtracting these elements from your images can have a significant effect on how visually pleasing they are. Take some time to think about what you want your viewers to look at and then ask yourself what you can do to make that happen.

Although the way you process your images is very useful, try to think about controlling these elements in-camera first. It isn’t always possible, but taking control over the brightness, contrast, color, and sharpness in-camera will give you better images to work with in post-production. Also, trying to save an image by pushing Lightroom sliders to their extremes usually isn’t a good idea.

As you get more intentional about what you add and subtract from your photography, you’ll start producing more engaging images. Your photography will also become more appealing to the viewer and yourself.

The post Composition Tips for Drawing the Viewer’s Eye Through Your Photographs appeared first on Digital Photography School.



Digital Photography School

 
Comments Off on Composition Tips for Drawing the Viewer’s Eye Through Your Photographs

Posted in Photography


5 Simple Techniques for Leading the Viewer’s Eye in Your Images

16 Feb

As photographers, it’s easy for us to make conscious composition choices that allow us to balance our photographs or to create harmony within them. It’s is more difficult however to try and lead viewers through your photographs. We rarely consider how to influence the viewers of our photographs. When composing images, we don’t think about the different elements in our images and the order by which we want viewers to see those elements.

This is a common tactic in classic painting, but not used readily by photographers. The reality is it’s hard to influence viewers and to dictate the ways in which they view our photographs.

The lines of the creek lead the viewer’s eye through and into the image.

In many cases, the subject matter we are shooting just happens too fast for us to consciously compose images with the intention of leading the viewer through our photographs. It’s much easier to lead the eye through images we construct like still life or landscape photos. In the case of sports photography, this would only happen by sheer luck or happy accident. But when you have the opportunity, think about using techniques that lead viewers to specific parts of your images.

#1 – Use a brightness gradient

One of my favorite techniques for leading the eye is to use a brightness gradient. The human eye is drawn to the brighter elements, and if you position an area of brightness within your image, the eye will be drawn to that location.

It is important, however, to remember that the key to this technique is to use a gradient of brightness. Small bright areas amidst darker tones will not achieve the same kind of effect. The idea is to make the progression of highlights subtle, like a path through your image. Of course, this technique will not be possible in all situations but if it’s available considering using this method.

5 Simple Techniques for Leading the Viewer's Eye in Your Images

Shot from a kayak during sunrise I wasn’t intending to shoot this image with a brightness gradient. Instead, it’s a happy accident.

#2 – Linear perspective

When using a wide angle lens, you can consciously create linear perspective within images. This technique might be one of the more easily attainable methods of leading the eye. The wide angle lens will exaggerate lines and lead the eye fairly directly through the photograph. You can compose your photographs in such a way that buildings or other architectural features draw viewers through your photograph.

5 Simple Techniques for Leading the Viewer's Eye in Your Images

The line of lights and the line of buildings lead the eye through the photo. The viewer should be stopped by the bright spots of light within the image but then continue on through the rest of the photograph.

I’ve added some arrows to this image so you can see how the lines of the pier point the viewer into the photograph. The teenager in the image is a second way of directing the eye as he stops to view the sunset.


#3 – Use shafts of light

Using shafts of light is another technique for pointing viewers in the right direction. The conditions are very specific, and shafts of light are not always readily available, but they can be a useful tool for pointing out specific directions or objects within a photograph.

The photograph below was taken by my son. His plan when composing was to have the ray of light point towards the people. I must admit I didn’t think of composing in such a manner and when I asked him later he said it was “the natural choice”. Since that time I’ve made conscious decisions to look for and incorporate rays of light into my images.

5 Simple Techniques for Leading the Viewer's Eye in Your Images

There’s a fairly strong lens flare in this image but my son made a conscious choice in how he composed his photograph and I’m proud of him for his decisions.

#4 – Use a blur gradient

Using a blur gradient (shallow depth of field) is another method of leading the eye. I will admit that I don’t use this technique much. I even struggled to find images to use as examples for the article. Part of my reasoning is that I hope I will now be forced to experiment more with this technique.

Using a focus gradient can lead the eye to the important elements of the photograph. Setting up a shot in which the foreground is blurred and slowly recedes through the image to the point of sharp focus will draw viewers to specific objects within the frame.

I used a fairly large aperture here and while the blur gradient isn’t as obvious it is still present in the image.

#5 – Use more than one technique

You can also combine these techniques to help influence eye movement throughout your images. In these two images, the eye moves through the image the light gradient is the most obvious technique but lines of architecture within the building help to draw the viewer down the tunnel. The lights hanging at the top of the image are an obvious line that directs the eye.

Similarly, this image of the couple walking through the image adds to the movement within the photograph. The lines of the path reinforce the direction the viewer should take within the image.

Shot at a provincial park this image combines elements like linear perspective and vectors.

Conclusion

Leading the eye through a photograph is not an exact science. You can’t force viewers to follow the path you set for them. Each person approaches the artwork in different ways. If your use some of the techniques outlined here, it will help you to create compelling compositions. The more thought and purpose we put into creating our images the better they will be. While there may not always be time to use these techniques, it’s always handy to keep them in the back of your mind and use them when the time is right.

The more thought and purpose you put into creating your images the better they will be. While there may not always be time to use these techniques, it’s handy to keep them in the back of your mind and use them when the time is right.

The eye-leading techniques used in this image are a little harder to spot. I used the lines of the barrels and rays of light to direct the viewer’s eye into the center of the image.

googletag.cmd.push(function() {
tablet_slots.push( googletag.defineSlot( “/1005424/_dPSv4_tab-all-article-bottom_(300×250)”, [300, 250], “pb-ad-78623” ).addService( googletag.pubads() ) ); } );

googletag.cmd.push(function() {
mobile_slots.push( googletag.defineSlot( “/1005424/_dPSv4_mob-all-article-bottom_(300×250)”, [300, 250], “pb-ad-78158” ).addService( googletag.pubads() ) ); } );

The post 5 Simple Techniques for Leading the Viewer’s Eye in Your Images by Erin Fitzgibbon appeared first on Digital Photography School.


Digital Photography School

 
Comments Off on 5 Simple Techniques for Leading the Viewer’s Eye in Your Images

Posted in Photography


How To Lead Your Viewer’s Focus to the Subject

05 Jul

Take a look at this photo and remember what your initial thoughts are:

Inlaid Marble Detail Inside Taj Mahal, Agra, India, Asia

Inlaid marble detail inside Taj Mahal, Agra, India, Asia

Where was the first place you looked in the photo? What about the second?

Some of the more interesting photos (and artwork in general) moves your view around the image, and often brings you back for more.

When you take a photo, you know what you’re looking at and what is most important, but this doesn’t always come through in your picture, unless you make a concerted effort to help the viewer see the same thing. Luckily, as a photographer you have more than a few tricks to lead your viewers in your photos.

Leading Lines

The first technique is to simply point the way. As humans, we like lines that go somewhere and we tend to follow them. A trail, a road, repeating patterns; they are all fodder for the technique of leading lines.

PWC-2011-0207-0588

Crossing to the Olympic Peninsula, Washington, USA

Prayer Wheel Wall, Kathmandu, Nepal

Prayer wheel wall, Kathmandu, Nepal


Leading lines, when stretched far, can also give your image greater depth by taking viewers into your scene. The lines need not be straight. They can be as meandering as a forest path.

PWC-110402-153640-3017

Meandering path, Cascade Mountains, USA

Non-traditionally, I consider a repeating pattern, moving in a particular direction, to be a form of leading line. Such as with this line of bridge braces.

Across The Bridge

Wooden bridge in Olympic National Park, Washington, USA

Selective Focus

Selective focus seems so simple, but can be tricky if you haven’t mastered the use of aperture in your photography. Selective focus is also useful when you have a subject far on the edge of your photo. By habit we tend to look at the middle of a scene first and it’s quite easy to use selective focus to move your viewers to the edge, and the main subject.

PWC-100815-070403-0541

Sunrise on South Sister Mountain, Oregon, USA

It’s also another way to help your viewers ignore the distractions in the scene and find the main subject.

Alaska Rainforest Floor, Glacier Bay National Park, Alaska, USA

Alaska Rainforest Floor, Glacier Bay National Park, Alaska, USA

There is a great article here: How to Use Leading Lines for Better Compositions by Anne McKinnell, that expands on this topic.

Colors

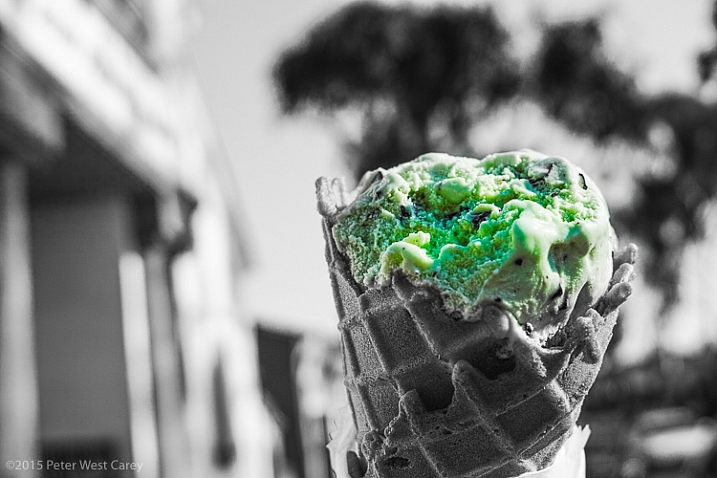
We’ve all seen this technique that became quite popular many years ago.

Chocloate Chip Mint Icre Cream Cone, Balboa Island, California, USA, North America

Chocolate chip mint ice cream cone, Balboa Island, California, USA, North America

You might have just cringed or you might have liked the technique, but there is no doubting where you looked in the photo.

But color need not be a single instance amongst black and white. Simply having a splash of color in a fairly monotone scene helps move the viewer to your main subject.

Prayer Flags And Cho Oyu, Gokyo, Nepal, Asia

Prayer flags and Cho Oyu, Gokyo, Nepal, Asia

Plumeria flowers, outdoors

Plumeria flowers, outdoors

Coffee Cherries Sit Ripe For Picking In Hawaii, USA

Coffee cherries sit ripe for picking In Hawaii, USA

Contrast

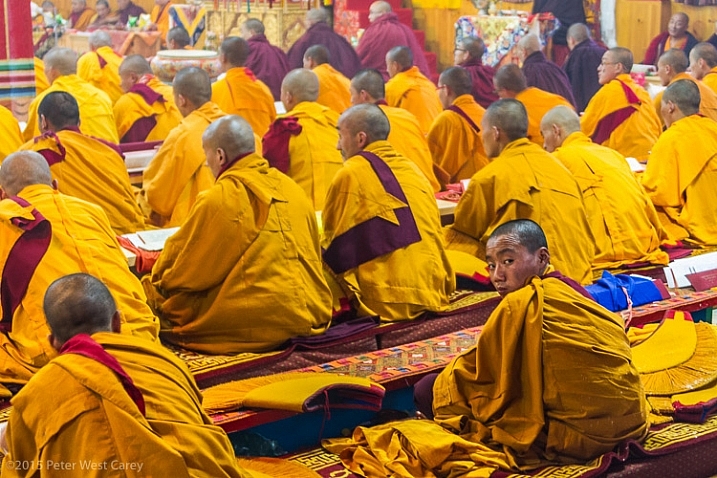
Something or someone going against the grain also brings focus and attention to that point.

PWC-Bhutan2013-0321-6240

Buddhist monks, Jakar, Bhutan

It can also be a contrast in colors or patterns.

High above California's Central Valley, USA

High above California’s Central Valley, USA

The wide open spaces of Serengeti National Park beckon, Tanzania, Africa

The wide open spaces of Serengeti National Park beckon, Tanzania, Africa

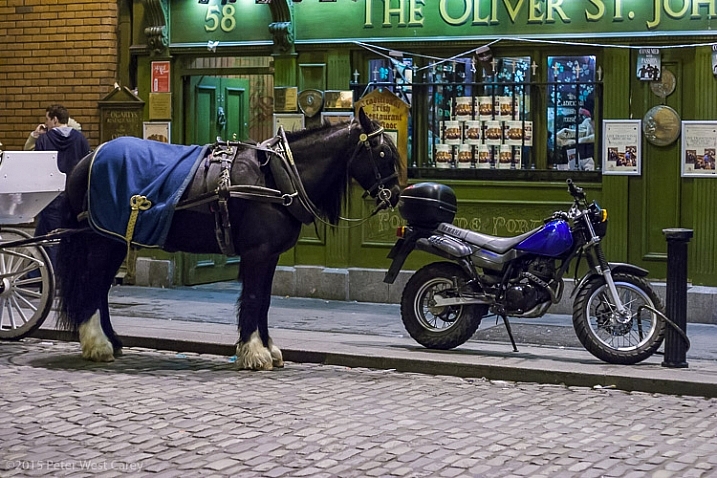
Or it can be a juxtaposition that is the contrast; old and new, youth and elders, fast and slow, etc…

PWC-040318-215251-9790

Old:New; Slow:Fast, Natural:Man-made – Dublin, Ireland

Eyes

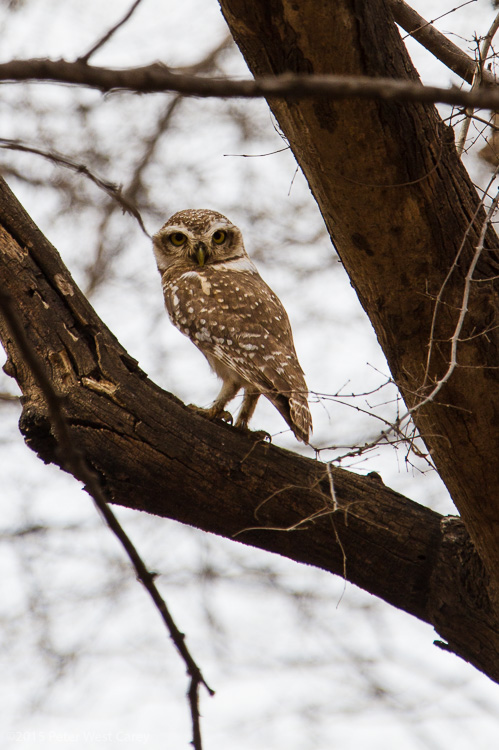
Eyes are an easy way to draw focus. So easy, it almost seems like cheating. We naturally connect with eyes, be they human or animal. We can look around a scene and find eyes faster than most objects.

Use that to your advantage!

Close-up of monkey - East Africa - Tanzania

A baboon in the thicket, Serengeti National Park, Tanzania

PWC-India2012-0418-7848

Pygmy owl, Ranthambhore National Park, India

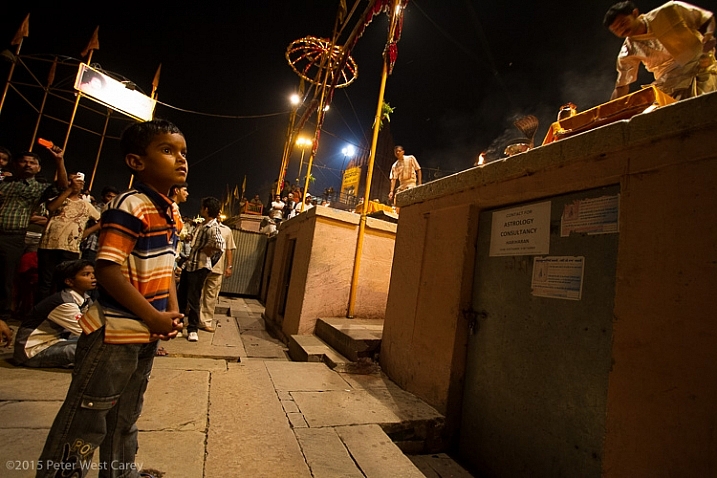
Eyes can also be used to point a way. I have often stated that we don’t like eyes looking off the edge of the photo because we want to know what the person is looking at. But eyes looking toward the middle of an image invite exploration.

PWC-India2012-0422-8911

Child watching Ganga Arti Celebration, Varanasi, India

Frozen Action

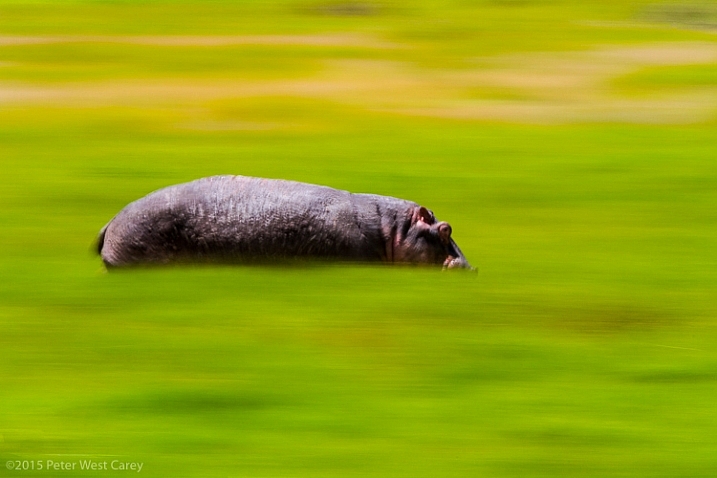
Panning blur is a simple technique to freeze action on your subject, while letting the rest of the image blur. This is a type of selective focus, when we get right down to it, but used in a unique way.

Hippos are amazingly fast animals, deceptively so. I had heard about this before heading to Africa in 2010, but once I witnessed just how fast they can run, and how mean they can be, I made sure my daughter and I were always close to, or in, a vehicle larger than a hippo when they were around. Ngorongoro Conservation Area, Tanzania.

Hippos are amazingly fast animals, deceptively so. I had heard about this before heading to Africa in 2010, but once I witnessed just how fast they can run, and how mean they can be, I made sure my daughter and I were always close to, or in, a vehicle larger than a hippo when they were around. Ngorongoro Conservation Area, Tanzania.

The technique not only leads viewers directly to the main subject as it is the only thing in focus, but also has them looking back where the subject came from, and asking why is there movement.

For more on this technique, check out: Mastering Panning – Photographing Moving Subjects.

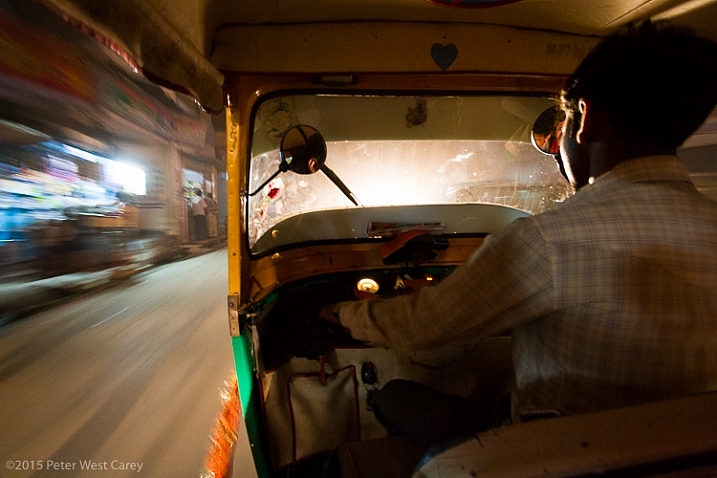
It can also be used when inside a moving object to emphasize speed, while also giving focus to the stationary objects of interest.

Speeding through the night streets of Varanasi, India

Speeding through the night streets of Varanasi, India

Going Into Your Photo

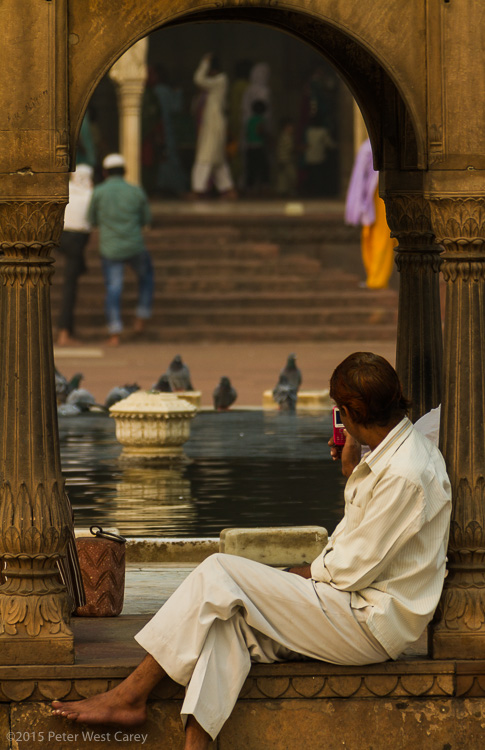
Arches, doorways, tunnels…these are all things that naturally make us want to go “into” a photo. We want to progress from the outside in. Craft your images by having more than one layer, in a three dimensional sense.

PWC-India2011-1031-9584

Taking photos at Masjid-i Jah?n-Num?, Delhi, India

Through The Arch

Arches National Park, Utah, USA

Conclusion

Postcard shots are certainly a fine use of a digital camera. They capture a whole scene and make things static. But if you want to move your viewers around your images and have them coming back for more, think about how you are composing your photos.

googletag.cmd.push(function() {
tablet_slots.push( googletag.defineSlot( “/1005424/_dPSv4_tab-all-article-bottom_(300×250)”, [300, 250], “pb-ad-78623” ).addService( googletag.pubads() ) ); } );

googletag.cmd.push(function() {
mobile_slots.push( googletag.defineSlot( “/1005424/_dPSv4_mob-all-article-bottom_(300×250)”, [300, 250], “pb-ad-78158” ).addService( googletag.pubads() ) ); } );

The post How To Lead Your Viewer’s Focus to the Subject by Peter West Carey appeared first on Digital Photography School.


Digital Photography School

 
Comments Off on How To Lead Your Viewer’s Focus to the Subject

Posted in Photography


How to Use the Right Captions on Your Photos to Better Connect With Viewers

03 Jun

30 years ago, we used slides, prints and albums to share photos with family and friends.  Now, between Facebook, Instagram, Flickr, Google+ and 500px, you have more options than ever to share your photos.  The problem is, how do you connect to this much larger audience?

Sharing a story alongside your photo will help you connect with your followers, and often turn a great photo into something spectacular.

When you share a photo, people may wonder where it was taken, why you were there, what made you photograph the scene, or what was going through your head the moment you snapped the shutter. These are all questions that can be spun into a narrative and shared along with your photo.

The right caption draws viewers into the image

Here’s an example. Which of the following captions draws you in and makes the photo more interesting for you?

Image1

Caption 1: Kayakers on the Hudson River

Caption 2: Springtime in upstate New York is full of variable weather. The changing temperatures coupled with different types of precipitation can make for beautiful and unpredictable landscapes. On this particular morning, the Hudson River was covered in a thick fog and knowing how fleeting that can be, I hurried down to the waterfront hoping to capture some shots. Out of nowhere, two colorful kayakers appeared, adding life to my scene as they cut their way down the river and disappeared into the abyss.

I may be biased, but for me it’s Caption 2. Seeing a beautiful photo with a story attached to it pulls me in. It puts me in the same space that the photographer was in when they took the photo, enriches my experience, and ultimately makes the photo, which was good in the first place, a great one.

If you went to a yard sale and and saw a beautiful glass bowl for $ 20 you may think, “Well, that’s a bit steep for a simple bowl at a yard sale.” But, I bet your mindset would change if the owner told you a story about the bowl — how she acquired it at a glass blowing factory in Halifax back in the 1950s, how it was one of just a handful made and how the bowl moved around the United States with her and family for the past 60 years. Now $ 20 seems like a bargain!

Nothing changed, you just got some more information. A story enriched your understanding, and in turn, completely changed how you experienced something.

Here’s another example:

Image2

Caption 1: The Mohonk Mountain House after an ice storm

Caption 2: It was early December and an ice storm had just ripped through the Hudson Valley leaving debris, destruction, and a clear blue sky in its wake. My wife and I began our hike that day at a lower elevation, and realized as we got higher that the entire forest was encased in ice. It was a winter wonderland that was both beautiful and dangerous. Limbs of trees were scattered everywhere, boulders were slick with ice and in some spots, five foot long icicles hung like stalactites above our heads. As we made our way to the top of the mountain, I stepped into a small gazebo overlook and focused on the Mohonk Mountain House and surrounding landscape, letting the icicles in the foreground frame my shot.

There’s nothing wrong with the first caption, but the second caption really paints a picture in the viewer’s mind and places them there with you.

Here’s another shot I took this winter.  In the past I would have shared it with Caption 1 below, but instead I shared it with Caption 2,  and found that it really resonated with my audience.

Image3

Caption 1: Winter Sunset

Caption 2: It was a Friday night and I rushed out of work wanting to photograph something. I made a quick stop at home, put on boots, and grabbed my snowshoes just in case. With so much snow on the ground I racked my brain for a spot that I could easily get to with the potential for a decent sunset shot. Luckily, this incredible vista is just down the street from me. I got there when the sky was beginning to turn all sorts of colors, hurriedly set up my tripod, and captured this winter sunset. I stayed for a little while, watching blues give way to pinks, yellows and oranges until all the color in the sky was gone and my frozen hands signalled to me that it was time to go home.

Viewer experience is enhanced

Not every photo needs a page of text written alongside it, but it’s been my experience that adding a couple of sentences, rather than just a few words (or none at all), greatly enhances the experience of the viewer.  It helps them to connect to your photo and ultimately with you as a photographer.

Image4

Caption 1: The Space Needle in Seattle

Caption 2: After an afternoon touring Seattle and Pike Place Market, my wife and I headed over to the Olympic Sculpture Park but found it was closing just when we arrived. Disappointed that I wasn’t able to capture any images of the park, I turned my camera around towards the city as we left and captured this unique view of the iconic Space Needle.

Summary

When I share a photo, I want people to respond to it. I want them to share in the moment and feel what I was feeling when I took the photo. Your story might seem mundane to you, but to your audience it gives them a closer look at who you are and how you think — as a person and a photographer.

googletag.cmd.push(function() {
tablet_slots.push( googletag.defineSlot( “/1005424/_dPSv4_tab-all-article-bottom_(300×250)”, [300, 250], “pb-ad-78623” ).addService( googletag.pubads() ) ); } );

googletag.cmd.push(function() {
mobile_slots.push( googletag.defineSlot( “/1005424/_dPSv4_mob-all-article-bottom_(300×250)”, [300, 250], “pb-ad-78158” ).addService( googletag.pubads() ) ); } );

The post How to Use the Right Captions on Your Photos to Better Connect With Viewers by Joe Turic appeared first on Digital Photography School.


Digital Photography School

 
Comments Off on How to Use the Right Captions on Your Photos to Better Connect With Viewers

Posted in Photography


Directing your Viewer’s Eyes with Lightroom to Make a More Powerful Image

17 Aug

One key to a successful photograph is that it directs the viewer’s attention towards the subject in question. There are many ways that this can be achieved through composition and lightning in the field, but did you know, you can also direct the attention of your viewer’s eyes through post-production?

truck edit-2

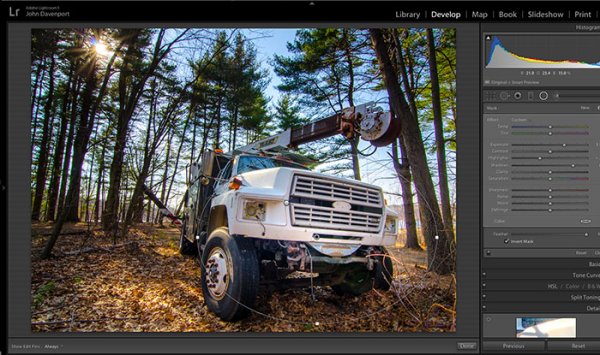
You still need an interesting subject for this to work, as directing your viewer’s eyes to a boring location within a frame is still going to result in a boring photograph. For the sake of this tutorial I’ll be using this photograph of an abandoned utility truck, but you could use anything from an interesting tree, to a model, to your pet, and achieve similar results.

First a few basic edits to bring the photo to life

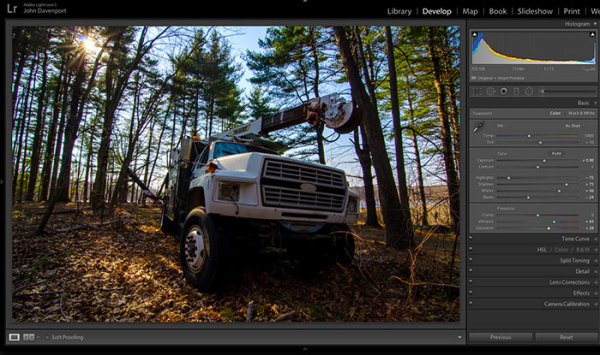
Before we can work on drawing the attention of the viewer this photograph needs a bit of life pumped back into it. Having shot this photograph into the sun, the foreground and front of the truck are going to require some basic recovery techniques. I’ll be using the Basic Tab in Lightroom 5 to recover the detail and add some interest to the shot.

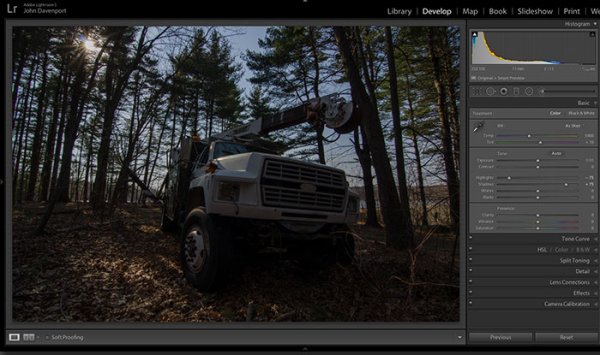
Step One: Highlights and Shadows

direct-viewers-attention-11

Shooting into the sun can be tricky as it often will cause your sky to turn white. Reducing the highlights slider will help to counteract this. It does so by targeting the brightest areas of your photograph without effecting the overall white point of the image. The shadows slider has a similar effect on the darker areas of the image, allowing detail to be brought out in the grill of the truck and along some of the trees.

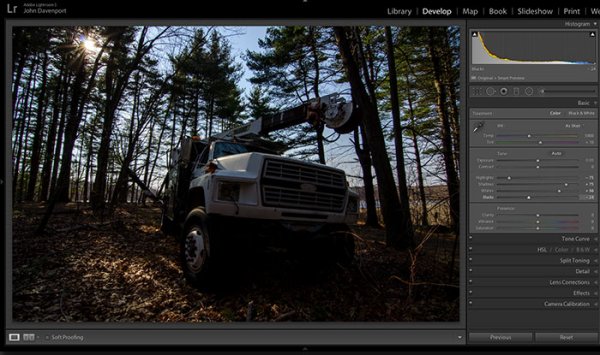
Step Two: Add contrast with the Blacks and Whites sliders

direct-viewers-attention-10

One of the problems with the highlights and shadow recovery technique above is that it often will reduce the contrast of the image and create a sort of muddled and dull look. To counteract this you can use the whites and blacks sliders to effectively set your white and black points, as well as bring a bit of contrast back into the image. This allows you to have a bit more control over the contrast of your image as opposed to the more global Contrast slider adjustment.

Do this by dragging your White slider to the right until your histogram touches the right edge of the graph. Make sure not to go too far and clip any highlights. Holding down the Alt (Option) key while you drag the slider will show any areas that are clipped – so drag to the right until you see some, then bring it back to the left just until they are no longer visible. Do the same with the Blacks slider by pulling it to the left. The Alt (Option) key works with this one too, but in the case of Blacks you actually do want a little clipping. Having a good black in your image will add that contrast you’re looking for.

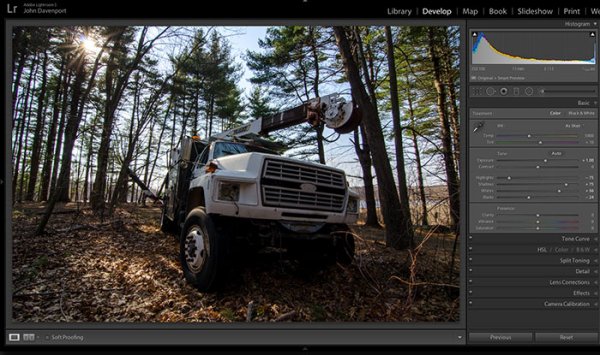
Step Three: Even out the exposure

direct-viewers-attention-9

Now that the highlights, shadows, whites and blacks are set –  a quick bump up on the exposure slider will even out the rest of the scene and get us close to something we’re ready to work on.

Step 4 (optional): Saturation and Vibrance

direct-viewers-attention-8

For this particular shot I wanted to add a bit more saturation to the trees and the floor of the forest. It’s going to depend on the shot that you’re working on, and the look that you are trying to achieve, as to whether this step is necessary. But it doesn’t hurt to play around with it before you move on to the next steps.

For more on Lightroom’s Basic Tab read: Master These Five Lightroom Sliders and Your Photos Will Pop

Now to draw the attention of the viewer

While the truck itself is a strong subject, and one that does capture the viewer’s attention on its own, there are a few tools that Lightroom has to offer which will allow for even more attention grabbing goodness.

Cropping for better positioning

direct-viewers-attention-7

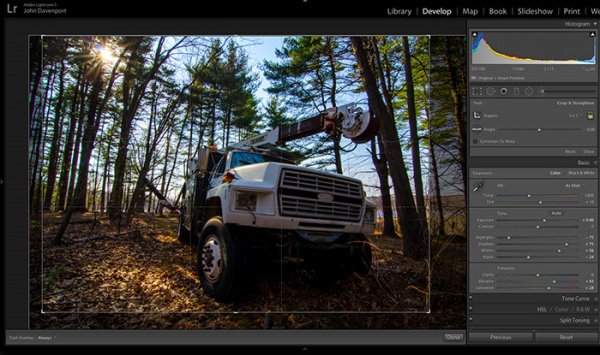
The crop tool allows you to have more control over the positioning of your subjects within the frame. In this shot the truck was a bit too centred and there was a little too much dead space in the forest so by cropping in a bit closer the shot becomes a bit more balanced, allowing the viewer’s eyes to stay focused on the truck.

The Graduated Filter tool

direct-viewers-attention-6

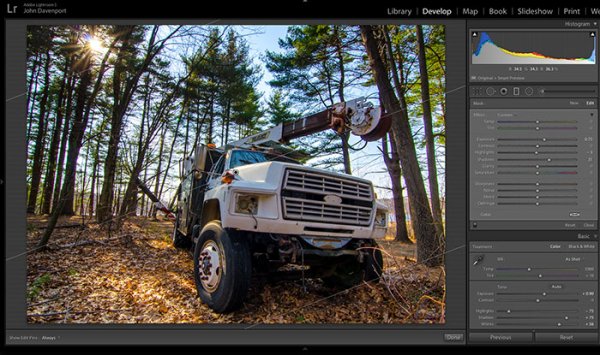
By adding a graduated filter to the bottom right of the image more detail can be recovered from the front of the truck without effecting the rest of the exposure. This allows for a more compelling focal point for the viewer to rest their eyes on. When you go about placing graduated filters in your own images be sure to think about how it’s effecting the overall light of the scene and ask yourself if it looks natural.

Getting creative with graduated filters can allow you to have some really interesting results read 4 Fun Tricks to Enhance Your Photos With Lightroom’s Graduated Filter Tool for more creative uses of the graduated filter tool.

The Radial Filter tool

direct-viewers-attention-4

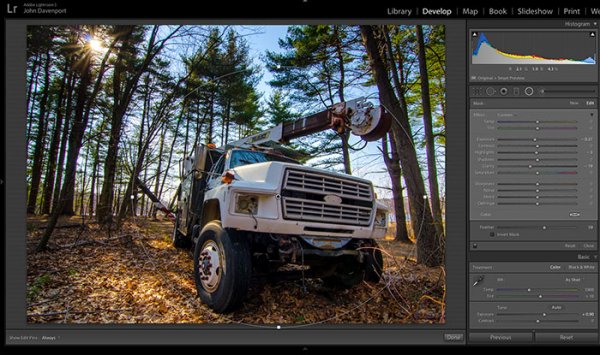
The radial filter allows for a subtle vignette to be added to the image which helps to keep the viewer’s eye within the frame. It also has the added benefit of darkening the sky, without darkening the truck, allowing for deeper blues to come through. After I was happy with this first radial filter I dropped in a second one to increase the brightness and detail of the grill of the truck. To do this the radial filter was inverted and the exposure and clarity sliders were increased.

direct-viewers-attention

Removing distractions

direct-viewers-attention-2

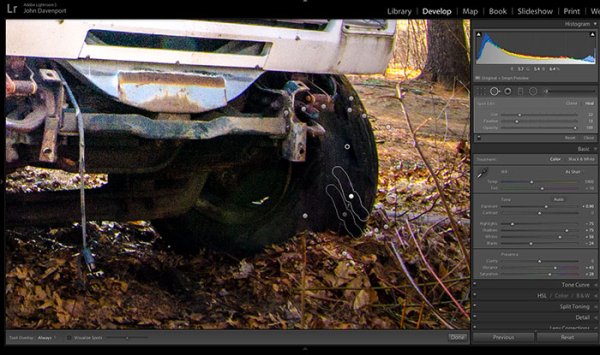
Once you’ve gone through all the work of drawing attention to a particular area of a photograph you’ll want to go through with Lightroom’s clone/healing tool and remove anything that competes for that attention. Adobe has greatly improved this tool in Lightroom 5 allowing you to drag paths, making it possible to remove distracting branches with ease.

The Final Edit

With a few quick adjustments in the basic tab, a simple crop, and a few of Lightroom’s filters –  this utility truck really grabs the attention and is a vast improvement over the original straight out of camera shot. Go try this workflow for yourself and share your own before and after in the comments below!

truck-edit2

Watch this Edit Click for Click

For those who prefer to sit back and watch – here’s  a quick video of the edit above.

The post Directing your Viewer’s Eyes with Lightroom to Make a More Powerful Image by John Davenport appeared first on Digital Photography School.

Digital Photography School

 
Comments Off on Directing your Viewer’s Eyes with Lightroom to Make a More Powerful Image

Posted in Photography