RSS
 

Posts Tagged ‘Variety’

How to Mix Lifestyle and Posed Photography Styles to Add Variety

28 May

The post How to Mix Lifestyle and Posed Photography Styles to Add Variety appeared first on Digital Photography School. It was authored by Jackie Lamas.

As photographers, we take time to hone in our craft and practice many hours getting it right. When it comes to photographing people, there are two main approaches in directing clients to get the photos you want. I’ll explain the difference between both, and how to apply the two during the same session to get the most variety in the final gallery that your clients will absolutely love!

Mixing posed and lifestyle can add variety to your photos.

What is lifestyle photography?

Lifestyle photography is when you capture your clients a little more naturally than you would if you were posing them. It’s all about letting the session unfold naturally all while you photograph your couple, family, or individual being themselves.

Lifestyle can mean going for a walk through a botanical garden with your clients.

It’s also about showcasing the person in their daily life or routines too. For example, joining a family as they casually hang out at their home and bake together. Or joining a couple for coffee and a stroll through the park.

Going for coffee while you photograph your clients can also be considered lifestyle.

Lifestyle photography can be both natural or styled. Styled simply means curating the look so that even though the person is hanging out drinking coffee on their sofa, they are dressed and using items that make the photos have a cohesiveness.

Using a styled home can also offer a great location for lifestyle photos of a couple hanging out in the living room.

Much of what you see on Instagram can be considered lifestyle photography.

What is posed photography?

Posed photography is when you are directing your clients to sit, stand, and well, pose exactly how you would like them to. This gives you a more controlled and directive role in addition to being the photographer.

Directing people to pose a certain way is posed photography.

Posed photography can be really beautiful and usually lies in the editorial, fashion, or fine art styles of photography. However, posed photography can be used in every session where you want to control the final pose in your photo.

How to mix both styles to get variety

In a portrait session, it doesn’t matter if it’s family or just one person, mixing the two styles can really help add variety in the final images that you deliver to your client.

Mixing styles

When you’re starting the session, begin with posed photography because most clients are nervous at the beginning of a session. Getting them comfortable posing, and being more direct in how you want them to stand can help them to feel more comfortable in front of the camera.

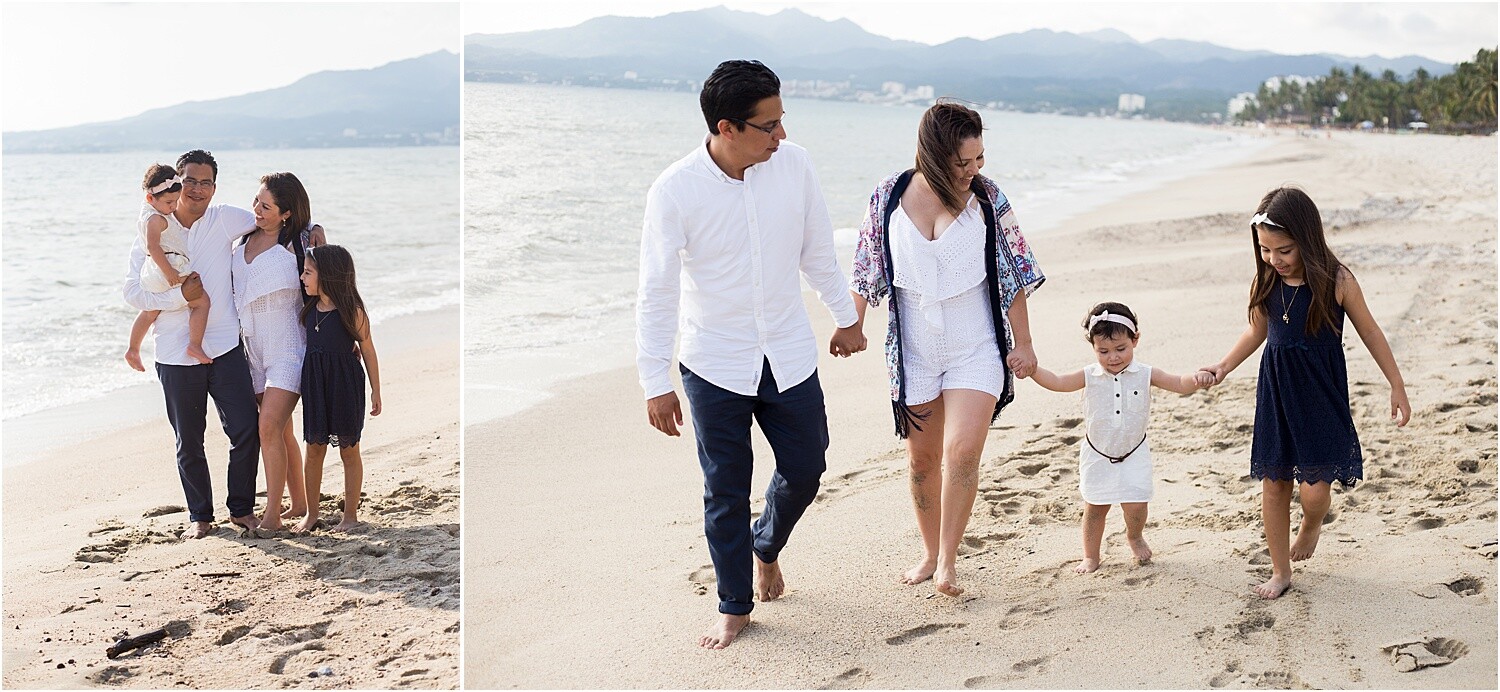
The photo on the left was lifestyle, and the right is posed. Same family, same session, two different styles that add variety to the final images.

While you’re posing, show your client exactly how you want them to pose rather than merely instructing, which can get confusing.

For example, instead of saying “put your left hand on your right elbow,” you would instead go over to where they are standing and show them how you want them to put the left hand on their right elbow.

This is a quicker way to help your client visually see what you want them to do.

After you’ve posed your client enough, and they seem a little more comfortable in front of the camera, go for the lifestyle approach.

Tell your client to relax and walk around the area. If it’s a family, for example, ask them to walk and talk to each other while telling a funny joke. Make sure to keep your camera at the ready during these times. That way you can achieve photojournalistic style photos that make lifestyle so meaningful.

With children, you can capture them playing with their toys and also get posed photos during the same session.

As you go through the session, keep alternating between posed and lifestyle. You can also pose your clients, a couple, for example, so that they’re facing each other, take a few photos and then ask the couple to say one nice thing about the other.

This is a great way to transition from posed to lifestyle. You will get authentic expressions from the couple because you are putting them in a particular pose then giving them something to do that will seem natural. It’s a perfect mix of the two styles at the same time.

If you’re more comfortable with lifestyle and candid photography styles, don’t be afraid to stop your clients in mid-walk, hug, or whatever they are doing naturally to hold the pose. This is a transition from lifestyle to posed.

Mixing the two styles offers your clients more variety as well as an overall great experience. They will feel more comfortable being in front of the camera because they were allowed to be themselves while you also stopped to make sure to get posed photos as well.

Using both styles will give the session a more fluid flow and also allows your clients to have a good time during the session. This is especially important when photographing children. Letting them play and have a good time while mixing in posed photos will give them a fun experience.

In conclusion

lifestyle-and-posed-photography

Mixing the two styles, lifestyle and posed photography, will add variety to your client’s photos and will also ensure that they have a great experience without feeling stiff or uncomfortable in front of the camera.


The post How to Mix Lifestyle and Posed Photography Styles to Add Variety appeared first on Digital Photography School. It was authored by Jackie Lamas.


Digital Photography School

 
Comments Off on How to Mix Lifestyle and Posed Photography Styles to Add Variety

Posted in Photography


Pentax offers K-30 in a variety of colors and finishes

03 Apr

k30_colors_logo.png

Pentax has announced a wide range of new colors options for its K-30 weather-sealed mid-level DSLR. Available in either a shiny ‘Crystal’ or matte ‘Silky’ finish, the 16MP DSLR now comes in dramatic tones like orange, yellow and blue. The cameras are available for pre-order at a retail price of $ 799.95, including the 18-55 kit lens. Click through to see a complete list of available color options.

News: Digital Photography Review (dpreview.com)

 
Comments Off on Pentax offers K-30 in a variety of colors and finishes

Posted in Uncategorized


5 Big Tips to add Impact and Variety to your Wildlife Images

30 Nov

A Guest Post by Piper Mackay from www.pipermackayphotography.com.

Wildlife photography can be very exciting, which generally means your adrenalin is running on overdrive. It is too easy to be caught up in the action of the moment and just snap away at what you are witnessing. What you saw was so great, yet when you view your images they just don’t seem to have the impact that you experienced. I have put together a series of images of wildebeest, generally a very boring animal that is quite drab in color. This is to help illustrate how light, mood, and motion can bring powerful visual impact to your images.

Wildlife Variety

This is a Wildebeest for those of you who have not seen one.

Plan to go at the Best Time

Many species migrate or give birth at particular time in a particular location. Plan you trip around these extraordinary events. This was photographed during the annual wildebeest migration crossing the Mara River in Kenya. It has been said to be the greatest wildlife show on earth. The mass of the animals and the dust kicking up gives big impact to this image. Large numbers of any species will add impact.

Wildlife Variety 1

Backlighting and Side Lighting

It is natural to want the beautiful golden light on a wildlife subject as you see in the first photograph, but more dramatic can be adding backlighting or side lighting shown in the image below it. Take the safe shot and then get creative. Backlighting works great on the wildebeest beards and it also creates some rim lighting. Rim light is when backlighting creates a lit edge around the subject.

Wildlife Variety 2

Wildlife Variety 3

Wildlife Variety 4

Look for Moody Elements such as Dust and Fog

This is another great time to add backlighting or side lighting. Backlighting will generally create a silhouette so I generally prefer to use side lighting in these situations. The light filters thought the elements for dramatic light and you can still see the details in your subject.

Wildlife Variety 5

Add Motion to your Image with a Pan Blur

In the first image you can see the animals are in motion; notice I have a little backlighting going for added impact. However, by panning with the animals to create a blur in the background it shows a more dramatic sense of speed and motion.

Wildlife Variety 6

Wildlife Variety 7

To shoot a pan blur you need to slow down your shutter speed, 1/60-1/30 generally works, depending on the speed of your subject. You need to focus on the eye’s/shoulder of your subject, pan at the same speed as your subject while holding down the shutter. Yes, this takes lots of practice and you will delete hundreds of images, but when you get one that works it is very exciting. This is something you can practice anywhere so when the opportunity comes you are ready.

Here is another set of images to show the impact and difference between a fast shutter speed stopping the action and a pan blur to show motion. Notice in the second image the front wildebeest are in focus while the rest of the images has a slight blur giving the viewer a more powerful sense of motion.

Wildlife Variety 8

Wildlife Variety 9

Slow Down your Shutter Speed

Stopping the action of animals running through water with a high shutter speed makes a dramatic image, but slowing down the shutter speed will add a different impact and variety to the story. Different from a pan blur, here you hold the camera still and slow down the shutter letting the moving element create the effect of motion. Water works great as well as tall grass that is blowing or branches moving is a tree. In the first image my shutter speed was very high to stop the action and the explosion of water. In the second I showed down the shutter to create a different mood and show the spray of the water. In the third I slowed down the shutter just a little more to really show the blast of the water.

Wildlife Variety 10

Wildlife Variety 11

These simple tips will not only add impact and variety to your images but will make them stand out in a sea of imagery on the same subject.

Wildlife Variety 12

Piper Mackay is a professional travel and wildlife photographer whose work is heavily based in Eastern Africa. She is currently leading both wildlife and cultural safaris in Kenya, Tanzania, Rwanda and Ethiopia. Her work is represented by Getty images and she is and instructor for the Travel and Editorial track at Calumet. View her work at www.pipermackayphotography.com.

Post originally from: Digital Photography Tips.

Check out our more Photography Tips at Photography Tips for Beginners, Portrait Photography Tips and Wedding Photography Tips.

5 Big Tips to add Impact and Variety to your Wildlife Images


Digital Photography School

 
Comments Off on 5 Big Tips to add Impact and Variety to your Wildlife Images

Posted in Photography


Microsoft Publisher 2010 – A Variety of Underline Styles

30 Oct

Underline text in a Publisher 2010 document with dots, dashes, waves, and more.

Underlining text in a Microsoft Publisher 2010 publication is easy – just highlight the text and press CTRL+U, or click the U button from the “Home” tab in the Ribbon.

Did you know, however, that you can change the underline style, including underlining text with dots, dashes, and waves? It requires just a few clicks:…

Read more at MalekTips.
New Computer and Technology Help and Tips – MalekTips.Com

 
Comments Off on Microsoft Publisher 2010 – A Variety of Underline Styles

Posted in Technology