RSS
 

Posts Tagged ‘Unwanted’

Removing Reflections and Other Unwanted Elements in Photoshop

26 Apr

The post Removing Reflections and Other Unwanted Elements in Photoshop appeared first on Digital Photography School. It was authored by Darina Kopcok.

tips for removing reflections in Photoshop featured image

Photoshop gives you a lot more options for retouching than Lightroom because it’s a pixel editor. This means you can manipulate the individual pixels in your image file to refine your images. It allows you to make complex adjustments, such as removing reflections and other unwanted elements in your photo.

You can do one thing in multiple different ways in Photoshop. For the scope of this article, we will focus on two tools: the Content-Aware Fill and the Clone Stamp tool.

Removing Reflections and Other Unwanted Elements in Photoshop
Shot at f/7.1 at 65mm IS0 200 Shutter Speed 1/160

How to approach retouching

Before you get started with any retouching, it’s important to assess your image and your end goal for it. Every image is different, and therefore requires a unique approach.

How complex is the adjustment you want to make? Is there a lot of pattern or other detail in the area you wish to retouch? How much contrast is there, and how will that influence your decisions? Will one technique be enough, or will you need to layer various techniques or tools to get the end result you are seeking?

Retouching is a process of problem-solving. It’s important to know where you want to get to before you get started.

removing reflections in Photoshop
Shot at f/8 100mm macro lens at 100 IS0 Shutter Speed 1/160

Content-Aware Fill

Content-Aware Fill is an incredibly useful tool in retouching your photography. It works by analyzing the content in your image to provide a seamless blend in the elements or objects you wish to alter. It allows you to remove unwanted objects or move them to other areas of the image.

To use Content-Aware Fill, you must duplicate your layer to access the information contained within the image. It’s also important to work in a way that is non-destructive, so you can simply delete any mistakes or unfavorable results and start again.

I first created a layer called “Clean” to clean up any dust or small blemishes from the image and then went on to remove the seeds.

To duplicate your layer, hit the shortcut Cmd/Ctrl+J.

For simple edits, like removing small objects from your composition, you can do a quick Content-Aware Fill by using a selection tool to select the object, then hit Shift+Delete.

For example, in the pomegranate image below, I wanted to remove some seeds from the surface, as I felt there were too many causing distraction.

removing reflections in Photoshop
Before Content-Aware Fill

I used the Lasso tool to select the seeds I wanted to remove from my image, then hit Shift+Delete. This can often give you great results, but you might have to blend edges with the Clone Stamp tool.

removing reflections in Photoshop
After Content-Aware Fill

The other way to use Content-Aware Fill is a method that allows you to bring up a Preview window so you can see how your adjustment will look before committing to any changes. This is a good way to work on larger objects or areas.

For the image of the raspberries below, I wanted to remove a couple of the raspberries so the client could add text to it.

removing reflections in Photoshop
Shot at f/3.5 with 100mm macro lens at 1S0 100 Shutter Speed 1/160

To use this method, use the appropriate tool to make a selection of the area you wish to adjust.

removing reflections in Photoshop
Use the Lasso tool to make a selection.

Go to Edit->Content-Aware Fill.

Removing Reflections and Other Unwanted Elements in Photoshop

This will bring up the Preview window.

The area in green shows you where Photoshop intends to sample from. However, you may not want it to include all of those areas. So use the brush found in the tool panel in the Preview window to brush out any area you don’t want it to sample from.

Be sure to brush out shadows that may cause your final adjustments to look uneven.

Removing Reflections and Other Unwanted Elements in Photoshop

Set the desired Opacity.

Removing Reflections and Other Unwanted Elements in Photoshop

Keep in mind that when you’re selecting areas for Content-Aware Fill, that you need to account for depth-of-field throughout your frame, or your image can end up looking fake.

Once you are satisfied with the look of your image, choose New Layer to keep the file size small, or Duplicate Layer for a larger file size. I usually choose the latter.

If your final result is good but not perfect, you might want to use the Clone Stamp tool to finesse it further.

removing reflections in Photoshop

The Clone Stamp Tool

removing reflections in Photoshop

With the Clone Stamp Tool, you’re copying pixels to a new location. This is one of the most utilized tools in Photoshop because it’s a great way to touch up the various elements in your image, especially when your object has a defined edge.

The Clone Stamp tool is perfect for removing reflections in Photoshop.

The shortcut for the Clone Stamp tool is Cmd/Ctrl+S.

Use the softest brush in Normal Mode.

10% to 20% Opacity at 100% Flow is generally a good place to start, but see what works for your individual image.

In the image of the chocolate cake below, I used the Clone Stamp tool to remove the hard reflection on the knife at 20% Opacity.

removing reflections in photoshop
Before and After of reflection on knife
Shot at f/5.6 on 100mm macro at 100 ISO Shutter Speed 1/160

When using the Clone Stamp tool, you can flip it if your pattern looks too repetitious.

It’s also great when you want to mirror a reflection to make it look more realistic. This feature is one of the key reasons the Clone Stamp tool is the best tool to remove reflections in Photoshop.

To flip your brush, go to the Toggle Clone Stamp icon.

You can also use “T” to transform the clone stamp collection, to adjust its size and placement.

Removing Reflections and Other Unwanted Elements in Photoshop
Flips the clone source

Conclusion

To sum up, use the Content-Aware Fill tool when you want to remove unwanted objects or elements by using the surrounding areas.

Use the Clone Stamp tool to copy and paste pixels to areas with more defined edges.

Keep in mind when you want to remove reflection in Photoshop, that you want to keep some of the reflection. Our eyes are used to seeing reflections in glass and similarly shiny objects, so removing all of the reflection tends to look fake.

Try this method for removing reflections in photoshop out, and show us your before and after results in the comments section!

The post Removing Reflections and Other Unwanted Elements in Photoshop appeared first on Digital Photography School. It was authored by Darina Kopcok.


Digital Photography School

 
Comments Off on Removing Reflections and Other Unwanted Elements in Photoshop

Posted in Photography


NASCAR teams up with DroneShield to bring down unwanted drones at racing events

18 Mar

It’s not just countries and federal agencies getting tough on drones, unruly or otherwise. According to a report from TechCrunch, NASCAR, the sanctioning body of multiple stock-car racing series in the United States and abroad, has struck a deal with anti-drone technology company DroneShield to help shoot down rogue drones at specific venues.

According to the report, DroneShield will be present at NASCAR-sanctioned events held at Texas Motor Speedway in Fort Worth, Texas. This includes events for the Monster Energy NASCAR Cup Series and other feeder stock-car series throughout the 2019 season. Below is a promotional video captured and shared by DroneShield showing off its new DroneGun product:

In an email announcing the news, DroneShield CEO said ‘We are proud to be able to assist a high-profile event like this […] We also believe that this is significant for DroneShield in that this is the first known live operational use of all three of our key products – DroneSentinel, DroneSentry and DroneGun – by U.S. law enforcement.’

DroneShield Sentry (left), DroneShield Sentinel (right).

Despite being the first time its trifecta of products are being used, this isn’t the first time DroneShield has been used at major sporting events. DroneShield technology was used at the 2018 Winter Olympics in PyeongChang, South Korea, as well as at the Commonwealth Games in Brisbane, Australia most recently.

Articles: Digital Photography Review (dpreview.com)

 
Comments Off on NASCAR teams up with DroneShield to bring down unwanted drones at racing events

Posted in Uncategorized


Unwanted grey boxes pdf site forums.adobe.com

12 Sep

batch classes it would be very nice to get unwanted grey boxes pdf site forums.adobe.com summery report on screen on top of the huge list of details. As AC already have Validation AND optional Verification modules, filtering like this would be helpful when you have a large amount of batch classes and need to export […]
BooksChantcdCom

 
Comments Off on Unwanted grey boxes pdf site forums.adobe.com

Posted in Equipment


Better Than Before: 10 Unwanted Structures Transformed for New Uses

02 Mar

[ By SA Rogers in Architecture & Houses & Residential. ]

time capsule factory

Creative conversion projects transform old disused structures like factories, churches, grain silos, cisterns and slaughterhouses for new purposes, helping them avoid demolition. Often abandoned yet still bearing historic, aesthetic and functional value, these buildings become the basis for unusual homes, offices, spas and museums.

La Fabrica: Cement Factory Turned Private Residence, Barcelona, Spain

time capsule factory 2

time capsule factory 3

time capsule factory 4

time capsule factory 5

A sprawling cement factory in Barcelona, built in the post-World War I era and containing structures in all sorts of interesting shapes, has become architect Ricardo Bofill’s home and studio. Bofill transformed the complex by demolishing strategic areas to create voids for open-plan spaces interspersed with gardens. Years after he began, the home is covered in greenery in a way that seems chaotic at first, as if nature is taking the formerly abandoned space over whether it was converted or not. But a closer look reveals planned rooftop gardens atop cylindrical silos, palm trees and lush ivy. Many elements of the original structures were preserved as interesting architectural details.

Military Bunker Turned Wine Museum, China

china bunker to wine museum

bunker to wine museum 2

bunker to wine museum 3

bunker to wine museum 4

An old military bunker 1.5 hours outside Shanghai is now an unusual industrial-style winery, transformed by China-based wine lifestyle and consulting firm Shanghai Godolphin. Built inside a Chenshan Mountain cave over 80 years ago, the structure was once used to store artillery and anti-aircraft machine guns. Today, organic installations of wooden wine boxes almost seem to have populated the space naturally, like bees building their honeycomb in an abandoned vehicle.

Underground Crypt to Spa, France

crypt to spa 2

crypt to spa 3

crypt to spa

crypt to spa 4

Hundreds of years ago, this subterranean space near Saint Pierre’s Church in eastern France was likely used as a crypt. Now, the underground facility serves as the luxurious Atrium Spa & Beauté, transformed by Italian designer Alberto Apostoli into a series of soothing rooms full of tubs and massage tables.

Abandoned 1920s Bank to Co-Working Space, Montreal

bank to coworking space

bank to coworking space 2

bank to coworking space 3

bank to coworking space 4

How would you like to go do your daily work or write your novel in a gorgeous historic space instead of your local Starbucks? Architect Henri Cleinge oversaw the conversion of an opulent former 1920s bank into co-working space ‘Crew,’ inserting plenty of tables and private pods beneath the dramatic vaulted ceilings of the 12,000-square-meter space.

Water Cistern to Private Home, Madrid

water cistern home

water cistern home 2

water cistern home 3

A two-level water cistern site near Madrid is now a stunning sculptural home after an adaptive renovation by Valdivieso Arquitectos. This is one example of a conversion that uses the original structures as a guide, but mostly leaves them behind, the final product showing few signs of what the home used to be. Yet the shapes of that cistern determined the unusual curves of the residence, including the glazed wall looking onto a courtyard.

Next Page – Click Below to Read More:
Better Than Before 10 Unwanted Structures Transformed For New Uses

Share on Facebook


[ By SA Rogers in Architecture & Houses & Residential. ]

[ WebUrbanist | Archives | Galleries | Privacy | TOS ]


WebUrbanist

 
Comments Off on Better Than Before: 10 Unwanted Structures Transformed for New Uses

Posted in Creativity


Darth Vader Goes Fishing: Unwanted Paintings, Reimagined

03 Jan

[ By Steph in Art & Drawing & Digital. ]

david irvine 1

Storm troopers mow the lawn, Jesus rides a Segway, Ceiling Cat lurks in the sky and the Stay-Puft marshmallow man gazes out over a nonchalant 19th century crowd in dusty, unwanted thrift store paintings altered by David Irvine. The Toronto-based artist inserts characters from contemporary pop culture into unexpected settings, like bucolic rural pastures and traditional religious imagery.

david irving 2

david irving 7

michael myers

Irvine picks through yard sales, secondhand stores and sidewalk piles destined for the landfill to find rejected paintings to alter, rescuing them from obscurity and placing them in the hands of collectors all over the world. According to his website, “David will never paint over the existing signature and depending on the project will adapt the traits of the original (coloring, lighting, brushstrokes etc.) or will go in a complete opposite direction and achieve a high contrast in imagery.”

david irving 3

david irving 4

david irving 8

Characters from Star Wars and comic books are some of Irvine’s favorite subjects, with Darth Vader enjoying a relaxing afternoon fishing on the lake and Jabba the Hut getting his portrait painted. In a painting entitled ‘Not the Gardener,’ Leatherface raises his bloody chainsaw in a rose garden. An otherwise unremarkable painting of a dirt road becomes the backdrop for a 1970s car chase.

david irvine 5

david irving 6

jesus segway

The pieces have become so popular, he can’t keep them stocked in his Etsy shop, but if you want your very own romantic beach scene of Batman and Wonder Woman or Spock appearing to an angel on an oversized donut, you can keep tabs on Irvine’s work at his Facebook page. Prints are also available at Society6.

Share on Facebook


[ By Steph in Art & Drawing & Digital. ]

[ WebUrbanist | Archives | Galleries | Privacy | TOS ]


WebUrbanist

 
Comments Off on Darth Vader Goes Fishing: Unwanted Paintings, Reimagined

Posted in Creativity


How to Use LAB Color in Photoshop to Remove an Unwanted Color Cast

15 Dec

Marin County Headlands with LAB adjustments

In a recent article about the LAB colorspace, I covered the basic LAB move to enhance colors. Hopefully that gave you an idea of the power of the LAB colorspace to manipulate color in Photoshop. In this article we are going to build on that a little bit. Whereas in the last article we simply used the basic LAB color move to enhance color, now we will get into color manipulation. Specifically, I will show you how to remove an unwanted color cast from your photos using LAB. In many ways doing this in LAB is simpler and more powerful than doing it in your normal color space (RGB).

Setting the stage

Removing color casts and manipulating color will be simple for you once you know a little bit about how LAB color works, so first let’s make sure you understand what is going on in the LAB colorspace. Once you understand how LAB works, everything else will be easy.

LAB stands for Lightness, A channel, and B channel. The L channel strictly controls lightness and we won’t be working with it for purposes of this article. All color in the LAB colorspace is within the A and B channel. The A channel consists of greens and magentas. The B channel consists of blues and yellows. The histogram in both of these channels almost always looks like a spike in the middle of the histogram. Because LAB is such a ridiculously broad color space, there will be a lot of empty space on either side of the histogram. As you saw in the last article, this empty space is what gives us the opportunity to enhance color so effectively in the LAB colorspace.

LAB color graphic

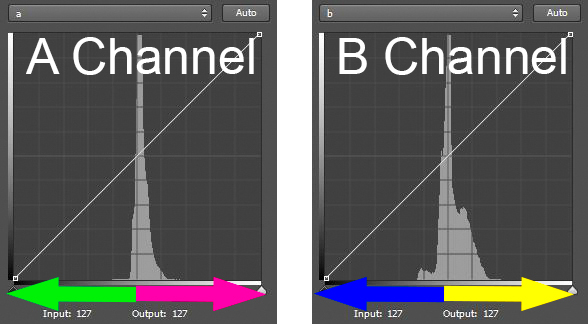
Now let’s look at the histogram of the A channel more closely so that you can see how this works. The A channel is a combination of green and magenta. The further to the left you are in the histogram, the more green is present. Conversely, the further to the right you are in the histogram, the more magenta is present (see diagram above).

The middle of the histogram is a gray tone without any real color. It is designated as zero. As you move away from the zero (gray) point in the middle, more color is added. To the left, the numbers go into negatives (all the way down to -128) and things get more green. To the right, you move into positive numbers (toward a max of +127) and things get more magenta (pinkish).

It works exactly the same way in the B channel, only the colors are different. In the B channel you still have a starting middle point of zero, which is also gray. But, as you move to the left on the histogram towards -128, the colors get bluer. As you move to the right towards +127, the colors get more yellow.

Also note that the center line of the histogram runs right through the zero in the center of both the A and B channels. This will be important for identifying and correcting color casts.

If you are still with me thus far, everything will be easy from here. Now you can take what you just learned and see how to identify and fix color casts easily in LAB.

Identifying color casts easily

It is easy to identify a color cast in LAB mode. Just look at the A or B channel. If the colors are more or less evenly distributed on either side of the midpoint of the histogram, your picture will probably not have a color cast. But if the histogram values are skewed to the left or to the right of the histogram, you are probably have a color cast. Here is how it works in the A and B channels:

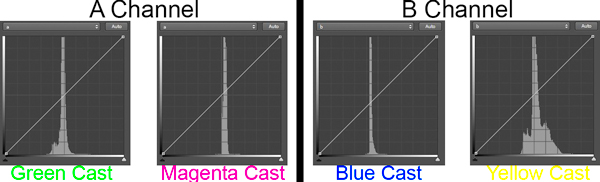
  • In the A channel, if the colors are more on the left side, you will have a greenish color cast in your image. If they are to the right, you will have a magenta color cast.
  • Similarly, in the B channel you know if the histogram appears shifted to the left, you will have a bluish cast to your picture. If the values are to the right of the histogram, your picture will appear more yellow.

LAB color cast chart

In this way, the LAB colorspace makes it super simple to determine if you have a color cast. Just look at the middle of your histogram, and if the colors are skewed to one side or the other, you know you have a color cast or shift. This is important because a slight color cast is not always apparent to the naked eye. Your eye gets acclimatized to seeing the picture in a certain way, and accepts that as normal. Now this we’ve identified a color cast, let’s set about fixing it.

Fixing  color casts in LAB

Much of the power of the LAB colorspace comes from scooting in the endpoints on either side of the histogram. In the last article, we did that to separate the colors, which enhances them. We moved the endpoints in toward the center the exact same amount on each side of the histogram. That enhanced colors without affecting the overall color cast of the picture. This time, however, we are going to move the endpoints in different amounts to fix color casts.

For example, let’s say your picture has a blue color cast. When you open up the B channel, the spike showing color is skewed to the left of center on your histogram. To fix it, you simply scoot in the right endpoint of your histogram more then the left endpoint. It’s as simple as that.

Let’s try another example, let’s say you open the A channel of one of your pictures, and noticed that the values are skewed to the left of center on the histogram. That means that you likely have a green color cast. To fix it, simply scoot in the right endpoint a little bit. Don’t do it too much, usually three to five points will make a major shift in color.

Identifying and fixing a slight color cast

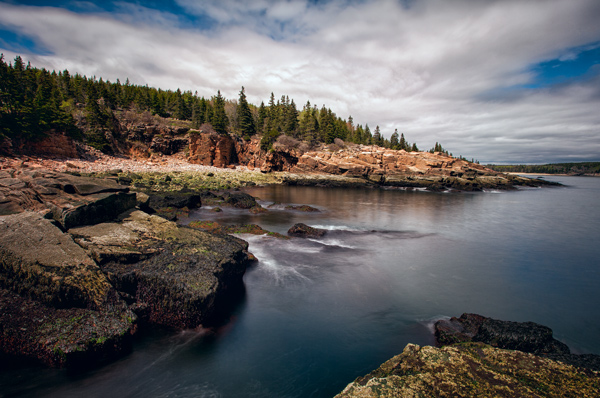
This might make more sense to you if we walk through an actual example. So here’s a good example of everything we have been talking about in this article so far. We will start with a photo that I was in the process of editing:

Original photo with color cast

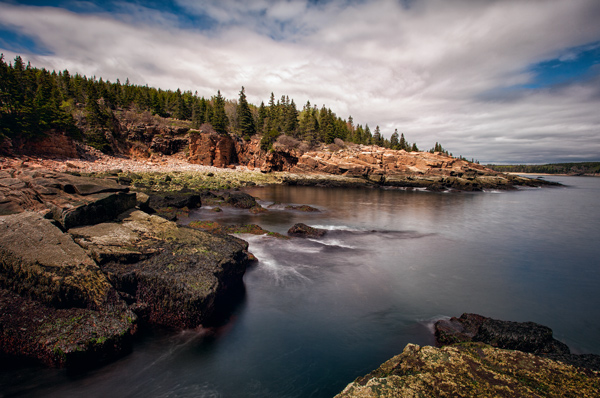
I frankly did not see a color cast, however, I decided to check it out. I converted to LAB, opened a Curves Adjustment Layer, and looked at the histogram of the A channel and the B channel. Here is what I saw:

Histogram showing A & B channels

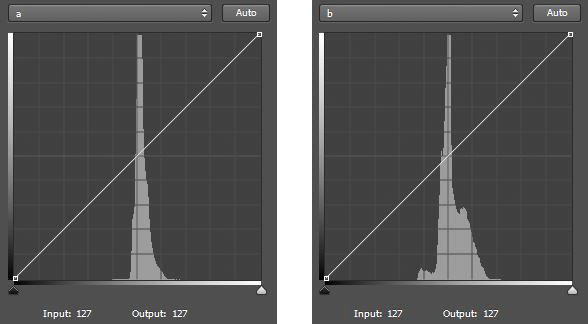
Two histograms in LAB. The left histogram is the A channel. The right histogram is the B channel. Notice that both are skewed to the right of the centerline – a sure sign of a color cast in the picture.

Notice that in the A channel most of the pixels are stacked up to the right of the center line on the histogram. That is a sure sign that there are more magenta pixels than green in the picture. Notice also that in the B channel most of the pixels are also stacked up to the right of center, which means there are more yellows than blues in the picture. Neither necessarily means there is anything wrong with the image, but that might mean a color cast. So let’s make an adjustment as described above and scoot in the left endpoints a little bit in each channel. Here are the two minor moves I made:

Histograms of A & B channels - after adjustment

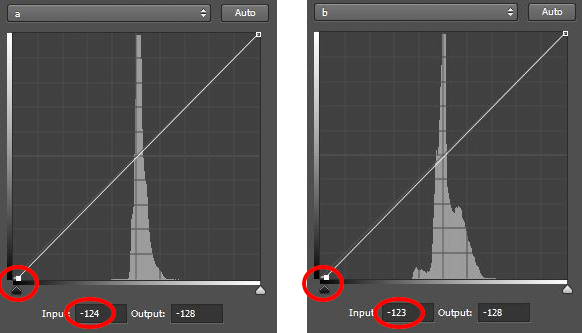
Here are the histograms after the adjustments. Notice that I pulled in the left endpoints of each to the center.

All I did was pull the left endpoint of each histogram to the center a little bit to offset the fact that the colors are skewed to the right of the histogram in each channel. As mentioned above, a change of three to five points will create a large adjustment, so that is all I did. As the numbers below the histograms reflect, I made the following adjustments:

  • A Channel:  I pulled the left endpoint to the center by four points (from -128 to -124).
  • B Channel:  I pulled the left endpoint to the center by five points (from -128 to -123)

After the adjustment, here is the resulting picture:

Acadia After LAB adjustment

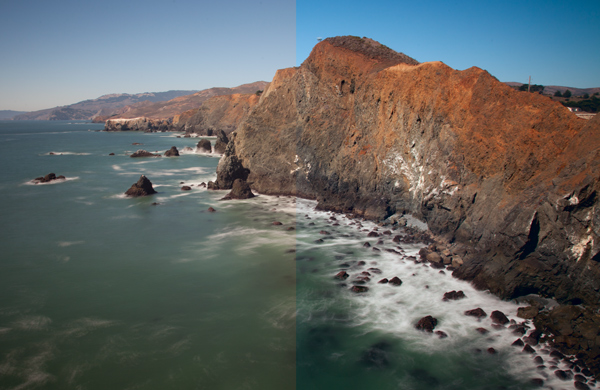
I think it looks better now. To me, it had a color cast that I just wasn’t seeing. The difference is subtle, but significant. In particular, look at the clouds. Here are the before and after pictures side-by-side:

Comparison

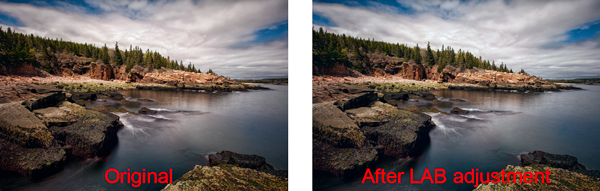
The original picture is on the left. The picture on the right had is after a minor LAB adjustment. I did not even see the original color cast, but I think it looks better after the adjustment.

Incorporating this into the LAB color move

Sometimes, you will notice that the spike in the A or B channel is to one side of the center of the histogram, but you do not really want to change the overall color of the picture. It is still important to understand what is going on when you are making your normal LAB color move.

If you ignore the shift to one side or the other, then when you scoot in your endpoints by equal amounts, you may be exacerbating the color shift. Therefore, keep an eye on your histogram and try to make your shift pivot around the spike rather than on the center of the histogram. In other words, if the pixels are to the right of the histogram, scoot in your left endpoint a little bit more (and vice versa). In this way, you can make your normal LAB color move, but at least not add any color cast to your picture.

Why not just do this in RGB?

You may be asking, can’t I just remove color casts in RGB? The answer, of course, is yes. But the LAB colorspace has advantages that I want to make sure are clear to you.

First, because LAB separates Lightness from all color adjustments, LAB allows you to fix these casts without any impact on lightness or contrast. This is not possible in RGB. When you affect the red channel, green channel, or blue channel in RGB, you are necessarily affecting lightness. It is all tied together in RGB.

Second, LAB makes it easier to identify color casts. As you saw above, you just open up the A or B channel and see if the spike is shifted to one side of the histogram. If it is, you likely have a color cast. If it isn’t, you do not. In RGB, you have to compare channels and see how one channel appears compared to the other two channels.

Isn’t this like setting your white balance?

You may have noticed that the LAB colors correspond with the sliders in Lightroom or Adobe Camera Raw (ACR) that are used to set the white balance in your picture. You can think about LAB in those terms and it might help you to understand how the colors work together. But using LAB to manipulate color offers certain advantages over just setting your white balance. For one thing, you can change the colors later in your workflow, and are not compelled to do it right up front. For another thing, you can take advantage of Photoshop’s layers and selections in manipulating color. Although Lightroom and ACR have very helpful aids in setting the while balance, like the White Balance Selector (the little dropper) or the presets, there is no histogram to allow you to really see and fine-tune your changes.

Applying this to your worklflow

What the technique shown in this article will allow you to do, is make your normal LAB color move in a more nuanced fashion. In the last article, I showed you how to make the LAB color move in a basic, unthinking way. You simply moved the endpoints of your A channel and B channel by equal amounts. It is sort of a one-size-fits-all approach, which doesn’t always work in photography. Now, you can use this to manipulate color a little bit or at least keep it from getting worse as you edit.

I have talked about correcting color casts as if there was a special correct way. But of course that isn’t really true and what looks correct to me might not look exactly right to you. Use your own judgment and do what seems right to you. As you make these moves, however, you might want to bias them in one direction or another. Remember that sometimes a color cast can add effect or mood to your picture. Sometimes a slight color cast just looks good. For example, a warmer tone created by a yellow or magenta cast can actually enhance your picture. Sometimes, but less often, a bluish cast can be appropriate. Also remember that a greenish cast never looks good and should be avoided.

I know it can sometimes be confusing knowing where colors reside, and how to fix them within the LAB color space. To try to make it easier for you, here is a chart:

LAB Color Casts Chart

Conclusion

The LAB colorspace is a powerful beast. You previously learned how to unleash that power by using the basic LAB color move. Using the technique in this article will allow you to tame that beast a little bit. It will allow you to use the power of LAB without getting garish effects or color casts in your pictures. It will also allow you to fix these color casts simpler and easier than anything that RGB allows. Give it a try and see if it corrects your colors.

googletag.cmd.push(function() {
tablet_slots.push( googletag.defineSlot( “/1005424/_dPSv4_tab-all-article-bottom_(300×250)”, [300, 250], “pb-ad-78623” ).addService( googletag.pubads() ) ); } );

googletag.cmd.push(function() {
mobile_slots.push( googletag.defineSlot( “/1005424/_dPSv4_mob-all-article-bottom_(300×250)”, [300, 250], “pb-ad-78158” ).addService( googletag.pubads() ) ); } );

The post How to Use LAB Color in Photoshop to Remove an Unwanted Color Cast by Jim Hamel appeared first on Digital Photography School.


Digital Photography School

 
Comments Off on How to Use LAB Color in Photoshop to Remove an Unwanted Color Cast

Posted in Photography