RSS
 

Posts Tagged ‘Twilight’

Recommended Gear for Doing Long Exposure Photography at Twilight and Dusk

03 Aug

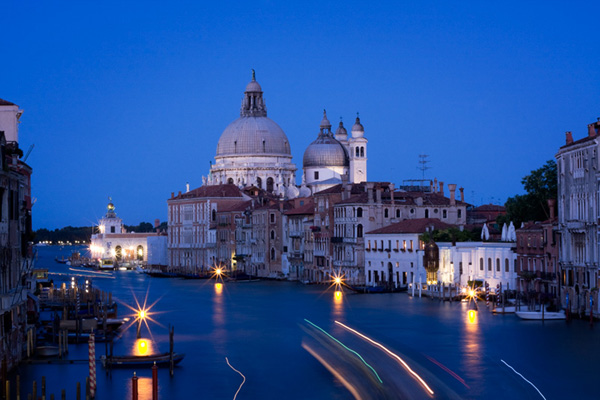
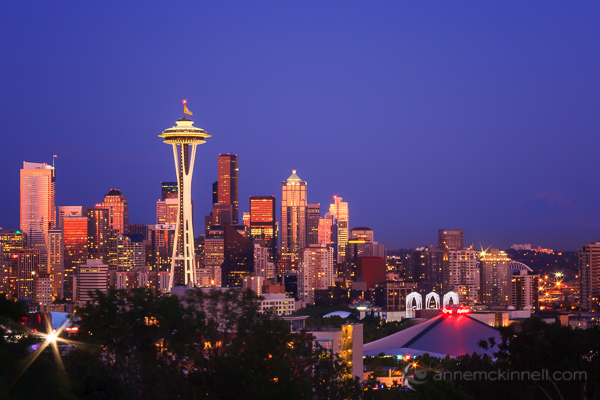
Have you ever come across beautiful cityscape photos captured at twilight and dusk (the so-called “blue hour”) with silky smooth water, like this Marina Bay (Singapore) photo below, and wonder how you could do that yourself? Assuming that you’ve already got your camera (a body and lens), let me go through some of the other gear that is required to do stunning long exposure photography at twilight and dusk.

Recommended Gear for Doing Long Exposure Photography at Twilight and Dusk

Marina Bay (Singapore), shot at 35mm, f/11, for 194 seconds (just over a 3-minute exposure).

Use a Tripod

A tripod is the single-most important piece of gear for photographers shooting at twilight and dusk. Photos shot at these hours require long exposures sometimes lasting for many seconds or even minutes. Therefore, a sturdy tripod is absolutely essential for keeping photos blur-free.

Unlike your camera body, a tripod isn’t something you will upgrade often. So, try to get the best possible tripod within your budget. A good tripod could last a lifetime! I own a Manfrotto MT190CXPRO3 Carbon Fibre Tripod (supports up to 7kg). If your tripod doesn’t come with a tripod head (like mine), get yourself a steady ball-head or 3-way style, whichever you prefer (I own Sirui K-20X Ballhead that supports 25kg).

Tripod - Recommended Gear for Doing Long Exposure Photography at Twilight and Dusk

Mini-Tripods

Mini tripods come in handy at locations where a full-size tripod isn’t allowed inside (e.g. The observation deck of a tower). I own a Joby Gorillapod Focus for DSLRs which supports up to 5kg. It has a dedicated ball head (Joby GorillaPod Ballhead X for Focus) that you can buy as a bundle, but I’m using my own ball-head (aforementioned Sirui K-20X Ballhead) as I feel it’s redundant to have two.

Mini tripod - Recommended Gear for Doing Long Exposure Photography at Twilight and Dusk

Clamp Tripod

A clamp tripod is another tool that comes in extremely handy when there is no appropriate space to set up a tripod. I own the Manfrotto 035 Super Clamp without Stud (supports up to 15kg). Into that, I plug the separately-sold Manfrotto 208HEX 3/8-Inch Camera Mounting Platform Adapter (or a cheaper alternative Manfrotto 037 Reversible Short Stud) into the socket in order to firmly mount a tripod head and camera on top of that. Then I clamp the whole setup onto handrails, etc. This setup is rock solid and is a game changer for us cityscape photographers aiming to take very sharp photos at twilight and dusk without using a full-sized tripod.

Clamp infographic - Recommended Gear for Doing Long Exposure Photography at Twilight and Dusk

This graphic shows how to mount a DSLR on Manfrotto Super Clamp by using a camera mounting platform adapter.

Steps:

  1. Plug a camera mounting platform adapter into a Super Clamp socket and secure it with the double lock system.
  2. Mount a tripod head with DSLR on the mounting platform adapter, just like you do with your regular tripod.

Clamp - Recommended Gear for Doing Long Exposure Photography at Twilight and Dusk

Neutral Density Filters

Neutral density (ND) filters help reduce the light that is coming through the lens, allowing your shutter speed to be extended much longer. This is a must have tool if you want to create the silky smooth water effect typically seen in long exposure photography.

ND filters come in different strengths such as; 3-stop, 6-stop or 10-stop. The bigger the number, the darker the filter and the less light that is let through. My favorite is 6-stop ND filter (I own a B+W 6-Stop ND Filter). With this attached to my lens, a base exposure of 2 seconds (i.e. when no filter is attached) can be extended to 128 seconds. Each “stop” of the ND filter doubles the required exposure time (2 seconds > 4 seconds [1 stop] > 8 seconds [2 stops] > 16 seconds [3 stops] > 32 seconds [4 stops] > 64 seconds [5 stops] > 128 seconds [6 stops]), which is long enough to create silky smooth water effects.

Filters come in two types, screw-on and square filters. If you’re getting screw-on filters, be careful with the size of filter you’re purchasing. It depends on the filter thread size of your lens (e.g. 77mm for Nikon 12-24mm, 67mm for Canon 10-18mm, etc. – look inside your lens cap for the filter size of that lens). If you have two or more lenses with different filter thread sizes that you’d like to use an ND filter on, get one that fits your largest lens (i.e. lens with the largest filter thread size). Then purchase a step-up adapter ring to make the single filter fit into other lenses with smaller thread sizes.

Filters - Recommended Gear for Doing Long Exposure Photography at Twilight and Dusk

Left: Screw-on ND filter. Right: Drop-in square filter (image courtesy of Tiffen).

Or, you can get a square ND drop-in filter instead, along with a holder and adapters (check out at these options we’ve reviewed and featured here on dPS). The advantage of square filters is that you only need one filter to fit all of your lenses. That said, I still prefer screw-on filters because they take up less space in my camera bag and I only own one lens that takes front filters (my trusty Nikon 18-35mm with 77mm filter thread), anyway.

Wireless Remote or Cable Shutter Release

This is another essential tool, as it lets you take photos without touching the camera and helps keep your photos sharp. No need to get a pricey one, though. I’m still using a Phottix IR-Nikon (wireless remote) that I bought years ago for $ 20 (it is available for Canon as well).

Wireless remote - Recommended Gear for Doing Long Exposure Photography at Twilight and Dusk

Long Exposure Calculator App

When you use a semi-manual mode (e.g. Aperture Priority), the shutter speed cannot exceed 30 seconds on most DSLRs. With a 6-stop ND filter used at twilight and dusk, much longer than a 30-second exposure is required. So this is where you’ll need to switch to Manual Mode and take the full control of the camera yourself.

But, how will you know the correct exposure time (shutter speed) to use when your camera no longer assists you? Well, there are a number of free phone apps that help you determine a correct shutter speed. I’m using Long Exposure Calculator app by Junel Corales (get it here for iOS devices or here for Android).

Long exposure calculator - Recommended Gear for Doing Long Exposure Photography at Twilight and Dusk

By setting your filter density (e.g. 6-stop) and base shutter speed (e.g. 2-seconds), the Long Exposure Calculator app automatically calculates the required shutter speed you will need to use (2 minutes and 8 seconds [128 seconds] in this case).

Lenskirt

A lenskirt is a handy tool when shooting through the glass window of an observation deck, hotel room window, etc., as it helps eliminate reflections (such as yourself, room lights) off of the glass window. It might catch the unwanted attention of other visitors due to its odd shape but it has worked quite well for me and has found a permanent place in my camera bag when I’m traveling.

Lenskirt - Recommended Gear for Doing Long Exposure Photography at Twilight and Dusk

Lenskirt in use on the 100th-floor observation deck of the Shanghai World Financial Center. By attaching it to the lens and its pushing suction cups onto the window, it shades the front element of the lens and cuts reflections from the glass window, leaving no chance for any stray light to get into the camera.

Conclusion

That’s all about it. I hope this will get you started with long exposure photography at twilight and dusk. For me, dusk is the most beautiful moment of the day. It ends in the blink of an eye, and that’s what makes it even more special. Try to capture the beauty of long exposure photography at twilight and dusk with this gear.

If you have any other pieces of gear you use for long exposures that you find indispensable, please share them in the comments below.

The post Recommended Gear for Doing Long Exposure Photography at Twilight and Dusk by Joey J appeared first on Digital Photography School.


Digital Photography School

 
Comments Off on Recommended Gear for Doing Long Exposure Photography at Twilight and Dusk

Posted in Photography


The Magic of Natural Light: Twilight

01 Sep

The Magic of Natural Light: Twilight photo

One of my favourite times for taking photos is at twilight. Especially during the spring and summer, the seasons when the light is at its most magical at this time of evening.

I’ve always liked the idea that great photography happens on the edges. Twilight, the transition between night and day, is an edge. While the low light levels can be technically challenging, the reward in terms of quality of light are well worth it. I think of it as the ‘magic hour’. You may also see it referred to as the blue hour, a reference to the colour of the ambient light as night falls.

What is twilight?

Twilight is the time that marks the transition between day and night. It starts after the sun has set and continues until night completely falls. The quality of light during twilight can be truly beautiful, especially after a bright sunny day. The duration depends on your distance from the equator. In the tropics night falls very fast and twilight is short. Go far enough north (or south) in the summer and it can last for over an hour.

Landscape photography during twilight

One of the more obvious subjects that benefits from the quality of light at twilight is the landscape. Now, I’m sure most photographers are aware that one of the best times to photograph the landscape is during the golden hour – the hour or so before the sun sets. The sun is low in the sky and the warm, raking light it casts can bring the best out of a beautiful location.

Whenever I’m on location and see other photographers, I’m always a little surprised how early most of them leave. For the few that wait until the sun has set the reward is often an intensely beautiful, soft golden glow that gradually fades as night falls. This type of light is especially beautiful if you are by the sea or a lake as the water reflects the light. The opening photo is a good example of that.

The Magic of Natural Light: Twilight photo

There are two approaches to taking landscape photos in low light. One is to use a high ISO setting and shoot with the camera hand-held. I took the photo above at 1600 ISO shortly after sunset.

The Magic of Natural Light: Twilight photo

To take full advantage of the beautiful light during twilight though you will need to use low ISOs (better image quality) and consequently slow shutter speeds. You’ll need a tripod to support the camera and a cable release or remote control to fire the camera without touching it (the self-timer will do in a pinch). The advantage of this approach is that you can use the slow shutter speeds to create blur. This works particularly well when there is water in the scene, as in the photo above.

Portrait photography

The Magic of Natural Light: Twilight photo

I also like twilight for portrait photography. It’s not without challenges, but if you can overcome those you’ll be rewarded with some beautiful portraits taken in unusual conditions where many photographers wouldn’t bother taking photos.

The best way to take advantage of the twilight for portraits is to arrive with your model before sunset to take advantage of the late afternoon light. Explain to your model that the light is best at this time of day, and they will be rewarded with some beautiful images. Then, just as in landscape photography, you can keep shooting after the sun has set until the light fades or the magic disappears. Unlike landscape photography though it’s not practical to use a tripod, so you will need to set a high ISO and use the wide aperture settings of your lenses.

When it comes to lenses, primes are best because the wide maximum apertures let you shoot for longer. For example, if you have a kit lens, the maximum aperture at the telephoto end (focal length usually around 55mm) is f5.6. If you have a 50mm prime lens, the maximum aperture will be at least f1.8. That’s a three stop difference.

You will also need to set a high ISO. It’s a good idea to test out your camera beforehand using different high ISO settings to see how high you’re willing to go before the deterioration in image quality is more than you’re happy with. On my EOS 5D Mark II, for example, I’m quite happy to shoot at 3200 and sometimes even 6400, especially if I can expose to the right to maximise image quality. If you have a newer camera, especially full-frame, you might even be able to go higher. If your camera is older your limit will probably be lower. It’s a personal decision that only you can make.

The photo above was taken using ISO 6400 and an aperture of f1.4. It was nearly dark, much darker than it looks in the image. The lights behind the model are a good indication of this.

The Magic of Natural Light: Twilight photo

Another approach is to use a tripod to support the camera and a portable flash to illuminate your model. If your model keeps still during the long exposure, there will be very little blur. This portrait was taken with a shutter speed of two seconds. This technique allows you to keep shooting during twilight when there is very little light.

Mastering Photography

The Magic of Natural Light: Twilight photo

My latest ebook, Mastering Photography: A Beginner’s Guide to Using Digital Cameras introduces you to digital photography and helps you make the most out of your digital cameras. It covers concepts such as lighting and composition as well as the camera settings you need to master to take photos like the ones in this article.

Post originally from: Digital Photography Tips.

Check out our more Photography Tips at Photography Tips for Beginners, Portrait Photography Tips and Wedding Photography Tips.

The Magic of Natural Light: Twilight


Digital Photography School

 
Comments Off on The Magic of Natural Light: Twilight

Posted in Photography


Shooting in the Twilight Zone

15 Jan

For most photographers, the best time to shoot is during the golden hours – those times right around sunrise or sunset when the sky is full of drama.

For me though, the best time to shoot is a little while after all that drama happens and all the other photographers have packed up and gone home – twilight – when the skies become calm and peaceful.

Half Dome, Yosemite National Park, California

Half Dome, Yosemite National Park, California

The length of twilight varies dramatically depending on the time of year and your position on earth. At the poles twilight can last as long as 2 weeks! But generally speaking, twilight usually starts shortly after the sun drops below the horizon and continues for another 40-60 minutes or so before the sky is completely dark.

During this time the sky still has plenty of rich colour but there is no longer any direct light. You might be surprised how much colour there really is in the sky during twilight since a camera’s sensor can pick up more light than we are able to see with our eyes.

The images in this post demonstrate how different the sky can look between the early stages of twilight to the end of twilight.

Driftwood Beach, Jekyll Island, Georgia

Driftwood Beach, Jekyll Island, Georgia

I prefer to shoot twilight after sunset, but of course it happens in reverse order in the morning too!

Assuming you are shooting after sunset, the first stage of twilight is when the subtle pinks begin to show in the sky. Slowly the blues will begin to appear. I love to shoot landscapes during this early stage when there is still a lot of ambient light so the land is not entirely dark.

Basin Head, Prince Edward Island, Canada

Basin Head, Prince Edward Island, Canada

During this early stage the sky is often much brighter than your subject which makes exposure difficult. It’s a great time to use high dynamic range (HDR) photography and blend multiple exposures to maintain detail in the landscape. Or, depending on the type of scene you are photographing, you can use graduated neutral density filters to even out the exposure.

Soon the sky will begin to get darker and the pinks and blues will deepen. The exposure will even out so that neither HDR nor graduated neutral density filters are needed.

Mule Ears, Bid Bend National Park, Texas

Mule Ears, Bid Bend National Park, Texas

During the later stages of twilight the pinks will fade and the blues will intensify to a dark cobalt shade. This is a great time to photograph cityscapes. The combination of natural light in the sky and artificial city lights is magical.

Seattle, Washington

Seattle, Washington

To make the most of the limited amount of time you have to shoot during twilight, scout out your location before hand. Twilight doesn’t last long so you need to be prepared. If you can’t make a separate scouting trip at least go an hour or two early so you have plenty of time to explore before deciding what to shoot.

Find a subject with a distinct shape and take some test shots to figure out the best composition and perspective. Keep your eye out for good foreground elements and any artificial light sources that might be present later.

Tips:

  • Use a low ISO to reduce the amount of noise in the image.
  • Long shutter speeds will allow the camera to pick up lots of colour.
  • If there are city lights in your image use a small aperture, like f/22, to turn the lights into star bursts.
  • A tripod is an absolute requirement if you want a low ISO, long shutter speed, and small aperture.
  • You may need a polarizing filter and/or a graduated neutral density filter for the early stages of twilight.
  • Use a cable release and/or a 2 second timer so you do not introduce camera shake.
  • Use your mirror lock-up feature so the movement of the mirror does not introduce camera shake.
  • Your camera’s auto-focus may not work in low light conditions. If you set up ahead of time, you can use your auto-focus while there is still light in the sky and then turn auto-focus off to prevent your camera from attempting to refocus when it is is darker outside. Otherwise you will need to focus manually.
  • Use your histogram to ensure you are getting a good exposure.
  • Bring a flashlight so you can find your way home.
  • Wear or bring bug spray so the little bugs don’t ruin your good time.
  • Bring warm clothes! Don’t miss the perfect shot because you got cold and left too early.

Shooting at twilight can sometimes take a little preparation and planning but the rewards are definitely worth it.

Post originally from: Digital Photography Tips.

Check out our more Photography Tips at Photography Tips for Beginners, Portrait Photography Tips and Wedding Photography Tips.

Shooting in the Twilight Zone


Digital Photography School

 
Comments Off on Shooting in the Twilight Zone

Posted in Photography


LoZ: Twilight Princess in 3D

23 Nov

Requested by nintendoplayer183 Special thanks to zeldauniverse for the article! 😀 Check them out: www.zeldauniverse.net I think I could do better with this one… I might make a revised one in the future. Please thumbs up, and show your friends! 😀
Video Rating: 4 / 5

Chinese Man – 7th Street Directed by : Fred&Annabelle Music : 7th Street by Chinese Man extrait de The Groove Sessions Vol.2 (2009) Label : Chinese Man Records – www.chinesemanrecords.com
Video Rating: 4 / 5

 
Comments Off on LoZ: Twilight Princess in 3D

Posted in 3D Videos


A Demi Twilight

05 Sep

As we were driving around aimlessly looking for a location Demi asked, “How do you find your locations?”

This is a question I’d never quite known how to answer but I’m starting to realize it’s all just chance.  Fate.  Inspiration literally leads me to some of these places.

So that’s what I said, “Fate.  I just find them, randomly, almost like I’m led there.”

Not 30 seconds later I saw a dirt road on my right, I pulled in and found… this place.

Inspiration.  Listen to it and it will show you the way… sometimes.


Model is Demi


Jake Garn Photography

 
Comments Off on A Demi Twilight

Posted in Uncategorized