RSS
 

Posts Tagged ‘Tricks’

8 Amazing Photography Tricks You Can Do With a High-Speed Camera Trigger

18 Feb

If you are a photographer, you probably heard that the camera doesn’t take a good picture, the person behind the camera does. It’s true because with right knowledge and practice you can take great photos with an entry level camera or even a mobile camera. But if you don’t have an idea about lighting, composition or the features of your camera, the world’s most advanced camera can’t take good photos for you.

8 Amazing Photography Tricks You Can Do With a High-Speed Camera Trigger

But when it comes to some special equipment, this phrase sometimes doesn’t apply. One piece of such equipment is called the MIOPS Smart Camera Trigger. This high-speed photography trigger can take photos at a precise moment which just impossible doing your own.

The trigger has various modes like lightning, sound, laser, time-lapse, scenario and DIY that can help you to take some outstanding images which you may have seen only on the internet previously. It can trigger your camera or fire the flashes and you can control everything using your smartphone.

So, let’s see what we can do using this wonderful high-speed trigger.

1. Popping Balloons

8 Amazing Photography Tricks You Can Do With a High-Speed Camera Trigger

When you burst a water-filled balloon, the water inside the balloon makes a shape similar to the balloon for a few moments before it falls on the ground. It happens so fast that you can’t see it happening live but you can capture it using your camera.

The MIOPS Smart Trigger has a sound mode for this kind of photography. As soon as you pop the balloon, it will trigger your camera or flash. You can change the sensitivity so it doesn’t trigger with other sounds and it also gives you the option to set a delay time for triggering so that it clicks at the exact moment you want.

The sound mode can be used to photograph bursting balloons in different ways. For example, you can place sunglasses or a hat on a water-filled balloon, burst it, and capture the shape of the water wearing a hat and glasses. Or you can burst a balloon with an arrow or a dart, fill the balloons with different colored water, and take different shots and merge the images into one. The possibilities are endless.

2. Lightning

8 Amazing Photography Tricks You Can Do With a High-Speed Camera Trigger

Lightning is the most beautiful natural phenomena. But it’s extremely difficult to photograph because you have no idea of when and where it will strike and chances of missing the moment are very high.

MIOPS Smart Trigger has a lightning mode for this scenario. All you need to do is set your camera on a tripod, attach this trigger, start lightning mode and leave your camera. When lightning strikes, it will trigger the camera automatically and capture that beautiful moment.

3. Paint Sculptures

8 Amazing Photography Tricks You Can Do With a High-Speed Camera Trigger

You can create amazing paint sculptures and satisfy for your artistic soul with the help of this sound trigger. Do do this, you need to put a rubber sheet on a speaker, put some watercolors on it and play sound. The sound will generate vibrations on the rubber sheet and because of that paint will jump up and make different shapes.

With the help of sound mode of the MIOPS Smart Trigger, you can focus on creating different sculptures by experimenting with quantity, density, and placement of colors. Thus you leave the tough job of clicking at the perfect moment to the MIOPS.

4. Dancing Colors

8 Amazing Photography Tricks You Can Do With a High-Speed Camera Trigger

It’s just like paint sculptures, but you can use dry colors instead of watercolors and create totally different results.

5. Water Droplet Refraction

8 Amazing Photography Tricks You Can Do With a High-Speed Camera Trigger

Imagine capturing our Earth or even the entire universe inside a drop of water. Yes, it is possible.

MIOPS Smart Trigger has a laser mode that can help you to take such pictures in the easiest way. All you need to do is create a setup to release water drops and place a picture in the background that you want to capture inside the drop. When the drop comes in front of the camera and breaks the laser beam, the camera will capture it automatically.

6. Water Galaxy

8 Amazing Photography Tricks You Can Do With a High-Speed Camera Trigger

When you spin a water-soaked ball, the water comes out from the ball and creates a beautiful galaxy shape which looks amazing.

You can capture this moment by using the laser mode of MIOPS Smart once again. When the ball comes between the trigger and the laser, the camera will shoot automatically.

7. Collision in Mid-air

8 Amazing Photography Tricks You Can Do With a High-Speed Camera Trigger

Imagine a scenario where two glasses filled with colored water or paint collide in mid-air and create a beautiful splash. MIOPS Smart Trigger’s sound mode helps you to take such pictures, as seen above.

8. Action Sports Photography

8 Amazing Photography Tricks You Can Do With a High-Speed Camera Trigger

You can capture high-speed action sports like a cyclist in mid-air or someone jumping on a skateboard with the help of the laser mode of this trigger. It’s very useful when you are performing the action yourself and shooting it too. Just set the MIOPS Smart Trigger to laser mode and start doing actions and leave the rest to the MIOPS.

Finally

You can also photograph birds or insects using laser mode. Just set the laser near the bird feeder and when a bird will come for feeding, the camera will capture it. Also, you can shoot fireworks with the lightning mode. The possibilities are endless, you just need to use your imagination.

In addition to this, MIOPS Smart also works as intervalometer in time-lapse mode and clicks images on a set interval to convert to time-lapse videos. Using HDR mode you can capture bracketed images and merge them into HDR. You can check the MIOPS Smart User Manual to learn more about the MIOPS Smart Trigger.

Disclaimer: MIOPS is a paid partner of dPS.

The post 8 Amazing Photography Tricks You Can Do With a High-Speed Camera Trigger by Ramakant Sharda appeared first on Digital Photography School.


Digital Photography School

 
Comments Off on 8 Amazing Photography Tricks You Can Do With a High-Speed Camera Trigger

Posted in Photography


5 Tricks to Make Your Landscape Photos Stand Out

15 Feb

Are you passionate about portrait photography? Do you love sharing images of your trips and landscape photos? Or maybe you spend your free time capturing the streets of your city?

Let me tell you something you might not know about yourself. Every now and then you are a landscape photographer, too. Everyone is. Let’s be honest, you couldn’t resist that beautiful mountain view you photographed a few weeks ago on a hike. Your social media feeds are full of your friends’ photos of canyons, lakes, and forests. Even your grandma sent you a picture of a sunset from her backyard the other day.

01 Sunset in Ilulissat Icefjord Greenland - 5 Tricks to Make Your Landscape Photos Stand Out

The amount of landscapes captured and uploaded every day is overwhelming. So how can you make people stop and look at YOUR images? How do you make YOUR landscape photos stand out?

Here are some useful tips and tricks to help you. Save them for later, and the next time you are photographing a beautiful view make sure to follow them. You will have a much better chance of taking a good picture and making it noticed.

1. Less is more

“A designer knows he has achieved perfection not when there is nothing left to add, but when there is nothing left to take away.” – Antoine de Saint-Exupery

011 Greenland midnight sun - 5 Tricks to Make Your Landscape Photos Stand Out

This famous quote also applies very well to landscape photography. I know you are excited to show the whole world how beautiful nature is around you. However, often showing everything is equal to showing nothing.

For instance, look at the image below. It is simple and straightforward. You clearly know what the photographer tried to show.

Now, imagine there is a road below the greenery, two smaller mountains on the right and little pond on the left. You could capture all of that instead; it would give much more information about the location. However, then your viewer wouldn’t know where to look.

002 Bad weather Iceland - 5 Tricks to Make Your Landscape Photos Stand Out

Your viewer is exposed to thousands of images every day (social media, streets banners, TV, online advertising, etc.). Don’t give him any more work. Seeing your photo should be an effortless and enjoyable process. Here is how to get rid of the unnecessary parts of your images:

  • If you have a zoom lens, zoom into the frame.
  • Reposition yourself. Sometimes you have to walk closer to your subject or choose a different point of view.
  • As a last resort – crop your image later. Generally, It’s not advisable to crop more than 20% of your images. This rule will keep you more disciplined about your choices in the field. Also, it will help you keep your images in high resolution in case you decide to print them one day or participate in photography contests. (Many contests don’t allow cropping more than 20%).

2. Avoid distractions

Now you’ve decided which part of the scene is the most compelling. But before you click the shutter, make sure that these technicalities are in check:

A) Check that the horizon is straight. Turn on the grid in your camera to help you with that.

003 Nepal tilted horizon - 5 Tricks to Make Your Landscape Photos Stand Out

004 Nepal straight horizon - 5 Tricks to Make Your Landscape Photos Stand Out

B) Position your subject away from the middle of the frame. Most of the time you will find yourself following the rule of thirds

005 Rule of thirds precise - 5 Tricks to Make Your Landscape Photos Stand Out

.Sometimes following the rule, precisely.

006 Rule of thirds approximate - 5 Tricks to Make Your Landscape Photos Stand Out

Sometimes, not so much.

C) Get your settings right to avoid overexposed, underexposed, blurry, or noisy images.

3. Look for color contrast

This is an extremely important concept that you need to be familiar with.

Our brains are wired in a way that when we look at a picture, we first respond to contrasts in color and light, then to the shape, size and other characteristics of the scene.

Make sure you know the theory of color contrast. The general rule is that cold and warm colors work well together. Here are some examples:

007 color contrast moon iceberg - 5 Tricks to Make Your Landscape Photos Stand Out

008 color contrast aurora - 5 Tricks to Make Your Landscape Photos Stand Out

4. Test a thumbnail of your image

In a perfect world, you would make a large format print of your image and people would come and spend hours savoring every detail of it. In reality, your picture will be one of many tiny thumbnails on someone’s social media feed. (If you don’t post your images online, you can skip this part.)

A great exercise is to look at your image as a small thumbnail. Can you tell what’s on it? Would you pay attention to it if you saw it on your Instagram timeline or would you scroll past it? You’ll notice, that simple images with high color and/or light contrast stand out the most.

Can you guess which of the images from the grid below got the most amount of interaction on Instagram?

009 thumbnail grid - 5 Tricks to Make Your Landscape Photos Stand Out

5. Is the image good or does it make YOU feel good?

You just came back from a trip and that sunset you observed with your partner was amazing. You still remember the sound of the waves and the warm wind coming from the sea. Time to share that memory with the world!

99% of the time, that’s fine if you want a snapshot of a holiday, but not if you want people to see an artistic value in it. A great image should be great by itself, regardless of what emotions you have attached to it.

A good practice is to look through your photos weeks, or sometimes months after you took them. You will be surprised at how your selection will change compared to the day of the shoot.

Here are a couple more images that follow the tips above.

010 iceland beach - 5 Tricks to Make Your Landscape Photos Stand Out

012 Norway window lights - 5 Tricks to Make Your Landscape Photos Stand Out

Over to you

Do you have some images that reflect the points of this article? Share them in the comment section so that others can learn from you.

The post 5 Tricks to Make Your Landscape Photos Stand Out by Maria Sahai appeared first on Digital Photography School.


Digital Photography School

 
Comments Off on 5 Tricks to Make Your Landscape Photos Stand Out

Posted in Photography


5 Must-Know Photoshop Retouching Tips and Tricks for Photographers

23 Dec

Here are five quick tips for doing retouching in Photoshop that are essential to know. Learn them to do better retouching on your photos.

#1 – Load Luminosity as a Selection

In Photoshop you can use the luminosity of an image (the bright pixels) as selections. The easiest way to make a selection out of the bright pixels of a photo is by pressing Command+Option+2, (Windows: Ctrl+Alt+2).

If you cannot remember the keyboard shortcut, you can also load luminosity as a selection by holding Cmd/Ctrl and clicking on the RGB thumbnail in the Channels panel.

01 selection - 5 Must-Know Photoshop Retouching Tips and Tricks for Photographers

With a selection active, you can create an Adjustment Layer to apply the selection to the Layer Mask.

02 adjustment mask - 5 Must-Know Photoshop Retouching Tips and Tricks for Photographers

This Adjustment Layer will only target the brighter pixels of your image. If you make an adjustment, you’ll notice that you will only affect the bright pixels and not the dark ones.

03 adjustment lights - 5 Must-Know Photoshop Retouching Tips and Tricks for Photographers

You can target dark pixels by inverting the selection. To do so, Select the Layer Mask, and clicking on Invert in the Properties panel.

04 invert mask - 5 Must-Know Photoshop Retouching Tips and Tricks for Photographers

Now if you make an adjustment, the dark pixels will be affected and not the bright.

05 adjustment darks - 5 Must-Know Photoshop Retouching Tips and Tricks for Photographers

#2 – Spot Healing Brush Tool Modes – Lighten and Darken

One way to remove wrinkles, blemishes, and other distractions from the face quickly and efficiently is to use the Modes in the Spot Healing Brush Tool and Content-Aware.

First, think of the blemish, wrinkle, or distraction that you are trying to remove. Is it darker than the skin tone or is it brighter than the skin tone?

06 portrait - 5 Must-Know Photoshop Retouching Tips and Tricks for Photographers

In this case, the wrinkles are darker than the skin tone. That means that you want to “lighten” those wrinkles.

With the Spot Healing Brush Tool selected, in the Options bar, click on Content-Aware, and under the Mode drop-down menu, select Lighten.

07 lighten - 5 Must-Know Photoshop Retouching Tips and Tricks for Photographers

Then start painting with a small brush and small strokes over the wrinkles to remove them. But you will not lose essential details in the highlights. The Spot Healing Brush tool is only targeting dark pixels which are the wrinkles.

08 before after - 5 Must-Know Photoshop Retouching Tips and Tricks for Photographers

If your blemish or distraction is brighter than the skin tone, such as the bright wrinkles above the lip, then select Darken from the Mode drop-down menu, and paint them away.

10 final heal - 5 Must-Know Photoshop Retouching Tips and Tricks for Photographers

To learn more about how this technique works, check out this video on the Spot Healing Brush Tool:

#3 – Open the Same Image in Two Windows

In Photoshop, you can open the same image in two windows and set them side-by-side to work on both details and the overall image at the same time.

This technique is great when you are working with two monitors. But even with one monitor, this technique can be very useful.

To open the same document in two windows, go to Window > Arrange, “New Window for [Name of Document].” Then go to Window > Arrange > Two up Vertical to put the two tabs side-by-side. You can then Zoom into one window, and zoom out on the other.

same doc two windosw - 5 Must-Know Photoshop Retouching Tips and Tricks for Photographers

These are not two separate files. They are the same document, and any adjustments that you make to one will reflect on the other instantly.

#4 – Targeted Selections with Color Range

The Color Range command can be an excellent tool for selecting difficult areas of an image. However, if you simply use the Color Range on a problematic image, it may not give you the results you want. Sometimes there is too much information on a single image, and you need to focus on just one area.

To focus the Color Range in only one area, create a selection around the object that you want to select. A simple rectangular selection will be fine.

12 selection - 5 Must-Know Photoshop Retouching Tips and Tricks for Photographers

Then go into Select > Color Range, and you will see that Color range is now focusing solely on the selected area.

13 color range - 5 Must-Know Photoshop Retouching Tips and Tricks for Photographers

Select a red color on the shirt using the eyedropper, then use the fuzziness slider to adjust the selection.

Keep in mind that it is going to be next to impossible not to select the hands or the railing that she’s leaning on because the skin tones and the paint on the railing are very similar in color to the red that you are trying to select.

But you can use the Lasso tool to quickly deselect those areas, leaving only the red in the shirt selected.

14 selection only red - 5 Must-Know Photoshop Retouching Tips and Tricks for Photographers

With a selection active, you can create a Hue and Saturation Adjustment Layer that will just target the red in the shirt.
Then use the Hue slider to change the color of the shirt.

15 change color - 5 Must-Know Photoshop Retouching Tips and Tricks for Photographers

#5 – Use the Lab Color Mode

Most of the time, you will work with RGB or CMYK while in Photoshop. But there is another Color Mode that you can use that can be very useful in certain situations. If you go to Image > Mode > Lab Color, you will change your photo’s color mode to Lab.

16 color mode - 5 Must-Know Photoshop Retouching Tips and Tricks for Photographers

The Lab color mode has three channels: Lightness, A, and B.

  • The Lightness channel contains the detail of the image – the Luminance values.
  • “A” is the relationship between green and magenta. These are the same colors as the Tint slider in Lightroom and Camera Raw.
  • “B” is the relationship between blue and yellow. These are the same colors as the Temperature slider in Lightroom and Camera Raw.

17 lab graphic

One of the most significant advantages of working with the Lab color mode is that Lab separates detail (luminosity) from color. This separation allows you to work with color without affecting detail and vice versa.

17 red dress - 5 Must-Know Photoshop Retouching Tips and Tricks for Photographers

For example, you could turn a red dress green by duplicating the layer, and then selecting “A” from the Channel’s panel, and pressing Cmd/Ctrl+I to invert the channel.

18 a channel

Notice that the color of the image changed, but the detail was left intact.

19 green layer - 5 Must-Know Photoshop Retouching Tips and Tricks for Photographers

You could then use a Layer Mask to contain the adjustment to only the dress.

20 mask dress

Another advantage of using the Lab color mode is that you can sharpen without affecting the color of a photo. If you apply any sharpening filter to the Lightness channel, you will only target the detail and will leave the color intact.

The example below has the same Sharpening filter applied to both the regular image and the Lightness channel in Lab Color. I’ve made sharpening effect an extreme one for demonstration purposes, to make the results more noticeable.

Notice that when you apply sharpening to the Lightness channel (right), the colors on the edges are not saturated or changed. They only become brighter or darker. While the sharpening on the regular layer increases the saturation of the edge pixels.

21 sharpening

As a side note, Photoshop doesn’t really add detail to an image when you apply sharpening. It creates the illusion of detail by adding contrast to the edges in the photo. You can see that edge contrast in these extreme adjustments.

You can learn more about sharpening in this video on sharpening photos in Photoshop:

One important thing to note is that the Lab color mode does not have access to all the Adjustment Layers, and some Adjustment Layers will work a bit different than their RGB counterparts.

If you are working with Adjustment Layers and you would like to go back to the RGB color mode, you will have to put the image, and the Adjustment Layers in a Smart Object then make the conversion. Otherwise, Photoshop will ask you to delete the Adjustment Layers or flatten the image.

Conclusion

I hope you found these tips helpful for retouching or editing your images in Photoshop. Do you have any other tips or tricks that you use? Please share in the comments below.

The post 5 Must-Know Photoshop Retouching Tips and Tricks for Photographers by Jesus Ramirez appeared first on Digital Photography School.


Digital Photography School

 
Comments Off on 5 Must-Know Photoshop Retouching Tips and Tricks for Photographers

Posted in Photography


7 Style Tricks to Steal from Other Artists

11 Dec

You’ve been taking photos for quite a while now but suddenly you notice your shots are looking a bit the similar. Same locations, same light, same style, same subjects.

Yes, you can travel to new places once in a blue moon, but you itch to get out with your camera all the time taking inspiring shots.

Welshrobin

You want to create something new and individual but there is always that nagging feeling that everything’s been done.
Yes, friends and family love what you do, but you want to make an impression on your peers. Maybe even enter a competition or two.

Well, you can break out of the same old same old ruth, here’s how. Just borrow a little style from other artists – they’ve been making images for thousands of years and are well practiced at bringing in the new.

7 Ideas to get you out of a rut

1. Andy Warhol Pop Art

Rowanpopart - Seven Style Tricks to Steal from Other Artists

Warhol is famous for his multi-image saturated color artwork such as his portrait of Marilyn Monroe and his Campbell’s soup cans. There is little depth created and the work is all about the surface patterns.

For this first steal you need a straight forward head and shoulders shot against a plain background. There are dozens of videos on YouTube that show you the process for creating pop art, which is quite straight forward, even for a novice at photo manipulation. Choose colors to suit your decor or mood. It’s a lot of fun scrolling through the hues and selecting the color combinations that grab you.

2. Rothko’s Color Fields

Mark Rothko’s paintings are often a field of just one color. They are full of texture, light and shade and nuances of hue and tone. Completely abstract, they still encompass a gamut of emotions from calm reassurance to dark solemnity. Other works include bands of color or two juxtaposed fields.

For this style, try photographing a field full of texture and color such as rapeseed in golden hour light for a picture full of joy. A windswept, sandy beach or a derelict urban factory wall make great subjects to try.

You could create bands of color with long exposures and intentional motion blur smoothing out features that may distract from the visual idea.

The field of orange ephemeral leaves here is offset with the solid green of the tree for changes in texture and color. This would be a good subject for the motion blur technique.

Beechpath - Seven Style Tricks to Steal from Other Artists

3. Escher’s Perspectives

Famed for his impossible changes of perspective and tessellating patterns, Escher also looked at the natural world capturing unusual, thought provoking views. One of those was a woodcut of tire tracks holding a puddle reflecting trees. It’s one of those pictures where you do a double take. This isn’t the same as including reflections in rain covered streets, it’s more about capturing another world where the rest of the scene is merely background.

This example is a small pool in a beech wood. There is just enough “right way up” detail to explain the view point but not enough to change the subject.

Pooltrees - Seven Style Tricks to Steal from Other Artists

4. Monet and Impressionism

The work of the Impressionists is hugely popular, full of light and sparkle. This was achieved by placing complementary colors such as orange and blue next to each other. Your eyes mix the colors and create a myriad of tones that seem to dance across the surface.

You can recreate this effect by looking out for natural occurrences of complementary colors such as these orange and gold leaves against a blue sky. Overexposing the shot slightly helps to give the high key and luminance you need for this to work well.

Beech tree blue sky - Seven Style Tricks to Steal from Other Artists

5. Rembrandt and Chiaroscuro

Rembrandt was a master of Chiaroscuro, the use of deep changes in tone from dark to light adding drama and mood. He mostly used this style for portraits, his brightly lit figures coming out of a deep dark background.

It’s a lovely technique you can use on your portraits, as Rembrandt did, using a dark room and a simple light source such as a lantern. You could also use this style to add a different dimension to still life or macro subjects such as this ox eye daisy.

In this case the background was in shadow behind the flower and a reflector was used to direct more light onto the bloom itself. A little tweaking with Photoshop increased the depth of the darks.

Daisy - Seven Style Tricks to Steal from Other Artists

6. Mondrian Grid Patterns

Blocks of pure color carefully arranged and separated by black lines of a grid were Mondrian’s stock in trade.

To replicate this style, you could look out for grid patterns occurring in the environment, such as different color fields separated by stone walls, paintwork in urban decay, windows in office or apartment blocks, and reflections on water surfaces. You could even set up a still life on a black table using found textures and colors.

In this photo, the initial attraction was the colored reflections, the duckling was a happy accident!

Duckling red water - Seven Style Tricks to Steal from Other Artists

7. Mandalas

These are currently hugely popular across creative fields from adult coloring books to crochet.

This is a great style to use to organize still life subjects containing lots of small items in a cohesive structure. It can be most enjoyable and therapeutic to create the mandala in the first place. You then have the added bonus of the photo opportunity at the end.

This photo used a selection of fruit, leaves, and nuts on a slate table mat background. Nothing went to waste in this one.

You could try autumn leaves, sea shells on the sand, sweets, or mixed media. Get the family to join in for some creative bonding.

Fruitmandala - Seven Style Tricks to Steal from Other Artists

Conclusion

So now it’s over to you. You can take some of these ideas and maybe some of your own inspired by this article and run with them. It’s time to get out with your camera and look around with an artist’s, as well as a photographer’s eye. Good luck, happy shooting, and please come and share your results in the comments below.

The post 7 Style Tricks to Steal from Other Artists by Janice Gill appeared first on Digital Photography School.


Digital Photography School

 
Comments Off on 7 Style Tricks to Steal from Other Artists

Posted in Photography


Video: 3 simple Lightroom tricks you should definitely know

09 Sep

Photographer Travis Transient recently put together this helpful tutorial that might just teach you a thing of two about Adobe Lightroom. The video outlines three simple ‘tricks’ that Travis discovered by playing around with the sliders in Lightroom and really digging deeper than most of us ever try to dig.

These are the kinds of tips we usually see from Adobe itself—from enabling edge detection when using the brush tool to make a selection, to finding and eliminating color fringing by using the Dehaze tool to emphasize it. Check out the full video above and let us know which (if any) of these tips are totally new to you.

Articles: Digital Photography Review (dpreview.com)

 
Comments Off on Video: 3 simple Lightroom tricks you should definitely know

Posted in Uncategorized


Tips and Tricks for Night Photography of the Starry Sky

04 Sep

During the last year, I’ve become a big fan of night photography and the night sky. I’ve always enjoyed it but my hometown in Norway doesn’t have the most interesting landscape. So I rarely bothered to go out during night – unless there was a rare show of Northern Lights or meteorite showers. After packing up my stuff and moving to the north of Spain, however, I’ve found myself spending more and more time photographing the stars. What appears pitch black to the naked eye can be beautiful scenery through the camera.

In this article, I’ll share some tips and tricks on how you can photograph the various states of the night sky including The Milky Way, new moon, or northern lights.

Camera Settings for Night Photography

Light is the most important part of photography; without light, there’s no picture to be taken. During the night it is dark and the light is sparse, making it challenging to photograph. In fact, in order to capture an image during the night, you’ll most likely have to sacrifice some image quality – forget about using a narrow aperture and low ISO.

Unlike regular landscape photography, night photography requires less than ideal settings in order to capture enough light to properly expose the scene. Since there’s not a lot of available light, that means opening the aperture, increasing the ISO and lengthening the exposure time (shutter speed).

Tips and Tricks for Night Photography the Starry Sky

There isn’t one correct setting for each and every scenario as it depends on many factors (such as the brightness of the moon). But as a rule of thumb, you want to use the widest aperture your lens allows in order to get the sky as detailed as possible. Lenses with an aperture of f/2.8 are widely popular amongst nighttime and astrophotographers and if your lens allows for such an open aperture, this is where you should begin.

ISO and shutter speed

The ISO also needs to be increased quite a lot for night photography. For regular landscape photography, I always stress the importance of shooting with the lowest possible ISO. Even though we still want to shoot with the lowest possible setting we’re now looking at an ISO of at least 1600 at night. It’s not uncommon to use an ISO of 3200 or 6400 during the night. Still, to maintain as much quality as possible, try to use the lowest possible option.

Tips and Tricks for Night Photography the Starry Sky

Choosing the shutter speed is slightly more challenging as it depends on the focal length of your lens, but I recommend not going longer than 30 seconds unless you want to photograph star trails (I’ll come back to this later in the article). The 500 Rule is a good guideline when choosing the shutter speed. Basically, divide 500 by the focal length of the lens you’re using and you’ll know the maximum shutter speed you can use (to avoid star trails). If you’re using a crop sensor camera you’ll need to calculate the equivalent focal length of a full-frame lens (for example 20mm on crop sensor = 30mm. 500/30 = 16.6 seconds).

Remember that a tripod is essential for night photography in order to get a sharp image. It’s simply not possible to hold your camera still for several seconds!

Planning to Photograph the Night Sky

Scouting can be hard during the night so it’s often beneficial to have familiarized yourself with the area before going there in the dark. I know this isn’t always possible but the very least use an app such as PhotoPills to learn the phase of the moon, its position, as well as the time of sunrise, sunset, moonrise, moonset and anything else related to your shoot. The more you’ve prepared, the higher the chance you’ll get a great image.

Tips and Tricks for Night Photography the Starry Sky

Let’s summarize what you should know before going out photographing:

  • Time of twilight
  • Time of Nautical and Astronomical dark
  • Phase of the moon
  • Moon’s position in the sky
  • Time of moonrise and moonset
  • When The Milky Way is visible (if applicable)
  • The Milky Way’s position (if applicable)

All this information is easy to find in an app such as PhotoPills or by doing a quick search online.

General Ideas for Night Photography

If your goal is photograph stars and the natural night sky, I think it’s fair to guess that you want to see as many stars as possible. In order to get the best possible view of the stars, you’ll need to position yourself at a location that’s away from larger cities and light pollution.

Tips and Tricks for Night Photography the Starry Sky

A subtle display of Northern Lights in Lofoten.

Website and maps such as DarkSiteFinder are great resources when searching for areas with less light pollution. If you live close to a major city you’ll probably have to travel a little further than if you live near a small town. There are filters, such as NiSi’s Natural Night Filter, that help reduce the light pollution but it won’t magically remove it all and give you a starry sky – it simply neutralizes the color of the light pollution.

For the most detailed night sky, it’s also ideal to avoid the weeks closest to a full moon. During that period, the sky is brighter and there are fewer stars visible to both the camera and the naked eye. However, that doesn’t mean that you should stay home; there are many interesting subjects during the full moon as well.

The Milky Way

Norway is known for Northern Lights, dark and starry nights, as well as the overall beautiful landscape but what we don’t have is The Milky Way. Let me be a little more specific; the Galactic Center (the brightest most visible part of The Milky Way that you see in most photos) is never visible in Norway – we only see the edges of it. So, you can imagine my excitement every time I get a chance to photograph the Galactic Center and The Milky Way in its most beautiful display.

Milky Way photography - Tips and Tricks for Night Photography the Starry Sky

The techniques for photographing The Milky Way are mostly similar to other types of night photography. You’ll want to use an open aperture, high ISO and a shutter speed of no more than 30 seconds. I find that a slightly higher ISO and a shutter speed of around 25 seconds (when shooting at 14mm @f/2.8) gives the highest amount of detail when photographing The Milky Way. By using a slower shutter speed, the camera starts picking up slight movement in the stars (due to earth’s rotation) and it begins to get blurry.

It’s also best to photograph The Milky Way during the new moon or before the moon has risen. The darker the sky, the more stars you see and the more detailed The Milky Way becomes.

Photographing a Meteor Shower

Whenever there’s a meteor shower, such as the recent Perseids Meteor Shower, I keep my fingers crossed for clear skies. There’s nothing more magical than being outside in the pitch black, looking up at dozens or even hundreds of shooting stars during a span of several hours.

Northern Light Meteorite - Tips and Tricks for Night Photography the Starry Sky

Since most the shooting stars last for only a second or two, it can be hard to capture them in an image. In order to capture as many of them as possible, I set my camera to interval shooting and I let it go continuously. To pick up even the smaller shooting stars I increase the shutter speed slightly to approximately 15 seconds (depends on the brightness of the night).

Photographing the Northern Lights

Northern Lights is a phenomenon that we’re lucky to have in the northern hemisphere. It’s unlike anything else and I can guarantee that once you see it, you’ll want to witness it again.

The challenges when photographing the Northern Lights is that it often moves quite quickly and it can be rather bright. In order to freeze the motion, you’ll need a quicker shutter speed such as 1-10 seconds. Exactly how quick depends on the intensity of the lights. Just keep in mind that if they’re moving quickly, you should use a quicker shutter speed.

Northern Lights Iceland - Tips and Tricks for Night Photography the Starry Sky

Also, pay attention to the histogram as it’s easy to blow out the highlights. Since it’s a bright phenomenon in the otherwise dark night, the contrast can be great. I recommend always exposing for the highlights and if needed take a second exposure for the landscape that you can blend in later during post-processing.

Slow it Down and Photograph Star Trails

Due to the rotation of the earth, your camera registers movement in the stars once the shutter speed becomes too long. This creates a blurry and soft sky and can be quite displeasing to watch.

That being said, every now and then this is something you want to use as an advantage rather than viewing it as a problem. By lengthening the shutter speed to several minutes or even an hour (this lets you use a low ISO and narrow aperture but may result in hot pixels) you’re able to capture what’s known as star trails. This effect can be really interesting but make sure that the shutter speed is long enough so that the stars don’t just look blurry.

Tips and Tricks for Night Photography the Starry Sky

Stars over the Sahara desert – image by dPS Editor Darlene Hildebrandt. Series of 30-second exposures over 45 minutes, stacked using StarStax, blended with a couple of light painted images of the tent.

Alternatively, you can capture a series of images using a shorter shutter speed and merge them together in Photoshop or a software such as StarStax.

Full Moon and Bright Moon Phases

As I’ve mentioned previously, nights, when the moon is small, are best for night photography as it’s during this period you’ll see most stars. However, when the moon is up there are still many interesting images to be captured.

moonrise in lofoten - Tips and Tricks for Night Photography the Starry Sky

First of all, since the moon is a bright source of light, you can get away with using a slightly lower ISO or narrower aperture. It can also be easier to find a composition as the landscape is brighter. Use this light to your advantage and pay attention to the shadows in the landscape. Perhaps the moon lights up a mountain? Perhaps it creates a nice reflection in a lake? During this period, it can be wise to compose your image to include more landscape than sky as that’s where the most interesting things are happening.

Personally, I prefer to photograph the moon when it has a low position in the sky as I find the shadows to be slightly more interesting during that time. Note: This is for the same reasons shooting at sunrise and sunset are best for daytime landscape photography.

Conclusion

Have you tried night photography before? If not, grab your camera and tripod (and maybe a buddy for some company) and get out and give it a go. Share any other night photo tips you have in the comments below as well as your night sky images. We’d love to see them.

The post Tips and Tricks for Night Photography of the Starry Sky by Christian Hoiberg appeared first on Digital Photography School.


Digital Photography School

 
Comments Off on Tips and Tricks for Night Photography of the Starry Sky

Posted in Photography


10 Amazing Photography Tricks You Can do at Home with Everyday Objects

26 Jun

Here is a quick video showing you 10 photography tricks or projects you can try at home using everyday objects. You may have some of these things lying around your house, if not most are inexpensive to buy.

Try some of these ideas:

  • Make it snow indoors
  • Use a magnifying glass for fun effects
  • Create your own light flare
  • Try some refraction using water drops or a glass

Have any others? Please share your ideas in the comments below.

The post 10 Amazing Photography Tricks You Can do at Home with Everyday Objects by Darlene Hildebrandt appeared first on Digital Photography School.


Digital Photography School

 
Comments Off on 10 Amazing Photography Tricks You Can do at Home with Everyday Objects

Posted in Photography


5 Hacks and Tricks to up your Landscape Photography Game

05 May

Landscape photography is something that most photographers do. You may be a beginner or an advanced landscape photographer, you may have your own style, or you prefer certain subjects, but there’s always room for something more, something different.

This article is meant to show you five ways in which you can experiment with landscape photography. The techniques will force you to think differently about the surrounding landscape and will uncover new potential shots in places or situations where you might not have considered even getting your camera out.

Let’s see what these five landscape photography hacks that will up your game:

#1 – Long exposures in unusual places

When you think about long exposures you may be thinking of water flow, night photography, or everything that is in low light. The thing is, you can do a long exposure on anything that moves or changes over time. If something is still, then there is no point of doing this technique.

Sometimes you’ll need a Neutral Density filter of 6-stop or maybe even 10-stops if you want to do this during the day when the light is bright. In this case, you would need an ND to dim it down. The idea is to seek subjects that are moved by the wind for example; it works better if some elements of are still and some are moving. Maybe leaves or some thinner branches are moving and the thicker tree trunk is still.

5 Hacks and Tricks to up your Landscape Photography Game

5 Hacks and Tricks to up your Landscape Photography Game

Place your camera on the tripod, use the ND filter if necessary, and take the shot. You’ll get a simple, yet powerful image that represents not only a glimpse of time but few seconds. You can also try this with crops blown by the wind.

#2 – Move your camera while shooting

You usually try to stay still when you shoot so that’s why, as a landscape photographer, you use a tripod. But sometimes it’s interesting to bend the rules and see what the unexpected offers. You can try and move the camera while shooting. Move it from up to down or maybe you can rotate it slightly while the shutter is pressed.

This technique will produce more of an impression of what you see and certain movements work better with certain types of subjects; for example, move your camera up and down if you have straight tall trees. It also helps to have an exposure time of about one second.

5 Hacks and Tricks to up your Landscape Photography Game

5 Hacks and Tricks to up your Landscape Photography Game

5 Hacks and Tricks to up your Landscape Photography Game

5 Hacks and Tricks to up your Landscape Photography Game

5 Hacks and Tricks to up your Landscape Photography Game

#3 – Zoom your lens

Another element that usually stays the same while you press the trigger is the focal length. But what would happen if you changed it during the exposure? Of course, it helps a lot if you have longer exposure time so that you’ll have time to actually zoom.

You have two options with this technique. You can just zoom in or out and you get an interesting effect like everything is “running” to the edges of the photo.

5 Hacks and Tricks to up your Landscape Photography Game

Or you can first zoom your lens in all the way and hold the zoom ring. While you press the shutter button keep the zoom ring fixed and rotate the camera so that the lens zooms out. Don’t forget to keep the hand that is holding the zoom ring still; you are actually zooming out by moving the camera. You’ll get a twisted effect that I find it works better on pines or similar trees.

5 Hacks and Tricks to up your Landscape Photography Game

5 Hacks and Tricks to up your Landscape Photography Game

5 Hacks and Tricks to up your Landscape Photography Game

#4 – Use graduated filters in unusual ways

As a landscape photographer, you likely know how to use graduated ND filters to balance the brightness of the sky with the foreground, but you can do so much more with them too.

In the old days, photographers used to dodge and burn certain areas of a photo to lighten or darken those spots. The technique is still used today in post-processing.

But what if you could do this right in the camera using two graduated ND filters to darken the margins of an image. You only need to place the grad ND filters at a 90-degree angle, one facing left and the other facing right. You don’t even need to have the same filters; you can use a 2-stop and a 3-stop, for example. This will create a light beam effect.

5 Hacks and Tricks to up your Landscape Photography Game

#5 – Create Cinemagraphs

Cinemagraphs are the new thing, and they look cool. You may be wondering what is a Cinemagraph? Well, it’s a combination of still photography and video. The result is a video, but because of this combination, I included this idea here. Here’s an example of what they look like:

In short, the technique requires you to record a video, preferably with the camera on a tripod, freeze one of the frames and make it a photo, and then creating a mask that reveals only one element that moves. It looks better if you make the video loop-able but that is not absolutely necessary. The effect plays with your mind because everything is still apart from one element that moves.

Conclusion

I hope you’ll find these ideas interesting and you’ll use them to open new horizons and explore new techniques. I think experimenting plays a big part in photography and landscape photography is no exception.

Share your landscape tricks and tips in the comments below.

The post 5 Hacks and Tricks to up your Landscape Photography Game by Toma Bonciu appeared first on Digital Photography School.


Digital Photography School

 
Comments Off on 5 Hacks and Tricks to up your Landscape Photography Game

Posted in Photography


Daredevil Santa: Human Flying Drone Enables Sky-High Snowboarding Tricks

24 Dec

[ By SA Rogers in Gadgets & Geekery & Technology. ]

human-flying-drone-1

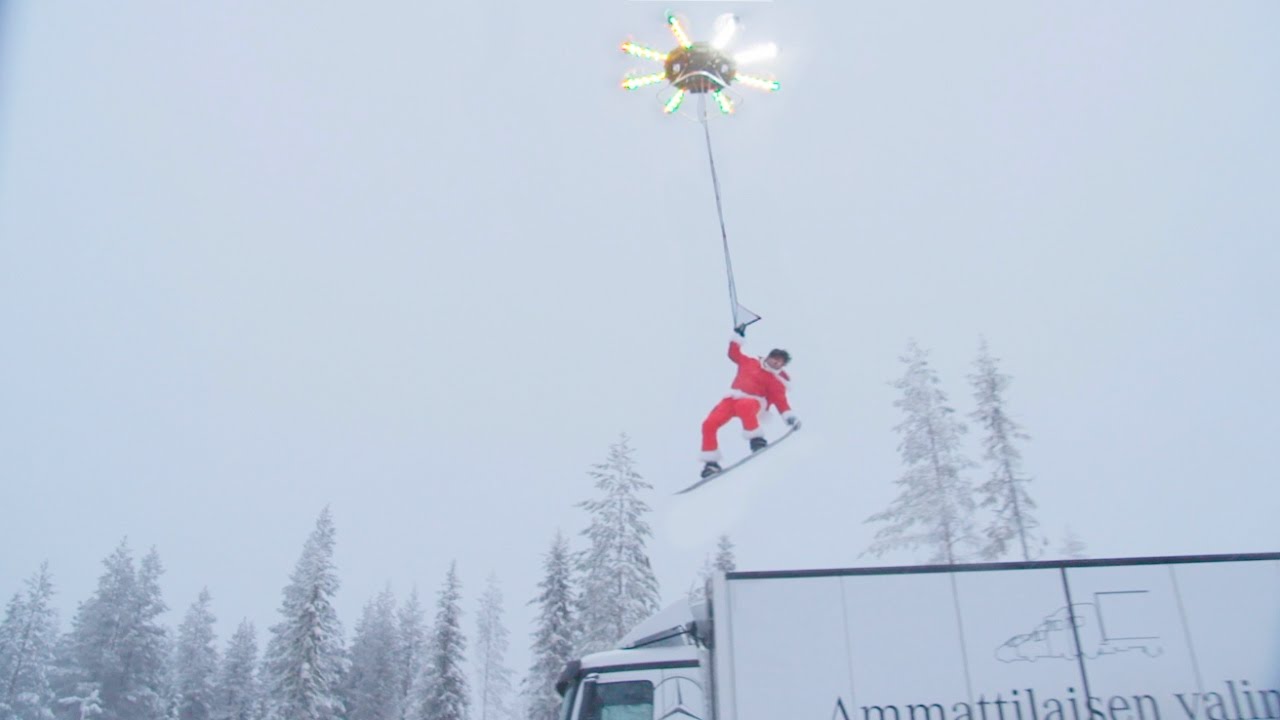
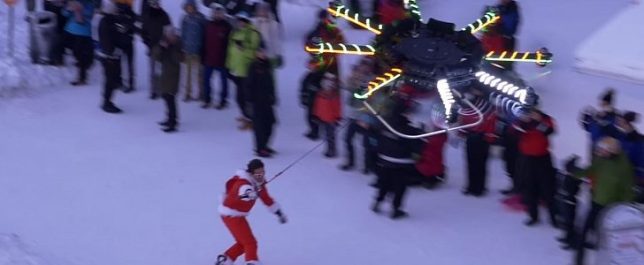
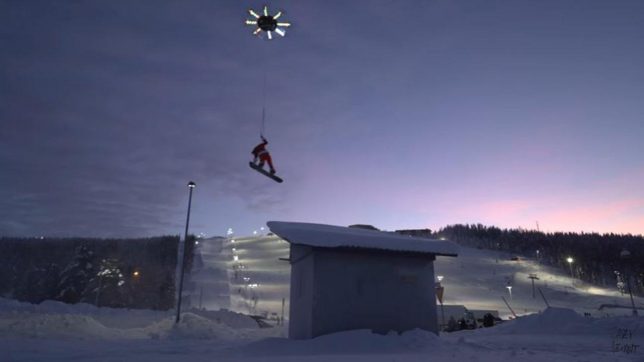
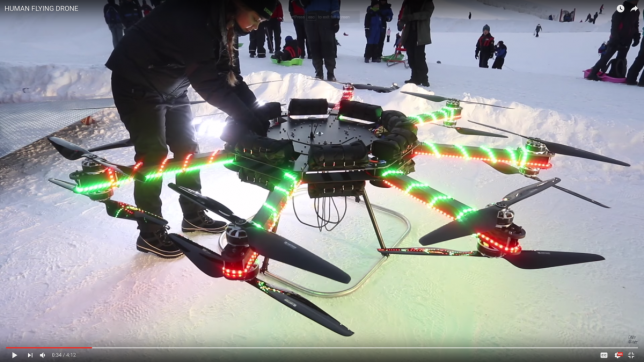
“This isn’t fake, I promise,” said filmmaker Casey Neistat as he announced the impending debut of his ‘Human Flying Drone Holiday Movie’ on Twitter with a dubious-looking graphic. Anyone who saw that tweet could be forgiven for their skepticism, especially since Neistat was teaming up with fellow YouTube star Jesse Wellens of the channel PrankvsPrank to pull off the stunt. But by all accounts, this footage of the ‘world’s largest homemade drone’ is real, and a Santa-suited Neistat is actually flying 25 feet in the air.

human-flying-drone-5

No one in the world sells a drone that can lift a human being, so Neistat and his team set out to create one. The octocopter drone, which is augmented with a Samsung Galaxy Gear 360 action camera, reportedly took over a year to build, and the video clip was shot at a ski resort in Finland over the course of four days. In it, the daredevil YouTuber zooms down a slope on a snowboard and then takes off into the sky, going higher and higher before the final jump takes him 100 feet into the air, as smoke bombs fastened to his feet emit vivid pink plumes.

human-flying-drone-2

human-flying-drone-3

One thing that’s not quite what it seems is Neistat’s single-handed grip on the handle: he’s actually securely fastened to the drone, dubbed ‘Janet,’ by a body harness. The rest of it, as far as anyone can tell, is legit. Looks like fun! Check out how it’s done in the behind-the-scenes video above.

Share on Facebook


[ By SA Rogers in Gadgets & Geekery & Technology. ]

[ WebUrbanist | Archives | Galleries | Privacy | TOS ]


WebUrbanist

 
Comments Off on Daredevil Santa: Human Flying Drone Enables Sky-High Snowboarding Tricks

Posted in Creativity


Transformers: 2 Beijing Houses Packed Full of Space-Maximizing Tricks

08 Dec

[ By SA Rogers in Architecture & Houses & Residential. ]

blue-architecture-studio-narrow-5

Think you’ve seen it all when it comes to ideas for saving space in small houses and apartments? Beijing’s B.L.U.E. Architecture Studio is here to prove you wrong in the most delightful way, with a series of transforming elements and incredibly clever layouts in two tiny ‘hutong’ alley houses. Working with lots as small as 258 square feet that are squashed between existing buildings, the architects managed to produce functional, comfortable, private residences full of natural daylight and enough space for multi-generational families.

blue-architecture-studio-narrow-1

Both homes butt up against other structures, making it impossible to incorporate windows into the design. B.L.U.E. added skylights to both, utilizing open-plan lofted layouts inside to encourage a bright and cheerful atmosphere. The first home is on a narrow L-shaped lot and features a cool glass-filled rear wall that opens all the way up to the courtyard.

blue-architecture-studio-narrow-2

blue-architecture-studio-narrow-4

blue-architecture-studio-narrow-6

Inside, beds and children’s play areas are lofted above a pale wooden built-in full of sliding elements, fold-down tables, transforming stairs, beds that instantly double in size, retractible walls and a modest-sized table that expands to seat six diners.

blue-architecture-studio-narrow-7

blue-architecture-studio-narrow-3

The second house is even smaller, with a nearly-identical arrangement of skylights and cabinet-packed walls revealing an array of unexpected features when opened. Extra countertops and work surfaces pop out of the wall facing the galley kitchen, and storage space stretches from the floor to the ceiling.

blue-architecture-studio-hutong-2

blue-architecture-studio-hutong-3

Beneath the lofted bedrooms for the owners and their kids, a third bedroom area doubles as an extra dining space. Remove the mattress to reveal a pop-up table and cushioned bench seating that you climb into like a retro conversation pit, or lay it back down and pull down the blinds for privacy. A second table folds down from the adjacent wall in seconds, with storage cubes doubling as stools.

blue-architecture-studio-hutong-1

blue-architecture-studio-hutong-4

From the pictures, it looks like there are even more built-in elements that aren’t demonstrated in GIF form, like a mysterious hatch in the dining room floor. The whole setup is clean, modern and uncluttered enough for a minimalist’s sensibilities despite so many people living in such a small space – an inspiration for all the tricks and hacks we’re going to have to come up with to boost housing density in cities with burgeoning populations.

Share on Facebook


[ By SA Rogers in Architecture & Houses & Residential. ]

[ WebUrbanist | Archives | Galleries | Privacy | TOS ]


WebUrbanist

 
Comments Off on Transformers: 2 Beijing Houses Packed Full of Space-Maximizing Tricks

Posted in Creativity