RSS
 

Posts Tagged ‘translucent’

How to Backlight Translucent Objects for Dramatic Effect

22 Dec

Incorporating translucent elements into your compositions can add an interesting dynamic of luminosity to your photographs. Especially if you can backlight them.

How to Backlight Translucent Objects for Dramatic Effect

Water spray, smoke, steam, and things such as flags, flowers, and fabric when backlit can take on an almost surreal quality because of the way the light refracts as it passes through these types of semi-transparent elements. In this article, I want to share with you some ideas and examples of how to make the most of backlighting translucent objects.

Front light versus backlight

How to Backlight Translucent Objects for Dramatic Effect

If you light a translucent element from the front it will look pretty normal as the light will reflect naturally. Lighting translucency from behind means the light is refracted, (bent,) and scattered before your camera’s sensor records it.

As you can see from the two example photos of the mad scientist with the red liquid in the flask. Notice how the color of the liquid appears very different in the two photos. See how dark it is above, compared to the bright red color in the image below where it has backlighting.

How to Backlight Translucent Objects for Dramatic Effect

Any colored liquid in a glass, or even any colored glass containing no liquid, will take on a dramatically different quality when it’s backlit. The colors will appear lighter than if they are lit from the front.

Position yourself to create backlight

Water spray, steam and smoke all provide you with great opportunities to produce creative photos. Backlighting and photographing any of these elements will return very different results than if you position yourself so the light is behind you and the camera.

As the light passes through these elements, (or anything translucent,) the rays are bent and the light is diffused before your camera records it. Backlit semitransparent things tend to glow because of this.

How to Backlight Translucent Objects for Dramatic Effect

In the image above, I found a good location where the sun was in front of me to photograph during the Song Khran festival in Chaing Mai, Thailand, (which is one huge water fight). This lit up the water spray as buckets were thrown and hoses sprayed on revelers.

Seeing the monk sweeping leaves and burning them in the temple grounds (below) I carefully positioned myself to photograph the sun coming through from behind the smoke.

How to Backlight Translucent Objects for Dramatic Effect

Good subjects for backlighting

Flags and flowers are two of my other favorite translucent things to photograph. If you can find an angle where the sun is coming from behind a flag or row of flags the resulting photos can be far more colorful and interesting than if the flag is front-lit.

How to Backlight Translucent Objects for Dramatic Effect

Photographing flowers where you have the opportunity to light them from behind, or even part of them from behind, (as in this image of the purple orchids,) can really make them pop. However, if you are wanting to get clear and realistic correct color of flowers you are photographing it is probably better to light them from the front.

How to Backlight Translucent Objects for Dramatic Effect

Exposure notes

When you are photographing any backlit element take care to expose well. Don’t be too concerned about getting a “correct” exposure as often slightly overexposing will enhance the effect. Expose to create a feeling or mood rather than to achieve a technically precise result.

Your camera’s exposure meters measure reflected light. When you photograph refracted light passing through a translucent element your camera may not give you an acceptable result if you are using any of the automatic modes. Being in control of your exposure manually will allow you to experiment and set it to give you the result that you think looks best.

How to Backlight Translucent Objects for Dramatic Effect - colorful drinks

The background matters

If you are able to include a dark background in this style of photograph this can often enhance your pictures as well. The glow of a backlit semitransparent element can really stand out from a dark background where the light is three or more stops lower.

This photo of a Lahu man smoking against the dark background of my outdoor studio is a good example of this.

How to Backlight Translucent Objects for Dramatic Effect

Processing

Taking a little more time to post-process photos you have made using this technique is advisable. Because of the unusual nature of the lighting and the subject your camera may not always record the photo exactly how you want it. Manipulating the contrast levels, blacks, highlights and using the dehaze feature will allow you to enhance your photos of translucent backlit subjects.

How to Backlight Translucent Objects for Dramatic Effect

Please share your photos in the comments below of smoke, spray, steam or any other translucent elements with backlighting that you’ve enjoyed making.

The post How to Backlight Translucent Objects for Dramatic Effect by Kevin Landwer-Johan appeared first on Digital Photography School.

Digital Photography School

 
Comments Off on How to Backlight Translucent Objects for Dramatic Effect

Posted in Photography


Review: Lastolite 6×4 Foot Panelite Collapsible Reflector with Translucent Diffuser

12 Apr

review-lastolite-panelite-diffuser-0803

How many times have you heard that there are certain times of day you shouldn’t photograph people? For example, at midday in harsh sunlight. The logic is pretty sound. Direct, hard light can lead to unflattering shadows and ultra high contrast, which can result in unsatisfactory portraiture. However, if you follow this advice blindly, and only wait for the golden hours each day, you’re missing out on an enormous amount of time that could be spent photographing people.

There are several options to combat this problem, but one of the easiest and most effective, is a piece of gear called a diffusion panel.

What is a diffusion panel?

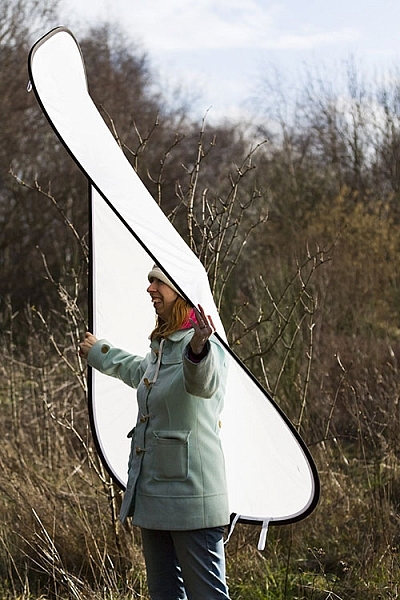
At its most basic, a diffusion panel is a piece of translucent material that allows harsh direct light to pass through it, so it effectively becomes a light source of its own. This softens the light and can allow you to obtain great, flattering, natural light portraits, in unfavorable conditions.

review-lastolite-panelite-diffuser-2745

There are many types of diffusion panels available ranging from very small, handheld ones, to giant ones that are many meters across and require dedicated stands.

When size matters

Small diffusion panels are useful, and if you happen to have a 5-in-1 reflector, you probably already have one. These are indispensable for still-life and tabletop work; however, in terms of portraiture, their small size often limits them to closely cropped images and headshots.

This is where the Lastolite Panelite Reflector comes in. At 6×4 feet (1.8m x 1.2m) it’s large enough to cover enough area for full length portraits. At $ 128 retail, its price also means that it isn’t way out of reach for the serious portrait photographer.

Putting it through its paces

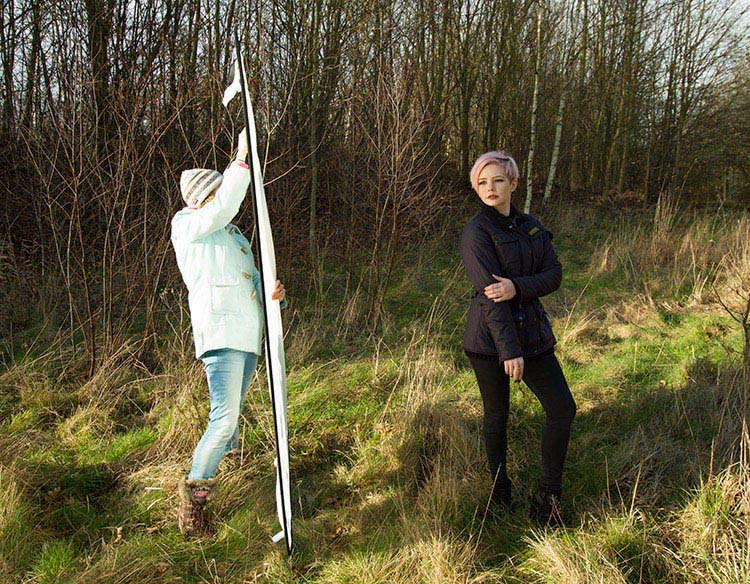
To test it out, I took the Lastolite Panelite Reflector out on location, at mid-afternoon on clear days. The sun was low at this point, but still very harsh, and the high contrast would have been difficult, if not impossible, to manage without a modifier.

review-lastolite-panelite-diffuser-0385

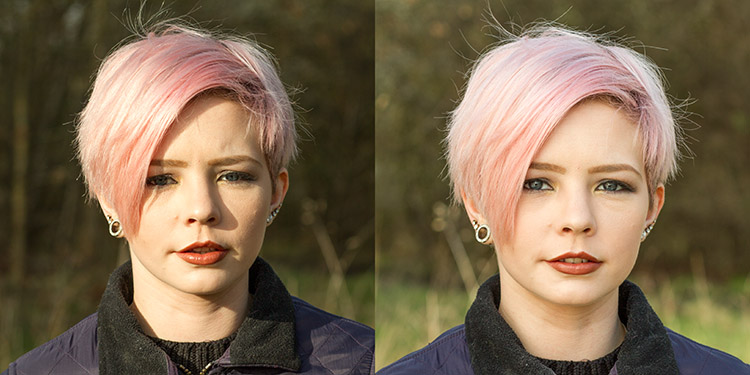
By Diffusing the sun back lighting the scene, you can even out the exposure of the highlights and shadows which is far more pleasing for portraits.

review-lastolite-panelite-diffuser-0569

On the left, the bottom half of the image is shaded by the diffuser. You can see the two stop difference in exposure. In the image on the right, you can see how the hard directional sunlight has been softened (note that more exposure was needed overall so the background was also brightened in the process).

review-lastolite-panelite-diffuser-2621

Apart from the unflattering shadows in the left hand image, the direct sun made it painful for the model to look into the camera. With the diffusion panel (right image), her eyes were shielded from the harsh light.

review-lastolite-panelite-diffuser-2734

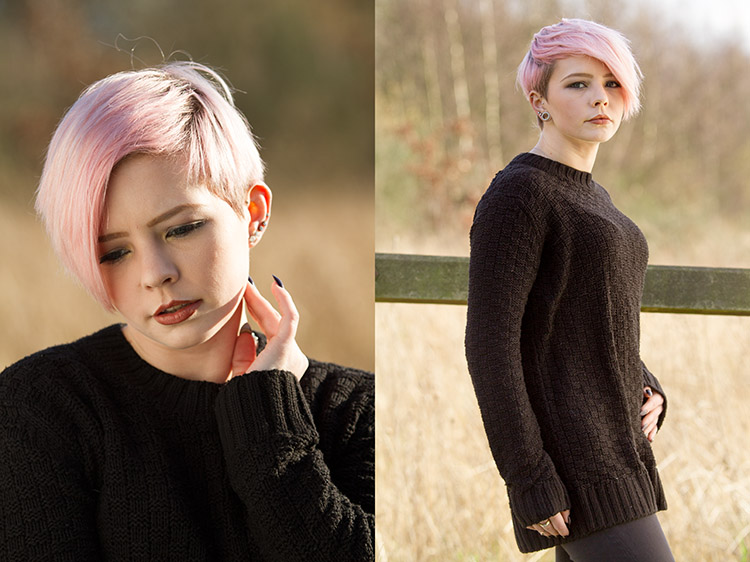
In the left hand image, the extreme contrast from the back lighting made exposing for the rest of the image a nightmare. By diffusing the back light, the exposure was evened out, but still allowed for a pleasing rim light (image above right).

Let’s look at some of the pros and cons of using this light panel.

PRO: Two stop diffusion

review-lastolite-panelite-diffuser-2737

By reducing contrast, the loss of two stops of light can be a huge help in some scenarios.

When working with the extremes of bright sunlight, it can be difficult to get away from small apertures like f/16. This is a problem because these settings won’t allow for a shallow depth of field. By reducing the light on your subject by two stops with the diffuser, that hypothetical aperture of f/16 becomes f/8 and makes background blur much easier to control.

PRO: Size

review-lastolite-panelite-diffuser-2656

This thing is huge. It’s not the biggest on the market, but it’s big enough for full length portraits, which is a major plus. I did not yet have the opportunity to test it on groups of people, but I believe it should work well for up to four people, with careful control.

review-lastolite-panelite-diffuser-0734

The ability to diffuse a large enough area for 3/4 and full length portraits is a big plus.

PRO: Portable

Like a lot of Lastolite’s product, the diffusion panel is collapsible, and folds up to a tiny fraction of its size. Packed in its case, I would compare it to the surface of a medium sized cafe table. Combined with its light weight, it’s easy enough to throw in the back of a car, and carry along on location with you, without strain.

PRO: Price

At $ 128, this is not a budget tool. However, for photographers serious about location based portraiture, the Lastolite Panelite Reflector comes in cheaper than lighting modifiers of moderate quality and unlike those, this doesn’t require lights to go with it.

CON: Extra hands

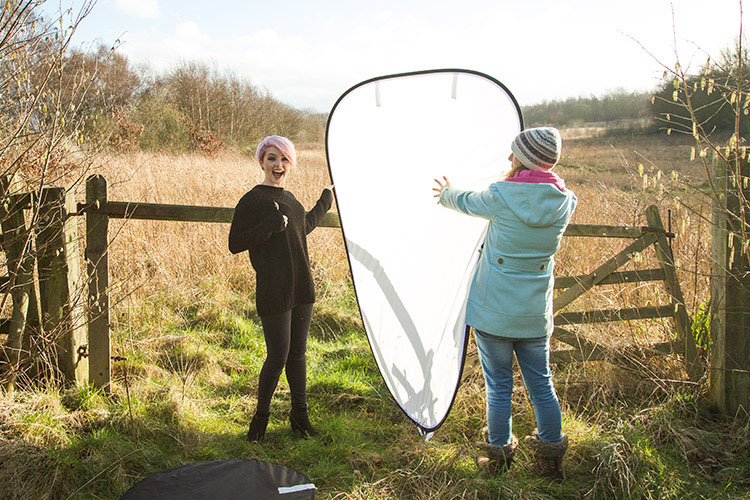
The Lastolite Panelite Reflector is large, and you will find it very difficult to manage without an assistant to hold it for you. If it needs to be held much higher than ground level, you may well need two people. It may be possible to rig it to some stands, but this leads into the next point.

CON: Be wary of wind

review-lastolite-panelite-diffuser-2695

A small gust of wind sparked a several minute struggle to regain control over the panel.

The only real problem I came across while testing the Lastolite Panelite Reflector was that the slightest gust of wind will send it flying, and folding in on itself. Whoever is holding it for you needs to have a sure grip on it, and even then the whole process is still irksome.

If you’re into slapstick, this can be hilarious to watch, but any time spent trying to get the diffusion panel to play along, is time not spent taking photographs.

CON: Dirt

Like white reflectors, softboxes and white umbrellas, the Lastolite Panelite Reflector is really, really white and will be hard to clean when it inevitably gets dirty.

Overall thoughts

review-lastolite-panelite-diffuser-0640

If nothing else, when used head on, the Panelite Reflector creates some interesting catch-lights.

To sum it up easily, the Lastolite Panelite Reflector does exactly what it says on the tin. It’s portable, creates a beautiful diffused light, and is relatively affordable. Although, it can prove tricky to handle under some conditions, I found the results to be well worth the extra logistics and effort, and I am looking forward to a long an extended relationship with it in my photographic arsenal.

googletag.cmd.push(function() {
tablet_slots.push( googletag.defineSlot( “/1005424/_dPSv4_tab-all-article-bottom_(300×250)”, [300, 250], “pb-ad-78623” ).addService( googletag.pubads() ) ); } );

googletag.cmd.push(function() {
mobile_slots.push( googletag.defineSlot( “/1005424/_dPSv4_mob-all-article-bottom_(300×250)”, [300, 250], “pb-ad-78158” ).addService( googletag.pubads() ) ); } );

The post Review: Lastolite 6×4 Foot Panelite Collapsible Reflector with Translucent Diffuser by John McIntire appeared first on Digital Photography School.

Digital Photography School

 
Comments Off on Review: Lastolite 6×4 Foot Panelite Collapsible Reflector with Translucent Diffuser

Posted in Photography


Light House: Translucent Dwellings in an Abandoned Parking Garage

24 Oct

[ By Steph in Architecture & Houses & Residential. ]

light house 1

With their cavernous abandoned spaces, the hundreds of stalled skyscraper projects throughout tropical Asia could serve a purpose by hosting low-budget micro-dwellings aimed at ‘urban nomads.’ Economic conditions put many high-rise building projects on hold, while the global housing crisis is making it difficult to impossible for young people, the middle class and the urban poor to find affordable accommodations in desirable cities. A project called ‘Light House’ offers a temporary solution.

light house 5

light house 4

Designed especially for mild climates, these prototype housing units consist of perforated metal grid frames, plastic-laminated plywood floors and walls made of layered textiles. “The different degrees of perforation of the walls give variation to the space within by selective filtering of external elements,” say the creators, Bangkok design firm All(zone). There are shelves for personal items, a changing room with a closet, and a bed surrounded by mosquito net.

light house 2

light house 3

light house 10

Each one costs $ 1,200 to make and can be quickly assembled and disassembled, taken to a new location when the current ‘host’ is no longer available. The designers themselves lived in the prototype units to test them out. But would the average young city resident really want to live in a space like this?

light house 6

light house 7

The need for affordable housing, adaptability and reclaiming vacant urban spaces is undeniable, but flimsy structures like these seem like just one shaky step above homelessness, and might be better suited to serving that population instead. The transparency of the walls could be seen as a statement on what it’s like to live in the streets, perhaps making an even more profound statement on the housing crisis than the creators intended.

Share on Facebook


[ By Steph in Architecture & Houses & Residential. ]

[ WebUrbanist | Archives | Galleries | Privacy | TOS ]


WebUrbanist

 
Comments Off on Light House: Translucent Dwellings in an Abandoned Parking Garage

Posted in Creativity


Cool Colors: Rainbow Igloo Built of 500 Translucent Blocks

25 Mar

[ By WebUrbanist in Art & Installation & Sound. ]

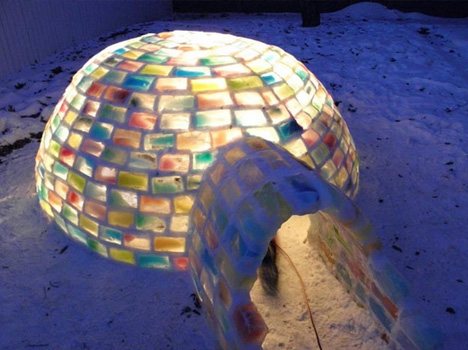
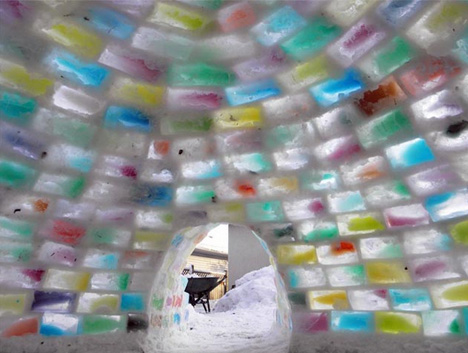
colorful rainbow ice igloo

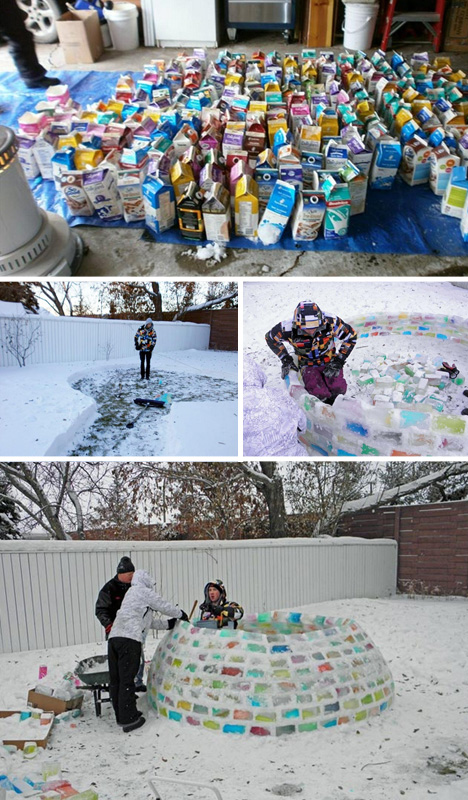
When your prospective future mother-in-law takes the time to fill hundreds of cartons with colored water before your visit, it would behoove you to do something with them. And thus this unexpected collaboration was born.

colorful iglooe interior blocks

Braving temperatures down to negative 25 degrees (both Fahrenheit and Celcius), engineering student Daniel Gray and his girlfriend Kathleen Starrie took these frozen ice bricked (formed by Brigid Burton) and constructed an incredible structure.

colored snowcrete construction process

Instead of carving each block, Gray developed a kind of ‘snowcrete’, using flexible layers of snow as mortar to create the hemispherical shape required (after extensive calculations to make sure it was of a size that would not run them out of building materials).

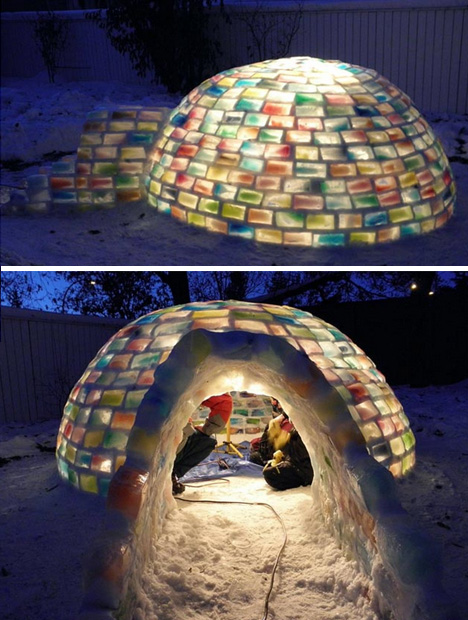
colorful igloo night entrance

150 combined work-hours and 5 days later, the result is nothing short of stunning – the semi-spontaneous igloo is colorful by day, but even more dazzling by night when lit from the inside. If this was a pre-marital tes, one can only hope he passed with flying (or frozen) colors.

Share on Facebook


[ By WebUrbanist in Art & Installation & Sound. ]

[ WebUrbanist | Archives | Galleries | Privacy | TOS ]


WebUrbanist

 
Comments Off on Cool Colors: Rainbow Igloo Built of 500 Translucent Blocks

Posted in Creativity