RSS
 

Posts Tagged ‘Topaz’

Topaz Labs will end free upgrades for several products starting in August 2020

15 Feb

Topaz Labs, the software company known for offering free software upgrades, has announced a major change to its business model: customers will have to pay to upgrade several of the company’s products starting in August 2020. The announcement was made by company CEO Eric Yang in a statement on Thursday. Gigapixel AI, DeNoise AI, Sharpen AI and Mask AI are all affected by the change.

Yang explains that offering free major upgrades for its products was a way ‘of acting differently than faceless corporations,’ but that it ultimately had an unwanted effect. By hinging its revenue on new products rather than product upgrades, Yang says, ‘we found that we weren’t focusing as much as we wanted on improving existing products.’

Yang goes on to state:

We ended up with several different products that did similar things, which caused confusion about which tool to use. Although it started out with good intentions, our free upgrade policy ultimately prevented us from delivering the best possible products to you. Make no mistake about it: this situation was 100% our fault. We were not thoughtful enough about aligning our pricing structure with continuous improvement of our products.

Topaz Labs says more than $ 8 million worth of free upgrades were claimed for major new products last year. In 2020, the company will transition to paid upgrades, which will involve paying $ 49.99 for a year of upgrades following an initial first year of free major and minor upgrades. For customers who own multiple Topaz Labs products, the upgrades can be collectively purchased for $ 99.99.

The company says that Mask, Sharpen, DeNoise and Gigapixel will require upgrade licenses this year. Topaz Labs stresses that customers retain access to the products they purchased even if they choose not to purchase software upgrades. ‘Wait until [the upgrade] actually includes something you want to pay for,’ Yang says. ‘This also incentivizes us to make sure that the improvements we do implement are useful enough for you to upgrade.’

Some customers are understandably upset about Topaz’s decision to start charging for upgrades. Yang acknowledges this in his post, stating that it was a hard decision to make. ‘I’m asking you to lock arms with us and walk through this phase of our development by accepting this change,’ he states. Users will soon be able to view how much time remains on their upgrade licenses within their customer accounts.

Articles: Digital Photography Review (dpreview.com)

 
Comments Off on Topaz Labs will end free upgrades for several products starting in August 2020

Posted in Uncategorized


Topaz Labs DeNoise 6 adds standalone option, batch processing, camera profiles

02 Mar

Topaz Labs has released DeNoise 6, the latest version of its noise-removal software. This latest installment can be used as a standalone application in addition to functioning as a plugin for host software like Adobe Lightroom and Photoshop; it also adds batch image processing as well as profile presets for dozens of camera models.

Topaz Labs announced the software update last week and is offering it to new customers at a discounted $ 49.99 rate until March 20, after which the regular $ 79.99 price tag will apply. Existing DeNoise customers can update to version 6 for free. DeNoise 6 is available for 64-bit Mac OS X and Windows systems.

Via: Topaz Labs Blog

Articles: Digital Photography Review (dpreview.com)

 
Comments Off on Topaz Labs DeNoise 6 adds standalone option, batch processing, camera profiles

Posted in Uncategorized


Getting Creative With Topaz Impression

26 Oct

Topaz Labs recently released a new standalone image processor called Topaz Impression and I wanted to show you how it works and the kinds of things you can create with it.

However, I should make it very clear up front, that this is not a standard keep it real kind of image processor, so if you cringe at the thought of image manipulation you may want to turn away now.

getting-creative-with-topaz-impression

What is Topaz Impression?

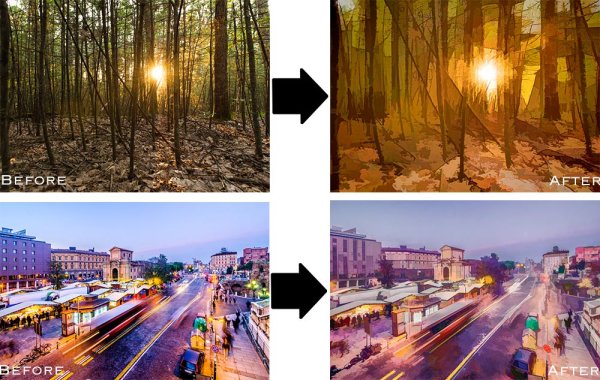
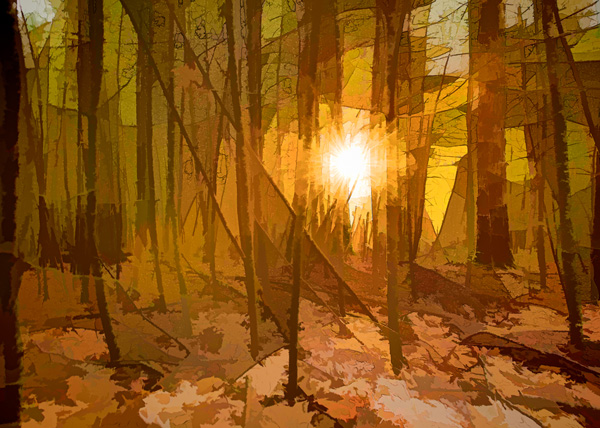
On the surface Topaz Impression is a digital image processor which allows you to take any photograph and convert it into something that resembles painted or drawn art. If this sounds familiar you might be thinking of their other product, which is a plugin called Topaz Simplify (which I covered in a past article here on DPS Create Art with your Photos Using Topaz Simplify), and it does provide some similar functionality, but works in a different manner.

The basic difference is that Simplify works by removing or softening the details and edges within a photograph that you present to it, while Impression works by creating different brush strokes based on the customizations that you choose.

basicUI

The other great benefit of Topaz Impression is the user interface, which is fairly intuitive and easy to navigate, while still being fairly powerful in terms of the customization options you have available to you – in comparison Simplify’s interface can be kind of cumbersome to use.

Finding Your Way Around Topaz Impression

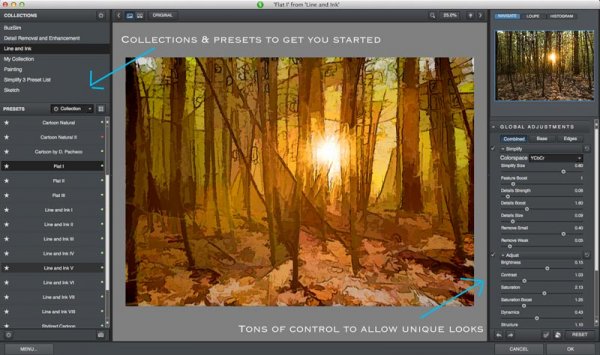
As I mentioned, one of the great things about Impression is that it’s fairly simple to use. Impression’s user experience is built on the idea of starting with a preset and then customizing that further to suit the needs and vision of the artist. A basic workflow would look something like this:
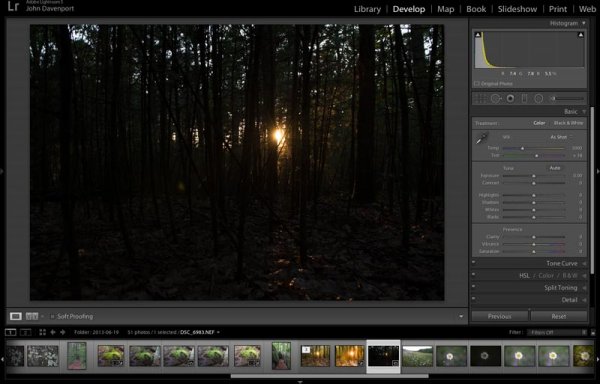
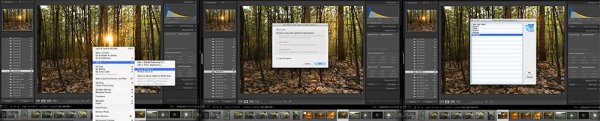
Pop in an image

import-image

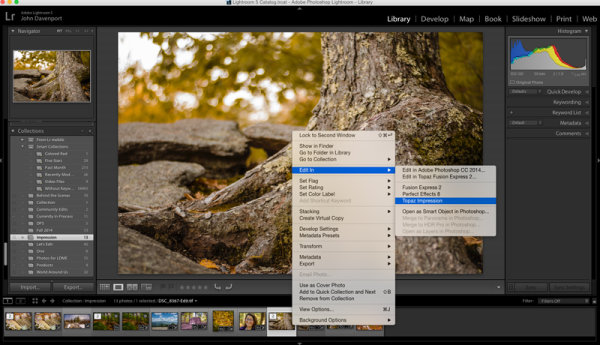
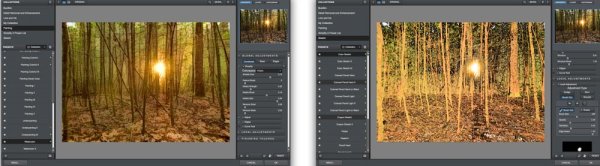
You can do this either by choosing “Edit In Topaz Impression” from your Lightroom library or, as seen further above, you can simply uploading a photograph directly into Impression from your computer’s hard drive.

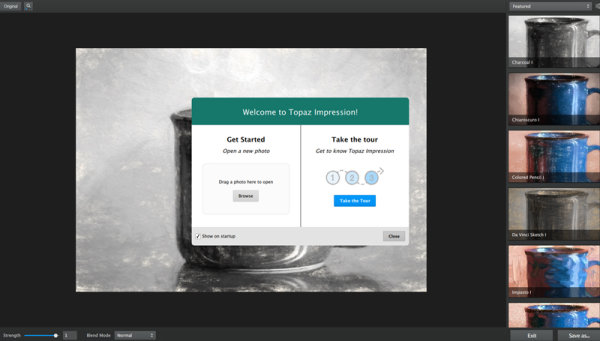
Select a preset you like

select-preset

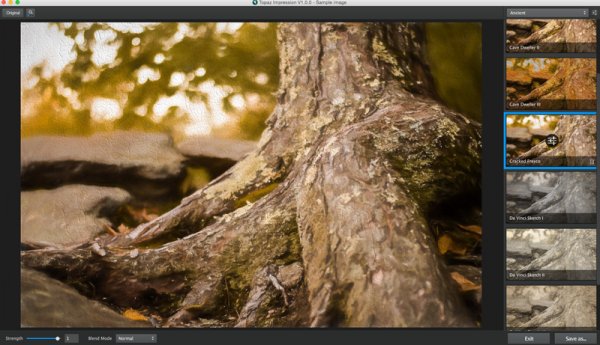
There are a handful of presets to choose from in a variety of categories: Ancient, Impressionistic, Modern, Painting, Pencil, Charcoal & Pastel, and of course you can create your own as you work with the platform and find that you prefer certain tweaks over other ones.

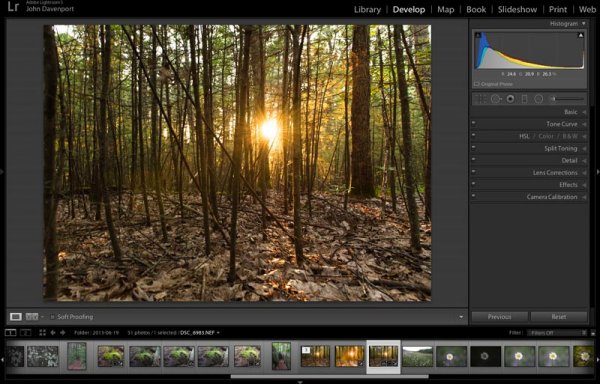
Modify to your liking

customize

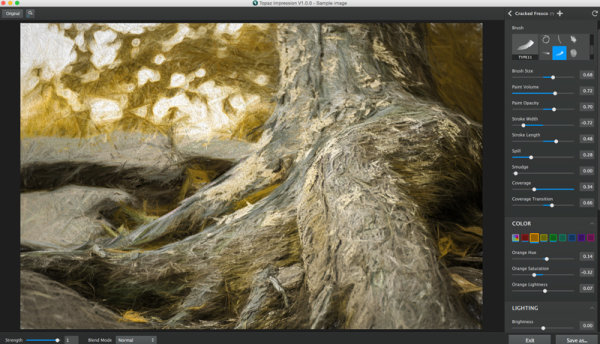
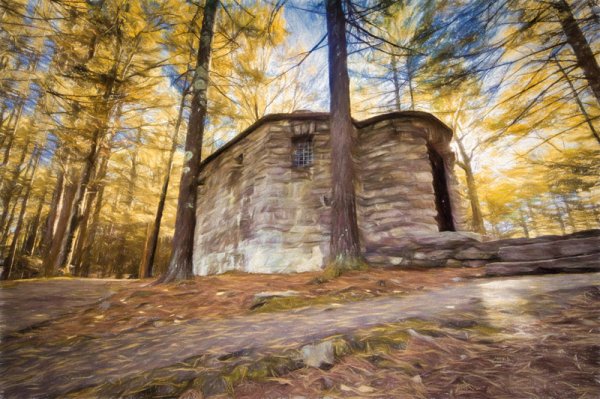
Like any good digital photo editor you have the ability to modify the chosen preset to suite the image you’ve uploaded. This is where Impression really can come to life. As you can see in the screen capture above, the preset has been changed in a number of ways to create an image that is drastically different than the preset I’d selected.

More on Customization Inside Topaz Impression

The customizer in Topaz Impression is where the magic happens. Inside the customizer you have a number of controls available to you, from 14 different types of brush strokes to multiple preloaded textures.

You have the ability to control things like the size of the brush, the amount and opacity of the ‘paint’ that’s making up your image, the width and length of your stroke, and spill, smudge and coverage give you even more creative control over the look of the image.

customization-tools

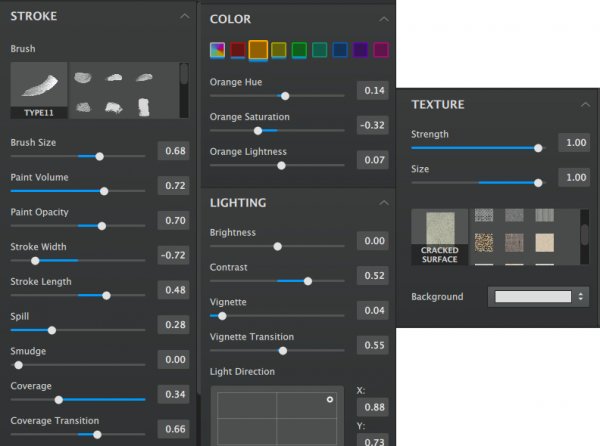
However, you don’t just control the way the brush strokes are presented, but Impression also lets you control how the various colors of your image are displayed. From a basic global setting, to selectively adjusting the various tones that make up your image you have the ability to get fairly specific with your modifications here.

One other interesting aspect of Impression is that it gives you the ability to control the direction of your lighting. Of course this can’t control what’s happening inside your photograph, but rather, it controls the way the lighting effects the textures that you’ve applied to the painting allowing you to match this up with the lighting inside your photograph.

A Few Feature Requests and Suggestions

This is version 1.0.0 and I’m sure the people at Topaz have plans to build out Impression in the future, but there are a few things missing that I’d personally like to see included in future versions.

  1. Local Adjustments – At the moment there’s no way to go about modifying on a local level. This does keep the interface and customization options easy to learn and use, but limits what you can do in a way.
  2. Custom Brushes/Textures – At the moment you’re stuck using the ones that Topaz has provided with the platform. I’d like the ability to create and/or upload our own brush strokes.
  3. Undo/History – At the moment all that is available to you is a one button reset button which will take you back to square one. I’d like the option to be able to undo iterative changes, or better yet, a history option similar to Lightroom.

Topaz Impression in Action

Here’s a quick look at Topaz Impression in action. If you want to skip the Lightroom part just jump to the 5:30 mark in the video:

Overall Thoughts

As I said at the start of this article – Topaz Impression is a program for those willing to put their photography through a digital manipulation workout – but it is quite fun. I think it’s a great start and could become an interesting niche style for some photographers out there, however with it’s present iteration being a bit lacking in terms of local adjustment capabilities or the freedom to at least apply our own textures within the program, it leaves a little to be desired.

getting-creative-with-topaz-impression-2

after-topaz-impression

Have you used Topaz Impression? What have you thought about it? Maybe share some of your before and after images below.

And if you’re interested in trying it out for yourself Topaz does offer a 30 day trial so you can see how it works before you buy.

The post Getting Creative With Topaz Impression by John Davenport appeared first on Digital Photography School.


Digital Photography School

 
Comments Off on Getting Creative With Topaz Impression

Posted in Photography


Create Art with your Photos Using Topaz Simplify

27 May

Simplified-after-1

Topaz Simplify is designed in a way that allows you to transform your photography into something that resembles painted or drawn art. There are a ton of different styles of art packed into Simplify, from line and ink, to oil and watercolor painting; so it should provide some great creative opportunities for you. Today I’m only going to do a basic walk through on a couple of different photographs in order to introduce the product to you.

TopazSimplfiy-Beforeandafter

Before getting started I do want to mention that while I’ll be using Topaz Simplify as a Lightroom plugin today, it also works with Photoshop, Aperture, iPhoto and others so you don’t have to have Lightroom to use it. Find out all the info and get the free trial of Topaz Simplify here.

Topaz Simplify Basic Walkthrough

As you can see from the original RAW file below this photograph is in some serious need of help. It’s basically just an underexposed shot of the sun setting through the forest, without much of a focal point or anything interesting going on. Now I don’t want you to think that Simplify will solve all your terrible miss-fired shots, in most cases it won’t. But here I think it does a remarkable job at making lemonade out of lemons.

Do Lightroom basic adjustments first

TopazSimplify-Original

Original RAW file in Lightroom

Before we can use Simplify however, we do need to get the photograph into some sort of usable shape. For this photograph I’ve got to really rely on Lightroom’s power of saving an underexposed image which it handles without too much of a problem.

After some adjustments in Lightroom 5 using a combination of sliders in the basic tab, you can see that the photograph is at least now in a condition that Simplify will be able o handle.

TopazSimplify-LightroomCleanupCrop

After some basic Lightroom adjustments

To use Topaz Simplify in Lightroom you’ll also need the free Fusion Express plugin (download it here) which is what launches all of the Topaz products. Once both programs are installed launch Topaz Simplify by right clicking on your photo. Navigate to EDIT IN > FUSION EXPRESS 2.

TopazSimplify-LaunchSequence

You can see this in more detail in the video below

Next, a dialog box will open up asking you to select how you’d like the photograph to be brought into Topaz Simplify there are three options here – I always choose ‘create a copy with Lightroom adjustments’ as the other two work off the original file in Lightroom. Note: if this is an area of confusion for you, you’ll be able to see this process in more detail in the video below.

TopazSimplify-AdjustmentForest

Topaz Simplify preset and adjustment options

Next try the ready-made presets that come with Simply

Once you’ve launched Topaz Simplify you’ll be brought into a new editor screen with a bunch of prepackaged collections filled with different presets.

On the left-hand side, as you can see from the screen shot above, the Line and Ink collection is currently selected. There are a handful of other collections, each one containing a different set of presets, all of which are great when you’re just getting started with Topaz Simplify. I highly recommend just playing around with them to find out which ones suite your own creativity best, before getting to involved with the rest of the program. Here are a couple more variations on the photograph above that I achieved with just a few mouse clicks using presets.

TopazSimplify-Forest2

A couple more Topaz Simplify variations.

Customize and play

However, once you have gotten used to the presets and found the ones you like, you also have a lot of control to make the images your own through various adjustment options.

The right-hand panel offers the ability to control things like the overall intensity of the Simplify effect, the ability to determine which edges are drawn in harder or removed entirel,y and the ability to modify how much overall detail is pulled out from the scene.

You also have access to some options for basic image adjustments should you need to do some minor contrast, brightness or saturation modifications (though I’d suggest waiting on these until you get back into Lightroom).

Finally – one of the best parts of Simplify – is that Topaz decided to include bunch of great local adjustment options allowing you to burn, dodge, smooth and/or brush out the effects of Simplify in specific areas of your photograph.

Simplified-after-2

For a look at Topaz Simplify in action watch the video below where I run our second photograph from the two before and after images above through Simplify.

Topaz Simplify Basic Video Walkthrough

What do you think? Have you simplified a photo?

So after this basic walk through I’d love to hear your thoughts on the software. If you do go ahead and use it, or have done so in the past, how about a sharing one of your favorite before and after image sets in the comments below – I’m curious to see what you’re able to come up with.

The post Create Art with your Photos Using Topaz Simplify by John Davenport appeared first on Digital Photography School.


Digital Photography School

 
Comments Off on Create Art with your Photos Using Topaz Simplify

Posted in Photography


This Side Up – A Short Animation by Liron Topaz

25 Jul

My short Animated film from Ringling College of Art and Design. www.lirontopaz.blogspot.com A naive music-lover’s patience is tested on his quest to download music online, as his perspective on technology completely changes. Visit the official site for the movie – http Copyright © Liron Topaz 2009 Music by Erez Koskas Sound Design by Ido Levran My online portfolio- www.lirontopaz.com

Another series of animated optical illusions. I created all of these from scratch using photoshop. One of the simplest yet amazing illusions. The definition of illusion: something that deceives by producing a false or misleading impression of reality
Video Rating: 4 / 5


Enhancing HDR Photos in Photoshop with Topaz Adjust and Topaz DeNoise

07 Mar

This video is part of my HDR How-to Guide from my website at www.CaptainKimo.com
Video Rating: 5 / 5

 
Comments Off on Enhancing HDR Photos in Photoshop with Topaz Adjust and Topaz DeNoise

Posted in Retouching in Photoshop


Enhancing photos in CS4 using Noiseware Pro and Topaz Adjust 3 with layer masks.

20 Feb

In this tutorial I show how I further improve image quality of a photo after RAW editing in Lightroom 2. Opening the photo from LR to CS4 in 16bit tiff 300dpi mode and then using layer masks with Imagenomic’s Noiseware Pro and Topaz Adjust 3. This is “my way” of enhancing nature photos where there’s a lot of separation between the background and subject. I do not using Topaz Adjust 3 on portraits nor do I use it on landscape shots. I’m also a “self-trained” photoshop user, so if you know that I’m doing something wrong or a better way to do it, then please let me know.

TUTORIAL FOR THIS BEFORE PIC: i96.photobucket.com COMES IN SEVERAL PARTS, AFTER PIC: i96.photobucket.com
Video Rating: 4 / 5