The post The 6 Top Photoshop Tools for Still Life Photography appeared first on Digital Photography School. It was authored by Darina Kopcok.

Even if you do most of your editing in Lightroom, you’ll still find that you need Photoshop to really finesse your photos. Because it’s a pixel editor, Photoshop offers you more retouching tools and gives you further control than you can obtain from Lightroom.
In still life photography, like food and product, every aspect of your image needs to hold up to scrutiny for maximum impact. It needs to look clean and perfect.
There are certain tools in Photoshop that will help you tweak the best out of your images.
Although this article won’t go in-depth for every single tool – you’d need several articles for that – it will get you up and running in applying some basic treatments to your still life photography.
So without further ado, here are the most useful Photoshop tools for still life photography.

1. Spot Healing Tool
The Spot Healing tool is one Photoshop tool that you’ll use on every still life image you retouch in Photoshop. This tool has improved greatly over the years.
Similar to the Healing Brush tool, it samples pixels from the surrounding areas to correct blemishes and imperfections. However, unlike the Healing Brush, it automatically samples the pixels without your having to specify where they should come from.
Why is this so great? Because the Spot Healing brush does this way better than it used to. This means you can remove dust and small marks very quickly.
If you’ve ever tried the Spot Removal tool in Lightroom, you’ll know that clicking on it repeatedly will quickly slow down Lightroom’s performance. Photoshop will give you better results, more quickly.
When you’re dealing with still life photography, remember that you want a clean-looking image. Zooming in on your photo at 100% and cleaning up any dust or blemishes will make a big difference in the overall aesthetic.
To use the Spot Healing tool, select it from the tool menu or hit J.
Zoom into your image and simply click on the blemish you wish to correct. It will automatically sample from an appropriate area and apply the pixels.
You can also clean up a larger area by brushing over it.
One thing to note is that if you use it repeatedly in a small area, the pixels can start looking unnatural and plastic-like.

2. Patch Tool
The Patch tool is another Photoshop tool for still life photography that you’ll most likely use on the majority of your images.
It works great on small areas by creating a selection and replacing the pixels with other pixels of your choosing. It considers lighting, shade and texture when sampling an area.

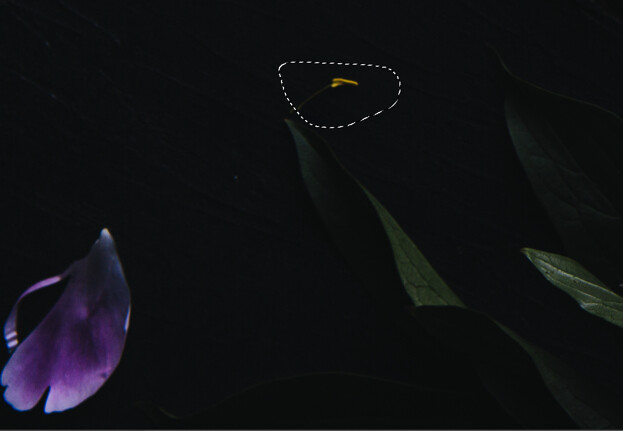
In the image below, I wanted to get rid of the yellow filament from my flower because I found it distracting.
There are many ways to do this in Photoshop, but I find the patch tool quick and seamless for this type of correction.
To use the tool, select it from the toolbar.
Draw a selection around the area that you wish to correct.

Click on your mouse and drag the selection to an area that you would like to replace the selected pixels with. Let go of the cursor.
Press Command D to undo the selection.
To have greater control over the final result, make sure you have Content-Aware selected in the tool menu and play with the Structure and Color to further influence the edges.


3. Content-Aware Fill
Content-Aware Fill is sort of like the Patch tool on steroids.
It was first introduced in CS5 as a fill option in the Fill Dialog box. In 2019, Adobe improved this tool by leaps and bounds.
Content-Aware analyzes the pixels from a chosen area to determine what pixels it should use to remove unwanted objects. With the improvement, it allows you to choose exactly where you want it to sample the pixels from. It gives you so much more control and also allows you to rotate, scale or resize your selection, and preview the results.
To use Content-Aware Fill, draw a selection around the area you would like to correct. The Lasso tool makes a nice, versatile tool, but I often use the Rectangular or Elliptical Marquee tools.
Go to Edit and choosing Content-Aware Fill from the dropdown menu.

This opens up the Content-Aware task space.

On the right-hand side of the task space, you’ll see a Preview area that will show you how the changes are affecting your image.
If required, resize the sampling area with the Sampling Brush Tool.
You can find the tools for Content-Aware Fill in the left-hand corner of the workspace. The Brush tool is the first one on the top and the one you’ll most often use.

You’ll also notice on the right-hand side of the workspace that you can make adjustments to the opacity.

Save your changes as a Duplicate Layer.
I often use Content-Aware Fill to even-out my still life photography backgrounds, which tend to look less even in color and texture as I would like.
In this image of a salad, I wanted to even-out the left-hand corner of the image, which was looking too dark, despite my removing vignetting. I used the Rectangular Marquee tool to select the part that I wanted to change and brushed out the parts of the image I didn’t want sampled from.

I played around with the opacity until I got something that looked good, which in this case was 66%.
4. Clone Stamp Tool
Can anyone live without the Clone Stamp tool?
No matter what kind of photography you do, you probably use the Clone Stamp tool a lot. Great retouching is largely about cleaning up the little things, which all come together for a powerful, transformative effect. Clone Stamp is one of the crucial Photoshop tools for still life photography.
The Clone Stamp tool allows you to copy pixels to a different part of the image to another. It’s great on areas where you have texture and pattern, or an edge. However, with this tool there is no real blending, so you often have to use it with other tools to get a more seamless-looking result.
Note that if you work with the Clone Stamp tool on its own layer, you can use it with other tools such as Free Transform to make further adjustments to the cloned areas.

In the image above, I used a surface that was textured and knotty, but I wanted it to look smoother. I did this (achieving the image on the right) by cloning smoother areas over the bumpy areas.
To utilize the Clone Stamp tool, select it from the toolbar by hitting S for the shortcut, or hit Cmd/Ctrl+S

Select the area that you wish to paint the pixels from by choosing Opt/Alt. The selection point will be indicted by the crosshairs.
Paint with your cursor over the area you want to correct while making sure the crosshairs don’t pick up any pixels you don’t want.

5. Transform
Transform is another of the useful Photoshop tools for still life photography because it allows you to make changes and adjustments to objects in your image, like straightening and shaping.
For example, I decided to make a change to the olive oil bottle in the image below. I wanted to adjust the direction the handle was facing and to make the bottle appear larger in scale. I did this easily and quickly with Transform.

Start with your background layer or your top layer. Use the appropriate tool to make a selection. In this case, I used the Lasso tool but I could have also used the Quick Selection tool.

Copy the selection onto another layer by hitting Ctrl/Cmd+J.

Then hit Ctrl/Cmd+T to bring up Transform, or go to Edit and choose Transform from the Menu.
Make the adjustment by manually rotating or expanding the Transform box by clicking on the white points/squares.

Hit Enter to accept the adjustment.
Always make sure to constrain proportions when necessary.
6. Focus Stacking
If you’re shooting a product, you’ll usually need your subject to be sharp throughout. This means using a high F-stop number like F/13 or F/16. However, this requires a lot of power if you’re using flash.
You can also get lens diffraction at these higher numbers, which will degrade the quality of your photo.
The answer to shooting with a wider aperture and still getting a sharp image is to focus stack in Photoshop.
This is when you take two or three images with different focus points and blend them together to create one image file that is sharply in focus throughout. It’s a quick process and isn’t anywhere near as complicated as it sounds.
To utilize focus stacking, make sure your images have the same exposure and alignment.
Export PSD files into a folder or onto your desktop where you can easily navigate to them.
Follow these steps:
- Open Photoshop.
- Go to File and choose Scripts.
- Select Load Files into Stack.
- Click Browse and select all the images from where you saved them initially.
- Check the Box for Attempt to Automatically Align Source Images.
- Click OK. Each of the images will open as a new layer in Photoshop.
- Hold down Shift and click on the top layer in the Layers panel to highlight all the layers.
- Under Edit, select Auto Blend-Layers.
- Check the box for Stack Images and also for Seamless Tones and Colors. DO NOT check ‘Content-Aware.’ Click OK.
- Save the final image.
If you have uploaded a lot of images, flatten the final image by selecting Layer -> Flatten Image -> Save.

Three images focus-stacked in Photoshop
Conclusion
Photoshop is a powerhouse of a program and there are many tools that can help you retouch your photography. The tools mentioned here are my top Photoshop tools for still life photography. They are easy to learn and utilize, and will quickly take your images to the next level.
Do you have any other Photoshop tools for still life photography that you’d like to share? Do so in the comments section!
The post The 6 Top Photoshop Tools for Still Life Photography appeared first on Digital Photography School. It was authored by Darina Kopcok.

Digital Photography School


You must be logged in to post a comment.