RSS
 

Posts Tagged ‘TiltShift’

Two Autofocusing Tilt-Shift Lenses From Canon May Debut Next Year

08 May

The post Two Autofocusing Tilt-Shift Lenses From Canon May Debut Next Year appeared first on Digital Photography School. It was authored by Jaymes Dempsey.

two autofocusing tilt-shift lenses may debut next year

Canon will release its first RF-mount tilt-shift lenses within the next year, claims Canon Rumors. What’s more, these will “be the first tilt-shift lenses with autofocus.”

At the time of writing, Canon offers a number of tilt-shift lenses for its DSLR lineup, including the 17mm f/4L, the 24mm f/3.5L II, and the 90mm f/2.8L Macro. But all of Canon’s TS lenses are manual focus only, and Canon has not yet produced a tilt-shift option for mirrorless shooters. 

If the rumors are right, Canon will release two wide-angle TS lenses:

  • A 14mm f/4L lens
  • A 24mm f/3.5L lens

The 14mm f/4L lens should be perfect for ultra-wide landscape photography; with a 14mm focal length, you gain the expansive field of view that’s especially popular among pro landscape photographers. It’s a perspective that cannot be matched by Canon’s current tilt-shift offerings (Canon’s widest TS lens is the aforementioned 17mm f/4L, followed by the 24mm f/3.5L II).

The 24mm f/3.5L, while perhaps less groundbreaking, offers a “standard” wide-angle perspective. It’ll undoubtedly excel when shooting landscapes, architecture, and even environmental portraits, either as a conventional lens or with the tilt-shift effects applied. 

But what’s the value of a tilt-shift lens?

Lenses featuring tilt-shift capabilities allow you to address certain problems posed by architecture and landscape photography (though the TS effect is also just cool!). Specifically, tilting the lens adjusts the plane of focus. You can use this to produce a “miniature” effect, where all the elements look small and human-made – or you can use it to keep certain elements in focus while blurring out other elements. 

So a landscape photographer might use the tilt effect to keep an entire scene in focus from front to back, even with a shallow depth of field. And a portrait photographer might use the tilt effect to creatively blur out all but the subject’s face.

You can also shift the lens; this essentially lets you choose a vantage point off to the side of your camera, but without having to move the camera body. It’s invaluable for architectural photography, where shifting the lens upward prevents unwanted distortion. You can also use the shift effect when capturing panoramas in landscape photography (it makes for beautiful, easily stitched results!).

Currently, Canon’s tilt-shift lenses are relatively expensive, and I doubt this RF-mount glass will break the mold, especially given the added autofocus capabilities. But we’ll ultimately have to wait and see; Canon Rumors suggests a “first half of 2022” announcement (one that should, incidentally, come “alongside a high-megapixel camera”).

So keep an eye out for more information. And if you’re thinking about purchasing a tilt-shift lens, you might want to hold off until these RF-mount options have been unveiled.

Now over to you:

What do you think of Canon’s potential tilt-shift lenses? Would you be interested? What draws you toward tilt-shift glass? Share your thoughts in the comments below!

The post Two Autofocusing Tilt-Shift Lenses From Canon May Debut Next Year appeared first on Digital Photography School. It was authored by Jaymes Dempsey.


Digital Photography School

 
Comments Off on Two Autofocusing Tilt-Shift Lenses From Canon May Debut Next Year

Posted in Photography


How to Easily Simulate a Tilt-Shift Effect Using Photoshop

03 Feb

You might not know it, but even if you’ve never heard of tilt-shift photography you have probably seen a photograph that was captured in just such a way. A few years ago tilt-shift photos exploded into the mainstream with oddly miniaturized images of cities, cars, and even landscapes going completely viral seemingly overnight.

How to Easily Simulate a Tilt-Shift Effect Using Photoshop

Tilt-shift photography, in itself, is nothing more than a literal optical illusion. Essentially, it is nothing more than adding a strip of sharp focus to an otherwise blurred image. Even the name itself refers not to the type of photograph but rather the camera or lens movements needed to achieve the effect.

Yes, tilt-shift photos have their roots in large format photography but don’t worry, I’ll only touch on that as much as needed to in order to get the point across. What I will focus on (get it?) is showing you how the tilt-shift photo effect can be very closely and easily simulated using Photoshop. Oh, and don’t think that in-camera tilt-shift photos can only be made with large format cameras. There are quite a few tilt-shift lenses available for your SLRs and DSLRs.

What is Tilt-Shift?

The best way to understand the concept behind tilt-shift photography work is to understand what “tilt” and “shift” actually mean as they relate to photography. As I mentioned earlier, they refer to the movements of a large format camera.

The tilt aspect refers to the physical tilting, either forward or backward, of the front or rear part of the camera. This tilt impacts the focus plane.

How to Easily Simulate a Tilt-Shift Effect Using Photoshop

Front and rear tilts demonstrated with a large format camera.

Without going too far into large format camera movements, tilting the front and/or rear of the camera allows for very selective depth of field control.

The “shift” is less important for our purposes today, but since I like being thorough, shifting the front or back of the camera simply means it is moved from side-to-side (or up and down) and literally shifts the image from left to right or up and down.

How to Easily Simulate a Tilt-Shift Effect Using Photoshop

Right and left shift movements on a large format camera.

The tilt effect is what you’re about to learn how to simulate in Photoshop right now.

How to use the Tilt-Shift Filter in Photoshop

To begin, first, select an image that is conducive to the tilt-shift effect. Photos which have a relatively isolated subject with large areas of foreground and background usually work best. Make most if not all of your basic edits before you start your tilt-shift, including sharpening. Here is my image after I’ve made some core adjustments.

How to Easily Simulate a Tilt-Shift Effect Using Photoshop

Open the image in Photoshop

I like to start off in Lightroom and then pitch the image over to Photoshop as a Smart Object to apply the tilt-shift effect. I’ll show you why in just a bit.

How to Easily Simulate a Tilt-Shift Effect Using Photoshop

Now that you have the image opened in the loving hands of Photoshop the fun can begin! Yes, I think this is fun….

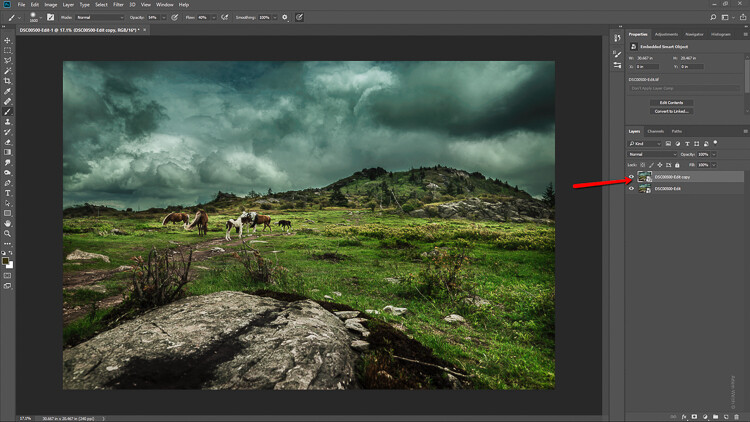
Duplicate the Layer

The first step in applying the tilt-shift effect is to duplicate the base image layer. Use the keyboard shortcut Ctrl/Cmd+J. It’s this duplicate layer to which you’ll apply the tilt-shift blur.
How to Easily Simulate a Tilt-Shift Effect Using Photoshop

Applying the Blur

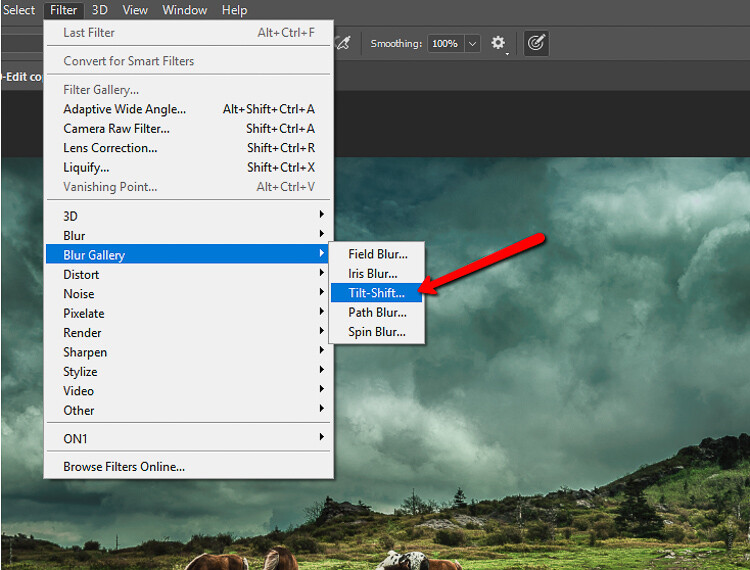
Tilt-shift is essentially a blurring effect, so it makes sense that it is located along with the other blur filters in Photoshop. Click on Filters > Blur Gallery >Tilt-Shift.
How to Easily Simulate a Tilt-Shift Effect Using Photoshop

This brings you into the tilt-shift blur module of Photoshop. You’ll notice that you can also add other forms of blur here, but ignore all that as we are just going to work with tilt-shift.

When the module opens you will see a masking tool already on top of your image. It resembles a dual graduated filter tool. In fact, it works very similarly to the graduated filter. The effect will feather out to the top and bottom from the central axis dot in the center of the filter. The solid lines control the border of the effect with the dotted lines determining the feathering. Here’s a breakdown.

How to Easily Simulate a Tilt-Shift Effect Using Photoshop

The tilt-shift filter overlay.

The intensity of the blur is controlled by the Blur slider or by adjusting the intensity dial. Keep in mind that the entire filter can be moved either simultaneously or the top and bottom portions can be moved and adjusted separately. This happens to be the final position of my tilt-shift filter.

How to Easily Simulate a Tilt-Shift Effect Using Photoshop

Click Ok and allow Photoshop to render the blur.

A few tips for you

While we’re waiting…this is a good time to go over a couple of things that will help make your tilt-shift more effective.

Always remember that, if you’re going for realism, an accurate tilt-shift simulation should adhere as closely as possible to the optical principles of photography. This means that since tilt-shift controls the depth of focus, your effect should also follow those rules. Be careful you don’t have significant irregularities at the borders of the blurred areas. Also, pay special attention to the elements within your photo and their spatial relationship to one another to avoid an overly artificial appearance.

Keep in mind that there are quite a few other sliders to be seen here in the tilt-shift module; namely those for distortion, bokeh, and light range. (Of course if you’re feeling adventurous then, by all means, try out those sliders but I generally leave them as is for virtually all of my work.) Distortion can be added to varying degrees to the blurred areas as well as bokeh enhancement/coloration. The light range slider allows control over blur based on specific luminance values. However, in most cases, the default settings for these sliders will be just perfect for your image.

After your tilt-shift effect is complete the image will automatically reopen in the main Photoshop window with your edits applied.

Tweaking the Effect

Just because you have to loosely adhere to some rules of optics doesn’t mean you are totally bound by them. I actually attempt to never use the word “rules” when it comes to photography. If you find you need to adjust the tilt-shift effect just remember that this is Photoshop after all and you, the intrepid post-processor, wield great power!

Remember how you imported your image as a Smart Object earlier? Well, this is where having your image available as a Smart object really comes in handy.

How to Easily Simulate a Tilt-Shift Effect Using Photoshop

You’ll notice the tilt-shift has already been scooped into its very own layer mask. So now, you are free to paint the blur effect in or out until it is just right. This allows you to go beyond the constraints of filters in the tilt-shift module. With this image, I used a little judicious painting on the Smart Filter layer mask to make the effect look a little more natural.

How to Easily Simulate a Tilt-Shift Effect Using Photoshop

Finish in Lightroom

After I’m completely finished with the tilt-shift I kick the image back over to Lightroom. I add in one last edit to help harmonize the tilt-shift and that is a graduated filter at the bottom of the frame to darken it ever so slightly.

How to Easily Simulate a Tilt-Shift Effect Using Photoshop

And that’s it! You should now have a genuine imitation tilt-shift image. Have a look at the before and after.

Before

After

Final Thoughts on the Tilt-Shift Filter…

Tilt-shift photography in Photoshop is easy and can add some amazing effects to your photos. As with most post-processing effects, it’s important to keep things within the realm of reality unless your goal is to deliberately skew things.

The effects achieved in Photoshop aren’t perfect, of course, but you can get very close to the look and feel of real tilt-shift photography. All this without needing to use a real tilt-shift lens or moving into large format photography. Experiment with the tilt-shift blur in Photoshop and keep these important tips in mind:

  • Remember tilt-shift is just a manipulation of depth of focus.
  • Try not to break the rules…I mean, the guidelines of optics.
  • Pick images that have larger areas of foreground and backgrounds with isolated subjects.
  • Don’t forget to tweak the tilt-shift effect or even add additional edits.

Try out the lessons in this article and stretch your creative legs with tilt-shift blur in Photoshop. And as always remember to have fun with your editing and please share your results and any questions you have in the comments area below.

The post How to Easily Simulate a Tilt-Shift Effect Using Photoshop by Adam Welch appeared first on Digital Photography School.


Digital Photography School

 
Comments Off on How to Easily Simulate a Tilt-Shift Effect Using Photoshop

Posted in Photography


How to do Tilt-Shift Style Photography with the Lensbaby Edge 50

14 Jan

Professional architectural and landscape photographers use tilt-shift lenses to avoid converging vertical lines and to get the entire scene in sharp focus. Portrait and food photographers use them to create interesting effects using blur and shifts in the plane of focus. Tilt-shift lenses are exciting creative tools, but they are also specialist items. That means they’re expensive to buy, especially for hobbyists.

Lensbaby Edge 50 lens - How to Lens Tilt-Shift Photography with the Lensbaby Edge 50

But there is a way you can apply a tilt-shift style effect (although there are no shift movements) with a relatively inexpensive camera lens – the Lensbaby Edge 50.

The Edge 50 is a 50mm lens attachment that fits in the Lensbaby Composer Pro II. The two are sold together, or you can buy the Edge 50 separately if you already have a Composer Pro II. It’s available for all major camera mounts.

How to Lens Tilt-Shift Style Photography with the Lensbaby Edge 50

The Lensbaby Edge 50 (with an inexpensive lens hood that I bought on Amazon) and Composer Pro II mounted on a Fujifilm X-T1 camera. The Edge 50 lens is tilted down in this photo.

On my APS-C Fujifilm camera, the Edge 50 is a short telephoto lens ideal for portraits and many other subjects. If you own a full-frame camera then you’ll get the same field of view and a similar effect with the Edge 80 optic.

How to Lens Tilt-Shift Style Photography with the Lensbaby Edge 50

The Edge 50 lens lets you tilt the plane of focus so that it runs in any direction across the frame you like.

How to Lens Tilt-Shift Style Photography with the Lensbaby Edge 50

The red lines show the direction of the plane of focus in the photos above.

Why buy a Lensbaby Edge 50?

So, why buy the Lensbaby Edge 50 optic? For me one of the driving factors was curiosity. I had so many questions. Could I make interesting photos with this lens? Is it any good for portraits? What happens if I add an extension tube to make close-up photos? The images in this article will provide some answers.

What I didn’t expect is that I would love using this lens. There’s something strangely fascinating about viewing the world through a lens that has tilt movements. The Edge 50 is so much fun to use there’s a genuine danger that you use it all the time and forget about your other lenses!

How to Lens Tilt-Shift Style Photography with the Lensbaby Edge 50

The Edge 50 can help you make photos with a miniature effect created by tilting the lens. These work best when you have a high viewpoint overlooking the subject.

Practicalities of using the Edge 50 lens

There are some differences between the Edge 50 lens and regular camera lenses that you need to know about before you buy one.

The Edge 50 is a manual focus lens

This is not an autofocus lens and you need to take great care when focusing for accuracy. It’s easier to focus with cameras that have electronic viewfinders and focus peaking. Or you could use Live View.

How to Lens Tilt-Shift Style Photography with the Lensbaby Edge 50

The Edge 50 lens is perfect for fine art black and white photos like these.

The Edge 50 doesn’t come with a lens hood

This is disappointing as it means you can’t point the lens anywhere near the sun without getting lens flare. I bought a metal lens hood from Amazon for a few dollars. The lens hood reduces lens flare and protects the front element from accidental damage when the camera is hanging at your side.

How to Lens Tilt-Shift Style Photography with the Lensbaby Edge 50

You can experiment with shifting the plane of focus, photographing the same scene in multiple ways.

Depth of field is very narrow at the widest aperture of f/3.2

I’ve learned to stay away from the widest aperture setting and stop down to f/4 or f/5.6 to get the best results. You will also have to use a higher ISO to get the correct exposure in low light than you would with a regular 50mm prime lens.

How to Lens Tilt-Shift Style Photography with the Lensbaby Edge 50

The Edge 50 lens with an extension tube can create close-up photos like this.

You can shift the plane of focus in all directions

With this lens, you can position it so that the plane of focus lies horizontally, vertically or at any angle in between. This allows you to get creative and experiment with different focusing effects.

For example, portraits are very effective when the plane of focus is horizontal, as you can focus on the model’s eyes and throw the rest of the scene out of focus.

How to Lens Tilt-Shift Style Photography with the Lensbaby Edge 50 - portrait

The Edge 50 is great for close-ups when combined with an extension tube

I use a Fujifilm MCEX-16 extension tube with this lens for taking close-ups of flowers. It lets me shift the plane of focus around and create interesting effects in a way that you can’t do with a conventional 50mm lens.

How to Lens Tilt-Shift Style Photography with the Lensbaby Edge 50

Conclusion

The Lensbaby Edge 50 lens is a great addition to my camera bag and one that I’m very happy to have made. If you like creative photography, interesting bokeh, and blur effects, or if you’re looking for something a little different for your portraits, then the Edge 50 could be just what you need.


Would you like to learn more about lenses and your camera? My ebook Mastering Lenses teaches you everything you need to know. The buying guide alone will save you many times the cost of the ebook!

The post How to do Tilt-Shift Style Photography with the Lensbaby Edge 50 by Andrew S. Gibson appeared first on Digital Photography School.


Digital Photography School

 
Comments Off on How to do Tilt-Shift Style Photography with the Lensbaby Edge 50

Posted in Photography


How to Use a Tilt-Shift Lens Creatively and for Perspective Control

14 Sep

When you hear tilt-shift lens or tilt-shift photography, there is a probability that an image looking like a miniature model crossed your mind. That is because, over the years, tilt-shift lenses have become synonymous with this style. The miniature look is interchangeably referred to as the tilt-shift effect and you can even recreate it in post-processing. These lenses though have quite a few other strengths that are worth considering.

tilt-shift lens - miniature effect

The miniature look that is affiliated with tilt-shift lenses.

So why use a tilt-shift lens?

The simple answer here is for perspective control. If you compare your regular lenses to a tilt-shift lens, you will notice they are built differently. The latter is designed to physically move (tilt, shift and rotate) independent of the camera and each other. This design feature gives you remarkable control over perspective and depth of field. In fact, a tilt-shift lens is also known as a perspective control lens.

How to Use a Tilt-Shift Lens Creatively and for Perspective Control

Left: Shot with the camera pointing up to capture the entire scene. Right: Lens shifted to minimize distortion.

Tilt Versus Shift

The tilt function gives you the ability to keep different elements of focus on different planes. Thus you can shoot two subjects at two different distances. With a regular lens if you want to shoot at a wide aperture, you usually have to make a focus choice of either the foreground or background. A tilt-shift lens allows you to have both your subjects in focus.

The shift function allows you to minimize distortion (common when using wide angle lenses) when you are shooting from a high or low angle. It also helps correct vertical line convergence (tilting buildings).

Tilt-Shift Lens Uses

Architecture

When photographing architecture, the shift function helps you maintain proper perspective. Ordinarily, when you want an entire building in your frame, you tilt your camera up. If you have ever tried this, you will be familiar with images where the buildings appear to be leaning backwards.

How to Use a Tilt-Shift Lens Creatively and for Perspective Control

Church shot at 24mm with a standard lens.

This skew is caused by the sensor plane of the camera being titled in relation to the building. Ideally, you want the sensor perpendicular to the ground and pointing straight ahead/centered. With a tilt-shift lens, instead of angling your camera upward, you “shift” the lens. Since the camera stays put and only the lens physically shifts, your building will be straight. This technique is very helpful when shooting interiors with high ceilings.

Church shot at 24mm with a tilt-shift lens.

Landscapes

In landscape photography, one of the primary uses of a tilt-shift lens is to minimize wide angle lens distortion. Another great way to use this lens is for panoramic shots. A common challenge with panoramas is after the shots are stitched together there is still some distortion to be corrected. When this distortion is corrected in post-production, you may lose part of your scene. By using the shift function of the lens, you can create high resolution distortion free panoramas with negligible post-processing work.

Creative uses of tilt-shift lenses

Miniatures

The tilt function of the lens is responsible for that miniature look you are likely familiar with. A miniature effect is when you take a life-sized scene and make it appear as if it’s on a miniature scale. The lens here is used to add blur to the photo which simulates shallow depth of field. This mimics the look you get when you use a macro lens to shoot a miniature scale model.

How to Use a Tilt-Shift Lens Creatively and for Perspective Control - miniature effect

The blur above and below creates a perception that your camera is only inches away from the scene.

To create this type of look, you need to be elevated at least 10 feet /3 meters (recommended higher if possible). Elevation gives you that same perspective as if you were looking down on a miniature model. So other than the subject, a high vantage point is key for these types of photos.

How to Use a Tilt-Shift Lens Creatively and for Perspective Control

The tilt function allows you to creatively add blur (in this image the blur is on the right side).

Note: Shooting wider gives you a better sense of place.

Portraits

Shooting portraits with a tilt-shift lens can be quite creative. At the very basic level, you are now able to capture in focus two subjects (or a group), even though they may be at different distances from the lens.

Another creative use is capturing someone walking towards or away from you. As you know, a moving person can quickly be out of focus. But with a tilt-shift lens, you have the ability to extend your plane of focus to the front and back of your walking subject so they stay sharp even at different distances.

Bonus: The Scheimpflug Principle

The Scheimpflug Principle is where more of your subject plane is in focus (from near to far) and refers to what looks like a near-infinite depth of field. To achieve this great “depth of field”, you tilt the plane of focus in the same direction as the plane of the subject – which puts the image in focus at various points along the subject plane.

By Fil Hunter at English Wikipedia – Transferred from en.wikipedia to Commons by Jacopo Werther., Public Domain

For example, if you are shooting a field of flowers going off into the distance and you want to have all of the flowers in focus. Shooting at a small aperture will work, but may (based on your lighting) increase your shutter speed – which reduces your chance of sharp flowers. By changing the plane of focus, your tilt-shift lens allows you to shoot at a wider aperture and still get all your flowers in focus.

Conclusion

The perspective control that tilt-shift lenses offer will save you a lot of time in post-processing and is also a great way to correct for depth of field limitations of most lenses. These lenses also give you a lot of depth without the need to use smaller apertures. So besides straightening tall buildings, what have you used, or hope to use tilt-shift lenses for?

Here are some other creative ideas for you. Please share your tilt-shift images in the comments below.

The post How to Use a Tilt-Shift Lens Creatively and for Perspective Control by Nisha Ramroop appeared first on Digital Photography School.


Digital Photography School

 
Comments Off on How to Use a Tilt-Shift Lens Creatively and for Perspective Control

Posted in Photography


How To Do Freelensing – Budget Tilt-Shift Photography

08 Jun

Photographers are always looking for new and interesting ways to create images. But even as a hobby, photography can be a very expensive venture. Camera bodies, memory cards, bags, tripods, lenses, it can all add up to one seriously prohibitive price tag. But all is not lost! We photographers are a clever bunch, good at developing DIY tricks to minimize costs. One of these is a handy little trick I discovered for budget tilt-shift photography. While it’s not perfect, the technique does work pretty well in simulating a tilt-shift lens without the price of an actual tilt-shift lens.

How to do Freelensing for Budget Tilt-Shift Photography

How to do Freelensing for Budget Tilt-Shift Photography

How to do Freelensing for Budget Tilt-Shift Photography

I knew keeping around an old graphics card would have its uses. The freelensing effect gives the impression that the little nodes on the computer board are buildings in a city.

Tilt-shift…what?

Tilt-shift photography is used to control the part of an image that appears sharp. By adjusting the knobs on the barrel of tilt-shift lens upward/downward (tilt) and side to side (shift) you can be extremely select about the area of focus, allowing for only a very small portion of the photograph to be sharp. By changing the angle of the lens relative to the camera body, you also have greater control in changing the perspective in an image too.

Tilt-shift lenses are often used in architectural photography. For example, if you take a photograph of a building from below, the lines of the building will appear to converge, and it will look as if it is leaning away from the viewer. A tilt-shift lens realigns convergence by moving the lens parallel to the sensor, without having to physically move the camera much further back.

So what is freelensing?

How to do Freelensing for Budget Tilt-Shift Photography

Freelensing is a technique of letting your lens run free of the camera body! Tilting an unattached lens in front of the camera’s docking point simulates the selective focus of a tilt-shift lens. But first things first.

As the proud owner of a camera baby, you may be thinking to yourself, “Is it actually safe to remove the lens from a camera for extended periods?” The answer is yes… and no. While the camera will function fine without a lens attached, there is a greater chance of dust entering the body and ending up on your sensor. That’s why I strongly recommend trying this project out on a spare or old camera you may not use anymore. Sensor cleaning is expensive so proceed at your own risk.

Method

The method for tilt-shifting with a detached lens is fairly straight forward but takes a little preparation. I recommend using a prime lens, because it’s lighter and simpler, with less moving parts. Before detaching your lens, line up the shot and set the camera to manual mode. You may want to use a tripod to reduce camera shake. Meter and adjust your exposure settings and switch the lens to manual focus. Now, detach the lens and hold it about a centimeter (1/2 inch) from the lens cradle.

Have a look through the viewfinder. At first, you may only see blurry versions of the subject, that’s normal! Keeping the lens close to the camera body, and slowly begin tilting the angle of the lens from side to side. Tilting the lens to the right means that the left side of the image retains the most focus, and vice versa.

Take advantage of the light peeking into the gap between the camera and the lens. Achieving atmospheric bokeh and soft light effects are another great reason to try out freelensing. Try taking photographs at different times of the day and under different lighting conditions.

One of the downsides of this method is that achieving perfect focus is almost impossible, but with a bit of adjusting, you can come pretty close. Even the slightest of movements can affect the outcome of the image dramatically, but you will get a feel for it sooner than you might think.

The light leaks peeking through the gap between the lens and the camera body make for some beautiful atmospheric images

Here’s a blast from the past! The contrasting colors and textures of the Tamagotchi and the fluffy blanket make a dynamic juxtaposition enhanced by the freelensing technique.

Conclusion and give it a try

Freelensing is a fun and simple way of experimenting with tilt-shift photography. Once you have a handle on the technique, head out into the world!

Aim to photograph scenes that have a variety of depth. Tilt-shift photography isn’t as effective when used to photograph a scene that is consistently the same distance from the camera. Try looking for subjects that trail off into the distance. Good examples are densely wooded forests, long, straight streets populated with people, fields of flowers or a line-up of dominoes.

Give it a try and share your images in the comments below. I look forward to seeing them. Happy freelensing!

The post How To Do Freelensing – Budget Tilt-Shift Photography by Megan Kennedy appeared first on Digital Photography School.


Digital Photography School

 
Comments Off on How To Do Freelensing – Budget Tilt-Shift Photography

Posted in Photography


How to do Tilt-Shift Portraits

14 Dec

Photography gives you an awesome opportunity to present to the world your vision of it rather than its absolute reality. At their best, photos can evoke the feel of a moment without being an exact representation of it. Think of the last time you fell in love. Most likely, your memories aren’t clear, linear progressions, but rather a series of moments, blurred together by a high-dose cocktail of dopamine and romance. Life can be a blur and feel so good. For me, that’s where tilt-shift portraits come in.

tilt-shift-photography-8-of-1-13

tilt-shift-photography-8-of-1-6

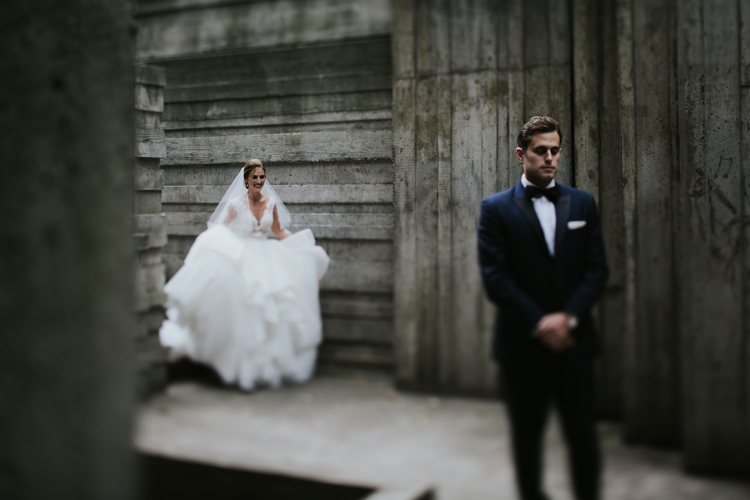
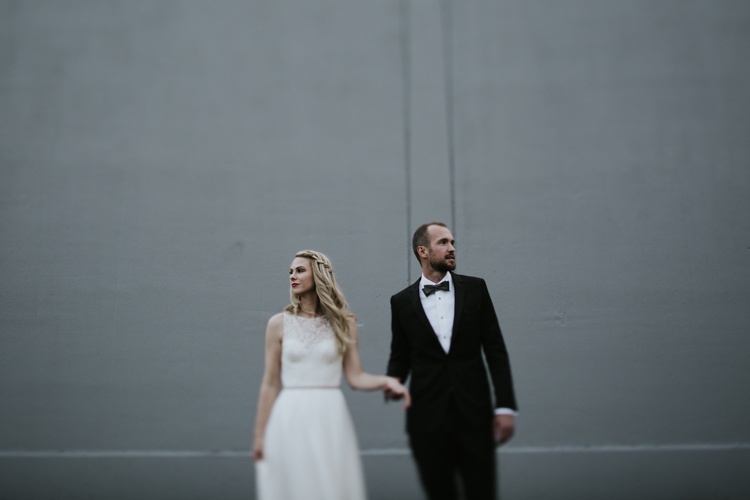
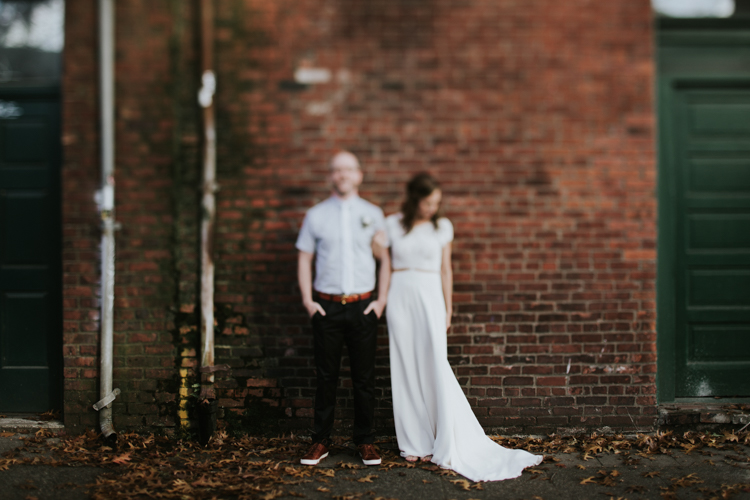
Tilt-shift lenses are most commonly used for architectural purposes, meant to fix converging verticals when shooting tall buildings in order to reduce distortion in the final photo. You’ve also probably seen the miniaturized versions of city streets shot from above where even a city as grand as New York can seem positively dainty. Tilt-shift portraiture however, involves carefully selecting focus and letting anything that isn’t the subject of your photo fade into obscurity. This allows the viewer to be swept into your alternative realty. In my view, it’s a portrait that can be a truer representation to how a moment actually felt.

Tilt-shift portraiture however, involves carefully selecting focus and letting anything that isn’t the subject of your photo fade into obscurity. This allows the viewer to be swept into your alternative realty. In my view, it’s a portrait that can be a truer representation to how a moment actually felt.

Tilt-shift portraits = high risk, high reward

tilt-shift-photography-4-of-1

Most of my tilt-shift portraits are taken wide-open (using the largest aperture setting) with the lenses shifted as far as possible. This means that my focus point is tiny and the chances of me missing it are huge. This means that if I want the eyes in focus, I have to slow down, concentrate, play with my focus ring and maybe take a few shots just in case.

When the focus is even just a little bit off, you lose the ability to the guide the viewer. That said, when you do nail the focus, the subject jumps out of the frame surrounded by bokeh.

Note: if you do not own a tilt-shift lens, look into renting one from a local camera store.

Wait, what’s a tilt-shift lens?

tilt-shift-photography-8-of-1-10

The tilt-shift is a specialty lens that allows the photographer to bend and distort light by tilting and/or shifting the lens itself.

Shifting implies that the lens actually shifts its position (and the view through it) either up or down, left or right. This can minimize distortion especially with wider focal lengths. Tilting is when the front lens elements literally tilt (again, up or down, left or right) to get selective focus in a given plane.

tilt-shift-photography-8-of-1-12

So how do you use this lens to take an interesting portrait? Here is a step by step guide:

Step #1 – Visualize it

tilt-shift-photography-8-of-1-11

Because of the precision and manual focus, you need to visualize your shot before you take it. You need to know exactly what story you want to tell. Do you want the viewer to zoom in to the subject’s eyes or perhaps your shot is about the flow of her dress or how he’s placed his hand. Most of the time, with tilt-shift, you gotta pick one thing to tell your story. What do you want that to be?

Step #2 – Shift it

tilt-shift-photography-8-of-1-8

Tilt-shift lenses can become rather mundane without a shift. Sure, you can use your tilt-shift to take shots straight on with neither tilt, nor shift, but where’s the fun in that? I recommend shifting your lenses before framing your shot as your sweet spot on your lens will help determine your framing. With that, I should mention…

Step #3 – Know your lens’s sweet spot

tilt-shift-photography-8-of-1

Every tilt-shift has parts of the lens that it captures better when tilted or shifted. Know where to place the subject in your frame to get it in focus.

Step #4 – Manual focus

tilt-shift-photography-8-of-1-5

If you’re used to relying on autofocus, switching to manual focus can feel like jumping into the driver’s seat of a stick shift car after years of only using automatic. You’ll be a rusty at first and are sure to stall out once or twice, but soon enough, you’ll get the hang of it.

On most dSLRs you have two options to view your focus. The first is right through the viewfinder, just make sure that the dial (the diopter) next to the viewfinder is set to match whatever your eye needs or you will have a hard time getting focus pinned down. The second is through Live View Mode on the back of your LCD.

At times, Live View is a better option as it provides a larger screen but also it allows you to zoom in to your precise focus point and make sure you’re right on.

Step #5 – Take a deep breath

tilt-shift-photography-8-of-1-9

Tilt-shifts are not quick and easy lenses to use. You need to spend time to set up your shot. Relish in its slowness. Just before taking the shot, take a deep breath. Not only will it help steady your shot, but you’ll feel darn good after clicking that shutter.

Step #6 – There’s more to life than just faces

tilt-shift-photography-8-of-1-2

Portrait artists can get overly fixated on eyes. Yes, eyes are incredibly satisfying and captivating things to focus on, but so are fabrics, texture, movement, etc. In life, all of these things at times can be the sole focus of our attention and that story needs to be told too.

tilt-shift-photography-3-of-1

Conclusion

Tilt-shift lenses make it so we can’t get anxious about precision but rather let the feel of photograph take center stage. They can open up a whole new way of viewing not only the world but your photographic style. Now go forth and play!

googletag.cmd.push(function() {
tablet_slots.push( googletag.defineSlot( “/1005424/_dPSv4_tab-all-article-bottom_(300×250)”, [300, 250], “pb-ad-78623” ).addService( googletag.pubads() ) ); } );

googletag.cmd.push(function() {
mobile_slots.push( googletag.defineSlot( “/1005424/_dPSv4_mob-all-article-bottom_(300×250)”, [300, 250], “pb-ad-78158” ).addService( googletag.pubads() ) ); } );

The post How to do Tilt-Shift Portraits by Laura Sullivan appeared first on Digital Photography School.


Digital Photography School

 
Comments Off on How to do Tilt-Shift Portraits

Posted in Photography


Nikon announces ultra-wide PC Nikkor 19mm F4E ED tilt-shift lens

19 Oct

$ (document).ready(function() { SampleGalleryV2({“containerId”:”embeddedSampleGallery_4526415391″,”galleryId”:”4526415391″,”isEmbeddedWidget”:true,”standalone”:false,”selectedImageIndex”:0,”startInCommentsView”:false,”isMobile”:false}) });

Nikon has announced a new PC Nikkor 19mm F4E ED tilt-shift lens (which the company calls ‘Perspective Control.’) This ultra-wide lens offers 97° of coverage and can shift ±12mm and tilt ±7.5°. Unlike the company’s existing PC-E designs, the mechanism for tilt can be rotated independently from the mechanism for shift, allowing the tilt to be set either parallel or perpendicular to the shift.  The lens has three ED and two aspherical elements as well as Nano Crystal Coating.

The lens will be available next month with an MSRP of $ 3399.95.

Press release:

MASTER YOUR PERSPECTIVE WITH OPTICAL EXCELLENCE: NIKON ADDS TWO PRO-GRADE FX-FORMAT LENSES TO CELEBRATED NIKKOR LENS LINEUP

Extraordinary Next-Generation AF-S NIKKOR 70-200mm f/2.8E FL ED VR Sets a New Standard for Pro Telephoto Workhorse Lenses, While New PC NIKKOR 19mm f/4E ED is Nikon’s Widest Ever Tilt-Shift NIKKOR Offering 

MELVILLE, NY (October 19, 2016 at 12:01 A.M. EDT) – Today, Nikon Inc. has announced two exciting FX-format additions to the storied NIKKOR lens lineup, designed to achieve amazing optical performance for the most demanding professional and enthusiast photographers. An evolution of one of Nikon’s most versatile and popular pro-zoom lenses, the newly redesigned AF-S NIKKOR 70-200mm f/2.8E FL ED VR sports an updated optical formula capable of amazing image quality, while optimized for high-speed shooting. Also introduced today is Nikon’s widest perspective control lens to date, the PC NIKKOR 19mm f/4E ED tilt-shift lens, which helps photographers effortlessly control perspective when capturing architecture, interiors, fine art, product photography and landscapes.

“Nikon continues to raise the bar of optical excellence, and our newest FX-format NIKKOR offerings provide experienced photographers with powerful tools to help ensure brilliantly sharp images, whether capturing a high-speed photo finish or creatively framing an architectural marvel,” said Kosuke Kawaura, Director of Marketing and Planning, Nikon Inc. “While the new AF-S NIKKOR 70-200mm f/2.8E FL ED VR builds upon the success of its predecessors to offer a true all-around NIKKOR optic, the PC NIKKOR 19mm f/4E ED will provide fantastic perspective control for a variety of challenging wide-angle applications.”

The Ultimate Workhorse Lens for Seasoned Photographers

Long considered an essential lens in the bag of professional photographers, this updated AF-S NIKKOR 70-200mm f/2.8E FL ED VR sets a new benchmark for fast telephoto zoom lenses, taking image quality and handling to the next level. An indispensable and powerful tool for nearly any photographic scenario, the NIKKOR 70-200mm remains the professional’s choice with a wide f/2.8 constant aperture that is ideal for capturing sports, weddings, stunning portraits and more, even in low-light.

The next generation design of the lens helps ensure the very best in image quality, speed and low-light performance, while offering balance and handling that is nothing short of superb. Nikon’s new 70-200mm provides up to four stops1 of Vibration Reduction (VR) image stabilization, an improvement from its predecessor that helps users to eliminate blur and camera shake even when shooting handheld or in challenging light. During burst shooting, the lens takes advantage of an electromagnetic diaphragm for consistent auto-exposure control. Additionally, a Silent Wave Motor (SWM) enables ultra-fast and quiet AF operation with seamless manual focus override. Discerning photographers will also appreciate assignable function buttons on the lens barrel that offer customization, perfect for engaging pre-set autofocus or other focusing options.

A new optical formula consisting of six ED elements, one Fluorite element, a high refractive element and Nano Crystal Coat helps make for a lighter and more versatile lens, while reducing chromatic aberration and helping to all but eliminate distortion, ghosting and flare. Ready for even the most rugged of assignments, the magnesium alloy lens barrel features superior weather-sealing that achieves anti-dust and waterdrop-resistance, while Fluorine coating on both the front and rear glass facilitates easy cleaning. Whether shooting with a camera like the Nikon D5, D810, D750 or D500, capturing sports or weddings, the AF-S NIKKOR 70-200mm f/2.8E FL ED VR is a fantastic lens choice for experienced photographers. 

Seamlessly Control Perspective with the New Super-Wide PC NIKKOR Lens

Also new from Nikon is the latest perspective control lens (designated PC) in the NIKKOR lens lineup, the PC NIKKOR 19mm f/4E ED, a tilt-shift offering that will help photographers master perspective and depth-of-field. For storytellers who yearn to capture optically-challenging subjects like cityscapes and architecture, interiors or unique landscapes, this lens offers 97° of coverage – the widest focal length of any PC lens in the NIKKOR family. Tilt the lens to sharpen focus throughout a scene or create a miniature effect, or shift2 to adjust perspective in-camera, create panoramas or eliminate converging lines. For the first time with a NIKKOR PC lens, the direction of tilt operation can be made parallel or perpendicular to shift, offering users nearly unprecedented ability to control perspective, focus and depth-of-field, without having to lock and unlock to make adjustments. 

Sporting a super-wide 19mm focal length, the lens provides a unique perspective ideal for shooting horizontal or vertical panoramas, or even filmmaking. With this ultra-wide angle in mind, the latest FX-format NIKKOR offering was crafted with three ED and two aspherical elements that help combat distortion and glare, while virtually eliminating chromatic aberration and coma, even at the widest aperture settings. The lens also features core NIKKOR technologies such as Nano Crystal Coat to combat ghosting and flare, an electromagnetic diaphragm for fast auto-exposure control, as well as a Fluorine coat that helps resist dirt, water spots and smudges. Ready for a variety of challenging ultra-wide applications, the PC NIKKOR 19mm f/4E ED is a powerful tool for discerning photographers looking for full creative and perspective control. It joins three other Gold Ring Series PC lenses in Nikon’s line-up; the PC-E NIKKOR 24mm F3.5D ED, PC-E Micro NIKKOR 45mm f/2.8D ED and the PC-E Micro NIKKOR 85mm f/2.8D.

Price and Availability

Both the AF-S NIKKOR 70-200mm f/2.8E FL ED VR and PC NIKKOR 19mm f/4E ED will be available starting in November 2016 for suggested retail prices (SRP) of $ 2,799.95* and $ 3,399.95*, respectively. For more information on these new Nikon products and pricing for optional accessories, please visit www.nikonusa.com.

1 Based on CIPA Standard. This value is achieved when FX-format compatible lenses are attached to a FX-format digital SLR camera and zoom lenses are set at the maximum telephoto position.  

2 Depending on combination of shift and rotation, operation may be restricted by mechanical interference between the lens and camera when used with certain Nikon cameras.

  • Models that can be used without any limitation: D5, D4 series, D3 series, D810 Series, D500
  • Models that can be used with some limitations: Df, D800 series, D750, D610, D600, D300 series, D7200, D7100, D5500, D5300, D5200, D5100, D5000, D3400, D3300, D3200, D3100
  • Models that are not compatible with PC NIKKOR 19mm f/4E ED: D2 series, D1 series, D200, D100, D90, D80, D70 series, D3000, D60, D50, D40 series, film cameras, Nikon 1 series with FT-1

*SRP (Suggested Retail Price) listed only as a suggestion. Actual prices are set by dealers and are subject to change at any time.

Nikon PC Nikkor 19mm F4E ED specifications

Principal specifications
Lens type Prime lens
Max Format size 35mm FF
Focal length 19 mm
Image stabilization No
Lens mount Nikon F (FX)
Aperture
Maximum aperture F4
Minimum aperture F32
Number of diaphragm blades 9
Optics
Elements 17
Groups 13
Special elements / coatings 3 ED + 2 aspherical elements + fluorine & Nano Crystal coatings
Focus
Minimum focus 0.25 m (9.84)
Maximum magnification 0.18×
Autofocus No
Full time manual Yes
Focus method Internal
Distance scale Yes
DoF scale Yes
Physical
Weight 885 g (1.95 lb)
Diameter 89 mm (3.5)
Length 124 mm (4.88)
Sealing Yes
Other
Notes Can rotate 90 degrees in either direction, tilt up/down 7.5 degrees, shift left/right 12mm.

Articles: Digital Photography Review (dpreview.com)

 
Comments Off on Nikon announces ultra-wide PC Nikkor 19mm F4E ED tilt-shift lens

Posted in Uncategorized


How to Simulate Tilt-Shift Lens Effects Using Lightroom

24 Jun

We’ve all at one point been enamoured by the effects produced by tilt-shift or PC (perspective control) lenses.

Even in wide-angle shots, the extremely narrow field of focus transforms the scene into a surreal miniature world. It can be hard to decipher whether it’s actually a close-up of a tiny model scene, or the result of the visual trickery that a tilt-shift lens can produce.

Tilt-shift effect applied to a beach scene.

The tilt-shift effect can be used on more than city street scenes. Use your imagination and be creative!

Besides the nifty miniaturization effect, these high-end specialty lenses are imperative for professional architectural photography. Tilt-shift lenses are basically split into two, parallel to the lens, elements and enable you to tilt the front of the lens barrel in relation to the rear portion, or slide it parallel.

Without actually changing the physical location of the camera, these adjustments allow you to alter the perceived perspective. The most practical application of this effect is to eliminate certain types of distortion, especially the keystone effect.

The keystone effect refers to the convergence of parallel lines which occurs when a camera’s sensor is not parallel to them. You have seen this distortion a million times when the camera was pointed upward at a tall building. It looks as if the building is about to fall over backwards, and it creates the illusion that it is wider at the bottom and continually narrows to the top. The same thing happens with horizontal lines but is often less noticeable, or detrimental to the image.

Although tilt-shift lenses have other practical uses, these are the two that can be replicated effectively in post-processing: creating a miniature effect, and fixing certain kinds of lens distortion.

Eliminating Converging Lines Distortion

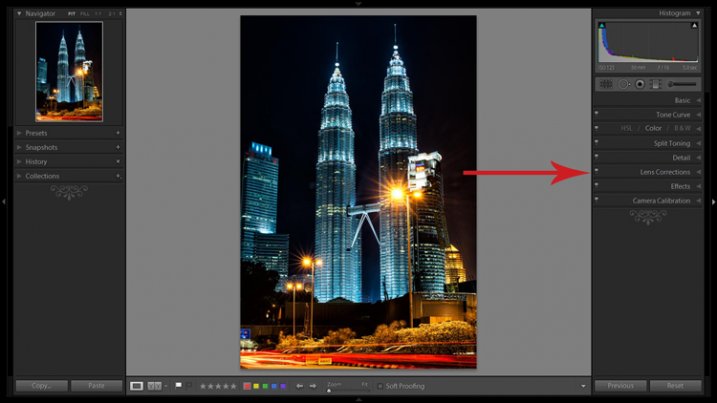
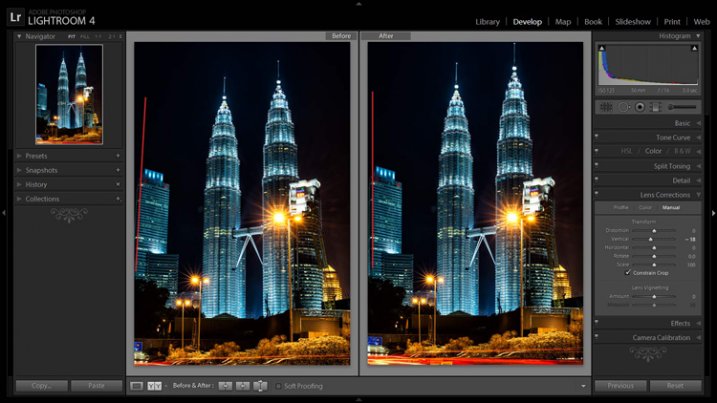
Correcting lens distortion in Lightroom (LR) is fairly straightforward with a couple of considerations to keep in mind. I’ll use a night shot of the Petronas Tower in Kuala Lumpur, Malaysia as an example.

1. Straighten first.

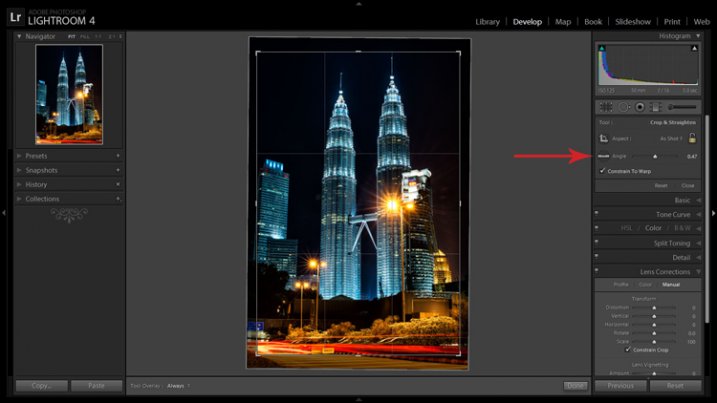
If the image you are working with has a distinct horizontal or vertical line which you know to be level or plumb, use the Straighten tool located within the Crop tool (keyboard shortcut R) to align the image before making any lens corrections.

The Level tool can be found beside the Align slider or activated by holding CTRL key.

The Level tool can be found within the Crop panel beside the Align slider, or activated by holding CTRL key.

To align the image using a vertical line, it must be near the center of the image due to the distortion which you are about to fix. With the Crop tool active, you can either grab the Level tool located beside the Angle slider, or hold down the CTRL key and drag the cursor along the chosen line and LR will rotate the image to level or plumb.

Note: new in LR6 or LRCC is the Auto function of the crop tool which attempts to do this for you. Alternatively, the Rotate slider in Lens Corrections can be used with similar results.

2. Open the Lens Corrections panel and click on the Manual tab.

Distortion corrections are made in the Lens Corrections panel.

Distortion corrections are made in the Lens Corrections panel.

3. Check the Constrain Crop box.

Note: As is often the case in life, you don’t get something for nothing. When LR manipulates the image to fix these lines, it must also crop it. You can also crop it manually after you adjust the image, but it is easy to inadvertently leave a little gray strip somewhere along the edge of your image by not cropping it enough.

4. Adjust the sliders

There are several ways to adjust sliders: dragging the slider itself, clicking the name of the slider and using the +/- keys, clicking the value on the right of the slider and dragging the cursor left or right, clicking the value and entering the desire value or clicking the value and using the arrow keys to make micro adjustments. I recommend the latter for accuracy.

5. Show the grid

Hovering the mouse over any of the sliders will show a grid over the image to help guide your adjustment. For this image, a -18 compensation straightens the lines right up.

A before and after showing corrections for converging lines.

A before and after showing corrections for converging lines.

If you plan on shooting architecture and utilizing this feature instead of dropping $ 1,400 on a tilt-shift lens, it may benefit you to activate the crop tool (keyboard shortcut R) to get an idea of how much LR cropped your image. This will give you a point of reference while composing scenes in the future.

Creating a Miniaturization Effect

The tilt-shift effect of severely softening most of an image to isolate a small sharp strip can be simulated in post-processing very effectively. Although there are a couple of different ways to achieve this effect in Lightroom, I find the following to be the easiest and most effective.

Golden Gate Bridge with the tilt-shift effect applied.

The tilt-shift effect can add another level of interest to certain photographs.

Keep in mind that not every photo is a good candidate for this effect. You can find good advice about image selection in the article An Introduction to Tilt-Shift Photography.

1. Process the image as you normally would.

Boosting sharpening, contrast and saturation can help exaggerate the effect.

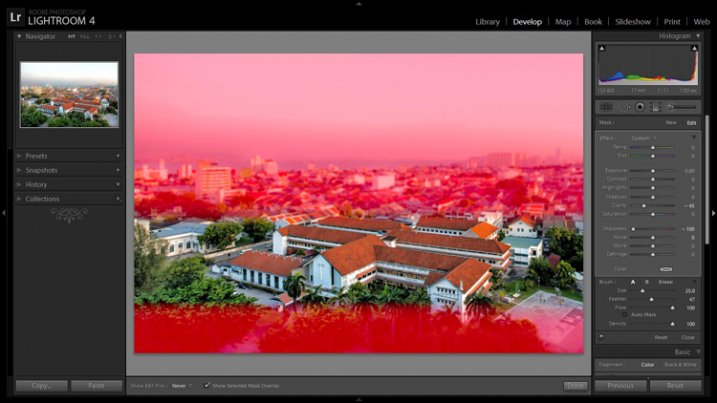
2. Activate and setup the Adjustment Brush (keyboard shortcut K).

Drag the Sharpening slider all the way down to -100. I also like to reduce Clarity which adds a bit of glow and exacerbates the effect.

3. Show the Mask Overlay box (keyboard shortcut O)

This will allow you to clearly see where the effect is being applied (shift+O will rotate through different mask colors, you may find red is better one image whereas green may work on another).

5. Adjust the brush settings

Setup such things as brush size, flow, etc. Spend a few minutes experimenting with different combinations of these settings to find what works best for your image. CTRL+Z (CMD+Z on Mac) is your friend here.

6. Blur most of the image less a small strip

Holding down the shift key while you click and drag the brush horizontally across your image will apply the effect in a straight line. The goal is to blur the entire image except for a small strip. Make one line across the upper boundary and one line across the lower boundary of the strip you wish to isolate. You can then release the shift key and paint in the remainder of the areas. The in focus strip should account for 20 per cent or less of the image area. If the strip is too big, the effect will be weak.

Holding down the shift key will keep the brush level to paint a straight line.

Holding down the shift key will keep the brush level to paint a straight line.

7. Repeat to increase the effect.

Repeating the previous step several times will compound the effect. To repeat the step, click on New at the top of the Adjustment Brush panel – this will remove the mask to reveal the most recently applied effects, and allow you to add a new pin (brush strokes) and repeat the process.

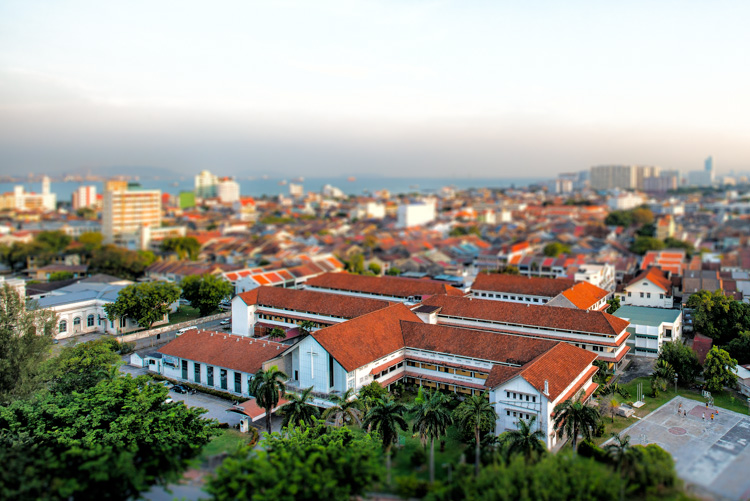
Before applying the effect to a photo of Penang, Malaysia.

Before applying the effect to a photo of Penang, Malaysia.

After application of the miniaturization effect.

After application of the miniaturization effect.

The effect can also be applied using the Graduated Filter tool but I find it ends up blurring the entire image to some extent and is less effective.

This is a starting point from which to experiment with the effect. Everybody’s tastes differ, so although the general process will remain constant, go crazy with the other variables and see what happens!

googletag.cmd.push(function() {
tablet_slots.push( googletag.defineSlot( “/1005424/_dPSv4_tab-all-article-bottom_(300×250)”, [300, 250], “pb-ad-78623” ).addService( googletag.pubads() ) ); } );

googletag.cmd.push(function() {
mobile_slots.push( googletag.defineSlot( “/1005424/_dPSv4_mob-all-article-bottom_(300×250)”, [300, 250], “pb-ad-78158” ).addService( googletag.pubads() ) ); } );

The post How to Simulate Tilt-Shift Lens Effects Using Lightroom by Jeremie Schatz appeared first on Digital Photography School.


Digital Photography School

 
Comments Off on How to Simulate Tilt-Shift Lens Effects Using Lightroom

Posted in Photography


Kirchenfotografie mit dem Tilt-Shift

30 Mar

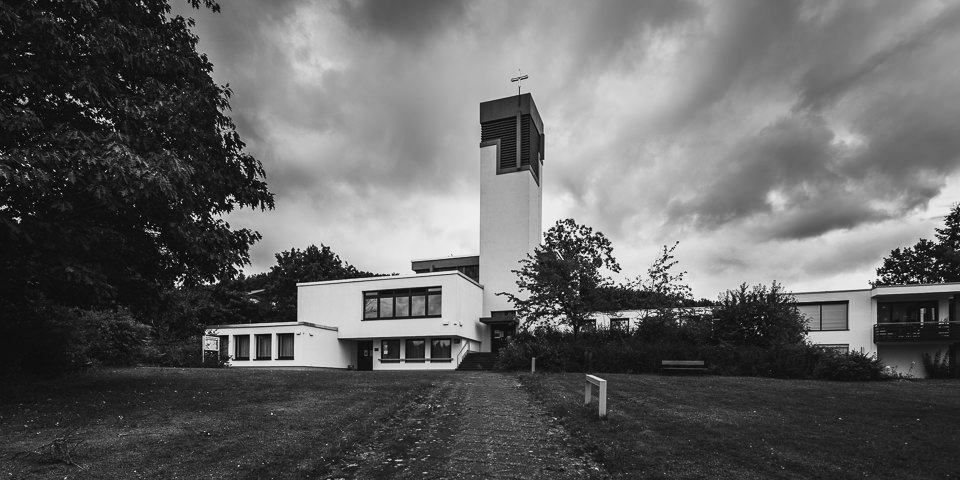
Moderne Kirche vor düsterer Wolkenfront

Es war im August 2013, als ich einen für mein damaliges Portfolio ungewöhnlichen Auftrag bekam. Ich sollte für einen Kirchenkreis alle Kirchengebäude von außen „portraitieren“ – für ihr Archiv, für Veröffentlichungen und für die Nachwelt. Die Fotos sollten darüber hinaus anschließend auch gedruckt im zentralen Verwaltungsgebäude (Kirchenkreisamt) aufgehängt werden. Sie sollten möglichst authentisch sein und die Kirchen mit all ihren Details einigermaßen genau zeigen.
kwerfeldein – Fotografie Magazin | Fotocommunity

 
Comments Off on Kirchenfotografie mit dem Tilt-Shift

Posted in Equipment


Tips for Using Tilt-Shift Lenses for Correction and Creativity

01 Mar

If you’ve ever wondered about the effects of using a tilt-shift lens this video with host Vincent Laforet will show you some of uses such as:

  • Correcting distortion caused by wide lenses and converging lines
  • Create stitched images without distortion
  • Creating miniature looking scenes by shifting the focus plane
  • Achieving maximum focus on your subject using shift

Here are some of the Tilt-shift lenses mentioned in the video.

Obviously these are specialty lenses and not everyone has a need for, or can afford them. But perhaps if you have the ability you may want to rent one and play around. Check with your local camera store or online with places like Borrow Lenses. Or you can try the less expensive Lens Baby for making some fun effects.

Have you ever tried one out? Do you do the type of photography that requires a tilt-shift lens? Or is it a luxury for the wish list? Share your thoughts in the comments below.

googletag.cmd.push(function() {
tablet_slots.push( googletag.defineSlot( “/1005424/_dPSv4_tab-all-article-bottom_(300×250)”, [300, 250], “pb-ad-78623” ).addService( googletag.pubads() ) ); } );

googletag.cmd.push(function() {
mobile_slots.push( googletag.defineSlot( “/1005424/_dPSv4_mob-all-article-bottom_(300×250)”, [300, 250], “pb-ad-78158” ).addService( googletag.pubads() ) ); } );

The post Tips for Using Tilt-Shift Lenses for Correction and Creativity by Darlene Hildebrandt appeared first on Digital Photography School.


Digital Photography School

 
Comments Off on Tips for Using Tilt-Shift Lenses for Correction and Creativity

Posted in Photography