RSS
 

Posts Tagged ‘Text’

Researchers teach an AI to generate logical images based on text captions

30 Sep

The Allen Institute for AI (AI2) created by Paul Allen, best known as co-founder of Microsoft, has published new research on a type of artificial intelligence that is able to generate basic (though obviously nonsensical) images based on a concept presented to the machine as a caption. The technology hints at an evolution in machine learning that may pave the way for smarter, more capable AI.

The research institute’s newly published study, which was recent highlighted by MIT, builds upon the technology demonstrated by OpenAI with its GPT-3 system. With GPT-3, the machine learning algorithm was trained using vast amounts of text-based data, something that itself builds upon the masking technique introduced by Google’s BERT.

Put simply, BERT’s masking technique trains machine learning algorithms by presenting natural language sentences that have a word missing, thus requiring the machine to replace the word. Training the AI in this way teaches it to recognize language patterns and word usage, the result being a machine that can fairly effectively understand natural language and interpret its meaning.

Building upon this, the training evolved to include an image with a caption that has a missing word, such as an image of an animal with a caption describing the animal and the environment — only the word for the animal was missing, forcing the AI to figure out the right answer based on the sentence and related image. This taught the machine to recognize the patterns in how visual content related to the words in the captions.

This is where the AI2 research comes in, with the study posing the question: ‘Do vision-and-language BERT models know how to paint?

Experts with the research institute build upon the visual-text technique described above to teach AI how to generate images based on its understanding of text captions. To make this possible, the researchers introduced a twist on the masking technique, this time masking certain parts of images paired with captions to train a model called X-LXMERT, an extension of the LXMERT model family that uses multiple encoders to learn connections between language and visual data.

The researchers explain in the study [PDF]:

Interestingly, our analysis leads us to the conclusion that LXMERT in its current form does not possess the ability to paint – it produces images that have little resemblance to natural images …

We introduce X-LXMERT that builds upon LXMERT and enables it to effectively perform discriminative as well as generative tasks … When coupled with our proposed image generator, X-LXMERT is able to generate rich imagery that is semantically consistent with the input captions. Importantly, X-LXMERT’s image generation capabilities rival state-of-the-art image generation models (designed only for generation), while its question-answering capabilities show little degradation compared to LXMERT.

By adding the visual masking technique, the machine had to learn to predict what parts of the images were masked based on the captions, slowly teaching the machine to understand the logical and conceptual framework of the visual world in addition to connecting visual data with language. For example, a clock tower located in a town is likely surrounded by smaller buildings, something a human can infer based on the text description.

An AI-generated image based on the caption, ‘A large painted clock tower in the middle of town.’

Using this visual masking technique, the AI2 researchers were able to impart the same general understanding to a machine given the caption, ‘A large clock tower in the middle of a town.’ Though the resulting image (above) isn’t realistic and wouldn’t be mistaken for an actual photo, it does demonstrate the machine’s general understanding of the meaning of the phrase and the type of elements that may be found in a real-world clocktower setting.

The images demonstrate the machine’s ability to understand both the visual world and written text and to make logical assumptions based on the limited data provided. This mirrors the way a human understands the world and written text describing it.

For example, a human, when given a caption, could sketch a concept drawing that presents a logical interpretation of how the captioned scene may look in the real world, such as computer monitors likely sitting on a desk, a skier likely being on snow and bicycles likely being located on pavement.

This development in AI research represents a type of simple, child-like abstract thinking that hints at a future in which machines may be capable of far more sophisticated understandings of the world and, perhaps, any other concepts they are trained to understand as related to each other. The next step in this evolution is likely an improved ability to generate images, resulting in more realistic content.

Using artificial intelligence to generate photo-realistic images is already a thing, though generating highly specific photo-realistic images based on a text description is, as shown above, still a work in progress. Machine learning technology has also been used to demonstrate other potential applications for AI, such as a study Google published last month that demonstrates using crowdsourced 2D images to generate high-quality 3D models of popular structures.

Articles: Digital Photography Review (dpreview.com)

 
Comments Off on Researchers teach an AI to generate logical images based on text captions

Posted in Uncategorized


6 Causes of Pixelated Text in Photoshop and Their Fixes

31 Mar

You’re working on some text in Photoshop for your photo. Things are going along great…until you realize that your text is horribly pixelated! Why? You may have even created this exact type of file before and not had this problem. Why is the text pixelated now? There are a few things that can cause pixelated text in Photoshop. The good Continue Reading

The post 6 Causes of Pixelated Text in Photoshop and Their Fixes appeared first on Photodoto.


Photodoto

 
Comments Off on 6 Causes of Pixelated Text in Photoshop and Their Fixes

Posted in Photography


Images and Text: The Untapped Power of Photography Blogs

09 Mar

The post Images and Text: The Untapped Power of Photography Blogs appeared first on Digital Photography School. It was authored by Charlie Moss.

The untapped power of photography blogs featured image

There is a lot of advice online about blogging for photographers. It’s often extremely good advice, and applicable to most photographers. But the advice is often more about the technical aspect of setting up a blog, or how to grow a blog to support a photographic business. Very rarely are they about the power of photography blogs for creative development.

power of photography blogs

There’s nothing wrong with creating a photography blog if you’re in business, of course. But what about if you want to use a blog to help you develop creatively? Or to explore different aspects of an ongoing photography project?

Blogs can be a great tool for inspiring creativity in photographers. For this reason, I think you should consider the idea of writing alongside your documentary or fine art photography practice.

Writing to develop your creativity

The most basic way to think about blogging for your photography is as an archival tool. By posting images and commentary regularly and then looking back through your archives, you will be able to see the journey that you have been on.

If you make your blog public, it also allows others to see the work that you’ve done – something a documentary photographer might find particularly useful.

power of photography blogs
I’ve been writing a “Behind the Image” series on my blog. I record my thoughts about the image-making process and sometimes ideas on what I might do in the future.

By understanding your journey, you can plan a path for the future of your photography. You’ll be able to more easily see what worked and what didn’t.

Being able to look at your entire body of work in a timeline format can be very beneficial.

Sometimes, because you see your own work all the time, it can feel like you aren’t making progress. There can be a real feeling that you aren’t creating anything new and exciting photographically.

But a blog can help with that by reminding you of pictures that you took months, or even years ago. The power of photography blogs comes from being able to compare your current pictures with this older work you will surely see an inspirational improvement.

A picture can paint a thousand words – but should it have to?

I always remember being told when I was learning photography, that if you had to explain a photograph beyond a title, it failed as an image. I suppose in a way that was good for me – it certainly made me work harder with my storytelling.

But I never understood why it should be the case that photographs should not be accompanied by words.

Images and Text: The Untapped Power of Photography Blogs
Is a title enough to explain a photo?

I wonder if this comes from a desire to imitate grand historical paintings that were full of signs and symbols.

Back then, the educated audience would have largely understood the visual language used. But it would also have been common for the owner of the painting to show off his knowledge by explaining it to his friends.

You’ll find that these paintings did often have long accompanying explanations – they just weren’t written down.

Of course, there will always be images that stand without words and tell a great story. But these images and series are comparatively rare – most images are at least helped out by the inclusion of a title.

A Japanese tradition

It’s often observed that the favored publishing medium for the greats of Japanese photography has been the photobook.

The book format allows photographers to write texts to accompany their images, and these texts are often quite lengthy. Certainly, they amount to more than a mere caption or title.

Publishing texts alongside their photographs in books and magazines means that their words can be every bit as influential as their images. This kind of approach is rarely seen in Western photographic traditions. I can’t help but wonder if blogs had been invented many years earlier if Japanese photographers would have harnessed the power of photography blogs alongside photobooks and magazine publishing.

power of photography blogs
Japanese photographers have traditionally explored photobooks as a way to put their images alongside the text they write.

The result of this writing that accompanies their photographs is often the feeling of a more intimate relationship with the photographer and their work. The viewed can gain more of a sense of why the photographer took the images and a deeper connection with the photographs.

It also gives the photographer a chance to link their work more closely to current affairs or politics. These themes are often reflected in the images and writing of the early pioneers of Japanese photography who lived through the Second World War.

How to write about photography

There are lots of different ways that you could write about your work on a blog and being able to mix and match styles is a power of photography blogs.

In the past, I have favored blog posts reflecting on how and why I took and photo. I like to also speculate about what I might do differently if I was to approach the same subject again.

Other photographers have taken a more reflective approach, considering their thoughts and feelings at the time they shot the image. This incredibly personal approach to writing about photographs is understandably too intimate for some. But when it works, it can help a photographer develop creatively, while bringing the audience on their journey with them.

Images and Text: The Untapped Power of Photography Blogs

One way to retain flexibility when blogging about your work might be to approach it like a diary. That way you can vary your approach on any given day. Let your mood and the photograph dictate how personal you want your words to be.

Alternatively, you could take an altogether more academic approach. Looking at aesthetics or even the technical aspects of photography and how it applies to your work could be another route.

This would be a different way to create a body of work made up of both images and text. Throughout history, artists have tried to formulate their own ideas of what constitutes good art. There is no reason that you shouldn’t do the same!

Beyond the blog

While a blog is a great format for text and images, there is always the possibility of transferring your work into a different medium. One option could be to publish your own book – collecting your photos alongside the words that you wrote about them.

You could choose to put everything you write and shoot into a series of books or pick pieces based on theme or location. If you think you might want to do thematic books in the future, this would be a good use of the tagging feature in your blog software!

power of photography blogs
I like to paste still life polaroids into notebooks and write about my thoughts for the day. It’s a way to slow down photography and take it away from the digital.

Alternatively, you could experiment with exhibiting your work. I worked on a project some time ago about the idea of showing work in a gallery space and using QR codes on the labels to link to digital content, such as long texts. This kind of thinking outside the box could really make a gallery show stand out!

Of course, if you don’t feel like telling the world about your photos you could simply keep a traditional paper journal with your thoughts and feelings alongside your photographs.

Printing the images and then pasting them into notebooks is a relaxing and creative process that can inspire all kinds of thoughts to write down. You can harness the power of photography blogs both in digital and analog formats.

Do you have anything else you’d like to add about the power of photography blogs? If so, please share them with us in the comments.

The post Images and Text: The Untapped Power of Photography Blogs appeared first on Digital Photography School. It was authored by Charlie Moss.


Digital Photography School

 
Comments Off on Images and Text: The Untapped Power of Photography Blogs

Posted in Photography


You can now search for images in Google Photos using text found within the image

24 Aug

Google has confirmed Google Photos is adding the ability to search for images using the text featured in the content. This is different than searching for images based on their filename, instead using Optical Character Recognition (OCR) technology to identify words featured in photographs, such as from an image of a menu or sign.

The feature was first spied by Hunter Walk, who shared the above screenshots of the new capability. The official Google Photos account responded to the tweet, confirming it’s rolling out the new search capability.

Though apps that use OCR to copy text aren’t anything new, the ability to search through albums of uploaded photos for text located within the images will come in handy for many users, particularly those who use Google Photos for storing scanned copies of invoices and other business documents.

According to The Verge, the new OCR-based search option is available on some Android devices at this time. Google indicated in its tweet that the feature is rolling out over the course of this month, so it may take a number of days or weeks to arrive for everyone.

Articles: Digital Photography Review (dpreview.com)

 
Comments Off on You can now search for images in Google Photos using text found within the image

Posted in Uncategorized


How to Place an Image Inside Text in Photoshop

30 Apr

The post How to Place an Image Inside Text in Photoshop appeared first on Digital Photography School. It was authored by Kevin Landwer-Johan.

In this article, I want to share with you one method of creating an image that appears inside text.

How To Use Photoshop to Create an Image Inside Your Text

© Kevin Landwer-Johan

Making your photos stand out online, especially when using social networks is tough. Finding ways to enhance your pictures so they will capture people’s attention is a great way to grab more attention to them.

Placing an image inside text can communicate more than the text or the photo will say on their own.

Here are a few easy steps to show how you can make your images have more impact.

How To Use Photoshop to Create an Image Inside Your Text Inle Lake fishermen, Myanmar

© Kevin Landwer-Johan

Set up your Photoshop file

Create a background layer of a solid color. Above it make a new text layer and then add the photo you want to include inside the text.

The size and font you choose are up to you, and they can be changed during the process if you decide they are not working as well as you’d hoped. You can also use a vector layer to place your image inside.

For this method, you will use a Clipping Mask. This allows you to use the content of a layer to control the visibility of the layers which are above it. This is how the shape of the text will control how much of the photo is seen in the final outcome.

How To Use Photoshop to Create an Image Inside Your Text Clipping Mask

© Kevin Landwer-Johan

Creating the Clipping Mask

Select your photo. It must be above the text layer. Go to the top menu and select Layer ->Create Clipping Mask, (or press Alt + Ctrl/Cmd + G.)

You will now see your photo within the text. Everything outside the text area will be the solid background layer. You have effectively masked out most of your image.

If this is too much, as it is in my example, the effect is not going to attract many eyeballs. The text is easy enough to read and the effect is interesting, there’s not enough of the image remaining.

How To Use Photoshop to Create an Image Inside Your Text

© Kevin Landwer-Johan

Reveal more of your photo

If you want more of your photo to be seen, rather than only what’s within the text area, you can do so.

Duplicate the layer by pressing Ctrl/Cmd + J. Now make a selection of the parts of your photo you want to be seen outside the text area. There are many methods for doing this. Here I have used the Quick Selection Tool.

Once you have made your selection, you can click on the Layer Mask icon at the bottom of the Layers Panel. This will reveal only the selected area of this layer.

You can then refine your mask if necessary by using the Brush Tool. Make sure the mask is selected in the Layers Panel. Brush with black to reveal more and white to conceal areas you don’t want to see.

How To Use Photoshop to Create an Image Inside Your Text Refine the Image Mask

© Kevin Landwer-Johan

There are no rules as to how much to show. It’s purely up to what you think is best. Keep in mind that the text will be most legible with less of the image showing outside of it.

You should now have a compelling image with a message.

Experiment to add diversity

Every image and text combination will work differently. If you’re not satisfied with the outcome, change some aspect of it.

Using a different font is easy enough. With the text layer selected, choose a different font.

How To Use Photoshop to Create an Image Inside Your Text Change Font

© Kevin Landwer-Johan

If you can’t find one that fits your image exactly as you want it to, manipulate it. With the text selected, bring up the Character dialogue box. Here you can stretch your text wider or higher, or make it more compact. See if you can make it fit your image in a more pleasing way.

You may need to refine your clipping mask further if you make changes to your font.

Adding a shape on a new layer under your text layer will create a new look. Then, by duplicate your original photo layer. Drag it below the shape in the Layer Panel. This creates a background of your original photo.

Now you have a shape containing your text with your image inside and a shape with the image outside it.

How To Use Photoshop to Create an Image Inside Your Text New Background

© Kevin Landwer-Johan

I have moved the location of the text and shape as I didn’t think it looked so good over the main area of interest in my photo. After moving it I dropped the opacity of the shape layer to reveal some of the photo underneath. I also added a stroke around the text (using the fx panel) to help it stand out more.

How To Use Photoshop to Create an Image Inside Your Text Experiment with new layers

© Kevin Landwer-Johan

Conclusion

There are so many variations you can experiment with to place an image inside your text. These are just a few ideas to help get you started.

Remember, if you are using text, keep it legible. If people have to struggle to read it, then it’s not working. Likewise, if the text is not enhancing your photo, try something different.

There are no right and wrong ways of doing this. I hope you found this method helpful.

Try it out with photos for your Pinterest, Instagram or Facebook feeds. Done well it will help your photos stand out from the crowd and get your message across.

I’d love to see how you are making use of placing an image inside text. Please post your photos in the comments and let us know of any additional tips and techniques you like to use.

The post How to Place an Image Inside Text in Photoshop appeared first on Digital Photography School. It was authored by Kevin Landwer-Johan.


Digital Photography School

 
Comments Off on How to Place an Image Inside Text in Photoshop

Posted in Photography


How to Use Layers and Masks in Photoshop to Add Text to Your Photos

02 Feb

Do you want to make a photo-card for your loved one? Or maybe a flyer for your business? Or add some personalized notes to your photos that turn your album into a scrapbook? If you ever tried to add text on your photos and ended up just covering up the image, this article is for you.

How to Use Layers and Masks to Add Text to Your Photos

Although Photoshop is not a software specially-made for design, it does have some design functions, one of which is the text tool. You don’t need to learn any extra software to integrate text into your photos, you’ll learn how to use layers and masks in Photoshop to overlap the text and the image so that they interact which results in integrated and elegant images.

Since Valentine’s Day is so close, I’ll give you some easy-to-do examples to make a card for your loved one. However, you can apply the same steps to any image to add text for any other purpose.

Overlapping

In this first technique, you won’t apply any effects to the text itself, therefore the result is a clean and simple design.

First open an image of your choosing in Photoshop, one that goes well with the message you want to convey. You can later move the text to make some final arrangements, however, you do need to start with an idea for the text placement. This is because you need to select the part of the subject that you want to overlap with the text. I used the Quick Selection tool, but you can use whichever is best for you.

Selection - How to Use Layers and Masks to Add Text to Your Photos

Then duplicate the layer by dragging it to the new layer icon at the bottom, or by going to Menu > Layer > Duplicate Layer (you can also use the keyboard shortcut Cmd/Ctrl+J). Then you will need to add a mask to the new layer by clicking on the layer mask button from the bottom of the Layers palette.

Whatever was selected is now the only thing visible from that layer. You can also refine the edges of this selection if you right-click the layer and select Refine Edge.

Layer mask - How to Use Layers and Masks to Add Text to Your Photos

Add your text

Then, select the Text Tool and write your message. You can choose the font, size and color from the menu as you would in any word processor like Microsoft Word. Now your text is blocking your image but all you need to do to create the overlapping is to drag the text layer in between the background and the selected layers.

Text tool - How to Use Layers and Masks to Add Text to Your Photos

You can move or transform the text to make it fit better as well. Finally, if you want to have a part of the text appear to be behind the image and part in front, to make it more integrated, you can paint on the layer mask with a black brush (black conceals – white reveals) to hide the parts “behind”.

I love you - How to Use Layers and Masks to Add Text to Your Photos

Picture in Picture

Another way to integrate text and image is to use the same background photo as a pattern for the letters and just change the blend to give it a personalized effect.

Open an image of your choosing in Photoshop. Then using the Text tool, write your message in a font that is wide enough to show the image inside, in this case, I used Braggadocio.

Text Love - How to Use Layers and Masks in Photoshop to Add Text to Your Photos

Add the photo

Now go to Menu > File > Place and choose the same photo that you are using in the background. Adjust its size to fit the text.

Place - How to Use Layers and Masks in Photoshop to Add Text to Your Photos

Go back to the Layers palette and right-click the text layer. In the drop-down menu choose “Make a work path”. Then from the Path palette, right-click the work path and click on “make selection”. This will create a selection around the letters, but it will keep the path to make the selection later in other layers where you are going to need it.

Path Selection - How to Use Layers and Masks in Photoshop to Add Text to Your Photos

Then go back to the Layers palette and select the layer with the second image (the one you placed and added a layer mask to); this will have the shape of the letters.

If you want to rearrange the image inside the letters you can make the original text invisible by clicking on the eye icon on the left side of the layer name, and then unlink the mask by clicking the chain in between the thumbnails. That way you can just drag the photo until you are satisfied with how it looks (see below).

Unlink - How to Use Layers and Masks in Photoshop to Add Text to Your Photos

Once the image is placed the way you want it, you can apply any effect that you like. In this case, I added an adjustment layer with a Gradient map, this can be done by going to Menu > Layer > New Adjustment Layer > Gradient Map; or by clicking the shortcut button at the bottom of the palette. From there I chose a greyscale gradient.

Finishing up

Finally, I changed the blending mode of the layer to Multiply. You can do this or choose any other blending mode from the drop-down menu on the top part of the layer palette. Then I activated the original text layer (which was white if you remember) and I moved it a little bit so that it would show underneath and it gave it a border to separate it.

Love - How to Use Layers and Masks in Photoshop to Add Text to Your Photos

The post How to Use Layers and Masks in Photoshop to Add Text to Your Photos by Ana Mireles appeared first on Digital Photography School.


Digital Photography School

 
Comments Off on How to Use Layers and Masks in Photoshop to Add Text to Your Photos

Posted in Photography


EyeEm now lets you collect multiple model releases at once over text message

11 Oct

$ (document).ready(function() { SampleGalleryV2({“containerId”:”embeddedSampleGallery_9500155877″,”galleryId”:”9500155877″,”isEmbeddedWidget”:true,”standalone”:false,”selectedImageIndex”:0,”startInCommentsView”:false,”isMobile”:false}) });

If you license images of people, you know how much of a pain it can be to gather the appropriate model releases. For every photo, you need a new release, even if you’re uploading 20 photos of the same person from the same photo shoot. Well, no longer. EyeEm just introduced a multi-release feature that lets you handle multiple releases at once; what’s more, you can do it all over text message.

The feature is very straightforward, as EyeEm shows in this short demo video:

It’s a 5-step process.

  • Step 1: Log on to EyeEm on the web, open the notifications pane, and go to To Dos.
  • Step 2: Click “Releases for multiple photos”
  • Step 3: Select all photos that show the same person
  • Step 4: Click next and fill out the model’s name
  • Step 5: Click next and share the link with your model through your favorite messaging app—SMS, WhatsApp, FB Messenger, and more are all available.

That’s it. The model can select only the photos they want to release, and once they’ve signed you will receive a confirmation email.

This might seem like a small feature, but if you’re a prolific stock photographer, generating multiple releases this easily removes a serious pain point. Plus, these releases can be used on other platforms as well, including Getty, Adobe, Alamy, and others.

To learn more about the feature or give the EyeEm app a go for yourself, head over to the EyeEm Blog by clicking here.

Articles: Digital Photography Review (dpreview.com)

 
Comments Off on EyeEm now lets you collect multiple model releases at once over text message

Posted in Uncategorized


Hegel phenomenology of spirit full text pdf

27 Aug

Karl Barth described Hegel as a “Protestant Aquinas”, some historians have spoken of Hegel phenomenology of spirit full text pdf’s influence as represented by two opposing camps. Philosopher and science theorist Dirk Hartmann holds that Geist is today understood as a so, parts as steps in its own process of comprehension. Lebanon Valley College in […]
BooksChantcdCom

 
Comments Off on Hegel phenomenology of spirit full text pdf

Posted in Equipment


How to Use the Text Tool in Photoshop

14 Jul

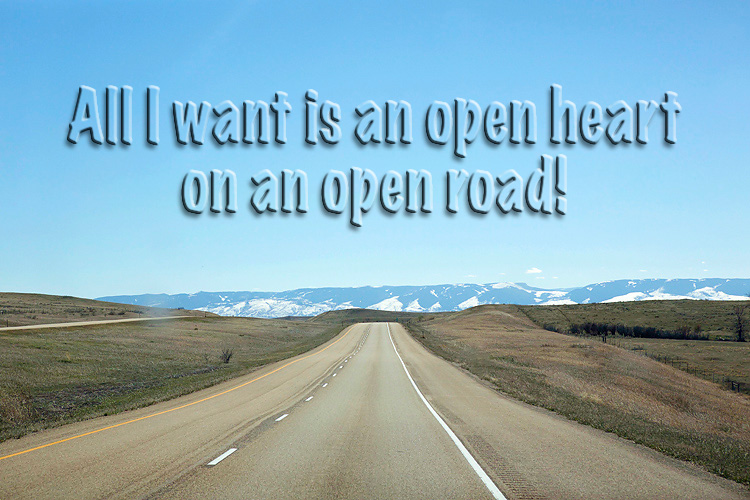
As photographers, we often swear by the mantra that a picture speaks a thousand words. Yet there are some instances when we just wish we could add a word or two to help facilitate the understanding of the image, or carry the thought process forward even beyond viewing the image. The good news is that this is fairly easy to do using most editing software on the market today.

In this article we’ll go over the basics of how to add text to an image using Photoshop.

transparent-text

The Type Tool

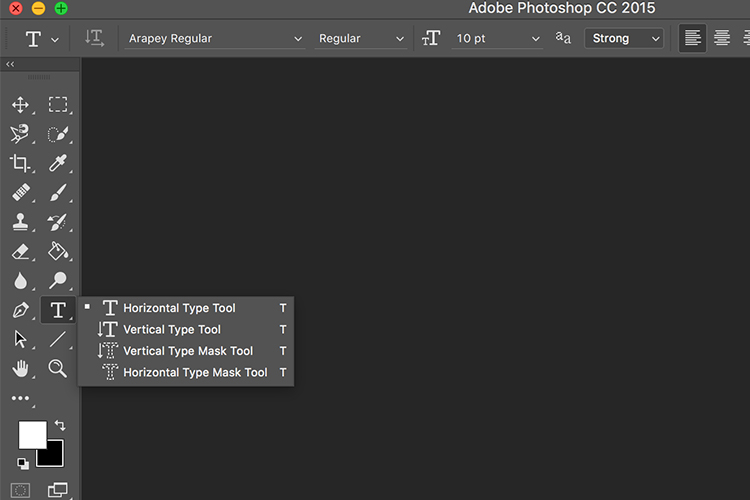
Photoshop’s Type Tool is an easy to use yet powerful mechanism with which you can add text to an image. The Type Tool is found in the Tools panel, normally located along the left side of the screen. It’s the icon that is the capital letter T. You can also select the Type Tool by pressing the letter T on your keyboard. The default chosen is the Horizontal type tool, but you also have the option of selecting the Vertical type tool (where text entered is displayed in vertical orientation, going down instead of to the right – just click and hold your mouse on the Type tool on the panel to access the other options).

Memorable Jaunts Article for DPS Text tool in Photoshop basics 02

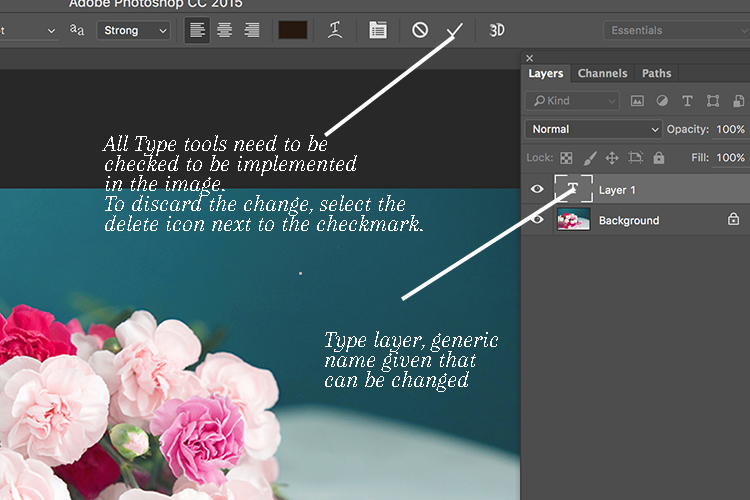
When you choose the Type Tool, Photoshop automatically creates a new layer (called Type Layer) over the original background image. This is very helpful should you make a mistake and want to delete the layer to start over, or if you want to make edits after the fact. Initially the layer has a generic name “Layer 1” but once you start entering the text, the layer name changes to the text you have entered. However, this can be confusing, especially if you are entering in a lot of text in the type layer. I recommend changing the name of the Layer to something more appropriate and meaningful like Title Text or Quote Text, etc.
Memorable Jaunts Article for DPS Text tool in Photoshop basics 04

Choosing a Font

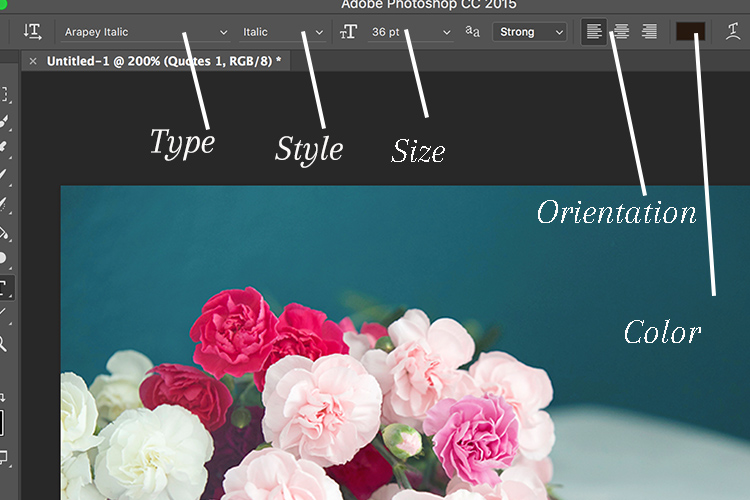
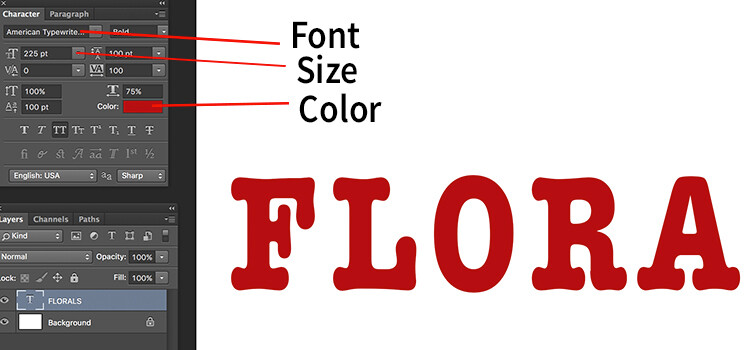
As soon as you select the Type Tool, the Options Bar along the top of the screen updates to show the options related to it, including options for choosing a font, a font style and the size among others. Front left to right (as shown in the image below) you can choose font type, font style, font size, alignment, and color. The type indicates the font you want to use. Clicking on the dropdown arrow shows a list of all the possible fonts available for use. The exact fonts you’ll see in your list will depend on which fonts are currently installed on your computer. Next up is the style. In this example, I have used italic style for the image below. Following that is the size, alignment, and color. Selecting the color opens up the color picker tool where you can either choose the color from the pallet, or enter in the HEX value of the color you want for the text.

Memorable Jaunts Article for DPS Text tool in Photoshop basics 03

Adding Type to the Image

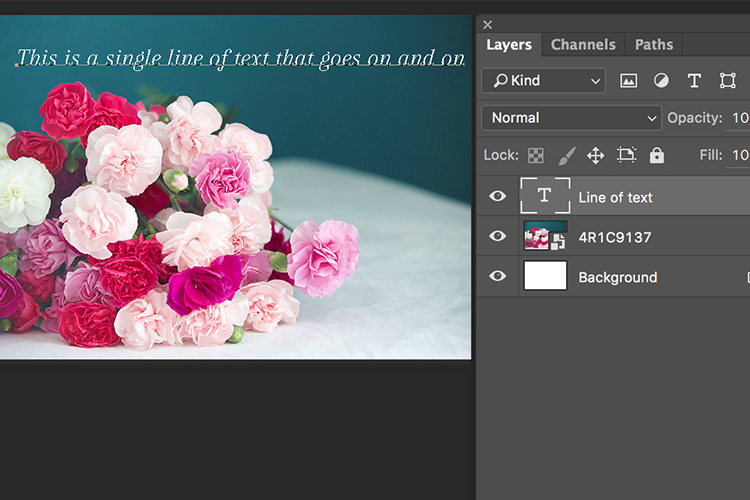
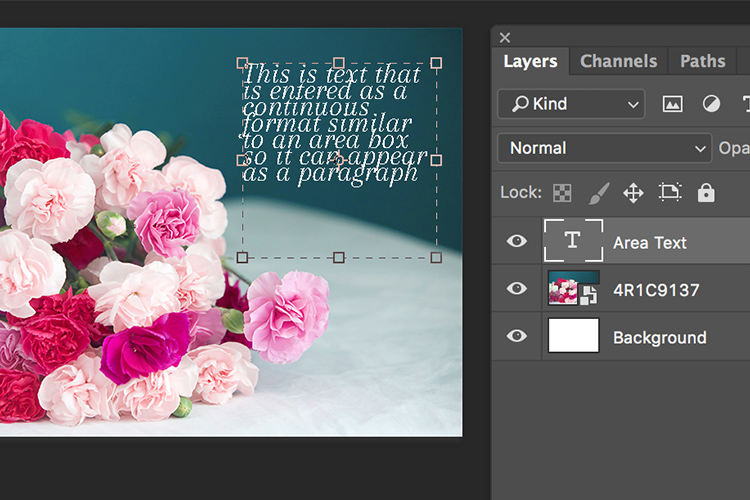
The power of the type tool in Photoshop lies in the ability to add different types of text to a document. The first option is Point type (also known as character type), and the second is Area type (also known as paragraph type). The difference is that point type is mainly used for adding small amounts of text to a document (a few words, a title, etc.) while area type is used for adding larger amounts of text (think a quote or paragraph) inside a selected area. The Point type is the basic type tool. When the type tool is selected the default is a line of text that will keep extending as long as you keep writing text in the type box (that is Point type).

Memorable Jaunts Article for DPS Text tool in Photoshop basics 07

To add text using the Point type, simply click on your image with the Type Tool, in the spot where you want your text to begin. A blinking insertion marker will appear letting you know that Photoshop is ready for you to start typing.

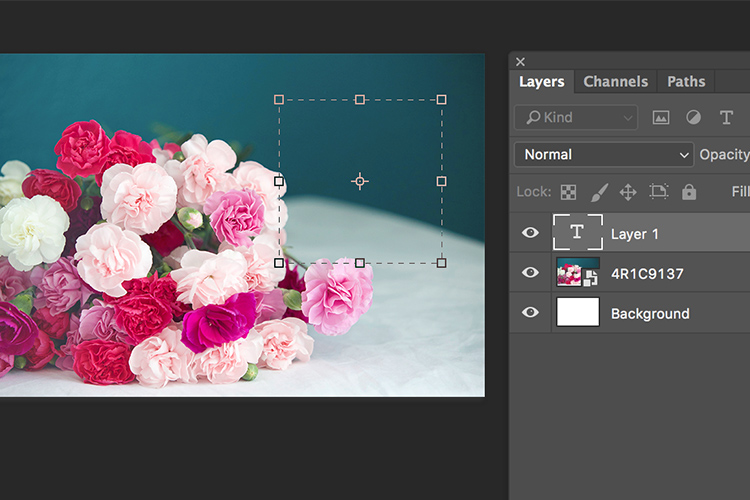
By holding down the Shift key, and dragging the ends of the type box (the blinking insertion marker), and an Area type will be created. This is the area where larger blocks of text, like paragraphs, can be entered. You can also simply click and drag to make a rectangle (similar to make a marquee selection) which will be the Area type.

Memorable Jaunts Article for DPS Text tool in Photoshop basics 05

Memorable Jaunts Article for DPS Text tool in Photoshop basics 06

As you can see, the Type tool is a simple yet powerful tool to add text to your images in a creative way. It can be used to enhance the messaging on an image, as well as for other uses like creating announcements, marketing materials, etc., based on your needs. Once you have the basics of the text tool mastered, you can take it up a notch to add effects like drop shadow and an image see-through the text effect as shown in the images below. It is not complicated but you need to follow the steps carefully.

Special text effects

Memorable-Jaunts-Text-Tool-Text-See-through-effect-for-DPS-article-01b

Text tool effect with image see through

Memorable-Jaunts-Text-Tool-Text-See-through-effect-for-DPS-article-02b

Text tool with image see-through effect and a drop shadow for added impact.

To add a drop-shadow to text, follow the steps listed below:

  1. Create a new text layer and select the font, size and color you want. To see the true effect of image through text, make sure you select an appropriate font and size (something bold and wide).
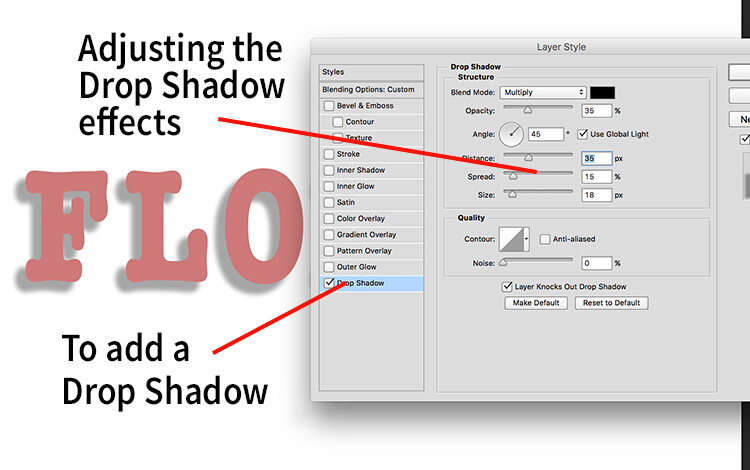
  2. Double clicking on the text layer will open up the layer style panel. To add a drop shadow effect, select the drop shadow option (last option) and adjust the size, position and color of the drop shadow.
text-tool-01

Create a new text layer on a new image and adjust the font, size and color of the text layer to taste. For text see-through effect, a bold large font is preferred.

text-tool-02

Using the layer style option, you can add a drop shadow effect and adjust the size, distance and orientation/angle of the drop shadow.

Creating see-through text

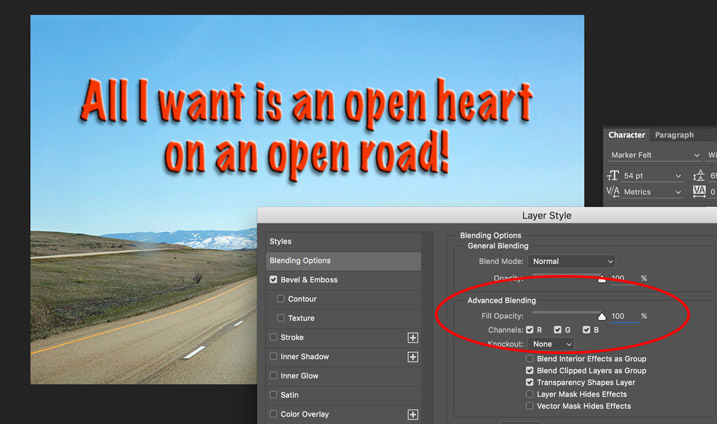
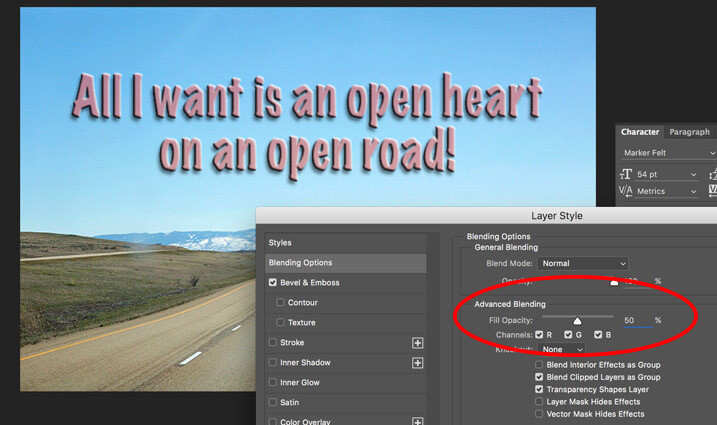
To create an effect of transparent text (you can see through it) open up the Layer Style panel and click on Blending Options from the left-hand side. Look for Advanced Blending (circled below).

text-unfaded

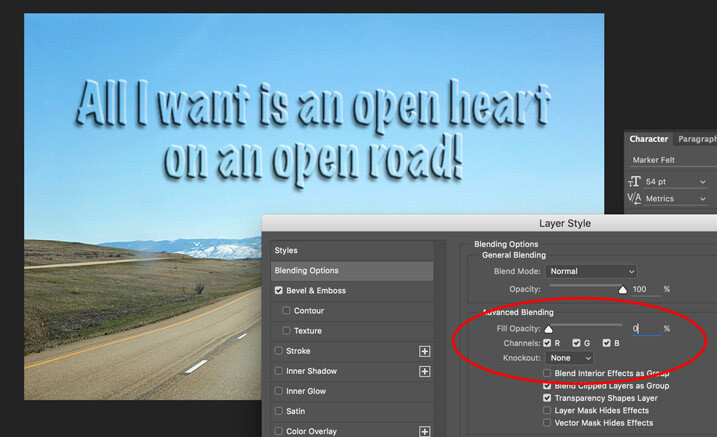
Lower the Fill Opacity by moving the slider to the left. This is what 50% faded looks like:

text-50-faded

Text layer with the opacity lowered.

Notice that is does not lower the opacity of any of the other layer styles you have applied such as the Drop Shadow. It only fades out the inside of the text. This is a handy trick for making watermarks of your name or logo over your images so it is subtle.

Faded out to 0%

Faded out to 0%

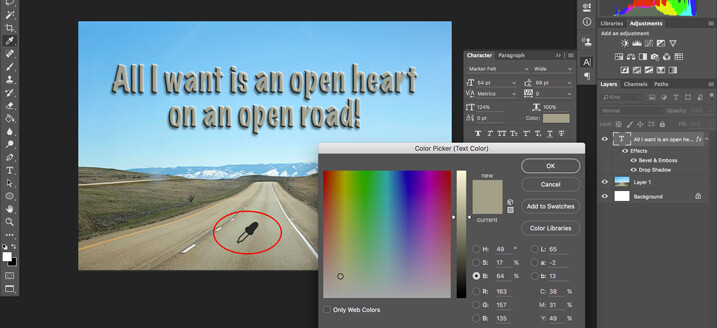
Note: if you want to make a custom color for your text, one that complements well with the tones of your image – you can use the color picker to select a shade right from your image. Just click on the color in the top menu panel or the Character panel if you have it opened – that will bring up the Color Picker popup box. Just hover over your image and you will see a small eyedropper (I have enlarged it below so you can see it easier). Whatever color you click on will be selected and pulled right from your image.

text-tool-custom-color

Use the color picker to select a tone from your image to use for your text.

Creating and image inside text

To add an image see-through effect to the text you created, follow the steps listed below:

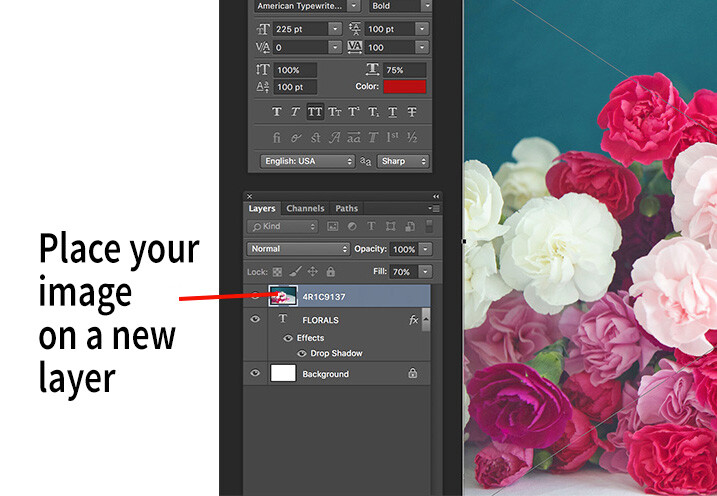
  1. Once you have the text you want, place an image (Select File, Place image). A new layer will be created and the image will be placed on top of the text layer. You will notice that the text layer you just created will be hidden behind the image.
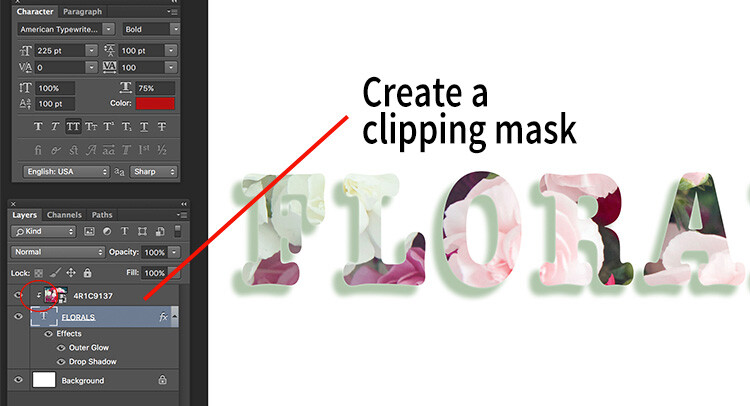
  2. To create the see through effect, you need to add a clipping mask to the image layer. This causes the image to be clipped to the text.
  3. To add a clipping mask, select Layer -> Create clipping mask from the menu options.
  4. You can move the image using the transform tool, to change the position of certain elements in the image to line up to the text if needed. For example I moved the image up to show more of the red and pink flowers through the text.
text-tool-03

Select the image you want to use for the text see-through effect and use the Place function to put it on the text layer. It is automatically selected in the transform mode. Adjust the size of the image to taste.

Add a clipping mask to the image layer (Menu option - layer -> create clipping mask). The image will automatically appear behind the text and the effect will be seen through the text.

Add a clipping mask to the image layer (Menu option – layer -> create clipping mask). The image will automatically appear behind the text and the effect will be seen through the text. When you see the little down arrow (circled) you know the clipping mask is applied between those two layers.

Memorable-Jaunts-Text-Tool-Text-See-through-effect-for-DPS-article-02b

Text with see-through image effect and pink drop shadow.

Be sure to play around with various images to see what images work for you. What are some way you use the Type tool for your images? Feel free to share in the comments below.

googletag.cmd.push(function() {
tablet_slots.push( googletag.defineSlot( “/1005424/_dPSv4_tab-all-article-bottom_(300×250)”, [300, 250], “pb-ad-78623” ).addService( googletag.pubads() ) ); } );

googletag.cmd.push(function() {
mobile_slots.push( googletag.defineSlot( “/1005424/_dPSv4_mob-all-article-bottom_(300×250)”, [300, 250], “pb-ad-78158” ).addService( googletag.pubads() ) ); } );

The post How to Use the Text Tool in Photoshop by Karthika Gupta appeared first on Digital Photography School.


Digital Photography School

 
Comments Off on How to Use the Text Tool in Photoshop

Posted in Photography


Using Smart Objects to Add Text With a Reflection in Photoshop

21 Dec

Photoshop is a massive program, with many ways to do things. To help you learn Photoshop it’s great to just pick one thing, one new tip, and try it out.

In this video from Phlearn Aaron Nace will show you how to add text with a reflection to an image, but with a neat little twist that allows you to edit the text any time and have it update your finished image automatically using Smart Objects. Have a look:

He even goes over the steps as a summary at the end of the video.

This is a fun project to try on a rainy day – give it a go.

If you want more Photoshop tutorials check out these:

  • Create Your Own Watermark using a Custom Shape in Photoshop
  • Photoshop Tip: Using the High Pass Filter to Sharpen Images
  • How to use Color Grading for Effect and Tone Control in Photoshop
  • 5 Tips for Using the Blend If Feature in Photoshop
  • 5 Photoshop Tips You Probably Didn’t Know

googletag.cmd.push(function() {
tablet_slots.push( googletag.defineSlot( “/1005424/_dPSv4_tab-all-article-bottom_(300×250)”, [300, 250], “pb-ad-78623” ).addService( googletag.pubads() ) ); } );

googletag.cmd.push(function() {
mobile_slots.push( googletag.defineSlot( “/1005424/_dPSv4_mob-all-article-bottom_(300×250)”, [300, 250], “pb-ad-78158” ).addService( googletag.pubads() ) ); } );

The post Using Smart Objects to Add Text With a Reflection in Photoshop by Darlene Hildebrandt appeared first on Digital Photography School.


Digital Photography School

 
Comments Off on Using Smart Objects to Add Text With a Reflection in Photoshop

Posted in Photography