A light tent is an invaluable photography tool for shooting smaller objects and items and for achieving even, near-shadowless lighting. In our earlier post, we looked at How to Use a Light Tent for Product-Style Photography, which covered the basics for using and shooting with a light tent. In this post, we will take a look at a head-to-head comparison between buying a light tent kit versus making your own DIY version.
The light tent contenders
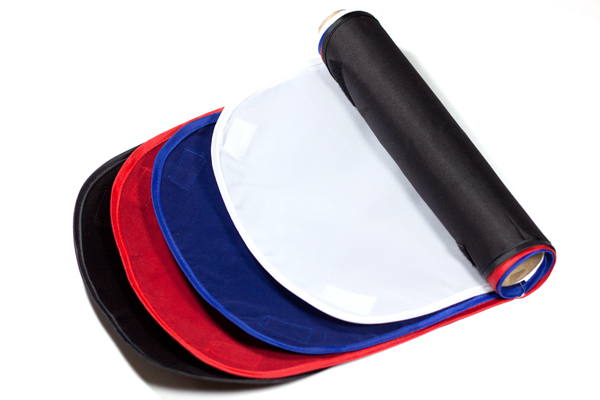
In this corner, we have the Square Perfect SP500 Platinum Photo Studio In A Box. This kit contains: two pop-up light tents (one 30 inch cube and one 12 inch cube – 12 inch shown below); two lights with adjustable stands; two 30W, 5400K daylight fluorescent bulbs; a tripod; a carrying case; and two sets of four colored fabric backdrops (white, black, red, and blue) sized for each light tent.
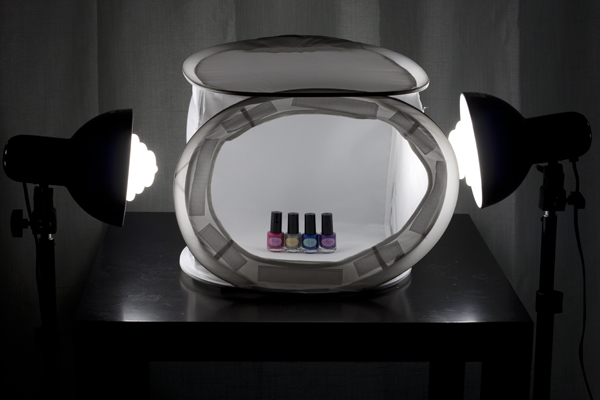
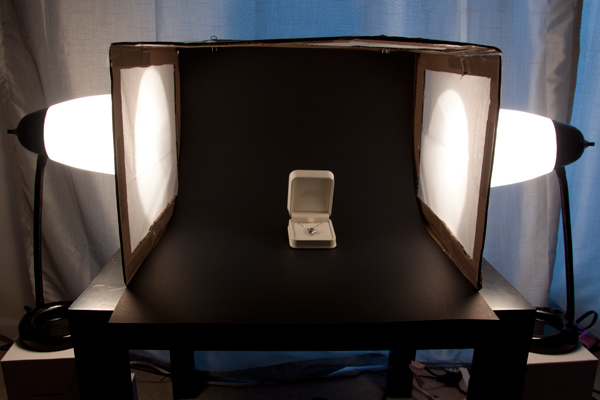
And in this corner, we have the DIY Light Tent, built using these specifications: Foldable DIY Photography Light Tent. This light tent will be lit by means of two adjustable desk lamps and 60W, 2900K halogen bulbs. The backdrops are made from standard poster board and cut to size. You can purchase daylight-rated light bulbs for your DIY kit as well, but you may need to order them online from a photography or home improvement site.
To make this an even test, we will be comparing the 12 inch kit cube against the 12 x 16 x 18 DIY tent. The first set of comparisons will feature each set as described above (the lights that come with each kit), while the second set will put the two up against each other using the same lighting set up for both kits.
Light tent comparison: using their own lights
For this first photo-face-off, each light tent will be evaluated using its own lights (daylight fluorescents for the light tent kit and halogen bulbs for the DIY light tent). A major consideration when shooting with a light tent is controlling or choosing the correct white balance to match the lights being used. You want your white backdrop to look white and not have any color tint from the lights used. Read more about that issue in: How to Use a Light Tent for Product-Style Photography.
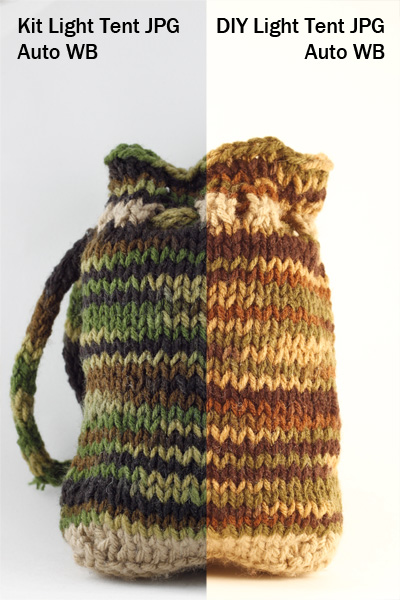
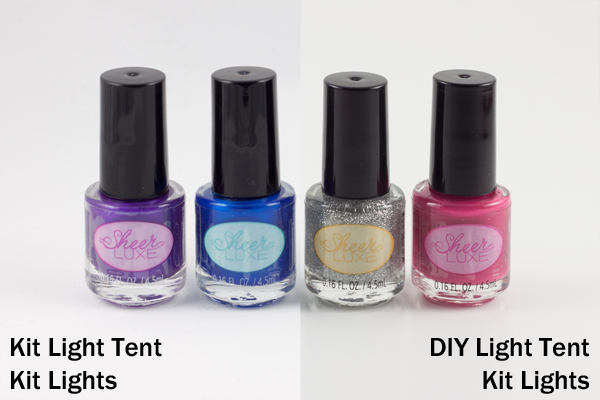
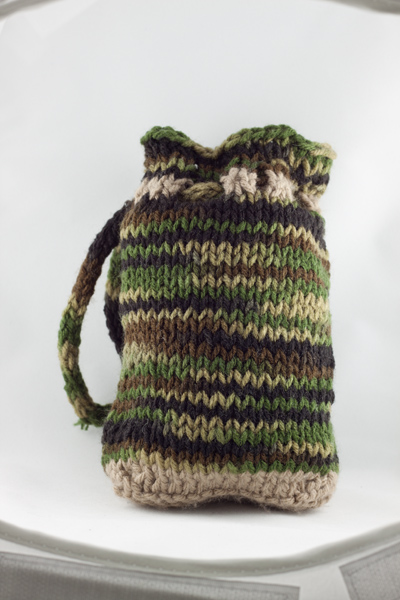
These shots show SOOC (Straight out of Camera) JPG files for the kit and DIY light tents using auto white balance.The kit’s light gives a cooler (more neutral) look to the background, and the colors of the knit bag are much truer to life, while the DIY lights impart a yellowish hue to the bag and the background. Setting your camera on “Tungsten” white balance for the DIY table lamps may give you a more neutral color, or you can also do a custom white balance using a gray card or even the white backdrop as a test shot. Consult your camera manual for how to perform a custom white balance with your camera.
This image is a little dark on purpose so you can see the color tint of the background more easily
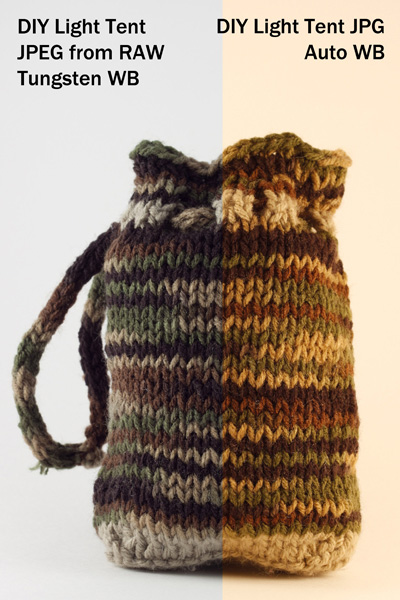
If you want perfectly clean whites and neutral blacks, then I would recommend shooting in RAW, which will give you greater flexibility regarding the white balance in post-processing. These images (left) show a comparison of the same image of the bag with a Tungsten white balance setting as compared to the Auto. The Tungsten white balance was selected in post-processing from the RAW image file, or it can also be selected as a white balance preset on the camera when shooting, especially if using JPG format.
Light intensity
As you can see by the image below the DIY lights are considerable less intense (not as bright), which will mean you will either need to use a much longer exposure (shutter speed) to get a correct exposure, or increase your ISO. If working on a tripod (recommended for this type of set up) exposure time shouldn’t be an issue though so just stay at ISO 100 and adjust accordingly.

Light tent comparison: using the same lights
A final test was done to see whether this difference in light was due to the different light bulbs being used or to a difference in the light tents themselves.
Left image shot at 1/25th – right image at 1/13th
These two shots were taken using the daylight lights from the light tent kit with both the kit tent and the DIY tent (again, in aperture priority, ISO 100, f/8). The kit light tent shot was taken at 1/25th of a second, and the DIY light tent shot was taken at 1/13th of a second, which is a full full stop difference. This means that even with the same lights, the DIY light tent blocked more light than the kit light tent and required longer shutter speeds to shoot the same exposure. The background also came out a little more gray than the kit light tent.
Light tent comparisons: practicalities
There are many other considerations to keep in mind when deciding which kind of light tent would be best for you. Think about how much room you have to devote to gear use and storage, as well as how much the benefits of a pricier kit outweigh the cost investment.
Use of ease
Notice edges of tent showing in places
The lighting stands that come with the light tent kit have greater range and reach than a typical desk lamp, but they cannot get down as low. This makes it difficult to use the kit lights for shooting with the 12-inch cube sitting on a table top, as the lights are too tall to sit beside it on the table and too short to reach up from the floor. A coffee table seems to be the ideal height. For the desk lamps, they work well when sitting on a table next to the light tent, but they will need to be placed on a stack of boxes or books if shooting from something like a coffee table (as shown earlier).
The 12-inch cube also has a lip around the edge, making the functional shooting space a bit smaller, as you want to avoid the edge appearing in your frame. This is far less of a problem with the 30-inch cube. One workaround is putting a book underneath the backdrop to raise the bottom up. The benefit here of the DIY box is that you can make it the size you want for the subject you have, and there is no lip to shoot around, so you can shoot straight-on at your subject.
Backdrops
Backdrops require careful handling and attention, and the poster board DIY versions are much easier to replace than the fabric ones from the kit. If you are going to be shooting something potentially messy or greasy, consider using a poster board backdrop regardless of which light tent you use.
Care for your fabric backdrops by ironing out the wrinkles before hanging. If you roll them up on a cardboard tube when you are finished shooting, you should be able to reuse them again without having to iron every time. Keep a lint roller or clear tape on hand to deal with any dust or lint, and save yourself the time of editing it all out in post-processing.
Portability
The light tent kit has the edge in portability, as it comes with its own carrying case. The case is not particularly sturdy or padded, however, so you would not want to travel with it other than carefully placing it in your car (without stacking anything on top of it).
Storage
The DIY light tent folds down flat for easy storage, and you can simply put your two desks lamps back where you borrowed them from, until the next time you are shooting. The light tent kit takes up significantly more space, and the process of folding the light tents back down into themselves is a little complicated and requires some practice, though there are plenty of “how to” videos online. There is also the risk of deformation if you leave the tents stored too long in their folded down state.
Cost
The DIY light tent is the clear winner in the cost department, particularly if you already own a desk lamp or two, which are the priciest elements. The cardboard box and tissue paper should not set you back more than about five dollars. The light tent kit is currently listed at $ 143, a very discounted price on Amazon, which makes it reasonable to consider as an investment.
Final verdict: which light tent to choose?
There are a lot of different variables to consider when making the final choice about whether a DIY light tent will serve your needs or whether you should invest in a light tent kit. If you are looking at exploring what a light tent can do and whether it would be useful, then definitely build your own to experiment with. Keep the white balance in mind and shoot in RAW. But if you are shooting JPG, remember to adjust the white balance setting when shooting by using a preset or doing a custom white balance.
If you know that you will be consistently shooting a lot of this style of shots, perhaps for selling jewelry or crafts online or for displaying directions for your own DIY projects on a blog, then you should consider investing in a light tent kit. The time savings of having bulbs that match your white balance is considerable if you are doing a lot of light tent photography. You will also have significant flexibility with a kit that offers different sizes of light tents and a better range of motion and height for the lights and light stands.
Do you shoot with a light tent? Do you prefer a light tent kit or a DIY version? Share your thoughts in the comments below.
The post Light Tent Comparison – DIY Versus Kit Tents by Katie McEnaney appeared first on Digital Photography School.

Digital Photography School


You must be logged in to post a comment.