RSS
 

Posts Tagged ‘temperature’

Using Color Temperature in Black and White Conversions

26 Mar

The post Using Color Temperature in Black and White Conversions appeared first on Digital Photography School. It was authored by Adam Welch.

Digital photography has opened up enormous possibilities for black and white photography. The ability to first shoot in color and then convert the image to black and white offers photographers a way to express themselves in ways that reach beyond the influence of color. Well, for the most part.

You see, advanced black and white conversions take advantage of the different luminance values present in our RAW files so that we can individually manipulate those values after we have converted the color image to black and white. Usually, this is done via the HSL (BW) Panel in Lightroom or other processing software.

color-temperature-black-and-white-digital-photography-school-adam-welch

But there is one ingredient of the black and white pie that gets constantly overlooked during the average photographers (let’s pretend) black and white conversion process; color temperature. I know, the operative word here is COLOR and black and white photos…you know…don’t really have a lot of color.

In this article, we’re going to take a cruise aimed at getting a little closer to understanding how much of a role color temperature plays in our digital black and white conversions. We’ll look at how we can leverage this constantly neglected aspect of digital black and white photography so that we have many more opportunities to make even more impressive monochromatic images.

I also intend to make at least one black and white related pun before the end.

Let’s get started!

A quick refresher on color temperature

When we talk about color temperature, we are referring to the hue-based Kelvin scale (there’s a temperature-based one too) which measures the hue of color and thus relates to white balance; which is the theoretical absence of color cast within an image. More blue or “cool” colors have a higher Kelvin number, and more red or “warmer” colors have a lower Kelvin number.

“Adam…but wait! Most image processing software shows lower Kelvin color temperatures as blue and warmer colors as red!”

Yes, you are precisely correct. You paid excellent attention in science class!

color-temperature-black-and-white-digital-photography-school-adam-welch

In short, the color temperature sliders in most photo editors are in fact reversed from the true Kelvin scale. From what I’ve gathered, this inversion is due to the approach that white balance adjustments in digital photography are based on “compensation” rather than direct cooling or warming of colors. This means that if a photo is “cool” out of the camera, we will tell the software to “warm it up” by increasing the Kelvin value to bring the white balance closer to the original scene. Thereby, making the photo perceptibly warmer.

Yeah, it’s confusing.

Luckily, we don’t have to worry about any of that.

For our purposes, we are just concerned with how the cool or warm the colors are within the image regardless of actual numeric Kelvin temperature.

Thank goodness for that.

How color temperature affects black and white photos

The remainder of this article assumes that you are shooting in RAW format or at the very least in color JPEG.

We need the color information from the image file to exploit the impact of color temperature on luminance values after the black and white conversion. This means it is imperative that you do not shoot in a dedicated monochromatic mode.

Got it? Good.

Now that we’ve got that out of the way it’s time to experiment.

Let’s first convert an image to black and white in Lightroom Classic CC and see what happens when we begin to adjust the color temperature. I just happen to have a photo ready to go right here. It is a RAW file with a relatively well-balanced color temperature that I converted to black and white.

color-temperature-black-and-white-digital-photography-school-adam-welch

Color temperature slider set to 5050K in Lightroom

First, let’s slide the color temperature slider entirely to the left and “cool” the image.

color-temperature-black-and-white-digital-photography-school-adam-welch

Color temperature slider at 2000K in Lightroom

Next, we’ll move the color temperature slider all the way to the right to “warm” the image.

color-temperature-black-and-white-digital-photography-school-adam-welch

Color temperature slider set to 50000K in Lightroom

From this, we can see that there are some readily apparent changes in contrast based solely on the adjustments in color temperature.

So, what exactly is happening here?

Let me show you.

Have a look at the original histogram with conventional white balance:

color-temperature-black-and-white-digital-photography-school-adam-welch-1-2

HIstogram with normal white balance

Now with a much cooler color temperature…

color-temperature-black-and-white-digital-photography-school-adam-welch-1-2

Histogram at 2000K

And lastly, with warmer color temperature.

color-temperature-black-and-white-digital-photography-school-adam-welch-1-2

Histogram at 50000K

When we cool down the image we are causing the colors to become more blue, purple and magenta in hue; hence the shift in the histogram and resulting contrast change. The same is true for the warmer color temperature where the photo becomes more red, orange and yellow.

What we are doing is setting a bias towards certain colors which in turn augments their luminosity when converted to black and white. The benefit here is that these drastic changes in color temperature allow us to make some impressive adjustments to the luminance values beyond what might usually be possible once you have converted it to black and white.

Practical applications

Advanced digital black and white conversions rely heavily on specific adjustments in luminance values based on color information contained within the image file. If we increase the amount of a particular color within an image, we then have more latitude in manipulating the brightness values of that color in relation to the other colors within the photo.

Here are three separate versions of the Golden Gate Bridge photo from earlier. The first photo was processed using the HSL/BW Panel to brighten the bridge and darken the sky.

color-temperature-black-and-white-digital-photography-school-adam-welch-2

Next, I went to work on the 2000K version from earlier. Seeing as the blue tones had skyrocketed, I was able to achieve some interesting results.

color-temperature-black-and-white-digital-photography-school-adam-welch-2

Last but not least is the warm-toned version which clocked in at 50000K. Which if you recall, would make the photo cooler instead of warmer if we were operating in the world. However, we’re not. This is photography.

color-temperature-black-and-white-digital-photography-school-adam-welch-2

These extreme swings in color temperature are useful almost exclusively in the domain of black and white digital photography. Outside of that, the only result will be gruesomely unappealing white balance.

color-temperature-black-and-white-digital-photography-school-adam-welch-2

I mean really unappealing (caption)

color-temperature-black-and-white-digital-photography-school-adam-welch-2

Just look at it…terrible.

Ok, I’ll admit that maybe I low-key like that last one.

Final thoughts on color temperature and black and white photos

We can get caught up with the idea that there are certain “rules” which must always be adhered to when we process our photos.

Nothing could be further from the truth.

While it’s true that color temperature plays an important role in rendering colors within your image accurately, we must remember that we are still allowed to paint outside the lines whenever we choose. Perhaps the benefit of this free-thinking mentality is no more apparent than when it comes to working with our black and white photos.

Making drastic changes to the white balance of your black and white images is not only allowed, but it can make for some exciting outcomes and boost your creative thinking.

Even though your mind may not immediately jump to color when you think of black and white photography, the fact remains that even though we may not see color within a photo, the inherent color information remains (as long as you shoot RAW) and that information is still wholly adjustable, including white balance. The role color temperature plays in processing your photographs is never black and white. See, I told you I would work that pun in there somewhere.

Experimenting with some interesting black and white conversions using color temperature? As always, we’d love to see what you’ve been up to, so feel free to post your photos in the comments below!

The post Using Color Temperature in Black and White Conversions appeared first on Digital Photography School. It was authored by Adam Welch.
Digital Photography School

 
Comments Off on Using Color Temperature in Black and White Conversions

Posted in Photography


Lumu Power meters light, flash and color temperature

02 Dec

The team behind the Lumu smartphone light meter has launched a Kickstarter campaign to fund the production of Lumu Power, their next generation device. In addition to ambient light levels, the Lumu Power is also capable of measuring flash exposure and color temperature. Read more

Articles: Digital Photography Review (dpreview.com)

 
Comments Off on Lumu Power meters light, flash and color temperature

Posted in Uncategorized


Climactic Table: Zero-Energy Furniture Regulates Temperature

22 Jun

[ By WebUrbanist in Design & Furniture & Decor. ]

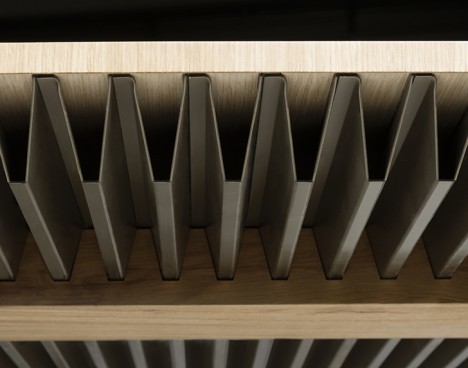
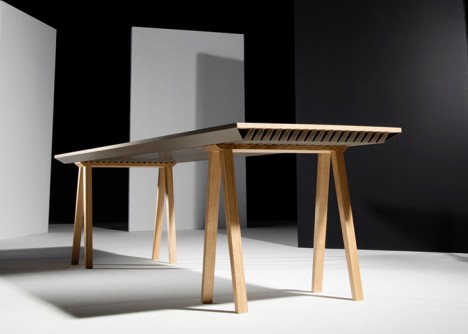
phase change material furniture

Able to reduce cooling costs by up to 30% and heading expenses by as much as 60%, this series of temperature-regulating furnishings stores thermal energy without requiring an external power source, helping maintain room temperatures both during the day and at night.

temperature controlling furniture

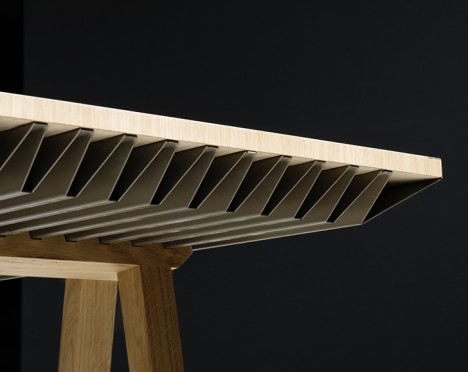
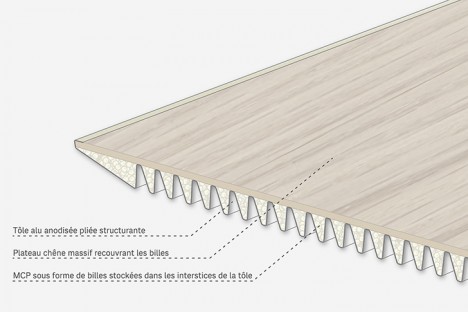
Designed by Raphaël Ménard and Jean-Sébastien Lagrange, designs in this series such as the Climactic Table are composed of a combination of solid oak and corrugated aluminum with phase-change materials (PCM) sandwiched in between.

temperature furniture structural design

The wood contributes to desired thermal properties while the shaped aluminum provides structural support and conductivity. As a passive heating and cooling strategy, these objects can augment existing systems or replace them entirely in moderate climates.

temperature regulating wood aluminum

A familiar phenomena in the realm of architecture, the idea of using materials to store and discharge heat or cold naturally is an old one. Stone, concrete or brick, for instance, are often placed to pick up warmth during the day then mitigate the temperature change at night, releasing that stored heat energy. While there is no specific control mechanism in play, such systems naturally create a level of equilibrium that reduces the next for external active (HVAC) systems.

Share on Facebook


[ By WebUrbanist in Design & Furniture & Decor. ]

[ WebUrbanist | Archives | Galleries | Privacy | TOS ]


WebUrbanist

 
Comments Off on Climactic Table: Zero-Energy Furniture Regulates Temperature

Posted in Creativity


The Inverse Square Law & Color Temperature

08 Jul

Image by Alana Tyler Slutsky from her Surrealia series as featured on Fashion Photography Blog (FashionPhotographyBlog.com)

LIGHT: THE INVERSE SQUARE LAW & COLOR TEMPERATURE


Hey FashionPhotographyBlog.com readers,

Welcome back and hang tight! Last time we are talked about the science behind lighting.

Today’s topic gets a little confusing.

The “Inverse Square Law” shapes EVERYTHING in photography.

What does that even mean?! When opening up a stop, the light doubles. When closing down a stop, the light halves. This is applicable to light as well as all aspects of your camera: aperture, shutter, ISO.

*DISCLAIMER* Before we get into this:

LEARN YOUR APERTURE AND SHUTTER VALUES! It’s the only way any of this will make sense.

Aperture and Shutter Values Chart as featured on Fashion Photography Blog (FashionPhotographyBlog.com)

As far as light goes, if you move a light x2 as close, it appears x4 larger. If a light is moved x2 away, it appears 1/4 of the original size. Surface Area = Distance ²

As far as the Inverse Square Law goes according to your camera (All numbers here are purely for example purposes)… If you have an aperture of f/11 and open up to f/8, the amount of light coming into your camera will double (same can be said of you change from ISO of 400 to 800 or a shutter speed of 1/60 to 1/30). If you have an aperture of f/11 and stop down to f/16 the amount of light coming into your camera will be cut in half (same can be said of you change from ISO of 400 to 200 or a shutter speed of 1/60 to 1/125.)

Real life example:

A light at 5′ with a meter reading of f/8 gives 100% (correct exposure)

A light at 10′ with a meter reading of f/4 gives 25% (2 stop difference. Your image is now underexposed.)

Basically… As you move away, the cone of light gets wider but weaker. Using the outer cone of light for weaker light output is called feathering and gives you a more diffused light.

Light Intensity to Light Source Chart as featured on Fashion Photography Blog (FashionPhotographyBlog.com)

Color Temperature

All lights have a different and specific color temperature, which is measured in Kelvins. The lower the number, the warmer the color is, the higher the number, the cooler the color the light gives off.

Color Temperature Chart as featured on Fashion Photography Blog (FashionPhotographyBlog.com)

Be certain to set your own white balance based on the type of light you’re shooting in. White balance in camera makes up for changes in color based on the type of light you’re shooting with. Color shifts will occur when color temperature is not balanced correctly. If you don’t know what type of light you’re in, you can always use Auto White Balance (AWB)- when using AWB the camera figures out (approximately) what the color temperature is of the light source you’re shooting in and shifts colors in camera accordingly.

White Balance examples as featured on Fashion Photography Blog (FashionPhotographyBlog.com)

The most common types of light used in photography are continuous lights and flash.

Continuous lighting, such as hot lights, are.. You guessed it… A continuous form of light.  This type of light, with incandescent bulbs, are tungsten balanced.  There are special bulbs and special lights referred to as “HMI’s.” These lights have bulbs which are balanced to day-light. HMI’s are commonly used in the film industry.

Flashes (Strobes) are short bursts of light and are balanced to daylight. Types of flash include but are not limited to speed lights, mono-lights (single flash units), pack lights (generator and flash head units), ring lights, etc.

Now that you have dealt with all of the boring stuff, check in tomorrow to see how everything from the past two days applies to real life and shooting.

See you tomorrow –

Alana


IMAGE SOURCE:

Feature image & image 1: photography by Alana Tyler Slutsky from her Surrealia series. To view the rest of the photos from this series visit her website.

Image 2, 3, 4 & 5: Alana Tyler Slutsky


Fashion Photography Blog

 
Comments Off on The Inverse Square Law & Color Temperature

Posted in Uncategorized


Lightroom 4: White balance & color temperature | lynda.com tutorial

18 Oct

This Photoshop Lightroom tutorial discusses changing and working with the color temperature and white balance of photos. Watch more at www.lynda.com This specific tutorial is just a single movie from chapter three of the Photoshop Lightroom 4 Essentials: Enhancing Photos with the Develop Module course presented by lynda.com author Chris Orwig. The complete Photoshop Lightroom 4 course has a total duration of 5 hours and 32 minutes, and guides photographers through the process of improving images with creative color, sharpening, and other effects in the Lightroom Develop module. Photoshop Lightroom 4 Essentials: Enhancing Photos with the Develop Module table of contents: Introduction 1. Getting Started with the Develop Module 2. Develop Module Workflow Tips 3. Working with Color Temperature and White Balance 4. Masking Basic Tonal Adjustments 5. Improving Vibrance, Saturation, and Clarity 6. Basic Panel Workflow Reflections 7. Cropping and Composing 8. Retouching Tools 9. Using the Graduated Filter 10. Making Localized Adjustments 11. Modifying the Tone Curve 12. Changing HSL and Color 13. Converting to Black and White 14. Creative Color with Split Toning 15. Noise Reduction and Sharpening 16. Making Lens Corrections 17. Adding Vignette and Grain Effects 18. Using the Camera Calibration Controls Conclusion
Video Rating: 5 / 5

 
Comments Off on Lightroom 4: White balance & color temperature | lynda.com tutorial

Posted in Retouching in Photoshop