RSS
 

Posts Tagged ‘Taken’

Apple has turned ‘bokeh’ into a verb (and taken a stance on how it’s pronounced)

20 Feb

According to Merriam-Webster, bokeh is a noun that means ‘the blurred quality or effect seen in the out-of-focus portion of a photograph taken with a narrow depth of field.’ Apple, however, has different plans.

In a recent video advertisement, Apple has turned the word bokeh into a verb, ‘bokeh’d.’ Not only has Apple turned bokeh into a verb, it’s also taken a stance on how the Japanese term is pronounced, a widely debated topic. Based on the video, Apple’s pronunciation of choice is ‘bok-uh,’ a departure from the Japanese pronunciation which sounds more along the lines of ‘bow-kayh.’

The advert itself is humorous regardless of your pronunciation preference and, for better or worse, Apple’s ‘verbing’ of the word bokeh may very well become a universally accepted.

Articles: Digital Photography Review (dpreview.com)

 
Comments Off on Apple has turned ‘bokeh’ into a verb (and taken a stance on how it’s pronounced)

Posted in Uncategorized


Why we haven’t taken a stance on in-body stabilization vs OIS – and why that has changed

20 Dec

DPReview has never taken sides in the row over whether image stabilization should be provided in-body or in the lens. But we’ll now list the absence of in-body stabilization as a Con in our camera reviews. We’ll explain what’s happened to change our stance.

For at least the last decade, our internal policy has been to have no preference between in-body and in-lens stabilization. It’s an approach that was sometimes seen as fence-sitting but was driven by two logical precepts:

Our primary reasoning was based on our guiding principal that it makes more sense to concentrate on the photographic impact, rather than which technology was used. For many years, a majority of users bought DSLRs that came with a stabilized lens and had essentially the same experience as those users who bought a camera body with stabilization. The in-body advocates talked a good game about ‘every lens being stabilized’ but we didn’t hear reports from thousands of distraught DSLR buyers wondering why their shots were blurry.

There are genuine advantages and disadvantages to both approaches

Secondly, there are genuine advantages and disadvantages to both approaches. As a broad generalization, in-body stabilization does a better job of correcting the translational movements that affect close-up and wide-angle photography, while in-lens designs cope better with the large pitch and yaw corrections needed with long focal lengths. So why would we give credit for one and ignore the benefits of the other?

The result was close enough to a wash that we felt it was inappropriate to have a preference.

So what’s changed?

That’s now changed, again for two main reasons. The first is prevalence: for our review Pros and Cons, we tend to recognize a new feature as a Pro if it’s rare or exceptional but then acknowledge its absence as a shortcoming, once it’s become a common (and hence expected) feature. So, for example, we started off seeing USB charging as a ‘Pro’ (with an associated ‘Con’ if it was used as an excuse to leave an external charger out of the box), when it first appeared. But, now that it’s become commonplace, it’s the absence of USB charging that would be seen as a negative.

Now that Ricoh, Olympus, Panasonic, Sony, Fujifilm and Nikon all offer in-body IS on at least some of their interchangeable lens cameras, its omission starts to look like a factor we should highlight to would-be buyers.

The second factor is the growth in importance of video. There may have been little difference in performance between in-lens and in-body stabilization when it came to stills, but the same can’t be said for video. Watch TV or movies and you’ll see all sorts of camera movements, but what you won’t tend to see is roll: left-and-right rotations that cause the horizon to tilt. In-lens stabilization can correct for pitch and yaw but it can’t correct for roll: which gives in-body stabilization an immediate advantage.

There may have been little difference in performance between in-lens and in-body stabilization when it came to stills, but the same can’t be said for video

We’ll still test each camera to see how well its IS works: our approach of assessing effect, rather than technology means we’ll check whether digital stabilization in concert with in-lens stabilization provides a good degree of correction. But don’t be surprised if you see Cons highlighting the lack of in-body stabilization in our future reviews.

Articles: Digital Photography Review (dpreview.com)

 
Comments Off on Why we haven’t taken a stance on in-body stabilization vs OIS – and why that has changed

Posted in Uncategorized


Lens Rentals calls the Z7 the ‘best built mirrorless full-frame camera we’ve taken apart’

31 Oct

In case you were wondering what’s packed inside the Nikon Z7 and how well constructed it is, Lens Rentals has kindly cracked one open so you don’t have to, as promised in its EOS R teardown.

The camera equipment rental and repair business, famous for its camera teardowns, has documented the process of taking the Z7 apart, showing pictures of the weather sealing, electronic design, internal structure, and component layout of Nikon’s flagship full-frame mirrorless camera.

Roger Cicala, the man behind the teardown and founder of Lens Rentals, praises the extensive weathersealing protection from ingress of dust and moisture in the camera’s construction, and says the joints in the body are overlapped, screwed together and then covered by adhesive and rubber. He’s also impressed with the neatness of the electronics and the way the boards are packed into the body without leaving much space between them, especially with the in-body image stabilization.

“[The IBIS] noticeably more compact, has less travel than the Sony system, and seems more robust,” says Cicala. “From our focus on repair, we see this as a good thing – early Sony IBIS systems would sometimes move enough to jam and/or break. (To be clear, that’s not an issue with newer Sony cameras. I point this out just to show that the manufacturers have been watching each other.)”

Cicala’s only concerns seem to be that the diopter adjustment knob might not stand being pulled out and pushed in multiple times in rental models, and that the tripod screw isn’t as deep as some, so runs the slight risk of a long thread busting through it.

In conclusion Cicala says “I’m impressed by the very solid construction of the chassis and IBIS unit. I’m impressed with the neat, modern engineering of the electrical connections […] I’m not here to tell you which camera is best to use or has the best performance. I’m just here to say this is a damn well-built camera, the best built mirrorless full-frame camera we’ve taken apart.”

Go to the full teardown on Lens Rental’s website to see more photos and a more thorough take with all his comments. And remember, don’t try this at home!

Articles: Digital Photography Review (dpreview.com)

 
Comments Off on Lens Rentals calls the Z7 the ‘best built mirrorless full-frame camera we’ve taken apart’

Posted in Uncategorized


The Isolite intelligent modifier system lets you change a photo’s lighting after it’s taken

01 Dec

An intriguing new lighting system called Isolite just launched on Kickstarter. The system of hardware accessories for strobes and speedlights comprises what parent company Phototechnica calls the “first ever intelligent light modifier.” What does that actually mean? Basically, with Isolite, photographers are able to modify the lighting in an image after taking it.

Phototechnica stresses that this process involves turning on and off actual lighting in the image, not simply lightening /darkening it or adjusting contrast—this is the real deal, not a post-processing trick.

The Isolite system doesn’t require a 3D render or special camera to enable light changes during post-processing. Raw images are converted by the Isolite converter, which enables users to adjust the image’s lighting before outputting it as a raw DNG file. That final DNG file can then be edited with compatible software like Capture One and Lightroom.

Phototechnica lists the following capabilities on its Kickstarter campaign:

  • Turn real lights on and off after the capture has been made.
  • Push, Pull, Paint light after the capture has been made.
  • Hard and soft light in one capture.
  • Adjust the exposure and ratio of each light source after the capture has been made.
  • With selective masking of each light source, difficult or impossible lighting control can be done with ease.
  • Light can be animated after capture turning still image captures into full motion video.
  • Using our proprietary tools, online images can be brought to life with light.

Here’s a video intro the further explains what the Isolite system is and how it works:

As far as hardware is concerned, the Isolite system features the Duolite and Beauty Dish Kit. The gear is designed to work with popular Speedlight sizes, most legacy Speedlights, the newest Profoto and Tri/Bowens Mount Strobes, plus there are adapters for using it with Elinchrom products.

Phototechnica is offering the Isolite Dualite through Kickstarter for pledges of at least $ 195 CAD (~$ 150 USD), a Dualite Speedlight Kit for $ 250 CAD (~$ 195 USD), Isolite Studio for $ 500 CAD (~$ 390 USD), and the Isolite Deluxe Studio for $ 1500 CAD (~$ 1,165 USD). The campaign is also offering early bird versions to backers who make pledges starting at $ 95 CAD (~$ 75 USD).

For now the campaign has a long way to go before its funding goal is met, and only 15 days to get there, so we’re not holding our breath on this one. But if the campaign is successful, shipments to some backers are estimated to start in May 2018.

To find out more or put down your own pledge, head over to the Kickstarter campaign.

Articles: Digital Photography Review (dpreview.com)

 
Comments Off on The Isolite intelligent modifier system lets you change a photo’s lighting after it’s taken

Posted in Uncategorized


Studio portraits taken with the Godox A1 smartphone flash trigger

08 Aug
Photo: Godox

When Godox first teased its off-camera flash and 2.4GHz flash trigger for smartphones, the Godox A1, on Facebook a few weeks ago, people got very excited. Unfortunately, we weren’t really able to see what this trigger could do since the only images Godox released of the flash trigger in action were some silly behind the scenes toy photos.

Today, they fixed that.

In a new blog post about the release event for the upcoming flash and trigger, Godox didn’t just rehash the same details about the A1 that we already knew, they also showed off some professionally-shot studio portraits captured with an iPhone 7 Plus, the Godox A1 and a Godox 600II monolight. You can see a photo of the setup above.

All of the photos were shot wide open at f/1.8 (no other option really…) with the ISO set to 25 and the shutter speed at either 1/30 or 1/20 sec. Have a look for yourself:

$ (document).ready(function() { SampleGalleryV2({“containerId”:”embeddedSampleGallery_5198490931″,”galleryId”:”5198490931″,”isEmbeddedWidget”:true,”standalone”:false,”selectedImageIndex”:0,”startInCommentsView”:false,”isMobile”:false}) });

The post is mostly about the big reveal itself, which will happen at an event on August 12th at 1:30pm Shenzhen time (1:30am Eastern). But the sample portraits give you a good idea of the kind of photography a product like the A1 opens up to smartphone photographers.

Still no word on how much the Godox A1 will cost or when you’ll be able to order one for yourself, but we’ll get that info to you just as soon as it becomes available. In the meantime, take a look at the sample gallery above, and let us know what you think of the A1 and these smartphone studio portraits.


All photos courtesy of Godox.

Articles: Digital Photography Review (dpreview.com)

 
Comments Off on Studio portraits taken with the Godox A1 smartphone flash trigger

Posted in Uncategorized


This is the first photo of a total solar eclipse ever taken, shot in 1851

01 Aug
The first successfully captured photograph of a total solar eclipse, this daguerreotype was shot on July 28, 1851, by Prussian photographer Johann Julius Friedrich Berkowski.

Here’s a little history lesson to help you pass the time between now and the next total solar eclipse on August 21st. The photograph above, a daguerreotype captured almost exactly 166 years ago, is the first successfully-captured photograph of a total solar eclipse.

The photo was captured by master daguerreotypist Johann Julius Friedrich Berkowski, a Prussian photographer who was commissioned by the Royal Prussian Observatory at Königsberg to do what nobody else had managed up until that point: capture an appropriately-exposed photograph of a total solar eclipse.

Up until that point, every photograph taken had been over or under-exposed, and/or didn’t capture sufficient contrast between the bright corona and the obscuring disk of the moon.

According to a paper in the journal Acta Historica Astronomiae, the photograph was captured using a small refracting telescope attached to the hour drive of the 15.8-cm Fraunhofer heliometer. Berkowski began exposing the image shortly after totality, and the final daguerreotype took 84-seconds to capture.

To learn more about this photograph, click here. And if you want to learn how to capture the August 21st eclipse for yourself (and why you should maybe put the camera down for this one…) check out our own eclipse how-to.

How to photograph the August eclipse, and why you probably shouldn’t try.

Articles: Digital Photography Review (dpreview.com)

 
Comments Off on This is the first photo of a total solar eclipse ever taken, shot in 1851

Posted in Uncategorized


THE HAUS Berlin: Abandoned Building Taken Over By 165 Street Artists

25 Apr

[ By SA Rogers in Art & Street Art & Graffiti. ]

Set to be demolished in June to make way for an apartment building,THE HAUS in Berlin is a formerly abandoned 5-story building filled with site-specific works by 165 street artists. Dreamed up by artists Kimo, Bolle and Jörni of Die Dixons collective, THE HAUS was once a bank on avenue Kurfürstendamm, but fell into disuse over the years. The artists activated their network of creative contacts to temporarily turn it into a street art free-for-all that’s so popular with visitors, there’s often a two-hour wait outside.

The artists, who range from Berlin locals to international activists, worked almost nonstop from mid-January through March 9th to complete the project, and installations include geometric patterns made of tape, video projections, interactive exhibits and sculpture.

The exhibit opened April 1st, and guided tours run almost all day long on Tuesdays through Sundays with a donation-based, pay-what-you-can system and a ‘no phones’ rule. “Look through your eyes and not through the screen of your phone,” the website urges. You can see each individual installation on THE HAUS website, and learn more about the artists who created them.

Even beyond the art itself, the project is definitely a community effort. Nearly all of the supplies were donated by supportive businesses, and a four-star hotel even put up all the artists free of charge. Berliner Pilsner donated beer. In an interview with Vice’s The Creators Project, Kimo stresses that THE HAUS is “not a marketing joke,” noting that nothing was for sale.

“Feel the freshest urban art gallery ever with a guided tour!” says the site. “108 dope artworks are waiting to be seen, to be experienced and to be memorized by you. Every single piece is created by one of the 165 artists from Berlin and all over the world. But be aware that THE HAUS is created to be destroyed – in the end of May the gallery is going to close and the wrecking ball will follow.”

Share on Facebook


[ By SA Rogers in Art & Street Art & Graffiti. ]

[ WebUrbanist | Archives | Galleries | Privacy | TOS ]


WebUrbanist

 
Comments Off on THE HAUS Berlin: Abandoned Building Taken Over By 165 Street Artists

Posted in Creativity


Sci-Fi to Reality: Giant Manned Robot Method-2 Has Taken Its First Steps

03 Jan

[ By SA Rogers in Conceptual & Futuristic & Technology. ]

method-2-manned-robot-main

Looking and working remarkably like the robots in the 2009 movie Avatar, the 1.5-ton, 13-foot-tall ’METHOD-2’ by South Korean firm Hankook Mirae Technology has officially taken its first steps. Engineers and reporters watched the robot navigate the company’s facility on its massive mechanical legs, traversing about ten feet before reversing. It appears to be remote-controlled for this exercise, while previous videos have shown how it functions with a human ‘pilot’ sitting inside.

The idea is that METHOD-2 will be able to help people reach the kinds of hazardous destinations that are currently too unsafe to navigate, and it’s easy to imagine this thing walking down the street like a superhero after a disaster. It sounds like the company is currently working out the mechanics of the robot itself, and it’s unclear whether it’ll ultimately be able to climb over obstacles, negotiate uneven terrain or withstand harsh climates.

method-2-robot-gif

method-2-manned-robot-6

Its first planned expedition is into the space between North and South Korea known as the DMZ (demilitarized zone), the world’s most dangerous border, but it’s still got about a year of planning and tinkering to get it into shape. Right now, it requires a tether for power. Its arms weigh 300 pounds each and are controlled by the pilot’s own limb movements.

method-2-manned-robot-3

method-2-manned-robot-4

Unsurprisingly, the robot was designed by Vitaly Bulgarov, who previously worked on the Transformers films and helped design Boston Dynamics’ bipedal robots. Yang Jin-Ho, chairman of Hankook Mirae Technology, says the robot is still taking its ‘baby steps’ but ultimately aims to “bring to life what only seemed possible in movies and cartoons.”

method-2-manned-robot-5

method-2-manned-robot-7

METHOD-2 is already getting lots of interest from companies who want to purchase one, and the price tag is expected to run around $ 8.3 million. The final version is expected to be ready for potential buyers by the end of 2017.

Share on Facebook


[ By SA Rogers in Conceptual & Futuristic & Technology. ]

[ WebUrbanist | Archives | Galleries | Privacy | TOS ]


WebUrbanist

 
Comments Off on Sci-Fi to Reality: Giant Manned Robot Method-2 Has Taken Its First Steps

Posted in Creativity


7 Smart Lighting Setups for Portraits Taken at Home

30 Nov

Let’s get one thing clear – you’re not going to learn how to shoot perfect portraits overnight. There are many things you need to learn first. When it comes to portrait-shooting, no factor is more important than lighting. Even if you’re planning a home portrait session, you can still make the most from various lighting setups to achieve great results. Continue Reading

The post 7 Smart Lighting Setups for Portraits Taken at Home appeared first on Photodoto.


Photodoto

 
Comments Off on 7 Smart Lighting Setups for Portraits Taken at Home

Posted in Photography


3 Reasons to Have Your Own Portrait Taken

19 Nov

I teach a six-week class at Oklahoma State University called “Preparing Online Instructors” which is designed to give faculty who have never taught internet-based classes, a solid foundation upon which they can build a successful online course. The class is delivered mostly online, and structured much like any other: it has quizzes, homework assignments, and required online discussions. One of the goals for my class is to put college instructors in the role of a student, so they get to experience an online class firsthand. This gives them a better understanding of the needs and challenges that any normal college student might face when taking online classes.

In the most recent offering of this POI course one of the participants, who is a tenured professor with decades of teaching experience under his belt, remarked at how strange it was to once again have homework and quizzes. “I haven’t taken a class like this in almost 30 years,” he said to me at the end of our third week, “And I think I finally understand why my students have so much trouble meeting due dates.” As photographers it’s essential that we take the same approach from time to time: put down our cameras and experience what it’s like to be on the other side for a change.

have-your-photo-taken-family-leaves

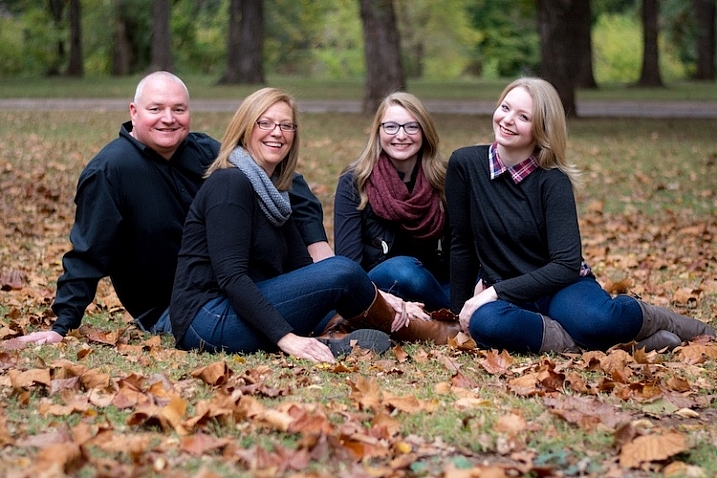
A few weeks ago my wife and I had a friend of ours take some photos of our family, and it was a nice opportunity to remove my photographer’s hat, and just go along for the ride as a person being photographed. We had a fantastic time, and along the way I realized a few things that have not only helped me, but I believe would benefit you and many other photographers as well.

#1 It helps you understand your clients’ perspective

Most of the time we photographers see things from our own side, and when we go to a photography session we look at things that are important to us; lighting, backgrounds, props, camera gear, and so on. When our clients show up, we’re often in full photographer mode telling people what to do, where to look, how to pose, and generally asking them to meet our needs. Switching things around and allowing yourself to be photographed helps you see all these things in an entirely different perspective—one that could make all the difference in your own work.

have-your-photo-taken-family-bench

Having photos taken with my own kids gave me a whole new appreciation for what this family must have gone through before I took their pictures.

When we went out to our recent family session I realized there was a whole lot going on behind the scenes before we even met up with our photographer, and even though I was aware of this intrinsically, I had never actually experienced it firsthand. My wife and I bought new shirts for ourselves and our two little boys, we all got haircuts, and there were all sorts of last-minute hassles from diaper changes to shoe switches. When we arrived on location with our photographer we were frazzled, our boys were anxious, and we desperately tried to keep all the clothes clean just long enough for some pictures that were bound for our Christmas card.

have-your-photo-taken-baby-blanket

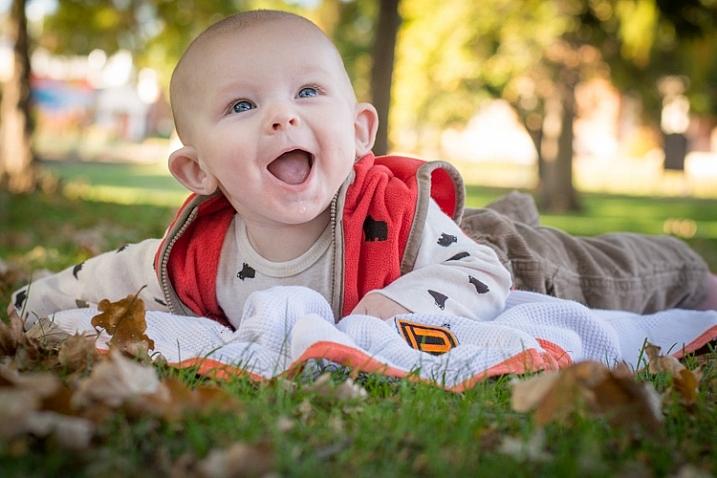
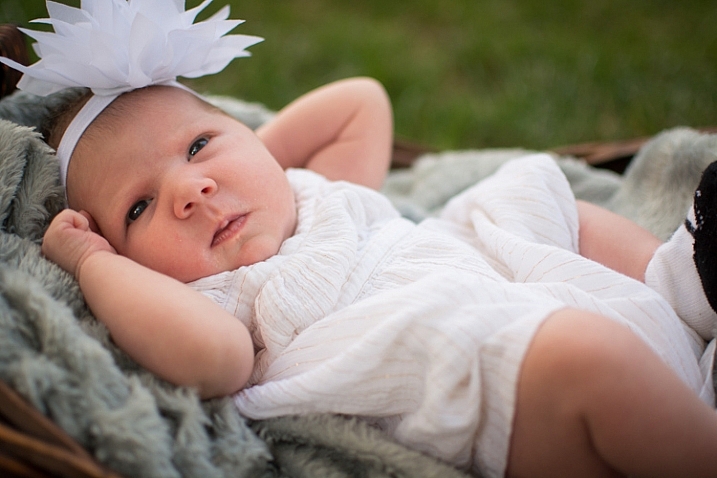
Knowing what it took to get my own kids prepared for a photo session, I can only imagine what this baby’s parents must have gone through to get him ready.

Normally when I take photos I don’t pause to consider everything my subjects may have gone through leading up to the shoot, and if people arrive late, or seem like they are not paying attention, I can get a little frustrated (though I try to never let it show). However, after putting myself in the role of a client, I have a new appreciation for just how hectic things can be, and have tried to loosen up much more ever since.

If someone seems distracted, maybe there’s a good reason. If parents seem exasperated with their kids, maybe they spent hours before the shoot trying to get everyone to put on their nice clothes, or even, if there are toddlers, put on any clothes at all. There’s a lot going on in the lives of our clients, and if we don’t take time to be in that role ourselves from time to time, it can cause us to lose touch with reality and get stuck with photography tunnel vision. Even though it might seem counterintuitive to suggest that one of the best ways to improve as a photographer is to stop taking pictures and let yourself be photographed, I certainly found this to be the case for me.

have-your-photo-taken-senior-hat

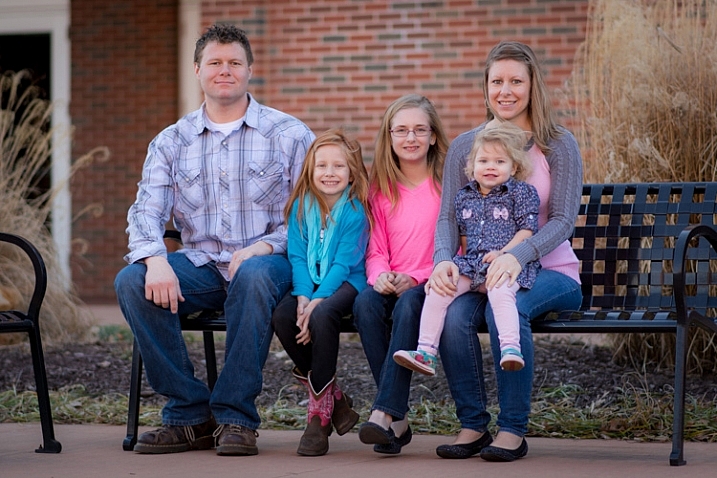
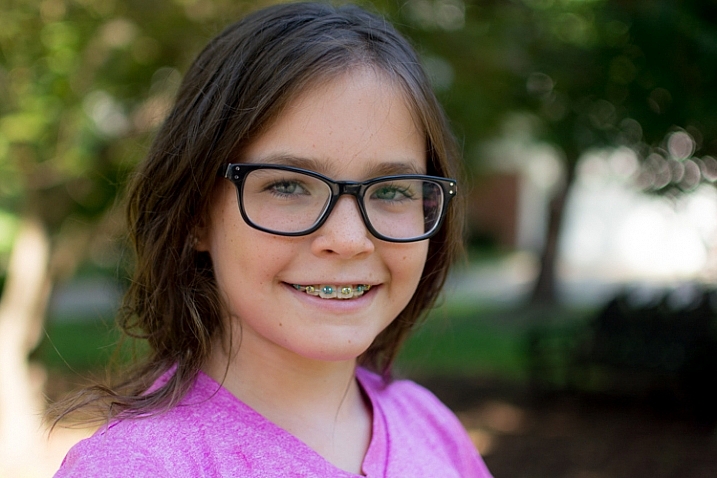
Watching a photographer take pictures of my four-year-old helped give me new ideas for taking photos of high school seniors.

It helps you understand other photographers’ perspective

When I’m doing a photo session I’m often thinking about technical details; where the light is coming from, whether I will need to manipulate light with reflectors or strobes, what exposure settings will produce the results I want, and so on. I, of course, make sure to smile and interact with my subjects too, and all this makes for a tricky combination. Having my own photos taken helped me understand all this much more than I ever have before, and has helped me see my own role as a photographer in a new way.

have-your-photo-taken-baby-basket

The woman who took our pictures was a consummate professional. She was friendly, she spent time with our kids, she suggested fun poses but gave us plenty of leeway to have our own input, and she even brought her own daughter to help get our kids to smile. I honestly don’t know how she did all this, because we spent much of the session coralling our boys who were more interested in getting their new jeans dirty, than having their pictures taken (although she did get plenty of fun candid shots when that happened).

Being on the other side of the lens helped me have a new understanding of what a good photographer needs to do in order for a session to go smoothly, and helped me see some glaring flaws in my own technique that need to be addressed. I learned from our session that I need to be more patient, while also being more confident. I appreciated when our photographer told us where to go, what to do, how to pose, and do other sorts of things that I sometimes have trouble saying. I wanted our photographer to take charge, and that’s precisely what she did. She walked a good line between friendly and firm, while also paying attention to the setting and the the technical aspects of her camera gear.

It’s one thing to experience this from your own perspective, but letting your guard down and allowing yourself to be photographed can help you not just appreciate the role of photographer but find ways to improve your own skills.

have-your-photo-taken-fourth-grader

It gives you new ideas for photographs

Like any good photographer I like to study the work of others, from portrait artists like DaVinci and Rembrandt, to the landscapes of Ansel Adams and modern masters like Steve McCurry. Learning from other practitioners is one of the best ways you can grow. Even just browsing through Instagram or Flickr often helps inspire me, and give me new ideas for my own photography. But nothing was quite like getting our own pictures taken by a professional photographer.

We had our photo session at a park on the south side of town that is one of my favorite places to shoot. I know what I like in terms of setting, lighting, and background, and while I am quite pleased with the images I bring back from my own shoots I was surprised at what our photographer was able to get from the exact same location. She had vastly different ideas for our pictures than I would have ever come up with on my own, and seeing her go through the mental and physical process of creating our pictures gave me all sorts of new ideas for my own photography.

I often get inspiration from other pictures, and enjoy watching tutorials online where people discuss how they got certain shots, but being part of the creative process as the subject instead of the photographer put all this in a whole new light. I came back from our session full of new ideas to try the next time I go there, or anywhere else, to take photos.

have-your-photo-taken-high-school

It’s kind of ironic that one of the best ways to improve as a photographer is to put down your camera and let someone else do all the work, but I am so glad I had this experience and wish I had done it a lot sooner. It’s not always easy or even possible to do this sort of thing. For example, if you are a wedding photographer but are already married, you probably won’t get to go through the experience of being the bride or groom being photographed. If there is a way, though, I highly recommend making it happen, and at the very least you should end up with some nice pictures of yourself and your family

Just like some of the professors who take my class at OSU, I found myself learning so much more than I ever would have realized, simply by putting myself in someone else’s shoes.

What about you—what are some things you have learned from being photographed? What are some of your favorite pictures that illustrate how you have grown? Leave your thoughts and any examples in the comments below.

googletag.cmd.push(function() {
tablet_slots.push( googletag.defineSlot( “/1005424/_dPSv4_tab-all-article-bottom_(300×250)”, [300, 250], “pb-ad-78623” ).addService( googletag.pubads() ) ); } );

googletag.cmd.push(function() {
mobile_slots.push( googletag.defineSlot( “/1005424/_dPSv4_mob-all-article-bottom_(300×250)”, [300, 250], “pb-ad-78158” ).addService( googletag.pubads() ) ); } );

The post 3 Reasons to Have Your Own Portrait Taken by Simon Ringsmuth appeared first on Digital Photography School.


Digital Photography School

 
Comments Off on 3 Reasons to Have Your Own Portrait Taken

Posted in Photography