RSS
 

Posts Tagged ‘Tabletop’

How to Create a Budget Tabletop Photography Setup for Shooting Food and Products

31 Mar

The post How to Create a Budget Tabletop Photography Setup for Shooting Food and Products appeared first on Digital Photography School. It was authored by Jackie Lamas.

It can feel like photography is a money vortex and unless you have an unlimited amount, many types and styles of photography may seem out of reach. We’re here to tell you that you can create your own tabletop photography setup on a budget and still create some amazing food and product photography.

tabletop photography setup
The white paper in this setup is used to help bounce light back ono the products as the window (the main light source) is at camera left.

All you need is a trip to your local dollar store and craft store, and you’ll have a set up ready to go that won’t break the bank. It will also let you create the images your clients will love.

What is a tabletop photography setup?

A tabletop photography setup is generally used to photograph products and food for commercial or marketing services.

tabletop photography setup
1/20 sec; f/3.2; ISO 1600 using a 50mm lens. The product is the coffee mug and to get this shot I used a table I already had, a bright window to camera right, and notebooks to give it more height.

In recent years, tabletop photography setups have moved away from the Lightbox and toward more authentic setups thanks to social media.

The basic tabletop photography setup is a table, backgrounds, tabletop backgrounds, and nice light source that you can use to light your products and food.

What you need for a basic setup

A tabletop photography setup doesn’t have to be complex or involve a lot of materials. You can have a simple setup that offers you a variety of backgrounds, looks, and setups all in the same spot, at the same table.

tabletop photography setups
There is a big window to camera left and here we can see the basic setup with kraft paper and white paper taped to the wall.

You’ll need:

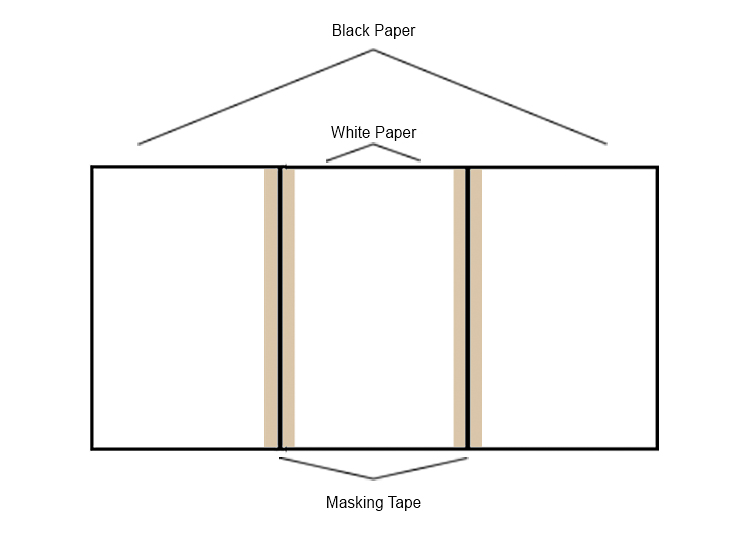
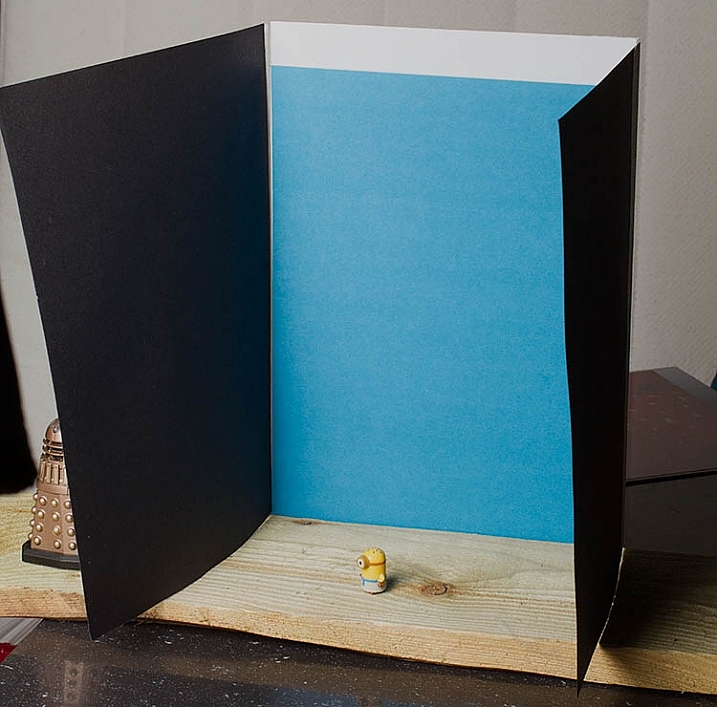
  • a table or any stable surface to place items onto of
  • a few backgrounds like a white paper, kraft paper, black paper, foam boards, different types of fabric and textures
  • depending on your products/food you’ll need some stands, dishes, and plates, or other styling items
  • tape
  • a large window for window light
  • clips or clamps to hold things down
  • a tripod for max aperture and depth of field to avoid camera shake.
tabletop photography setup
1/10 sec; f/14; ISO 400 using a 50mm lens.

This basic setup will help you to create your tabletop photography setup without the need to be in a big space or rent a studio. It will also keep costs down.

Get creative with backgrounds

While a table, solid plain wall and a good light source are the basic set up, it can often get boring. As you get more clients, you’ll want to have different setups to help you get more interesting photos.

tabletop photography setup
These were just a few of the backgrounds and items we had for styling. We didn’t use all of them but get creative with what you already have in your home.

A quick trip to the dollar store can help keep costs down. You can get items that can give your tabletop the right look and style for the product that you’re photographing.

How to Create a Budget Tabletop Photography Setup for Shooting Food and Products
1/15 sec; f/11; ISO 400 using a 50mm lens. You can see the window in the reflection of the watch.
How to Create a Budget Tabletop Photography Setup for Shooting Food and Products
Here is a behind the scenes shot of the watch. Using a lace dress for the background made for a moodier photo.

Choose different patterns for backgrounds, like this shower curtain I used to give the tabletop photography setup more of a marble texture and style. The watch stands out against the colors and pattern and creates a more interesting effect.

How to Create a Budget Tabletop Photography Setup for Shooting Food and Products
1/10 sec; f/14; ISO 400 using a 50mm lens. I took photo using a shower curtain and big sliding glass doors as the main light source. Both watch photos were taken minutes apart at the same table and distance from the window.

Different placemats work really well as backgrounds and tabletops for food photography as well as product photography. Letting you change the tabletop photography setup without having to directly paint or change your table.

How to Create a Budget Tabletop Photography Setup for Shooting Food and Products
Here we used a placemat and bowl from the dollar store and a kitchen towel already owned.

Posterboard can be really useful in creating a faux cyclorama wall for products giving the illusion of a seamless background. Taping fabric to the wall also works to help keep the backgrounds in place and creates seamless backgrounds.

Placemats of various textures and prints can also be perfect for food photography and work in many different settings for products as well.

tabletop photography setup
1/20 sec; f/8; ISO 400

Kitchen towels can also serve as props for your food styling as well as backgrounds.

Find the light

The biggest concern is getting enough light and that is what a big window is for.

How to Create a Budget Tabletop Photography Setup for Shooting Food and Products
1/200 sec; f/2.2; ISO 200. For this image, I used an external flash (580EXII) pointed at the ceiling for added light. If you have a flash, you can use it off-camera to create images with more pop.

If you don’t get lots of light in your home, go outside! Take your tabletop setup out onto your patio or yard. Find some good indirect shaded light to work in.

tabletop photography setup
1/20 sec; f/5.6; ISO 400. Using a plastic dollar store plate and the wood textured placemat as a background, this photo has a different feel. We even get a little reflection on the plate. The light source is a big window at camera left.

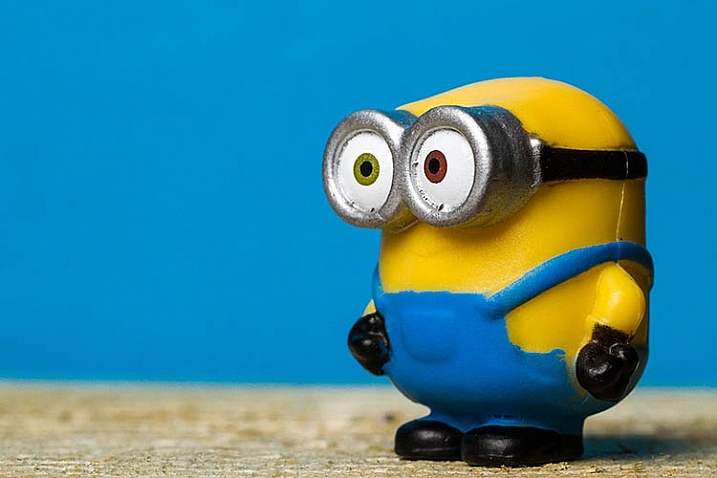
The idea is to create an evenly-lit tabletop setup so that you’re able to set your camera to the correct settings and get the look you want.

Having enough light to work with, lets you take away light with flags or create shadows with different items. You’re also able to get different exposures to your products or food.

How to Create a Budget Tabletop Photography Setup for Shooting Food and Products
Both of these images are shot at different times of the day with the window at opposite sides of the camera. The photo on the left has the window to camera-right, and was shot later in the day with twinkling Christmas lights behind. The photo on the right was shot with the window at camera-left during the morning.

Different times of day can give different types of lighting for your tabletop photography setup too. Take advantage of the lighting changes and experiment to see what light is best for the items you’re photographing.

tabletop photography setup
This photo was created a bit darker on purpose to create a more cozy effect and to capture the twinkle lights. Taken in the same location as the bowl photo above with the window to camera left. Settings are 1/20 sec; f/6.3; ISO 400.

Using available ambient light can really help keep costs down while doing tabletop photography and can offer lots of different types of lighting.

Don’t limit yourself to a table

With a lifestyle component, you can take your tabletop photography setup on the go. Take your backgrounds, fabrics, and styling items to different locations to get different types of photographs.

How to Create a Budget Tabletop Photography Setup for Shooting Food and Products
Taken outside under a covered area with bright sunlight behind the camera. I used a found bark branch to style the product. Settings are 1/400 sec; f/3.5; ISO 400.

You can photograph in a park, trail, cafe, or in front of an interesting wall in your neighborhood.

How to Create a Budget Tabletop Photography Setup for Shooting Food and Products
Taken on my sofa with settings as 1/500 sec; f1.8; ISO 400. The window is at camera-right.

Using your creative eye, you can photograph food and product photography just about anywhere that will save you money, while also giving you amazing results.

In conclusion

How to Create a Budget Tabletop Photography Setup for Shooting Food and Products
I created this on location at the restaurant where the food was photographed. It used ambient light ,which was a combination of window light and overhead daylight lamps. I adjusted the white balance to suit. f/160 sec; f2.0; ISO 400.

As you can see, creating a tabletop photography setup doesn’t have to mean spending loads on lighting, space, styling equipment or backgrounds. With a trip to your local dollar store and craft store, you can create stunning product and food photography for a fraction of the price.

tabletop photography setup
Aluminum foil and other kitchen supplies can work great to create a background that is interesting and fun. Settings are 1/20 sec; f/5.6; ISO 400 with window to camera left.

Your clients will love their photos and you will have a setup that you can use anywhere!

Do you have any other tips for creating a tabletop photography setup? Share with us in the comments section.

The post How to Create a Budget Tabletop Photography Setup for Shooting Food and Products appeared first on Digital Photography School. It was authored by Jackie Lamas.


Digital Photography School

 
Comments Off on How to Create a Budget Tabletop Photography Setup for Shooting Food and Products

Posted in Photography


3 Legged Thing’s new tripods feature leveling base, video heads, table-top option and more

26 Nov

Tripod manufacturer 3 Legged Thing has announced a new range of premium tripods that are designed to suit both stills and movie photographers. Inspired by the skateboarding world, the Legends range will offer video heads for the first time as well as new leg locks, a leveling base as well as three detachable legs that can become monopods or booms arms for lights and microphones. The company has launched two models, Mike and Jay, and promises more for the future.

The 8-layer carbon fiber legs offer a lightweight tripod without compromising stability and rigidity according to the company, and new Rapid Latch locks on the tops of the legs make them quick and easy to open for those with disabilities.

Mike is the taller of the two, measuring 66.7cm (26.26in) when closed, but extending to a maximum height of 147.5cm (58.07in). Mike weighs 1.65kg (3.64lbs) and can support kit of up to 14kg (30lbs). Jay is designed to be travel-friendly and measures 40.5cm / 15.94″ when folded and extends to a maximum height of 111.2cm (43.78in). He weighs 1.41kg (3.1lbs) and can hold the same weight as Mike – up to 14kg (30lbs).

Jay has a minimum height of 10.0cm / 3.94″ and Mike of 13.5cm / 5.31″, but both models can have their legs removed and optional ‘footwear’ mini-legs attached so that they can be used very close to the ground or on a tabletop. With the mini-legs attached the leveling base can double as a 3-legged stabilizer for one of the main legs when used as a monopod.

The company has also released its first video heads, which offer left or right panning arm placement, fluid movement and adjustable tilt motion. The AirHed Cine comes with either an Arca-Swiss clamp and plate or a standard version, and both have a mounting thread for attaching accessories.

Mike will cost $ 549.99 / £499.99 on his own, or $ 849.99 / £729.99 with the AirHed Cine, while Jay costs $ 479.99 / £449.99 on his own, or $ 779.99 / £679.99 with the AirHed Cine. The AirHed Cine costs $ 349.99 / £299.99 by itself. The company says there will be more to come for the Legends system in the next few months.
For more information see the 3 Legged Thing website.

Press release:

3 Legged Thing Announces New Legends Tripod Range

The award-winning British tripod manufacturer introduces a new ultra-premium tripod range and the first three products.

Following the phenomenal growth in popularity of its Pro and Punks tripods, 3 Legged Thing is excited to announce Legends – the most radical departure from conventional tripod design ever developed. Designed and engineered in Stagsden, England, the new products deliver unbelievable strength, maximum versatility, and incredible build quality. It is the first time 3 Legged Thing has introduced products designed for both photo and video.

Taking its inspiration from skateboarder, musician, photographer and 3LT Pro Team member, Ray Barbee, the ethos of the Legends range is innovation, outstanding performance, and creativity.

3 Legged Thing’s CEO and Founder Danny Lenihan explains: “With every incarnation of tripods, we bring new and exciting technological advances, and upgrades to existing design and engineering. Legends is a back-to-the-drawing-board look at how we use and need tripods in modern photography and videography, with ideas dating back five years that we had previously left undeveloped. With emphasis on workflow and user-friendliness, we’ve simultaneously lowered the weight, and increased the load-to-weight ratio, without compromising stability or rigidity. We’ve added advanced functionality, the likes of which have never been seen before, and made major aesthetic changes for our most incredible tripod range to date.

Danny continues: “When I first saw Ray Barbee, as a teenager, making his Bones Brigade debut in the Powell-Peralta film, Public Domain, my perception of skateboarding instantly changed. Here was this kid, who had defied normal conventions of neon and garish 80s fashion, and replaced them with a tee, jeans, Vans and a baseball cap. His style was smooth, inimitable, flowing and utterly effortless, and it was this that inspired me most. The parallels between Ray Barbee’s ethos and creativity, and the ideas forming in my head were tangible and quantifiable. I wanted to bring this new range to life, with fluid workflow, effortless movements, and unbounded style. When I mentioned to Ray that we’d like to name a tripod as a tribute to him, he was incredibly modest and humble. I knew then that it was exactly the right thing to do. Whilst the Ray tripod isn’t the first in the range to launch, it is important to understand that the influence and inspiration for the rest of the range, and the three debut products, all stem from Ray Barbee’s commitment to the arts, and I look forward to launching his signature product in 2020.”

The first two tripods in the range are Mike and Jay, 3 Legged Thing’s first levelling-base, hybrid photo/video tripods. Equally useful for video makers or landscape photographers, levelling base systems enable smooth and fast set-ups on challenging terrain. Mike is a full size carbon fibre tripod, designed for incredible stability in any conditions, whilst Jay features shorter carbon fibre legs with more sections, creating a travel-friendly video option, the first of its kind.

Mike is named after one of the original Bones Brigade skateboarders, Mike McGill. Inventor of the McTwist (arguably the most iconic trick ever invented), Mike is one of the most famous skateboarders in the world, and a professional for over 30 years. Jay is named for the late Jay Adams, the Dogtown skateboarder, whose style was inspired by surfing, influencing a whole new generation of skaters.

Similarly, the tripods in the Legends range share this DNA of innovation. These tripods have not one but three detachable legs, adding a level of versatility rarely seen in a tripod system. The legs can be used as a monopod; as boom arms for lights or microphones, or both!

With the legs removed the tripod can be used on table-tops or at ground level by joining a set of 3LT’s tripod footwear to the leg hinges. This enables both Mike and Jay to be used for macro work, bringing photographers a varied range of perspectives from which to shoot. With the addition of 3LT footwear, the levelling base can also be used as a foot stabiliser for a monopod leg, adding an extra level of versatility to the products.

The tripods are constructed from 8 layers of 100% pure Japanese carbon fibre, and aerospace-grade, anodised magnesium alloy, providing incredible strength, rigidity, and durability.

The new tripods have 3 Legged Thing’s new Rapid Latch, a hardwearing anodised mag-alloy latch with auto-engage lock, which is used to open and position the legs. The Rapid Latch has been specifically designed to make adjusting the legs quick and simple, even if the user is wearing thick gloves. Rapid Latch is also designed to be friendly to those with disabilities or hand injuries, enabling them to easily change the leg angles without complication or fuss.

Each of the legs can be used at three optimal angles creating different shooting heights, and can be positioned independently for use on uneven ground. The tripods come with removable rubber Bootz, which can be replaced with one of four varieties of alternative footwear, to increase stability on even the most challenging surfaces.

The Legends range tripod leg locks have new external designs with raised O-Pads for improved, grip, leverage and water displacement. Internally, the locks have been engineered with a new design of Chicken Lips (shims) which give the locks greater strength and grip, and formidable anti-rotation.

Mike and Jay’s levelling base has a friction control that enables users to finely-adjust the positioning. Both tripods are also available in kits with 3 Legged Thing’s stunning new video head, the AirHed Cine.

Precision milled from aerospace-grade magnesium alloy, and featuring a distinctive spiderweb design, the AirHed Cine has an adjustable, fluid-motion, tilt mechanism that offers smooth movement and can be controlled directly, or with the included panning arm. The arm can be fitted to either side of the head for right or left-handed operation. The AirHed Cine is available with a choice of standard video clamp and plate, or an Arca-Swiss compatible clamp and plate, and features a ¼”-20 thread for externally mounted devices such as articulated arms.

The first two tripods in the Legends range are available for pre-order starting today. Mike’s suggested retail price is £499.99 / $ 549.99 for tripod only, with tripod kit including AirHed Cine SRP of £729.99 / $ 849.99. Jay’s SRP is £449.99 / $ 479.99 tripod only, and £679.99 / $ 779.99 for Jay Kit with AirHed Cine. The AirHed Cine is available separately with a suggested retail price of £299.99 / $ 349.99.

Articles: Digital Photography Review (dpreview.com)

 
Comments Off on 3 Legged Thing’s new tripods feature leveling base, video heads, table-top option and more

Posted in Uncategorized


How to Make DIY Reflectors for Tabletop Photography

15 Dec

The use of reflectors in photography is just a way of taking advantage of the existent light, and bounce it to different places in your image. This can be done with virtually any surface that reflects light, like a wall, a mirror, cardboard, styrofoam, aluminum foil, etc.

Dedicated photography reflectors come in many different colors, shapes and sizes. Silver, gold, white, and sometimes mixes of these three colors commonly know as zebra reflectors are the most common colors. There are also 5-in-1 reflectors that include a black surface to absorb light, and a translucent surface to soften light.

What shape?

The shape of the reflector depends on the subject you are trying to photograph. Usually collapsible round reflectors are the most used because they are easier to handle on location, and also easier to fold, but triangular and rectangular reflectors are very popular too.

01

The size of the reflector depends on the area you are trying to illuminate, and when it comes to small subjects like tabletop photography, things get tricky because standard reflectors are usually too big to produce small spots of light. In this article, I will guide you through the steps of building your own customized small reflectors for tabletop photography like the ones above.

Materials

Even though you can use simple paper sheets with some kind of object as a stand to hold it in place, this simple folding technique will for sure give you more control on the way you place your reflectors.

To start you will need some metallic paper sheets. The ones I’m using here can be found in office supply or craft stores, and exist in various sizes and colors. I bought 50×70 centimeters sheets, that are about 20×28 inches, and that allowed me to make a nice set of reflectors of different sizes and shapes.

A useful feature of this type of paper is that the back side is white, so you can use the metallic side or just flip to the white side to have different types of reflections. Beside the obvious silver and gold, you can also buy metallic textured papers for special effects of light reflection.

02

Cutting to size

Now it’s time to cut the paper to size. This depends on the reflector size you want to create; in this case I’m making a 8x13cm (3×5 inch) reflector.

03

Now mark the lines with a ballpoint pen and fold the paper on those lines. You will end up with something like this.

04

To keep the overlapping folds on the back together, I used small magnets. You can use tape, velcro or even re-usable adhesive, but magnets give you more choices of repositioning the angle of the reflector when you are looking for the right spot.

05

Magnets are also very useful if you use a gooseneck or a magic arm to hold the reflector instead of placing it on the table.

06

Positioning the reflectors

Now that we built some nice reflectors it’s time to try them out.

I have used some high end lighting equipment along my career as a professional photographer, but I must say that it always amazes me what is possible to do with the light of a window or a tabletop lamp and a couple of reflectors. The following image is an example.

07

Here is how it was made:

08

Start with Tabletop tungsten lamp with a diffuser as a back light.

09

Now the same tabletop tungsten lamp with a diffuser, plus a reflector on the left side.

10

Now AND another reflector on the right side.

So, there it is, a simple and highly effective setup that is guaranteed to give more control over the way you light your images for tabletop photography.

Give it a try!

googletag.cmd.push(function() {
tablet_slots.push( googletag.defineSlot( “/1005424/_dPSv4_tab-all-article-bottom_(300×250)”, [300, 250], “pb-ad-78623” ).addService( googletag.pubads() ) ); } );

googletag.cmd.push(function() {
mobile_slots.push( googletag.defineSlot( “/1005424/_dPSv4_mob-all-article-bottom_(300×250)”, [300, 250], “pb-ad-78158” ).addService( googletag.pubads() ) ); } );

The post How to Make DIY Reflectors for Tabletop Photography by Ivo Guimaraes appeared first on Digital Photography School.


Digital Photography School

 
Comments Off on How to Make DIY Reflectors for Tabletop Photography

Posted in Photography


How to Make a DIY Tabletop Studio Setup

22 Oct

When it comes to studio accessories, photographers are spoiled for choice. There are a lot of great options available, whether they be dedicated studio tables, extra large reflector panels or even backgrounds that studio lights are fitted onto. These accessories can all be brilliant, but one thing they are usually not is portable. They can also be cost prohibitive. What do you do if you get into a conversation with an acquaintance or a shop-owner, and they ask you to do some photos for them on the spot? You could, of course, decline, and attempt to get them to come to you sometime in the future, but this may lead to complications for what could be an otherwise easy task.

The easiest way to get around some of these problems is to build your own solution. This may bring about visions of complicated engineering skills and power tools, but it really does not have to be that way. In the end, all you really need is the ability to shape and modify the light you have available to you, and that doesn’t need to be complicated.

DIY-studio-setup-1845

This tutorial will teach you how to make a simple tabletop studio setup with things you are likely to already have on hand, or at the very least, you’ll have little trouble obtaining: paper and tape. As it is so simple, this setup is ideal for straightforward record and product shots.

It can be modified in a variety of ways for different effects, but if you’re looking for an elaborate and permanent solution, this is probably not what you need. However, if you need something that can be set up in moments, with next to no cost, then read on.

What you need

  •  Two sheets of black paper/ card (thicker paper provides more stability)
  •  One sheet of white or colored paper/card
  •  Tape
  •  A base (a block of wood or similar that will raise your subject above the bottom of the setup.) Simply choose something that will look good in your photos.
  •  Extra paper (assorted colors, plus extra black and white)

Putting it together

Assembly is as easy as taping the sheets of paper together as illustrated in the diagram below. The only thing to watch out for is to ensure that the edges of the paper are flush and not overlapping. You should be able to fold each sheet over one another without difficulty.

DIY-studio-setup-studio-diagram

Here it is is in all of its unbridled glory:

DIY-studio-setup-1849

Fortunately, it doesn’t matter what it looks like on the table. You’re the only person who ever has to see it. What matters is the results you can get in lieu of having no other options.

Putting it to use

The entire point of any studio equipment is to modify light. It doesn’t matter what the source of that light ism and this setup will work as well with strobes, as it will with natural light. With that said, the best results from this setup will come with a single directional light source.

With your light source illuminating the subject from the front, the black sides are acting as flags and are controlling how much light hits your subject. This creates, and emphasizes, a narrow strip of light on your subject. It also increases contrast and can help to illustrate depth.

DIY-studio-setup-1827


Because the sides are not fixed into position, you can move them inward and outward as you see fit to alter the effect. When doing this though, you need to watch the background. Make sure that the sides are not casting any shadows over any part of the background that will be in your final images. Any such shadows will show up as ugly gradations in your photos.

Because your subject is mere inches from the background, a proper exposure for your subject should, in most cases, allow for a correct exposure of the background as well. However, if you’re using a white background and the results aren’t satisfactory, try to insert a piece of colored paper and compare the results.

It really is as easy as that: meter for your subject and go.

However, you do need to take special care with your compositions. Because of the small amount of space you have to work with, you will need to pay extra attention to ensure that the edges of the background do not make it into the frame.

Reflectors

DIY-studio-setup-1836

In most situations, especially in natural light, your light will probably be coming from above your subject. This can cause deep shadows where you may not want them. The easiest way to combat this is by adding a small reflector and laying it flat in front of your subject. In most cases, this will be enough. Reflectors are easy enough to make, but there are also inexpensive 12″ circular varieties on the market, that are portable and fold up. These make good additions to any camera bag, especially if you find yourself photographing small subjects, such as flowers, a lot.

In situations, like the photo above, where there isn’t a lot delineation between the subject and the background, you can add a reflector from behind. Anything white or silver will do the job. Try something like an index card. In this example, I used the white balance portion of my ColorChecker Passport.

DIY-studio-setup-1835

The spice of life

Aside from simplicity, the real beauty in this setup is the scope of variations. The only limitations for how much you can change things to suit your needs are only limited by your imagination. Here are a few changes you can make to get wildly different results.

Side panel colors

Instead of the black cards acting as flags, tape aluminum foil to the inside of the panels. This will still shape the light falling onto your subject, but instead of deepening contrast it will fill in the shadows, and result in brighter images. If the effect is too strong, try making only one side a silver reflector. For a more subtle effect, try using white paper as the sides. The shadows will still fill in, but the effect will not be as strong.

Exploring these options may result in flatter images, but depending on your needs and taste, that may be perfect.

Backlighting

If the paper or card you’re using for a background is thick enough, you can cut most of the center of it out, being sure to leave enough to allow it to be taped to the sides. You could then tape tissue paper to the inside of the background, covering the hole and acting as diffusion material.

Then face the back of the setup toward your directional light source, effectively back lighting your subject. When doing this, it’s best to use a reflector to fill in the inevitable shadows and high contrast this will cause. To fashion a makeshift reflector, simply tape a bit of foil to a scrap of cardboard.

Backgrounds

DIY-studio-setup-1790

Of course, you’re not limited to solid color backgrounds. As long as the material you choose to make the setup will support the weight, you can use anything from fabric to wood. If it seems like it might work: try it.

A favorite trick of mine is to use old prints that I have scattered about. Once they’re in position you can have anything from an abstracted, colorful background to a landscape.

Scalability

Everything here has been on a pretty small scale, but you can make this setup as big as you need, provided you can find the materials. You may have trouble trying to build one for an elephant, but a trip to a hardware store should provide the right materials to make an affordable portrait sized setup.

In the end

This solution may not reek of elegance or creativity, but what it is in fact is: fast, cheap, and effective. Folded up, the whole thing can fit, undamaged, in a bag with a laptop, so it can go anywhere you do. Of course, this is only one option. As such, you could pull it out to isolate a wildflower in a field for a record shot. Or you could build one in minutes to create product photography for a friend’s e-commerce site.

googletag.cmd.push(function() {
tablet_slots.push( googletag.defineSlot( “/1005424/_dPSv4_tab-all-article-bottom_(300×250)”, [300, 250], “pb-ad-78623” ).addService( googletag.pubads() ) ); } );

googletag.cmd.push(function() {
mobile_slots.push( googletag.defineSlot( “/1005424/_dPSv4_mob-all-article-bottom_(300×250)”, [300, 250], “pb-ad-78158” ).addService( googletag.pubads() ) ); } );

The post How to Make a DIY Tabletop Studio Setup by John McIntire appeared first on Digital Photography School.


Digital Photography School

 
Comments Off on How to Make a DIY Tabletop Studio Setup

Posted in Photography


Liven Up Your Tabletop Photoshoots

14 May

Tabletops are great for elbow leaning, finger drumming and they make pretty good photo backdrops too!

You can set anything down on ‘em, from baked goods to the newest product in your Etsy store, and just snap away.

But if you’re sick of the same ol’, plain ol’ tabletop, we’ve thought of five fun ways to spice up your next tabletop shot.

Whether you’re selling something or just want to up your Instagram game, you’re gonna love these tabletop makeover tips.

Take Tabletop Photos That Pop 

(…)
Read the rest of Liven Up Your Tabletop
Photoshoots (629 words)


© Taylor for Photojojo, 2015. |
Permalink |
No comment |
Add to
Photoshoots”>del.icio.us

Post tags:


Photojojo

 
Comments Off on Liven Up Your Tabletop Photoshoots

Posted in Equipment


Episode 1 , studio photography lighting tabletop glassware

28 Apr

basic studio photography lighting for glass objects by prophotolife.com
Video Rating: 4 / 5

 
Comments Off on Episode 1 , studio photography lighting tabletop glassware

Posted in Photography Videos


Episode 18, Tabletop Studio Photography done with mirrors

06 Feb

For comments and questions visit prophotolife.com and search for video episode 18. A gallery of the still images from this video are available from the website.
Video Rating: 4 / 5

 
Comments Off on Episode 18, Tabletop Studio Photography done with mirrors

Posted in Photography Videos