RSS
 

Posts Tagged ‘Sync’

How to Make Beautiful Portraits Using Flash and High-Speed Sync

14 Mar

The post How to Make Beautiful Portraits Using Flash and High-Speed Sync appeared first on Digital Photography School. It was authored by Sean McCormack.

how to use flash and high-speed sync for stunning portraits

The scene: Outdoors with full sunlight.

The gear: Your camera, lens, and flash.

The problem: You find that your flash only works at 1/200s or below, so you need to be at f/16 or f/22 to get a well-exposed shot. And at f/16-f/22, everything is in focus, including all the cars and other distractions in the background. (Those dust spots you keep meaning to clean are also perfectly visible.)

Why can’t you shoot with a higher shutter speed so you can have a wider aperture?

Well, it’s all down to the issue of sync speed.

More specifically, it’s about using flash and high-speed sync.

Generally speaking, to overpower the sun and stay below your camera’s sync speed, you’re forced to use a narrow aperture. Here I’m at f/20 just to stop the backlight overpowering the hair and the sky from blowing out:

Woman shot with off-camera flash

The resulting aperture means that everything is pretty much in focus, leaving the background looking cluttered.

(This shot is for example only; you should generally make a point of choosing clutter-free backgrounds.)

What is sync speed?

Sync speed is the fastest shutter speed for which the camera can expose the whole frame at once.

It’s a bit technical, but when you fire any shot below the sync speed, the first shutter curtain opens fully, revealing the entire sensor to light. At the end of the exposure time, the second shutter curtain moves across the frame to finish the capture.

(Generally, the sync speed varies between 1/125s and 1/250s; it depends on your camera.)

When you go above the sync speed, the second curtain starts to move before the first one has completed its journey. As your shutter speed gets shorter and shorter, the gap between the curtains narrows to a tiny slit. Despite this, all parts of the sensor receive light and a full exposure is made. On a bright day with a prime lens, you can easily shoot at 1/8000s at f/1.4 and have a perfect exposure. All parts of the frame still receive light, because ambient (non-flash) lighting is continuous throughout the exposure.

So why does the sync speed actually matter?

The sync speed problem

It’s when you introduce flash that you start to have problems.

You see, when a flash is fired (which usually happens when the first curtain is opened), all the light from it comes out in a very short space of time (in the order of milliseconds).

When you go above the sync speed, the position of the curtains doesn’t reveal the entire frame at the time the flash fires. So the shutter curtain blocks part of the flash and prevents it from reaching the sensor.

Any ambient light will expose normally, but the flash gets hidden in part of the frame. As your shutter speed gets faster and faster, more and more of the flash is blocked until it’s no longer visible in the shot (i.e., your exposure is what you’d get if you never fired the flash at all).

Below is a set of images taken at 1/3-stop increments with a flash. The first photo is at 1/250s, the native sync speed of my Fujifilm X-T2 camera. The other shutter speeds are, in order from left to right (and top to bottom): 1/320s, 1/400s, 1/500s, 1/630s, 1/800s, 1/1000s, and 1/1250s. Note that 1/320s is potentially usable if the subject is away from the edge of the frame.

portraits with flash and no high-speed sync

Everything in focus

Normally, when you use flash outside in daylight, you end up having everything in focus.

Remember the Sunny 16 Rule? If your subject is in direct sunlight during the day, you can set your aperture to f/16 and your shutter speed will be one over your ISO value.

So if your ISO is set to 100, your shutter speed would be 1/100s (at f/16). If your ISO is 200, then the shutter speed would be 1/200s.

Now, to get a darker, richer sky while using flash, you’d really need to be at f/22. Because you can’t get faster than 1/250s (remember, it’s the sync speed!), you have to increase the aperture to expose the shot correctly.
portraits with flash and no high-speed sync
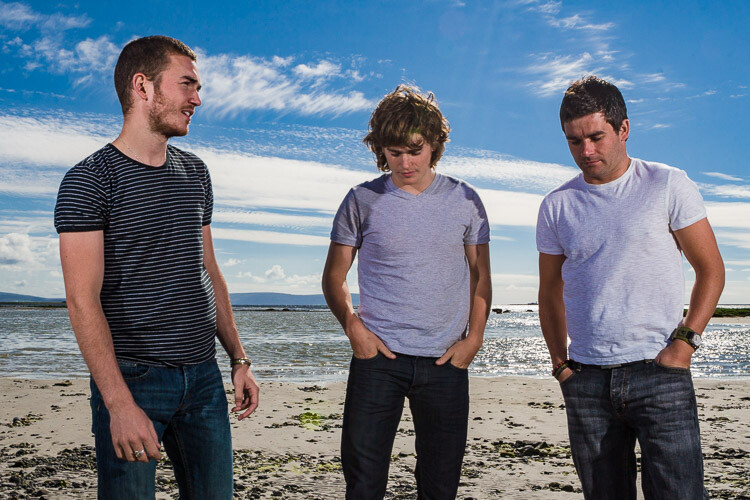
I shot at f/20 and 1/160s to get a richer sky for this band promo shot. It’s quite an old photo, so there were limited options for widening the aperture at the time. Even the hills in the background are in clear focus. The beach isn’t exactly pretty, either.
portraits with flash setup
A behind-the-scenes shot showing my two flashes set to full power.

As you can see from the photos above, this is a huge problem. Shooting at an f/22 aperture just doesn’t give you the creamy bokeh that portrait photographers love, and it can leave you with unpleasant, distracting backgrounds.

So what do you do?

The solution: high-speed sync

There is a solution: high-speed sync, also known as focal-plane sync.

No, it’s not perfect, but it does work. You see, instead of firing the flash at the start of the shot, high-speed sync pulses the flash throughout the whole exposure, trying to simulate the effects of a continuous light.

flash set to high-speed sync
My flash set to high-speed sync. Usually, there’s a single-button hold or a double-button combination to turn HSS on.

It looks good, but it comes at the expense of power and heat, because HSS works the flash really hard. After a few shots, the flash may even shut down for cooling.

Now, for high-speed sync to work, you need the camera to transmit a signal to the flash and for the flash to have high-speed sync built in. Cactus Image makes a trigger called the V6 II, which allows you to use any HSS flash with any camera.

a flash trigger
The Cactus Image V6 II offers power and zoom control over a wide range of speedlights, and it also offers high-speed sync capabilities.

The look of high-speed sync

You can use high-speed sync to go over the sync-speed barrier, so settings like 1/4000s at f/1.4 are achievable with flash. You get complete control over the light, but while using the wide apertures you usually associate with natural-light photographs. Yes, please!

By shooting wide-angle photos with a shallow depth of field, you can even create images that look like stills from a movie.

Settings for high-speed sync

Let’s look at a typical setup and settings for a photo using high-speed sync. This particular shoot was done in the evening when the light was relatively low, but I really wanted a shallow depth of field – and therefore required high-speed sync.

I set my camera to f/1.4 for a super-shallow depth of field. To get the clouds properly exposed, I had to boost the shutter speed to 1/4000s. To get the flash to work, I had to set it to high-speed sync. Using a Cactus V6 II trigger, I could easily get my Fujifilm X-T10 to shoot with high-speed sync.

portraits with flash and high-speed sync
An evening HSS photo shot at 1/4000s, ISO 200, and f/1.4. Notice the shallow depth of field.
portraits with flash and high-speed sync behind the scenes
The behind-the-scenes shot, showing an octabox in front of a model (photo by my assistant, Ola).
close-up portrait
Using high-speed sync, I captured this shot at about 3:00 in the afternoon with the sun high in the sky. I worked with an 85mm lens at 1/2000s, f/2.5, and ISO 100 on a Canon 5D III. The sun acted as a second light in the shot. Again, the background is nicely out of focus.

Another high-speed sync portrait example:

portrait with high-speed sync
An issue with shooting outdoors on overcast days is that your shutter speeds can be low enough to cause camera shake. By bumping up the ISO, you can get a faster shutter speed, keeping you safe from blur. Using high-speed sync then lets the flash do the work. Here, I’ve shot to keep the flash looking as natural as possible.
1/1000s | f/4 | ISO 800

The alternative

Note that high-speed sync isn’t the only way to shoot with a wide aperture and flash.

For one, you can always head out at the beginning or the end of the day when the light is pretty low; then the ambient lighting won’t add much to the shot, and you’ll be able to get a nice exposure at 1/200s. Plus, you can get great sky color and you won’t be fighting against strong sunlight.

portrait with high-speed sync flash
A shot of the band Drown for Thin Air magazine. The evening light made the shot. I needed a higher aperture to get the whole band in focus, so I opted not to use high-speed sync here.

Of course, if you’re doing any photoshoots with clients, you often have to work with the subject’s schedule rather than your own. So you may have to shoot at midday to suit them.

And that leads to the next option.

Using a neutral density filter

If you shoot landscape photography, you will be familiar with neutral density (ND) filters. This filter type allows you to slow the shutter speed down to get nice, silky water.

Neutral means that it adds no color, while density refers to blocking light. You can get ND filters in a range of values from 1 stop to 16 stops.

For portraits, neutral density filters allow you to widen the aperture instead of dropping the shutter speed. So a 4-stop ND filter would take you from f/16 to f/4.

The drawback is that, as you block light, focusing can become harder.

Another potential issue is that not all ND filters are actually neutral. Some tend to have a color cast. (I have a Firecrest 10-stop ND for landscapes, which is neutral, but the older 4-stop filter I own – also from Firecrest – is slightly pink.)

portrait without a neutral density filter
Without the ND filter applied, I was forced to use a narrow aperture; note how the entire scene is in focus.
1/250s | f/16 | ISO 200
portrait with flash and high-speed sync
With the 4-stop ND filter applied, the background can be rendered out of focus. The flash is still at the same power as the unfiltered shot above. The filter does have a color cast, which is hard to remove completely.
1/250s | f/4 | ISO 200

Flash and high-speed sync: conclusion

As you now know, you can make outdoor portraits even when the sun is bright – simply by using flash and high-speed sync.

So make sure you get a flash that has HSS capabilities.

And start practicing!

Now over to you:

Have you ever used high-speed sync? Have you ever struggled to get nice bokeh in bright sunlight? Share your thoughts (and high-speed sync images!) in the comments below.

The post How to Make Beautiful Portraits Using Flash and High-Speed Sync appeared first on Digital Photography School. It was authored by Sean McCormack.


Digital Photography School

 
Comments Off on How to Make Beautiful Portraits Using Flash and High-Speed Sync

Posted in Photography


How to Make Exciting Flash Action Photos with Second-Curtain Sync

12 Jun

The post How to Make Exciting Flash Action Photos with Second-Curtain Sync appeared first on Digital Photography School. It was authored by Rick Ohnsman.

dps-flash-action-photos
Blur or Freeze motion?  How about both?!!
In still photography, we can choose to blur or freeze motion. Or… we can do both! Read on to learn how.

All the excitement surrounding the latest cameras seems to center around their video capabilities. Fine, I guess. But, maybe you’re like me, a dedicated still photo shooter with no desire to make videos? I don’t need to make things move in my photos, but I do want to illustrate movement.

My options?

1) Use a long exposure/slow shutter speed causing moving things to blur creating the suggestion of movement, or

How to Make Exciting Flash Action Photos with Second-Curtain Sync
Panning with the subject, and using a slower shutter speed blurs the background, giving a sense of motion. Canon D30 with Tamron 17-50mm f/2.8 lens. 1/60th sec. f/4 ISO 400.

2) Use a short shutter duration to freeze the action, capturing a moment of motion that could not have been seen with the human eye, or

A fast shutter speed will freeze the action.  1/8000 sec.  No flash.
A very short shutter speed will freeze action in many cases. This was lit with bright sunlight only, no flash. Canon 50D with Canon 50mm f/1.8 lens. 1/8000th sec. f/3.5 ISO 400.

3) Use the very short duration of a flash to capture an even thinner slice of time freezing very fast-moving objects.

But have you considered the fourth option? How might you make flash action photos that combine the motion blur of a long shutter speed with the freezing power of flash in the same shot? Let’s explore how that works.

Flash action photos - combining motion blur with frozen action.
Motion blur + Frozen action = Flash action photos. Combining slow shutter speeds with the freezing power of a flash. Canon D30 with Canon 24-105mm f/4 lens. 1/20th sec. f/4 ISO 400. Canon 500EX flash – Second-curtain sync.

An exposure within an exposure

When you make a flash photo, you are really making two exposures in one. Open the shutter and whatever available ambient light is there streams in through the camera iris onto the sensor. How much light is controlled by two things; the size of the aperture (measured using f/stop terminology), and the duration of the exposure (controlled by the shutter speed.)

When we use a flash, the burst of light happens during that same shutter duration. Flash duration is typically much shorter than the total shutter duration and happens “within” the total exposure. Thus, an “exposure within an exposure.”

Flash action photo - an exposure within an exposure.
There are two exposures in one here – The ambient light creates the blur using a longer shutter speed while the flash freezes the action at the end. Canon 50D with Tamron 17-50mm f/2.8 lens. 1-second, f/13 ISO 100. Second curtain sync flash – Canon 500EX.

Open the curtain and let the show begin

Unless you’re using a camera with a leaf shutter (rather rare anymore), your camera probably uses a focal-plane shutter. There are two “curtains” (and that’s what they are called), between the rear of the lens and the sensor.

Watch this slow-motion video of what happens during an exposure.

When the shutter button is pressed: 1) With a DSLR, the mirror swings up out of the way. 2) The first curtain goes down, exposing the sensor to light. 3) The second curtain then comes down, again blocking light from the sensor.

The total exposure duration, the time between the opening of the first curtain and the closing of the second, that is the amount of time the sensor is exposed to light and is what we control with the shutter speed setting.

Back in the outside world

Outside the camera in the real world, life goes on. If the subject or the camera moves during the exposure, the relative distance it moves during the exposure duration will be recorded as a blur.

Subjects that don’t move at all won’t blur even during a long exposure.

Fast-moving objects could move quite a bit and thus blur more unless the shutter speed is fast, the exposure duration short, and the amount of motion imperceptible during that brief period.

Enter the flash

The above describes what happens when a photo is made using only ambient light. It doesn’t matter the light source; it could be the sun, the moon, candlelight, continuous man-made lighting sources like incandescent, fluorescent, LED, flashlights, whatever. For our purposes, ambient light is whatever light exists during the entire duration of the exposure.

The flash, however, will be comparably short and happen within the duration of the exposure. Depending on output power and the type of flash used, flash duration can be very short. Take a look at the chart below illustrating the flash duration of a typical Speedlight (here a Canon 580EX).

Flash power/duration chart for Canon 580EX.
The lower the power, the shorter the flash duration. However, less power also means less working distance.

At a 1/128th power setting, the flash duration can be as short as 1/20,000th of a second! Even fast-moving objects won’t move far during such a thin sliver of time, so they will be frozen by the flash.

Flash did the freezing here - The room was dark, so no ambient light and the shutter speed not that fast – 1/60th sec. f/25 ISO 100 (but the flash at 1/16th power had a duration of just 1/16,000 sec.
Flash did the freezing here – The room was dark, so no ambient light. The shutter speed not that fast – 1/60th sec. f/25 ISO 100 (but the flash at 1/16th power had a duration of just 1/16,000 sec. so everything is totally frozen with no motion blur.

Ambient + Flash = Flash action photos

Since a photo using flash is an exposure-in-an-exposure, what if we harness the power of both ambient light and the flash to use the advantages of each?

What might we get if we used a long exposure to capture the ambient light and thus blur the moving subject and then a burst of flash to freeze it? We could get a photo that combined both motion blur and a frozen subject! We could call that a flash action photo.

Flash action photos - Combine a long shutter speed for the blur with a 2nd curtain sync flash to freeze the action too.
Combine a long shutter speed for the blur with a 2nd-curtain sync flash to freeze the action. Canon 50D with Tamron 17-50 f/2.8 lens. 1 Second, f/5.6, ISO 100

First versus Second-Curtain Sync

The flash will be fired within the total duration of the exposure. If, say, the shutter speed is 1/125th second and the flash duration at 1/64th power is 1/14,000 second, when during that 1/125th second does the flash fire?

The default for most cameras and flashes is to have the flash fire as soon as the first curtain drops to expose the sensor. This is what is termed “first curtain” (aka front curtain) sync.” The timeline below illustrates how that works.

First Curtain Sync Timeline

In a standard flash photo with the flash in ETTL mode, this will be the sequence with the default first-curtain sync:

  • Shutter is pressed.
  • Pre-Flash fires (Omitted if Flash is in Manual Mode).
  • Camera calculates necessary flash output power needed (Only in ETTL Mode).
  • First curtain drops exposing the sensor to ambient light.
  • Flash fires.
  • Ambient light continues for the duration of the exposure.
  • Second (aka “rear”) curtain drops, covering the sensor and the exposure ends.

With most flash photos, especially things like portraits and such, the total exposure will be short enough there won’t be a noticeable difference between the portion of the exposure made with ambient light and that made with the flash. To best capture the moment, having the flash immediately fire is usually a good thing and probably one reason manufacturers make first-curtain sync the default.

So why use second-curtain sync?

We started out talking about photos that combine the blurred motion caused by a slow shutter speed with the freezing power of a flash. The problem with the default first-curtain sync that triggers the flash at the beginning of the exposure is that the frozen portion of the image happens immediately, and the blurred portion made with the remaining ambient light happens after. As the subject moves, the recorded blur will be in front of the frozen portion of the shot.

Flash action photos - Illustrating first and second curtain sync flash.
Assuming we want to make the car look like it’s traveling forward, the top shot done with second-curtain sync flash looks more natural. All settings were the same and the toy car was pushed from right to left in both cases. The top shot is second-curtain sync, the bottom shot the default, first-curtain sync.

But that looks weird

Standard convention is to see the blurred portion of action behind, not in front of the moving object. Illustrators and cartoonists know this and use motion lines (also called “sphericasia”) to help depict motion. (They also use Quimps, Plewds, Grawlixes, and a bunch of other cartoonist marks. Check out this fun read).

How to Make Exciting Flash Action Photos with Second-Curtain Sync

Sometimes as photographers, we will pan with a moving object, use a longer shutter speed, and if we pace our pan correctly, get a photo with a blurred background and the subject relatively frozen. The blur will be behind the subject, and that looks natural. But use a long shutter speed combined with a default first-curtain sync flash and…nope…that just looks weird.

A fast jet can be made to look motionless with a 1/200th second shutter speed.
Though flying at hundreds of miles per hour, this U.S. Air Force Thunderbirds jet can be made to look motionless with a very fast shutter speed. Canon 6D with Canon 400mm f/5.6 lens. 1/2000th sec. f/5.6 ISO 200.
Illustrating movement with motion lines.
This is how an illustrator or cartoonist might depict motion using “sphericasia” or motion lines.

Activate second-curtain sync

So let’s make it look right and create some flash action photos that look correct. You will need to activate second (rear) curtain sync. In some cases, this will be done on your camera. In others, you will do it on your flash. There are too many variables of camera/flash combinations for me to tell you just how to do it with your equipment, so you’ll need to get out your manuals. Look for second (sometimes called rear) curtain sync.

How to Make Exciting Flash Action Photos with Second-Curtain Sync
Left to right – This is the symbol that indicates second-curtain sync on my Canon 550EX flash. Center and right – Setting up second-curtain sync on my Canon 6D camera. Every camera/flash combination will differ, so you may need to consult your manual on how to get into second-curtain sync flash.

This is usually pretty easy. In the combo I used for this article, a Canon 6D camera with a Canon 550EX flash, it was done on the flash. Once set, I was good to go.

Flash action photos - First vs second curtain sync flash.
The same action, swinging the hatchet down into the log. was performed in both photos. All the settings were the same except, the left shot used first-curtain sync flash, while the one on the right used second-curtain sync flash.

Other considerations

You will need to experiment to determine exactly what your settings should be given the variables of amount of ambient light, distance to the subject, speed of the moving subject, and exactly the look you’re going for. There is no precise “recipe” here.

However, here are a few things that may help you get great flash action photos:

  • Going full-manual with both the camera and flash will give you the most control.
  • Going manual with the flash should prevent a pre-flash, which you don’t want.
  • Determine what ISO and aperture you need to expose for the given ambient lighting conditions.
  • Shutter speed will vary depending on the speed of your moving subject, how much blur you want, and whether you’ll be panning with the movement of the subject.
Which is which?  Flash Action photos with first / second flash curtain sync.
Which uses first and which second curtain sync flash? It’s hard to tell with objects like this ball. Here’s a clue – The ball was rolling away from the camera in both shots.
  • You will need sufficient light on your subject to properly expose the ambient portion of the exposure. Take some test shots without the flash to see how things look.
  • You will likely want to manually adjust the flash output power depending on how close you are to the subject and how much “freezing” power you want for that part of the photo. Use the aperture and ISO to control the ambient portion of the image, the shutter speed to control the amount of blur, and the flash power to control the frozen part of the image.
Flash Action Photos - First or second curtain sync?
Another test… In both shots the ball was rolling right to left. So which uses first and which second curtain sync flash?
How to Make Exciting Flash Action Photos with Second-Curtain Sync
If you will be controlling the motion of your subject and also the camera, a remote trigger is handy. Here, I used a Yongnuo RF602 radio trigger.
  • The blurred portion of your moving subject made with the ambient part of the exposure will have a translucent, “see-through” look. You will need some contrast between it and the background to help it show up. Shooting a brighter subject on a darker background helps a lot, especially as you learn the technique.
How to Make Exciting Flash Action Photos with Second-Curtain Sync
Canon 50D with Tamron 17-50mm f/2.8 lens. 1/6th sec. f/ 4.5 ISO 100 w/ second-curtain sync flash.

The key – practice!

As with so much of photography, there is no substitute for practice. Getting your camera/flash into second-curtain sync mode is the easy part.

After that, do some simple experiments such as I show, rolling a bright ball across a dark floor. That should help you grasp the concepts.

You will find that timing can be the tricky part. Know that the flash will fire at the end of the exposure, so experiment to determine where the object will be when that happens as it won’t be when you first click the shutter.

Flash action photos - illustrating he fast and furious of cycle racing with second curtain sync flash.
Illustrate the fast and furious action of cycle racing but still get the expression on the rider’s face with a 1/8th second shutter speed combined with second-curtain sync flash. Canon 6D with Canon 70-200mm f/2.8 lens. 1/8th second, f/8 ISO 800.

Move up to something like the hatchet photos I show here, or maybe someone swinging a golf club or baseball bat. When you have the concepts down, head out to a sporting event or something where there’s some action, to depict like the bicycle races I show or recruit some dancers or other performers.

Blur and frozen action both - Flash action photos with second curtain sync flash.
Canon 50D with Tamron 17-50mm f/2.8 lens. 2 seconds, f/5.6 ISO 100. Second-curtain sync flash with Canon 550EX flash.

Flash action photos that combine blur and a frozen subject all in one shot, will teach you the principals of ambient and flash lighting. Best of all, you can make some really cool and unique images! Gotta scoot now…have fun!

Flash action photo - Scale model of the author's 2003 Ford Sport Trac.  Second curtain sync flash.
Canon 6D with Canon 24-105mm f/4 lens. 1.7 seconds, f/8 ISO 100.

The post How to Make Exciting Flash Action Photos with Second-Curtain Sync appeared first on Digital Photography School. It was authored by Rick Ohnsman.


Digital Photography School

 
Comments Off on How to Make Exciting Flash Action Photos with Second-Curtain Sync

Posted in Photography


ON1 announces 360° cross-device sync service for editing and managing images remotely

29 Apr

Software developer ON1 has released details of a new service it claims will allow photographers to synchronize the editing and organizing of images across computers and mobile devices no matter where they are stored. The ON1 360° application will connect up to five computers and five mobile devices so that images stored on any one of them, or on attached external hard drives and NAS systems, can be accessed and edited from any of them – with changes synced across them all.

The software relies on a cloud storage service and a newly developed compressed RAW file format. Photographers select which files, folders or albums they would like to have access to and compressed versions are sent to the cloud. Connected devices, including smartphones, can then access those compressed files so they can be edited locally and the changes saved to all synchronized versions of that picture. A new free mobile app will be available for Android and iOS devices that will have the same RAW processing engine as its ON1 Photo RAW 2020 application so adjustments can match those made in the full desktop version of the software.

ON1 says the compressed RAW files that will pass between the devices will be 75% smaller than the original files, but we are told they will retain the same tonal and color range as the originals. Users also have the choice to store their full-sized originals in the cloud so they can be shared between devices as well.

ON1 claims its new program will offer ten times the amount of storage as competitors, but its application will cost 20% less. The high compression of the new RAW file format all also mean that more pictures will be able to be stored in the same space.

The company says it will retain its perpetual license options alongside subscription services with monthly or annual payment plans. The ON1 Photo RAW 2020.1 desktop application costs a one-off $ 49.99 at the moment, while the ON1 360° starts at $ 59.99 per year with 200GB of storage, or $ 109.99 per year with 1TB if you already own Photo RAW. If you want to buy Photo RAW and the 360° service together it will cost $ 89.99 for 200GB and $ 179.99 1TB per year. The monthly prices will be $ 5.99 and $ 9.99 for those who own Photo RAW, and $ 7.99 and $ 15.99 for those who don’t. Pre-ordering the 360° plan will also get you a training course and a pack of extra pre-sets.

For more information on ON1 360° go to the ON1 website.

Press release:

ON1, creators of ON1 Photo RAW, announces ON1 360° will be available in late June.

ON1 360° is a new end-to-end photography workflow solution for capturing, editing, and accessing photos seamlessly between multiple computers and mobile devices. ON1 360° connects ON1 Photo RAW 2020 on macOS and Windows computers with the new free ON1 Photo Mobile on iOS and Android devices. ON1 360° is the complete photography ecosystem that photographers have been waiting for; giving them more choice and more control. Multiple options for syncing files, control in file storage methods, and new capabilities for managing and editing across devices no matter where files are stored are available in ON1 360°.

At the core of ON1 360° is ON1’s new cloud storage service and sync technology, which allows photographers to sync photos, metadata, and edits, as well as albums, cataloged folders, and more between all their computers and devices, external hard drives, or even network drives. Unlike other cloud service offerings, ON1 360° will allow customers to choose which files or folders to sync, where the files live, as well as their preferred storage format.

“Our focus is on giving photographers control. Control of where they store their photos, what they want to sync and how they want to edit. There isn’t another solution out there providing this flexibility or functionality. We are still going to offer customers perpetual license options where they keep the software, even if they choose not to continue with this service. Of course, the subscription plan will be a good option as well and is ultra-competitive when it comes to price and features. The ON1 360° subscription plan includes 10x the storage at 20% less cost compared to other plans. Plus, the optional ON1 compressed-raw file format requires significantly less storage to have access to all your photos from all devices,” says Dan Harlacher, VP of Product.

With ON1 360°, customers can choose between syncing their original raw files or syncing their photos using ON1’s compressed-raw file format, which is 75% smaller than the original RAW file while maintaining the same tonal and color range. They are perfect for remote editing, sharing, and even printing common sizes, without noticeable loss in quality, saving the customer additional storage costs.

“Some people like using external drives, and some people like storing photos in the cloud. And some like both. The great part about ON1 360° is that you get to choose where photos get stored while still having access to them on all of your devices so you can share from anywhere,” add Matt Kloskowski, ON1 Educator and Guru.

“These all-new technologies that are the foundation of ON1 360° have been under development for some time and we are very excited to deliver them in June. This complete photography solution allows our customers to incorporate ON1 in every stage of their photography. With the technical foundation in place, we will start integrating new AI tools and features into all our products. There has never been a more exciting time at ON1.,” President and CEO, Craig Keudell adds.

Key Features
One Workflow — A complete end-to-end workflow between desktop and mobile with just one desktop application in ON1 Photo RAW 2020. No bouncing between organizers, raw processors, and layered pixel-editors. ON1 Photo RAW 2020 is a modern photo organizer, raw processor, layered editor, and effects app, all-in-one well thought out and affordable application.

Value — ON1 360° plan options start out at 10x the storage amount for 20% less cost compared to competitive plans available today.

Complete Control of Photos — Photographers can organize how they choose, where they store photos, and how they back up their photos. Whether photos are on local drives, upload some or all of them to the ON1 360° cloud storage, it’s their choice. All metadata and edits will back up automatically with ON1 360°.

High Quality with Less Space — ON1’s unique compressed-raw file format will also allow photographers to store more photos in the same amount of space without noticeable loss in image quality when processing. The new file format will also let photographers view, edit, and share their photos without having to store the original photo in the cloud.

ON1 Photo Mobile — The new free ON1 Photo Mobile will be a single app for capturing, editing, and syncing photos back to desktop computers, where each photo will also be re-editable. More than a basic raw processor, ON1 Photo Mobile uses the same RAW processing engine developed for ON1 Photo RAW. Adjustments will include Exposure, Contrast, Shadows, Mid-tones, Highlights, Whites, Blacks, White Balance, Noise, and Sharpening. Built-in filters will start with, black and white, adding film grain, darkening the edges with a vignette, and enhancing local contrast. ON1 Photo Mobile will be available for both iOS and Android devices and is free for anyone.

Capture and Create Anywhere — The new free ON1 Photo Mobile’s camera mode works like your device’s camera app but with many more advanced features. Capture raw photos on your smartphone with all the tonal range and details you expect from an interchangeable lens camera. The pro-level manual controls include the ability to adjust exposure, shutter speed, depth, and white balance.

Photos Stay in Sync — Automatically or selectively sync photos and edits from ON1 Photo RAW 2020 on desktop or laptop computers back to the free ON1 Photo Mobile using ON1 360°, providing a complete, photo editing and organizing system. ON1 360° will allow photographers to wirelessly send photos between desktop and mobile devices. Photos can be viewed, edited or downloaded directly to ON1 Photo RAW 2020 on both desktop or laptop computers with the non-destructive editing settings intact. You can also push edits from ON1 Photo RAW 2020 on desktop or laptop computers and automatically or selectively sync them back to ON1 Photo Mobile.

Privacy — Privacy is most important, and with ON1 360°, all photos will be kept private. ON1 will never analyze any photos using ON1 360° to build ways to market to photographers.

Availability and Pricing
ON1 360° subscription plans will be rolled out gradually starting today and continuing to the full release in late June 2020 when the ON1 360° service officially begins and all purchasing options become available. Today, owners of Photo RAW 2020 can take advantage of special introductory pricing on a 1-year prepaid subscription for ON1 360° (service only edition) with reduced pricing and pre-order bonuses including a new ON1 Pro pack with 360 custom presets ($ 100 value) delivered today, and a new ON1 360° Training Course delivered in June when the ON1 360° service begins. New customers can purchase a perpetual license for ON1 Photo RAW 2020 at a reduced price and the ON1 360° Service Add-on or the ON1 360° Software & Service subscription which includes everything. For a limited time, ON1 is cutting the price of ON1 Photo RAW 2020 by 50% during the lead up to ON1 360° availability in late June.

In June 2020, ON1 will roll out all ON1 360° plans including monthly subscription plans which include ON1 Photo RAW 2020, the ON1 Photo Mobile connectivity, and the 360° syncing service. As always, ON1 will continue offering Photo RAW as a perpetual-license product separate from ON1 360°, for those who prefer to own their software. This allows customers to upgrade to future versions at a time of their choosing, and it allows them to add or cancel any ON1 360° subscription without losing access to ON1 Photo RAW or their photos.

Articles: Digital Photography Review (dpreview.com)

 
Comments Off on ON1 announces 360° cross-device sync service for editing and managing images remotely

Posted in Uncategorized


ON1 announces upcoming Photo RAW 2020 update, two mobile apps and ON1 Sync

22 Aug

ON1 has announced the impending release of ON1 Photo RAW 2020 as well as three new products: ON1 Video, ON1 Photo Mobile and ON1 Sync Service. ON1 says in its press release that ‘in the coming months’ it will launch a ‘complete line of photo and video products to all levels of photographers providing an integrated creative workflow.’

ON1 Photo RAW 2020

The first product to arrive is ON1 Photo RAW 2020, a successor to ONE1 Photo RAW 2019 that brings with it new AI-powered features and more. Specifically, ON1 says Photo RAW 2020 will feature ‘AI Match and AI Auto, four filters in Effects (Weather, Sun Flare, Color Balance, Channel Mixer), Custom Camera Profiles with X-Rite, SmugMug integration, improved noise reduction, a map view, a Print Module, and significant speed/performance enhancements.’

Additionally, ON1 Photo RAW 2020 will be available in eleven languages for the first time, including English, German, Spanish, French, Japanese, Korean, Simplified Chinese, Russian, Portuguese, Italian and Dutch.

ON1 says it plans to release a public beta for Photo RAW 2020 in ‘mid-September’ 2019. ON1 Photo RAW 2020 is available to pre-order as the full version for $ 99.99 and an upgrade for Photo Raw 2019 users for $ 79.99.

ON1 Photo Mobile 2020 App

ON1 has also announced it will soon release ON1 Photo Mobile 2020, an Android and iOS app that will allow you to both capture and edit Raw photos on your mobile device. According to ON1, the app ‘will allow you to capture raw photos on your smartphone using the pro-level controls you are familiar with on your interchangeable-lens camera.’ In addition to capture, it will provide basic editing tools to adjust the captured images.

ON1 Sync

Alongside the ON1 Photo Mobile 2020 app, ON1 has announced ON1 Sync, an optional service that makes it possible to ‘view and edit photos on all your devices without requiring you to store them in the cloud or a closed system.’

The optional add-on for ON1 Photo Mobile 2020 will sync albums, presets and more between devices. ON1 doesn’t elaborate on how exactly it’ll work, but says ‘You can store your photos on your desktop or laptop computer, an external hard drive, in any of the popular cloud services or on your mobile devices, and you can still access them from anywhere.’

ON1 also emphasizes its priority on privacy, saying using the ON1 Sync service won’t grant ON1 any additional rights to the content, nor will the company ‘have permission to use your photos for image analysis or any sort of marketing purposes.’

ON1 Video 2020

Last but not least, ON1 has announced ON1 Video 2020, a new video editing application that it says was ‘explicitly designed for the photographer.’ ON1 says it ‘will be a simple, yet robust video editor’ with tools for enhancing, tripping, editing audio, grading and sharing videos. ON1 says ON1 Video 2020 will work seamlessly with ON1 Photo RAW 2020.

A public beta for ON1 Video 2020 is expected mid-November with a final release timeframe of ‘early 2020.’

Articles: Digital Photography Review (dpreview.com)

 
Comments Off on ON1 announces upcoming Photo RAW 2020 update, two mobile apps and ON1 Sync

Posted in Uncategorized


Ricoh GR III gets firmware update to improve low-light focusing, add Wi-Fi Image Sync option

24 Apr

The Ricoh GR III is far from perfect, but it’s won over the heart of at least one DPReview writer. Many of the imperfections it has can’t be fixed with a firmware update, but Ricoh is still attempting to address at least a few problems with the camera in the form of a new firmware update — version 1.10.

The updated firmware improves the autofocus performance of the camera in dark scenes and low-contrast environments, a complaint note by Barney in the aforementioned article. It also adds a Wi-Fi option for Image Sync (version 2.0.4 or later) and fixes a number of under-the-hood issues to improve the overall stability of the camera.

Firmware version 1.10 for the Ricoh GR III will be available to downloaded for macOS and Windows on Ricoh’s website by the end of the day, according to a Ricoh spokesperson. If you can’t wait, you can download it from Ricoh Japan’s English-translated website.

Articles: Digital Photography Review (dpreview.com)

 
Comments Off on Ricoh GR III gets firmware update to improve low-light focusing, add Wi-Fi Image Sync option

Posted in Uncategorized


How to Create Dark and Dramatic Backgrounds Using High-Speed Sync

30 Oct

The Usefulness of High-Speed Sync

Among other things, high-speed sync lets you underexpose your backgrounds for dramatic images.

High-speed sync (HSS) is easily one of the most useful features in lighting. Not only does it let you overpower the sun for more flattering light in the middle of the day, it also lets you use your largest apertures in broad daylight.

It also lets you use another useful technique – underexposing your backgrounds by several stops. With a powerful enough light you can even underexpose the sun by three or four stops, thus making it a compositional element in your frame. This lets you create dark, dramatic backgrounds for visual impact. It also brings your subject forward in the frame, ensuring they’re the dominant aspect of your image.

Fortunately, using HSS to create dark backgrounds like this is easy. And in this short tutorial, I’ll show you how to do it using both E-TTL and manual exposure modes.

Why Darken Your Backgrounds?

While you won’t want to darken the background in every situation, dark backgrounds in scenes that would normally be very bright look great. It may be a stylised affair, but it’s a cool style.

Darkening the background brings your subject forward in the frame(providing they’re well lit), and emphasizes them as the focal point of the background. And the inherent contrast added by putting extremely dark tones in the frame helps to make things pop.

This shot was taken without a flash and is all natural light. You can see the background shares a similar tonality to the subject, reducing the subject’s impact within the frame.


By intentionally underexposing the background with HSS, the subject now dominates the frame.

What Do You Need?

To get started with this technique you’ll need:

  • A flash with HSS capability (and TTL capability if you don’t want to use manual).

Some studios strobes (such as the Pixapro Citi600) now come with HSS functionality built in.

  • A trigger or some other means to fire your flash. (You’ll need a TTL-compatible trigger if you want to use TTL.)

If you want to use manual mode, a PC Sync cable will do the job. But for E-TTL you’ll need a compatible trigger. (The icon circled in red is the HSS icon.)

E-TTL Mode

To use this technique with TTL metering, turn on the flash, trigger, and camera of whatever system you’re using. Set your flash mode to HSS and E-TTL. (If you don’t know how to do this, refer to your manual.) You should also zero out the flash exposure compensation settings on your flash.

Switch your camera to ‘Aperture Priority‘ mode and choose the desired aperture. I’m fond of f/4 and f/5.6 for this technique, but it’s not a rule.

Now dial between -1 and -3 stops of exposure compensation into your camera. What this does is underexpose all the ambient light in your scene. It’s how you achieve the dark backgrounds – everything that isn’t properly exposed by your flash will be darkened.

Backgrounds that are already in shadow (such as the one in this photo) may only need one stop of underexposure.

For dark backgrounds already in shadow, -1 stop of exposure compensation will be enough. For bright backgrounds or backgrounds in direct sunlight, you’ll need to underexpose more. To overpower the sun, you’ll need to underexpose by at least three stops.

Backgrounds lit by direct sunlight (such as the one in this image) may need up to four stops of underexposure.

Take a test shot, evaluate the image and the histogram on your camera, and adjust the flash exposure compensation as needed.

That’s all there is to it.

Manual Mode

HSS is great for overpowering the sun. Here, three stops of underexposure controlled the appearance of the sun in the frame. Notice how dark the rest of frame (lit in broad daylight) appears.

The steps for manual mode are almost identical to using E-TTL mode.

  1. Set up the flash, trigger, and camera of your system.
  2. Set the camera to aperture priority mode.
  3. Set the camera to your desired aperture.
  4. Dial in -1 to -3 stops of exposure compensation.
  5. Take a test shot.
  6. Adjust your flash power as needed.

However, in manual mode, the meter in your camera doesn’t relay any exposure information to your flash as it does in E-TTL mode. That means you’ll need to set your flash power yourself by evaluating your test shot and turning the flash power up or down as needed. You may need to alter the flash power a lot more than you would with E-TTL. Just keep taking tests shots and evaluating the exposure until it’s where you want it.

Adjusting the power in manual mode means dialing through all the increments on your flash. This isn’t a problem, but it’s harder than E-TTL.

As an aside, light meters are now available that can measure HSS such as the Sekonic L-858D. However, they’re very expensive. A Slovenian company called Lumu also makes a light meter that plugs into an iPhone to measures HSS. I saw these being demoed at a trade show and was very impressed with the results. They’re less expensive, but they currently work only with iPhones.

That’s It

Provided you have the necessary equipment, the technique is quite easy. And it can give you a variety of results, so make sure you experiment with different amounts of exposure compensation.

Though limited by your access to the equipment, this HSS technique is easy to employ and can result in bold, dramatic imagery.

Other Considerations

Here are a few things to keep in mind while using this technique:

ISO. Generally speaking, you should keep your ISO as low as possible. Of course, if you have a particularly low-powered flash you may need to bring it up.

Flash Meters. Most flash meters can’t meter for HSS exposures. There are specialist meters that can, but be prepared to pay through the nose for them.

Daylight Conditions. This technique works in all sorts of lighting conditions, from direct midday sun to diffused light on a cloudy day. You’ll need a powerful light to overpower the sun on a bright day, but if you do the technique works really well.

This HSS technique works well in all lighting conditions. The image on the left was created in overcast conditions, while the image on the right was taken in direct sunlight.

Flashguns / Speedlights. Many flashguns have HSS functionality built in and are capable of great results. If you have a flashgun, consider using them for this technique.

Give it a try

Now that you’ve seen what can be accomplished with this relatively easy technique, I encourage you to get out and try it for yourself. And let us know how you went in the comments.

The post How to Create Dark and Dramatic Backgrounds Using High-Speed Sync appeared first on Digital Photography School.


Digital Photography School

 
Comments Off on How to Create Dark and Dramatic Backgrounds Using High-Speed Sync

Posted in Photography


How to Sync Your Develop Presets to Lightroom Mobile

10 Oct

Better. Faster. More efficient.

That’s what we photographers demand from our gear as we keep pushing them to perform at levels that were unheard of a few years ago. Even the means to post-process our digital images has been ramped up to the point where we can do it on our mobile device within minutes (if not seconds) of making the exposure.

For the past couple of years Adobe has done its best to keep pace with the need for mobile-friendly editing with Lightroom Mobile – the mobile device counterpart of the Lightroom CC flavor of our beloved Lightroom Classic. But in June 2018 Adobe upped the ante by fully integrating develop presets into the Lightroom Mobile application. This means we can take ALL of our develop presets (purchased and self-made) with us on our mobile devices, which is a huge deal for those of us who use presets for the bulk of our photo editing.

So how do we get the presets from our computers to our Lightroom Mobile app? Until recently we could do it only by using some unofficial workarounds. But with Adobe’s newly minted cross-platform support for develop presets, you can carry your  presets with you wherever you go simply by clicking a button.

Let me show you how to sync your beloved develop presets from Lightroom Classic to your Lightroom Mobile app.

What You’ll Need

To sync your develop presets from your computer-based Lightroom Classic you currently need to be a member of the Adobe Creative Cloud Photography plan. If you have a standalone (non-cloud) version of Lightroom you won’t be able to sync your presets with your mobile device.

Every Adobe Creative Cloud Photography plan includes both Lightroom Classic CC and Lightroom CC. I realise these names can get a little muddled up, but bear with me.

Lightroom Classic CC is the tried and true version of Lightroom most of us remember. Adobe calls it the “desktop-focused” version of Lightroom, and what many of us moved from when we switched to the Adobe Creative Cloud Photography plan.

Lightroom CC is the new cloud-based version of the Lightroom we knew previously. While it’s a boiled down, more streamlined incarnation of the classic Lightroom, it still has all the tools we know and love. And it’s the software we’ll use to sync with our Lightroom Mobile app.

So you need to have Lightroom CC installed on your computer to sync your develop presets with your mobile version of Lightroom. You also need to have the Lightroom Mobile (Lightroom CC) app installed on your mobile device.

How to Sync

Getting your develop presets from Lightroom Classic CC to Lightroom Mobile is incredibly easy once you understand a few simple steps. In fact, the process is almost automatic once your install Lightroom CC alongside Lightroom Classic CC.

Once you installed and open Lightroom CC, your develop presets and profiles will sync automatically through your Adobe Cloud account. Keep in mind that while you can sync catalogs from your Lightroom Classic CC software, your develop presets won’t sync to Lightroom Mobile until they’re synced to your Lightroom CC software.

Once you have your presets in Lightroom CC, sync your devices by clicking the cloud icon at the top right.

When your develop presets appear in Lightroom CC, it’s time to open your Lightroom Mobile app.

Open an image, and scroll to the develop presets icon.

You should now see your newly synced develop presets from Lightroom CC (and thus Classic CC) available for use on your Lightroom Mobile app.

Final Thoughts on Syncing Develop Presets to Lightroom Mobile

Whether you love it, hate it, or just want to get on with your processing, the fact we photographers can now work more readily on the go can’t be ignored. We no longer need to get back home, or even back to a waiting laptop, to begin processing our images. Whether or not it’s a good thing is entirely up to you.

Being able to use our develop presets across all of the Adobe Creative Cloud Photography plan platforms will make our photographic lives even easier. If you use Lightroom Mobile regularly, be sure to share your thoughts about this newfound mobility in the comments below.

The post How to Sync Your Develop Presets to Lightroom Mobile appeared first on Digital Photography School.


Digital Photography School

 
Comments Off on How to Sync Your Develop Presets to Lightroom Mobile

Posted in Photography


What is Flash High-Speed Sync and Why Do You Need it?

24 Nov

Using flash is already complicated enough, but adding in a fast shutter speed makes it even harder. In these two videos, you will learn about your camera’s flash sync speed and why it’s limited. Then you’ll see what you can do to solve it and use faster shutter speeds using something called high-speed sync.

Flash sync speed and high-speed sync explained

In this first video, Matt Granger explains the mechanics of what is going on inside your camera and why it has a maximum flash sync speed. With the use of some great slow-mo clips, you will see inside the camera to learn exactly what happens when you press the button.

High-speed sync in action on location

In this next video, J.P. Morgan from The Slanted Lens will walk you through exactly what high-speed sync is and why it’s needed. You’ll learn how your camera shutter works and why your camera sync-speed won’t let you use fast shutter speeds with flash without high-speed sync (often referred to as, HSS).

He is using the some of following gear:

  • Dynalite Baja B4 battery powered strobe
  • SpiderPro camera holster
  • A medium-sized softbox 
  • Tamron’s 15-30mm lens

Conclusion and more learning

If you need more help using your flash check out these dPS articles:

  • How to Understand the Difference Between TTL Versus Manual Flash Modes
  • 4 Beginner Tips for Creating Dramatic Portraits with One Flash
  • Why Off-Camera Flash Isn’t as Scary as You Think
  • Flash Shopping Guide – Things to Consider When Buying a Speedlight
  • How to Use Your On-Camera Speedlight to do Bounce Flash Effectively
  • 9 Steps to Get Over Your Fear of Off-Camera Flash

The post What is Flash High-Speed Sync and Why Do You Need it? by Darlene Hildebrandt appeared first on Digital Photography School.


Digital Photography School

 
Comments Off on What is Flash High-Speed Sync and Why Do You Need it?

Posted in Photography


Shooting an Olympic sailor in action using remote high speed sync

12 Nov

This article was originally published on Luminous Landscapes, and is being republished in full on DPReview with express permission from Terry McDonagh.


In January of last year, I was commissioned to shoot some dramatic action shots of an Olympic sailor; however, I did some image research and wasn’t overly impressed by any images I found, so I decided that a good approach would be to try and light the subject and by doing so I could afford to underexpose the available light.

This would help add to the drama, plus in doing so I would be able to get some light into the water spray coming off the boat. In order to get this shot, I needed to freeze the action using a high shutter speed and combine that with flash, so how was I going to achieve all that?

Obviously, I needed to use flash, but I knew I would be shooting at a high shutter speed, so it had to be high-speed sync (HSS). The beauty of HSS is that it allows you to shoot at a high shutter speed whilst still syncing the flash, which was unheard of a few years ago.

I decided that I would use two flashes, both for the extra power and to avoid any redundancy due to the high risk of this particular situation. I was attaching a flash to a boat which could easily capsize, and I was doing it in January when, due to it being 3°C, the batteries weren’t going to last too long. In other words: I was only getting one chance to nail this job, so I had to minimize the chances of anything going wrong.

Flashes facing Starboard

I had used HSS before, but never remotely and not on the water, which was all a bit daunting.

To prepare, I did a bit of research on trigger systems and decided on a Phottix Laso trigger for a couple of reasons. Firstly, it would trigger my Canon 600EX-RT directly, via the built-in radio on the flash. Second, it came with a separate receiver for my Canon 580 EX-ll, which meant I could control both units remotely from one base unit. And finally, the receiver had a metal hot-shoe mount, which I wanted, as I knew that the gear was going to get bounced around out there so I wasn’t risking any plastic hot-shoe mounts.

Flying along flashes pointing to starboard

The next part of the jigsaw puzzle was the batteries, as HSS is really hard on batteries and the faster the shutter speed, the higher the power drain. I did some more research and came across some ‘Panasonic Eneloop pro rechargeable’s’, apparently the best. I purchased a few sets of them, tested them in the cold, and found they were amazing.

Which brought me to my next major problem: waterproofing the flash units. There was a strong chance that they would be submerged if the boat capsized, and having sailed a Lazer, the boat that I would be shooting, a few times, I knew that these boats flip over very easily. To counter this issue, I developed a triple bagging system using some freezer bags.

When I submerged the flash in a bucket of water to test, it stayed watertight: Happy Days!

The trick was to place one bag over the complete unit and then mount it to the hot-shoe. Then I placed another bag over this, but upside down, and a third one over the spigot so that it was completely sealed.

Flashes bagged up and tethered.

Then it was just a matter of pushing the spigot into the Manfrotto clamp which was attached to the boom of the boat.

Flashes pointing to port.

I headed down to the yacht club to do a technical recce and try to attach the gear to the boat and figure out all my settings.

I settled on mounting the units upside down, firstly so that the sail would not damage them, and also because I was afraid they might rotate with any impacts, plus I reckoned there would be fewer forces on them if they were not top heavy. I used a Manfrotto super clamp as it has a secondary safety lock, so I was able to instruct Annalise how to open the clamp and rotate the speed-lights.—every time she did a tack she rotated the units so they were always facing her, and she was brilliant at doing it. Her sailing wasn’t too shabby either.

Total control

So, I had designed a system that I could remotely fire, adjust exposure and rotate, and it was waterproof… pretty cool! Next thing was to get out there and see how it all worked.

On the day of the shoot, conditions were perfect: overcast, but with some nice contrast. I was getting a light reading of around 1/640 @ F3.2 iso 500. I underexposed by around two stops to try and get some drama into the images but without making it look too much like nighttime.

We headed out to sea about 4 km out as that’s where the wind was and I wanted little or no background buildings etc. in the images. To preserve the batteries I left the units off until we reached our destination, This proved to be a bit of a mistake as the boats were dancing around a lot, so much so that I almost fell in trying to locate the switches on both speed-lights and the receiver, and through the Ziploc bags it proved very tricky.

Luckily my very quick-witted boatman spotted this and grabbed me at the last moment, otherwise I honestly would have gone into the water with a 5DSr and a 70-200mm lens plus my phone etc. Thank god is all I can say.

We shot for approximately an hour, as that was long enough for both Annalise and me, and the batteries were getting very low on energy. I reckoned I had the images I needed in the bag.

Annalise loving the conditions.

I was shooting on a Canon 5DSr with a 70-200mm lens. Final settings were 1/640 @F3.2 and iso160. I had considered using a faster camera but the flash wouldn’t have kept up with it so I just stuck with the higher 50MP camera, which was important as we were using the image on billboards etc. so the higher the quality the better.

The shoot worked out brilliantly. The hardest bit was trying to maintain focus on Annalise, and trying to keep the horizon level; plus, watching all the other elements meant that after an hour of this type of thing you’re pretty burnt out.

When we finished, Annalise nearly fainted when she heard that there was approximately €2k worth of gear attached to her boat. She said had she known she wouldn’t have sailed so hard! I didn’t believe that for one minute.

Wind just died, time for home.

Based in Dublin, Terry works for leading advertising, design and architectural agencies throughout Ireland and often abroad in the areas of industry, architecture, products, people and food.

He provides a fast and reliable digital retouching and manipulation when required, and shoots live action commercials too. Feel free to contact Terry for more information.

Articles: Digital Photography Review (dpreview.com)

 
Comments Off on Shooting an Olympic sailor in action using remote high speed sync

Posted in Uncategorized


Google introduces Backup and Sync for Photos and Drive

16 Jul

Google Photos is a very efficient tool for storing and sharing your images online, and can be conveniently used via dedicated mobile apps for iOS and Android. Now, using the service has become easier for desktop computer users as well.

Google has just introduced the Backup and Sync desktop app for Windows PCs and Apple Mac computers to replace the existing Google Photos desktop uploader and Drive for Mac/PC.

Google says the new app is a simpler, speedier and more reliable solution than the previous tools, and safely backs up files and photos from your computer or connected memory cards and cameras. Simply choose the folders you want to back up, and the app takes care of the rest.

Backup and Sync is now available for download on the Google website. More information on how Backup and Sync works is available in the Google Help Center.

Articles: Digital Photography Review (dpreview.com)

 
Comments Off on Google introduces Backup and Sync for Photos and Drive

Posted in Uncategorized