When looking through your pictures, have you ever had that sinking feeling of seeing everyone in a single image perfectly happy and smiling except for one person who was sneezing, sniffling, or looking at a squirrel? I can recall several times when I have returned from photo shoots being all optimistic about the experience, but realized as I combed through my images, that while I had several good shots where most people were perfectly posed, I didn’t have any shots where everyone looked just right.
It can be intensely frustrating, especially if you know you did everything in your power to get just the right shot. Fortunately Photoshop can help. With a few simple steps, you can learn how to load up a couple of images and perform a face or head-swapping maneuver with surgical precision, that would make Nicolas Cage blush (as in from the movie: Face Off). If it’s done correctly, no one will ever be able to tell that the final image has been altered.

Heade-swapping can be incredibly useful when dealing with squirmy kids. This impromptu photo at a birthday party is actually a composite of three separate pictures.
When going through my pictures, I always start with Lightroom to cull the images down to the best ones, and do initial edits, such as exposure and color adjustments. If I come across a situation where I need to take a face from one photo, and put it in another, I open both pictures in Photoshop (which is a simple matter of right-clicking and choosing: Open as Layers in Photoshop). For example, the following picture turned out fine except for the boy who was distracted by something off to the side.

This family picture I took on July 4th is fine, but the boy’s expression is not the greatest.
Fortunately I had another picture that looked great, but in this one the mother was blinking. No worries though – Photoshop was there to save the day!

The little guy has a much better expression in this photo, but his mother was blinking. Photoshop to the rescue!
When working with edits like this it’s a good idea to use as high-resolution of pictures as possible, so you have the maximum amount of data to work with. Do not export your images from Lightroom as low-res JPG files, and then import them into Photoshop. Instead use full-size originals, though I do like to make sure the exposures are as closely matched in each picture first. Edit your white balance, color adjustments, and other parameters such that both images are as close as possible before going into Photoshop, or your composite will look painfully obvious. (Some photographers take the exact opposite approach and do all the Photoshop work first, and then do color adjustments and cropping in Lightroom. Either way works, but I prefer the former method.)
If you’re unfamiliar with Photoshop, and it seems a bit overwhelming at first, don’t think about all the buttons, menus and options available to you just yet. This face compositing really only requires two sections: the Layers panel in the bottom right corner, and the Brush tool on the left side.
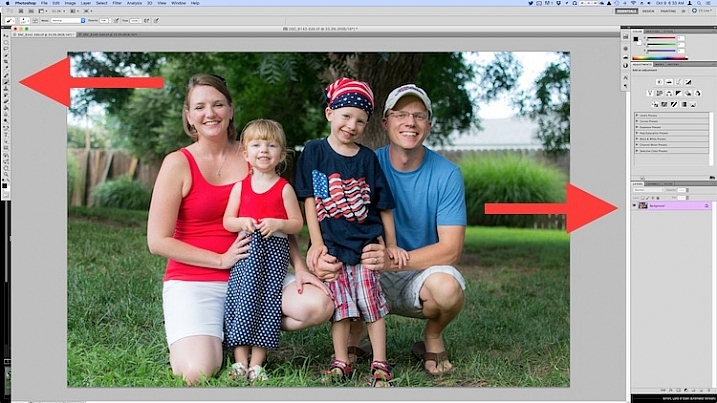
Open both images as layers in Photoshop
Select both images in Lightroom and right click, then choose: Open as Layers in Photoshop. Once your images are open in Photoshop, rename one or both so you can tell which is the one to use most people, and which is to copy the new head from.

You now have two layers in one image: the background (in this case, the one where everyone but the mother is smiling) and the layer you just copied over (in this case, the one where only the mother is smiling).
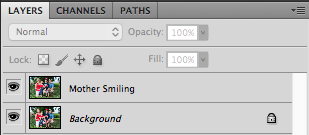
Make a layer with just the new head to be added
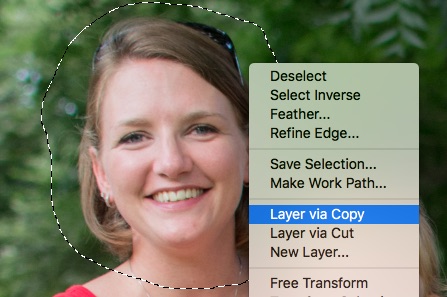
From here there’s a couple different ways to go about combining them, but when doing a simple head swap the method I prefer is to get rid of everything in the second layer except the face I want to put into the first image. To do this, use the Lasso tool to draw an active selection around the face, and create a new layer which consists of just the face itself. I like to use New Layer via Copy just in case I want to go back to the original for something, but it’s up to you. Make sure to leave plenty of padding around the face so you have enough room to blend it in as you make your adjustments.
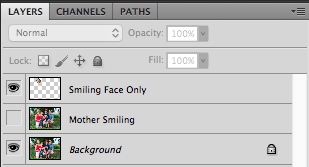
You now have three layers in the side panel: the original background, the new one you copied over, and the face itself. Since you only need the face, you can click the eye icon just to the left of the layer you copied over, which leaves it intact but invisible (hidden layer).
Compositing or blending them together
Now comes the fun part – compositing the face! I like this step because I get to be a little creative, and play around with exactly how I want the final image to look. The first thing you’ll notice is the face you are working with is probably going to be out of place, unless your camera was on a tripod, and everyone was perfectly still.
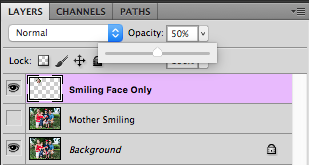
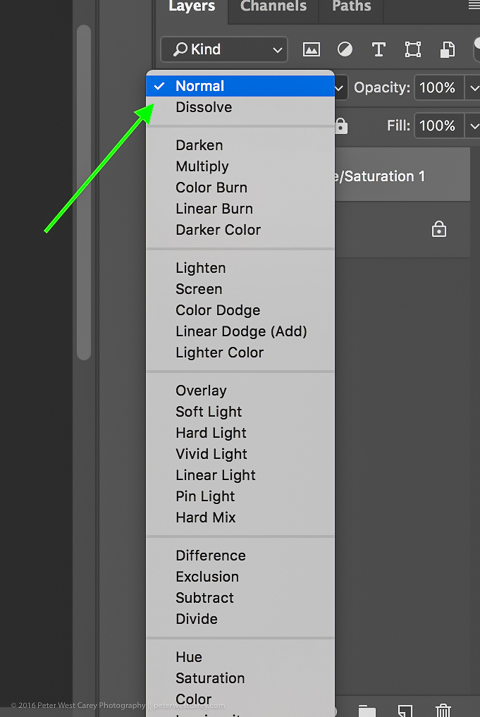
To get the face into the proper position, select it in the Layers panel and change its opacity to about 50%. That way you can see both faces at the same time, which will help you as you start lining them up. (Note: alternatively you can change the face layer’s blend mode to Difference. That will show it sort of inverted (negative) and it makes it easy to position them or align the layers. Then just change it back to normal when done.)
With the face layer still selected, choose “Transform” from the “Edit” menu, or press command-T on a Mac (control-T on Windows). Use your mouse to drag the face into the proper position, and press the arrow keys on your computer to fine-tune your movements on a per-pixel basis. You can also use the Transform command to rotate the face in case the person has turned his or head slightly. To do this, put your mouse cursor just outside the border near one of the corners, where it will change to a rounded arrow which means you can now click and drag to rotate.
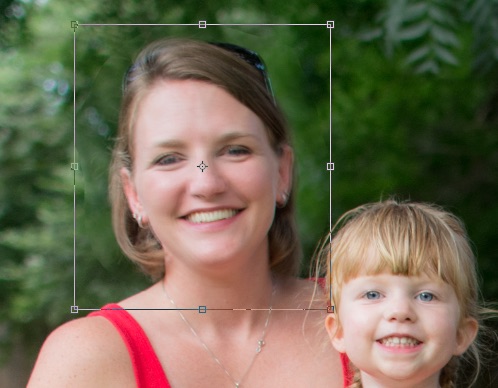
Once you that have the second face lined up properly over the first one, press the [Enter] key to lock it in place, then bring the layer opacity of the face back up to 100%. Don’t worry if you didn’t get things just right: you can always made additional Transformations later by selecting the layer and choosing “Transform” just like before.
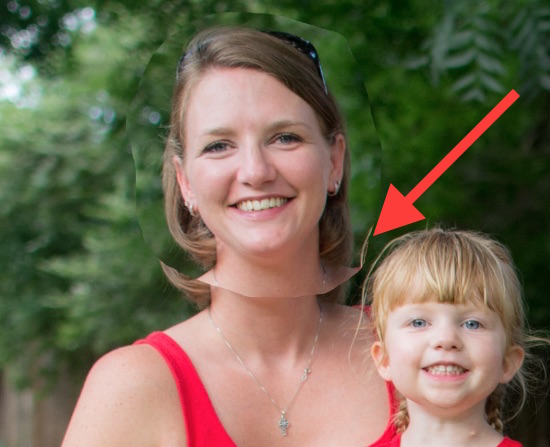
At this point things are looking pretty good, but right away you will notice a harsh border around the face where your selection box was. This needs to be eliminated so you only have the facial features you want, and not the person’s hair or any background elements that might have changed between the shots.
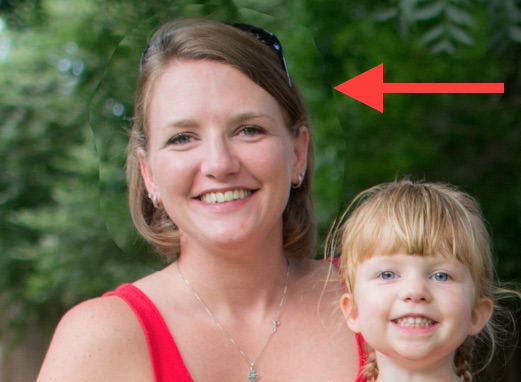
At this point you might be thinking “No problem! I’ll just use the eraser tool to get rid of the parts I don’t need,” but that’s a rookie mistake you will soon regret. The eraser tool is permanent, so instead we’ll use what’s called a layer mask to get rid of any parts we don’t want. It works similar to the eraser tool, but is fully adjustable and even altogether reversible (it’s called non-destructive editing) so that any edits you make can easily be undone at any point. With the face layer selected, click the “Add Layer Mask” button at the bottom of the Layers panel.

Now you can use the brush tool to paint out (using black) any areas of the face layer you do not want, or paint them back (paint with white) in if you do decide to keep them. This layer mask method is far more flexible than using the eraser tool, and it allows you to use varying levels of opacity as well. You can partially erase something, while retaining just enough to allow for a smooth transition, instead of a harsh line. Select the brush tool and choose a brush with soft edges. Play around with your flow rate and opacity settings too. I don’t like to go all the way to 100% opacity right away, so I usually start with 50%-70% to leave some wiggle room. Remember, you can always change your adjustments later.
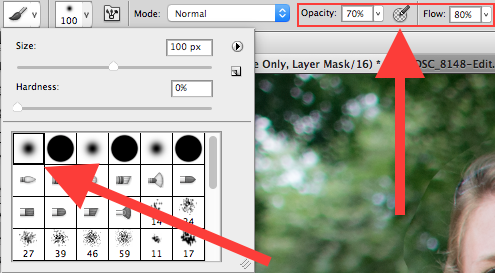
Now you can start blurring the line between the background photo and the face you are compositing onto it. Use the brush tool to gradually erase around the edges of the face, and if you find yourself wanting to brush anything back in just press the X key to reverse the process (X switches your foreground and background colors, in this case black and white) as you apply the brush. Notice that you’re not actually painting on the image of the face, but on a mask that has been applied to the layer. You are basically telling Photoshop which parts of the face layer you want to see, and which parts you want to erase (hide) or mask out. In the Layers panel you will see this mask show up to the right of the original layer as a mostly white box with some dark spots that indicate where you have painted with the brush.
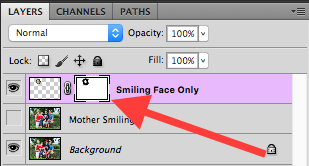
Using brushes on the layer mask is the most part of this whole process as I get to see my edits in realtime, and get as detailed as I want with brushing in the smiling face.

The final image
You can use this technique to composite as much as you want, including background elements, multiple faces, or even individual features such as eyes or teeth. Learning this simple head swapping technique is not only handy for creating the perfect group portrait, but can also be your gateway into a much broader world of Photoshop editing in general.
What are your favorite tips for doing simple edits in Photoshop? Do you have any other techniques that have worked for you over the years? Leave your thoughts in the comments below.
googletag.cmd.push(function() {
tablet_slots.push( googletag.defineSlot( “/1005424/_dPSv4_tab-all-article-bottom_(300×250)”, [300, 250], “pb-ad-78623” ).addService( googletag.pubads() ) ); } );
googletag.cmd.push(function() {
mobile_slots.push( googletag.defineSlot( “/1005424/_dPSv4_mob-all-article-bottom_(300×250)”, [300, 250], “pb-ad-78158” ).addService( googletag.pubads() ) ); } );
The post How to do a Head Swap using Photoshop by Simon Ringsmuth appeared first on Digital Photography School.

Digital Photography School






 This last week Sony released a couple of cameras that caused a big stir around the online photography community – the Sony A7 and A7R cameras (pictured right). These full frame, interchangeable cameras come in a compact body with lots of features and the initial hands on reviews being published from around the web say that they are going to be really popular.
You must be logged in to post a comment.