RSS
 

Posts Tagged ‘Sure’

DPReview TV: the Laowa 24mm F14 Probe may look strange, but it sure is fun

05 Aug

This week we take a look at one of the more unusual optics we’ve seen for quite a while. The Laowa 24mm F14 Macro Probe lens may look like something out of a science fiction movie, but as Chris and Jordan discover, it opens the door to some really interesting photo opportunities.

Be sure to subscribe to our YouTube channel to get new episodes of DPReview TV every week.

Articles: Digital Photography Review (dpreview.com)

 
Comments Off on DPReview TV: the Laowa 24mm F14 Probe may look strange, but it sure is fun

Posted in Uncategorized


Make Sure You Know all the Drone Regulations Before You Fly

23 Oct

Everywhere you look, it seems like everyone has their hands on a drone. YouTube is crawling with aerial drone footage, and you can buy one at just about any electronics store. But just because drones are everywhere doesn’t mean you can (legally) fly them anywhere.

Here at dPS, we dove into topics such as tips to get started with drone photography and how to get stunning aerial photos with your drone. One thing we haven’t covered that’s worth talking about is where you can and can’t fly your drone. Read on for some tips on things to consider before you fly a drone.

Aerial Drone Photography Rules - Drone Regulations to Consider Before Traveling With One

Why Are There Drone Regulations?

On the surface, drones may seem like fun toys or new tools to add to your photography or videography kit. After all, they’re marketed as such and most of the time, they don’t do any visible harm. However, drones can be dangerous from the perspective of privacy and physical safety.

No one likes the idea of a drone spying on them, or worse yet, a drone that comes crashing down and damages property or hurts someone. But these very plausible scenarios are exactly why drone regulations exist – to protect drone pilots and the general public from accidents.

Aerial Drone Photography Rules

Who Makes Drone Regulations?

So who comes up with drone rules and regulations? That depends entirely on where you live. Generally speaking, drones are considered unmanned aerial vehicles (UAVs) and as such, they are regulated by the national aviation authority of each country. Thus, most countries will have their own rules, and often each state or city within the country might have further regulations.

So it’s important to do extensive research about where specifically you plan to fly your drone. Punishment for violating drone regulations can be hefty fines or even imprisonment, so it is very important to follow drone rules, especially in foreign countries.

What Kind of Drone Regulations Are There?

Aerial Drone Photography Rules

Drone rules vary in every country, but here a few common ones:

Register Your Drone

Today, drones vary from fitting in the palm of your hand to requiring a large backpack to transport them. Generally speaking, drones weighing any more than 0.55 pounds must be registered with your national aviation association before flying.

Get Licensed to Fly

Some countries require drone operators to pass an exam to get a license before flying a drone, so be sure to get licensed if it’s necessary.

Aerial Drone Photography Rules Drone Regulations to Consider Before Traveling With One

Get Insurance for Your Drone

In some places, you must have insurance for your drone in order to fly. But drone insurance is something you should have any way to protect your investment.

Avoid Flying over People and Properties

Even the tiniest drone can be a hazard to someone or something if it comes crashing down from the sky or runs into an airplane. As a general rule, don’t fly your drone over crowds of people or near private or government property. You should also avoid flying near airports or helipads.

Sample Drone Regulations in the USA

Drone Regulations to Consider Before Traveling With One

In the United States, drones are considered unmanned aircraft systems (UAS). As such, they are regulated by the Federal Aviation Administration (FAA). There are two sets of regulations: one for those flying drones for fun, and one for those flying for commercial (professional) reasons. A summary of the FAA rules is below, with more details available here.

  • Flying drones for recreational or educational use is okay without a permit. Drones must be registered if they weigh over 0.55 lbs (250g). Drones cannot be flown within five miles of an airport or helipad without prior notification to the airport and air traffic control.
  • If flying for commercial use, the drone pilot must be over 16 years of age, have a Remote Pilot Airman Certificate, and pass TSA vetting. The drone must fly under 400 feet and at or below 100 miles per hour. Drones can only fly during the daytime, and must not fly over people.

For More Information

  • Global Drone Regulations Database
  • Master List of Drone Laws

Apps

  • UAV Forecast
  • Hover

https://www.faa.gov/uas/

In Conclusion

If your head is spinning when you reach the end of this article, you’re not alone. There are many more drone rules and regulations than most people know about, which makes enforcement of them very patchy.

What’s more is that drone regulations are in a constant state of flux, so it’s hard to say exactly what rules exist and apply at a given time. But with that said, it’s better to know the rules and do your best to follow them, or risk getting arrested and potentially fined like this French tourist in Italy.

The post Make Sure You Know all the Drone Regulations Before You Fly by Suzi Pratt appeared first on Digital Photography School.


Digital Photography School

 
Comments Off on Make Sure You Know all the Drone Regulations Before You Fly

Posted in Photography


Before you invest in LED lights, make sure you understand CRI

30 May

LED lighting technology is all the rage, and there are great reasons to invest in LED lights. (Beyond using them as a lightsaber.) However, photographers are keenly aware that it’s not just the light that’s important, but also the quality of light you have.

One tool we can use to assess the color accuracy of a light is the color rendering index, or CRI, which provides some information about how accurately a light can reveal color compared to an ‘ideal’ light. A light which perfectly emulates the color accuracy of natural daylight would have a CRI score of 100.

Companies love to state CRI numbers on their products, leading you to believe that they can provide the color accuracy you’re looking for. However, while a higher CRI number is generally better, it’s important to understand how that number is generated, and why it’s not as definitive as manufacturers like to make it sound.

Learn more at premiumbeat.com

Articles: Digital Photography Review (dpreview.com)

 
Comments Off on Before you invest in LED lights, make sure you understand CRI

Posted in Uncategorized


Desktop Jellyfish Tank: This Invertebrate Aquarium Sure Beats Goldfish

21 Feb

[ By SA Rogers in Design & Products & Packaging. ]

jellyfish aquarium 3

Rapidly warming oceans have led to an explosion of jellyfish numbers in seas around the world – allow that fact to float around your brain for a bit as you stare at translucent invertebrates illuminated within your very own desktop jellyfish aquarium. Would owning such a thing offer comfort and entertainment, or just be a sad reminder that humans have really mucked things up on our home planet? Now’s your chance to find out.

jellyfish aquarium 1

The JellyTank is a compact 5-gallon aquarium with a modern design and color-changing, remote-controlled LED lights. This ‘flow bar design’ with laminar pump-driven water creates an environment similar to what jellyfish would experience in the wild, and there’s a built-in mechanical and biological filtration system. The tank is made of high-grade aquarium acrylic, and its housing is available in black or white.

jellyfish aquarium 5

desktop jellyfish tank 6

The creators came up with the idea after purchasing a $ 400 jellyfish tank for their office, and finding that the grates kept sucking up the jellyfish and killing them. They wanted to create a ‘sustainable’ tank that comes pre-assembled for the least amount of fuss. Everything you need to set it up is included, except for the moon jellyfish, which are purchased separately through the JellyTank website.

jellyfish aquarium 2

“JellyTank is currently working on developing an aquaculture facility to grow Jellyfish for our customers,” reads their Kickstarter. “We are speaking with industry experts and marine biologists from across the nation to develop the best protocols and standards of practice to ensure we deliver the healthiest sustainable source of jellyfish available in the world today. our proposed aquaculture program will be overseen, staffed and managed by leading jellyfish aquaculture specialists.”

This living reminder of the ravages of human-induced climate change can be yours with a pledge of $ 175 or more at the JellyTank Kickstarter. The creators aren’t allowed to include live jellyfish with their rewards, so they have to be claimed separately when the kits are ready to ship. People are clearly excited about the project, having raised almost twice the fundraiser’s goal with 16 days to go. It remains to be seen whether flushing dead jellyfish down the toilet is as depressing as doing so for your late pet goldfish.

Share on Facebook


[ By SA Rogers in Design & Products & Packaging. ]

[ WebUrbanist | Archives | Galleries | Privacy | TOS ]


WebUrbanist

 
Comments Off on Desktop Jellyfish Tank: This Invertebrate Aquarium Sure Beats Goldfish

Posted in Creativity


The internet figured out a genius way to make sure you see the supermoon tonight

15 Nov

Tonight’s supermoon will be the largest in decades, appearing 7% larger than your typical full moon. While photographers around the world are making a game plan to capture the drama, Twitter user Alex Duggan has found another, simpler solution. Step one: secure a tortilla. Step two: apply it to the nearest window for instant supermoon.

Since we’re guessing that a tortilla won’t do the trick for you, here are a few actual supermoon photos to help you get inspired.

Embed from Getty Images

Are you planning on photographing the supermoon? Do you find the whole thing underwhelming? Let us know in the comments.

Articles: Digital Photography Review (dpreview.com)

 
Comments Off on The internet figured out a genius way to make sure you see the supermoon tonight

Posted in Uncategorized


How to Make Sure You Use Your New Camera

10 Jan

Raise your hand if this scenario sounds familiar: you get a new camera, possibly as a gift, and immediately your mind leaps with excitement at all the photographic possibilities that await. You quickly start taking photos of everything around you; houseplants, food, pets, your kids, the trees in your yard, even mundane objects like cookware, or office trinkets. You just can’t wait to get your new camera and kit lens off the shelf and shoot photos of everything.

But after a week or two the lustre wears off, and your camera starts spending more time in your closet than in your hands. You find yourself too distracted, too uninspired, or worst of all, too busy to take photos. Every now and then you pick up your camera, put it in Auto mode, and take a few interesting pictures – but sooner or later your camera, which initially held such wonderful photographic possibilities, spends most of its time tucked away, only to be pulled out on special occasions when you really need some good photos.
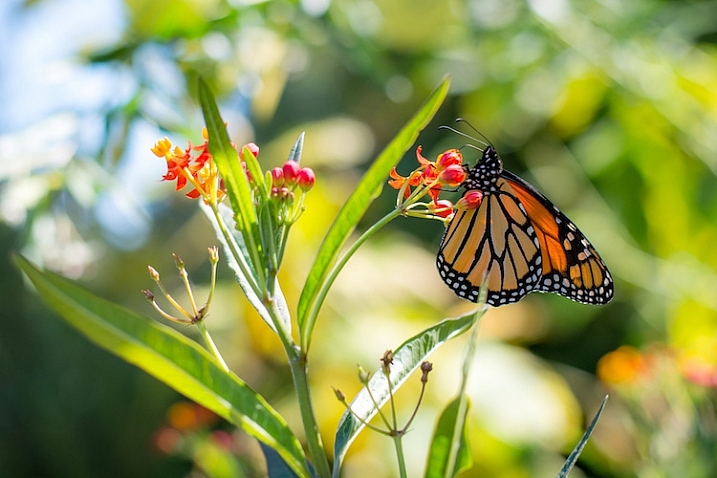
use-your-new-camera-butterfly

If that rings a bell it’s because almost everyone interested in photography goes through a similar phase at some point. Thankfully there’s hope! I’ve been in this same situation, as have many other people I know. So, here are some tips that will help you get your camera out more often, so you can start learning and growing as a photographer.

Take your camera with you

This may seem obvious, but it’s an important step that many new camera owners overlook. Your fancy DSLR or mirrorless camera doesn’t have to be just for special occasions, it can be for anything you want. The important thing is that you have it with you to take pictures.

Basically, if you don’t want your camera to end up collecting dust on a shelf, don’t let it sit and collect dust on a shelf. Going to work? Grab your camera. Heading to a friend’s house? Take your camera. Taking a walk? By all means, bring your camera. Of course you’re going to bring your camera to events like your kid’s baseball game or your friend’s graduation, but using it only in those circumstances often leads to camera atrophy.

use-your-new-camera-student-fountain

This shot was a complete accident. It was not planned at all, and I only got it because I had my camera with me when I was out for a walk.

The famous hockey player Wayne Gretzky once quipped, “You miss 100% of the shots you don’t take”, and the same holds true for photographers. The only way you’ll ever start taking more pictures, and thus growing as a photographer, is if you start taking more pictures. And you can’t do that if you don’t have your camera.

I take mine with me to work every day, and even though I have a similar daily commute and work routine, I constantly find myself looking for new shots to take, and new ideas for photography. If you are worried about breaking your camera, buy a cheap bag or a better carrying strap. If you’re a bit self-conscious of what people may think if they always see you with your camera, just tell them you’re trying to learn more, and get better as a photographer. It might seem kind of weird at first to take your camera with you wherever you go, but that will likely pass (it has for me, and for others I know) as you start to discover the joyful serendipity that’s inherent in documenting the world around you with a camera that’s leaps and bounds better than the one in your mobile phone.

Join a photography community

In the movie Office Space, the protagonist, a twenty-something chump named Peter Gibbons, tells a pair of consultants why he has so much trouble doing his job. “It’s a problem of motivation,” he casually explains, as the three of them discuss his low work performance, and what can be done about it. Photographers, especially new ones with recently-acquired gear from the holidays, often suffer from the same problem. They are highly motivated to take pictures and use their cameras, but when the rigours of their daily life set in, they lose the motivation they once had. One solution is to join a group, whether online or face to face, of fellow photographers and enthusiasts.

use-your-new-camera-construction

Photography communities have been invaluable to me as a source of knowledge and inspiration.

Being a part of a photography community offers all sorts of benefits. You can get answers to questions, get help with your camera, share your own experiences with others, go on photo walks, engage in photo critiques, and get to hang out with a lot of really fun people. If you live in a small town like I do, you may not have a group that you can join in person, but there are many online forums that offer similar experiences. DPS has an extensive set of online forums where people engage in all sorts of photography discussions, and there are hundreds more like this on the internet. Facebook is rife with thousands of photography groups that cater to interests as varied as people who like sharing photos, to those who own specific models of cameras, or live in certain locations. Reddit’s r/photography forum is a fantastic source of news, information, discussion, and education.

I could go on and on, but the point is that joining some type of photography community will not only help motivate you to take more photos and grow as a photographer, it will also help you meet a lot of new and interesting people who share a similar passion for taking pictures.

use-your-new-camera-eclipse

I don’t know anything about astrophotography, but asking about it in photography communities taught me enough to get this composite shot of a recent lunar eclipse.

Do a Weekly Photo Assignment

Many churches, businesses, and support groups use the concept of accountability partners; people with whom you develop a personal relationship in order to keep each other on the straight and narrow path. Photographers can benefit from this type of accountability as well by taking part in weekly photo assignments, essentially ensuring that you always have a reason to go out and take pictures. DPS has a weekly photography challenge, but there are lots of other weekly challenges you can find online as well.

While the goal is not to create a one-on-one relationship of support and trust, just knowing that you have an assignment to take pictures each week can go a long way towards helping you use your camera more often. In doing so, you will learn more about your equipment, but also grow as a photographer as you try new things, and get exposed to ideas for pictures you would have never otherwise considered.

use-your-new-camera-leaves-rain

Doing weekly photo assignments has forced me to look for picture opportunities where I would have never otherwise seen them.

Notice that I said weekly and not daily, and there’s a reason for this. Photography burnout is a very real problem especially for new photographers, and doing a daily challenge or assignment can be fun at first, but often gets more than a bit overwhelming. I know several people who have actually stopped taking photos because of a daily challenge. They felt like they were failures because they could not meet the requirements of taking pictures every single day, and that in turn led them to stop taking pictures altogether.

Monthly challenges are nice, and will not usually overwhelm you, but they are (in my opinion) a bit too infrequent to be sufficiently challenging or motivating. Weekly photo assignments seem to hit the sweet spot, and can be a fantastic way to help ensure you get a lot more use out of your camera.

use-your-new-camera-spider-grasshopper

If you do a weekly assignment for a while and don’t feel as though it offers enough of a challenge, then by all means start doing daily photo projects. Alternatively, if you find that you can’t meet the demands of a weekly photo, then go down to one a month. The point of these is to hold yourself accountable for using your camera more often, to improve your skills over time, and a weekly assignment is a fantastic place to start.

Never let the value of your photos be determined by others

This final rule is more of a word of caution to new photographers – do not fall into the trap that likes or shares on social media equates to quality images. Use your camera to take photos that are interesting for you, not for others. Find ways of expressing yourself, capturing emotions, telling a story, or presenting a scene through photography, not with the purpose of getting likes on Instagram or Facebook, but simply because it’s something you personally enjoy.

The problem with chasing after likes and shares is that there’s simply never enough. Initially you might be thrilled to have a dozen, but soon you’ll want more. After a little while you’ll be thrilled to have 100 likes, but then you might wonder why your friend got 200 on a picture that you think is clearly subpar. One of your photos gets shared a hundred times, or you post an image that gets lots of shares, but another one is virtually ignored. Or a beautiful shot you took gets no retweets, while a selfie you took with your iPhone gets retweeted dozens of times. Or an image you spent hours trying to capture gets no comments at all.

If your enjoyment of photography can only be quantified by social media metrics, you’ll probably never be satisfied.

use-your-new-camera-squirrel

This is one of my favorite animal pictures I’ve taken. I know it’s not perfect and the squirrel blends in a bit too much with the leaves, but I like it and that’s what gives it value to me.

The problem with these scenarios is they all rely on external validation of your work, and if it fails to materialize, then it can lead to feelings of worthlessness on your part. Taking pictures should be fun, interesting, experimental, captivating, and enjoyable for you. If you like your photos, then it doesn’t matter if you don’t get hearts, thumbs-up, plus-ones, or shares online. Of course you can, and should, seek opinions and advice from others so you can learn to grow your skill, and improve as a photographer. But, don’t let the worth or value of your images be determined by the numbers below them on social media. That’s a trap into which many budding photographers have fallen, and while it can be fun to see one of your images get a lot of attention, the truth is that attention is so fleeting that people will move on to something else within a few hours.

Summary

If you just got a new camera, congratulations! If you have one that’s been sitting around waiting to be used, go pick it up! I’m excited for you, and I am thrilled for the journey that awaits. If you have been in these situations before, what are some of your favorite tips and tricks that have helped you use your camera more over the years? I’d love to hear your thoughts in the comments below.

googletag.cmd.push(function() {
tablet_slots.push( googletag.defineSlot( “/1005424/_dPSv4_tab-all-article-bottom_(300×250)”, [300, 250], “pb-ad-78623” ).addService( googletag.pubads() ) ); } );

googletag.cmd.push(function() {
mobile_slots.push( googletag.defineSlot( “/1005424/_dPSv4_mob-all-article-bottom_(300×250)”, [300, 250], “pb-ad-78158” ).addService( googletag.pubads() ) ); } );

The post How to Make Sure You Use Your New Camera by Simon Ringsmuth appeared first on Digital Photography School.


Digital Photography School

 
Comments Off on How to Make Sure You Use Your New Camera

Posted in Photography


5 Questions to Help You Make sure Your Photos are Safe Inside Lightroom

29 Nov

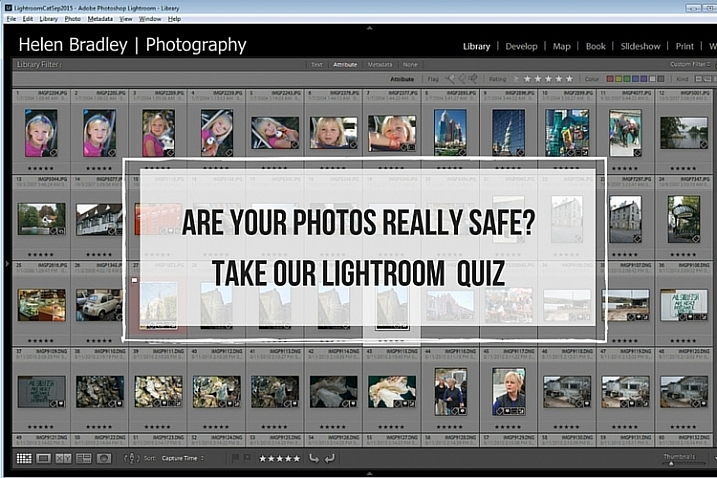
Lightroom quiz lead image

New Lightroom users often get into trouble because of a lack of understanding as to how Lightroom works. Unfortunately the result of these misunderstandings is often that their precious photos are lost, either permanently or temporarily. When you are new to Lightroom it can help if you understand some basics about how Lightroom works to ensure that your precious photos are safe.

Here’s a quick five question quiz to see if your photos are safe in your hands.

Question 1: True or False?

Lightroom stores a copy of your photos for you. When you delete a photo from Lightroom even if you opt to delete it from disk, the original is still safe.

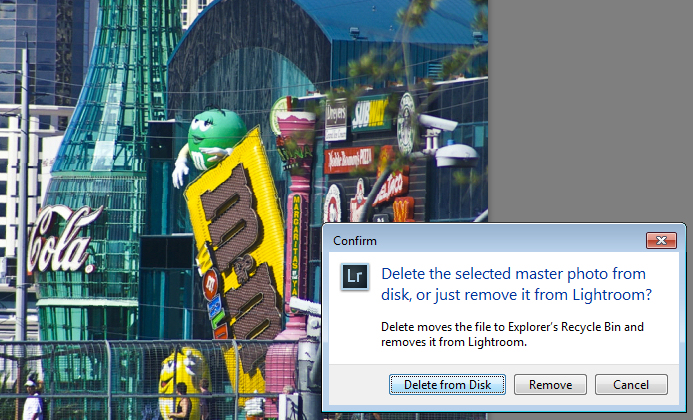
What happens when you select to Delete from Disk in Lightroom

Answer: False

Lightroom simply keeps an record of where your images are on your hard disk. It does not actually store any images. So, if you remove a photo from Lightroom, and when prompted select Delete from Disk, then then you’re deleting the original of that image. If that was your only copy you’ll have deleted that forever.

Question 2: True or False?

You have deleted all the photos from a folder inside Lightroom. This means that there are no photos left in that folder so it’s safe for you to open Finder or Windows Explorer and delete the folder itself.

Is an empty folder in Lightroom really empty?

Answer: False

Lightroom can only handle photo and video file formats. Even if you delete all the photos and videos from a folder in Lightroom there may still be other files in that folder that Lightroom can’t handle, such as PDF files, Microsoft Word, Excel and Quicken files. You cannot know that a folder is empty of files unless you check it by opening it in Finder or Windows Explorer.

Question 3: True or False?

Your photos are safe because every time you see a prompt to backup Lightroom you always click to do so.

Does Lightroom backup your photos when you select to Backup?

Answer: False

When you choose to backup upon exiting Lightroom, all you’re doing is backing up the Lightroom catalog, NOT your photos. Your photos are never backed up by Lightroom, so you will need to set up some other routine for backing up your image files. Also note that, in most cases, Lightroom saves the catalog backup on the same drive as the original catalog is stored so, if your drive crashes, you’ll lose the original catalog and all backups – so make sure you change it to save the backup on an external drive. (Note: you can only do this in the dialog box above when it pops up)

Question 4: True or False?

When you make changes to a file in Lightroom those changes are written to the file so, if you open the file in Bridge, Photoshop or some other graphics program you will see the image as it was edited in Lightroom

Are edits always saved to your Lightroom files

Answer: Not necessarily True

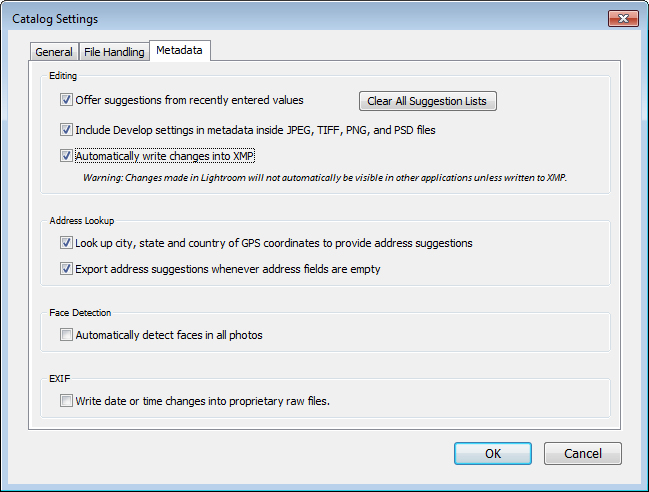
Whether or not the changes that you make to a photo in Lightroom are written to the photo files will depend on how your Lightroom preferences are configured. Choose Lightroom > Catalog Settings (Edit > Catalog Settings, on the PC) and select the Metadata tab. There are two settings of concern here: Include Develop settings in metadata inside JPEG, TIFF, PNG, and PSD files and Automatically write changes into XMP – for the edits you make in Lightroom to be written to the files themselves, both checkboxes should be checked.

Question 5: True or False?

You have moved or renamed some folders on your drive which contain photos. When you next open Lightroom you see that Lightroom can’t find those photos any longer. You must now reimport those photos into Lightroom.

how to resolve issues where you changed files outside Lightroom

Answer: False

When you move or rename folders outside Lightroom it is true that Lightroom will report the images as missing. However, instead of importing the images again, you simply need to tell Lightroom where the images now reside. To do this, click the exclamation mark icon, and choose Locate. Navigate to the folder that you renamed or moved, and select the image that matches the one that was missing (you need to find the exact image that was marked as missing). Click the image, and make sure that the Find nearby missing photos checkbox is checked, then click Select. The Lightroom catalog will be updated with the new location of the image and any other images that are in close proximity to it.

Note: You can also do this by right-clicking on a missing folder in the left panel of the Library module. Then navigate to find the entire folder and relink it to Lightroom.

In future, it is best to move images and folders, as well as rename folders, inside Lightroom. Changes such as this, that you make inside Lightroom, are written to your drive automatically. The benefit is that when Lightroom makes the changes, it always knows where your photos are, and won’t report them as being missing.

How did you do?

If you answered any of these questions incorrectly, your lack of understanding of how Lightroom works might be putting your photos at risk. Spending some time learning how Lightroom operates will help you keep your photos safe.

Now if you got all these questions right and if you are a Lightroom expert – what questions would you ask of a new user to help them keep their photos safe? We invite you to pose these as True/False questions – but remember, to help folks out – you should give them the answer, as well as pointing them in the direction of keeping their photos safe.

googletag.cmd.push(function() {
tablet_slots.push( googletag.defineSlot( “/1005424/_dPSv4_tab-all-article-bottom_(300×250)”, [300, 250], “pb-ad-78623” ).addService( googletag.pubads() ) ); } );

googletag.cmd.push(function() {
mobile_slots.push( googletag.defineSlot( “/1005424/_dPSv4_mob-all-article-bottom_(300×250)”, [300, 250], “pb-ad-78158” ).addService( googletag.pubads() ) ); } );

The post 5 Questions to Help You Make sure Your Photos are Safe Inside Lightroom by Helen Bradley appeared first on Digital Photography School.


Digital Photography School

 
Comments Off on 5 Questions to Help You Make sure Your Photos are Safe Inside Lightroom

Posted in Photography


Give Your Photographs The Stage They Deserve – Make Sure Your Website is Mobile Ready

12 Oct

If you post amazing professional-quality photographs to your website and nobody can access them, are they really that amazing? Nobody will know. All that hard work, focus, determination, and artistic ability -POOF – all for nothing. This is exactly what is happening to many very talented photographers. They pour their heart and soul into their art form and then entrust it to outdated technology that doesn’t adequately display their work on mobile devices.

ResponsivePortfolioSite

How important is being mobile friendly?

With the proliferation of mobile devices, it’s no surprise that many people do most of their web browsing on the go. Consider the following eye-opening statistics found on visual.ly:

  • Mobile search queries have grown five times in the past two years.
  • Nine out of 10 mobile phone searches result in a purchase or visit.
  • Three out of every five searches are conducted on a mobile device.
  • 99% of Smartphone owners use their mobile browsers at least once a day.
  • 52% of all local searches are conducted on a mobile device.
Mobile Search Statistics

Those are startling numbers, especially if you’re not keeping up with the changing face of the web. Unfortunately, it seems that there has been a lag in photographers adopting the appropriate web technology to showcase their work in a way that accommodates mobile users. To ensure that your site and your photography work are presented in an impactful way, it must be optimized specifically for mobile viewing.

Desktops and mobile devices don’t always play nice

Just building a site for the desktop doesn’t guarantee that the results will transfer to phones and tablets, or even the new smart watches. You do not want interested viewers to open your site on a mobile device and find a helter-skelter layout with distorted or inaccessible images. If this happens, it puts you in a difficult spot – you’re left hoping that they remember and desire to seek out your site for a second time when they’re back at a desktop computer. That’s wishful thinking considering the deluge of distractions we all encounter every day and the somewhat shrinking attention spans of the high-definition, high-speed digital generation. Here today, gone tomorrow, or maybe sooner in the case of your hard work and aspirations.

One of the worst-case scenarios you could be in is with a portfolio site that is completely based on Adobe Flash, leaving you to lose a whole group of mobile users who will rapidly look elsewhere when your site doesn’t load on their device. No one likes seeing a blank screen or a message saying, “This content cannot be displayed on your device.”

FlashOnlySite

Mobile devices often will not play Flash websites

Making your work accessible

It’s vital to give your audience exactly what they want – fast, fluid access to your dazzling work anytime anywhere. If they can’t clearly navigate your web site, it raises questions in their minds about your professionalism and your commitment to viewers and to your art form. This is not a good place to be for a proud, ambitious photographer. The good news, however, is that there are readily available solutions that you could leverage whether you already have an existing site or are starting one from scratch.

The key to optimizing the mobile user’s experience is to have a site that uses responsive web design or adaptive web design. These are two types of site programming that ensure a seamless transition of your content from the desktop to all mobile devices, regardless of screen size. Anything less than that, and you’re severely limiting exposure for your work and jeopardizing your chance of making a significant first impression. Negative experiences can turn into negative reviews. These travel fast in the digital age, and it’s difficult to change those perceptions once they’re public.

Using an adaptive design, you get a site that is specifically designed for particular browser sizes found on most mobile devices. In a lot of cases, the mobile site almost looks like a native app. Problogger.net (also run by dPS owner Darren Rowse) is an example of such a site. With this type of design, the experience on a mobile device is a bit different than that of a desktop, but you could still access the content in a readable format. This results in a fast and easy to read site that is user-friendlier on small web browsers.

ProBlogger Adaptive

Example of an adaptive design

A Responsive site is even better in that it is flexible in displaying the same content across a large array of devices while keeping much of the same styles. It maintains a fluid layout by using elements that are automatically resizable and could be placed where they fit best on the screen. This even works great on desktops when you want to shrink the browser window.

A perfect example of a website with a responsive design is Digital Photography School’s own site. If you’re accessing the site from a desktop browser, notice how the site responds fluidly as you resize the window. If you’re reading this from a mobile device, you’re still able to read the content just fine without having to manipulate the browser by zooming in and out or doing a lot of horizontal scrolling.

ResponsivePhotoSite

dPS is a responsive site

Simple changes make a HUGE difference

Updating your site from a clunky old format is quite simple, and the tools are readily available. Most people who have a blog use a Content Management System (CMS) such as WordPress, Joomla, or Drupal. These systems allow you to change the overall look and feel of your site by offering different designs or themes. There are plenty of available themes that are already responsive or adaptive right out of the box. These range in cost from free up to $ 100. A simple web search will reveal many sites that specialize in offering a variety of this type of themes. I’ve had great success using Theme Forest.

In addition to themes that are optimized for mobile browsing, these CMSs also allow you to install plugins that display the same content in a mobile-only theme. In some cases, especially if you already have an existing site, this might be the easier route to take.

Rock the mobile web

At some point, we’ve all experienced the disconnect between the artistic or creative world and the technology world. But in the modern age, you really can’t draw a distinction without suffering the consequences. It’s much wiser to embrace the role of technology in displaying art – in this case photography – and use it to your advantage.

With just a bit of effort, you can make sure that you nail that vital first impression with your fans and give your work the digital stage that it deserves!

The post Give Your Photographs The Stage They Deserve – Make Sure Your Website is Mobile Ready by Jorge Hassan appeared first on Digital Photography School.


Digital Photography School

 
Comments Off on Give Your Photographs The Stage They Deserve – Make Sure Your Website is Mobile Ready

Posted in Photography


Microsoft Word 2010 – Make Sure Others Can See Your Fonts

19 Oct

Embed fonts inside your Word 2010 documents to ensure others can see your texts as designed.

If you plan on exporting a Microsoft Word 2010 document to an earlier format for those with older versions of Office, or if you use non-standard fonts in your documents, others may not be able to see them as designed.

By default, Word 2010 does not include copies of fonts inside document files. If you send a file to a friend, co-worker, or family member, and they do not have the fonts referenced in the document, their copy of Word will try to substitute alternate fonts. Thus, your documents may not display as designed. However, this setting can be changed:…

Read more at MalekTips.
New Computer and Technology Help and Tips – MalekTips.Com

 
Comments Off on Microsoft Word 2010 – Make Sure Others Can See Your Fonts

Posted in Technology