RSS
 

Posts Tagged ‘Supercharge’

Lightroom Color Grading: An Easy Way to Supercharge Your Photos

25 Nov

The post Lightroom Color Grading: An Easy Way to Supercharge Your Photos appeared first on Digital Photography School. It was authored by Simon Ringsmuth.

The October 2020 update to Lightroom Classic introduced a feature called Color Grading, which puts an advanced color-correction tool in the hands of everyone who uses Lightroom.

For newcomers who have never tried this technique, it can feel a bit overwhelming.

But with a bit of practice, you’ll get the hang of Lightroom color grading in no time at all. And you’ll be able to give your photos the Hollywood treatment you never knew you could achieve!

young man portrait
Nikon D7100 | Nikon 85mm f/1.8G | 85mm | 1/2000s | f/1.8 | ISO 200

What is color grading?

While color grading is often associated with film productions, it applies to photography just as easily.

Color grading refers to the process of changing global attributes of an image to give it a specific look or feel. It’s a subjective, stylistic process that can involve many different types of edits, but generally involves changing the appearance of the highlights, shadows, and midtones of a picture. This allows a photographer to create a mood or tone, and convey a certain emotion to the viewer.

In a strict sense, any stylistic adjustments to an image could be considered color grading. Adjusting the HSL/Color panel or tweaking the tone curve are both valid color grading techniques.

However, when most editors talk about color grading, they are referring to the way a specific tint is applied to the shadows, highlights, and midtones.

A common color grading technique in movies, for instance, involves giving shadows a teal color and making midtones more orange. This gives a more intense, cinematic feel to films and the same is true for photos.

kids walking without color grading
Nikon D750 | 200mm | f/2.8 | 1/250s | f/2.8 | ISO 220. Ungraded.
kids walking with color grading
The same image as above, but with color grading applied in Lightroom. The shadows are slightly more teal, the highlights are slightly more yellow, and the midtones are just a bit more orange.

Color grading vs split toning

The Color Grading tool replaces a tool called Split Toning, which was available as its own panel in the Develop module in earlier versions of Lightroom.

Split Toning was like a beta version of Color Grading, in that it let users adjust the tint of shadows and highlights, but not the midtones. While this was certainly useful, the omission of midtone editing was a frustrating sore spot that dramatically limited the value of the tool.

Lightroom color grading split toning
The Lightroom Split Toning panel, which let users adjust the hue and saturation of only the highlights and shadows. The Color Grading tool does everything that Split Toning did and much more.

Color Grading contains all the functionality of Split Toning – and much more. In fact, any photos that were edited using Split Toning will have their adjustments completely intact thanks to the Color Grading tool.

In addition to midtone editing, the Color Grading tool introduces the vastly more useful color wheels in place of linear sliders:

Lightroom Color Grading panel

The Lightroom Color Grading tool: a step by step guide

While the color grading tool has incredible depth, accessing it and getting started could hardly be easier.

Open Lightroom and click on the Develop module.

Then open the Color Grading panel on the right side, and you’re all set.

The Lightroom Color Grading panel consists of three color wheels in the middle, a line of icons at the top, and two sliders at the bottom. Each of the color wheels lets you change the tint of its respective range: midtones, shadows, and highlights.

Lightroom Color Grading panel

Click and drag anywhere on one of the color wheels and you will immediately see the edit applied to your image. As you drag the slider, note that the distance from the center adjusts the saturation of the color grade, while the position of the slider around the circle adjusts its hue.

You can also click and drag the inner circle to adjust only the saturation and use the outer circle to adjust the hue. The slider at the bottom can be used to change the overall luminance of the midtones, shadows, or highlights, depending on which color wheel you are using.

Lightroom Color Grading panel
You can also hold the Shift key to adjust only the saturation, or Ctrl/Cmd to adjust only the hue.

Click and hold the eye icon just below and to the right of a color wheel to temporarily remove the tint adjustment, and then release the mouse button to re-engage the adjustment. Double-click anywhere inside a color wheel to reset the tint if you want to start over.

The Blending slider at the bottom of the Color Grading panel lets you adjust how much the midtones, shadows, and highlights blend together.

The Balance slider lets you customize the overall balance of highlights and shadows; values greater than 0 make the highlight edits more pronounced, while values less than 0 increase the presence of the shadow edits.

Lightroom Color Grading blending balance
Move Blending to the left to keep your shadows, midtones, and highlights separate from each other. Move Blending to the right to make your edits blend in with one another. Slide Balance to the left to make your edits to the shadows apply to more of the image. Slide it to the right to make your highlight edits more prominent. Or just leave these sliders alone and you’ll probably be just fine.

Look closely at the top of the Color Grading panel and you will see a strange-looking row of circular icons. The first appears to be some kind of alien hieroglyph, while the rest look like circles with different shading patterns. These switch between the different modes within the Color Grading panel.

The first icon, with three small circles, shows all three editing options at once: Highlights, Midtones, and Shadows. The others let you adjust a single parameter at a time. The final icon is a global Hue/Saturation/Luminance adjustment.

Lightroom Color Grading panel
These icons let you switch between editing highlights/shadows/midtones at once and editing each one individually. The final circle is a global Hue/Saturation/Luminance adjustment.

If you want more fine-tuned adjustments, you can click on one of the icons that show a much larger version of any of the three adjustment parameters. This can help you select your adjustments with pinpoint accuracy and give you greater control over precisely how your edits are implemented.

How to use the Color Grading tool for great results

As you make adjustments, keep in mind that there is no one correct way to use the Color Grading panel. It’s merely another tool in your arsenal to help you get your images looking the way you want.

That being said, if you want to get your feet wet but aren’t sure how to start, let’s walk through a color grading edit so you can see firsthand how it can be used to give your pictures an extra bit of punch and visual impact.

kids running in an alley with no color grading
Nikon D7100 | Nikon 50mm f/1.8G | 50mm | 1/180s | f/4.0 | ISO 1250. Original photo without any color grading applied.

For a scene like the one above, with a lot of tonal variety, I like to start by editing the shadows first. Rather than using the all-in-one adjustment option with all three circles showing, I prefer to use the larger circles to edit each parameter individually. I like the fine-grained control this gives me.

I recommend you start by adjusting the Luminance slider, which will make the darkest portions of the image even darker when pushed to the left, or brighter when pushed to the right. For this example, I’m going to make shadows punchier by decreasing the luminance.

Lightroom Color Grading panel

Then click and drag on the color wheel to add a teal tint to the shadows; this will start to give the photo a more cinematic feel. Your shot might look a little weird with only the shadows adjusted, but it will come together after you customize the highlights and midtones.

kids running in an alley
Color grading applied to the shadows.

Next, click the Highlights option and adjust the Luminance slider to make the brightest portions of the photo lighter or darker. Some people prefer to adjust the Luminance before doing any color editing, but this is up to you.

Once you have the Luminance adjusted, click on the wheel to add a bit of orange. This will make the brightest portions of the image really stand out from the darkest portions of the image, since teal and orange are on opposite sides of the color wheel.

Lightroom Color Grading panel

At this point, the example image is starting to come together. It has a grittier, cinematic feel compared to the original, thanks to a touch of teal in the shadows and orange in the highlights.

kids running in an alley

After the highlights and shadows are edited, head to the Midtones wheel to give your image a warmer or cooler feel overall. Instead of changing the appearance of the brightest or darkest portions of your image, the Midtones wheel affects everything between those two extremes.

Midtone adjustments are useful for giving your entire picture more of a warm or cool feeling. Adjust the Luminance slider, then click and drag the dot to orange or red to make your photo warmer, or blue to make it cooler.

Lightroom Color Grading panel

At this point, the image is nearing completion, and you can see the results below. It’s a far cry from the original, which feels flat and boring by comparison.

Lightroom Color Grading kids running alley
The shadows, highlights, and midtones have been adjusted. But the image isn’t quite done yet.

After editing the shadows, highlights, and midtones, it’s time to tweak the Blending and Balance sliders.

As I explained above, blending refers to how much each of the three parameters stays within its own range. It has a default value of 50, which results in a relatively smooth color grade overall.

Sliding Blending to the left means the edits to shadows are confined almost exclusively to the darkest portions of the shot, and the edits to the highlights are confined almost exclusively to the lightest portions of the shot. A balance of 0 essentially makes each of the edits stay in its own lane and not affect the rest of the picture. And bringing the Balance slider to the right will increase how much each tonal area overlaps with one another. The result is often quite subtle, but can have a noticeable impact when applied carefully.

Lightroom Color Grading kids running alley
Blending set to 0 after the shadows, highlights, and midtones were edited. The difference is most noticeable in the sidewalk.

Now, the Balance slider determines how much of the picture is treated as shadows and how much is treated as highlights. Moving the slider to the left takes whatever adjustments you made to the shadows and applies them to more of the picture overall. The same happens to the highlight edits when you move the slider to the right.

If you have applied a certain tint to the shadows but want that tint to affect more of the picture, move the Balance slider to the left. Likewise, if you want your highlight adjustment to apply to more than just the brightest portions, adjust the Balance slider to the right.

kids running in an alley
Balance set to -54. The teal colors in the shadows now bleed over to much more of the rest of the picture.

Tips and tricks for Lightroom color grading

The key to color grading is to remember that there is no one magic solution. Don’t think of color grading as a search for the right way to adjust your image, but as a doorway to infinite possibilities that can be used however you see fit.

The best way to learn about color grading is to click around on the color wheels and experiment on your own. Lightroom is non-destructive, so you can always revert back to your earlier image. And in the meantime, you just might find a new way to edit your pictures that you never thought of before.

sunset on a lake without color grading
Fujifilm X100F | 23mm | 77 seconds | f/16 | ISO 200. Edited, but not color graded.

That being said, these tips will send you on your way to improving your color grading skills:

  • Edit your image to have an even exposure prior to using the Lightroom Color Grading tool. Use the Basic panel for highlights/shadows adjustments.
  • Give your shadows a richer look by adjusting them to be teal, blue, or purple
  • Contrast the highlights with the shadows by making them yellow, orange, or red
  • Adjust the midtones a little, but not too much. The midtones should complement the highlights and shadows, not compete by standing out.
  • For subtle tweaks, use the Blending slider to control how your graded colors meld together
  • Click the eye icon next to one of the color wheels to toggle between a before and after view
Sunset on a lake with color grading
The same image as above, but color graded. The shadows are blue, the highlights are orange, and the midtones are yellow-orange.

Lightroom color grading: conclusion

You should now have enough to get started with Lightroom color grading. Just remember that the goal here is the same as it is with most editing: You want to end up with an image you like! Color grading is just another tool you can use to make that happen.

Lightroom is a non-destructive editor. That means you can always undo your changes, so experiment with color grading as much as you want. And feel free to share your before and after images in the comments below!

The post Lightroom Color Grading: An Easy Way to Supercharge Your Photos appeared first on Digital Photography School. It was authored by Simon Ringsmuth.


Digital Photography School

 
Comments Off on Lightroom Color Grading: An Easy Way to Supercharge Your Photos

Posted in Photography


Secret Camera Settings that Supercharge your JPEG Photos

09 Jan

The post Secret Camera Settings that Supercharge your JPEG Photos appeared first on Digital Photography School. It was authored by Simon Ringsmuth.

Shooting pictures in RAW definitely has its advantages, but there are plenty of good reasons you might want to shoot using the JPEG format as well. It really comes down to personal preference, and both types of file formats have their pros and cons.

One of the biggest assets of the RAW format is that you can adjust your images as much as you want in programs like Lightroom or Luminar. Whereas the lossy compression algorithms used to create JPEG files leave much less room for post-processing flexibility. For this reason, to get the most out of your JPEG files, there are some important settings in your camera you should learn and customize to get your photos looking their best.

When you use RAW, you have access to the full data readout from your camera’s sensor. None of the data used to create your image was tossed out by your camera to compress the image and save memory card space. When shooting JPEG, your camera makes a series of determinations on the fly. It calculates what it thinks are the best values for various settings to get a pleasing photo almost like following a recipe to bake a cake. You can tweak that recipe to get the final output to be more customized to your taste. Doing so can be extremely helpful in many different photography settings.

White Balance

White balance is perhaps the most critical setting for JPEG shooters to understand. Getting this right can have a massive impact on how your images look. If you notice your images looking slightly yellow or blue, it’s likely due to the white balance not being calibrated correctly. Most people only use the Auto White Balance option which leaves the heavy lifting up to the digital brain inside your camera.

However, it’s straightforward to set the white balance by yourself and get much better results, particularly in tricky lighting situations. Especially indoors.

Setting the white balance at this cat show was really tricky due to the old fluorescent lights at the venue. Several of my auto white balance shots had a yellow tint, so I set the proper white balance in my camera and was able to achieve much better results.

It only takes a few seconds to set the white balance when shooting JPG and it can save you a lot of hassle in the long run. All DSLR and Mirrorless cameras, as well as most point-and-shoots, come with a variety of white balance settings. You can specify these if you know a little bit about the lighting conditions in which you are shooting. Many cameras have options such as Sunlight, Cloudy, Incandescent, Shade, even different types of fluorescent lighting. These can be selected to help make your photos look as good as possible.

The Overcast white balance setting gave me just the right look I was aiming for in this shot.

In my experience, the Auto white balance setting works great outdoors. However, when shooting inside, even the latest cameras can get tripped up by the many different types of artificial light. If you’re at a school, office, sporting event or another indoor setting with fluorescent lights, just choosing that option in your White Balance menu can make a huge difference to how your photos turn out. Try different settings and see what you like. Chances are, one of the pre-selected settings can help a great deal if you notice your photos looking a little blue or orange.

The picture I wanted to take was not what I ended up with. I missed a good opportunity largely due to improper white balance settings. A richer, more natural tone was what I wanted, but the image came out much cooler than I intended because I did not take a few seconds to set a proper white balance.

Finally, you can go all out and set a white balance of your own, which isn’t as big of a deal as it might sound. Every camera has its way of doing this. As long as you have a mostly white surface to point your camera at you should be all set (ideally it works if the surface is just slightly gray). Once again, the actual procedure is going to be different on every camera, and if you’re unsure do an internet search of your camera model and “custom white balance.” You should find the information you need.

Sharpening

While you adjust White Balance for various photography situations, Sharpening is a setting that you fine-tune to your taste and leave as-is. Of course, each photographer is different, but I’ve found I like a certain level of sharpening on all my JPG photos. This is because I have a particular type of look that I’m trying to achieve. Sharpening can’t fix an out-of-focus image. However, it can give your photos a certain level of pizzazz or clarity that you might have seen in other pictures but aren’t quite sure how to achieve on your own.

I ramped up the in-camera sharpening to get a clean, crisp image of these crayons. The foreground and background are just slightly out of focus due to shallow depth of field, but the middle is tack sharp.

Be careful not to set the sharpening too high though. Over-sharpening can lead to images that look fake and over-processed. However, you might find that with a few tweaks to the sharpening setting you can get your images to look much better.

Contrast

Adjusting the contrast slider can make dull images come to life and punch-up an otherwise boring image. Either you or your camera, depending on your shooting mode, makes decisions about how bright or dark your images are based on the exposure settings. The contrast becomes the overall difference between the brightest and darkest portions of your pictures. Dialing up the contrast makes bright parts brighter and dark parts darker, whereas lowering the value will have the opposite effect.

Adjusting the contrast value helped me get the shot I was aiming for.

Contrast may seem like such a simple thing and, for the most part, it is. But it’s something that often gets overlooked by casual photographers. They may want to have nice JPEG shots straight out of their cameras and not worry about fussing with all the technical details. You might find that you prefer your photos to have a little contrast lending an interesting dynamic element to them. Or, perhaps you want your images to be a bit more subdued. Try adjusting the contrast slider, and you might realize that it does the sort of thing you have always been trying to achieve but never quite knew how to get.

Saturation

If you have ever played around with filters on apps like Instagram you probably noticed that some of them make your colors pop and stand out while others have more subdued, muted tones. This effect is due in large (but not exclusive) part to saturation adjustments. You can fine-tune this on your camera to customize the look of your images. Some photographers prefer an over-saturated look – especially when taking nature or landscape pictures. It also works well for certain types of portraits too.

Adjusting your saturation after you take a picture can work, but it’s best to get it right in camera if possible.

Some photographers like a softer touch and prefer their JPEG files to be less saturated for a calm, timeless look. It’s all based on personal preference of the photographer. It can be useful and time-saving to change the saturation in-camera instead of in an image editing program. Adjusting the saturation is as simple as increasing or decreasing the value in your camera. You may find, after several test shots, that you prefer your images to be somewhat over or under-saturated. Either way, it’s worth giving it a try to see what you end up liking.

Other settings

Most cameras have additional custom settings you can change in addition to the basic ones covered so far. They can include things like film simulations, grain effects, highlight/shadow adjustments, and noise reduction, which can be very handy when shooting at higher ISO levels. If you have never explored these settings before, it’s a good idea to dive into your camera menus and do some experimenting.

If you dig into your camera menus you will find many other settings you can change to get just the right look you are going for.

Change some numbers, take some test shots, and see how the results compare to your normal shooting mode. It’s a good bet that you’ll end up with some appealing results. At the very least, you may learn more about your camera than you did before.

Custom Banks

A feature offered by many cameras is the ability to save banks of custom settings you can activate at will. Even my old Nikon D200, which came out in 2006, had this ability. The same is also true for every camera I own today. You can save specific values of most of your image adjustments such as Saturation and Contrast to a bank that you can recall at will. Using these custom settings means you don’t have to change individual values every time you want to shoot with a specific style.

This Fuji X100F has seven custom banks where you can save a huge variety of settings. You can switch between each bank with the touch of a button.

Think of this method as creating custom presets in Lightroom that you can apply to your camera with the touch of a button. If you’re shooting outdoors, you may have an in-camera preset with greater saturation and contrast. Perhaps you find yourself shooting school basketball games, so you create a preset with custom white balance and sharpening levels. If your camera does offer this feature, you can find it in the menus, or you can search online for your camera as well as the phrase “custom setting bank.”

Wrap up

I know not everyone shoots in JPEG, but if you do, some of these custom settings can come in handy and save you a lot of time. However, be aware that it’s difficult to undo them afterward. Unlike RAW, your JPEG files contain much less wiggle room and if you crank up the saturation and contrast in your camera, it’s challenging to undo these changes on your computer. Still, if you pay attention to what you are doing and make your adjustments carefully, you might be surprised at how useful these settings can be.

The post Secret Camera Settings that Supercharge your JPEG Photos appeared first on Digital Photography School. It was authored by Simon Ringsmuth.


Digital Photography School

 
Comments Off on Secret Camera Settings that Supercharge your JPEG Photos

Posted in Photography


Six Non-Photography Tips to Super-Charge Your Travel Photography

31 Jul

It’s a real challenge to portray the true essence of a destination and to show it to the world the way you see it. This genre, travel photography, calls for immense creativity, technical expertise, and unflinching dedication to the art. Every little detail that can weigh off your shoulders count.

I have been traveling across the most remote corners of the country and beyond for years now, and the best results are a boon of some of the non-photography decisions I’ve made. When you are on the road for long, you realize the real beauty of a travel shot goes deeper than its aesthetic value. All the technical training in the world, the best gear money can buy, and time-tested templates of composition can only take you so far. But then comes the real work. The stuff that makes a photograph, speak.

Six Non-Photography Tips to Super-Charge Your Travel Photography - overhead shot of a road and field

Here are six non-photography tips that will help you improve and super-charge your travel photography.

#1 – Go solo

This insanely frightening, uncomfortable, non-economic travel decision is also the most rewarding of all. This might mean, you will have to make all the plans, work out all the logistics, and deal with any issues by yourself. But, in a very unexpected way, this is what you need.

Travel photography does not allow for the luxury of blending and adjusting to plans of your co-travelers. The darkest hours, the first light of the sun, the busiest markets – what catches the artist’s eyes are endless. To be at the right time and the right place, you will need the freedom you only get when you have no strings attached.

Six Non-Photography Tips to Super-Charge Your Travel Photography - camera and the ocean

You must be ready to ditch your plans and make new ones at a snap, and be prepared for longer stays to get that one single extraordinary shot. Besides, you can always find backpacker hostels, local transport, and the denizen cuisine to fit into the budget; even without a companion to share the charges.

#2 – Learn the tongue

This tip is not just for the special ones with an eidetic memory though. Practically, all you need are a few dozen commonly used phrases and words to get the ball rolling. You will be amazed at how useful a little conversation with the locals can turn out to be, albeit with broken wording and all.

Six Non-Photography Tips to Super-Charge Your Travel Photography - Chinese writing

Learning the tongue goes beyond speaking a few words. It’s also about how you approach the culture and the people within. You have to understand them, think like them and start feeling their home like they do. That doesn’t just open up new doors and undiscovered locations but puts truth in the photographs.

The more you blend in with their culture, the more un-alienated the subject can be perceived.

#3 – Take the local choice

lady buying a bracelet from a monk - Six Non-Photography Tips to Super-Charge Your Travel Photography

The tourist trails are often unrevealing and pompous. The rustic secrets, the basic ingredients to amazing travel photographs need to be chased by getting off track. This might mean, taking the bumpy bus rides, eating spicy street food, cramped roadside shows, and everything over and under.

It adds an amazing perspective, nothing else can provide. Look for couch surfing and home-stays. Try the local cuisine and home-made meals. Take the local roads and transport, and even take part in the native leisure and social events. All of these things will add rocket fuel to your images.

Six Non-Photography Tips to Super-Charge Your Travel Photography - man sitting under columns

#4 – Volunteer

Taking time off from your camera sounds crazy, right? Being a part of the local’s life, besides gives an understanding of the destination, can be translated into unique perspectives, flavors, and themes in your work. The financial freedom, longer stays and new acquaintances are also invaluable.

bowl and hand with a stick - Six Non-Photography Tips to Super-Charge Your Travel Photography

This can be extended to work exchanges, internships, or any other short-term work you can find. Sites like Workaway, Volunteerhq, Helpx offer tons of opportunities all over the world. Deviating a little, one can consider online work, that can enable extended stays in a single place.

The goal is to try and get an inclusive feeling into the community and culture, standing in their shoes before photographing their homes.

#5 – Stay fit. Stay resistant.

mountains - Six Non-Photography Tips to Super-Charge Your Travel Photography

Being picky when traveling is the one biggest art killers. Compatibility of body and mind in extreme of conditions is the greatest tool you can ever have. A travel photographer needs to endure heat, rain, snow, and hail alike and still be ready to go.

Training so you are able to walk for miles or travel for hours is worth the effort exponentially. Being able to sleep wherever, eat whatever, and tune your body to be able to function in diverse habitats, let’s you break the physical barriers needed to visit THE photo spot. A tired body can no longer push itself for perfection.

Six Non-Photography Tips to Super-Charge Your Travel Photography - underwater shot

#6 – Be ready to take the leap

Adventure and nature photography are close cousins of the travel genre, and mastering them too makes you a Jedi. Most of your favorite shots are from off-beat places only the deadliest daredevils venture out. Economic travel facilities and easy gear have saturated the internet with spectacular shots.

sunset silhouette - Six Non-Photography Tips to Super-Charge Your Travel Photography

To make the difference, you have to see like no one has ever seen and go where no one has ever been. This might mean kayaking down the stream, cycling up a valley, hiking up a hill, or flying on a glider. Sometimes this might even mean, getting your own ride, staying in tents, and living off candy bars.

And more essentially, have a heart filled with enthusiasm and craving for adventure. Every step forward past other photographers is a step forward to more unique travel shots.

man in a field - Six Non-Photography Tips to Super-Charge Your Travel Photography

Conclusion

None of these skills require special training or innate power to accomplish. All of them can and will be acquired over time. But to be ready with these in mind, you can get one step ahead of every other photographer in town.

More than anything, a good travel photograph tells a good story and has a strong spirit to it. The best camera is what you have with you, or so they say. So, it’s time to hack into how you are going to make the best of it!

The post Six Non-Photography Tips to Super-Charge Your Travel Photography appeared first on Digital Photography School.


Digital Photography School

 
Comments Off on Six Non-Photography Tips to Super-Charge Your Travel Photography

Posted in Photography


How to Super-Charge the Spot Healing Brush Tool in Photoshop

28 Oct

The Spot Healing Brush Tool is often used in portrait photography to remove blemishes, wrinkles, and other distracting elements. By default, this tool works great, but sometimes you will need to add an extra level of control to get the results that you want.

In this tutorial, you will learn how to use the Spot Healing Brush Tool with Content-Aware to quickly remove blemishes and other imperfections from your photos.

Getting Started

First, create a new layer to work non-destructively (Shift + Ctrl/Command + N).

Then select the Spot Healing Brush from the Toolbar. Make sure that “Content-Aware” is the selected Type and that “Sample All Layers” is checked in the Options Bar.

How to Super-Charge the Spot Healing Brush Tool in Photoshop

Spot Healing Brush Tool – Normal Mode

With the Spot Healing Brush Tool active, just paint over any distraction to remove it. In most cases, the Spot Healing Brush Tool will do an excellent job in eliminating the problem.

02 spot healing comparison

However, there are times where the Spot Healing Brush Tool will destroy the original detail and texture found in the photo, giving you very unrealistic results.

In the example below, the Spot Healing Brush Tool removed the wrinkles under the eye by adding a skin texture that made the image and problem worse.

03 spot healing normal

Left before using the Spot Healing Brush. Right – after using it in Normal mode.

Using Modes to Enhance the Spot Healing Brush

For a more realistic result, you need to keep as much of the original detail as possible and only remove the distracting element.

To do so, first consider the blemish, wrinkle, or distraction you are trying to remove. Is it darker than the skin tone? Or is it brighter than the skin tone?

If the distraction is lighter, select Darken from the Mode in the Options bar. If the distraction is darker, select Lighten. In this case, the wrinkle is darker than the skin tone. That means that we want to lighten the wrinkles. So in the Options Bar, under Mode, select Lighten.

04 lighten

With the brush mode set to Lighten, Photoshop will only replace pixels that are darker than the good portion of the skin. Since the wrinkles and other skin distractions in this photo are darker than normal skin tone, only the distracting elements are removed, leaving more of the original texture surrounding it intact.

Notice that as you paint over a wrinkle, you don’t lose the original highlights and you keep a lot of detail. The example below shows the results between using Normal and Lighten to apply the same correction.

05 spot healing normal

Comparing results from different brush modes. Left: Spot Healing Brush in Normal Mode. Right: Spot Healing Brush in Lighten mode.

Additional Notes

To work faster, keep in mind that you can switch between Modes by holding the Shift key and pressing the + or – keys.

This technique also helps you remove blemishes in areas that contain detail that you would like to keep.

In the example, below you can see how by using the Lighten mode we were able to remove the skin blemishes while leaving the white hair strands intact.

06 spot healing forehead

This technique works in this case because the hair strands are lighter than the skin tone, and the blemishes are darker than the skin tone. The Lighten Mode makes the Spot Healing Brush target only darker pixels, so the fine white strands of hair are left intact.

This tutorial is part of my Content-Aware series on YouTube. There are more videos there if you would like to learn more about how content-aware works in Photoshop.

The post How to Super-Charge the Spot Healing Brush Tool in Photoshop by Jesus Ramirez appeared first on Digital Photography School.


Digital Photography School

 
Comments Off on How to Super-Charge the Spot Healing Brush Tool in Photoshop

Posted in Photography


How to Supercharge Your Photography with Highlight-Weighted Metering

17 Oct

Modern digital cameras have a variety of metering modes that they use to evaluate the light coming through the lens and help you choose your exposure settings. Each one is different and designed to fit a specific need. As you gain experience with them you will start to know which metering mode to use for any given scene you are shooting.

If you’re shooting portraits you might want to use Spot or Center-weighted metering, while landscape shooters may prefer the versatility of matrix or evaluative mode. Knowing which mode to use often comes with time and practice. But what if I told you there was a metering mode built-in to some cameras that could basically guarantee your shots would come out properly exposed every single time? Well, if you believe that then I’ve got a bridge in New York I’d like to sell you.

Highlight-Weighted Metering Mode

However, if your camera has Highlight-Weighted metering it will certainly help you get better results from your photos. While I can’t guarantee your pics will be perfect every single time, it can really come in handy if you’re not sure how to meter your scene and want a solution that you know you can rely on.

How to Supercharge Your Photography with Highlight-Weighted Metering

Different metering modes for different situations

The reason photographers use specific metering modes when shooting various scenes is that they want to make sure the right thing is properly exposed. For example, if you’re shooting a portrait it’s important to make sure your subject’s face is neither too bright nor too dark, even is it means some background elements will end up bright white or pitch black.

Center-weighted metering can solve this problem by helping you arrive at an exposure setting such that whatever is in the middle of the frame (i.e. your subject’s face) is exposed just right. Other metering modes such as Spot, Matrix/Evaluative, and Partial Metering all perform similar functions in that they help you make sure you have just the right camera settings to get precisely the important part of your composition properly exposed.

Highlight-weighted metering tosses all that out the window. In the process, it could also dramatically alter your approach not only to metering a scene but to photography as a whole.

How to Supercharge Your Photography with Highlight-Weighted Metering

I used Center-weighted metering here to make sure this couple was exposed just right, even though the background is a bit too bright. I cared more about the couple looking good than the tree leaves behind them.

Enter Highlight-Weighted Metering for Select Nikon Cameras

Available on only a few Nikon cameras, (D5, D850, D810, D750, D500, and D7500 as of the time of this writing) Highlight-weighted metering utilizes the incredible dynamic range of modern image sensors to give you a massive degree of control over your photos. Provided you don’t mind doing a bit of legwork in Lightroom, Photoshop, Luminar, or other post-processing software.

It works by looking at the brightest elements of a scene (instead of specific areas like the center or the focus point) and using those as the basis for taking an exposure reading. On the surface, this might seem like a terrible idea because doing so would obviously mean a great deal of your photo could, as a result, be much too dark and underexposed to be usable.

Accessing Highlight-Weighted Metering

I’ve talked to some photographers who own cameras that can do Highlight-Weighted metering, and some of them aren’t even aware that their cameras have this capability. It’s not that surprising since Nikon doesn’t seem to go out of its way to advertise the feature, and even if you know about it you still may not know how to enable it.

To access this feature, press the metering button on your camera and then turn the control dial until you see an icon that looks the same as spot metering, with the exception of an asterisk in the top-right corner.

How to Supercharge Your Photography with Highlight-Weighted Metering

You will see the same icon if you look at the rear LCD screen of your camera, and as soon as it appears you’re good to go. However, figuring out how to enable Highlight-Weighted metering is one thing but understanding how it works, when to use it, and how to get the most out of it is another matter entirely.

Exposing for the Highlights

Before I get too deep into what this all means, it’s important to understand that Highlight-Weighted metering isn’t really the best solution to use for everyday shooting. It’s designed to make sure the brightest portions of your composition are not overexposed, which means a great deal of the photo is going to be shrouded in darkness.

You also won’t really see the advantages of using it unless you shoot RAW because it’s designed to give you an image that is extremely flexible due to the amount of data you have to work with during the post-production phase. Since JPEG files toss out such a huge amount of image data, they’re not much use with Highlight-Weighted metering because you simply don’t have much room to edit your photos when developing them in Lightroom.

Metering Mode Comparison

As an illustration of how Highlight-Weighted metering works, consider this series of three images. I took the following shot using Matrix metering mode, which tries to get a good overall balance between highlights and shadows. It’s a mode that many people use by default since it helps you get properly-exposed images in most shooting situations.

How to Supercharge Your Photography with Highlight-Weighted Metering

Matrix metering resulted in a good overall exposure but the sky is so bright that it can’t be fixed in post-production.

You can see that the camera tried its best to balance out the highlights and shadows, and the resulting image is decent but there is a massive portion of the sky that is simply too bright and can’t be recovered in Lightroom, Photoshop, or any other post-processing software.

Using Highlight-Weighted metering meant that my camera helped me adjust the exposure settings such that the brightest parts (i.e. the sky) were not overexposed, which resulted in an image that seems unusable at first.

How to Supercharge Your Photography with Highlight-Weighted Metering

Highlight-weighted metering preserved the brightest portions of the image but left the rest vastly underexposed. This is the image as it came right out of the camera.

Fortunately, due to the incredible dynamic range in modern camera sensors, an image like this is perfectly usable. The key is that the highlights haven’t been lost or clipped, so the sky is exposed just fine while the dark portions of the image still contain so much data (because I shot in RAW) that it can still be transformed into a print-worthy photo with just a few clicks.

How to Supercharge Your Photography with Highlight-Weighted Metering

The sky was exposed properly, with plenty of shadow details still available for editing. This is the same image as above, after processing to pull detail out of the shadow areas.

Some Caveats

As you might expect, there are some caveats to using this approach as well as a few questions.

First of all, experienced photographers might wonder what the big deal is with this approach since similar results can be had by simply using exposure compensation. That is if you take a shot and see that the image is overexposed, just compensate by underexposing it a few stops. The problem with this approach is that it’s a multi-step solution which means a critical moment can sometimes pass you by while you are adjusting the exposure. However, using Highlight-Weighted metering ensures that the brightest parts of your image will never be clipped and therefore have plenty of data to use when editing.

It’s also worth pointing out that in order to get the benefits of Highlight-Weighted metering you need to be willing to edit your photos afterward in order to bring up the shadows and adjust your images accordingly. If you’re used to shooting JPG or doing minimal editing, it might not be worth the additional time that this solution adds to your workflow.

Finally, to get the most benefits you need to use low ISO values since the data from the sensor will be more usable. Sensor dynamic range drops off at higher ISO values so if you find yourself shooting at ISO 6400, 3200, or even 1600 you won’t be able to bring up the shadows nearly as well as you could with images shot at ISO 100 or 200.

Another example

For one more example, here’s a series of photos of a goose that illustrate this concept in action. This first image was taken using standard Matrix metering which did its job pretty well. Overall the scene is properly exposed, except for one glaring exception: the overexposed part right at the base of the bird’s neck.

How to Supercharge Your Photography with Highlight-Weighted Metering

Matrix metering, unedited RAW file.

After seeing my results I quickly switched to the Highlight-weighted metering mode. In doing so, my camera made sure that the brightest part of the image was properly exposed, which left the rest extraordinarily dark.

How to Supercharge Your Photography with Highlight-Weighted Metering

Highlight-weighted metering, unedited RAW file

Fortunately, there was plenty of color data to extract from the shadows, so a little finessing in Lightroom resulted in an image that I’d be happy to post to my Instagram feed.

How to Supercharge Your Photography with Highlight-Weighted Metering

Highlight-weighted metering, edited in Lightroom to pull out the shadow detail.

What if you don’t have a Highlight-weighted metering mode?

If you don’t have Highlight-weighted metering built into your camera you can approximate its effects by using Spot metering and the exposure lock button on your camera. This would allow you to set exposure values based on what you deem to be the brightest part of the composition, lock in your settings, and then recompose your shot before snapping the shutter. It’s not as simple or elegant as having the camera automatically meter the scene based on the brightest part of the composition, but it’s worth trying if your camera doesn’t have this function.

Conclusion

I like to think of Highlight-weighted metering as another useful arrow to have in my photography quiver, but not something I use all the time for every one of my shots. For most images, I tend to default to Matrix metering since it will usually give me a properly-exposed shot that I can tweak if I need to.

However, when I find myself in situations with extreme contrast between the lightest and darkest portions I will often switch over to Highlight-weighted metering so I can stop worrying about checking my settings and dialing in exposure compensation. That way I know that I’ll end up with images that I can edit however I need to in Lightroom because nothing will be overexposed.

The post How to Supercharge Your Photography with Highlight-Weighted Metering by Simon Ringsmuth appeared first on Digital Photography School.


Digital Photography School

 
Comments Off on How to Supercharge Your Photography with Highlight-Weighted Metering

Posted in Photography


4 Tips to Supercharge your Lightroom Workflow

23 Nov

In this article, we’re going to look at four tips to help you supercharge your Lightroom workflow and post-processing. Then you can spend more time doing what you love, photography!

The issue

Going through several hundred pictures after a photo session can seem so daunting and time-consuming that it becomes more of a chore than an enjoyable and creative part of the photography process. It’s those late nights staring at a collection of pictures on your computer monitor, sipping the last drops from your cold mochaccino long after the whipped cream has melted away, that can suck all the fun out of photography. It can make you want to up-end your workstation, chuck your gear in the trash, and look up the price of desert island real estate so you never have to edit another picture again.

Fortunately, most image editing programs have some type of photo management built-in to help streamline your editing. Lightroom has a set of tools that have been honed over many years of iterative development to really assist you when it comes to trimming precious time from your post-processing workflow. There are four specific techniques that can help you, and those just getting started in the field. Together they can save you time and maybe bring back the artistic spark that may have been lost over the years.

You can help me save time in Lightroom? Tell me more!

Can you help me save time post-processing in Lightroom? Tell me more!

#1 – Create your own presets

Most people know that Lightroom has a fairly extensive offering of built-in presets, and you can even buy additional sets like the ones we offer here at dPS. But as useful as those are, they might not meet your specific needs as a photographer. If you’re like me you, tend to use presets as a starting point and then tweak your images ad nauseam, but sometimes even getting to that starting point can be tricky.

Enter the wonderful world of user-created presets! Lightroom lets you save any combination of adjustments in the Develop module as a Preset that you can apply to any photo at any time. I find this really handy when doing my initial photo imports. I like the RAW files from my Nikon D750 to have a little bit of added vim and vigor right off the bat. So upon import, I usually apply a preset I made called “Nikon RAW Import” that adjusts black, white, and shadow levels along with a few other parameters. It gives me a nice starting point for almost any image and is a great way to save time when editing.

supercharge-lightroom-workflow-custom-presets

How to save your own presets

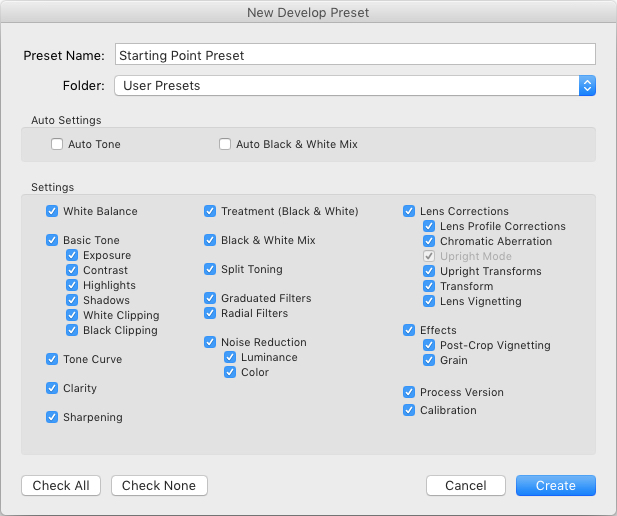
To create your own presets go to the Develop module and change the value of your sliders, adjust your tone curve, dial in your preferred level of sharpening and noise reduction, and you’re 90% finished. After you have an initial set of edits created go to the Develop menu and choose “New Preset.” Select the parameters you would like to include in the Preset and then click “Create.”

Your Preset is now ready to go and you can apply it with one click to any image, or to a batch of images. Do so by selecting them (from the thumbnails) in the Develop module, right-click on them, and choosing “Develop Settings > User Presets > [Your Preset name].” You can also apply it to all your photos on import by going to the right-hand side of the Import screen under the “Apply During Import” option. Where is says “Develop Settings” pull that menu down and find your preset from the list.

supercharge-lightroom-workflow-preset-import

As a bonus, you can even share your Presets with others by navigating to the folder on your hard drive in which they are stored (“Preferences” menu > Presets > Show Lightroom Presets Folder), copying the file with your Preset data, and sharing it with anyone you choose.

Read more here: How to Create Your Own Lightroom Presets

#2 – Sync edits across multiple photos

Photographers are going crazy over this! You can save all sorts of time in your Lightroom workflow by using this one weird trick! I know that sounds like a cheesy click-bait title from a sidebar you might see on a used car website, but in this case, it’s really true.

On many photo sessions you will end up with dozens of images that are relatively similar and thus can often benefit from the same types of adjustments. Let’s say you shoot a wedding and have 20 really nice images of the groomsmen getting ready and adjusting their superhero-themed vests in the church office. You could easily spend 5 or 10 minutes adjusting the white balance, black levels, highlights, color saturation, and noise reduction. You finally get one of the photos looking, as Goldilocks might say, “Juuuuust right,” and then realize you still have nine more to go. At which point you start looking up how much your 70-200mm lens might sell for on Craigslist because you know this is going to be another one of those editing sessions that involves way more late nights and cups of coffee than you had initially planned.

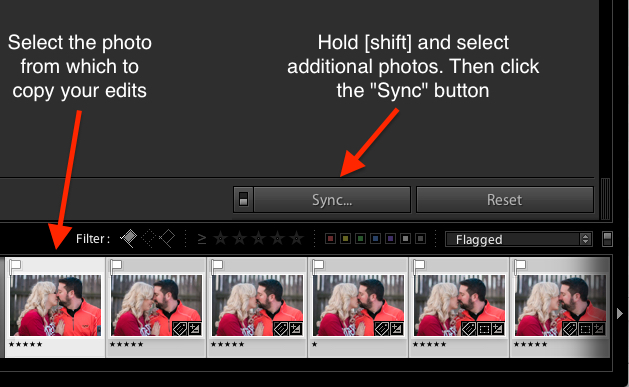
supercharge-lightroom-workflow-sync-button

How to sync your processing settings

But wait, there’s hope! To instantly sync the edits from the first photo to all the rest which are similar, select the initial image in the filmstrip view at the bottom of the Develop panel. Then hold down the [shift] key while selecting all the rest and click the “Sync…” button in the lower-right corner of your screen.

You can pick and choose which edits you want to sync, and with the click of a button, all the other images are instantly edited just like the first one. BAM! Time saved: infinite. You’re welcome.

Alternatively, you could use the Copy/Paste function to copy edits from one picture to the next, but that only works with a single photo at a time. I have found the Sync option to be far more useful, you may as well.

Using the Sync option saved my bacon on this photo shoot. I had so many pictures to edit that synchronizing the changes made things go much faster.

Using the Sync option saved my bacon on this photo shoot. I had so many pictures to edit that synchronizing the changes made things go much faster.

#3 – Use the White Balance Eyedropper

When I first started out with digital photography I was the kind of person who wanted to do everything myself. Auto mode? No thank you camera, I’ll set the exposure myself. Autofocus? I don’t think so. Automobile? Not me, I prefer to walk!

Over time, I learned to let go of some of these tendencies with one glaring exception. Setting the white balance on my RAW files in post-production, stuck with me far too long.

Setting the proper white balance is the foundation for almost any photo editing. If you fiddle with the Temp and Tint sliders long enough you can usually get a good result. The trouble is that takes a long time, especially when working with hundreds of images. It can take a lot of trial and error, and guesswork to dial in just the right white balance. Unless you let Lightroom do most of the heavy lifting for you.

White Balance got you down? The Eyedropper is here to help.

White Balance got you down? The Eyedropper is here to help.

Using the eyedropper

Nestled quietly on the left-hand side of the Basic panel in the Develop module is a strange icon. It looks like a medieval dagger or possibly a light saber that can’t decide whether it’s meant for a Jedi or a Sith. It’s actually an eyedropper. Using on it can help you out immensely when it comes to finding the proper white balance for a RAW file.

Click the icon and find a spot on your photo that is slightly gray (neutral). Not totally pure white mind you, but a little off-white to give Lightroom a reference point as it calculates the value of how the rest of the colors in the image should look. What it does is neutralizes any color cast or shift in that area. A half second later and voilà! Your picture is now properly white balanced, but if it doesn’t look quite right you can tweak it with the sliders. Using the eyedropper isn’t a surefire guaranteed method, but it almost always gets you right on the mark or very close to it.

One click and...bam! Instant white balance.

One click and…bam! Instant white balance.

#4 – Flag/Reject when culling images

I was just talking with a friend recently who takes a lot of pictures of his kids with his DSLR. He told me that one of the hardest things for him to do is go through his images and remove the bad ones. His solution was to simply not delete any at all.

If this sounds like you, whether you’re professional or amateur, and you just can’t quite bring yourself to tap the [Delete] key when browsing through your photo library – Lightroom is here to help.

You might do a family portrait session and get 20 pictures with just mom and dad, 50 that you took in burst mode with the kids sitting on their lap. Then a couple hundred from when the family invited their pet ferret to join the shoot. Some of your images would be easy to discard due to being out of focus, poorly composed, or overly pernicious polecats deciding to climb atop dad’s carefully crafted coiffure. But what about the rest? The ones that are all pretty good while also being quite similar?

So many photos, so little time...

So many photos, so little time…

How to flag images in Lightroom

As you scan through your library in Lightroom, you can use the arrow keys to move from one image to the next, and the P and X keys to mark images as keepers or rejects. Tap P (pick) on a picture to adorn it with a  white flag, and tap X to mark it with the Tiny Black Flag of Shame denoting a rejected image.

A Flagged picture is one that you have highlighted as particularly good, while a Rejected picture is not worth your consideration. Marking an image as Rejected does not delete it so you can always go back and look at it later. But it serves as a signal to you as you are culling, that you don’t need to consider it. You can also use the filter bar at the bottom of the screen to show only those images that are Flagged, Unflagged, or Rejected by clicking on their respective icons. If you accidentally mark an image incorrectly, press the U key to remove the Flag/Rejected status.

Filter them

You can also use the filter bar at the bottom of the screen to show only those images that are Flagged, Unflagged, or Rejected by clicking on their respective icons. If you accidentally mark an image incorrectly, press the U (unflag) key to remove the Flag/Rejected status.

Once you mark your images as Flagged or Rejected, use the filter icons to choose which photos to display.

Once you mark your images as Flagged or Rejected, use the filter icons to choose which photos to display.

Using the Flag/Rejected markings has significantly decreased my editing time, and will likely dramatically lower yours as well. In a similar fashion you can use the number keys 1-5 to mark images with one to five stars, and numbers 6-9 to label images with different colors. I find these less handy than simply using the Flag/Rejected method when doing the initial culling, but far more useful when deciding, for instance, which images are the Best of the Best and worth printing, sharing, or showing to clients.

Over to you

I hope these tips have been helpful. Certainly, there are many more options for helping your Lightroom workflow go a little smoother that we simply don’t have the space to cover in one article. What are your favorite tips? Please share your ideas, tricks, and shortcuts in the comments below!

googletag.cmd.push(function() {
tablet_slots.push( googletag.defineSlot( “/1005424/_dPSv4_tab-all-article-bottom_(300×250)”, [300, 250], “pb-ad-78623” ).addService( googletag.pubads() ) ); } );

googletag.cmd.push(function() {
mobile_slots.push( googletag.defineSlot( “/1005424/_dPSv4_mob-all-article-bottom_(300×250)”, [300, 250], “pb-ad-78158” ).addService( googletag.pubads() ) ); } );

The post 4 Tips to Supercharge your Lightroom Workflow by Simon Ringsmuth appeared first on Digital Photography School.


Digital Photography School

 
Comments Off on 4 Tips to Supercharge your Lightroom Workflow

Posted in Photography


4 Key Lightroom Sliders That Will Supercharge Your Photos

04 Jul

Lightroom is kind of like a Swiss Army Knife or, better yet, a Leatherman Wave, in that it does so many things and is an invaluable program for many photographers–amateur, professional, or anywhere in between. Regardless of whether you’re the kind of person who prefers presets, or someone who likes scooting sliders, there are four options hidden in plain sight, right on the Basic panel of the Develop module, that can dramatically enhance almost any picture.

It took me a few years to learn to use these sliders properly, and even now I am still figuring out new ways to work with them, in combination with other options in the Develop module to get my pictures looking just the way I want. But, now I am at a point where adjusting these four options is the very first thing I do on almost every single photo. They’re that useful for me, and could be for you too.

four-lightroom-sliders-girl

The four key Lightroom sliders are:

  1. Highlights
  2. Shadows
  3. Whites
  4. Blacks

Learning how to work with these four key sliders can have an amazing impact on your photography.

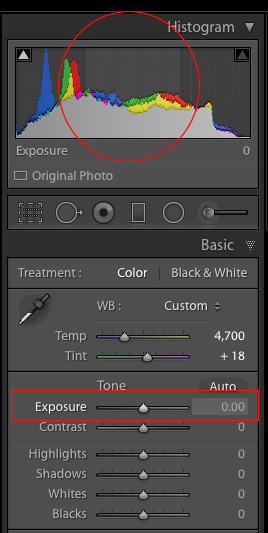
Exposure-sliderTo demonstrate the effect of each slider I’m going to show you a picture in various states of editing, as I adjust values for each option one by one. If you are used to using the Exposure (note in the screenshot on the right what areas of your image are affected by moving the Exposure slider) and Contrast sliders to adjust your images, you may want to put those aside for now and focus on these other four instead, as they can give you significantly better results.

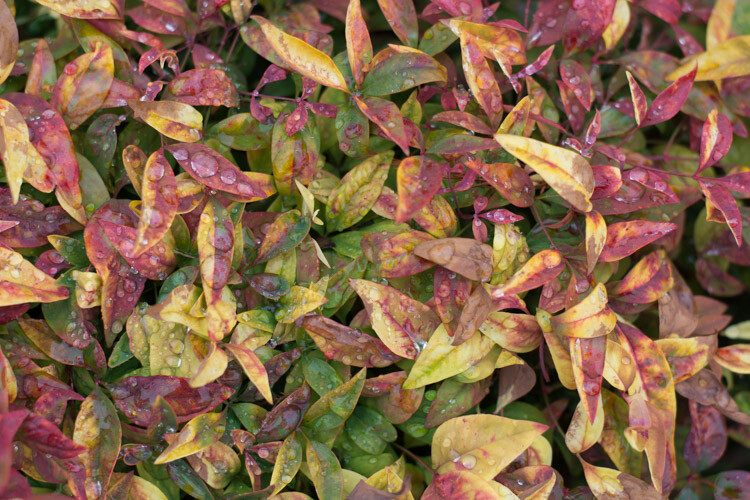
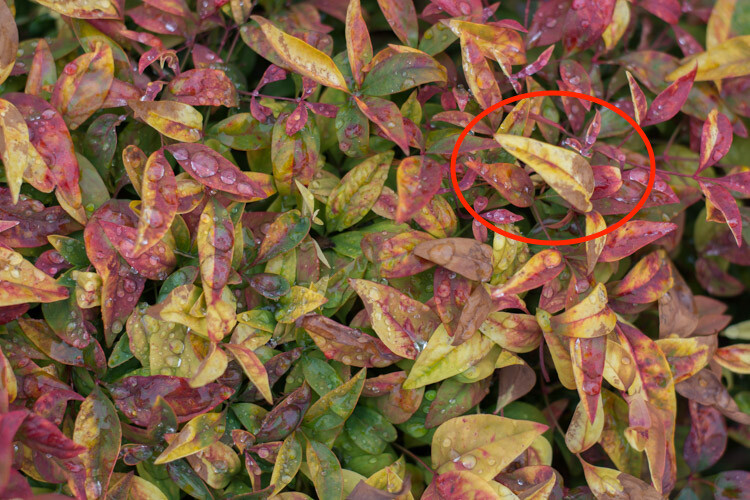
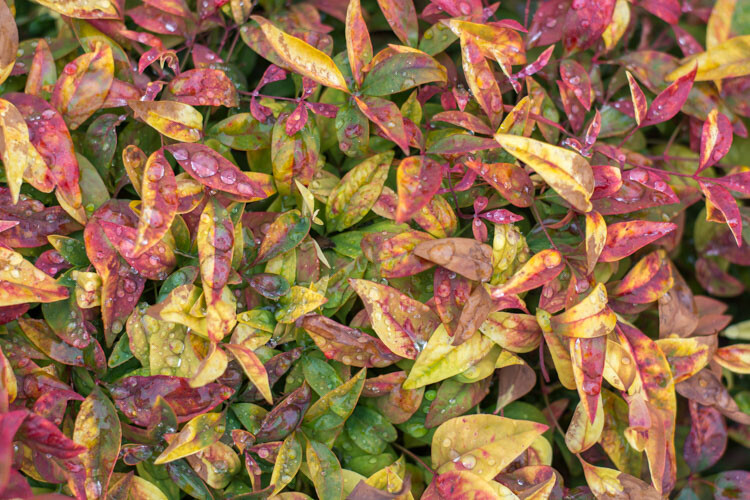
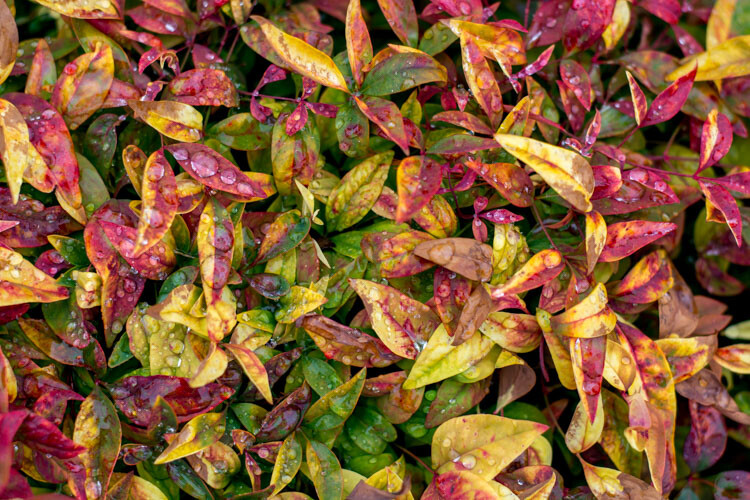
I should also note that, as with virtually all Lightroom tips and tricks, your results will be best if you shoot in RAW instead of JPG. The picture I’m going to start with is a shot of some colorful leaves on a rainy day, that seems fairly decent to begin with, but is made much more vibrant and richer just by adjusting these four key Lightroom sliders: Highlights, Shadows, Whites, and Blacks.

The original photo straight out of my camera with no adjustments applied whatsoever.

The original photo straight out of the camera with no adjustments applied whatsoever.

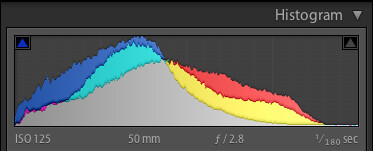
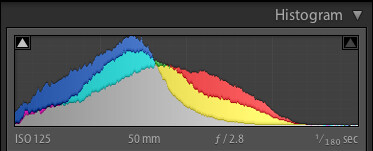
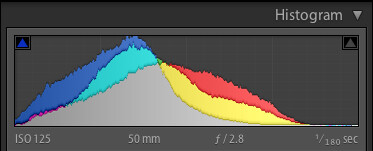
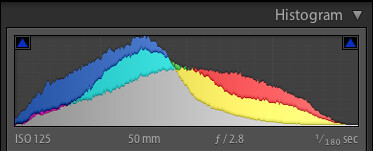
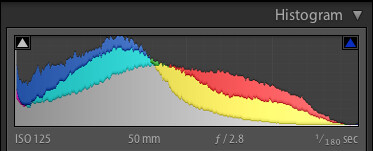
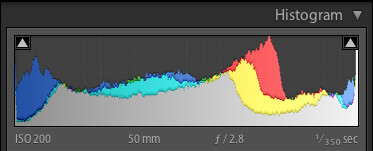
Histogram of original unedited image.

Histogram of original unedited image.

#1 – Highlights slider

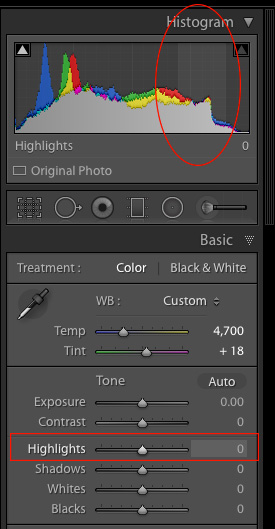
Highlights-sliderI mentioned the Exposure slider in the previous paragraph, which is a tool that adjusts the overall brightness or darkness of an entire image (based on the midtones). The Highlights slider allows you to perform a similar type of adjustment, but only with the brightest parts of an image (tones not quite pure white). Moving it to the left will make the brightest parts darker, and moving it to the right will make the same parts brighter. Hover over the Highlights slider with your mouse to see on the histogram which parts of the image will be affected (see screenshot at the right).

I use this as a starting point when making adjustments to a picture, because it can help recover some of the details in the lighter parts of an image that might seem a bit too bright or washed out, and can give the picture a more evenly-lit appearance overall.

Highlights adjusted to a value of -80. Notice how the yellow leaves, particularly the large one on the right-hand side, now display a much richer shade of yellow and are not as washed-out as in the initial photo.

Highlights adjusted to a value of -80. Notice how the yellow leaves, particularly the large one on the right-hand side, now display a much richer shade of yellow and are not as washed-out as in the initial photo.

Histogram with highlights adjusted.

Histogram with highlights adjusted.

As you adjust the Highlights, or any of the other three sliders mentioned in this article, you can use the built-in clipping guide to help get the right amount of adjustments to your image. Hold down the alt key (option on Mac) as you move the slider from left to right and you will see your image go all dark except for a few spots. These spots indicate areas of your image that are clipped, which means image data is being lost in those parts. You generally want to avoid clipping, so it’s a good idea to not adjust the Highlights or any other slider so much that you start seeing lots of clipped areas.

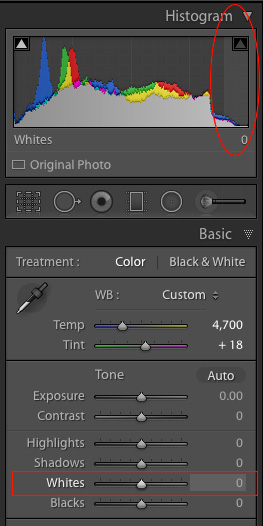
A peek at the histogram on top of the Basic module will show you similar information, as the more you adjust the Highlights slider to the right the more you will see the colors move to the right-hand side as well. If they move so far that they are off that side of the grid, areas of your image are being clipped, and there are going to be spots of pure white that you may not want.

#2 – Shadows slider

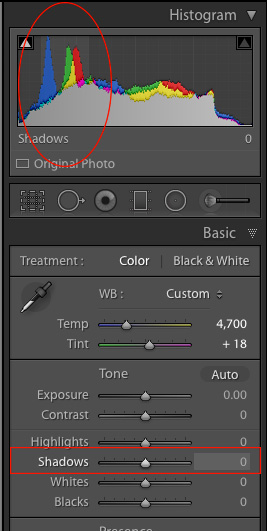
Shadows-sliderIn a similar vein as the Highlights slider, the Shadows option makes the dark parts of your image a little brighter (see image right for which areas are affected). It’s kind of like using the Exposure slider to make your image brighter, but restricting it only to the sections of an image that are very dark, while ignoring the rest. This works wonders on pictures that are underexposed, as modern cameras have image sensors that capture an amazing amount of detail in the shadows, particularly at lower ISO values. It’s rare that you will need to (or even want to) boost the shadow level clear up to 100, but it’s nice knowing Lightroom at least gives you the option of doing so.

I should also note that you could use the same slider to make the shadow areas of an image even darker, and depending on the type of photography you do, that may very well be a useful option but most photographers will want to just lighten the shadows instead.

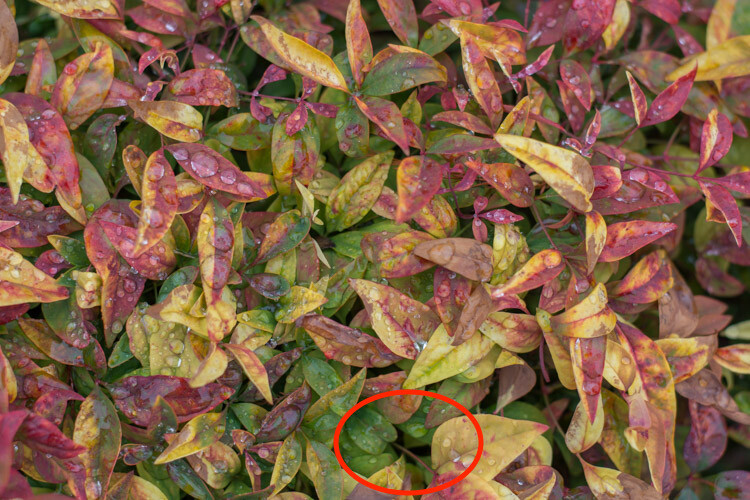
Adjusting the shadows by +50 helped to bring back some of the detail that was lost in the darker areas, as you can see in the area of green leaves inside the circle.

Adjusting the shadows by +50 helped to bring back some of the detail that was lost in the darker areas, as you can see in the area of green leaves inside the circle.

Highlights and shadows adjusted.

Highlights and shadows adjusted.

#3 – Whites slider

Whites-sliderThis is related to the highlights, but has a slightly different impact on your image, that is subtle but quite impactful. Adjusting this to the right essentially makes the white tones in your image, more pure white. It affects all the white tones in the photo (see image on the right) as opposed to the highlights slider which only deals with a narrow range of very bright colors.

What you’re doing here is setting the white point, or telling Lightroom what you want the brightest point of your photo to actually be. This can give a flat image much more depth and tonality, and take an otherwise boring picture and really start to make it shine. I almost always drag this slider a little bit to the right, though you must be careful not to let anything get clipped, which you can do by holding down the alt or option key while you drag it.

Bringing the white slider to a value of +45 now makes all the white areas more pure white. The effect is most noticeable on the various water drops which now appear much more vibrant and well defined.

Bringing the white slider to a value of +45 now makes all the white areas more pure white. The effect is most noticeable on the various water drops which now appear much more vibrant and well defined.

Highlights, shadows and whites adjusted.

Highlights, shadows and whites adjusted.

#4 – Blacks slider

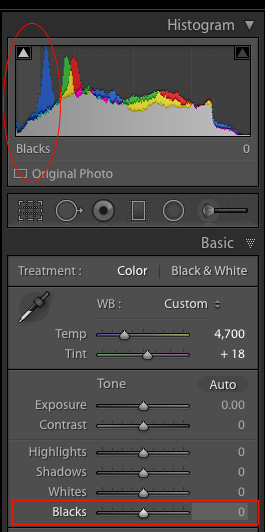
Blacks-sliderSimilar to the Whites slider, this one adjusts the black point of your image, or how dark the darkest portions really render. I almost always slide this to the left to give my photos a little more punch. It helps pictures have a little more contrast, while bringing out a lot more color in any image as a whole.

One difference to note when adjusting this slider, as opposed to some of the others, is that you actually do want the black level to be clipped slightly. So, when you hold the alt or option key down as you adjust this one, you want to see a few highlighted areas show up. The reason for this is to make the very darkest parts of your images truly black, which adds depth and a nice pleasing look to your pictures, that is far more effective than simply moving the contrast slider.

Note: the contrast slider pushes out from the middle of the histogram, whereas pulling the Whites and Blacks sliders pulls out from the edge – thus giving you more control over how contrast is applied to your image.

Bringing the shadows down to -70 makes the black areas pure black, and gives a much richer sense of contrast to the image overall than simply adjusting the contrast slider.

Bringing the Blacks down to -70 makes the black areas pure black, and gives a much richer sense of contrast to the image overall than simply adjusting the contrast slider.

All four adjustments made.

All four adjustments made.

Before and after

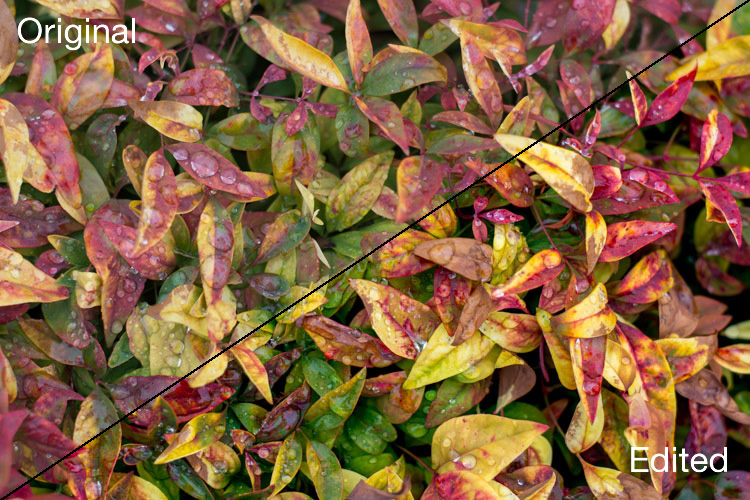
To give you a clear sense of just how much these four sliders can affect an image, here’s a before and after comparison of the same photo. The original seems so dull and lifeless, compared to the vibrant dynamic edited version. Remember, the only things that were adjusted were the Highlights, Shadows, Whites, and Blacks sliders.

four-lightroom-sliders-leaves-comparison

There are dozens of other edits that can be done in Lightroom to improve photos. Simple things like increasing the clarity, adjusting the tone curve, fine-tuning the sharpening, or selectively editing each color, can improve your original images (especially if you shoot in RAW) leaps and bounds beyond what you might have thought. But if all that seems like a bit too much to take in all at once, just know that you can get a huge amount of improvements just by using these four simple sliders in the Basic panel.

When I said that these four key Lightroom sliders can supercharge your editing, I really meant it. Learning to use them only takes a few minutes, and can make a huge difference in your images.

To recap, here’s what each slider does in a nutshell:

  • Highlights: Adjusts the brighter portions of an image to bring back some color that might be too washed out.
  • Shadows: Adjusts the darker portions of an image to bring out some color and detail where it may appear to be too dark.
  • Whites: Makes the whitest portions of an image more pure white.
  • Blacks: Makes the blackest portions of an image more pure black.
Original image, straight out of camera, with no edits applied.

Original image, straight out of camera, with no edits applied.

Original image histogram.

Original image histogram.

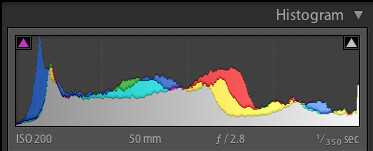
Highlights -47, Shadows +83, Whites +79, Blacks -56, and no other edits at all.

Highlights -47, Shadows +83, Whites +79, Blacks -56, and no other edits at all.

Adjusted histogram.

Adjusted histogram.

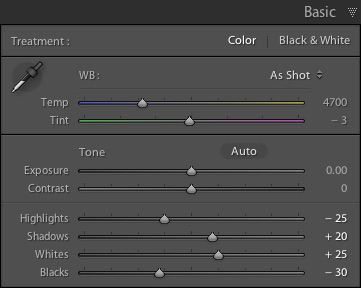
I have found myself using these four sliders so much that I actually created a custom preset in Lightroom that sets them all to specific values. I often apply this preset to every picture upon import, as it gives me a good starting point to work from, when doing my other edits. The values I use are:four-lightroom-sliders

  • Highlights -25
  • Shadows +20
  • Whites +25
  • Blacks -30

Your mileage will vary, and again this is just a starting point, but hopefully all of this illustrates just how useful these four sliders are. When I first started working with Lightroom I was so overwhelmed with all the options at my disposal, that not only did I think I would never be able to learn it, but I didn’t even know where to start. If that sounds like you, I would recommend giving these four sliders a try and use this as the springboard for the rest of your edits.

What about you? What are some of your favorite editing tips and tricks in Lightroom? Do you have a particular key to an effective workflow that you’d like to share? Leave your thoughts in the comments below.

googletag.cmd.push(function() {
tablet_slots.push( googletag.defineSlot( “/1005424/_dPSv4_tab-all-article-bottom_(300×250)”, [300, 250], “pb-ad-78623” ).addService( googletag.pubads() ) ); } );

googletag.cmd.push(function() {
mobile_slots.push( googletag.defineSlot( “/1005424/_dPSv4_mob-all-article-bottom_(300×250)”, [300, 250], “pb-ad-78158” ).addService( googletag.pubads() ) ); } );

The post 4 Key Lightroom Sliders That Will Supercharge Your Photos by Simon Ringsmuth appeared first on Digital Photography School.


Digital Photography School

 
Comments Off on 4 Key Lightroom Sliders That Will Supercharge Your Photos

Posted in Photography


10 Photo Sharing Websites That Will Supercharge Your Photography Presence

20 May

I’ll admit it, I’m a latecomer to the whole photography game.  I minored in it during college, but that ended up being a few classes using only black and white film cameras, darkroom fundamentals, film developing, and a dab of portrait basics.   When it was all said and done, I knew more about taking negatives and turning them into Continue Reading

The post 10 Photo Sharing Websites That Will Supercharge Your Photography Presence appeared first on Photodoto.


Photodoto

 
Comments Off on 10 Photo Sharing Websites That Will Supercharge Your Photography Presence

Posted in Photography