RSS
 

Posts Tagged ‘Sunset’

11 Sunset Photography Tips for Beautiful Results

23 May

The post 11 Sunset Photography Tips for Beautiful Results appeared first on Digital Photography School. It was authored by Darren Rowse.

sunset photography tips for beautiful results

If you’re looking to do gorgeous sunset photography, then you’ve come to the right place.

Because in this article, I’m going to share 11 simple tips that will instantly improve your sunset photos.

Specifically, I’m going to explain:

  • How to capture beautiful sunset tones consistently
  • How to create balanced, pro-level sunset compositions
  • The best type of weather for sunset photos
  • Much more!In fact, sunsets (and sunrises) aren’t even difficult to photograph!

Ready to become a sunset photography master?

Let’s dive right in.

1. For the best shots, plan ahead

While you can sometimes capture beautiful sunset shots without any forethought…

…the best shots usually come from real planning.

So scope out places that might be good for sunsets the day or two before your shoot. Look for interesting locations – locations where you can photograph the sun all the way down to the horizon, and where there will be opportunities for shots that include foreground elements and silhouettes.

Sunsets only take a few minutes, which is why you want to think about these elements before the sunset begins. Otherwise, you might miss the best shots.

Find out when the sun will set, then arrive at least half an hour beforehand. It’s often in the lead up to a sunset that the real magic happens.

And keep an eye on the weather. There are a variety of different types of sunsets that produce a range of different types of lights and patterns in the sky. Don’t just head out on clear days, because while these can produce some wonderful colors, it’s usually the days with (partial) clouds when the real action happens.

(Also, dust and smoke in the air can produce amazing results, too.)

Consider the equipment you might need. Take a tripod, lenses with a range of focal lengths, and extra batteries.

That way, when the sky turns beautiful, you’ll be ready!

sunset photography tips dock with boat

2. Shoot at a variety of focal lengths

Most sunsets are photographed with wide-angle lenses, and these focal lengths can make for beautiful images. A lens in the 10-30mm range will give you sweeping shots of your sunset scene.

However, if you want the sun itself to be a main feature of the shot, you’ll need to zoom right in. The sun is just half a degree across, so when you shoot with a wide-angle lens, the sun will be tiny in the frame. If you want to highlight the sun, you’ll need to zoom in with a 200mm lens or longer.

(This, in turn, will increase your need for a tripod!)

Also, be hyper-aware of eye-safety concerns: looking at the sun is always dangerous. And it’s even more dangerous when you look at it through a telephoto lens. So if you do include the sun in your composition, never look through your camera’s optical viewfinder. Instead, use Live View to check your composition and exposure on the rear LCD.

(If you use a mirrorless camera, this won’t be an issue. You can safely look at the sun through the electronic viewfinder.)

sunset over a misty valley

3. Use the rule of thirds to improve your sunset photography compositions

The rule of thirds states that you should position key elements of your scene a third of the way into the frame.

So instead of putting the horizon in the center of the composition, put it toward the top or the bottom, like this:

tree at sunset

Do you see how the horizon is a third of the way up from the bottom? That’s what the rule of thirds suggests.

And it’s not just about horizons. You can also use the rule of thirds to position the sun, foreground elements, background elements, you name it.

Of course, the rule of thirds isn’t a requirement. And you can break the rule of thirds for stunning results in certain situations.

But in general, the rule of thirds is a great starting point – so unless you have a good reason to do otherwise, I highly recommend you follow it!

4. Experiment with different exposures (to achieve a magical result)

First things first:

When doing sunset photography, you should always shoot with a semi-automatic or Manual mode. Don’t let your camera dictate your settings for you (in other words: get off Auto mode immediately!).

So before starting a sunset shoot, switch your camera over to Aperture Priority mode, Shutter Priority mode, or Manual mode.

And don’t just take one shot at one exposure. Instead, take a variety of shots at different exposures.

So while you can try a “standard” exposure based on your camera’s recommendation…

…don’t be afraid to underexpose by raising your shutter speed or narrowing your aperture. And don’t be afraid to overexpose by doing the opposite.

silhouetted skyline

The great thing about sunsets is that there is no one “right” exposure. You can get stunning results with underexposure and overexposure; the key is to experiment.

(Personally, I tend to start with a relatively quick shutter speed, then slowly work down to slower shutter speeds for brighter, more luminous shots.)

5. Bracket often

In the previous tip, I talked about experimenting with different exposures.

But did you know that there’s a technique, called bracketing, that guides you in your exposure experimentation?

Here’s how it works:

First, take a photo using your camera’s suggested settings.

Then adjust the settings (either manually or via exposure compensation) to slightly underexpose the photo and then to slightly overexpose the photo.

So if your camera says to shoot at f/8, you would take your first shot at f/8, as recommended. But your second shot would be at f/5.6, and your third shot would be at f/11.

That way, you’d end up with a “standard” shot, a darker shot, and a brighter shot, all of which will give you different colors and effects.

It’s a good way to guide your experimentation, and it’s also a good way to create “insurance” photos – so that, if you overexpose the standard shot on accident, you still have a darker file on your memory card.

Make sense?

sunset photography tips sunbeams

6. Auto Exposure Lock is your friend

Bracketing can be a lot of fun, but it also takes time – and it’s not the most precise way to create a well-exposed image.

That’s where Auto Exposure Lock (AEL) comes in handy.

Using AEL is simple. First, you point your camera at the area of the scene you want perfectly exposed, such as a beautiful foreground feature.

Then lock the exposure.

Finally, reframe the picture (while maintaining the exposure lock).

Basically, it lets you determine the exposure without interference from the ultra-bright sunset, which can wreak havoc on a camera’s meter.

Also note that you can use Auto Exposure Lock to create beautiful silhouettes; just point your camera at the brightest part of the sky, lock the exposure, and then reframe with a foreground subject. The result will look like this:

horse silhouette

Cool, right?

7. For the best colors, get off Auto White Balance

Your white balance setting adjusts the temperature of the colors in your scene.

So depending on the white balance, you’ll end up with a cooler (bluer) photo or a warmer (redder) photo.

When the white balance is set to Auto, your camera will automatically deal with the color temperature. And while this can sometimes work, it often gives subpar results – where you lose the warm golden tones of your sunset.

So instead of using Auto White Balance, switch your camera to the Cloudy or Shade presets, which will warm things up a little.

Alternatively, if you’re shooting a sunset and you do want a cooler, moody shot, you can experiment with other white balance settings, such as Incandescent.

One more thing:

If you shoot in RAW, it’s true that you can always tweak the white balance during post-processing. However, this is often pretty inconvenient; after all, how much time do you want to spend adjusting the white balance in front of your computer?

Which is why it’s worth getting the white balance right in-camera.

8. Always bring a tripod for the sharpest results

If you’re shooting at longer shutter speeds, such as 1/60s and beyond, then a tripod makes a huge difference.

It’ll keep your camera stable – so that your files remain tack sharp.

When you’re out doing sunset photography, you don’t need to start the shoot with a tripod, because the minutes leading up to a sunset bring plenty of light.

But as the sun sinks on the horizon, a tripod will become more and more necessary. (And by the time the sun is gone, a tripod will be absolutely essential.)

Note that you might want to use a tripod for your whole photoshoot, especially if you plan to capture long exposures that feature moving water, like this one:

long exposure sunset photography

What if you don’t have a tripod? Or you forget to bring one?

In such cases, I recommend you stabilize your camera against an object. You can put it on the hood of a car, or you can just set it on the ground; whatever allows you to minimize movement as much as possible.

9. Don’t be afraid to focus manually

We all love autofocus – but sometimes, when shooting in extreme lighting conditions, autofocus just won’t get the job done. Your lens will hunt all around, and the shot will end up out of focus.

That’s where manual focus comes in handy.

Now, not all lenses support manual focus. Some only allow for autofocusing, in which case you’re out of luck.

But many lenses do let you focus manually (and you can generally activate manual focus by pushing the AF/MF switch on the lens barrel to MF).

So when your lens starts to hunt, don’t fret; just swap over to manual focus and keep shooting!

10. Shoot more than just the sunset

Here’s one of the many wonderful things about sunsets:

They don’t just create wonderful colors in the sky; they also cast a beautiful golden light that is great for other types of photography!

So as the sunset progresses, keep an eye on other photographic opportunities around you. For instance, you can capture portrait, landscape, or macro shots. In the light of the setting sun, it’ll all turn out amazing!

portrait silhouette with sunstar

11. Keep shooting (even after the sun is gone)

A sunset constantly changes over time – which means that every additional minute is an opportunity for a different shot.

So don’t take a few shots and call it an evening. Instead, stick around and photograph the sun as it goes down. You can continue to capture the same composition, or you can test out different compositions; the key is to keep your camera out and your finger on the shutter button.

Also make sure to capture different exposures (bracket!) and consider working with different focal lengths, as I’ve discussed above.

And finally:

Don’t pack up once the sun is gone. The period after the sun has disappeared – called the blue hour – can be great for photography, too, thanks to its beautiful colors and ethereal light. So if you still have the energy, keep finding compositions until the colors have vanished completely from the horizon.

sunset photography tips

Sunset photography tips: conclusion

Now that you know these tips, you’re well on your way to capturing some stunning sunset photography of your own.

So the next time the sun starts to get low in the sky…

…grab your camera and head outside!

Amazing images await.

Now over to you:

Which of these sunset photography tips is your favorite? Are you going to use any of them the next time you photograph a sunset? Share your thoughts (and sunset photos) in the comments below!

The post 11 Sunset Photography Tips for Beautiful Results appeared first on Digital Photography School. It was authored by Darren Rowse.


Digital Photography School

 
Comments Off on 11 Sunset Photography Tips for Beautiful Results

Posted in Photography


8 Simple Guidelines for Capturing Spectacular Sunrise and Sunset Images

24 Jan

The post 8 Simple Guidelines for Capturing Spectacular Sunrise and Sunset Images appeared first on Digital Photography School. It was authored by Tim Gilbreath.

8 simple tips for stunning sunrise photography and sunset photography

When we are asked to think of popular subjects for landscape photography, images of beautiful sunsets and sunrises immediately come to mind.

What outdoor photographer worth their salt doesn’t have at least a couple of images of the sun dipping below the horizon?

In most people’s minds, sunrise and sunset photography is an easy thing to capture; the beauty and scale of the event itself should carry the photo, with minimal interaction from the photographer.

three birds at sunset

But is this really the case?

Unfortunately, it’s not. Unless you’re relying on luck alone, you’ll need to possess a few seeds of knowledge (eight, in this case!) to get you started capturing that epic sunrise or sunset.

None of these guidelines are difficult to comprehend, and they can all vastly improve your chances of properly capturing one of Mother Nature’s most incredible events.

So let’s jump right in!

1. Scout the location

As tempting as it is to just show up at a convenient location and start shooting, you greatly increase your chances of success by planning your sunrise or sunset photoshoot in advance. The first thing you’ll want to determine is the best location from which to shoot.

Pick a location that is out of the way of road and foot traffic, where you’re unlikely to be disturbed. Go to the location in broad daylight before the shoot, and ensure your view of the horizon will be unobstructed and free of any hazards.

The most important factor after the location is the time of day. Obviously, this will vary depending on whether you’re capturing a sunrise or a sunset.

But start by checking the weather. If your shooting time coincides with an approaching or recently-ended storm, the results can be staggering. Rain and storm clouds can add a dramatic layer of dimension to the scene.

You can also pinpoint the perfect time to shoot with an online tool or smartphone app that will display precise sunrise and sunset times for your location. Many low-cost (and sometimes free) solutions are available, including PhotoPills (for Android and iOS), and The Photographer’s Ephemeris (for Android and iOS).

sunset photography over lake

2. Sunrise or sunset?

If you’re familiar with color temperature, you’ll know that there is a slight difference in the appearance of light at sunset versus sunrise. Early morning light tends to be cooler (higher blue) than light in the late evening, which leans toward warmer color casts consisting of orange and red.

Since there are different color temperatures at work here, you might need to adjust your photos, depending on the look you’re after. You can do this through your camera’s white balance settings, through warming or cooling filters, or via adjustments in post-production – where you’ll need to add or remove warmth to achieve the perfect final photograph.

Be aware that physical filters placed over your lens will degrade image quality slightly, because they’re an additional obstacle for light to pass through, so adjusting color temperature with camera settings or in post-production is often the better choice.

sunflower sunrise photography

3. Plan your shots

Another important step to accomplish before heading out is to plan what you hope to achieve in your sunrise or sunset photo.

Ask yourself:

What look are you going for? Will you capture a definitive subject lit by the sunlight, or will the sunset itself be the star of the show?

Planning beforehand is also a great time to determine any other special considerations, such as whether you’ll be shooting an HDR (high dynamic range) photo.

If you do decide to use an HDR technique, you’ll need to prepare your camera for bracketed exposures to capture the full range of tones in the scene.

But while HDR can be a bit tricky to pull off, it’s a great way to produce some truly dramatic images!

4. Gather the proper gear

You can’t capture the right shot without the right gear, so make sure you have everything ready to go before you head out.

First and foremost, you’ll want to bring your tripod. Sunrises and sunsets are potential low-light situations (depending on the part of the sunset you’re trying to capture), so you’ll need a steady base for your camera.

Second, you’ll want to determine the right lens to use for the shoot. While beautiful landscapes can be captured using a 50mm to 85mm focal length, a wide-angle lens is preferred, including any zoom lenses that can shoot at 40mm or below. If you have a prime lens in the 12mm to 40mm range, you’ll have a better chance of capturing an even sharper image, and using a wide-angle lens will allow you to capture a vast, sweeping portion of the scene.

Do you own and use screw-on filters for your camera?

Although using filters can degrade image quality a bit, some can be useful here. A GND (graduated neutral density) filter, for instance, will darken the upper portion of the sky and keep it well-exposed and dramatic, even without HDR techniques.

A polarizing filter, on the other hand, may actually be a hindrance in these situations, so I recommend you avoid them. 

(Polarizers reduce the amount of light coming in to the sensor, further increasing the required exposure time, which may not be ideal if you’re trying to freeze motion, such as ocean waves.)

lifeguard at sunset

5. Use the right settings

Before you even arrive at your photoshoot destination, you can choose the settings on your camera.

Since you’re shooting a landscape image, you’ll want to use a smaller aperture, such as f/8, f/11, or even higher, to maximize the depth of field and capture sharp detail throughout. If you’re using a tripod, this shouldn’t be a problem.

Although you can shoot in Manual mode, I personally prefer to shoot almost everything in A/Av (Aperture Priority mode). This way, I can lock in my aperture and let the camera choose a proper shutter speed. Since low-light situations like this can confuse the camera and you run the risk of overexposure, you can always use your camera’s exposure compensation settings to drop the brightness a bit.

If possible, you should use a low ISO, such as 100 or 200, to ensure there isn’t a lot of noise in the final shot. This should be very achievable if you’re working with a tripod. However, if you’re hand-holding your shot, you will need to bump the ISO up to get a shutter speed that’s fast enough to avoid a blurry photo.

inlet sunset photography

This is also the time to choose your white balance, and as I mentioned above, you can use this setting to boost (or reduce) the warmth of your shot. If you’re after a warm, orangish image, set your white balance to the Shadow, Cloudy, or Daylight option.

And, of course, always shoot in RAW! To a certain extent, shadows and highlights that are lost in a shot can be recovered in post-processing later – but only if you have a RAW file.

6. Compose for interest

Now that the preparation is over, we get to the fun part! Once you’re on location and are ready to take the shot, you’ll need to consider your composition.

The most common error when shooting sunsets or sunrises is positioning the horizon exactly in the middle of the photo. While this can work, it normally causes a bit too much symmetry and can make the picture uninteresting.

Take a moment to look your scene over. Ask yourself: What part of the sunrise or sunset is the most dramatic? Are there any parts that aren’t that interesting?

Once you’ve done this, simply compose the shot to include more of the most dramatic scenery. If you have an angry, cloudy sky that accentuates the sunlight, let that occupy the upper two-thirds of the scene. If you have an interesting foreground or landscape but a less intriguing sky, let that occupy the bottom two-thirds of the image.

You want to draw the viewer into the composition, then let their eyes drift to the most dramatic part of the image.

sunset photography over trees

7. Waiting for the right shot

If you already have experience shooting landscapes, you know that sometimes waiting is the name of the game. Because of the dynamics of natural lighting, a scene can completely change from one hour to the next – and sometimes even from one minute to the next.

That’s why a sunrise or sunset shoot is the time to be creative! Try different exposure times and play with your exposure compensation settings for different tones. Let the clouds and sun change positions, then reshoot, or try a slightly different angle.

Maybe even include additional subjects in the frame, and shoot them in the foreground against the sunrise or sunset. The longer you’re at the location shooting, the more variety you’ll end up with!

pier close-up at sunset

8. Don’t leave too early

One of the most common tips you’ll hear regarding sunset photography is to stick around after the sun dips below the horizon.

This is certainly good advice, as the entire dynamic of the scene changes after sundown.

grasses at sunset

Specifically, the tones, colors, and hues in the sky often become more saturated and dramatic. You’ll need to compensate for the loss of your main source of light, probably with a tripod – but it’s hard to deny some of the most beautiful images can be shot right after the sun is out of sight.

8 simple guidelines for sunrise and sunset photography: Conclusion

Now that you’ve finished this article, you should be ready to capture some stunning images at sunrise and sunset!

So get up early, stay out late, and create some gorgeous photos.

Now over to you:

Do you have any beautiful sunset or sunrise photography you’d like to share? Post it in the comments below!

The post 8 Simple Guidelines for Capturing Spectacular Sunrise and Sunset Images appeared first on Digital Photography School. It was authored by Tim Gilbreath.


Digital Photography School

 
Comments Off on 8 Simple Guidelines for Capturing Spectacular Sunrise and Sunset Images

Posted in Photography


SLC-2L-13: Shoot Through Your Sunset

23 Aug

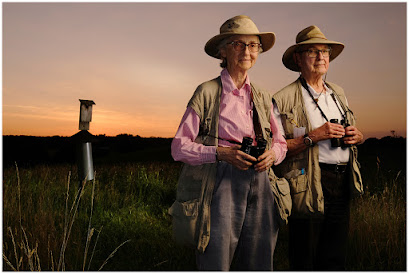
Whenever you have control over the time of day in which you'll be shooting a location portrait, always remember that the hour that wraps around sunset will offer you at least five different lighting environments in which to work. 

And for today's portrait of birders Jo (left) and Bob Solem, we're going to use three of them. 

Read more »
Strobist

 
Comments Off on SLC-2L-13: Shoot Through Your Sunset

Posted in Photography


SLC-1L-04: A Hack for Manual Flash at Sunset

16 Jun

Manual flash is great for its consistency and repeatability throughout a shoot. But working in a fluctuating ambient environment, such as against a fast-waning sunset, can get hairy.

Today in the Lighting Cookbook, how to easily control the exposure level of both your subject and background without your eye ever leaving the viewfinder. Read more »
Strobist

 
Comments Off on SLC-1L-04: A Hack for Manual Flash at Sunset

Posted in Photography


5 Reasons Why Your Sunrise or Sunset Photos Don’t Look So Stunning

20 Apr

The holy grail of travel photography is a stunning photo looking into the vast distance taken at sunrise or sunset. It seems to just work as a blend of color, composition, and light to create something that often makes the viewer utter that famous word that any photographer wants to hear, “Wow!”.

But why is it then that so often when you look at your own sunrise or sunset photos they don’t look so stunning? Here are 5 reasons why your sunrise or sunset photos don’t live up to your expectations.

5 Reasons Why Your Sunrise or Sunset Photos Don’t Look So Stunning - sunset on the coast

#1 – What’s the point?

I remember a picture editor once told me, “This might sound controversial, but a sunrise or sunset is actually pretty boring.” What he was referring to was the lack of compelling subject matter in a photo of a sunrise or sunset like for example an empty beach with just the setting sun.

While sitting on a beach and seeing a sunset can seem like a wonderful experience, unfortunately, the camera cannot replicate that. Most successful photos of sunrises or sunsets have a point of interest in them, in that there is a subject that is the main story and the sunrise or sunset is providing the light and the atmosphere.

That story doesn’t necessarily have to be a person or an object in the frame. The story could be the beautiful scenery or the crashing waves against the coast. But the key point is that there is something that gets the viewers’ attention. So, don’t just rely on the sunrise or sunset, try to build your composition using it as an addition rather than the story.

boring sunset photo - 5 Reasons Why Your Sunrise or Sunset Photos Don’t Look So Stunning

This photo just isn’t very interesting. There’s a lack of interesting clouds or even water movement.

In this image, the big rock in the foreground, footsteps in the sand and the people all add interest and context to the photo.

#2 – Clouds or no clouds?

For example, one element that can dramatically improve your sunrise or sunset photos is some clouds. Take your generic empty beach scenario from above, but this time add some dramatic clouds that the light can bounce off and suddenly you’ll go from something mundane to something that looks fantastic.

The clouds here add drama to the scene.

Of course, you can’t control the elements and no clouds in the sky means, there’s nothing you can do. In that scenario, you just have to work harder to frame your shot and give the viewer a point of interest.

While you generally want some clouds in the sky, too much cloud cover and you will often find the light seems flat and dull and the whole photo looks uninteresting (unless the sun can set below the clouds and light them up from underneath). So, in conclusion, while you ideally want some clouds, it’s important not to have a completely overcast day. You can, of course, plan your shoots around times when you will have the best conditions.

5 Reasons Why Your Sunrise or Sunset Photos Don’t Look So Stunning

#3 – Are your highlights and shadows correct?

One of the big challenges in photographing sunrise or sunsets is the vast contrast you get between highlights and shadows. Your highlights are the light areas of your photo (such as the sky for example) and your shadows are the dark areas in the photo (for example your foreground).

If either is pushed too far you will get completely white areas for highlights and completely black areas for shadows. This means that these areas contain no pixel details and is something you want to avoid.

The problem you face when photographing sunsets or sunrises is that your sky will be bright, and your foreground will be dark (a high dynamic range). The way that you can ensure that your highlights and shadows are exposed correctly in this scenario is to use a graduated neutral density filter to balance out the difference in the highlights and shadows.

There are also other techniques such as exposure bracketing as well that can help you achieve this in post-production and actually just brightening or darkening these areas in a software like Adobe Photoshop or Lightroom. But whatever you decide, just make sure that your highlights and shadows are exposed correctly and fine-tune them if you need to in post-production.

5 Reasons Why Your Sunrise or Sunset Photos Don’t Look So Stunning - clipped shadow areas

The blue areas on this photo indicate where the shadows are being clipped (black with no detail).

Here the same image has been adjusted in post-processing to hold more detail in the shadow areas. 

#4 – The image isn’t framed correctly

One of the key elements in ensuring the final photo looks great is to frame your composition correctly.

The easiest way to do this and a good starting point for any photographer is the famous Rule of Thirds where you try to place key points of interest on the intersection of the lines. But the Rule of Thirds is also worth remembering for your horizon line. Usually, you will find that placing the horizon either on the top third or the bottom third will look better than slap bang in the middle.

Horizon centrally framed.

Using the rule of thirds, the horizon here is on the lower third – off-center.

But try to consider the whole picture when framing your shot. Think if there are any areas that are just wasted space where you can crop in tighter. Or if your camera angle is slightly off and you can benefit by just moving a little to either side.

The beauty of photography these days is that you can usually take as many photos as it takes to get your shot framed right. So, play around with your composition and capture a few alternatives that you can then review later in post-production.

5 Reasons Why Your Sunrise or Sunset Photos Don’t Look So Stunning

Your camera may have the option to display the Rule of Thirds grid when you’re shooting or in image playback mode.

#5 – You haven’t fixed mistakes

Usually, the first bit of feedback that I often give newbie photographers when I look at their sunrise or sunset photos is on elements that could easily be fixed in post-production. Whether you are an advocate of post-production or not there are certain things that you simply should not forego on any photo.

The two biggest of these are:

  1. Ensuring that your photos are straight, that means the horizon line needs to be dead straight.
  2. Making sure you have the correct white balance for the photo (if you haven’t already done so when taking the photo). Think about the scene that you are showing, is it a warm and golden scenario or is it a cool and crisp setting? Either way, tweak your white balance until it is correct.

If you do nothing else in post-production, just making sure these two settings are correct will immediately improve your photos.

5 Reasons Why Your Sunrise or Sunset Photos Don’t Look So Stunning - crooked horizon line

This image is clearly not straight as can be seen from the horizon line.

Here the image tilt has been corrected.

Conclusion

Sunsets and sunrises are wonderful times in the day to photograph things. The soft golden light can transform an ordinary scene into an extraordinary one. When done well, they are often the photos that will be the “show stoppers” in any portfolio.

But always remember that a sunset and sunrise needs to work in combination with your composition and subject matter to create a wonderful photo. Follow these tips and you’ll be on your way to capturing great photos of sunrise and sunsets.

Now it’s your turn to get involved. Share your great sunrise and sunset photos below.

The post 5 Reasons Why Your Sunrise or Sunset Photos Don’t Look So Stunning appeared first on Digital Photography School.


Digital Photography School

 
Comments Off on 5 Reasons Why Your Sunrise or Sunset Photos Don’t Look So Stunning

Posted in Photography


Sunset, golf and a fake nuclear missile: How I spent four days taking pictures in Hawaii

27 Jan
Sony a6500 | 18-135mm F3.5-5.6 OSS @ 95mm | ISO 100 | F6.3

Being a child of the Midwest a hike, in my mind, is more or less walking across land that is mostly flat. There are trees, usually a dirt path, and maybe the occasional hill. A hike in Hawaii, I came to learn recently, can mean something vastly different.

I was in Hawaii on a Sony-sponsored trip along with a handful of other photography journalists, on Oahu for two vastly different shooting experiences: shooting pro golf with the a9, and trying out a new 18-135mm F3.5-5.6 zoom for the a6000-series. I was armed with a TSA-approved 3.4 ounces of sunscreen, a handful of memory cards and a pair of running shoes that prove to be woefully outmatched by the “hike” we’re about to embark on.

My first clue should have been when one member of our party put some spiky, chainmail-type overshoes on top of her street shoes. We walked across a parking lot toward the “trailhead,” a rocky slope where a faint suggestion of a path disappeared into some trees. What followed was 30 minutes of scrambling up a steep incline, grabbing at roots, tree branches and rocks for support. Oh, and did I mention I have a slightly weird thing about heights?

Suddenly, I was quite grateful for the a6500 and the lens’ small size. The whole kit fit easily into a low profile backpack and didn’t provide an extra physical challenge to overcome. Along the way we found a couple of points to stop off, breathe, and take a few photos. Every time we stopped I considered chickening out on the rest of the climb. Nobody would judge me, and I’d get perfectly nice photos from halfway up.

Sony a6500 | 18-135mm F3.5-5.6 OSS @ 18mm | ISO 100 | F4.5

Maybe the morning’s events made me feel bolder (more on that later). Maybe being the only lady journalist on the trip made me hungrier to prove my grit. Maybe it was just the beer I had at lunch giving me some extra courage. I kept going whatever the reason, and I’m pretty darn glad that I did.

Insert your favorite inspirational quote / rap lyric about making it to the top here.

Sony a6500 | 18-135mm F3.5-5.6 OSS @ 18mm | ISO 200 | F5.6

I wouldn’t have wanted to carry a lens/camera combo much bigger than the a6500 and 18-135mm on that hike. For its size, it proved to be a pretty versatile kit. The lens was wide enough for a sweeping view of sunset in the valley, but long enough for a quick shot of a helicopter in the distance when it swooped by unexpectedly. Your standard kit zoom wouldn’t have provided quite as many options.

Did you instinctively start humming the Jurassic Park theme when you saw this image? No? You’re a liar.

Sony a6500 | 18-135mm F3.5-5.6 OSS @ 90mm | ISO 100 | F5.6

I tend to gravitate toward wide lenses and like the convenience of carrying lightweight primes, but I was very happy to have the variety that the telezoom offered. When you’re standing on one 3′ x 3′ rock scared to move left or right for fear of falling to your death, you don’t have too many composition options with a 24mm prime.

As it turns out, that hike wasn’t the only time I contemplated my own mortality that day. Let me tell you about the events of that morning.

We all know now what happened, but when you’re woken up by your phone buzzing with this message (special attention to the part that says THIS IS NOT A DRILL) it makes for a very strange start to the day. The short version of my story is that I spent about 15 minutes in a semi-panic, and having only the tornado drills of my youth to call on for guidance, huddled in my hotel bathroom with a single bottle of water. Not exactly your best shot at surviving a nuclear attack.

I wish I could say I had some kind of profound experience when I found out it was all a mistake. In reality, I just put on some shoes and went downstairs for coffee and a yogurt, and more or less just went about my day. I made time to get into the ocean. That was nice.

A couple of days before the threat of nuclear warfare appeared on my phone, I found myself in a very different state of mind as I tried to photograph professional golf.

Sony a9 | FE 100-400mm F4.5-5.6 GM OSS @ 121mm | ISO 100 | F5.6

Golf is a mysterious game. As opposed to the tennis tournaments and baseball games I’m familiar with, the action happens all around you. I’ve thought of it as a game with a leisurely pace, but trying to photograph it for the first time, I’m amazed at how quickly the action unfolds. You have to get into position, pray that a caddy doesn’t step into your way at the last moment, and you only have a few seconds to get your shot before it’s all over. Oh, and you have to keep in mind the direction of the sun, ugly things like trash cans creeping into your backgrounds, and woe betide you if you make even a peep as a golfer prepares to swing a club – you’ll be swiftly escorted off the grounds.

“Game changer” has become sort of a joke around the office since it’s a phrase that’s been used to death and rarely lives up to its meaning. But if you’re a golf photographer, you really could consider the a9 to be a game changer. Plenty of resolution, 20 fps and silent shutter – particularly that last bit – is huge for a sport where silence isn’t just golden, it’s mandatory. Jeannette Moses noted this revelation when she photographed the Presidents Cup last year with the a9. I’ve seen it firsthand too, and it really is strange to be so close to a professional golfer raising his club to strike the ball while firing away at 20 fps.

Sony a9 | FE 100-400mm F4.5-5.6 GM OSS @ 100mm | ISO 100 | F5.6

Sony’s making a clear appeal to pro sports photographers with the a9, and before we set foot on the golf course we got a primer on the company’s efforts to bolster its offerings with Pro Support. If you aren’t familiar, this is a program for working photographers that aims to put Sony on even footing with Canon and Nikon.

Sony Pro Support members pay a $ 100 annual fee that entitles them to 24/7 phone and email support and access to service centers in Los Angeles and New York. If you need to send a product in for a fix, Sony claims a three-day turnaround with free loaner gear to cover repairs that take longer. To qualify, photographers must own at least two full-frame Sony bodies, three lenses and must be actively earning income from their photography.

For comparison, Nikon uses a point system and requires at least two camera bodies and two lenses. The system is tiered, but all levels include priority repairs, repair loans and discounts on repairs. Canon also uses a point-based tiered system, but doesn’t require a certain number of lenses or bodies.

I’m by no means a pro, and shooting golf proves to be a much more challenging experience than I was anticipating. An afternoon carrying two camera bodies, one of them with a sizable 100-400mm lens attached, was a fairly taxing endeavor. I also put my finger on the shutter too gingerly a few times, and with 20 fps silent shutter it’s easy to end up with hundreds of photos you didn’t mean to take. From over 3000 (!) images, I managed to scrape together a handful I feel comfortable putting my name next to. Not exactly a stellar hit rate.

Sony Open gallery

$ (document).ready(function() { SampleGalleryV2({“containerId”:”embeddedSampleGallery_8041997224″,”galleryId”:”8041997224″,”isEmbeddedWidget”:true,”selectedImageIndex”:0,”isMobile”:false}) });

I have a renewed appreciation for the tough job pro sports photographers have, and a respect for Hawaii’s lovely-yet-dizzying hiking trails. I also jump out of my seat now when my phone buzzes too loudly and I’m finally getting serious about putting together an earthquake preparedness kit. But my feeling of having stretched myself as a photographer, and I suppose as a hiker, outweighs my sense of distress over the whole thing. And if you’re going to survive a fake nuclear missile attack, there are worse places to experience it than Hawaii.

Sony 18-135mm F3.5-5.6 OSS sample gallery

$ (document).ready(function() { SampleGalleryV2({“containerId”:”embeddedSampleGallery_3207546459″,”galleryId”:”3207546459″,”isEmbeddedWidget”:true,”selectedImageIndex”:0,”isMobile”:false}) });
Articles: Digital Photography Review (dpreview.com)

 
Comments Off on Sunset, golf and a fake nuclear missile: How I spent four days taking pictures in Hawaii

Posted in Uncategorized


How to Take Better Sunset Photos

24 Jan

A beautiful sunset is one of the most desirable subjects for photographers to shoot and can be achieved any time of the year when the light is right. Most outdoor photographers will tell you that this is their favourite time of day to take photos when the landscape is bathed in golden light and the rich colours and last rays of the day can be magical. Photographing these moments can be truly satisfying so here are six useful tips to help you capture better sunset photos.

1 – Shoot into the light

Sunset photography tips 3F6A3213 HDRAB

You are more likely to snap a stronger image of the setting sun during the hour leading up to sunset, known as the golden hour. If you aim to shoot directly into the sun when it is low on the horizon you are more likely to capture a better scene than if you were to shoot into the light earlier in the day when the glow of the sun can be too strong and harsh.

That is when lens flare is likely to be present in the image due to the sun hitting the front of the lens element directly. It can sometimes, however, be used to your advantage.

Remember to take care when staring into the sun and don’t do this for too long to prevent damaging your eyes.

2 – Turn around (and shoot what’s behind you)

Have you ever been so focused on capturing the scene in front of you with the sun setting before your very eyes, to then notice that the view behind is just as spectacular? Novice photographers often make this mistake when starting out.

When you’re setting up the camera and composing for the shot in from of you, it is worth turning around to see whether the scene behind you offers any photographic potential. If it does, be sure to capture this alternative view as well.

Sunset photography tips 3F6A5279Deadvlei Namibia

3 – Hide the sun

If you have found a view you like and it is too bright shooting towards the sun, try hiding the sun behind an object to further improve the image. You can experiment by partially shielding the sun behind a tree, rock, or person, for example, to find different compositions.

This technique can result in striking images where you can create great silhouettes or even sun flares by partially masking the sun.

Sunset photography tips 3F6A3116 HDR

4 – Change focal length

Your focal length setting and choice of the composition will make a big difference to the overall picture. Experiment with different focal lengths and figure out what works well and what doesn’t.

If you want to photograph the setting sun in isolation and for it to be the main feature, zoom in and take close-ups. If you want to capture a broad and breathtaking landscape, choose a wider field of view to take in a larger area and include more elements that may provide a more visually pleasing scene.

Sunset photography tips 3F6A0444

5 – Experiment with the White Balance

You will find most cameras are set to Auto White Balance where the camera works out the color tone automatically and therefore sets the color of your photographs. This is the simple option and is great for capturing images where color shifts are not required.

However, if you want to change the color temperature of your image don’t be afraid to experiment with different White Balance settings to create a more interesting and visual image. To add warmth to your image, you will want to select a White Balance such as Cloudy or Shade, whereas if you want to create images with a cooler look and feel, try Tungsten or Fluorescent.

Sunset photography tips 4X8A4732

6 – Stick around after sunset

Once the sun disappears, don’t be tempted to pack up your camera bag and head home as you may get lucky with the light and witness a wonderful afterglow. Stay around after sunset, the sky will usually light up in color 25 minutes after the sun has set below the horizon, which can often give spectacular and colorful light.

Cloud formations can bring another dimension of beauty compared with clear skies especially when their colors start to pop and ignite.

Sunset photography tips 3F6A4514

Conclusion

Without a doubt, sunset photography can be very enjoyable. Using the techniques above may help you improve your pictures and capture a shot you like. Please share your sunset photos and tips in the comments below.

The post How to Take Better Sunset Photos by Jeremy Flint appeared first on Digital Photography School.


Digital Photography School

 
Comments Off on How to Take Better Sunset Photos

Posted in Photography


How to Plan and Take Killer Sunset Photos on Your Next Vacation

31 Oct

Who doesn’t love a good sunset photo? There’s something about that colorful, ethereal time of day that strikes a cord with just about every person. But as appealing and ordinary as sunsets are, the ability to capture that magical time of day as a photo can be surprisingly difficult.

Sunset Photos

Photo by Martin Genev

Yes, gear and camera settings are important. However, the ability to be in the right place at the right time of day is arguably the most important factor to photographing a sunset. Below, I’ll highlight several tips for planning

Yes, gear and camera settings are important. However, the ability to be in the right place at the right time of day is arguably the most important factor to photographing a sunset. Below, I’ll highlight several tips for planning

Find the best sunset location

How to Plan and Take Killer Sunset Photos on Your Next Vacation

If you’re visiting a new town and searching for an ideal sunset spot, your best bet is to do some online searches. Do a Google image search for “[location] sunset” and see what pops up. Better yet, visit stock image sites and enter similar search queries.

In most cases, you’ll see sunset photos taken from one or two popular locations. It might take some digging to find out exactly where those spots are, but once you have the answer, you’ll know where to shoot.

What time is the sunset?

A simple Google search will tell you exactly when sunset happens in the location of your choice. Keep in mind, however, that the hour or so before sunset is the ideal time of day for most photographers, so you’ll want to show up at your chosen sunset location closer to Golden Hour.

To really hone in the ideal times of day to shoot in a new location, the PhotoPills app is a handy tool. It’s packed full of information that can help you plan and execute outdoor photo shoots.

PhotoPills Sunset Planner - How to Plan and Take Killer Sunset Photos on Your Next Vacation

Image courtesy of PhotoPills

Camera settings for sunset photos

Your ideal camera settings for shooting a sunset depend on a variety of factors, but generally speaking, these are some rules to go by.

Shoot in RAW

When it comes to shooting the sunset, one of the biggest challenges is making sure your camera captures the same warmth and vibrancy that your eyes are seeing. You can typically make White Balance and Picture Style tweaks in camera (more on those below). But just in case, it’s also a good idea to shoot in RAW to give you greater creative control when you post-process the image.

Set White Balance

Leaving your camera White Balance set to Auto might suffice. However, if the color cast of your image is looking too cool or slightly off, try setting your White Balance to Daylight or Cloudy to warm up your shot.

Shoot in Aperture Priority

What shooting mode you should use is certainly debatable, but Aperture Priority will give you greater control over the depth of field. Shooting with a small aperture (f-step of f/16 or higher) will give you a large depth of field. This is ideal if you want more of your scene in focus.

How to Plan and Take Killer Sunset Photos on Your Next Vacation

Keep ISO Low

To avoid excessive noise in your image, maintain the lowest possible ISO for the amount of light you have available. If it happens to be a cloudy sunset or you’re shooting a scene with lots of shadows, you might have to increase your ISO unless you use a tripod.

Composition tips for unique sunset photos

After you’ve got your ideal sunset spot secured, it’s time to start thinking about what kind of sunset image you want to capture.

Keep this in mind: the way that most people photograph a sunset is to whip out their camera at hand, point it directly at the sunset and start snapping away. There’s nothing wrong with capturing the sunset this way, but it doesn’t always make for unique images.

If you’re trying to think outside of the box and get an interesting sunset photo, try some of these tips.

Zoom in

How to Plan and Take Killer Sunset Photos on Your Next Vacation

For most spontaneous sunset photographers, the camera at hand is their point and shoot or cell phone. These cameras are usually equipped with wide-angle lenses. Set yourself apart from the crowd by picking an interesting feature and zooming in.

Shoot away from the sun

Instead of shooting directly into the sun, consider pointing your lens in the opposite direction. The bright and often vibrant colors generated by the sunset can make the scene in the opposite direction equally alluring, without having to compensate for shooting directly into bright light.

Wait for Blue Hour

Every photographer has heard about Golden Hour, that magical time of day just before sunset. Lesser known is Blue Hour, that brief time of day that begins roughly 10 minutes after the sun has set (and before it has risen at dawn).

Blue Hour Photography - How to Plan and Take Killer Sunset Photos on Your Next Vacation

This image was taken just after sunset during Blue Hour.

The sky isn’t as obviously colorful during Blue Hour as it is during sunset or Golden Hour. However, Blue Hour still offers a window of time when it can be best to shoot cityscapes or landscapes with deep blue tones in the sky. You will almost certainly need a tripod to shoot during Blue Hour as it is significantly darker without the sun. But the lesson here is that many more photo opportunities exist even after sunset.

Over to You

Do you have any tips for shooting sunset photos? Share your photos and tips below!

The post How to Plan and Take Killer Sunset Photos on Your Next Vacation by Suzi Pratt appeared first on Digital Photography School.


Digital Photography School

 
Comments Off on How to Plan and Take Killer Sunset Photos on Your Next Vacation

Posted in Photography


Video – How to Shoot Stunning Photos at Sunrise and Sunset

28 Oct

In another video from Practical Photography, get some really good tips on how to shoot at sunrise and sunset to get the most epic images.

Follow along as two photographers go head to head in a little friendly competition to get the best sunset and sunrise photos. Get some practical tips that you can use in your photography at these magic hours as well.

Need more sunrise and sunset tips? Try these dPS articles:

  • 4 Reasons Shooting at Sunrise and Sunset Will Help You Take Better Photos
  • 8 Simple Guidelines for Capturing Spectacular Sunrise and Sunset Images
  • 7 Uncommon Tips for Winter Sunrise Photos Near Water
  • Tips for Location Scouting to Get the Perfect Sunset Photograph
  • Tips for Doing More Spectacular Sunset Photography
  • 5 Tips to Take Better Sunset Photos – and Why Not to Photograph the Sunset Directly

The post Video – How to Shoot Stunning Photos at Sunrise and Sunset by Darlene Hildebrandt appeared first on Digital Photography School.


Digital Photography School

 
Comments Off on Video – How to Shoot Stunning Photos at Sunrise and Sunset

Posted in Photography


Weekly Photography Challenge – Sunrise Sunset

28 Oct

Shooting the sunset or sunrise is a great way to come back with spectacular images. This week it’s time to get out there at dawn or dusk and make some magic.

Sunset in Nicaragua.

If you need some tips to help you on this one you can find a good video here and links to several articles on shooting the sunrise and sunset.

Remember you don’t have to have the sun in your photo to make it an effective shot. Use the nice soft directional light at these times of day to your advantage.

Sunrise in the beach in a fishing village in Nicaragua. I used the soft warm light to show the subject – this young girl taking home a fish for her efforts helping the fishermen on the boats coming in.

Another Nicaraguan sunset. Add an interesting subject in front of your sunset for a more dramatic photo.

Weekly Photography Challenge – Sunrise Sunset

Simply upload your shot into the comment field (look for the little camera icon in the Disqus comments section) and they’ll get embedded for us all to see or if you’d prefer, upload them to your favorite photo-sharing site and leave the link to them. Show me your best images in this week’s challenge. Sometimes it takes a while for an image to appear so be patient and try not to post the same image twice.

Share in the dPS Facebook Group

You can also share your images on the dPS Facebook group as the challenge is posted there each week as well.

The post Weekly Photography Challenge – Sunrise Sunset by Darlene Hildebrandt appeared first on Digital Photography School.


Digital Photography School

 
Comments Off on Weekly Photography Challenge – Sunrise Sunset

Posted in Photography