RSS
 

Posts Tagged ‘Successfully’

12 Steps to Successfully Promote Your Photography on Instagram

13 Aug

The post 12 Steps to Successfully Promote Your Photography on Instagram appeared first on Digital Photography School. It was authored by Robin Ryan.

promote your photography on Instagram

Instagram is an excellent way to attract attention, gain followers, engage with likeminded folks, and even improve your photography, but it’s all easier said than done, right? Plenty of photographers post on Instagram and get nothing out of it – no followers, likes, or even views.

So how do you use Instagram the right way? How can you promote your photography on instagram and come away with likes, followers, and comments galore, not to mention a great community?

In this article, I’m going to share my personal secrets for Instagram success. Specifically, I’ll offer techniques to get better exposure for your photography, build a community, and grow as a photographer through Instagram. I assure you, I know what I’m talking about; my personal Instagram account has 15,000 followers (and counting). So you know this advice works.

Let’s get started.

promoting photography on Instagram person on a mountain

1. Only show your best work

What’s the difference between a good artist and a great artist?

Great artists only show their best work. While nobody is expecting you to rival National Geographic photographers right away, you should pay close attention to what you’re sharing. It only takes one bad photo for people to lose interest in your photography.

In short, if a photo doesn’t make you say “Oh, yeah!” when you see it, don’t post it.

Also, don’t post too often. Unless you have a really good reason for spamming your follower’s feeds, don’t do it. I recommend sharing one or two images a week – it’ll keep people interested without getting annoying. So post the great stuff, and leave out the bad, the mediocre, and even the good.

2. Find your niche

This is key to defining your brand and to your growth as a photographer. It’s about determining what makes you different from everyone else and about using that difference to create something unique and interesting.

The amazing thing about Instagram is that it’s composed of people across the world, each of whom have a different interest. I’ve seen fantastic accounts focused on street food in Vietnam, rock climbing in Utah, and architecture in Turkey.

But despite these differences, the best accounts all have one thing in common: a focus around a central theme. And it’s this theme that captures their audience’s attention (and keeps it).

person by a fallen tree

Exploring the ancient #forests of Vancouver island, @kaitross and I found that even these giants succumb to time and the winds.

Don’t forget: the only person who should define your niche is you. Do you love paper maché and dinosaurs? Then become the best photographer making seaside portraits of paper maché Velociraptors.

I love to travel and explore nature, so my account reflects that and only that. You won’t find photos of my food or my family. If you want to share snapshots from your daily life, get a private account for your friends and your family to follow, because they’re the only ones who (might) want to see that stuff.

3. Use a dedicated camera, not just your smartphone

Your shiny new smartphone may take gorgeous snapshots, but constantly relying on a smartphone is like trying to perform a piano recital on a kid’s electronic keyboard.

Yes, smartphone cameras have come a long way in recent years, and yes, there are plenty of outstanding smartphone photographers out there. But unless you’re an experienced photographer with a lot of compositional and lighting knowledge, I highly recommend getting a “real” camera, such as a DSLR or mirrorless model.

Why? For one, it’ll force you to learn key photographic skills, such as exposure, depth of field manipulation, and proper handholding technique. Plus, it’ll give you additional focal lengths to play with, so you can shoot birds in the distance, sweeping landscapes, stunning close-up shots, and more.

snowy church

4. Take the editing process seriously

Instagram may lend itself to a snap-and-post style of photography, but producing excellent photographs doesn’t work that way. Great photographs aren’t taken – they’re created.

This means shooting in RAW, then working in your favorite image editing program (I recommend Adobe Lightroom). Learn how to manipulate light, shadow, and clarity until your final product is something you can be proud of. The Instagram app just isn’t built for this level of sophistication, so ditch all those cheesy filters and effects and do your work on the computer.

person climbing a mountain with buckets

5. Share a story with your photo

Great photography leaves an impression. So do well-written stories. But when you combine strong images with powerful words, you’ll evoke an emotional response in your viewer and help them connect with your work.

It wasn’t until I realized this and started sharing the story behind my photos that my account started getting real interaction – people writing about how the image or words affected them and their own experiences.

Nobody expects the next Hemingway to come out of Instagram, but some carefully chosen words in a thought-provoking caption will do wonders for connecting you to your fans.

beautiful mountaintop in China

After the frenzied atmosphere of Shanghai’s urban jungle, the fresh air of Huangshan’s Yellow Mountains was exhilarating. Still in the low season, March snow clung to the boughs of trees while distant clouds made it feel like the horizon could go forever. One of China’s better-developed tourist attractions, Huangshan has a long history: first recognized in 747 AD, it was said to be the place from which the Yellow Emperor ascended to heaven. This year, over 1.5 million visitors (mostly Chinese) will wander its paths. I caught it on a quiet day, and these peaceful memories linger with me still.

6. Ask questions in your captions

What’s the difference between a story and a question?

A story builds an emotional connection between the viewer and the image; a question builds a personal connection between your viewer and you.

So tell stories, but ask questions, too. Your questions should be open ended and create a space for your fans to contribute some of their own stories to the community. Remember that many Instagram users are new to digital photography and are looking for people to connect with. By asking questions, you can encourage them to engage with the community (you might even make friends along the way!).

7. Use hashtags effectively

I never understood the value of effective hashtagging until I started weaving them into my posts. You should be hashtagging important nouns and verbs – stuff people will be searching for.

And get specific, too. The difference between #fishing and #instagood is huge for obvious reasons: people who might be interested in your photo are much more likely to be searching for their favorite hobby than some meaningless, catch-all term. So don’t add a bunch of generic hashtags that say nothing about your work. Instead, use descriptive hashtags that target certain users.

landscape with green grasses

Speaking of hashtagging, do a bit of digging to find effective hashtags you might be missing. It wasn’t until I came across the hashtag #explorebc that I began connecting with a ton of great local photographers who eventually featured my work on their account (resulting in a huge boost of exposure for my photos!).

8. Post in the morning

The morning is when most Instagram users check their feed, so keep this in mind and set your posting schedule accordingly. I live on the West Coast of North America, so if I post at 8 AM, I’m already late for my East Coast followers. Aim to get your posts out early in the day for the time zone you’re targeting (of course, if your followers are worldwide, this is less useful).

Is there a best day of the week to post? Studies show that Sundays have the greatest number of interactions, which makes sense given that many users spend Sunday relaxing at home. Otherwise, stick to weekday mornings.

9. Build a community

Build a community by actively finding photographers you respect and developing relationships with them. I won’t lie – this is a long process, but it’s necessary and worthwhile.

It’s also pretty simple: Just find a hashtag that speaks to you and your work, then check it whenever you can to see who’s posting. When you find photography you like, leave a thoughtful compliment and follow the user. Chances are, if they like what you’re posting, they’ll check out your account and reciprocate.

Whatever you do, when commenting, don’t ask people to check out your account or follow you back. It’s tacky and makes you look desperate. Instead, be thoughtful, complimentary, and ask for nothing in return.

woman sitting by the sea

10. Cultivate champions

champion is someone who genuinely engages with your work. They comment frequently, and their comments are thoughtful – not just “Nice” or “Love it,” but lengthier, meaningful content explaining what they like about the posted image.

Champions are great for both your community and your popularity, but how do you get them? What makes champions comment on your photos?

Here’s the best way to draw in champions:

Foster relationships with other users.

Of course, this is easier said than done. But if users are leaving you thoughtful comments, return the favor and respond with something more meaningful than “Thanks!” If someone cares enough about your work to awkwardly type out praise on their smartphone, they’re worth their weight in followers. These are the people who are going to follow along through your adventures and refer their friends and followers. Do enough relationship building, and these delightful unicorns will be out there promoting your work for you.

11. Bring others into the conversation

Bring others into the conversation by photographing with them or referencing them in your posts. Two amazing women from Vancouver kicked off @localwanderer several years ago, in which they document their travels around North America and feature the hidden gems in communities.

Where the @localwanderer creators really excel (in addition to their photography and writing) is in their ability to constantly bring local shops, restaurants, and people into the discussion. By doing this, @localwanderer introduces its community to someone new, who in turn will introduce their community to @localwanderer.

So think about who or what you can reference on your account. If you’re a nature photographer, you might try tagging local parks; if you’re an architectural photographer, you might try tagging the owners of local buildings/businesses. The specifics will depend on the photography you do, but as long as you’re creative and you persevere, you’re bound to make some valuable connections.

12. Don’t confuse followers with community

I’d rather have 100 fans who interact with my work than 1,000 followers who never like and comment. Your goal shouldn’t be about quantity of followers – instead, it should be about the quality of your community.

Speaking of numbers, don’t be afraid to clean up (and block) followers, especially those who are clearly inactive or fake. The last thing you need is a bunch of zombie accounts clogging up your Instagram. Also, one danger of having many inactive followers is that your account is less likely to be recommended to other users of Instagram.

How to promote your photography on Instagram: final words

There you have it: 12 tips for success on Instagram. As long as you follow these tips, your account will grow and your engagement will skyrocket.

Now over to you:

What are your tips for promoting photography on Instagram? Do you have any success (or failure) stories you’d like to share? Let’s hear them in the comments section below!

The post 12 Steps to Successfully Promote Your Photography on Instagram appeared first on Digital Photography School. It was authored by Robin Ryan.


Digital Photography School

 
Comments Off on 12 Steps to Successfully Promote Your Photography on Instagram

Posted in Photography


How Does Adobe Stock Work: Successfully Selling Your Photos

04 Sep

Posts with images get 650% more engagement than those without. For this simple reason, stock photos are in high demand and it’s unlikely that demand will be going away anytime soon — and that’s just content writers. Designers, artists, and other creatives always need new design assets and content for their work. This has given rise to a number of Continue Reading

The post How Does Adobe Stock Work: Successfully Selling Your Photos appeared first on Photodoto.


Photodoto

 
Comments Off on How Does Adobe Stock Work: Successfully Selling Your Photos

Posted in Photography


3 Important Tips for Successfully Photographing Products for Brands

16 Dec

The post 3 Important Tips for Successfully Photographing Products for Brands appeared first on Digital Photography School. It was authored by Lily Sawyer.

photographing-products-for-brands

In this article, you’ll learn 3 important tips for photographing products for brands that will help you achieve better images.

Other than as a photographer, I wear many hats, one of which is as a content creator for brands. It’s common knowledge that when working with other brands, two things are key:

  1. Understand the brand’s USP (unique selling point)
  2. Communicate the brand’s USP

dps-lily-sawyer-photo

Brands that differentiate themselves from other brands, thereby having a clear uniqueness about them that they propose to their audience, achieve more success in their advertising endeavors.

However, it is not enough to have a great USP.

Presentation of the USP matters and this usually means visual presentation. This is where the photographer or film-maker comes in.

When it comes to photographing products for brands, our role as photographers is to understand that unique message and deliver it in the most effective way for the brand to succeed. We need to be able to communicate that USP in our images and visuals.

3-tips-photographing-products-for-brands-dps-lily-sawyer-photo

Social media allow brands to reach the masses more easily. Audiences now have access to more than one platform, one type of style or preference. They are inundated with an array of options from which they can make their choices.

To be part of the game, and have a slice of the pie, brands are endeavoring to reach beyond their expected target audience to those they want to convert to their aesthetics.

dps-lily-sawyer-photo

Audiences might not necessarily know what they want nor that they want something until it has been presented to them.

Take Henry Ford, for example. He may not have been the first person to invent a private automobile, but he was the first person to mass-produce it. Ford made his Model T accessible to the masses.

Prior to this, not many people had access to their own automobile. They relied mainly on steam-powered vehicles and mechanical forms of transport to get them to places. People were generally happy with what they had until something better, something they had not thought of before, in the form of their own gasoline-powered automobile, was presented to them. It was both accessible and available.

3-tips-photographing-products-for-brands-dps-lily-sawyer-photo

Various platforms widely used nowadays in brand advertising are websites, social media (Instagram, YouTube, Facebook, Twitter, Pinterest, Linked In, Yelp, Reddit), print advertising (magazine, billboards, leaflets, posters), television and radio ads. The type of communication will depend on what works best for the advertising platform used.

3-tips-photographing-products-for-brands-dps-lily-sawyer-photo

This article will focus on photographing products for brands to reach their intended audience. Assuming that you have an adequate understanding of the brand’s USP and ideas on how to communicate it on their chosen channel, here are 3 tips when photographing products for brands.

1. Understand what the audience wants

3-tips-photographing-products-for-brands-dps-lily-sawyer-photo

Whilst branding is the most important, it is no longer the only consideration, no longer the be-all-end-all. We need to think outside the brand and understand our audience.

Recently, I received an invitation to sit on an advisory board for a big company. The company was hard at work nailing their branding. They were at a point where they were able to clearly and articulately present their brand’s identity. The advisory board, composed of various sectors of the industry, was asked for opinions and input on how to effectively shout the brand’s identity to the world.

The meeting took an interesting turn as it became apparent that the brand, as strong as their identity was, needed to look outside of themselves and understand the market, consumers, and traders – the people on the receiving end of their message.

It’s no longer just about the brand. The audience is now just as important in the game.

3-tips-photographing-products-for-brands-dps-lily-sawyer-photo

What does the audience want? What type of images and visuals speaks to them the most? Where and how do they want the brand to speak to them? Old traditional ways don’t cut it anymore. We have to be thinking outside the box and exploring new ways of effective messaging.

Is it enough to present a product photographed against a ubiquitous white background? Is presentation in context now necessary as well? We are bombarded with short films and short stories everywhere we go. Static images in white boxes no longer pull the heartstrings.

Stories and contextual presentation, personal experience, and testimonies are now a must. Remember, photographs can tell stories just as effectively as moving images – we just need to keep up with our game.

3-tips-photographing-products-for-brands-dps-lily-sawyer-photo

2. Photograph with the intention of giving the audience what they want

I’m a typical consumer; before I buy something, especially if I have not seen it in real life and I’m only relying on web images, I’d like to investigate the item. I want to see it close-up, read a detailed description of it, and would like to envisage it in my own personal situation or surroundings. A complete range from context to product photography is what I need to complete my research and help me decide to purchase or not.

3-tips-photographing-products-for-brands-dps-lily-sawyer-photo

How do I want this presented? Personally, I’d like an image in context, then close-up images, then an image on a white background – pure product photography.

A contextual image should resonate with me and elicit my emotions. The close-up image should speak to my visual aesthetics and help me decide if I like the look of it enough to buy it.

Lastly, the product image on a white background speaks to my brain. It answers practical and logical questions I might have.

I’d expect a combination of visuals on a website or a good advertising platform.

3. Present the visual so the audience will engage

When it comes to photographing products for brands, depending on the channel or platform you choose, you need to be discerning about what image works best to ensure that a good percentage of the audience engages.

For example, on TV, emotionally moving adverts or humorous, unforgettable ones work best. The cost is immense. In the UK, big brands usually do quite long, full Christmas adverts around the time of the launch. These adverts then get cut and shortened on subsequent showings to help with the costs.

dps-lily-sawyer-photo

On social media, videos are hugely effective, but the most effective ones are the short and quick videos to keep in line with the limited attention span of audiences nowadays! Yes, there are videos longer than a minute that are effective too. However, this would perhaps require that you already have an engaged tribe willing to give up more time and stop for several minutes to watch your long advert.

Of course, the younger audiences (youths and young adults, especially Generation Z) are more used to watching longer videos, so there’s that to consider when creating and presenting product content.

dps-lily-sawyer-photo

On Instagram, for example, brands work with me to reach my audience. It’s not always a must that our aesthetics match, although often they do. It could be that the brand wants to reach my type of audience to expand their reach and to speak to new audiences who may not be familiar with what they have.

Think again of Henry Ford here.

In both cases, I would always present the ad in terms of how engaging it would be to my audience and not the brand’s aesthetics per se. This is better for the brand as the more engaged the audience is, the wider the reach is for them.

This is not to say that I disregard the brand’s USP. In fact, I communicate the brand’s uniqueness in my captions and make sure these are the focus of the message. But at the forefront of my mind, I will present the visual in a way that my audience finds most interesting so that they are encouraged to engage.

dps-lily-sawyer-photo

Wide, medium, close-up, and flatlay shots

In practical terms, this means my front image is always the contextual wide-angle image. I follow this with product images shot from a medium angle to close-up.

This is in line with what I know to be the most popular style of posts with high engagement rates.

3-tips-photographing-products-for-brands-dps-lily-sawyer-photo

Other pages may have close-up product shots as their most successful type of images, or flatlays, or products all shot in a seamless white background. To effectively communicate to your target audience, your images need to resonate with their aesthetics, not just needs and wants, as they might not be fully aware of those yet.

Whilst the brand needs to be true to its USP and key message, the presentation needs to be flexible to adapt to consumer demands.

3-tips-photographing-products-for-brands-dps-lily-sawyer-photo

As a photographer, keep the above in mind and usually aim to cover all bases when photographing. Take wide-angle shots using something like a 24-25mm lens, a mid-range angle using a 50mm-85mm focal length, and close-ups from 105mm upwards.

In terms of presentation, go with the most successful type of images that elicit high interaction from the audience. Suggest that as the front image for the client to use on platforms like Instagram. Then provide the necessary product shots as secondary images to use to complete the audience satisfaction.

Conclusion

In summary, when it comes to photographing products for brands, successful advertising takes into consideration your audience’s preferred aesthetics. Whether that audience is already your tribe or a new audience you are trying to reach with the brand, you want your visuals to resonate with them on an emotional level. That is one of the most effective ways of communicating with your audience and ensuring effective brand reach.

Do you have any other tips for photographing products for brands that you’d like to share? Please do so in the comments section.

The post 3 Important Tips for Successfully Photographing Products for Brands appeared first on Digital Photography School. It was authored by Lily Sawyer.


Digital Photography School

 
Comments Off on 3 Important Tips for Successfully Photographing Products for Brands

Posted in Photography


5 Top Tips for Marketing Your Photography Business Successfully

11 Sep

The post 5 Top Tips for Marketing Your Photography Business Successfully appeared first on Digital Photography School. It was authored by Darina Kopcok.

Marketing is something that often falls by the wayside for photographers. We push it aside when we’re busy, only to find the clients aren’t there when things slow down.

The best marketing efforts are those that are organic and purposeful. There is no quick fix. Promoting your work is not as simple as “build a website and they will come.” It takes consistency and effort to keep your name out there, no matter how long you’ve been in the business.

Here are my five top tips for marketing your photography business the right way.top-tips-for-marketing-your-photography-business-the-right-way

1. Curate your online portfolio

As a professional photographer, you need an attractive, well-curated website to highlight your work.

Your website will brand you as either a professional or an amateur. It will serve as the first impression of you and your work. You need to pay attention to every detail, from the template you choose, to how your images flow together to create a cohesive narrative of who you are as an artist.

Put only your best work in your online portfolio, but try to approach your images as a potential photo buyer might. It’s easy to get emotionally attached to certain photographs, but sometimes your favorites are not the ones that are going to resonate with your target market. Create galleries that organize your photos into a grouping that make sense. Pay attention to the colors, shapes, and lighting that flow well together. Create an experience for the viewer as they move through your body of work.

If you feel you can’t see the forest for the trees when it comes curating your work, hire a photo consultant who can give you an unbiased and expert opinion.

Starting an online portfolio from scratch? You might want to choose a web builder made for photographers, such as Photoshelter or Format, as they also offer various tools to help sell and distribute images.

Squarespace is popular with a lot of photographers because of their beautiful, minimalist and modern templates. Wix is also another site that has improved in leaps and bounds in the last couple of years. It is highly customizable and unlike some of the other options, offers tons of different templates to choose from.

5 Top Tips for Marketing Your Photography Business Successfully

2. Print your work

The demand for digital imagery is huge, however, print is not dead.

If you’re a commercial photographer, having a print portfolio is essential for meeting with clients. Showing up at an agency meeting with an iPad to show your work will make you look like an amateur.

In the commercial and advertising world, agencies want to see how your images hold up in print because any flaws become much more obvious. It’s important for them to see how your work translates into print before they hire you.

Creating a top-notch portfolio can be very expensive, but there are several sites like Artifact Uprising and Blurb where you can have good quality photo books printed at a reasonable price.


top-tips-for-marketing-your-photography-business-the-right-way

If you’re looking for commercial work and want to work with ad agencies, design firms, or magazines, you’ll also need to send out printed promos to your target market three or four times a year.

It’s said that it takes an average of seven contacts with someone before they buy from you, so this tactic may not pay off immediately.  However, never underestimate the silent watchers.

If you work on the retail level, such as in wedding photography or portraiture, it’s still useful to have printed work to show prospective clients. People love to see something tangible, something they can hold in their hands that will help them experience your work in a more direct way. The photographers who make a lot of money in these niches print out their photographs to show to clients in-person, which drives sales exponentially.

5 Top Tips for Marketing Your Photography Business Successfully

3. Create a quarterly email campaign

Do you have a ‘subscribe to email list’ on your website? If not, you should. Nothing converts like email. An engaged list is far more important than any form of social media. The changing algorithms and whims of companies like Instagram and Facebook can leave your business incredibly vulnerable if you depend on them.

By sending out a regular newsletter or a PDF mailer to your past clients and other relevant business contacts, you appear busy and relevant. Fresh content helps you connect to your audience.

Research whom you want to work with, and regularly make contact with them. Keep track of these contacts via a spreadsheet or CRM (customer relationship management), so you know who has received your previous mailing.

Hire a designer that can create a template for you. This will allow you to swap out pictures every time you do a new campaign with new work. Include your logo on the front and a short bio inside, along with your contact information. Alternately you can create a promo “newspaper” or magazine through a company like Blurb or Newspaper Club. 

Your email promo should look as professional as possible. The email campaigns should go out to your target clients every quarter to keep you top of mind when they’re looking for a photographer.

Even if you send out printed promotions, you should also send out email campaigns.

Printed promotions are expensive, which means you can only send them out to a select group of people – your most ideal clients. But with email, you can send out a promotion such as a PDF mailer to hundreds or prospective clients.


5 Top Tips for Marketing Your Photography Business Successfully

4. Use social media strategically

Everyone is complaining about their love/hate relationship with social media, but if you’re using it for business, it’s non-negotiable. The keys to success are your perspective and using social media the right way.

It’s best to pick one or two social media channels and concentrate on bringing up your visibility there. Start by asking yourself what you want to achieve?

Do you want to:

  • Drive traffic to your site?
  • Connect with agencies and brands?
  • Connect with potential brides or portrait clients?

Put aside time every day to post and engage with your target market by leaving thoughtful comments. 

Know that the path from a “like” to any “purchase” is a really big leap. Social media should be part of a wider strategy of creating visibility and engaging with a community. It’s great to follow other photographers and support one another, but most of them won’t be your potential clients. Avoid the big time suck of social media and focus on the people that are likely to hire you.

top-tips-for-marketing-your-photography-business-the-right-way

5. Write a WordPress blog

I’m always going on about writing a blog. I think most photographers should have a blog.

One reason is that if you have a WordPress blog connected to your site, you can get a massive boost to your SEO. Updating the blog regularly will get you a higher ranking in search results.

Writing a blog will also help you connect with your audience and build trust. Your clients will feel like they have come to know you.

If writing is not your strong suit, you don’t need to write a lot. In fact, your posts should have lots of images instead. You can share about a family or personal branding session. You can share shots and a short narrative about the latest wedding you shot or write about how you recommend clients dress for their personal branding session.

However you decide to approach it, make sure that your content adds value for the people reading it.

5 Top Tips for Marketing Your Photography Business Successfully


To sum up

Marketing gets a bad rap. As an artist, you may feel like a used car salesman when you’re trying to sell your services. However, think of marketing as a way of putting yourself in front of people and letting them know you’re there.

The most successful photographers are those that demonstrate that they can add value and solve a specific problem.

By taking a more curated, thoughtful approach to promoting yourself, you’ll be able to build a business that stays strong in the face of trends and stands out amongst your competitors.

Do you have any other Tips for Marketing Your Photography Business? Share with us in the comments!


top-tips-for-marketing-your-photography-business

The post 5 Top Tips for Marketing Your Photography Business Successfully appeared first on Digital Photography School. It was authored by Darina Kopcok.


Digital Photography School

 
Comments Off on 5 Top Tips for Marketing Your Photography Business Successfully

Posted in Photography


How to Photograph Destination Weddings Successfully

18 Feb

The post How to Photograph Destination Weddings Successfully appeared first on Digital Photography School. It was authored by Jackie Lamas.

So you’ve booked your first destination wedding, now what? Don’t worry, photographing a destination wedding is not much different from photographing a local wedding. Check out how to photograph destination weddings and make sure that everything runs as smoothly as possible.

1. Logistics and planning

It’s incredibly exciting getting the chance to travel to photograph a couple’s wedding. With that, however, comes the logistics and effective planning, so you aren’t scrambling or getting delayed by a flight.

First things first, make all the flight purchases and itineraries yourself. You should arrive at the destination at least one full day before the event.

For example, if the wedding is on a Friday, you need to arrive early Thursday morning at the latest. The best would be to arrive on Wednesday anytime. This way, if a flight gets delayed or canceled, you have time to figure out your next move. Never plan to arrive on the same day as the event.

If you are not extending your stay, make sure to leave the destination the next day or next night. The reason for this is because, after a full day of photographing a wedding, you won’t want to worry about packing, airport shuttles, and all that goes into traveling back home.

Get your rest, eat a good breakfast and then be on your way. Make sure to say goodbye to your clients before leaving if they are still on the property.

It is entirely up to you if you wish to extend the stay and turn the opportunity into a vacation. However, make sure that you separate the costs of work and vacation so that your clients aren’t paying for your vacation and you can relax knowing that you can enjoy your vacation.

Having said that, it is acceptable to extend the stay and travel a bit on your own. Destination weddings are perfect for this type of traveling, however, always be careful of your equipment when traveling.

2. Research the location of the wedding

Since you’ll most likely be traveling to a new place, you won’t be familiar with the location. Research online as much as possible so that you can find possible shoot locations and get an idea of what you’ll be working with.

Googling the location and adding “weddings” can also bring up other photographer websites who have photographed there. It can give you ideas of where to photograph or how the light looks.

Reach out to the planner or coordinator of the wedding and touch base with them before you arrive. It’s also nice to introduce yourself to them via email before arriving. Ask them in-depth questions about things such as the weather, the location, travel, and access.

All of these logistical and location questions are important so that you know whether to rent a car or if it’s easily accessible to the nearest town.

Getting all of this information can help you make an itinerary with the couple and they will be impressed that you went the extra mile to find out all of the details not only the wedding, but of the actual location.

3. Make the most of your time before the event

It can seem pretty enticing to take a dip in the pool after traveling to the destination of the wedding, however, it’s best to make the most of your time before the event.

Take the time to walk the grounds and get the lay of the land. This can help you get an idea of possible locations that aren’t too far from any of the important events of the wedding day. Ask the coordinator or planner to give you a quick tour of where the ceremony and the reception are taking place.

This is also a great time to check out the town if the couple has opted for photos there. Go and take a look and take the time to make a list of possible locations for portraits, family portraits, creative bridal party locations, etc.

In order to capture this shot, we had to wake up for sunrise at 6:30. Doing research on the location will help you determine the best time for photos.

Also, take a short break to say hi to the couple. Reassure them that you have arrived and have been checking out the location for the best possible photo spots.

Upon arriving, also check your gear. Check that everything is in working order after traveling and that your batteries are charged. If you find you need something, it’s best to find it during this time rather than finding out you needed extra double aa batteries during the ceremony.

Preparing yourself, the photo locations, and your gear allows you to fully relax knowing that you have everything ready to go for the event. Then you can take that dip in the pool without any worries.

4. Gear

Flying with gear can be stressful. Never check-in your gear. Whenever possible, put it in a carry-on case so that it is with you at all times – at least the most important gear. Light stands and tripods are not as crucial as a flash and your favorite portrait lens.

Keeping your lens within arm’s length always ensures nothing gets thrown or broken in the course of the trip. Also, you’ll be able to take photos as you travel on the plane, in the airport, and anywhere.

Before traveling, make sure to speak to an insurance agent about getting your gear insured while you travel. Some insurance agencies only cover your gear in the country you live in. Be sure to call around and have your gear covered as you travel.

Also, ask if your gear is covered in transit. That means that while you’re on your way to where your event is taking place. Transit means in the car on the way to the airport, to the resort, or on the plane.

Having your gear insured while you are traveling makes you feel more at ease in the event something were to happen. Something like a broken lens, a faulty flash, having your camera fall in the water or having your gear stolen.

No one would want this to happen, however, being insured against these things helps keep repair and replacing costs lower than if you didn’t have your gear insured.

Now that you’re insured make sure you bring a backup camera and lens that helps you to cover the wedding in case your main camera stops working for any reason. This is pretty basic for any wedding event – local or destination. However, overseas or far from your local camera shop, it’s unlikely you’ll be able to rent anything if something does go wrong.

5. Tell a story

Most destination weddings take place in places that tell part of the couples’ story or is meaningful to them in some way. Take a photo of the dress where the resort is shown off. For example, a couple from Washington has their wedding in Puerto Vallarta, Mexico. An excellent photo to showcase the beach would be to take a photo of the wedding dress outside where you see the reflection of the ocean in the sliding door windows.

You can also strategically place the details of the wedding day, such as the shoes, bouquet, or the family formals so that some part of the location tells the story. Including these details in the photos makes for a beautiful wedding album and tells the story of the entire day. It has more meaning than a photo of the bride’s shoes in a location that could have been local.

Destination weddings tend to have a smaller guest list, and therefore, most of the guests are very close to the couple. This means that toasts and first dances may be emotionally driven.

Photograph from a more journalistic point of view during these emotional moments, that way, you can capture the mother with tears of joy during the ceremony, or a meaningful hug from a best friend after the first kiss. All of these moments are important during destination weddings.

The bride’s father is the officiant and her sister is behind them.

Take lots of portraits of the bride and groom with their guests, either candid or posed. As the guest list is small, every person is essential, and you should photograph each of them. If the wedding is tiny, say less than 20 people, take a group photo of everyone who attended.

Capture all moments. This man was telling the bride that she was the most beautiful bride he had ever seen during the bride and groom portraits. A funny and sweet moment to remember!

It’s sure to be a favorite among all the guests, and the bride and groom will appreciate you took the time to get a group photo of everyone who made their day special.

6. Get vendor information

Destination weddings are perfect for publications and lots of blogs. You’ll want to get the full list of vendors so that you can also share the images with them and across social media sites.

Tagging a vendor in your photos always creates more buzz and can help you to book more destination weddings in the future. This is especially helpful if you would like to keep photographing weddings at that particular destination.

Send the coordinator/planner a thank you email along with the link to selected photos of the event so that they too can share the images and tag you. Include any hashtags that you’d like for them to use on social media.

Doing this can create a positive rapport with the vendors and give you another opportunity to photograph more weddings at the same location. It also helps your future clients if they need referrals to vendors that you have personally worked with before.

In conclusion

There is not much difference between a local wedding and a destination wedding. With these tips, you’ll be more than prepared to photograph your destination wedding. With the right planning, you’ll do the very best for your clients, and you might even get to enjoy a vacation while you’re at it.

Have you photographed destination weddings? We’d love to hear your experiences in the comments below.

The post How to Photograph Destination Weddings Successfully appeared first on Digital Photography School. It was authored by Jackie Lamas.


Digital Photography School

 
Comments Off on How to Photograph Destination Weddings Successfully

Posted in Photography


‘I’m Back’ digital back for analog SLRs successfully returns to Kickstarter

13 Mar

Last year, a Kickstarter project for a product called ‘I’m Back’ offered a digital back for 35mm film cameras, but it wasn’t successful. Now, the product has relaunched on the crowdfunding platform, where it has successfully raised (and exceeded) its €20,000 (~$ 25,000 USD) funding goal. As with other digital back products, “I’m Back” claims to transform an analog film camera into a hybrid that can capture digital images.

‘I’m Back’ is billed as a low-cost alternative to other digital back products, one that offers a 16MP Panasonic sensor with options to capture images starting at a 2MP resolution. The system works by capturing images off the device’s focusing screen, which results in “the nice vintage flavor of your 35mm camera,” according to the product’s creator.

The digital back also features a 2-inch touchscreen display, Wi-Fi for image transfers, and mobile control via smartphone. Other features include HDMI, USB, a 128GB microSD card for storage, a NOVATEK 96660 processor, and rechargeable battery.

According to the Kickstarter page, ‘I’m Back’ is directly compatible with many 35mm analog cameras, including multiple models from Nikon, Canon, Olympus, Pentax, Yashica, Leica, and Contax. However, a universal adapter accessory enables the digital back to be used with nearly any 35mm camera, including the Lomography Diana seen in the photo above.

‘I’m Back’ has raised nearly €29,000 (~$ 35,500 USD) on Kickstarter so far. Interested buyers can back the project with pledges starting at €225 (~$ 277 USD) for the ‘Pro’ kit, with global shipping to backers estimated to start in September of 2018. For more info, or to put down your own pledge, visit the Kickstarter page here.

And if you’re curious what DPReview thinks of these digital conversion products, this opinion piece by resident curmudgeon Richard Butler just about captures it:

Why Your Beloved Film SLR is Never Going Digital

Articles: Digital Photography Review (dpreview.com)

 
Comments Off on ‘I’m Back’ digital back for analog SLRs successfully returns to Kickstarter

Posted in Uncategorized


Successfully Copy Photos from Your Memory Card to your Computer

02 May

Before you can begin editing your photos you need to get them safely off your camera and onto your computer. Unfortunately this process is often hijacked by (well-meaning if misguided) software which purports to do the work for you but leaves you wondering just where your photos really are! So, to help you understand your options for getting your photos onto your computer, here’s what I recommend.

First of all: Take Charge!

The first thing to understand about getting photos from your camera card or camera onto your computer is that you’re in charge. Any application that opens and tries to grab your photos for you can be closed down. If it is not the application you want to use then do just that – close it.

Now you can take charge and manage the process in a way that makes sense for you.

Choose your application

If you’re using Photoshop then you can use Bridge to import your photos. If you are using Lightroom then you can launch Lightroom and import your photos using it. If you don’t have either program, or if you prefer to manage the process yourself, you can do so using Finder on the Mac or Windows Explorer on a PC. I’ll cover this process first, then look at Bridge and Lightroom.

Importing using Finder or Windows Explorer

import-photos-using-Windows-1When attached to your computer, a camera or memory card works like any drive, so you can view its contents. You can also copy photos from the memory card onto your computer’s hard drive manually using Explorer or Finder.

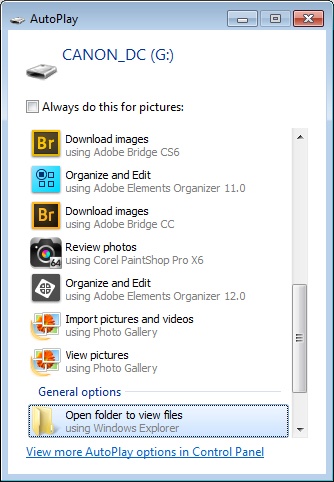
On a PC, if the AutoPlay dialog appears when you insert your camera card or attach your camera, choose the Open Folder to View Files option.

If the dialog doesn’t appear, simply launch Windows Explorer and select the drive that represents your camera or memory card.

Navigate to the folder that contains your photos – there may be multiple folders depending on how your camera stores images on the card. You can select the photos, then drag and drop them to the folder of your choice. It’s often easier if you first open the target folder in a second Windows Explorer window so you can drag from one to the other.

import-photos-using-Windows-2

The process is similar using Finder on the Mac. If iPhoto launches – stop it from downloading any photos and close it. Then you can drag photos from your camera card open in one Finder window, to a folder of your choice open in a second window.

import-photos-using-finder-on-the-mac

Importing Photos using Bridge

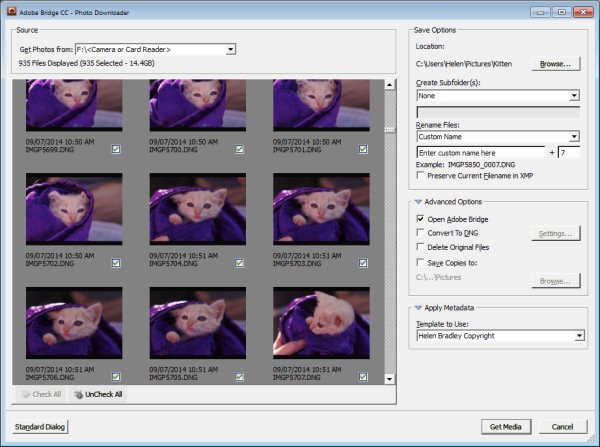
If you are using Photoshop, launch Adobe Bridge and choose File > Get Photos from Camera. Click the button to open the Advanced Dialog.

import-photos-using-bridge-1

From the “Get Photos from” drop down list select the drive letter that corresponds to your camera or card.

import-photos-using-bridge-2

You can now see and select the photos to import. This is one benefit of using Bridge over Windows Explorer – you will see thumbnail images of your raw files so you can see what you are importing.

On the right of the dialog select the folder in which to place the images. Typically this will be inside your My Pictures folder on your computer but you can choose any location that makes sense to you. However, if you want to find your photos later, on it is essential that you pay attention to the choices you make here.

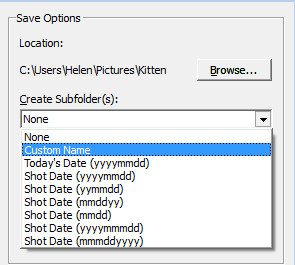
import-photos-using-bridge-3Once you have selected the folder to import the images into, you can, if desired, select a subfolder. In this way you can group photos by shoot, date or something that makes sense to you.  Bridge will create the folder for you if it doesn’t exist, so choose an option from the Create Subfolder(s) list and, if required, type a name for it or choose the date to use – either the capture date or today’s date. If you don’t want to organize photos in a subfolder then click None.
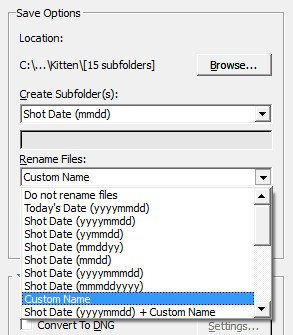
import-photos-using-bridge-4You can also select to rename files on import, or not. Choose Do not rename files if you don’t want them renamed or alternatively select a naming convention from the list.
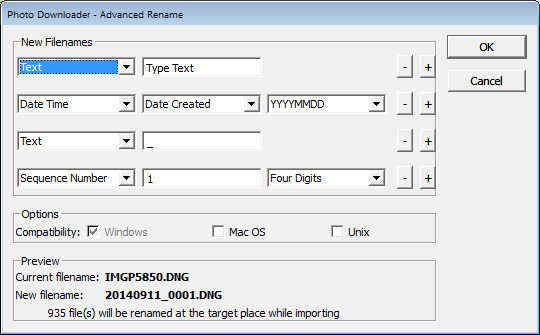
If you have advanced naming requirements for which the dialog does not provide an appropriate choice, scroll to the bottom of the list and click Advanced Rename to open the Advanced Rename dialog where you can create quite complex naming conventions. Whatever choice you make check the entry just below the dialog where Bridge shows you an example of the naming convention in place so you can check to see if it is what you want.

import-photos-using-bridge-5

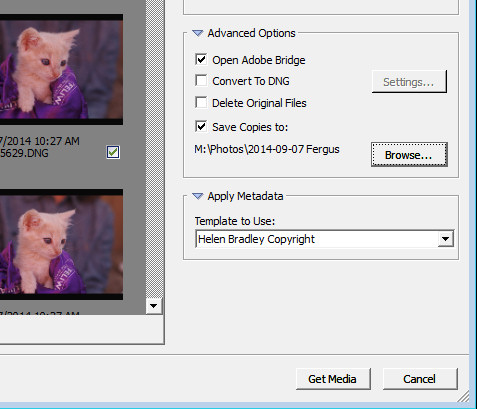
In the Advanced Options area you can choose other options including Convert to DNG – which is handy if your camera captures in a manufacturer specific format such as CRW, NEF, PEF and so on, but you prefer to work with DNG files. Select this option and Bridge will do the conversion for you.

You can also select Delete Original Files although this is not recommended. It’s best to make sure that the images are correctly copied onto your computer before the originals are deleted so I suggest you leave this option disabled.

Bridge offers a backup option so it will make a copy of your photos on import. To do this, click the “Save Copies To:” checkbox and select an alternate location (such as an external drive) in which to save a copy of your photos.

import-photos-using-bridge-6

If you have a metadata template already created you can select this from the Apply Metadata drop down list.

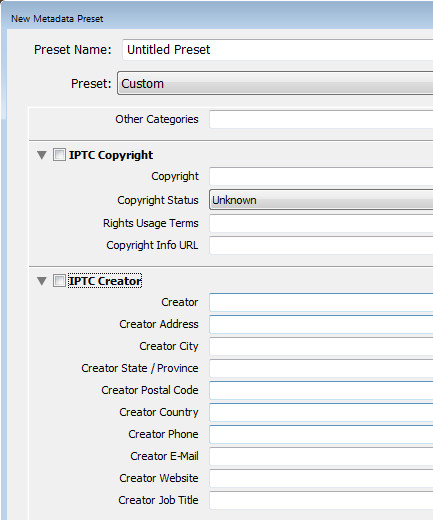
In future you can create such a metadata template in Bridge by selecting Tools > Create Metadata Template. I suggest that you complete the IPTC Core Data for Creator as well as Copyright Notice, Copyright Status and Rights Usage Terms. Also complete the Type Of Source entry in the IPTC Extension group. When completed this will give you a good all round metadata preset to apply to all your images. For more information on IPTC Copyright Metadata check out this article: Lightroom: Add your IPTC metadata on Import.

import-photos-using-bridge-7

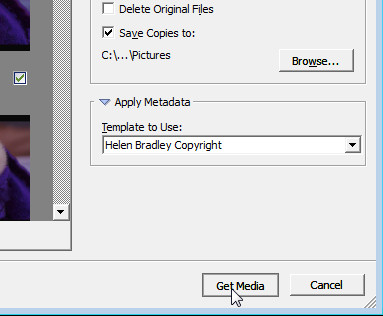
When you have your import settings selected and configured to meet your needs click Get Media to import the images.

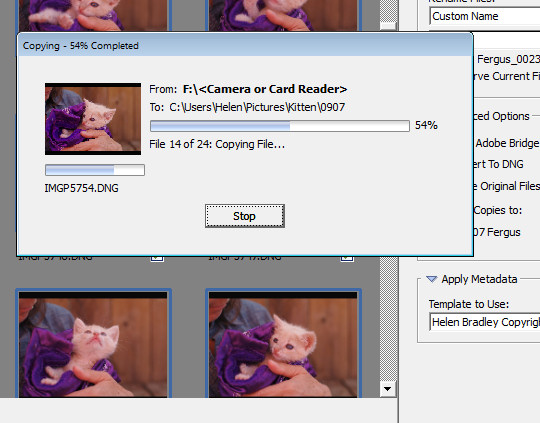
import-photos-using-bridge-8

You will see a dialog showing you the progress of the import process.

import-photos-using-bridge-9

Importing Photos using Lightroom

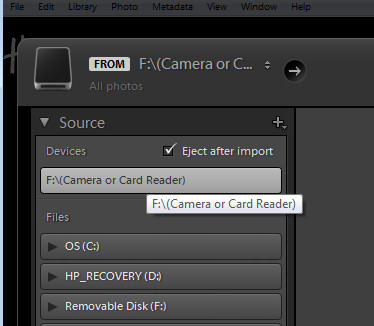
If you’re using Lightroom then it is the obvious choice for managing the process of importing photos from your camera or memory card. From the Library module click Import, then select the source in the top left corner of the Import dialog.

import-photos-using-lightroom-1

Across the top of the screen you will see only two choices, Copy as DNG and Copy. This reflects the fact that you’re importing images from a camera card or camera – the options Move and Add are not available for this process (if you do see Move and Add as available options, it appears that Lightroom isn’t recognizing your camera or camera card correctly and even though they may be available you should not use either of these choices).

import-photos-using-lightroom-2

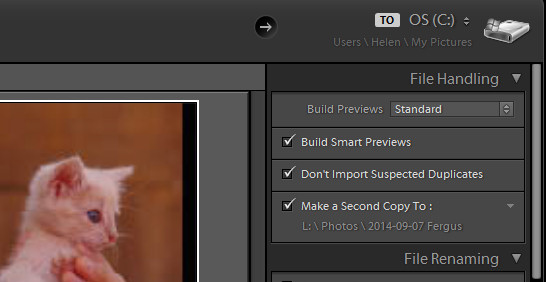
Next, open the File Handling panel on the right of the screen and select the kind of preview to create – Standard is a good choice. You can choose Build Smart Previews or not (if you’re unsure, check Build Smart Previews).

Checking Don’t Import Suspected Duplicates will ensure that Lightroom doesn’t import images again, that you’ve already previously imported. This is one feature available in Lightroom which is not also available in Bridge.

In Lightroom you can also choose to make a backup by making a second copy of your photos to an alternate location as you import them.

import-photos-using-lightroom-3

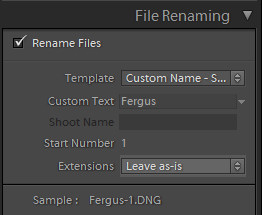
File Renaming panel allows you to rename images on import – you can select from a range of naming templates and even create your own. Here I’ve chosen to use the Custom Name – Sequence template so I’ve typed the Custom name and the sequence is set to start at 1:

import-photos-using-lightroom-4

The Apply During Import panel has an option for applying metadata to the image upon import. Unlike Bridge the drop down list for Metadata presets also includes an option New which you can use to create your own metadata preset. I suggest you complete the IPTC Copyright and IPTC Creator details, and in the IPTC Extension Administrative select Original digital capture from a real live scene from the Digital Source Type drop down list. Type a name for the preset and from the Present drop down list click Save current settings as new preset.

import-photos-using-lightroom-5

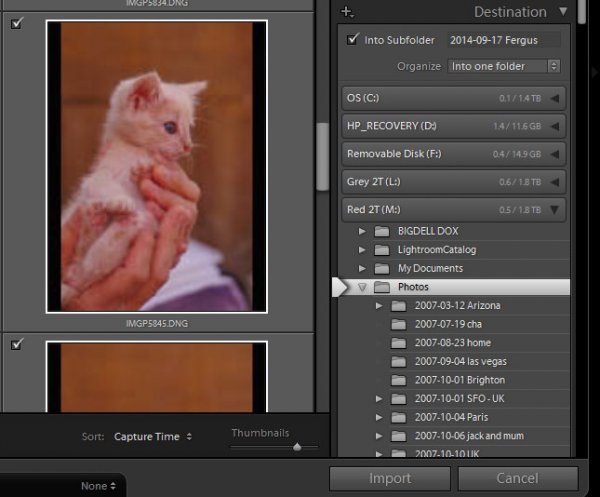
In the Destination panel you’ll need to select the location into which the images are to be copied. If you’re copying them to your hard drive then typically you’ll select your C drive, then your My Pictures folder which should be in your Users area.

If you save your images to an external drive then select the external drive and the folder into which the images should be imported.

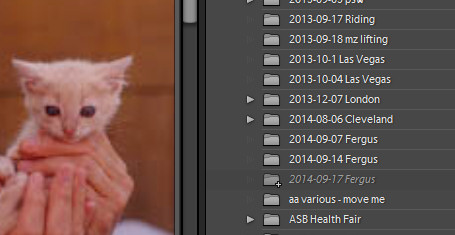
If the folder does not exist you can create a subfolder on import by selecting the Into Subfolder checkbox and type a name for the folder that Lightroom should create to import the images into.

import-photos-using-lightroom-6

From the Organize drop down list you can select to put the images into this folder (Into one Folder) or to organize them by date. Whichever choice you make you can see a preview of what’s going to happen in the folder list, allowing you to check and make sure that everything is going to be imported and arranged to your requirements before you go ahead and complete the import process.

import-photos-using-lightroom-7

When you’re ready to import the images click Import.

Whatever process you choose to use for getting images off your camera card onto your computer the acid test for whether it is a good system or not will be if you can find your images later on. Also be aware that it’s advisable to make a backup copy of your images in case your computer is stolen, damaged or your hard disk crashes. For this reason a backup on a removable external drive is a sensible choice.

Having an import routine that you understand, and can reliably execute, is a necessary first step for any photographer. The worst possible scenario is to have copied your images from your camera card to your computer and erased them from your card, only to discover that you cannot find the images. It’s a scenario that way too many users have encountered – don’t let it happen to you!

Find a video version of this blog post here:

Do you have any other copy and import tips? Please share in the comments below.

googletag.cmd.push(function() {
tablet_slots.push( googletag.defineSlot( “/1005424/_dPSv4_tab-all-article-bottom_(300×250)”, [300, 250], “pb-ad-78623” ).addService( googletag.pubads() ) ); } );

googletag.cmd.push(function() {
mobile_slots.push( googletag.defineSlot( “/1005424/_dPSv4_mob-all-article-bottom_(300×250)”, [300, 250], “pb-ad-78158” ).addService( googletag.pubads() ) ); } );

The post Successfully Copy Photos from Your Memory Card to your Computer by Helen Bradley appeared first on Digital Photography School.


Digital Photography School

 
Comments Off on Successfully Copy Photos from Your Memory Card to your Computer

Posted in Photography