Landscapes are one of the most popular photography subjects, and for good reason. Nature is enchanting to the human eye, and it’s only natural for people to want to capture that stunning natural scene with cameras. Some landscape pros and über-enthusiasts will plan ahead with tripods, shutter release cables, filters, and extra gear to make sure they really nail the shot they have in mind.
Then there are more casual photographers like myself who tend to shoot landscapes on a spur of the moment basis, usually during vacation. If you fall into the latter group, this article is more geared toward you. Maybe you have a single landscape shot that looks pretty good, but you’re looking for some light post-processing tips to top it off. If that’s you, read on!
In this article, I will present a few methods for enhancing natural scenes to keep them looking close to how you originally viewed them. All of these techniques have to do with enhancing a single shot, and the effects are not too dynamic or exaggerated, keeping you safe from overdoing it with say, HDR.
Tip #1: Enhance details
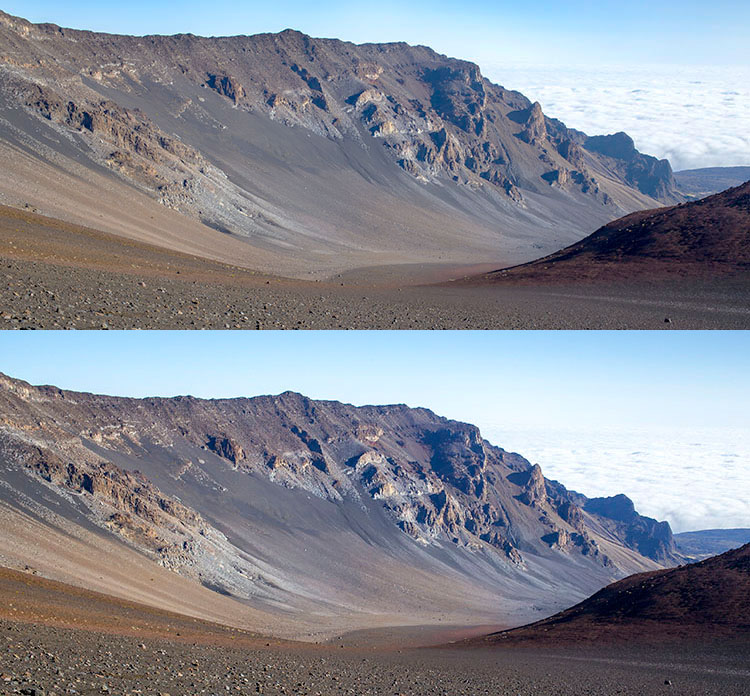
One of the quickest and easiest ways to polish any photo is to apply image sharpening. There are several ways to do this in Photoshop. For this article we’ll focus on applying the High Pass filter’s image sharpening effects to the landscape image below of Haleakala, a hiker-friendly dormant volcano in Maui, Hawaii. The before image is above and the after one is on the bottom. The effects may seem subtle from a zoomed-out perspective, but compare distinct areas such as the rock formations to see the sharpening in effect.
Steps for sharpening using the High Pass filter
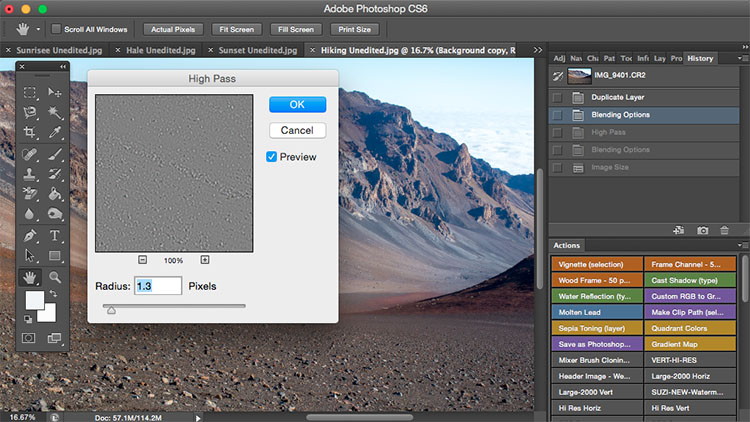
- Start by duplicating the Background layer, and changing the blend mode of the new layer to Overlay. The image will appear heavily contrasted, and with the Overlay blend mode applied, you’ll be able to get a preview of the High Pass filter effects.
- Next, apply the High Pass filter to the duplicate layer. It is located in the Filter menu at the top screen in the Other section.
- Adjust the filter settings: You’ll then see the High Pass filter dialogue box, which will allow you to use a simple slider to increase or decrease the intensity of the radius value (aka strength of the filter’s effect). The higher the value, the more intense the High Pass filter effect. Generally speaking, it’s best to keep the value on the lower side, between 1-5 pixels. In the case of this image, the radius was set to 1.2 to provide just enough sharpening around the edges of the image without exaggerating the effect.
- Tweak the layer settings: After the High Pass filter is applied, it can be fine-tuned by adjusting the blend mode of the duplicate background layer and/or lowering the layer’s opacity. The blend mode you choose can either intensify or reduce the amount of sharpening. For some examples, take a look at the image comparisons below. Hard Light and Vivid Light increase sharpening, whereas Soft Light keeps it subtle.

Tip #2: Remove image haze
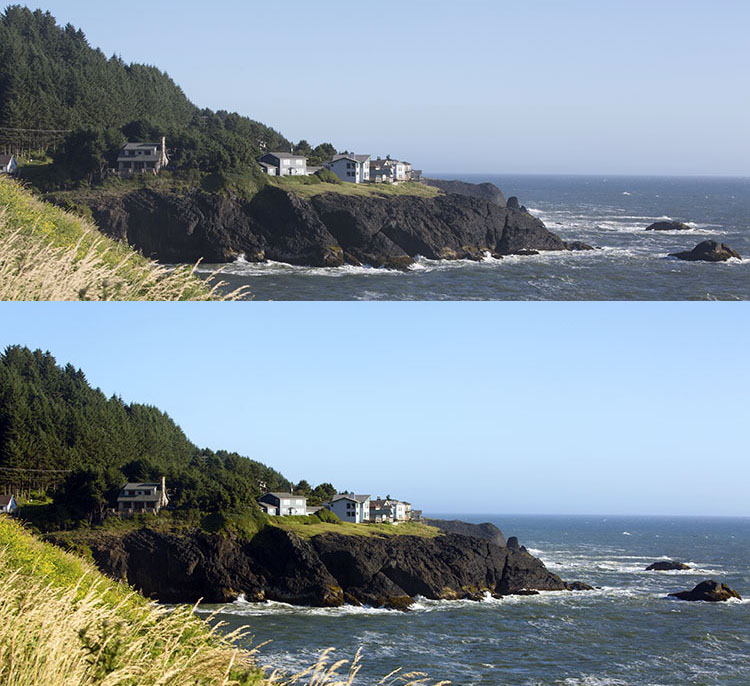
It’s not uncommon for landscape images to appear hazy or foggy when the natural weather conditions are such. The image above was shot on the Oregon Coast a few summers ago using a Canon 70-200mm at f/11 with just a basic clear UV haze filter on the lens. The mist in the air give the photo a dull look in the unedited, straight-out-of-camera version (top image below) but luckily this can be easily fixed in Photoshop (bottom image below).
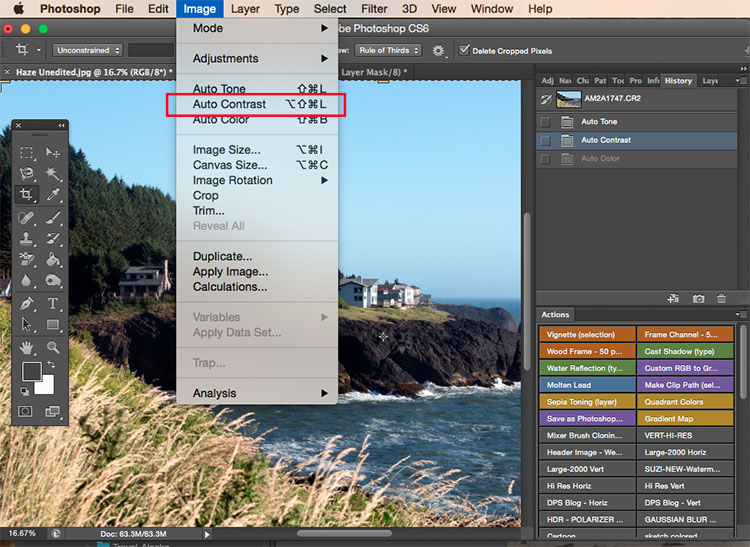
Since the biggest problem with hazy images is soft contrast, the quickest fix is to simply select the Auto Contrast function, located in the top menu dropdown under Image. Poor image contrast is then instantly fixed based on pixel luminosity, resulting in overall finer image contrast. After Auto Contrast was applied, I also adjusted Levels, Saturation, and Vibrance, and the resulting image looks much more balanced and vibrant despite the hazy conditions of the scene.
Tip #3: Enhance the colors in the sky
Most sunset photos are already quite spectacular when they’re captured with a camera, but sometimes it doesn’t hurt to enhance them a bit more, to fully convey an exceptionally surreal or beautiful scene you witnessed. The photo below is an unedited sunset shot taken at the Grand Wailea in Maui, Hawaii. It looks pretty fine on its own, but I wanted to paint a little more orange and pink into the sky.

To do so, we’ll follow these simple steps:
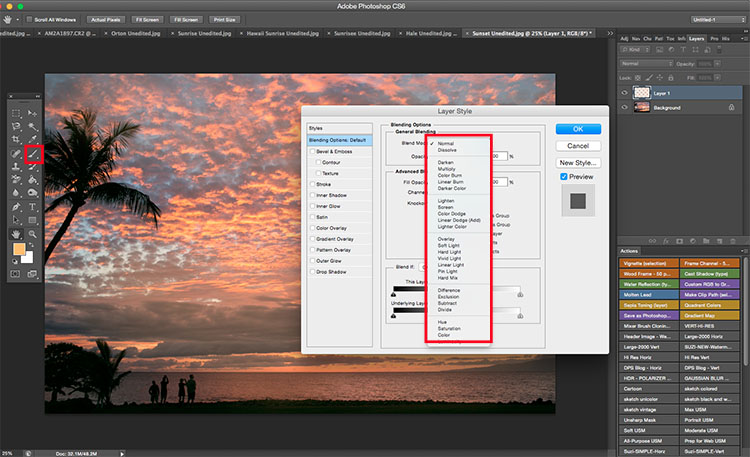
- Create a new layer by clicking on the layer icon to the left of the trash can in the layers panel.
- Then go to the toolbox and select the Paintbrush icon. To ensure a smooth transition, make sure the opacity is set to 100% and the brush hardness is set at zero.
- Set your color: With the Paintbrush still selected, click on the Foreground Color, which is at the bottom of the toolbar. A dialogue box will appear and your cursor will transform into an eyedropper tool. Left click on the desired color in your image that you wish to paint with, in my case a light pink-orange.
- Next, start painting over the areas of the sky that you wish to enhance. Be sure to limit the brush strokes to just your sky area; in my case, I wouldn’t want to paint over the darkened shadows on the left side of the photo since I want to keep them as dark as possible.
- Change the Layer Blend Mode: After you’re done painting, right-click on the layer you painted on and change the blend mode to something like Soft Light or Overlay to achieve the desired effect. If the effect is too strong, adjust the opacity of the layer to a lower percentage.
- Violá! You should now see much stronger, vibrant colors radiating from your sunset image.
How do you process your landscape images? Do you have any other tips or tricks? Please share in the comments below.
googletag.cmd.push(function() {
tablet_slots.push( googletag.defineSlot( “/1005424/_dPSv4_tab-all-article-bottom_(300×250)”, [300, 250], “pb-ad-78623” ).addService( googletag.pubads() ) ); } );
googletag.cmd.push(function() {
mobile_slots.push( googletag.defineSlot( “/1005424/_dPSv4_mob-all-article-bottom_(300×250)”, [300, 250], “pb-ad-78158” ).addService( googletag.pubads() ) ); } );
The post 3 Simple Tips for Subtle Landscape Photography Post-Processing by Suzi Pratt appeared first on Digital Photography School.






You must be logged in to post a comment.