As photographers (or budding photographers) we may increasingly find ourselves being asked for impromptu photo shoots. This often means having to improvise with borrowed gear and a bit of “shooting from the hip”. As a consequence, when this occurs weare pushed out of our comfort zone and must learn to make the best of it. I’ve often been guilty of the, “If only I had” syndrome when it comes to creating images. It’s situations like these that remind me even the most basic gear along with what can be found around the house is often more than required to get great shots. The last couple months I had two occasions where I was caught without my camera or any of my personal lighting when unplanned photo sessions were requested. Hopefully my quick and easy tips will illustrate that it’s often more about being creative with your resources than it is about how nice your equipment is. As the old adage goes, a craftsman never blames his tools.
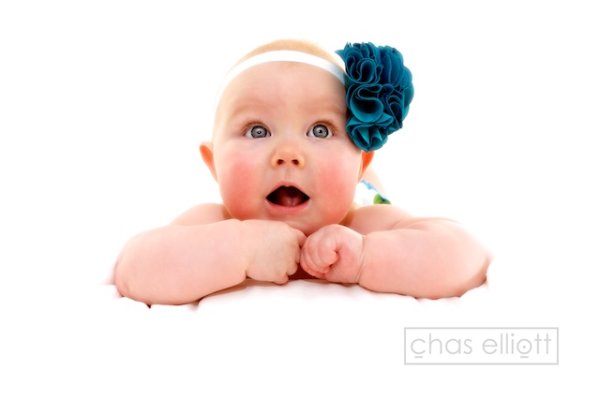
Lighting Baby Gianna

My wife and I were staying at a cabin with family when her sister said, “Hey, you’re photographers. Let’s take some cute baby pictures.” Of course in their minds eye they’re picturing those premeditated pics on Pinterest with amazing props and perfect lighting, neither of which I had. Babies are naturally photogenic and the truth is you don’t need that stuff. So when the pressure is on, take a step back and relax. Let’s dig in and talk about a couple quick and easy tips that will get you photos anyone would like with very little preparations.
Think lighting first.
First, find the location that has the most light. The cabin where we were staying was very rustic and pretty dark even with every light on. Natural light was hard to come by. It was chilly so outside shots with a newborn weren’t an option. For us the brightest place was on the island in the kitchen underneath a row of hanging lights. The light was bright but all light coming from a single direction above was a bit to heavy. I found a few desk lamps in the other rooms and set them up on either side to soften the shadows. Note here that it’s critical you don’t mix and match light types. Florescent lights have a greenish hue and incandescent bulbs have a golden one. While you can always increase exposure of an image that is too dark in postproduction, it’s difficult to correct for a babythat is half green and half yellow. It may look ok to your eye because our mind is constantly doing white balance correction so take my word for it that white balancing will be of no use if the lighting is not consistent. This also goes for your flash and is the reason many photographers carry orange and green flash gels in their camera bag. If you need to use the camera flash along with external lighting, try bouncing it off something that will distribute its hue. Cardboard or a wall can do the trick while also decreasing the intensity of such a small light source.
Because it wasn’t my camera I gave myself some time to playwith the setup. In retrospect, there is a lot I would have done differently with the camera settings, but live and learn. Try to remember that the basic balancing act is always the same.
 If you’re not trying to blur the background, keep your aperture as small as lighting will allow for a sharp crisp image. This is particularly important for keeping the detail in the eyes. If you really want to soften things up you can do it in postproduction.
- Eliminate noise by keeping the ISO as low as possible for the given lighting conditions. This is becoming less of an issue on the newest model cameras but low ISO is almost always the goal. The more light you have the lower you can set the ISO.
- Since you most likely won’t have a tripod, make sure the shutter speed isn’t dropping too low, which is more likely to catch some of your hand jitters. Some go by the rule, no lower than 1 over your focal length. (e.g. 1/50)
Before putting the baby down and blasting her with light, I found a huge pinecone and a squash to practice with until I felt like the light was as smooth as I could get– the pinecone didn’t make a peep and the squash held his pose nicely. Be sure to have all the setup ready right after the baby eats and has had a little nap. Their awake time is so short and if you test the lighting beforehand and get all prepared you will be able to maximize your happy baby time for some great shots. In the end, we got a few images we liked, and that’s probably all you need.
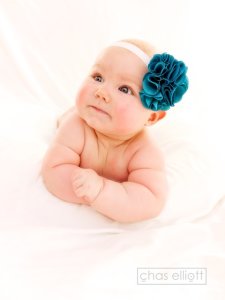
Baby Colette and her background
 Next up, I was hanging out with my brother recently one Saturday morning when he said, “Hey, I brought my camera. Can we do some quick 6 month baby pics?” His camera was a Micro 4/3rds Panasonic. Fortunately, he was geeky enough to have purchased one of the inexpensive wireless flash transmitters ($ 25), a used flash and a solid prime “pancake” lens. They also had brought a few ideas and some tutus and headbands to the table. Unlike the last baby shoot, we had a room with tons of windows and natural light to work with and the soft king size bed was a nice upgrade from a butchers block island. He also had a Gorillapod for his flash that allowed us to place the remote flash anywhere in the room until we achieved the best balance of light. So with light not such an issue this time it was on to the background.
Everyone looks fresh and happy on white.
Most people, but especially babies, look light and happy on a bright white background. When we did the kitchen shoot, we had to recruit family members to hold up different sides of a white blanket the baby was sitting on to hide the cluttered background of the kitchen. For this shoot, we opted for a better solution. We took a stapler and a nice white sheet and literally just stapled it right to the wall at the head of the bed. A little rudimentary, I know, but it gave the same effect you get with a seamless paper backdrop setup and we didn’t have to hold it. Because fabric has texture and shadows you may not want, a quick fix is to us the de-vignette tool in the editor of your choice. Crank up intensity of it until it just reaches the subject. This mimics that eternal white background you find done with professional seamless paper backdrops.
The next key component was figuring out how to support the baby in a more natural way than just lying flat on a bed. Under the sheet we used a Boppy which is often found in homes with infants or small children. It is an excellent support for babies who need a little help to stay up in the sitting position or to elevate their upper bodies for the belly shots.
Try using a three-person team.
First is, of course, the photographer. They are the most valuable player in the photography team and should direct the actions of others. If this is you, look at poses and angles you like for babies. Notice the way the angle can skew the proportions of the subject. This is especially important for babies. Their proportions are changing all the time as they grow.
Second chair is the baby maneuverer. This person, usually the mother will adjust the baby when they fall or wiggle and need to get back into the desired pose. Keep the parent involved by having them fix falling headbands and falling babies. Don’t be afraid to ask for their input, what angles they like and prod them on what they are hoping for. The third player is the happy outsider. They need to be able to charm that baby into cooing and ahhing over and over again. Any object can be used to capture the attention of a baby and induce a smile. Try rattling some keys or a sock puppet. The entertainer will need to get as close to the camera as possible so the babies expressions and eyes appear directed at the lens. However, make sure you also get shots of them drawing the baby’s focus away from the lens looking off to one side.
In the end, try to use these impromptu photo shoots as learning experiences. They probably aren’t paying customers so don’t let stress ruin a fun shoot. Take note of what didn’t work and move on. If you have any interesting experiences being caught unprepared for a photo-shoot and things did (or did not) work out please share below. Happy shooting.
Post originally from: Digital Photography Tips.
Check out our more Photography Tips at Photography Tips for Beginners, Portrait Photography Tips and Wedding Photography Tips.
Baby Sessions on a Shoe String

Digital Photography School


You must be logged in to post a comment.