RSS
 

Posts Tagged ‘STORY’

Worth a Thousand Words: The Story of a Photograph

08 Jun

Whether an image is spectacular or otherwise, a photograph is a representation of all the words that we choose to say…or not say. Photography is a medium, unique to perhaps all other mediums, which has the potential to convey thoughts and feelings without saying a word. You might say it’s worth a thousand words.

In today’s current photographic climate which is saturated with selfies, cellphone snaps, and impromptu portraits, have we forgotten the weight a photograph can carry? It’s an easy mistake to make and also a crime that we all commit from time to time. In case you have managed to forget, allow me to remind you of just how important the photographs you make can truly be.

Worth a Thousand Words: The Story of a Photograph

Photographs represent ourselves and how we see the world

The images that spew forth from our cameras are more than just bits of film or clusters of ones and zeros. Photographs are representations. Not just representations of time and events, of light and shadows, and splashes of vibrant colors. No, a photograph speaks to our own emotions and to the thoughts and emotions of others. They allow us to express our own feelings and inner workings in a uniquely personal way.

The photo could be a portrait that snatches a piece of the person’s elation or sorrow. It could be a photo of a morning sunrise reaching up over a snow covered mountain. Whatever the image is, there lives inside it the potential power to unveil a moment of emotionalism that may otherwise have remained covered.

Worth a Thousand Words: The Story of a Photograph

Like all forms of art, that power connects our mind (or even our soul) to that of the viewer, however briefly.

Photographs are records of reality

I’m about to say something that is completely arguable, non-provable, and likely inflammatory – even though it’s not intended to start a debate. Brace yourselves because here it goes….

Photography is one of the only artistic mediums that can portray the static reality of time and events fluidly mixed with personal expression.

Worth a Thousand Words: The Story of a Photograph

What I mean is that a painting displays a world that is filtered through the artist’s physical movements. The same is true for sculpture and other tactile forms of art. While the beauty and emotive content are absolutely the same in these other mediums, photography differs immensely in that it records the same world we all see, free of physical (usually) interruptions brought on by the photographer.

Worth a Thousand Words: The Story of a Photograph

The inherent merits of photography are that our images capture still moments of reality which is readily viewed all around us. A photograph, after all, is just a picture of “something.” Hence, it’s simply a record of different points of reality. The magic happens, and thus the art, when the image is captured in such a way that it become more than just the sum of its parts.

Worth a Thousand Words: The Story of a Photograph

It transcends the simple nature of being just a picture. If that sounds a little deep that’s because it is – but it’s also true. Making an image is more than just pressing a button. It’s a capture of a moment in time that will never come again. Always remember that every photograph you make has the ability to transport a viewer to a place and time they have never been and could never have witnessed otherwise.

Photographs are mechanisms of change

Photographs show what is good and right with our world. Just as true, photographs document what is all too often ugly, cruel, and evil as well. This duality itself is beautiful because it means that photography can be a powerful conduit for change. As first-hand accounts of events and human nature, photographs are visceral mechanisms that can spur awareness and make people take notice.

Worth a Thousand Words: The Story of a Photograph

Photos help in raising political advocacy which can affect the policies of entire nations and governments. They show the wonders of our natural world so that those places can be protected for the countless generations which will come after we are gone. They demonstrate the determinants of pollution, climate change, and species degradation that might otherwise have gone unnoticed.

Worth a Thousand Words: The Story of a Photograph

Seeing, after all, is believing. And nothing makes people see more than does a strong photograph.

Never forget…

Not all photographs have to be powerful expressions for social change or be plastered on the covers of national magazines in order to be important. I mean, making photographs is just plain fun…especially to fellow photo geeks like me. Sometimes we make images that are only meaningful to us and eventually end up in the trash bin.

Worth a Thousand Words: The Story of a Photograph

Still, we should never forget the weight that our work can and does carry. Our photographs speak loudly and sometimes they whisper. But they do speak. Always remember that. Be mindful of what your photographs might say…and just as importantly, the words they leave out.

The post Worth a Thousand Words: The Story of a Photograph by Adam Welch appeared first on Digital Photography School.

Digital Photography School

 
Comments Off on Worth a Thousand Words: The Story of a Photograph

Posted in Photography


So much for that idea: Swiss village lifts photography ban after story goes viral

03 Jun

A post shared by Bergün – Filisur (@berguen.filisur) on

Just days after ‘banning’ photography, the Swiss village of Bergüm has, not surprisingly, reversed course. In a bizarre video, the mayor of Bergüm states that ‘until the ban on photography is officially lifted, everyone with a camera will be given a friendly special permit.’

The video leaves little doubt that the whole thing was a PR stunt, with Mayor Peter Nicolay proclaiming ‘the beauty of our village has become world-famous thanks to our friendly photography ban.’ Judging by how quickly the story spread, the stunt worked exactly as planned.

Articles: Digital Photography Review (dpreview.com)

 
Comments Off on So much for that idea: Swiss village lifts photography ban after story goes viral

Posted in Uncategorized


Microsoft unveils Windows Story Remix, a video editor for Windows 10

14 May

Windows Movie Maker is revived in Story Remix, an app announced today for Windows 10 users at Microsoft’s Build conference. It allows users to easily edit together photos and videos from their mobile and desktop collections into movie clips.

Microsoft’s presentation emphasizes its ease-of-use and collaboration features, but the attention-getter is the ability to easily drop in special effects. Fireballs, 3D-figures and text can be added to a scene and anchored to objects for a realistic-looking cinematic effect. 

For those less interested in customizing their video, Story Remix can automatically edit photos and videos into a movie with basic input from the user, presenting the option to ‘remix’ the whole thing if you don’t like what you get. The demonstrations certainly look clever – we’ll be interested to see how end users take to the final product.

Articles: Digital Photography Review (dpreview.com)

 
Comments Off on Microsoft unveils Windows Story Remix, a video editor for Windows 10

Posted in Uncategorized


TIME Lightbox tells the story behind a viral May Day photo

03 May

Photographer Zakaria Abdelkafi, a Syrian refugee, explains how he reacted to a Molotov cocktail thrown at police, and how the experience impacted him.

Articles: Digital Photography Review (dpreview.com)

 
Comments Off on TIME Lightbox tells the story behind a viral May Day photo

Posted in Uncategorized


Gcam: the story behind the Google Pixel camera software

28 Mar

Google’s now independent X research division, which calls itself ‘the moonshot factory,’ has been publishing a collection of stories about the group’s graduated projects and where they stand today. The latest article in the so-called Graduate Series offers a closer look at Gcam, the software behind the class-leading cameras in Google’s Pixel devices. 

The blog post outlines how the Gcam team was set up back in 2011 to find a solution for the Google Glasses smart goggles’ most pressing challenge: providing a high-quality camera in a very small device. As using bigger hardware wasn’t an option, the Gcam team developed a method called image fusion, which uses multi-frame-stacking techniques to create a single, higher quality image with lower noise levels, better detail and increased dynamic range. 

The technology, which is now called HDR+, quickly grew beyond Google Glass and made it into the Nexus 5 and Nexus 6 cameras and eventually became the default camera mode in the Google Pixel series. The Gcam team now works across a range of imaging-related technologies, including Android, YouTube, Google Photos 360?Virtual Reality projects. If you are interested in more detail you can read the full blog entry on the X blog or find our full Google Pixel XL camera review here.

Articles: Digital Photography Review (dpreview.com)

 
Comments Off on Gcam: the story behind the Google Pixel camera software

Posted in Uncategorized


Landscape shooter Lisa Bettany shares her story of healing through photography

27 Jan


$ (document).ready(function() { SampleGalleryV2({“containerId”:”embeddedSampleGallery_7608234858″,”galleryId”:”7608234858″,”isEmbeddedWidget”:true,”standalone”:false,”selectedImageIndex”:0,”startInCommentsView”:false,”isMobile”:false}) });

Lisa Bettany is a renowned landscape photographer whose career began as she was recovering from a traumatic injury. Born in Canada, she was a competitive figure skater until the age of 21 when she suffered a back injury while skating. Years into her recovery it was still extremely difficult to walk and sit up, but when she acquired a camera things started to change for the better. One day at a time she ventured farther and farther from home, increasing each trip minute by minute, growing stronger and learning the art of photography. For her, learning photography was very much a journey from darkness into light, and nothing has slowed her down since then.

You can read the inspiring account of how her career started and the success she’s achieved as a pro photographer over on Resource Travel. You can also take a look at a few of her images above.

Has photography helped you achieve things that previously seemed impossible? Tell us in the comments below.


Articles: Digital Photography Review (dpreview.com)

 
Comments Off on Landscape shooter Lisa Bettany shares her story of healing through photography

Posted in Uncategorized


6 Tips for How to Build a Story and Shoot a Photo Project

04 Nov

I’m a strong believer that setting yourself photo projects is the best way to improve your photography skills. Projects give you focus and help you build a cohesive body of work. A photo project can last for years, and set a theme that helps you find new people and subjects to photograph.

Of course, you may be wondering what sort of project you could set yourself that would achieve these aims. A project can be simple, like photographing flowers in your back yard, or it can be more complex, such as travelling to a foreign country and photographing the people you find there.

storytelling-projects-22

Getting ideas for a photo project

You’ll find lots of inspiration at websites like Feature Shoot that regularly publish photo projects.

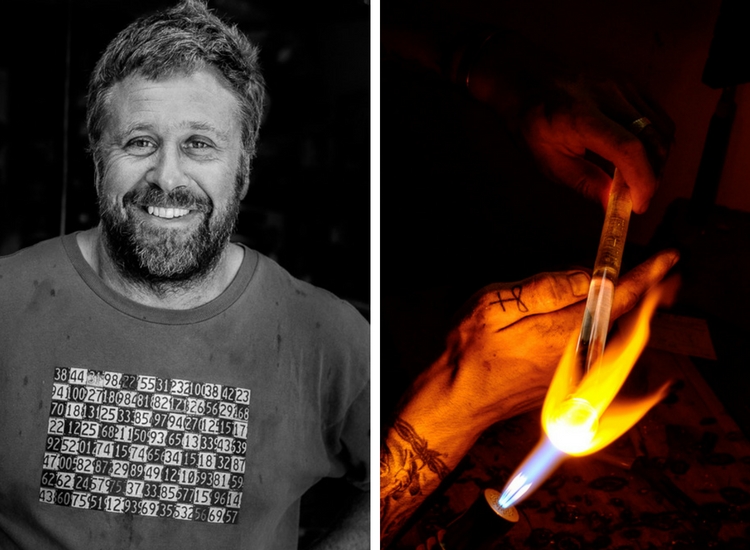
I’m going to give you some advice on tackling a project by giving you some examples from a project that I undertook to photograph artists and craftspeople. I have learned a number of things from this project.

Here are some of the most important:

  • Meeting new people and learning about their crafts is interesting. I like meeting and talking to new people and learning about their lives. The brief window I have during the shoot is a chance to connect and talk about art and creativity, as well as the work of the artist or craftsperson. Some of those people have become friends. This project has rewarded me on a personal level as well as on a photographic one.
  • It helps me find something interesting to photograph. For example, 18 months ago I spent three days in Raglan, a small town on the west coast of New Zealand’s North Island. Before I went, I contacted two local craftspeople and asked if I could drop by and take some photos. Both said yes – and I made my most interesting photos on the trip during those two shoots.
  • The project grows by itself. I send photos to the people I photograph, then ask them if they know of anybody else who may be interested. These personal introductions and recommendations help me find new artists and craftspeople to photograph.
  • My portraiture skills have improved. Practice makes perfect, and every shoot means I get a little better at this documentary style of portraiture.

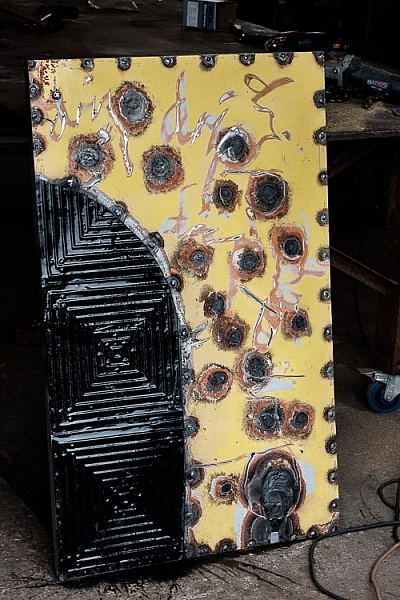
Here’s a portrait I made of artist Chris Meek, one of the artists I photographed in Raglan. We had a great conversation about art, creativity, and life. I’d never have had this experience if I hadn’t embarked on the project.

storytelling-projects-20

So, once you’ve decided on a project, how do you make it a success? These ideas will help.

1. Shoot a variety of images

This is important because it adds interest and variety to the photos you get from the shoot. But I’d like to add a proviso, because I think in general there are two ways to approach a project shoot.

Firstly, is to concentrate all your resources on getting one great photo. The second is to create a set of varied photos that collectively give a better interpretation and tell a story.

My suggestion is to combine these two approaches. Aim to create a variety of photos, but give each photo your best effort. In other words, when you see the possibility of an image, give it your full attention and make it as good as you can before you move on to the next.

storytelling-projects-17

How do you create variety? Here are two ways:

1. Vary your viewpoint. Get closer to your subject, or farther away. Take photos from below, or from above. Of course, the best viewpoint depends a lot on the subject of your project, the light, and the lenses you are using. But the key is to always be thinking about how you can add variety by moving around and taking photos from different angles.

2. Take scene setting shots and close-ups. You could start with a scene-setting photo that captures everything, then move on and create a variety of photos from closer viewpoints showing details.

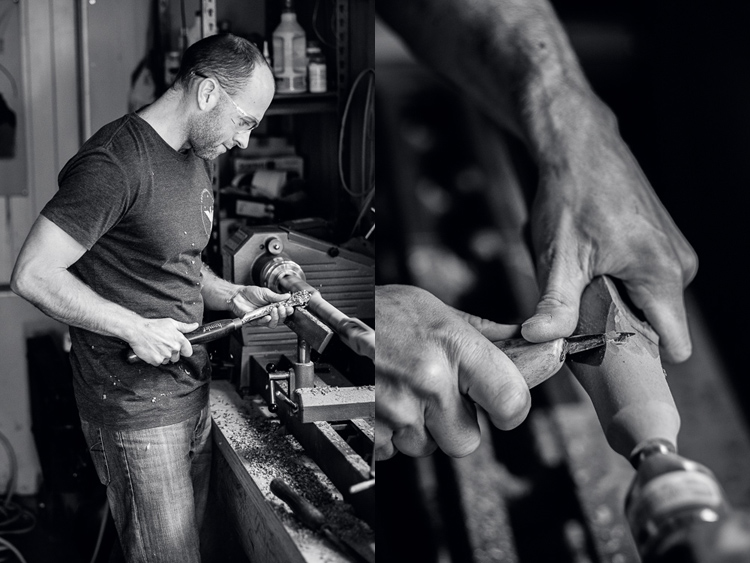
This works well for projects like mine, where you can take a photo of the artist or craftsperson at work in their studio, along with a series of tighter images and close-ups that show them at work. In this example, you can also take photos of the product the craftsperson makes as well as photos of the craftsperson themselves.

These two photos show Todd, a flute maker, working in his garage. Both were taken with the same lens, but I got a lot closer to make the second image.

Story telling and doing a creative photo project

This also applies to more static subjects like landscapes. If you have a landscape related project, you can create variety with photos that show the entire scene, mixed with some that show close-ups of details that you noticed within the scene.

2. Tell a story

It’s often hard to a story with a single image, but it’s much easier with a sequence of photos because you can show different aspects of the same story in each one.

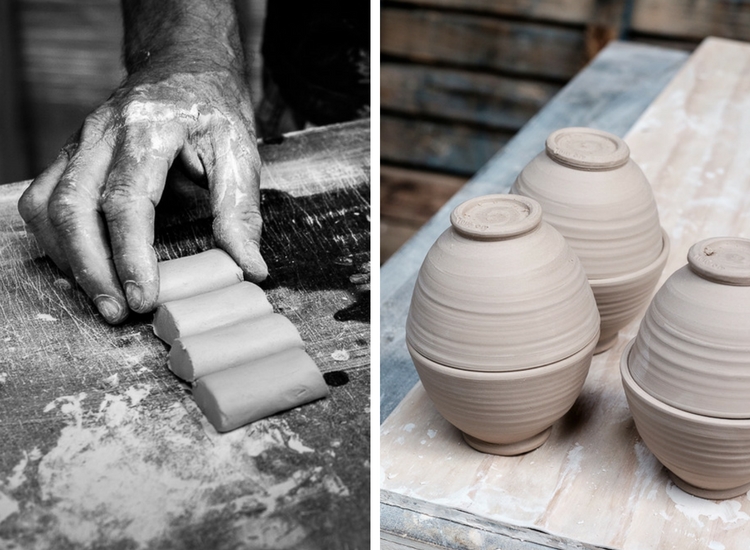
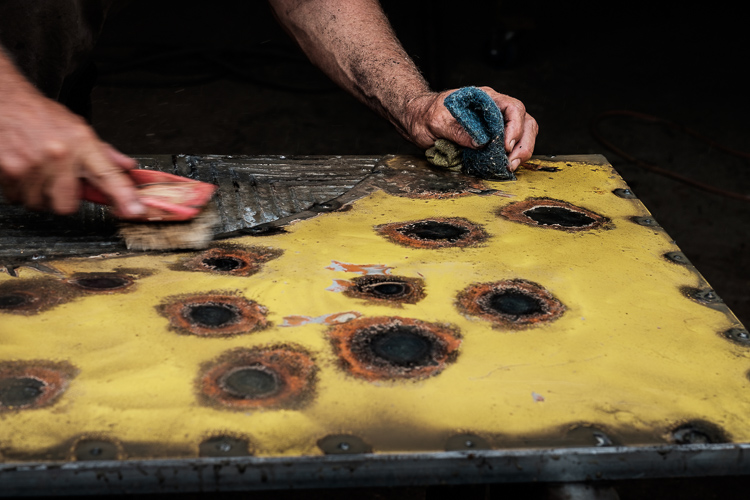
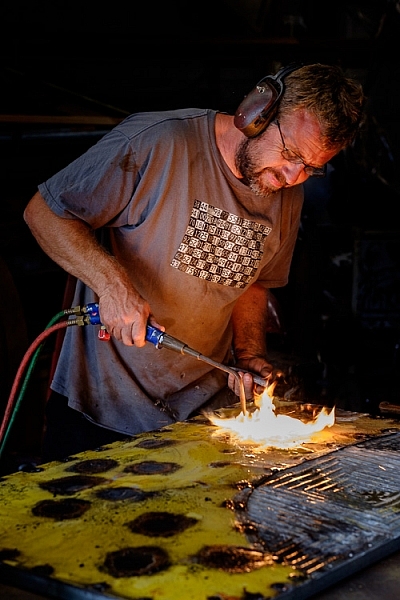
For example, with my photos of craftsmen I like to show images taken at different stages of the creation process. Put together they show how a certain item was made. That’s the story. These three photos show different stages in the creation of an artwork by Chris Meek.

storytelling-projects-6

storytelling-projects-5 storytelling-projects-7

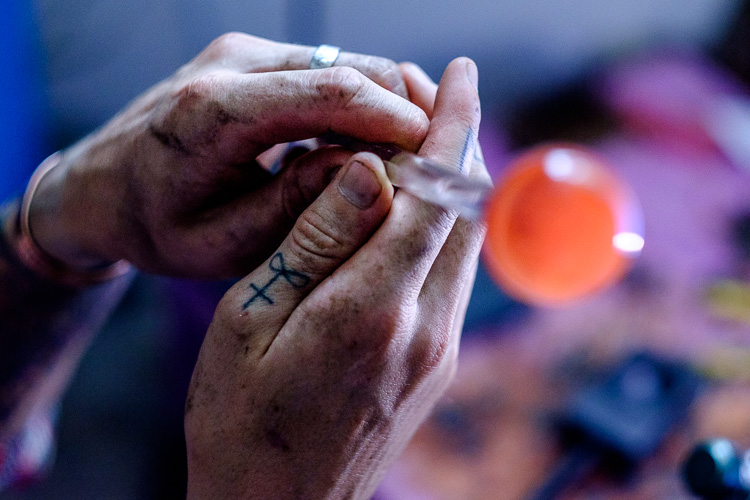
You can also tell a story by paying attention to detail. While taking photos of Eoin, a glass blower, I noticed that his hands gave away a lot about his profession. So I made sure that I took photos like this, that shows the dirt on his hands and the tattoo on his thumb.

Story telling and doing a creative photo project

3. Find commonalities that link the photos

While photo stories need variety amongst the images to create interest, it is helpful if the photos are also linked in some way. For example, you could process all the photos from a shoot in black and white. Or they could be processed in a similar style, perhaps by using the same Lightroom Develop Preset as the basis for the processing.

Or, if you have a project that involves portraits, you could use light to link the photos. Using the same lighting setup for each portrait is one way to to do that.

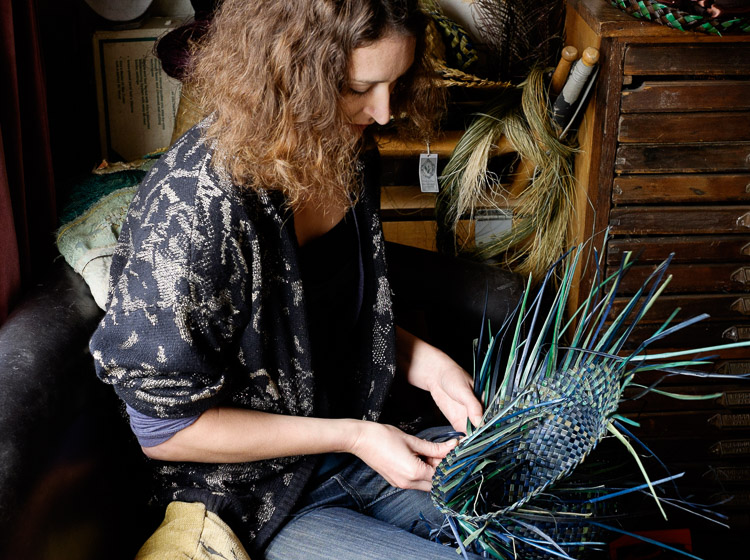
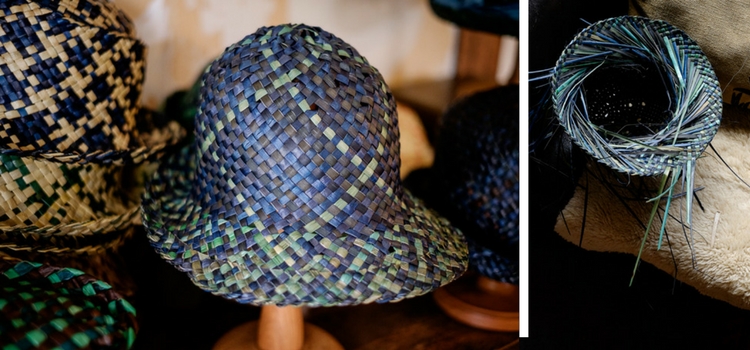
These photos of Jasmin, a weaver who makes hats, are linked by the lighting and the processing. Each is lit by natural light coming through a window in her home, and given the same color treatment in Lightroom.

storytelling-projects-9

storytelling-projects-21

4. Show genuine interest in people

If your project involves people it is important to be genuinely interested in them and what they are doing. Let’s say, for example, you undertake a project taking portraits of surfers. You’ll get the best results if you are genuinely interested in surfing and enjoy talking with surfers.

It’s all about authenticity. If you’re genuinely interested in people, you will have plenty in common and find it easy to talk with them. But, if you’re not, then you won’t make the connection that is essential for good portraiture.

5. Give it time

Give your projects time to evolve and mature. For example, if you have a project photographing your local landscape, giving it time lets you create a series of photos that show the variation created by weather and seasons. Showing the changes that happen over a period of time is also another way of telling a story.

6. Compare and evolve

The reason why projects are such a good learning experience is because they give you the opportunity to compare your current work with your earlier photos. You will see how your ideas and techniques have evolved over time. You’ll also benefit by building a body of work and learning to edit a portfolio by selecting the strong images that work together.

Story telling and doing a creative photo project

Your turn

Have you undertaken any photography projects? Did they help you become a better photographer? Please share your thoughts and project in the comments below.


The Creative Image

If you found this article interesting then please download my free ebook, The Creative Image for 10 brilliant ideas for creative photography projects you can do.

googletag.cmd.push(function() {
tablet_slots.push( googletag.defineSlot( “/1005424/_dPSv4_tab-all-article-bottom_(300×250)”, [300, 250], “pb-ad-78623” ).addService( googletag.pubads() ) ); } );

googletag.cmd.push(function() {
mobile_slots.push( googletag.defineSlot( “/1005424/_dPSv4_mob-all-article-bottom_(300×250)”, [300, 250], “pb-ad-78158” ).addService( googletag.pubads() ) ); } );

The post 6 Tips for How to Build a Story and Shoot a Photo Project by Andrew S. Gibson appeared first on Digital Photography School.


Digital Photography School

 
Comments Off on 6 Tips for How to Build a Story and Shoot a Photo Project

Posted in Photography


How to Shoot a Sequence of Photos That Capture a Story

27 Sep

As a photographer, you’ll often concentrate on perfecting your art at taking one perfect photo. However, there are many occasions where you’ll need to string together a sequence of photos with differing styles. Whether you’re shooting a magazine article or making a personal project, knowing how to produce photos that show details, people, and the whole scene is a skill worth having.

Shooting a sequence of photos

In the example you’re going to see in this article, a traditional puppet show will be used to produce this sequence of photos, but any number of other scenarios could apply. There is always plenty to photograph and although my example shows detail, portrait, and scene-setting images, there are other photos that could also have been taken from the same event.

In the image below you can see the area’s that are boxed. They contain the photos you’d be aiming to get from a scene such as this. Let’s talk about each of these shots and why they’re all important.

Overall image

The scene-setting photo

This is the big picture that shows your audience what’s going on, you’ll likely be using a wide-angle lens here to get as much story into your scene as you can.

The image from the puppet show below is the scene-setting photo. In this photo, the viewer can see the stage, audience, and the performers. In this case, a 50mm lens was sufficient to get the entire story needed from this scene. The aim here is not to go in too close, but to tell the whole story. The photo should capture the scale involved, and often it is helpful to do this shoot from an angle above or overhead

sequence tells a story - scene setter

This photo is the scene setter, you can see the stage and the audience watching the performance.

You’ll notice the image is almost identical to the image used to set out the example at the beginning. The left portion of the frame was a distracting element that wasn’t needed to show the action happening in front of the camera. It’s important to remember that although you want to capture a large canvas when telling your story, too much could detract from the specific story you intend the scene setter to display.

The portrait photos

Portrait photos are a real mainstay of any sequence that seeks to tell a narrative, it’s the people and their story you’re looking to show. There are many types of portraits, though, from ones that just show the face, to those that explore more of the scene around the person (often called environmental portraits).

When photographing a stage production you want to explore as much as you can, that means photographs of the stage, and if possible backstage as well. If the production is small, getting backstage may be as simple as asking the performers on the night of the event. But for large productions or things like music gigs, getting permission to shoot backstage ahead of time is advised. A lot of this work can and should be carried out with lenses best suited to portrait work, which means using primes lens in the range of 35mm to 135mm.

Sequence of photos

The layers created by a shallow depth of field act to give this photo impact, with the main focus on the puppet.

In the scene, you see photographs C (above) and D (below) are of the stage. In photograph C the image needed some compression to fit both the puppet and the puppeteer into the frame. To achieve that you’ll need to use a longer focal length, in this case, a 135mm lens was used. When using prime lenses like the 135mm f/2 you have a lot of control over the depth of field, making it possible to make your subject sharp while the background is blurred.

sequence of photos

In this photo, the interaction on stage between the puppeteers is captured.

In this case featuring the puppet, but contextualizing the image with the puppeteer in soft focus, gave the image more story, and hence more impact. Photograph D (above) shows more interaction between puppeteers and more of the stage in general. This time, the image was shot with a 50mm lens allowing for a wide part of the scene to be shown. Once again, focus is on the puppets, and the rest of the scene is softer because a large aperture of f/3.5 was used.

The photograph taken from location A shows musicians performing backstage (below). In this case, some tarpaulin was used to frame the image and give context to the photo. The woman was playing the gong as part of the music that goes with the puppet show. So although the live audience can hear this music, in terms of photography this aspect of the show can only be shown by going backstage to photograph musicians playing their instruments.

sequence of photos

This photo shows the backstage area of the puppet show. The tarpaulin background and the area being a little too cluttered for the stage can deduce this.

The detail photos

On their own detail photos can look nice, but don’t show your audience what’s happening. When added to a set of photos they can be a vital component that complements the scene setting and portrait shots. These photos are best taken with lenses that can get close to the subject, in other words, macro. You might only include details, or you could show detail but allow some background into the frame for context as well

sequence of photos

Here a line of puppets awaits use. Lines work well in detail photos, as do patterns.

sequence of photos - details

The puppets are full of intricate details, as this photo shows. The use of a macro lens at closer quarters would have enhanced this photo.

In the puppet show detail photos were taken on stage as shown in picture E (below), and backstage with two pictures taken from location B (above). At location B detail photos of the puppet were taken using a 135mm lens. Usually shooting with a macro would be better. However, walking around backstage wasn’t possible, so getting close to the subject was also not possible. The first shot shows a photo where the face of the puppet is prominent, taken in a similar manner to a portrait. The second image shows the puppets where they rest backstage between performances.

sequence of photos

Here is a detail photo that shows context.

Picture E (above) is a detail shot of one of the puppets, but with a bit more context as you can see how the puppet is being used. The shot has a minimalist feel to it, which makes it ideal for adding text above the puppet’s face. The strong light on the subject allowed me to expose for the puppet, and make the background much darker, which gave this shot its minimal tone.

How this set could be expanded on

Okay, so above there are a set of seven photos combining a number of different photos of differing styles into the one grouping that shows a puppet show. This is a snapshot of a show during a performance, could this be expanded on though? Yes, of course, it could. You could also get images of the puppeteers preparing before the show begins, you could ask if they’d let you photograph the puppets in a much more staged manner where you use lighting and select a background that would compliment the puppets. Then there could also be some staged portraits of the puppeteers with their puppets to add to the mixture of images taken during the show itself.

Other scenarios

The list of other scenarios that you could shoot to create a sequence of images is endless; it could be a rock concert, a wedding ,or a sports event. In the next example scenario, you’ll see another set of photos how a green tea field can be captured.

1
The scene-setting photo of the green tea fields, taken from a wide vantage point. On the left you can see some white bags, this is the area you’ll find portraits of the plantation workers. The field also has lots of lines and patterns that are ideal for detail photos

sequence of photos details

The fields are ideal for taking detail photos. In this case, a macro lens wasn’t needed to capture the lines and details, as the tea field required a wider lens.

sequence of photos

An environmental portrait shows a plantation worker at work, now you can see how those white bags are used.

sequence of photos portrait

Another portrait photo shows a plantation worker with his basket.

Your turn

If you have any scenario’s you’d like tips on capturing in the way described in this article please add those and any other comments in the comment section below.

googletag.cmd.push(function() {
tablet_slots.push( googletag.defineSlot( “/1005424/_dPSv4_tab-all-article-bottom_(300×250)”, [300, 250], “pb-ad-78623” ).addService( googletag.pubads() ) ); } );

googletag.cmd.push(function() {
mobile_slots.push( googletag.defineSlot( “/1005424/_dPSv4_mob-all-article-bottom_(300×250)”, [300, 250], “pb-ad-78158” ).addService( googletag.pubads() ) ); } );

The post How to Shoot a Sequence of Photos That Capture a Story by Simon Bond appeared first on Digital Photography School.

Digital Photography School

 
Comments Off on How to Shoot a Sequence of Photos That Capture a Story

Posted in Photography


How to Cull Your Images to Tell a Stronger Story in Your Blog or Social Media Posts

13 Sep

I have this photographer friend. This person is wildly talented, with impeccable images and an amazing eye. I love seeing what she is going to create next until she puts up a blog post. So let’s talk about how and why to cull your images.

These posts are usually a long, meandering wander through her shoots, with no thought to tell a story. Images that you swear are repeats – until you look closely and realize the model’s left pinky finger has maybe moved ever so slightly. Blurry shots that should have been culled in the first round. It boggles my dang mind to look at these posts because we as photographers should know better.

Cull-Images-top


You are better served to share your images in a way that compels viewers to keep coming back for more. While I may not be a pro-level blogger, I still think it’s an excellent way to share your images, and there are a few tricks that I always try to keep in mind as I’m putting together a blog post.

Step 1: Be Brutal

Think about this from the viewer’s perspective. They weren’t at the shoot. So how can you tell them the story in a concise way that shows off your best work? To do this, you have to be brutal. Cull like a maniac, and then cull some more.

Does it hurt to eliminate images that you love from the narrative of your post? Yep, it’s like choosing your favorite child, but you gotta shrink down the number of images you share. You must. Beyond the obvious culling— things like strange facial expressions, awkward hands, etc., there are so many photographers who feel they need to share each and every image that they love. Unfortunately, this is a good way to head straight to Boring Postville.

Do not share the same scene, and the same pose five times in a row! The viewer’s eye will get bored and start to skip over. Your goal is for each new image to draw the eye, and surprise the viewer in some way. If the images start blurring together, the surprise element is gone and you’ve lost their interest. Be brutal in editing: your posts will thank you.

culling (2 of 2)

culling (1 of 2)

Lovely people, lovely images, but they’re so much alike and it’s killing me softly. These do not both need to be in a post together.

Step 2: Change Your Perspective

If you were an invisible spy at the photo shoot, how would you absorb all the information of the day? You’d start far away and move in closer. Too many posts start with the super-tight ring shot, or the close up of the hand on the face, and the viewer is left wondering subconsciously, “How did we get here?”

So aim to tell your story from the perspective of someone who was peeking over your shoulder. A great example is a wedding day. You don’t start a wedding day with the big dramatic first kiss, right? Set your scene. Show the viewer your location. Introduce them to the setup, then move in close to get the detail shots. It’s a much closer proximation to the reality of the day, and it helps our brains understand what’s going on when we’re viewing it on a computer after the fact.

Start broad.

Start broad.

Then move in for more detail...

Then move in for more detail…

... and then even more detail.

… and then, even more detail.

From there, remember to include varying visual perspectives. If you’ve already shared a couple’s full-body portraits, don’t overdo it with the same angle. Move into a closeup of their faces, or a detail of their outfits. Or share a different detail from the day altogether. But for the love of Richard Avedon, please don’t share a dozen nearly-identical photos! Find a new perspective, and make it memorable.

culling (4 of 1)

Far away!

culling (3 of 1)

Close up! And it’s unique enough of a perspective, that including this shot rounds out the story of the previous one.

Step 3: Tell the Truth – Kind of

My favorite Emily Dickenson line is, “tell all the truth but tell it slant.” This is advice straight from a poet to a photographer, so use it wisely. Friends, there is no grand blog court that has ruled that you must share every image, from every scene, in every shoot. YOU are the artist, and YOU get to decide how you’re going to tell the truth! Let’s not squander that freedom! You’re an artist, and you can unfold a story in the most artistic way you deem worthy. Here’s what you do NOT have to do:

  • Share images in the precise order you shot them.
  • Share images from the scenes or poses that you wanted to try but didn’t quite work (and hey, good job trying new stuff!).
  • Share images the client asked you to take that don’t totally represent your vision or your brand.
  • Share images that don’t progress the story you want to tell.

The science of photography is that you always get to tell the truth. The art of photography is that you can tell it slant. Play that line because you can.

culling (5 of 1)

Step 4: Stay in the Flow

So, now that you’ve culled only the very best of your images, laid them out in a compelling story, shared your artistic skill with the world, and put together a bomb post, make sure the little details aren’t subtly throwing shade onto your creation.

Step away from your computer, go for a walk, have a glass of wine, do you… and then come back to review what you’ve written, shared, and how it all comes together. Try to have fresh eyes.

Is anything too repetitive? Do your shots flow together? Do your black and white images land in places throughout the post that make sense? If you include captions, do they add or detract from the overall effect of your story? These little details can take a post from good to truly excellent, so make sure you give your post another look before you click “Publish.”

culling (6 of 1)

What are your tips for culling photos for a great social media or blog post? What are your big no noes? I’d love to hear them.

googletag.cmd.push(function() {
tablet_slots.push( googletag.defineSlot( “/1005424/_dPSv4_tab-all-article-bottom_(300×250)”, [300, 250], “pb-ad-78623” ).addService( googletag.pubads() ) ); } );

googletag.cmd.push(function() {
mobile_slots.push( googletag.defineSlot( “/1005424/_dPSv4_mob-all-article-bottom_(300×250)”, [300, 250], “pb-ad-78158” ).addService( googletag.pubads() ) ); } );

The post How to Cull Your Images to Tell a Stronger Story in Your Blog or Social Media Posts by Laura Sullivan appeared first on Digital Photography School.

Digital Photography School

 
Comments Off on How to Cull Your Images to Tell a Stronger Story in Your Blog or Social Media Posts

Posted in Photography


How to Tell a Story with Portraits by Using Creative Composition

21 Aug

In this article, we will explore new ways of using composition and creative framing to tell a story in your portraits. We’ll do so by understanding the marvellous ways our brain (as viewers) construct a sense of story.

The common principle of the techniques I will describe here, is that they are all based on our mind’s ability to fill in missing gaps of information. A skill that helps us survive in a world of uncertainty.

F11A2018

Two things to note about creativity before we start

Skill, is not just a talent: Just like working on the flexibility of a muscle, I believe we can work on our creativity, with the “muscle” being our vision.

Being creative for the purpose of being creative: Creative compositions should be a vehicle for a purpose – an emotion or a story you want to evoke in the image. If you choose to add creativity to your images, just to be more creative, it will be an empty gimmick.

Half close up portrait – a full story

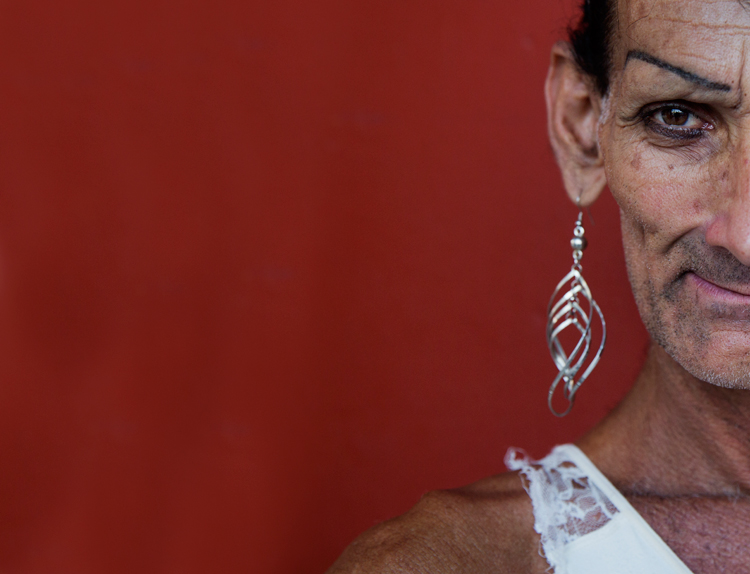
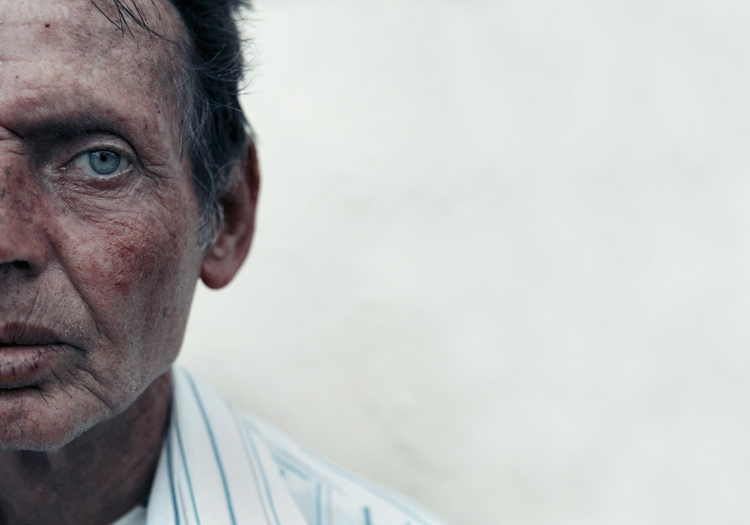
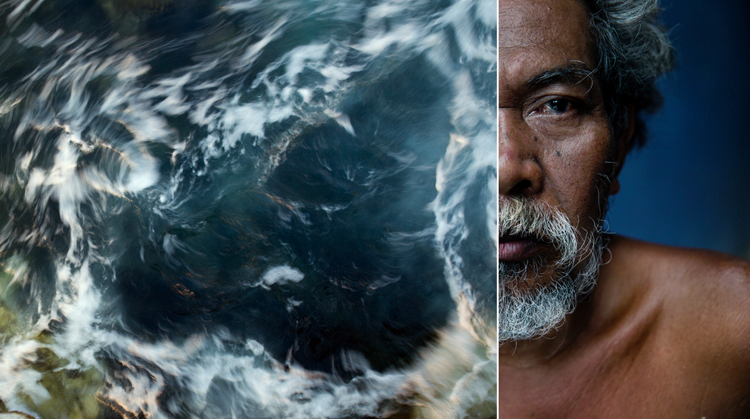
By showing only half of a close-up portrait, you stimulate the viewer’s mind and almost force it to delve into the image. We do so by activating their mind’s need to fill in gaps of missing information. This ability is rooted in us since ancient times, from which we evolved to understand that the two blurry spots between the trees, could be the hidden face of a tiger.

F11A6628

Good to know:

For best results, you can practice framing this kind of composition by using the crop tool in your editing software. Once you become comfortable with this technique (and framing); it will be easier to achieve a “half close-up portrait” in the field, without the need to crop it in the post-processing stage.

This kind of framing is like an exclamation mark, which one cannot ignore. Therefore, use it only on the most interesting faces, and not on every portrait.

F11A8534

Environmental portrait – a person in context

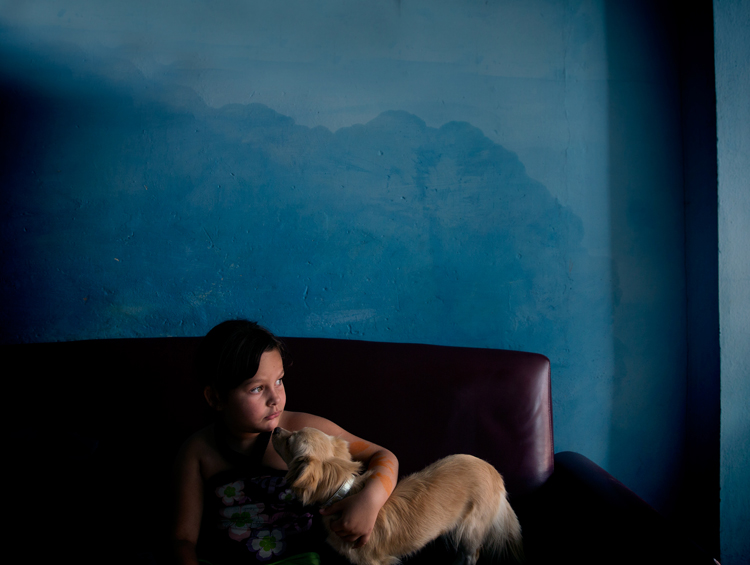
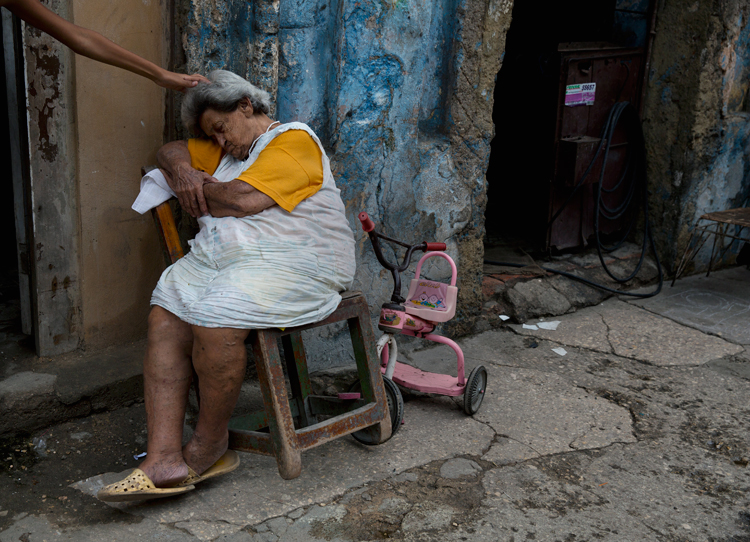
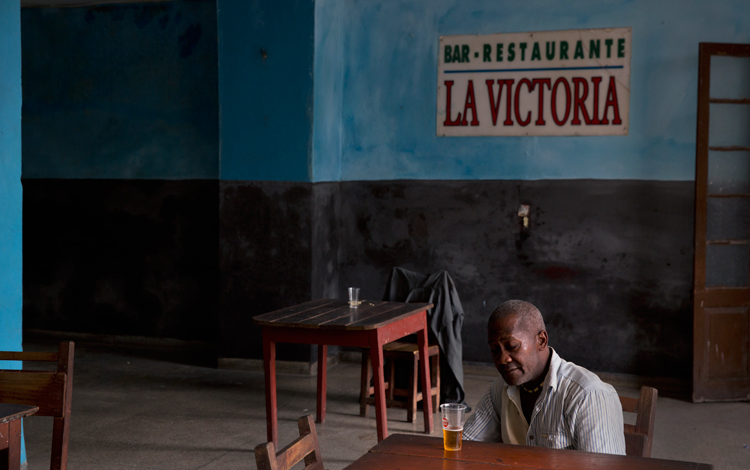
For me, this the most challenging and rewarding portrait framing style, the environmental portrait. This shows not only the person, which is the hero of your image, but also his or her environment: home, work place, country, etc. By doing so, you use the mind’s ability to conclude and understand a situation by connecting pieces of information.

14 the sleep

Good to know:

The biggest challenge in this type of composition is the balance between the main figure (hero) and environment. Keep in mind that the main figure must be dominant, and not overtaken by the background. Use light, color, and sharpness to make your subject significant.

Using a wide lens (below 50mm) is recommended for the environmental portrait framing, as it will allow you to capture the environment of your hero, even in small spaces.

F11A4931

Detail portrait – telling the story with small details

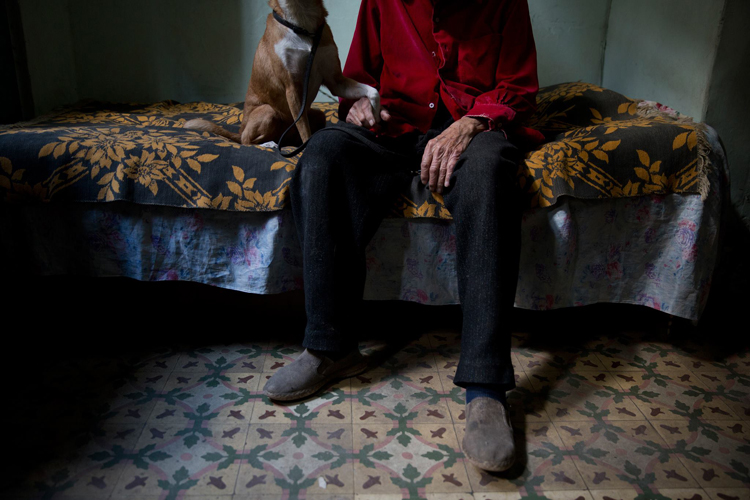
Like with the half portrait technique, in the detail framing we use the brain’s ability to fill in the gaps, by showing only a small fraction of the entire story. For a good detail shot, choose some with a connection to your subject. It can be a connection of similarity or difference. For example: take a close-up shot of his or her hands, shoes, the reading books on the shelf, the subject’s regular chair or smoking pipe, you name it! As long as this object, represent something which is bigger than the object itself.

12970960 1147522381976706 3379301587067512747 o

Good to know:

A good place to start is by examining your subject from head To toe. Looking for anything that other people might miss in that person. Did you spot anything special? Like a unique piece jewelry, a tattoo, or just a hole in their shoe.

Some of my best ideas came from my subjects. Ask your subject to show you an object to which he or she feel a strong connection. You do not even need to have any human presence in the detail shot, as long as the object represents or tell us something about its owner.

IMG 4005

Kuleshov effect – creating a meaning by interaction

In this technique, based on the groundbreaking experiment by the Soviet filmmaker Lev Kuleshov, we will use the brain’s ability to derive meaning from the interaction. Kuleshov demonstrated that the audience constructs the story not only by the content, but also by the order in which the images appear, and the connection between them.

In the experiment, Kuleshov used two different shots, which he put in sequence one after the other. The first shot, a close-up shot of the face of silent film actor Ivan Ilyich Mozzhukhin, remained the same throughout the experiment, while the second shot was replaced with every round of projection; a plate of soup, a dead young girl, a woman on a divan (sofa).

The audience praised the actor’s ability to express different feelings such as sadness and even hunger, using only his facial expressions, without knowing that they watched the same shot over and over, and the only thing that was changed was the second image.

Page 18

To use this effect in your work, just place two images side by side and try to evoke a connection between them. In the example, I combined between the portrait of Net, which I did with the half close-up composition, with an image of a swirling sea. Where does it take you?

Good to know:

You will be amazed by the power of creative composition. Challenge your audience. Don’t be afraid to create a connection which is too complicated to understand.

A good creative exercise which you can do is by collaborating with a different photographer. You will provide the first image, he or she will provide the second. In there you will have a connection, not only between the two side-by-side images but by two different points of view.

The author would like to thank Nicholas Orloff for his assistant in writing this article.

googletag.cmd.push(function() {
tablet_slots.push( googletag.defineSlot( “/1005424/_dPSv4_tab-all-article-bottom_(300×250)”, [300, 250], “pb-ad-78623” ).addService( googletag.pubads() ) ); } );

googletag.cmd.push(function() {
mobile_slots.push( googletag.defineSlot( “/1005424/_dPSv4_mob-all-article-bottom_(300×250)”, [300, 250], “pb-ad-78158” ).addService( googletag.pubads() ) ); } );

The post How to Tell a Story with Portraits by Using Creative Composition by Oded Wagenstein appeared first on Digital Photography School.

Digital Photography School

 
Comments Off on How to Tell a Story with Portraits by Using Creative Composition

Posted in Photography