RSS
 

Posts Tagged ‘Steps’

7 Steps to Perfect White Portrait Backgrounds in the Studio

22 Apr

The post 7 Steps to Perfect White Portrait Backgrounds in the Studio appeared first on Digital Photography School. It was authored by John McIntire.

Photographing subjects on a white background is one of those things that looks easy from the outside. However, once you start digging into the details, it turns out it’s not quite as simple as it seemed at first glance.

Unfortunately, being able to shoot on a white background is one of the most useful skills for you to have in all sorts of photography including portraits and still life. Even if you hate it stylistically, you will eventually have plenty of people ask you for a pure white background.

When you get the technique right, there are a whole host of things you can easily do with your photos, such as cutting your subjects out for composites. Even when your technique isn’t perfect, there are a host of post-processing options to get you, and your images, there in the end.

However, this article outlines a process to help you get perfect results straight out of the camera every time. If you’re handling a high volume of images – whether that be portraits or products – this may save you countless hours in post-production.

What you need

You will need a few lights for this technique. In this example, there are three lights and a reflector.

To get started with shooting on a white backdrop in a studio, you will need a few things.

  • At least two studio strobes with modifiers or flashguns (three or four would be preferable and will make your life easier). Softboxes are the easiest option for your background lights.
  • A light-colored backdrop. White is preferable, but this technique will work easily with anything up to mid-grey. It is more than possible to do it with darker backdrops but to avoid complications, stay light when you can.
  • Space. You will need space to get the best results. As described below, you will need to keep enough room between your subject and the background to help prevent spill from the background lights falling on your subject. For portraits, this could easily take ten to fifteen feet of space in addition to the distance you are from the subject. For smaller subjects, space is much less of an issue.
  • (Optional) A light meter. Because we’re dealing with moderately precise ratios, a light meter will help you here. You can get by without one, but it does make it easier.

Step One – Choose your aperture

Before you do anything with your lights or your subject, the first step in this process is to choose the aperture you want to shoot at. This choice is going to be the basis for everything else you do in this process. Anything from f/8 to f/4 is a good bet for studio portraits, but you can choose anything you like. Your only real limitation here is the power output of your lights.

If you choose f/11, then your backgrounds lights will need to be set at least two stops brighter, which would be f/22. You may struggle to achieve that with low-powered strobes. If that’s the case, then you will have to choose a larger aperture for your final image.

For the remainder of this article, the chosen aperture will be f/5.6.

Step Two – Light your background

When lighting your background, take the time to ensure that it is evenly lit. This will ensure that all of your background is white with no darker tones creeping into the sides and corners.

Once you know your aperture, the next step is to set up your background light(s). If you can, use large, directional modifiers like softboxes. This will help prevent excess light spilling where you don’t want it. It will also help to ensure that the background is evenly lit from top to bottom, preventing any inconsistencies in exposure in your final images.

Place your lights on either side of your backdrop and pointed towards it at a forty-five-degree angle. Try to position them so that you get even coverage.

Step three – Set the exposure for your background lights

The easiest way to find the exposure for you background is to use a light meter. Don’t worry if you don’t have one, you can still chimp the histogram to make sure it’s overexposed.

With your lights positioned, all you have to do is set the power so that the camera will record your background as pure white. Your background needs to be at least two or three stops brighter than your subject. Because the hypothetical aperture we’re using is f/5.6, that means the backgrounds lights should be at f/16 for three stops of exposure difference.

If you’re using a meter, be sure to check the exposure at the top and bottom of the background and not just the middle.

Step four – Place your subject for a test

On the left, the subject is too close to the background and the light is wrapping around her and lighting her front. Placed a few feet further away, the subject is rendered as a silhouette. (The detail in the darker image is from the overhead fluorescent that I hadn’t turned off yet.)

To figure out where your subject needs to stand, or be placed, put them in front of the background and take a test shot with only the background lights on. If they are far enough away from the background, your subject should be in perfect silhouette, and there should be no light falling on them or wrapping around them in any way.

Where there is light falling on your subject, just move them further away from the backdrop until you achieve that perfect silhouette.

If your exposure is right, you should have no details in your background and no details in your subject.

Because you are lighting a white (therefore reflective) surface, your background is effectively a light source and acts like one. The light from your backgrounds will fall off at a rate governed by the inverse square law. What you are trying to do is to place your subject in a place where the light level drops enough that it has no effect on your subject at your desired aperture.

Step four (part 2) – Flag your background lights

To ensure light isn’t going where you don’t want it, flag your background lights. Here, I’ve used black fabric and covered all but the section of background that will be in the photos.

It may be that you can’t achieve a perfect silhouette of your subject for some reason. This issue can arise from not having enough space to work in, or it could be that your modifiers are producing too much spill. One way to combat this is to flag your lights.

Flagging simply means to block light from where you don’t want it. You can do this in any way that you want. V-flats and black curtains (as in the example images) are both cheap and effective ways to flag your light.

Simply place your preferred flags in a manner that blocks excess light from coming back towards the camera, but doesn’t interfere with the part of the background that will wind up in your composition.

Step 5 – Place your key light

Once the background lights are done, you can light your subject in any way you want.

Now that your background is lit and you know where your subject needs to be, you just need to light your subject. All you have to do is place your light any way that you desire (any lighting pattern will work), and set the power to your desired aperture (f/5.6 in the examples).

Unlike the background lights, you don’t have to worry about what any excess light from your key light is doing. Because you are so far away from the background with a light set to a much lower power, it will have little to no effect on the final exposure of the background. However, do pay attention to what the light is doing off to the sides. If it’s firing into a nearby white wall or another light-colored surface, then that surface will act as a reflector in your images.

Step 6 – Add fill (optional)

Use fill lighting to reduce the impact of heavy shadows in your images. You can use another light if you wish, or a reflector as shown here.

If you want to add a fill light to your set-up, you can now do that as normal. You can fill with another strobe, or you can use a reflector as shown in the example images. The main thing to remember about fill light is that it should be at least one stop lower in power than your key light.

Step 7 – Check your final exposure

With everything set-up, you should have a perfect white background straight out of the camera.

With everything in place, take a test shot at your desired aperture. If your key and fill lights are in your desired position, everything should be spot on and you should now have an image with a perfectly white background straight out of the camera.

That’s it

This isn’t a hard technique, but it does require a fair few steps and a lot of attention to detail. Don’t be put off by any of that. Once you’ve set it up a few times, it will become second nature very quickly. You will also be able to learn how to set it up in a few minutes, potentially saving you a ridiculous amount of time post-processing backgrounds that aren’t perfectly white.

The post 7 Steps to Perfect White Portrait Backgrounds in the Studio appeared first on Digital Photography School. It was authored by John McIntire.


Digital Photography School

 
Comments Off on 7 Steps to Perfect White Portrait Backgrounds in the Studio

Posted in Photography


5 Steps for Photographing the Blue Hour

12 Apr

The post 5 Steps for Photographing the Blue Hour appeared first on Digital Photography School. It was authored by Jeremy Flint.

Blue hour photography is an attractive subject to shoot. It’s great to be outdoors after dark, there are usually less people around, and it presents the opportunity to capture a familiar daytime scene in a new and different light.

Taking photos during the blue hour is considered to be the optimum time to document a cityscape as the artificial lights awaken and the daylight disappears.

Blue hour is one of the most popular times for photographers to take pictures. The blue hour refers to “the period of twilight in the morning or evening, during the civil and nautical stages, when the sun is at a significant depth below the horizon and residual, indirect sunlight takes on a predominantly blue shade.”

For the purpose of this article, I will focus on outlining the steps required for shooting during the blue hour:

1. Consider the time of day

Sheldonian Theatre, Oxford © Jeremy Flint

The time of day is an important factor when photographing the blue hour.

The blue hour is not just limited to the period after sunset. Similar light can be achieved in the morning (before sunrise) and evening (after sunset).

During the blue hour in cities, buildings are lit, and streetlights come on, making it an ideal time for urban and city photography with a perfect blend of natural and artificial light. The sky takes on a deep blue hue with cold tones and warmer colors from the illuminated buildings. A gradient of colors from blue to orange tinges the sky in place of the sunrise and sunset.

In the evening, the blue hour coincides with the end of the civil twilight, just after the golden hour. In the morning, it coincides with the initial part of the civil twilight, occurring just before the golden hour.

Try taking pictures after this time to see how your images differ. You will generally find that when capturing cities after the blue hour, the natural light will have faded away and your images will appear darker in the sky. This can still be a good time to take interesting pictures.

2. Consider your subject and viewpoint

When preparing to take pictures during the blue hour it is important to take on board a few considerations. What are you going to photograph and how will you frame your image?

© Jeremy Flint

My first suggestion is to decide on your subject and consider what you want to include in your image. You may want to frame your subject with an attractive background or foreground to make the image look more visually pleasing.

I chose to photograph this night scene of Tokyo with the Rainbow Bridge as my main subject with the neon-lit cityscape and towering skyscrapers beyond.

3. Consider the exposure, aperture and shutter speed

You will need to decide on the settings you want to use. If there is movement in the image, you may want to prioritize shooting in shutter speed priority. If not, then aperture mode can be used to achieve greater depth of field.

University Church of Saint Mary the Virgin viewpoint © Jeremy Flint

The correct exposure will automatically be set to let in the right amount of light when you capture your images. Both methods allow the use of longer exposures.

As my subjects were static, I opted for aperture priority to achieve more depth.

4. Try different shutter speeds

As the light fades, you may find that you want to increase your shutter speed to maintain a well-exposed shot. I would start at around a second and increase the exposure accordingly when darkness falls.

© Jeremy Flint

You can also use shutter speeds to creative effect. For example, capturing moving traffic trails during the blue hour can give pleasing results. Try anything over five seconds of exposure time to allow for some movement.

Long exposures are another great way to create amazing photographs. For example, they can be used to exaggerate cloud movement or traffic trails even further. Try anything over 30 seconds.

5. Use a tripod or something for support

Using a tripod or a stable surface such as a table or wall is of paramount importance when photographing the blue hour. They will help you to achieve sharper pictures by minimizing unwanted camera shake.

Skytree, Tokyo © Jeremy Flint

I achieved the photo attached by setting my camera up on a sturdy tripod to prevent any potential movement.

Conclusion

Blue hour is a magical time to take photographs in towns and cities. Follow the above steps and see if you can improve your photos captured during the blue hour.

Share your pictures with us below and feel free to add your tips to capturing the blue hour.


5 steps for photographing blue hour

The post 5 Steps for Photographing the Blue Hour appeared first on Digital Photography School. It was authored by Jeremy Flint.


Digital Photography School

 
Comments Off on 5 Steps for Photographing the Blue Hour

Posted in Photography


Seven Steps for Post-Processing a Pure White Background

21 Mar

The post Seven Steps for Post-Processing a Pure White Background appeared first on Digital Photography School. It was authored by Kevin Landwer-Johan.

Photographs with clean, white backgrounds are extremely popular with

  • Stock agencies
  • Amazon
  • Graphic Designers
  • Magazines and websites
Seven Steps for Post Processing a Pure White Background Three Mangoes in a Bowl

The original background with a white border around it to clearly illustrate the contrast between pure white and off white

Producing pure white backgrounds is imperative. A background that’s not quite white looks terrible on a white page.

In this article, I will walk you through one method of post-processing I use to isolate subjects and give them a white background.

Choosing your photos carefully

Some photos are far more difficult to work with than others when you want a white background.

Any subject that’s fuzzy or hairy will be problematic. As will any blurred subject. Whether it’s focus or motion blur, you will have difficulty in obtaining a good clean transition with the background.

Smooth, clean edges are the easiest to work with. So if you want to sell wigs on Amazon, you are in for a tough time. It’s better to make sure you have a pure white background that requires no post processing with such subjects.

Seven Steps for Post Processing a Pure White Background Chicken Nerd


Step # 1

Choose your subject and photograph it against a clean, contrasting background. If the background is too busy, it will make isolating on white more difficult.

Keep your subject a good distance from the background. Use an aperture setting that keeps all your subject in focus, but the background is out of focus.

If your subject happens to be moving, make sure to choose a fast enough shutter speed to stop the motion. Making sure your subject is sharp will make post-processing much more straightforward.

Step # 2

Open your file in Photoshop. Make sure it’s the highest resolution jpeg file it can be. Working with low-resolution images is more challenging, but larger ones will slow your computer down.

You need to find a balance here. If you start working through these post-processing steps and find your computer is not handling it, downsize your photo and start again.

Choose the Select and Mask tool. You’ll find this in the Select Menu at the top of your window. Change the View Mode to an option that allows you to see your changes easily. I prefer the Overlay Mode.

Seven Steps for Post Processing a Pure White Background Select and Mask Menu

Choose the Select and Mask option from the drop-down menu.

Step # 3

With the Quick Selection tool, draw around the inside of your subject. Do this slowly, so Photoshop has time to render your action.

Pay careful attention to the areas you are selecting. You do not want to have any part of the background selected. If parts of the background are selected, paint over them with the Refine Edge brush.

Zoom in so you can see what you’re working on more clearly.

Seven Steps for Post Processing a Pure White Background Overlay Mode

Step # 4

When you’re all done and are satisfied your subject is masked, it’s time to output again to the main window in Photoshop.

Select New Layer with Layer Mask from the Output options and click OK.

Step # 5

Add a white background by clicking on the New Fill or Adjustment Layer icon at the bottom of the Layers Panel. Choose Solid Color and set it to pure white.

Step # 6

Check around the edges of your subject. Can you see any of the old background?

If you can, select the mask on your main layer in the Layers Panel. Choose the Brush tool and make the color Black.

Seven Steps for Post Processing a Pure White Background Mask Icon

Make sure the mask is selected.

Paint carefully over the areas where you can still see the old background. You may need to lower the opacity of the brush and adjust the feathering to achieve the best results.

If you have not done this before it can be challenging. However, don’t worry, if you erase parts of your subject, switch the brush color to white and paint back over them. They will re-appear.

There are various other methods and tools for erasing unwanted backgrounds. This is the best way I have found for images which are not too complicated.

Seven Steps for Post Processing a Pure White Background Clean Edges

Step # 7

Crop out any extra white space and save your new photo with your subject isolated on white.

Seven Steps for Post Processing a Pure White Background Clean White Background


Conclusion

This is one way to achieve a white background. As with most post-processing procedures, there is more than one sequence of steps which will provide an acceptable result.

Practice and experiment to find the workflow which works best for you.

Are you experienced in creating clean white backgrounds using other methods? Do you have any tips to share? Please share them in the comments section below.

The post Seven Steps for Post-Processing a Pure White Background appeared first on Digital Photography School. It was authored by Kevin Landwer-Johan.


Digital Photography School

 
Comments Off on Seven Steps for Post-Processing a Pure White Background

Posted in Photography


Keeping Colors Consistent in Photography in 3 Easy Steps

30 Nov

The post Keeping Colors Consistent in Photography in 3 Easy Steps appeared first on Digital Photography School. It was authored by Caz Nowaczyk.

In this video by Gavin Hoey from Adorama, he discusses ways of keeping colors consistent throughout your photography process.

Keeping Colors Consistent in 3 Easy Steps

Using these 3 quick steps in your photography workflow will make your process much easier and save you time.

1. Begin with the Right Computer Monitor

Begin with a great monitor, because a bad monitor makes editing your photos difficult. A monitor with at least 100% of the sRGB color space will work. Even better, is a monitor that displays 99% of AdobeRGB color space, such as the BEN Q SW2700.

You will need to color-calibrate the monitor. Get the best out of your monitor using a color calibration tool. Using something like an X-Rite i1 Display Pro Display and Monitor Calibrator. See more on using it here.

2. Getting Colors Right In-Camera

Set a custom white balance using a color checker passport. Open up to the grey side. Get the model to hold it in front of them. Fill the frame with the white card, use the custom white balance mode in camera (varies from camera to camera) and take a photo. Your white balance should now be correct.

Setting in-camera means you can show your subjects the photos in-camera.

Also saves you time in post-processing. The image may then look a bit wrong when looking through the view-finder. Just check the image when you take it – it should look correct.

Next, take a picture of the color checker passport fully-open to the color side, and under the same lighting conditions. We will use this to make the profile. This color setting will be used for the entire shoot.

3. Set-up Your Custom Profile in Photoshop

With the shoot done, it is time to make the Photoshop custom profile for post-process editing.

Bring the RAW file of the model holding the color checker passport into Photoshop. Open it as a DNG (Digital Negative) and save it somewhere that is easily accessible. Close the file.

Find your DNG file and drag and drop it onto the Colour Checker Passport application. The application will do all the work for you. All you need to do is click ‘create profile’ and save it with a unique name for that particular shoot/set-up. It is saved as a new color profile.

Next, open your RAW file into photoshop. Go to the ‘Profile’ Tab and select ‘Browse.’ Go to your saved profile and select it.

How do you use this profile for all the images across your shoot?

Go back to Camera RAW. Choose the icon in the top corner of the panel, and select ‘set as new camera RAW default.’ All of the photos you open will now apply the new color profile, keeping your entire shoot consistent.


You may also find the following articles helpful:

How to Choose the Right Monitor for Photo Editing

Setting Your White Balance with a Gray Card – a Tip from Phil Steele

Setting The Mood By Adjusting Your White Balance

How to Use the X-Rite ColorChecker Passport to Obtain Perfect Color

How to Make Custom Camera Raw Profiles for Lightroom & Photoshop

The post Keeping Colors Consistent in Photography in 3 Easy Steps appeared first on Digital Photography School. It was authored by Caz Nowaczyk.


Digital Photography School

 
Comments Off on Keeping Colors Consistent in Photography in 3 Easy Steps

Posted in Photography


7 Effective Post-Processing Steps For Beginners

23 Oct

Effective post-processing can be challenging to learn.

If you take photos in RAW format, you need to post process your photos to get them looking good.

Here are seven steps I take in Lightroom and Photoshop with most of the photos I take.

Typically, the photos I take are documentary-style, and I don’t change them with much post-processing. I have developed a workflow to enhance and tweak my photos with the aim of rendering a result similar to how I saw the picture in reality.

Technicalities and alternative variations are kept to a minimum in this article to avoid causing confusion and discouragement. This article is written for beginners starting on their post-processing journey.

7 Effective Post-Processing Steps For Beginners

The original unaltered RAW file.

Intention When Post-Processing RAW files

Post-processing software has become very complex and powerful. It is possible to manipulate photos, so they become entirely different from the original. There are dozens of tools and multitudes of ways of achieving the same or similar results.

My intention most for most photographs I post process is to make them look as natural as possible. I believe this is an excellent place to start, even when you want to go on and create more surreal looking images.

Tone range in a photo is one of my primary concerns. Your eyes can usually see a broader range of tone than your camera can record. How to post-process a RAW file to appear as close as possible to what you saw, in reality, is what I want to share with you.

Seven Post Processing Steps

  • Step 1: Process The RAW File
  • Step 2: Open in Photoshop (PS) and Create Two Layer Copies
  • Step 3: Balance the tone range
  • Step 4: Remove Distractions
  • Step 5: Dodge and Burn to Refine
  • Step 6: Crop (if you need to)
  • Step 7: Save a TIFF and a JPG

Step 1: Process The RAW File

7 Effective Post-Processing Steps For Beginners

The RAW file with no adjustments.

Choose the photo you want to work with and open it in the ‘Develop Module’ in Lightroom. Take a look at the shadow areas, mid tones, and highlights. Choose what you consider to be an essential part of your photo and pay attention to that when making your adjustments.

For this article, I am using a landscape photo of the view I see from my home. Within it, there are no real extremes or any outstanding main subject. The photo has a pleasing range of tone and color, and I want to see detail in each area – the sky, mountains, and the rice. As an unprocessed RAW file, it looks flat and dull.

Make use of the sliders in the ‘Basic’ panel on the right to begin making adjustments. For my image, I move the ‘Blacks’ slider to the left, darkening the black areas and take the ‘Contrast’ slider to the right up increase the contrast a little. Then move the ‘Shadows’ slider to the right a fraction to bring back detail in the dark areas that I may have lost while moving the previous two sliders. Lastly, I push the ‘Clarity’ slider to the right a bit.

It’s good practice to avoid moving any slider to its extremity because the image quality deteriorates. It’s better to use a combination of the various sliders to achieve the look you want and keep the quality.

The ‘Color Temp’ slider has also been moved towards the blue as the photo is a little too yellow.

I’ve made a Preset in Lightroom with these adjustments, using it on most of my photos, and then tweaking the sliders if need be.

7 Effective Post-Processing Steps For Beginners

The RAW file with adjustments.

Step 2: Open in Photoshop and Create Two Layer Copies

About 90% of the photos I post-process go through this step. I have an Action set up in Photoshop that is applied first-up on any photo I process. Make two layer copies and set the Blend Mode of the top layer photo to ‘Screen’ and the middle layer blend mode to ‘Soft Light’.

Creating two additional layers of your photos allows you to add extra punch to them. This extra punch happens by manipulating the top ‘Screen’ layer.

7 Effective Post-Processing Steps For Beginners

Opening Photoshop with two new layers created of the photo and Blend Modes changed.

Step 3: Balance the Screen Layer

Adjust the ‘Opacity’ of the layer until the darkest area you want to retain detail in is looking good. In my photo, it is the forest on the mountain that’s in shadow. I adjusted my screen layer to 40%.

7 Effective Post-Processing Steps For Beginners

Manipulate the opacity of the top Screen layer.

You can turn off the top to layers to see the changes you have made. The bottom layer is still as you imported it.

Now select the ‘Eraser’ tool and give it an Opacity setting of around 30%. Begin to gently erase the areas of your photo you want to darken. The sky is the area I worked on the most because I wanted to bring out more detail in the clouds.

7 Effective Post-Processing Steps For Beginners

Use the Eraser tool to darken some areas that are too bright.

Having the Opacity set at 30% allows you to be more precise in the way you manipulate your photo. I use a pen and tablet which is pressure sensitive and gives me more control than a mouse.

7 Effective Post-Processing Steps For Beginners

Turn off the lower two layers and temporarily make the Screen layer 100% opacity to see what you are doing more easily.

Turn off the other layers and temporarily bring the ‘Screen’ layer opacity back to 100%. Doing so makes it easier to see the changes you are making. Turn the layers back on and set the ‘Screen’ layer to the opacity level you chose.

Once you are happy, flatten the image.

Step 4: Remove Distractions

7 Effective Post-Processing Steps For Beginners

Use the Patch tool and clone tool to remove distractions.

Use the clone tool or the ‘Patch’ tool to remove distractions from your photo. There’s not too much distracting in my photo, but even taking out the few bright elements enhances the photo. I have used the ‘Patch’ tool to fill in the small section of road that was visible, the electricity poles, a person and a water tower in the distance.

7 Effective Post-Processing Steps For Beginners

Cleaned image with distractions removed using the ‘Patch’ tool.

Step 5: Dodge and Burn to Refine

Zoom your photo to fill your monitor and take a good look at it. Are there still areas which are too dark or too bright? If so, use the ‘Dodge’ and ‘Burn’ tools to fix them. You also may need to use the ‘Burn’ tool on areas you used the ‘Patch’ tool to help them blend in better.

In my photo, I have set the ‘Burn’ tool to an Exposure value of 11% and chosen to work on the ‘Mid-tone’ Range. I have darkened the clouds more and also some of the rice. The clouds now look more natural. The rice in the foreground is a little darker and helps draw your eye into the photo. I have used the ‘Dodge’ tool also on 11% Exposure, to lighten the palm tree.

7 effective post-processing Steps For Beginners

‘Dodge’ and ‘Burn’ to refine the tone range.

Step 6: Crop If You Need To

Take a look at your photo and consider whether cropping it somehow would make it a stronger image. Try it and see if you are not sure. Make a copy to crop and compare with your original. Alternatively, crop it and then use Ctrl+z (cmd+z on Mac) to see the comparison.

Step 7: Save a TIFF File and a JPG File

Saving two files gives you one of full quality and one you can use on the internet. I have a lot of different Photoshop ‘Actions’ set up to resize and save my photos depending on their usage.

7 effective post-processing Steps For Beginners

The photo with post-processing complete.

Not Every Image is Created Equal

Apply these steps with a good dose of flexibility and creativity. Experiment with them to discover alternative ways you can make your photos look.

Based on these, I have alternative steps I apply to some photos to achieve a certain look. As you work your way through these steps, remember the scene you photographed to keep your photos looking as natural as possible.

If you have any other helpful tips, please put them in the comments below.

The post 7 Effective Post-Processing Steps For Beginners appeared first on Digital Photography School.


Digital Photography School

 
Comments Off on 7 Effective Post-Processing Steps For Beginners

Posted in Photography


7 Steps to Find Inspiration so You Can Create Phenomenal Photographs

04 Oct

Staying inspired to create stunning photographs consistently is a tough challenge. In this article, I present seven methods you can use to find inspiration. If you take them on board they will propel you to your goal of making phenomenal photographs.

Most photographs you see in your day are mediocre at best. You will scroll past them rapidly and hardly notice most of them. Other people will do this with your photos on their social media feeds too.

Seeking inspiration from social media is not effective in the long run if you desire to make truly outstanding photographs.

Woman and elephant - 7 Steps to Find Inspiration so You Can Create Phenomenal Photographs

“Great things are not accomplished by those who yield to trends and fads and popular opinion.” – Jack Kerouac

1. Read. Read. Read.

Read a lot. Read books about photography by photographers. Read stories of how photographers became successful. People’s stories will teach you many varied ideas you will not read in how-to books or find on Youtube tutorials.

One of my favorite photography books is called, On Being a Photographer by David Hurn and Bill Jay. These authors were longtime friends and both accomplished photographers and teachers. I am inspired by their conversations in this book every time I pick it up.

Chinese temple near Warorot Market in Chiang Mai - 7 Steps to Find Inspiration so You Can Create Phenomenal Photographs

Find a few photography blogs to follow. Search for photographers whose work you admire and can relate to who are writing their own blogs. Read everything they write.

Keep reading the diversity of articles here at dPS. When you find a topic or author you appreciate, search back through their archives and read more. Find the author’s website and social media feeds and follow them.

There are not so many photography magazines published nowadays. Read them if you can find some you like. Pick up old copies if you see them in second-hand stores. They often contain well written, carefully edited articles and follow styles and themes. I still have photography magazines that are 20 years old in which I can still find inspiration.

flower on a moss covered wall - 7 Steps to Find Inspiration so You Can Create Phenomenal Photographs

2. Seek Out the Masters

Learn from the best. Keep watch for when photography exhibitions are held in your area. Make a point of seeing major photograph exhibitions, even if you have to travel some distance. Take a photographer friend and make a day of it. Having someone else who’s interested will mean you have lots of good conversation about the photos you see.

Buy books. Check books out from your local library. Books of photographer’s life work or long-term projects. Big picture books you can browse through and learn from. Look for what you like, images and styles you want to emulate.

Finding some photography heroes will help keep you looking upwards. Learning how the masters have succeeded will encourage you to new heights in your own photography. I have been incredibly inspired by the work of Irving Penn and many others.

Long neck Kayan mother and daughter -  7 Steps to Find Inspiration so You Can Create Phenomenal Photographs

3. Do Something New

Commit to learning a new technique. Research on the technique and how it’s best used. Practice it every time you use your camera it. When you have mastered it, learn another.

Do the same for your equipment. If you buy a new flash, reflector, filter or another piece of gear, don’t let yourself buy anything else until you have mastered it.

It’s easy to become uninspired doing things by half. If you have a new piece of kit or have started learning a new technique and not become familiar with it, you will not be able to use it effortlessly. By committing to becoming proficient you will enjoy it more and be more creative than frustrated.

Night Photography In Chiang Mai, Thailand at the Iron Bridge -  7 Steps to Find Inspiration so You Can Create Phenomenal Photographs

4. Do a Photography Project or Two

Always have at least one on-going photography project you work on regularly. Set goals and make yourself challenges to keep producing better and better images for your project.

Incorporate the other six points in this article to help you stay inspired for your projects. Generating a body of work you will be able to look back over in time can be incredibly motivating. To see how your photography skills and ideas grow over a period of six months, a year, five years or more is a valuable source of inspiration.

Samlor Tricycle Taxis at Warorot Market, Chiang Mai, Thailand -  7 Steps to Find Inspiration so You Can Create Phenomenal Photographs

5. Find Photographer Friends

Solo indulgence in any form of creative expression can leave you in a vacuum unless you are completely confident and never lack inspiration. I don’t think I know anyone like that. Being a photographer, whether for a living or as a hobby, is often something people do on their own.

Having someone to bounce ideas around with can breed creativity like nothing else I know. It’s not always easy to find people to do this with. If you seek them you will find them. Creatively compatible people often gravitate towards one another. Be open to relating with other photographers.

Have coffee or a beer together:

  • Swap stories.
  • Share ideas.
  • Encourage one another.
  • Ask questions.
  • Help each other.
  • Collaborate on projects.

Two Akha women in a rice field -  7 Steps to Find Inspiration so You Can Create Phenomenal Photographs

6. Crave Constructive Criticism

Have the photos you are taking critiqued by someone you respect. Find someone that can give you positive input on technique, method, and style. It may take some courage at first but this will help keep you inspired.

Receiving uplifting feedback about what you are doing creatively is important to personal growth. Learning to critique your own work is a valuable exercise to provoke motivation. Taking a step back and having your photos critiqued, by someone else or by doing it yourself, will stimulate fresh photography ideas.

Buddhist monk lighting a candle during a night ceremony in Chiang Mai, Thailand -  7 Steps to Find Inspiration so You Can Create Phenomenal Photographs

7. Find a Mentor

Someone you can trust and has real experience as a photographer is about the best way to help you stay inspired. A good mentor will incorporate both #5 and #6 as a friend and a critic of your photos. They will do more than that though.

A capable mentor will help guide you through all the points in this article. You will gain so much from their seasoned years of having a camera in their hands and living and breathing photography.

Finding a mentor you can connect with and who you feel comfortable with is important. You need someone who listens to you rather than just shares what they have done.

Woman making Giant Soap Bubbles -  7 Steps to Find Inspiration so You Can Create Phenomenal Photographs

You can ask local photographers near where you live or seek out someone online who’s photos and opinions you respect and appreciate. Even if they do not offer a mentoring service, just ask. They can only say no.

You may have to pay a mentor for their service, especially if they offer some kind of structured learning program. If you are serious about photography this will likely be the best investment you can make. It will do far more for you than upgrading your camera or buying a new lens.

“Great things are not done by impulse, but a series of small things brought together.” – Vincent Van Gogh

The post 7 Steps to Find Inspiration so You Can Create Phenomenal Photographs appeared first on Digital Photography School.


Digital Photography School

 
Comments Off on 7 Steps to Find Inspiration so You Can Create Phenomenal Photographs

Posted in Photography


6 Essential Steps in any Post-Processing Workflow

26 May

We live in a digital age, a time when a post-processing workflow is an increasingly essential aspect of our photography. Cameras produce images with the expectation that they will be altered later, will be corrected, sharpened, tinted, etc.

What this means is that post-processing isn’t something that can be easily bypassed, especially if you shoot in RAW, which I recommend.

That isn’t to say that every photographer today has to love post-processing. Some photographers, I consider myself to be among them, greatly prefer working in the field to working on the computer. But while it’s possible to shorten one’s post-processing workflow, a minimum amount of editing is necessary to keep up with today’s artistic and technological standards.

macro photography abstract winter ice - Post-Processing Workflow

In this article, I will discuss that minimum and explain the six essential steps in any post-processing workflow. My examples are done in Lightroom, but this applies to all photographers, no matter what software you use.

Once you’ve gone through these steps, you may declare your images complete, and that’s okay. Or you may choose to work on them further, which is okay, too. The point here is only to suggest the six core elements that all post-processing workflows should includeafter that, the choice is yours.


1. Crop (and straighten)

The first thing that I do as soon as I have opened my images in Lightroom is to crop and straighten them.

While it’s best to compose properly in camera, sometimes you see a slightly better composition when your image comes up on the screen. However, it isn’t good to rely on this too heavily. Cropping heavily reduces image resolution while also magnifying image imperfections.

Furthermore, when hand-holding your camera, it’s easy to take a slightly crooked image. This isn’t a problem, as long as you remember to straighten it out later.

daisy abstract macro photography flower - Post-Processing Workflow

Notice the slight change from original (right) to cropped and straightened (left) – look at the stem.

daisy abstract macro photography flower - Post-Processing Workflow

This image required a slight amount of cropping and straightening in order to balance out the frame. This is especially important when images have clear lines, as this one does (i.e., the daisy stem).

A word of warning: especially if you are a wildlife or bird photographer, you will be tempted to use cropping to compensate for a distant subject. Resist this temptation and focus on your stalking skills instead. If you find yourself consistently cropping a significant amount, recognize that you should probably make some changes while you’re in the field (get closer or use a longer lens).

2. Check the White Balance

I shoot in RAW. Thus, when I’m in the field, I leave my camera’s White Balance on Auto. Because the RAW file format allows for you to change the image temperature without any image degradation, this is perfectly acceptable (though it does mean slightly more time behind the computer).

snowy intimate landscape photography - Post-Processing Workflow

The left (final) image is after some adjustment; the right is adjusted in the other (warmer) direction.

snowy intimate landscape photography - Post-Processing Workflow

A cooler (bluer) color temperature was necessary to recreate a snowy, cold feeling for this image.

Use the Temp and Tint sliders to adjust the White Balance.

Sometimes the goal is to reproduce the color temperature that you saw in the field. Other times, you might be trying to achieve an artistic look. Higher temperatures (high degrees K) make for a warmer image and counteract colder light, whereas lower temperatures (low K) make for a cooler image and balance out a warmer color cast.

macro photography flower abstract sunset - Post-Processing Workflow

The left image is what I ultimately decided on; the one on right is an exaggeratedly cool version of the same image.

macro photography flower abstract sunset - Post-Processing Workflow

Taken at sunset, this image required a higher color temperature to match what I saw at the moment of capture.

3. Check the exposure

After adjusting the White Balance, I generally turn to the exposure. This is an aspect of a post-processing workflow that is often forgotten. Yet you should scrutinize your image carefully before moving on. Is it too bright? Too dark? Just right?

This is where the histogram is your friend. It’s to your benefit to learn to read it. Look for blown out highlights or crushed blacks as peaks pressing up against either end of the graph, as well as gaps that indicate a lack of darker or lighter tones in your image.

The histogram can tell you a lot about your image. This one says the image it represents is slightly overexposed. There are no blacks (it’s not touching the left-side of the graph). An Exposure adjustment and the Black slider will solve this issue.

macro photography flower abstract - Post-Processing Workflow

This situation was unique: While the right image isn’t underexposed, I was interested in a slightly brighter one with more contrast. So I altered the exposure in Lightroom and ultimately chose the left image.

macro photography flower abstract - Post-Processing Workflow

A darker image can be corrected in post-processing (this is easier to do with RAW files).

While it is ideal to expose perfectly while in the field, post-processing allows for a bit of leeway here. For instance, you can use the general Exposure slider in Lightroom to correct small exposure mistakes. And if you want to take this further, you can also work with the more narrowly focused Highlights, Shadows, Whites and Blacks sliders.

4. Check the Vibrance and Saturation

Saturation allows you to increase the intensity of all colors in the image, and Vibrance allows you to increase the intensity of the less saturated colors only. In most photo-editing programs, these are easy to change.

macro photography flower yellow abstract - Post-Processing Workflow

Notice the slightly more intense yellows in the left (more saturated) image.

macro photography flower yellow abstract - Post-Processing Workflow

A bit of saturation gave this image more punch.

Saturation and Vibrance can provide a slight punch to your images when done subtly. These are also quite easy to overdo, so be careful. You don’t want to slam the viewer with so much saturation that they are forced to look away!

5. Check for noise

Next, be sure to check the noise levels in your image. This is especially important if you’re working with a long exposure or an image that was shot at a high ISO. Increasing the exposure in post-processing may also introduce unintended noise.

macro photography abstract yellow - Post-Processing Workflow

This image required a slight amount of noise reduction.

macro photography abstract yellow - Post-Processing Workflow

While the difference is subtle, a crop of the final image (with noise reduction applied in Lightroom) is on the left.

If you find unpleasant levels of noise, you can generally use noise reduction software to remove it. Removing noise does decrease the overall image sharpness (if removing luminance noise) and saturation (if removing color noise). So, once again, this is a correction that should be used minimally.

6. Check the sharpness

Finally, I like to end my basic post-processing workflow by considering the complement of noise – sharpness. If working with a program such as Lightroom, this often needs little adjustment. With a good lens and good camera technique, your images will be rendered sharp simply by the photo-conversion presets.

For example, I rarely alter Lightroom’s Amount: 25 Sharpening preset. If your image is slightly soft, you may want to work with overall sharpness. You might also consider a second round of carefully applied sharpening in order to enhance specific features like the faces of birds, the center of flowers, etc.

autumn intimate landscape photography - Post-Processing Workflow

It is imperative that an image like this have a pin sharp subject.

autumn intimate landscape photography - Post-Processing Workflow

A crop of the final image (left) with sharpening applied in Lightroom.

However, even once you’ve sharpened for your original image, the sharpening work isn’t over. Before you export for printing or web viewing, you will likely need to sharpen again. Otherwise, you’ll find that your new image is slightly soft.

Lightroom has a neat little way of completing this post-processing step. Upon exporting files, you have the option to choose a level of sharpening. I generally choose Low or Standard.

macro photography abstract flower yellow - Post-Processing Workflow

Conclusion

These tips should give you an idea of what a very minimalist post-processing workflow looks like. If you follow this guide closelyeven if you do nothing else to your imagesyou’ll find that your images reach a higher standard.

What is your post-processing workflow like? Please feel free to share in the comments area below.


dahlia macro photography flower

Flower Abstract Macro Photography

The post 6 Essential Steps in any Post-Processing Workflow appeared first on Digital Photography School.


Digital Photography School

 
Comments Off on 6 Essential Steps in any Post-Processing Workflow

Posted in Photography


How to Make Storytelling Landscape Photos – 4 Steps

07 Jan

When we think of storytelling images, we immediately think of people doing something in a documentary type of photograph. After all, people make the most interesting stories. But landscapes have stories too.

As a landscape photographer, you can create a collection of images that tell a story about a place without having people as the main focal point in the image.

Salton Sea, California by Anne McKinnell - How to Make Storytelling Landscape Photos

The following steps will help you pull the story out of the landscape and convey it to your viewers.

1. What is the story?

The first thing you need to do is to spend some time thinking about what exactly is the story. Often we go to a place and start making images based on compositional elements in the scene without thinking about what is important to the story first.

Salton Sea California by Anne McKinnell - How to Make Storytelling Landscape Photos - 4 Steps

When I go to a new place, I often do a scouting trip first just to have a general look around and get a feel for it. Then I do some research to find an interesting story. If the place is a park, why is it a park? Who made it a park? What is the history? What interesting things happen there now and in the past? Do any animals live there, and if so which ones?

Once you have some background, you can pick a story to wrap your photographs around.

Egret at Salton Sea, California by Anne McKinnell - How to Make Storytelling Landscape Photos - 4 Steps

2. The first photo shoot – using different focal lengths

Your first photo shoot will help you bring your plan together. Go back to the places that had the most photographic potential from your scouting trip and while there look for elements in the scene that relate to the story you have chosen.

I usually start out with a wide-angle image that takes in the whole scene. Often I don’t end up using this photo in the final collection, but it helps me in my process of making the collection. When you have your photo that takes in everything, think about what are the most interesting things in the scene. Try to pick at least three things and then get closer to each one of them in turn.

Gulls Flying over Pelicans by Anne McKinnell - How to Make Storytelling Landscape Photos - 4 Steps

White pelicans by Anne McKinnell - How to Make Storytelling Landscape Photos - 4 Steps

Example

For example, when I went to the Salton Sea in California (a stunningly beautiful location that was created as a result of a man-made disaster) one feature that is most interesting is a layer of dead fish. But how do you make a good photograph of dead fish?

I started by making an image that took in the whole scene. Then I changed lenses to use a mid-range focal length and then a long focal length from where I was standing. Then I started to get closer and closer to the dead fish looking for elements of design such as lines and shapes along the way.

Salton Sea Tilapia by Anne McKinnell - How to Make Storytelling Landscape Photos - 4 Steps

Dead Tilapia at Salton Sea, California by Anne McKinnell - How to Make Storytelling Landscape Photos - 4 Steps

When I found something interesting, again I tried to use different focal lengths to see how I could convey the feeling of the place in an image.

Make sure you photograph the details of the scene as well as the overall feeling. Finally, when you find a really interesting detail, get really close to it using your wide-angle lens so you have an image with an interesting detail in the foreground that also takes the whole scene into the frame.

3. The second shoot – using the best light

The next step is to pick out your favorite images from your first shoot and think about what kind of light could make them better. Is there a subject with a great shape that would make an interesting silhouette? Is it transparent and might glow with some backlight?

Would it create interesting shadows at a certain time of day? Would it look best with warm light during the golden hour? Does it need a dramatic sky?

Sunset at Corvina Beach, Salton Sea, California - How to Make Storytelling Landscape Photos - 4 Steps

Whatever it is, plan to revisit the location when you have the best chance of getting the conditions you need to make your ideal shot. You may need to go back a number of times, if possible before you get all the shots you want.

4. Putting it together

Whether you are putting the images into a collection display on your wall, using them in a blog post, displaying them on your website, selling them to a magazine (along with your story of course), or simply showing your friends. Having an interesting set of images that are storytelling will always create a larger impact than random photos of a place that are not connected.

Salton Sea Collage by Anne McKinnell

The post How to Make Storytelling Landscape Photos – 4 Steps by Anne McKinnell appeared first on Digital Photography School.


Digital Photography School

 
Comments Off on How to Make Storytelling Landscape Photos – 4 Steps

Posted in Photography


7 Steps to Improve Your Closeup Candid Street Photography

01 Oct

Many people want to improve their street photography or get involved with this genre for the first time. But the major aspect that holds them back is the issue of taking close candid pictures of people without their permission. While I promise that it gets much easier over time, it can very difficult to get over the hump early on.

7 Steps to Improve Your Closeup Candid Street Photography

However, there are some steps you can take that will help ease you into the world of street photography if you do it right. Here are a few important tips that I believe will make shooting candid street photography much easier for you.

1. What to do if you get caught

Before we talk about how to get closer to your subjects, the first step is knowing what to do if something happens. The toughest aspect of getting into street photography is the fact that you will feel very uncomfortable with the idea of someone catching you and asking what you are doing, at first. However, while those situations are usually rare, if you handle them the right way, they don’t have to be all that bad.

7 Steps to Improve Your Closeup Candid Street Photography

To help ease your fears, it is important to know what to say if anyone should stop you and ask you if you took their photo. Smile, own up to it and say that you are a photographer or photography student doing a photo project on the area and the people in it. Tell them you thought they looked great and wanted to add them to it. Just be honest and open about it. If they then seem uncomfortable, offer to delete the photograph. It can even help to carry a business card with your photography information and to offer to email them the photograph after. The more direct and pleasant you are, the more disarming it will be.

To further keep yourself out of trouble, pick and choose the people you photograph carefully. It can help to stay away from photographing anyone who looks like they are in a bad mood, anyone with some sort of mental disability, or anyone who is homeless.

2. Light camera and prime lens

Street photography can certainly be done well with an SLR and a zoom lens. I shot for a long time with that setup. However, using a smaller camera such as a mirrorless, micro 4/3rds, or a Leica will make you much less noticeable. In addition, it will be lighter, which will make you faster and can only help with street photography. The difference is night and day.

By using a prime lens you will get used to the fixed focal length which will make you much more spontaneous. You will be able to intuitively know what your camera can capture before you even bring it up to your eye. That, and your camera will be smaller since zoom lenses are usually very large. With a light camera and lens, you will eventually notice yourself capturing images so quickly that your subject barely even notices you. This is the type of thing that is much tougher to do with an SLR and big zoom lens.

3. Picking a spot / getting in the middle

7 Steps to Improve Your Closeup Candid Street Photography

The next tip, which is often the most important, is to go where the action is and get right in the middle. It will be important for you to eventually photograph in all types of situations, from less busy to very crowded, but particularly when you are learning, go where a lot of action is happening. Go to fairs, get out at busy times, shoot from busy corners. The more that is happening, the more invisible you will be, and the less you will be noticed by other people. This will help a lot with your comfort level.

By picking a spot and letting your subjects come to you, you change up the dynamic of the situation. Instead of you entering their personal space, they will be entering yours. You will seem less creepy and intrusive because you will already be there with a camera. It will look like you belong.

In addition, when a moment occurs, you will already be the right position. You will be able to spend more of your energy watching your surroundings for a good moment to occur. This, of course, doesn’t mean that you shouldn’t photograph while you are walking and exploring, just that you should carve out some time to linger in a specific spot.

4. Acting

7 Steps to Improve Your Closeup Candid Street Photography

There are some photographers who will run up to people and get right in their face. If that’s your thing, more power to you, but many photographers prefer to be less conspicuous about it. We want to capture an interesting moment, we love to people watch, but we want to try to make the situation as comfortable as possible for both parties, and we want to be inconspicuous enough to not ruin the moment.

This is where a little acting can come into play. The most important thing is to act like you don’t notice the person you want to photograph that much. Look at things behind them, and to the side. They just happen to be in your way. Play the role of tourist, looking around. The more you do this, the more you will be able to get away with taking the photo unnoticed.

5. The camera snap and the way you move your camera

7 Steps to Improve Your Closeup Candid Street Photography

Similar to the last point, the way you move your camera can play a big part in keeping the situation candid. There is one thing that most photographers do, called the camera snap, where they take the camera away from their eye instinctively right after they take an image. Of course, there will be shots that you take so quickly that people won’t notice. But for other moments when the people notice you, this will often give away the fact that you were taking their photograph. Instead, take the picture and keep the camera up to your eye. Then move the camera away like you were taking a picture next to them and slowly remove the camera from your eye.

Similarly, you do not always have to point your camera directly at people right away to capture the image. Instead, point the camera above or to the side of your subject as if you were taking an image of something behind them. Then at the last second, move the camera over them, take the image, and move on.

6. Hold the camera up high

7 Steps to Improve Your Closeup Candid Street Photography

Whenever possible, try to keep your camera in your hands and at attention when you are photographing. If you allow it to hang off your neck, then when an amazing moment occurs you will have to locate and grab the camera before putting it to your eye. This is the least conspicuous way to capture an image.

Instead, try to keep the camera up high as much as you can. Then, when you take an image you will stand out less. It will feel much less conspicuous.

7. Zone focusing

7 Steps to Improve Your Closeup Candid Street Photography

Zone focusing is the technique of turning your camera to manual focus mode, pre-focusing it to a distance of about 8-10 feet, and then capturing your subject once they are in the range of sharpness for your camera. This is easier to do with a wide-angle lens with a medium to small aperture such as f/8 to f/16 so that there is more area of your image in focus. Keep in mind that this is a skill that can be improved – there are many photographers who can zone focus well even at f/2.

You can read more about zone focusing here, and while it is a little difficult to learn at first, you will quickly get much better at it. The main benefit of this type of focusing is so that you no longer have to lock the autofocus in on your subject. This allows you to be a little more spontaneous with your shooting, and it will give you an added split second to take the photograph. That, in turn, will allow you to better capture those very fast moving moments.

Most importantly, it will allow you to be a little more candid than you can be using autofocus. Since you won’t have to point the camera directly at your subject to lock in the focus nor will you have to look through the viewfinder to make sure you are focusing correctly, you can be much more inconspicuous. This will allow you to shoot from the hip and still know that your shots will be sharp.

Conclusion

I hope these tips help you do better candid street photography, and with more confidence.

So get out there, get close, and capture some amazing and spontaneous photographs!

The post 7 Steps to Improve Your Closeup Candid Street Photography by James Maher appeared first on Digital Photography School.


Digital Photography School

 
Comments Off on 7 Steps to Improve Your Closeup Candid Street Photography

Posted in Photography


A Few Steps Higher: 14 Unusually Artistic Modern Staircase Designs

11 Sep

[ By SA Rogers in Design & Fixtures & Interiors. ]

Stairs are inherently utilitarian, but some architects choose to really step up their interiors with highly sculptural designs that make you want to walk up and down a bunch of times. Cantilevered creations, floating stairs, spirals made of stone and zig-zagging graphic designs add both literal and figurative movement to these apartments, museums, offices and shops.

Stone and Wire in London by Groupwork + Amin Taha

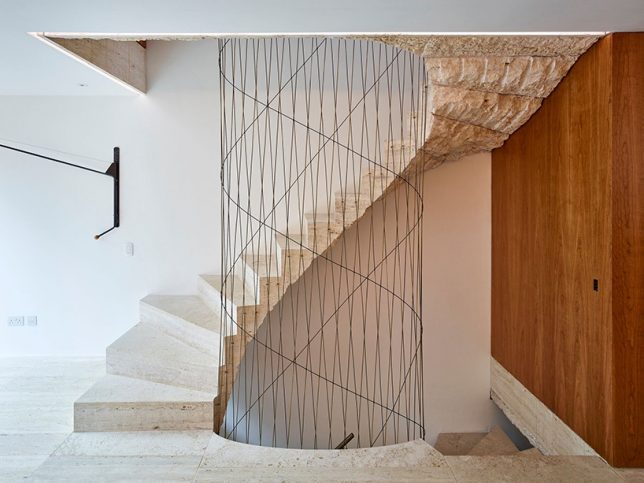
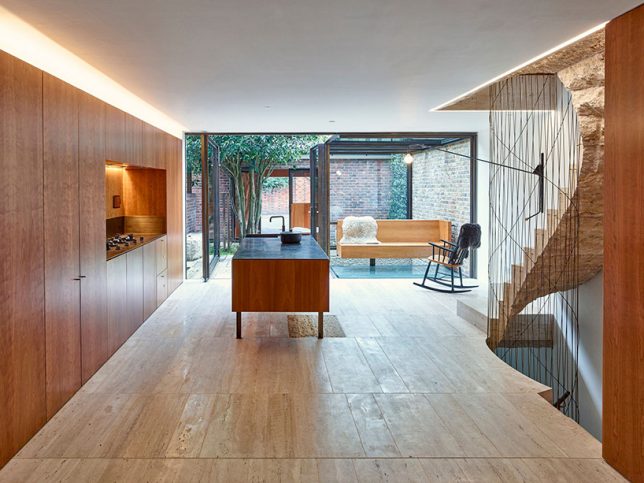
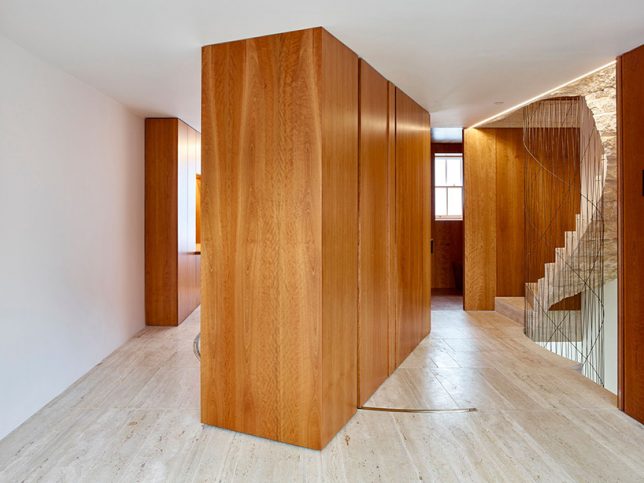
During the completion of a renovation on a terraced house in central London dating to the 1950s, Groupwork + Amin Taha created a gorgeous centerpiece with this stone staircase, spiraling around a central cylinder-shaped wire cage, which acts as a balustrade. The load-bearing cantilevered travertine staircase extends from the basement to a skylight in the apartment’s roof.

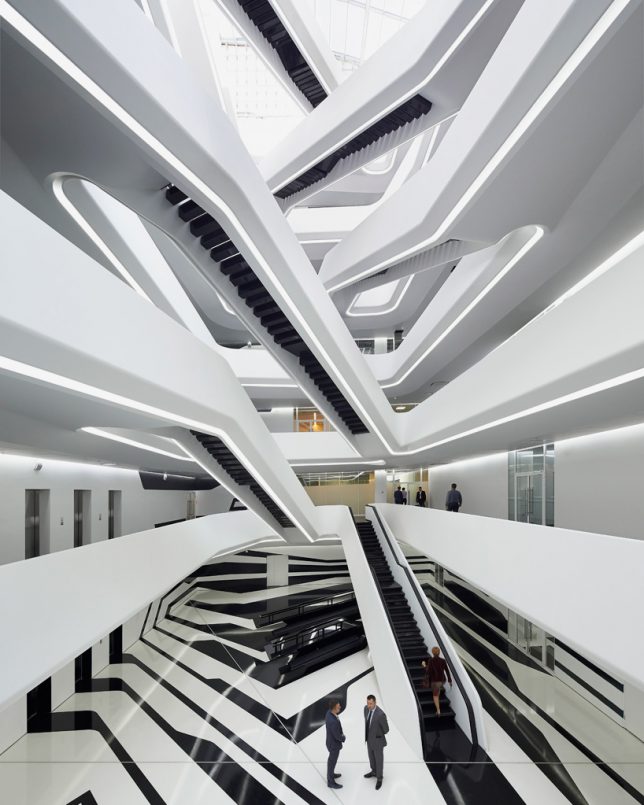
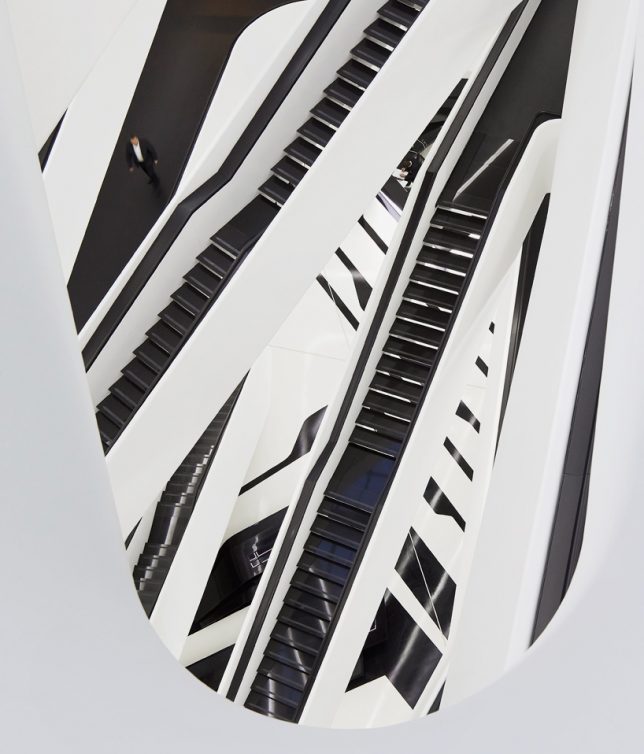
Atrium Stairs at Moscow’s Dominion Office Building by Zaha Hadid

There’s something very futuristic-looking about the stark, graphic black-and-white stairs zig-zagging through the atrium of Zaha Hadid’s ‘Dominion Office Building.’ Each level is slightly offset from the next, producing a disorienting effect when looking down at the stairs from the edge of any of the balconies.

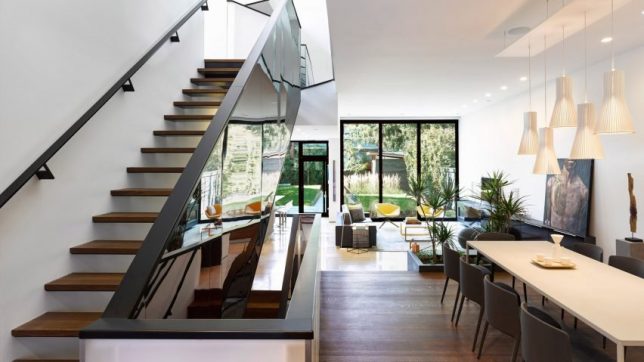
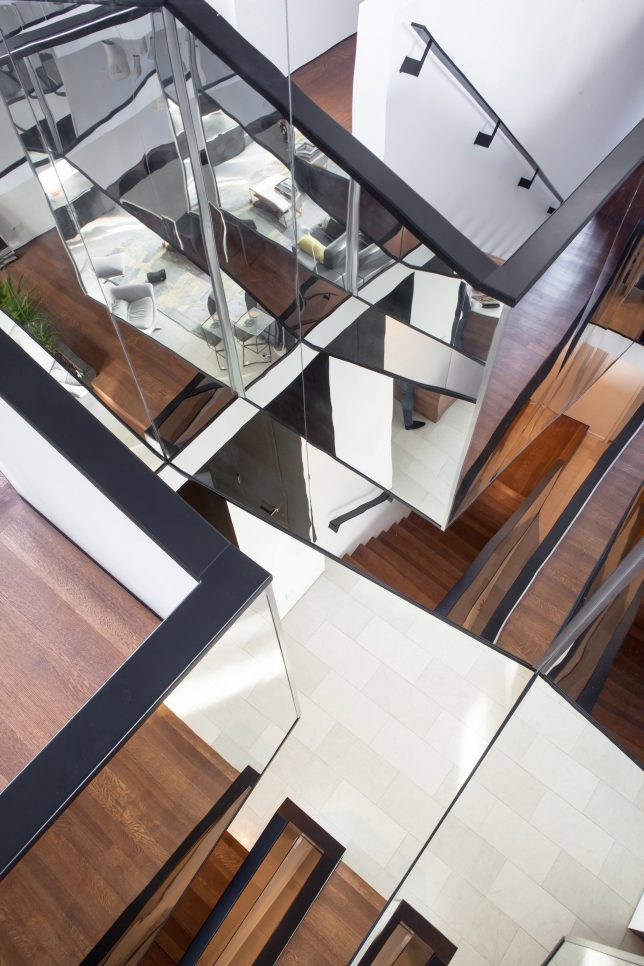
Mirrored Staircase at Kaleidoscope House by Paul Raff Studio

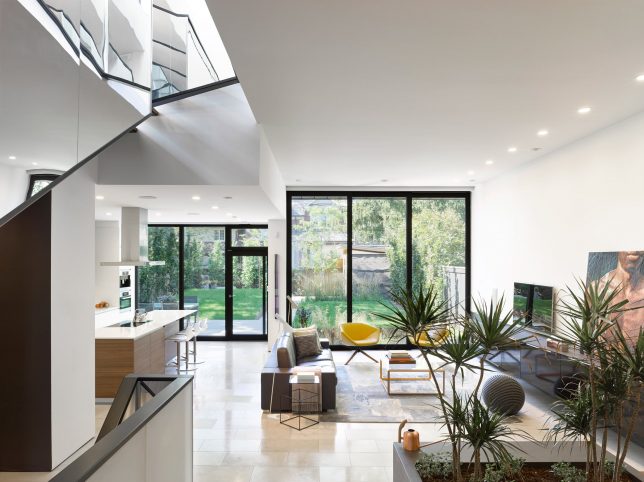
Sometimes, all it takes is a little creativity to produce a stunning effect, rather than a large space and expensive materials. The staircase ascending through Paul Raff Studio’s Kaleidoscope House features mirrored side panels on the balustrade which continue onto the landings of each level, reflecting each other so you can’t quite tell what’s real and what’s reflection. This piece is the heart of the home’s ‘kaleidoscope effect.’

Plywood Puzzle Stairs in London House by Tsuruta Architects

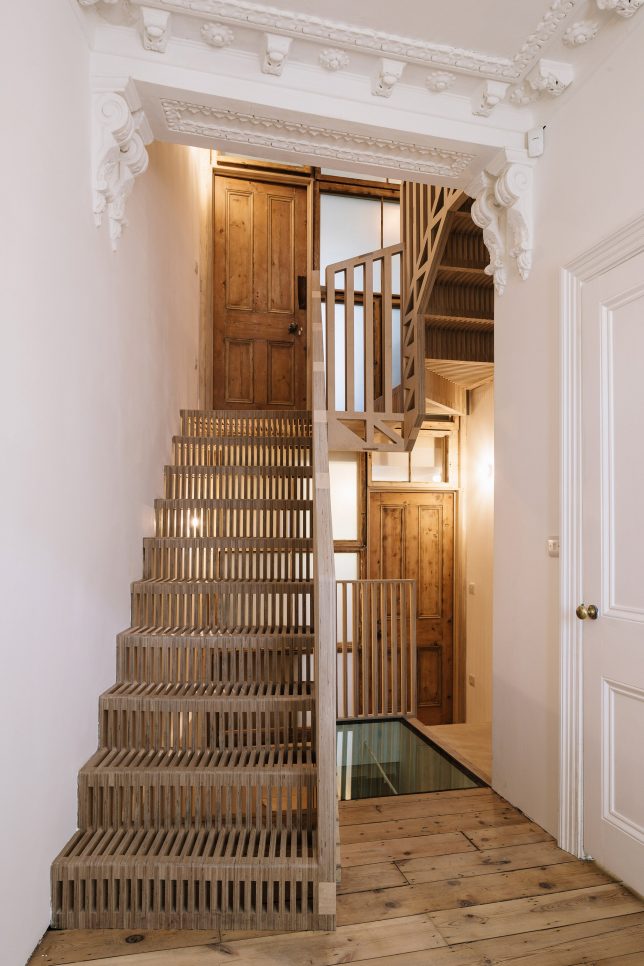
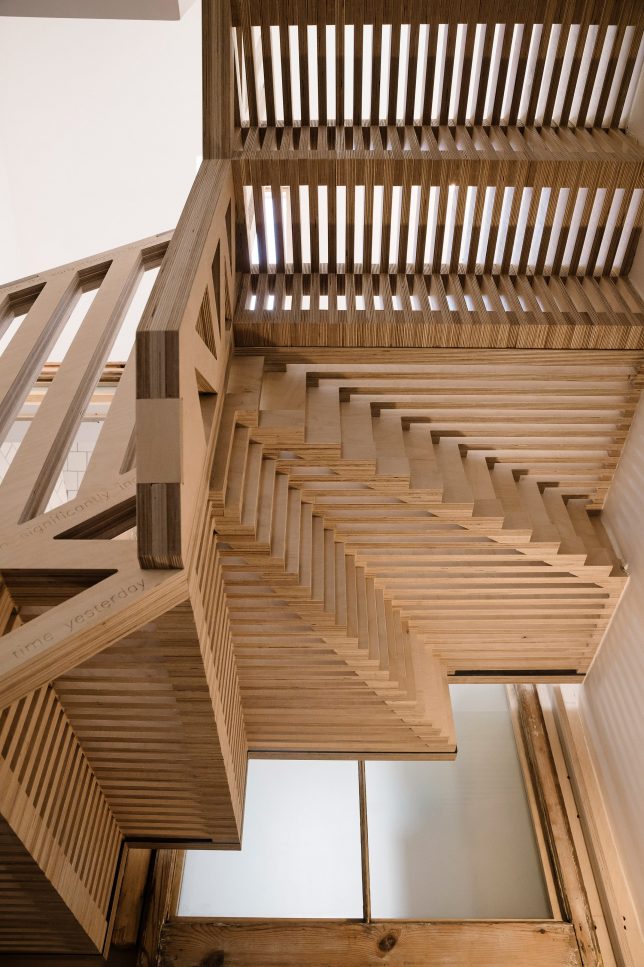
This staircase in a London Home renovated by Tsuruta Architects consists of nearly 2,000 plywood pieces slotted together like a puzzle. Replacing a larger staircase with a more compact design, this new creation connects all four stories without visually obstructing the transitional spaces between them, allowing light to filter through.

Smooth Staircase at Singapore Apple Store by Foster + Partners

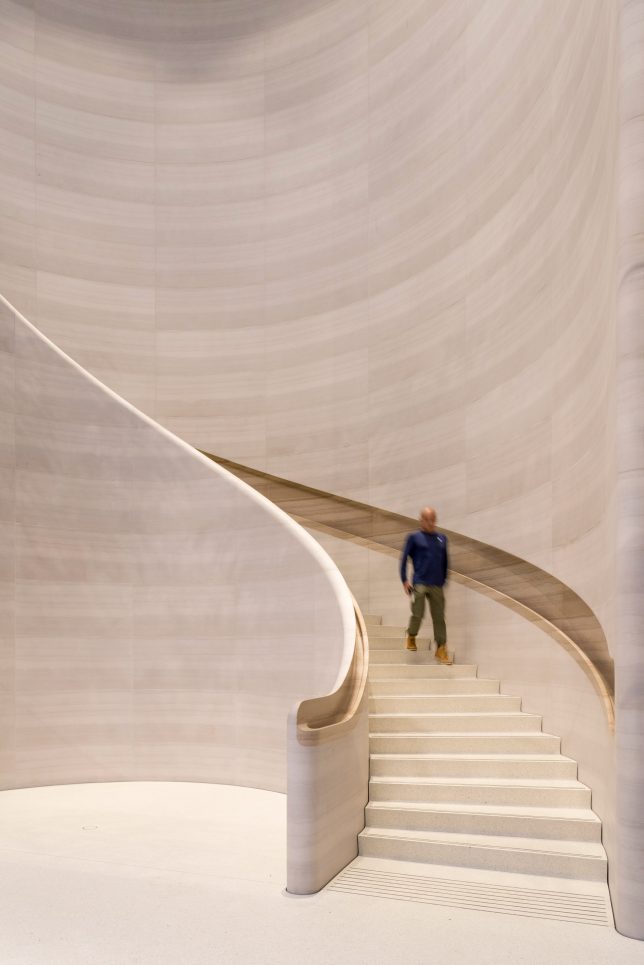
It’s not unusual for Apple stores in larger cities to function as showcases for architecture nearly as much as they do for electronics. In this case, internationally renowned firm Foster + Partners augmented “the greenest Apple space yet” with two hand-carved spiraling staircases made of Italian Castagna Stone. The architects describe them as “warm and beautifully sculpted bookends” in an “homage to craftsmanship and materiality.”

Next Page – Click Below to Read More:
A Few Steps Higher 14 Unusually Artistic Modern Staircase Designs

Share on Facebook


[ By SA Rogers in Design & Fixtures & Interiors. ]

[ WebUrbanist | Archives | Galleries | Privacy | TOS ]


WebUrbanist

 
Comments Off on A Few Steps Higher: 14 Unusually Artistic Modern Staircase Designs

Posted in Creativity