RSS
 

Posts Tagged ‘step’

Call of Nature: Waterfront Step Organ in Croatia Turn Waves into Tunes

20 Jul

[ By WebUrbanist in Art & Installation & Sound. ]

oceanfront wave organ

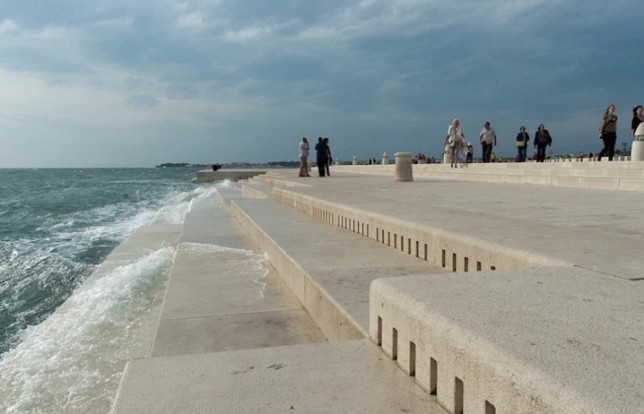
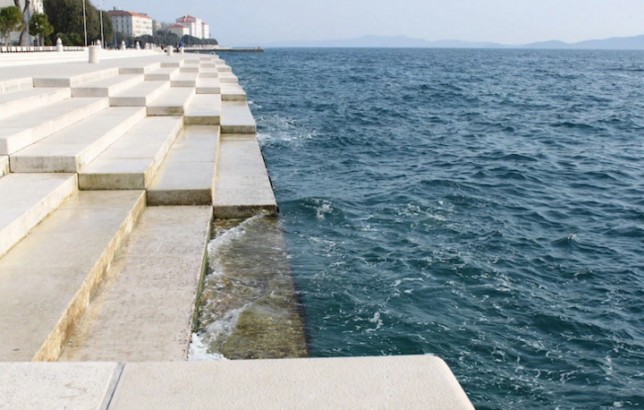
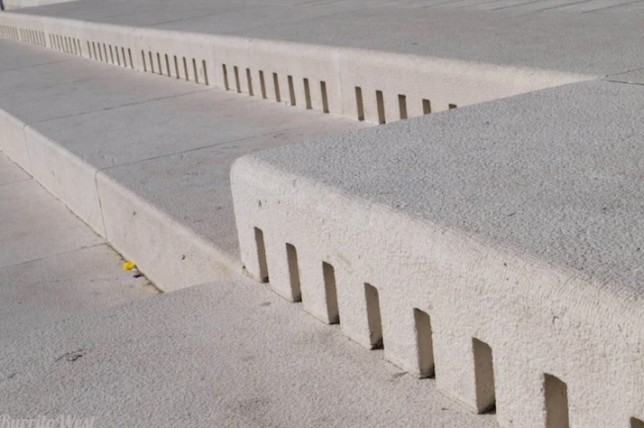
This 230-foot-long musical instrument contains 35 organ pipes and is powered by the Adriatic Sea, producing sounds for visitors that seem eerily composed rather than random.

Whistle holes cut into the stone steps are ‘powered’ by air pushed in by waves of water, creating chords that are strikingly harmonious in nature. The sounds are constantly shifting, but you can listen to a clip above (a .wav file of the waves, if you will).

seafront playable instrument music

The Sea Organ, or the Morske Orgulje, is part of plan to revive Zadar, a city over 3,000 years old that was nearly obliterated in the Second World War. Architect Nikola Baši? wanted to give the place something with character, differentiated from the stark and boring concrete buildings that were created during initial years of rebuilding.

sea organ white steps

The design was inspired by the Hydraulis, an ancient Greek instrument that used water to push air through tuned pipes, but also borrows from the Wave Organ in San Francisco, a likewise seaside device amplifying the sounds of the Pacific Ocean. (images by linssimato, Lisa and J We).

Share on Facebook


[ By WebUrbanist in Art & Installation & Sound. ]

[ WebUrbanist | Archives | Galleries | Privacy | TOS ]


WebUrbanist

 
Comments Off on Call of Nature: Waterfront Step Organ in Croatia Turn Waves into Tunes

Posted in Creativity


A Step by Step Guide to Processing Portraits in Lightroom

03 May

Book covers 2 Every time we ask our readers what post production software they use to edit there portrait photography the most common answer is Lightroom. It’s no surprise either – it’s a powerful tool for editing and organising your photos.

However we know when we talk to our readers about Lightroom that while we all know it’s got amazing power that it can sometimes be overwhelming too. Many of you report knowing you don’t use Lightroom to it’s full potential and wish you had a guide to editing your portraits using the tool.

Today we’re excited to announce our new online course, “Lightroom Mastery: People & Portraits“.

If you’ve ever wanted to discover the secrets professionals use to perfect portraits in Adobe Lightroom, then this course is for you.

And for a limited time, you can access over 4 hours of Lightroom training… that’s 32 step-by-step video modules for a massive 50% off the regular price.

This brand new online course from professional photographer Mike Newton will teach you all the Lightroom secrets the pro’s use to retouch portraits and turn average shots into stunning creations.

Mike is a commercial photographer and has worked with clients ranging from Fortune 500 companies like Bayer and Metlife, technology companies like Uber, and clothing brands like Deckers Outdoor Corporation.

Checkout his intro video below to see what you’ll be learning.

No matter what level of Lightroom user you are, you will walk away from this course with huge improvements in the quality of your portrait edits and the speed of your workflow.

The best part is, Mike makes it super easy to understand.

In this course you’ll learn how to use the very best of Lightroom for photos of people including:

  • The adjustment brush
  • Radial filter
  • Cloning and healing brushes
  • Mike’s very own Lightroom editing workflow for editing portraits
  • Eyes and lip editing techniques
  • Teeth whitening tips
  • Skin editing techniques including blemish removal

Save 50% on this brand new Lightroom Mastery for Portraits Course for a limited time.

PS: as with all dPS products this course comes with a 30 day satisfaction guarantee. If for any reason you don’t find it suits your needs please contact our support team and we’ll arrange a refund.

The post A Step by Step Guide to Processing Portraits in Lightroom by Darren Rowse appeared first on Digital Photography School.


Digital Photography School

 
Comments Off on A Step by Step Guide to Processing Portraits in Lightroom

Posted in Photography


Complete Step By Step Wedding Photography Workflow

01 Apr

You may have spent months planning a wedding with your client. After countless emails, meetings, and the actual wedding day itself; it’s time for the lengthiest part of your work to begin, the post-processing. Your wedding photography workflow is the part of the job that clients never see (and most never think about) after the event is over. Post-processing for digital photography starts from the moment you return to your home or office up until the clients receive their final images.

Wedding photography workflow

Every photographer has their own speed and style to post-processing and most will have their own aesthetic or editing programs they prefer to use. However, after owning a busy wedding photography studio for the past five years, I have created an efficient workflow that works well, while giving images a personal aesthetic. In this article you’ll find what to do after the wedding day is over, to delivering the final product to your clients using an efficient workflow.

Complete Step By Step Wedding Photography Workflow

Step 1: Back Up

You may have been shooting for eight or more hours, but when you get home, don’t crawl in that sweet, comfy bed just yet – your night isn’t over. It’s imperative that you back your client’s images up in several places as soon as possible. Not only did your client pay a lot of money for your time and expertise, but for the safety of their images as well. Until their images are backed up safely in several locations, no naps allowed! Don’t learn the hard way, back those things up.

Part one – download

On your computer, create a folder with the client’s name, and a sub-folder called “RAWS” (assuming you shoot in RAW, which you should. More on that later). You will need to copy the images from all of your memory cards into the new “RAWS” folder on your computer.

Note: RAW files are huge, s,o you will probably need to upgrade the amount of storage space on your computer, and get some more RAM while you’re at it to run your computer programs efficiently. If you’re using a Mac, make sure your computer is scheduled to back up using Time Machine as well.

Step1 BackingUp

Part two – make a copy

After all the files are on your computer, back them up again to a client folder on an external hard drive. When not in use, the external hard drive should be kept securely in a place like a fireproof safe. Some photographers back up on more than one external hard drive.

Part three – backup online

Lastly, when you don’t think you can stay awake another second, you need to start your RAW file back up to an online or cloud location. I use Zenfolio for my RAW storage, although there are other storage sites available. The good news? You can go to sleep while the files upload overnight (and maybe the next few days if you have a slower internet connection).

Step1 BackingUp1

Step 2: Importing and Culling

The most exciting part of your job – not!

I’m going to be honest here, culling, or going through every image you took of a wedding, rating them, and deciding which to keep and which to trash, is the most tedious, eye-bleeding part of your job. This is why it’s not a good idea to “spray and pray” throughout a wedding day with your cameras. The more selective you are with the photos you take, the faster your post-wedding workflow will be. Alternatively, there are companies you can use to cull your images for you if that is within your budget.

In Lightroom, create a new Lightroom catalog for your client in their client folder: File>New Catalog. Then import your RAW files from the client folder you created while in the Library module.

Step1 5 Importing

Once all the images are imported, make sure all cameras are set to the correct time, and do a “sort by capture time” so everything from the wedding day on all cameras is in chronological order.

Culling

Next, start to cull your photos by lens. I have found this is the quickest way to make a decision on which images to keep. You can do this in the Library Module, going to Metadata (or hitting the / key), and selecting the lens you want to cull (see below). Rate your images on what to keep (hit P for picks or keepers) and what to toss (hit X for rejects). Repeat your rating process with each lens, and after they are finished filter by “all lenses” in the Library module to see the images all together. From there, do a second (or third) round of culling in the Library module until you have your final number.

Step2 Culling

For the step above, you’ll need to choose a rating system that works well for you. My rating system is 1 stars are rejects, 2 stars are keepers, and 3 stars are keepers that need Photoshop retouching. I often find that if I took a series of photos at once (like I do for the family formals to ensure no eye blinks) the last ones in the set are usually the best, so I will look at those images first for my 2-star keepers.

For more on rating and flags in Lightroom read: How to Organize Your Photos in Lightroom OR Organizing Images in Lightroom.

Step 3: Basic Edits

This is where the magic happens!

You have your final number of culled images, and can now begin your basic Lightroom edits. This is where your cropping, straightening, and adjustments for exposure, contrast, shadow, highlights, etc., come into play. This part is very personal to each photographer and this is where your style begins to emerge. This is also why shooting in RAW is so important, as you will have greater flexibility in editing as compared to a JPG. Many photographers may stop after this step, and that’s A-Okay if you’re happy with your result! However, if you want to push your images further – there are a few more steps involved.

Quick tip! If you have a series of photos in the same lighting situation taken with the same camera, edit the first photo in the set, select the rest of the photos that match, then hit the “Sync” button to apply your edit to all of the photos in that set at once.

Step3 Basicedits

Step 4: Polishing

Making your images sparkle using Alien Skin or Presets.

Many photographers may polish their images (a.k.a. color tone) with a chosen preset after the basic edits are done. You can buy Lightroom presets from a plethora of sources online or create your own. I found the Alien Skin program years ago and fell in love. For me, Alien Skin gives me the pop, sharpness, and great skin tones that I absolutely adore. It also has beautiful lens flares and light leaks that I use for enhancing natural sunlight. If you choose to try Alien Skin, see the steps below, otherwise skip to Step 5.

  1. Choose your favorite images (or all of them) to put through Alien Skin by selecting them in Lightroom, right-clicking and choosing “Edit in Alien Skin” (once the program is installed, this will be an option).
    Step4 Polishing
  2. You can create your own presets in Alien Skin for a faster workflow and a likely favorite will emerge. Select your most used preset and apply to all. Then deselect all.
  3. Go through each photo individually, and make sure that’s the Alien Skin preset you want to use and see what tweaks are needed for each image.
    Step4 3 Polishing
  4. When you’re finished, click save and your images will automatically import back into Lightroom (as copies) with the filters applied. Hit the 1 key, to discard the originals that you’re not going to use. (Occasionally, I end up liking my Lightroom edit better than my Alien Skin edit, so it’s nice to compare them side-by-side).

Step4 5 Polishing

Step 5: Photoshop – Retouching Your Images

Now that your images have all your basic edits and color toning, select the images that need to be retouched with Photoshop by filtering for the 3-star rated images. Retouching can include editing out acne, stray hairs, doing head swaps or editing out any distracting objects in the image. On a Mac, you can hit command+E (Window is Control+E) in Lightroom to open your image in Photoshop. After retouching is complete, you can select CMD/CTRL+S (or File>Save) to return your retouched image to Lightroom.

Step5 Retouching

Step5 5 Retouching

Step 6: Black and White Images

This is the quickest part of my post-production and one my favorites, as well, because I love black and white images so much. Many wedding photographers provide a mix of color and black and white photos, with the color versions of each black and white as well. This where Alien Skin comes into play again. Not only are the black and white filters so dreamy, but they automatically make a copy for you, making your job really easy.

  1. In Lightroom, select the images you want to be in black and white by using CMD/CTRL+click to individually select them.
  2. Right-click and select “Edit in Alien Skin”. From there, all the selected images are uploaded to Alien Skin.
  3. It’s easiest if you already have a black and white preset that you love saved, and apply that to all images, then deselect all. Go through each image individually using the color sliders (especially the reds and yellows) to edit and ensure each black and white image is perfect.
  4. Save all black and white images back to Lightroom where the edited color version and the edited black and white version will be side by side.

Step6 BlackandWhite

Step6 5 BlackandWhite

Black and white images can also be made in Lightroom by creating a virtual copy, Photo>Create Virtual Copy (or CMD/CTRL+’). Then select “Black and White’ in your Basic Edits box, and adjust the color sliders until they’re perfect.

Step 7: Exporting. The Home Stretch!

Hooray! All of your images have been backed-up, culled, edited, polished, retouched, and you have your black and white copies. Now you just need to export the final versions to your client’s folder on your computer (I create a folder called “Edited:).

Step7 Exporting

Select all of your completed images in Lightroom, go to File>Export. Choose your file location, file name (I have mine set to custom name and sequence), file settings (Mine is set to jpeg, sRGB, quality 100), and then select export when you are finished.

Step 8: Importing to an Online Client Gallery

Once all of your high-resolution JPGs are exported to the Edited client folder on your computer, you can then upload to the online gallery of your choice. Some online galleries allow you to upload your high-res JPGs directly from Lightroom using a plug-in, letting you skip a step in the process. I use Pixieset for my galleries, as I like the modern look, ease of use, and their customer service.

Step8 Uploading

Step 9: At Long Last…

After you upload your images to an online gallery, copy your final edits to your external hard drive in their client folder. Once your edited files are safely online and on an external hard drive, you can delete the RAW files from your computer, because they take up a lot of space and you already have them safely backed up online and to an external hard drive (or two). If you ever want to use that Lightroom catalog again, it’s easy to sync the RAW files on your external hard drive with the Lightroom catalog that’s stored on your computer. I like to leave the edited JPGs on my computer for easy access.

Conclusion

This entire workflow process time will vary for every photographer. For me, I need 4-5 full days of nearly uninterrupted work. As you know, photographers are humans too. With life and other weddings/shoots in between – delivery time can take weeks or months after the event, depending on how busy your season is, how many photos you have, and how much retouching is required. You may need to mail prints, albums, USB drives, etc., as well, so keep that in mind for your total post-production time.

With a lot of practice and knowing your style, you’ll see your post-processing time get shorter and shorter. If you’re lucky enough to find a post-processing company that fits your style and budget, you’ll have extra time in life for the things you love, like photography. Until then, get to work!

The post Complete Step By Step Wedding Photography Workflow by Misti Marquette appeared first on Digital Photography School.


Digital Photography School

 
Comments Off on Complete Step By Step Wedding Photography Workflow

Posted in Photography


10 Step Guide to Improving Your Photography Without Buying New Gear

17 Mar

Will buying that new camera or lens or travel to iconic places automatically result in beautiful images?

Landscape photographers often dream about the latest gear or traveling to far away places to capture great images. For example, places like Iceland, Patagonia, Lofoten Norway, or Tuscany. The problem is that we spend too much time in front of our computers seeing all those great images on social media platforms and dreaming about photographing those vistas ourselves.

10 Step Mini-Guide - How to Improve Your Photography Without Buying New Gear - leading lines

We believe that going to iconic places or buying the latest gear will automatically make us better photographers, or that this is the only way of capturing great imagery. As with any craft, you need to practice, practice, and then do some more practice. This way you’ll have the greatest possibility of taking that fantastic photo, either close to home, or once you finally go away on that travel adventure of your dreams.

Here are my 10 tips for how to improve your photography without buying new gear:

1) Learn the basics about your camera and photography

Start by reading your camera’s user manual. Yes, it’s very basic and should be obvious to everyone, but you would be surprised how often people buy a new camera and start using it right away, thinking that the camera is going to do all the work. Many camera stores also offer beginner courses. Ask your local camera store about this option before deciding to buy from them.

Learn about topics like leading lines, the rule of thirds, exposure compensation, and the relation between aperture, shutter speed, and ISO. I will not go into this in more detail as it would merit a whole book, but these topics are available in printed books, e-books and here on dPS.

Read more here:

  • How to Use Leading Lines Effectively in Landscape Photography
  • 5 Simple Techniques for Leading the Viewer’s Eye in Your Images
  • How to Use Exposure Compensation to Take Control of Your Exposure
  • Mastering the Exposure Triangle for Newbies
  • Understand Exposure in Under 10 Minutes
10 Step Mini-Guide - How to Improve Your Photography Without Buying New Gear - leading lines

Using leading lines.

10 Step Mini-Guide - How to Improve Your Photography Without Buying New Gear - rule of thirds

Using the rule of thirds.

2) Do your photography under the right conditions

A word photography literally means drawing with light (from the Greek photós meaning “light”, and graphê meaning “drawing, writing”). I would say that at least 80 % of your most successful images will be taken during the sunrise or sunset when the quality of light is the best. The other 20 % will be taken during cloudy days when the light is much softer than days with direct sunlight.

Many photographers don’t consider this second aspect enough. When starting out, I would often photograph during sunny days with clear blue skies with hard light that produced too much contrast. Today I try to do as much photography when there’s a shift in the weather pattern from high to low pressure or vice versa. The reason is that during this period there’s often a build up of dramatic clouds and the weather shifts between rain and sun creating more drama in your photos.

I suggest that you regularly check the weather forecasts and try to plan your photography for these days.

10 Step Mini-Guide - How to Improve Your Photography Without Buying New Gear

10 Step Mini-Guide - How to Improve Your Photography Without Buying New Gear

10 Step Mini-Guide - How to Improve Your Photography Without Buying New Gear

10 Step Mini-Guide - How to Improve Your Photography Without Buying New Gear

3) Scout for new locations and return multiple times to the same place

The majority of my best photos are from places very close to home. Most of the time they were not taken on my first attempt, but rather I had to come back many times to the same location before the conditions were right.

Google Earth is a great tool for your initial location scouting as are social media platforms like 500px, Instagram, or Google+. Remember that you should use these sites for inspiration, and not try to copy the same images that have already been taken numerous times before.

4) Change your vantage point

Have you ever considered the vantage point of your photos? The majority of photographers always take photos from the exact same position as they are standing – at eye level. This creates boring photos that all look the same. It’s also the same vantage point from which your viewers see the world.

By crouching down low or shooting from a higher position, like a hill or even from the top of a rock, it will drastically improve your photos. The visual appearance of your photo can dramatically change by just placing your camera a couple of meters in another direction. You should “work the scene” by looking for different viewpoints and not be satisfied with your first choice.

10 Step Mini-Guide - How to Improve Your Photography Without Buying New Gear - low viewpoint

Taken from a low vantage or view point.

10 Step Mini-Guide - How to Improve Your Photography Without Buying New Gear

Shot from a low view point.

10 Step Mini-Guide - How to Improve Your Photography Without Buying New Gear

Taken from a high vantage point.

5) Use your lenses creatively

Use your wide-angle lens for creating depth in your image and your telephoto lens to compress the landscape. Both techniques are very effective and create totally different effects. By trying to pre-visualize how your want your photo to look, your choice of lens will be much easier. This takes time and comes more naturally as you gain greater experience.

For landscape photography, you often want to maximize your depth of field by taking photos between f8 and f/16. You could go higher than that but then you risk having softer images as most lenses have a “soft spot” between these parameters.

You could also try to zoom or move your lens during the exposure. This technique is more a trial and error basis and often you need to take many photos before you’re satisfied. Luckily all your frames in digital photography are free.

10 Step Mini-Guide - How to Improve Your Photography Without Buying New Gear

Use of a wide-angle lens.

10 Step Mini-Guide - How to Improve Your Photography Without Buying New Gear

Use of a longer or telephoto lens.

10 Step Mini-Guide - How to Improve Your Photography Without Buying New Gear

Created by intentionally moving the camera or lens during the exposure.

6) Use the elements in your surroundings to your benefit

Is there is a rock, a tree, strong colors, some leading lines, etc., that you can use to create interest in your image and lead the viewer’s eyes throughout your image?

Because we are fed daily with thousands of images, it becomes important to immediately catch the viewer’s attention and make sure that their mind is stimulated. Therefore, the image should have a clear object, this could be a person or a landmark, which the viewer can quickly identify.

If the photo is too busy with too many conflicting elements, the viewer will become confused and move on to the next image. Less is often better than more. Consider excluding elements that do not add to the image. It could be annoying things like tree branches entering the photo from the corner, paper bags and other waste in the photo, etc.

10 Step Mini-Guide - How to Improve Your Photography Without Buying New Gear

10 Step Mini-Guide - How to Improve Your Photography Without Buying New Gear

10 Step Mini-Guide - How to Improve Your Photography Without Buying New Gear

10 Step Mini-Guide - How to Improve Your Photography Without Buying New Gear

10 Step Mini-Guide - How to Improve Your Photography Without Buying New Gear

7) Invest in good quality accessories instead of buying the latest camera or lenses

There are some camera accessories that are more important than the latest camera or lens.

The single most important one is a good quality tripod. You should not waste your money buying a cheap aluminum tripod that will shake every time you put your camera on it, resulting in useless blurry images. In the end, you’ll be forced to buy a more expensive tripod anyway, adding unnecessary extra costs. Instead, spend the extra money on a quality tripod from Manfrotto, Gitzo, 3 Legged Thing, or any of the other top brands. Trust me, in the end, you will end up saving money.

Another very important accessory for us landscape photographers are filters. You definitely need a good polarizing filter to reduce the reflections on water and other shiny surfaces. Polarizing filters work the same way as your sunglasses.

https://www.digitalphotomentor.com/?s=challenge

Cameras are also limited in their ability to handle dynamic range. In short, this means the ability to register the darkest and lightest tones and everything in between. An example of this cis when you’re photographing a landscape and the foreground looks good, but the sky is too bright. This is where the graduated filters come into play. They have a dark and light part with a soft or hard transition in between. Generally, you should use a hard transition filter when photographing seascapes, as there is a clear definition between the sky and the water. A soft transition filter is preferred when photographing landscapes where there are trees, hills or mountains.

I’ve tested many different brands and would highly recommend LEE filters, They are expensive, but in my opinion are worth every penny. Lee also produces two neutral density filters called Little Stopper and Big Stopper. These filters enable you to slow down your shutter speed. When you see those photos with silky smooth water or clouds, most likely the photographer used such a filter.

https://www.digitalphotomentor.com/?s=challenge

https://www.digitalphotomentor.com/?s=challenge

https://www.digitalphotomentor.com/?s=challenge

While these accessories will cost you some money, they will be more of a one-time expense. Taking good care of them means you can use your accessories for many years to come.

8) Photograph in RAW format and learn to use a photo editing program

When photographing in JPG mode you let the camera do all the processing of the image. This means you have less control over the final outcome. It’s better to photograph in RAW format and then use a software like Adobe lightroom to post-process them yourself.

For me, the main reason for shooting in RAW is to have a greater dynamic range so that I’m able to save many images that are otherwise too light or too dark. Of course, it’s important to get the exposure correct from the start, but RAW files definitely give you some room for errors. There is a lot of information about RAW format and post-processing, read;  RAW Versus JPG – Why You Might Want to Shoot in RAW Format and How to Use Adobe Camera Raw and Photoshop to Make Your Landscape Images Pop.

9) Learn to focus manually

This is crucial for landscape photography. As mentioned above, you’ll hopefully be taking most of your photos in low light during the morning or evening. You will also be using a tripod to avoid camera shake.

10 Step Mini-Guide - How to Improve Your Photography Without Buying New Gear

During long exposure photography, it becomes very important to focus manually in order to avoid having the focus move during your exposure as is the risk when using autofocus. You should use a small aperture like f/11 and focus about a third of the way into the scene if you desire to have sharpness throughout the frame. Make sure you use your camera’s Live View mode or focus peaking if you own a mirrorless camera, for manual focus assistance.

10) Think before you shoot and study your photos afterward

Often I see photographers arrive at their location, take out their gear, and do the “machine gun “photography approach, taking dozens of photos from the same location over and over again. It’s important to work the scene, moving around looking for the best viewpoints.

The same applies when you’re done editing your photos at home. Try to study your photos and look for improvements. Compare your work with other established photographers to see how you can do things differently next time. This takes time, but after a while, you’ll certainly notice better quality in your work.

Conclusion

These 10 points are just the very basics to get you started. Make sure you search dPS for more information, study photography books, and feel free to leave a comment below or ask any question you might have. Good luck!

The post 10 Step Guide to Improving Your Photography Without Buying New Gear by Jacek Oleksinski appeared first on Digital Photography School.


Digital Photography School

 
Comments Off on 10 Step Guide to Improving Your Photography Without Buying New Gear

Posted in Photography


Teamlab Jungle: Step Inside a Massive Musical Instrument Made of Light

17 Feb

[ By SA Rogers in Art & Installation & Sound. ]

teamlab jungle light vortex

Anyone who visits ‘Music Festival, TeamLab Jungle’ this summer will get to immerse themselves in a space made of light, interacting with moving beams to help produce collaborative crowd-sourced music. ‘Light Chords’ is one of three ‘4D’ light-based installations the Japanese interdisciplinary group has planned for the event, all of which represent a unique intersection of art, design, technology and nature.

teamlab jungle light chords

teamlab jungle

‘Light Chords’ aims to create the sensation of being inside a massive musical instrument, touching the ‘strings’ to produce a sound and hearing it reverberate all around you. The beams of light rise into the sky when touched and then settle back down to be activated again.

teamlab jungle day

teamlab jungle light vortex 3

The second 4D space, Light Vortex, places visitors at the center of a surreal light show that bends and stretches around the space, while ‘Light Cave’ builds complex light-based architecture over attendees’ heads.

teamlab jungle vortex

teamlab jungle light vortex 4

Known for their use of illumination as an artistic medium and for a focus on interactivity, TeamLab brings their ‘Music Festival’ to various cities and spaces each year, with different experiences to be had by day and by night. Before dark, TeamLab Jungle is designed as a music festival for families, while after dark it becomes more like a dance party with BACARDÍ-sponsored bars.

Share on Facebook


[ By SA Rogers in Art & Installation & Sound. ]

[ WebUrbanist | Archives | Galleries | Privacy | TOS ]


WebUrbanist

 
Comments Off on Teamlab Jungle: Step Inside a Massive Musical Instrument Made of Light

Posted in Creativity


How to Make a Low Key Portrait Step by Step

22 Jan

What does low key mean?

In a world where the crisp, clean, high key shot dominates, it’s great to see a return to the low key portrait. In comparison to the high key image, where most of the tones are above (lighter than) 50% grey, the low key portrait has tones that are mostly under (darker than) 50%.

You’re replacing the light, airy feel with a more moody, dramatic look. Looking at your histogram, most of the information is bunched on the left-hand side. That’s not to say that you’re underexposing the subject to get this look. You still need correct exposure on the face. A lot of action movies or thrillers have posters with a low key feel. Think drama and you’re in the ballpark for how a low key portrait will look.

Low key portrait examples 01

The background and lighting

Your background needs to be dark, usually dark grey or black, and the tone of the clothing will be of a darker tone. They don’t need to be black strictly speaking.

You should set your lighting to create drama. Take your cues from film noir. The photos don’t need to be in black and white, though. However, you may find that the absence of color in low key images can lend itself to this look. As well as choosing dark clothes, avoid ones with patterns, as this will draw attention away from the face.

Low key portrait examples 02

Lighting a low key portrait

You don’t need to use artificial lighting to get a low key portrait. You could use natural light through a window. To get control, you need to close the curtains down to a tiny slit of light. Then, with the room lights off, place your subject in the light and expose for their face.

The rest of the room will go dark for a naturally lit low key portrait. If you’re in a corner room with a window on each side, you could even do this trick where the second window acts as a backlight. Just narrow the slit in the curtains to control the light for this effect (see below).

Low key portrait examples 03

You can also have this control in the studio, so let’s set up and refine a studio portrait.

You’ll need a lighting setup that is flattering and controllable. A strip softbox lets you control the light more, as would a beauty dish. If you don’t have either, you can add some material over the softbox you do have to create a strip light. If you have a grid, even better. As long as you can control where the light goes, you’ll be able to get this down. You can even block your light from the background using a black card (things that block light are referred to as flags).

Creating a low key portrait from scratch

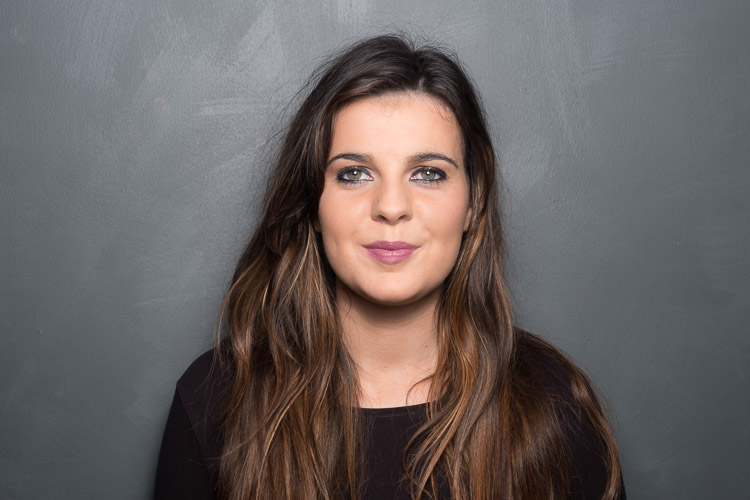
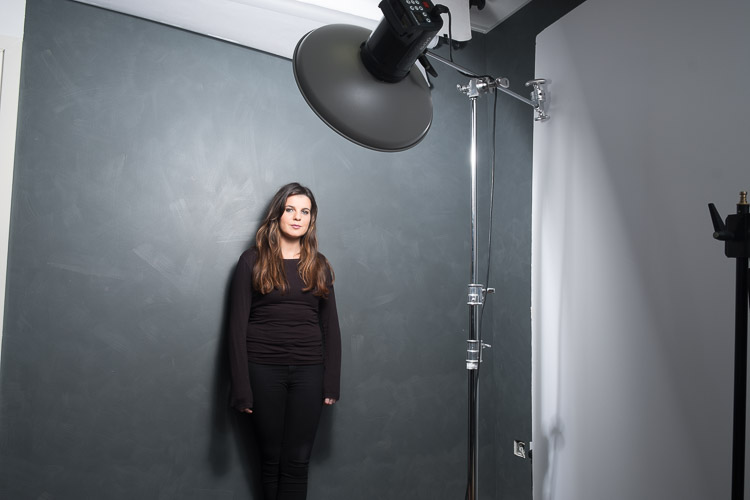
For the examples here, I used an Elinchrom BRX500 with a 44cm White Beauty Dish and a white deflector. Like I’ve mentioned, you don’t need to have exactly this gear to get these shots. Gear is only small part of the equation, it’s using the gear that counts.

Making the background darker

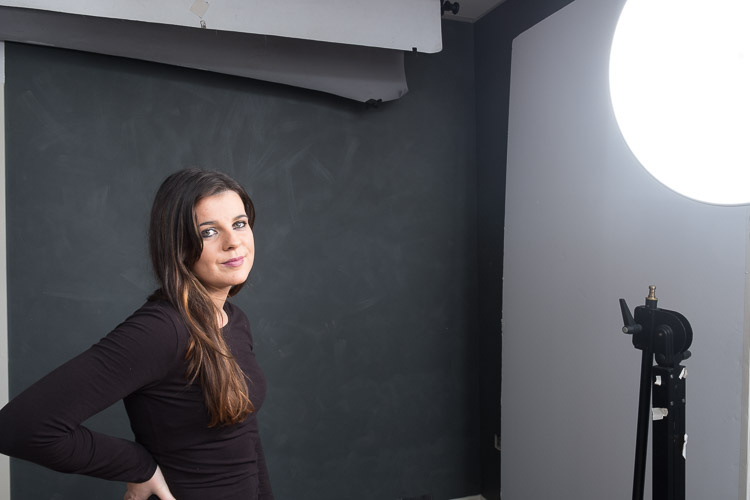
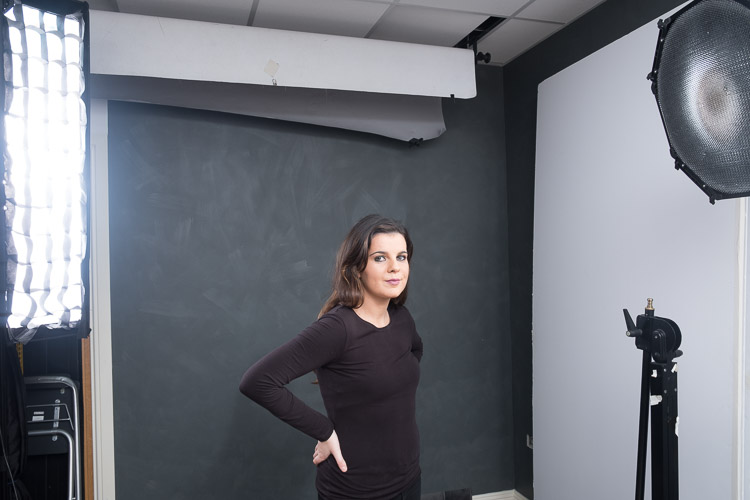
In this first shot, you’ll see the model against the wall, photographed with a butterfly lighting pattern. Even though the tones are dark, the image itself is too bright for a low key portrait.

Low key portrait example 02

Close to the grey wall.

The Setup

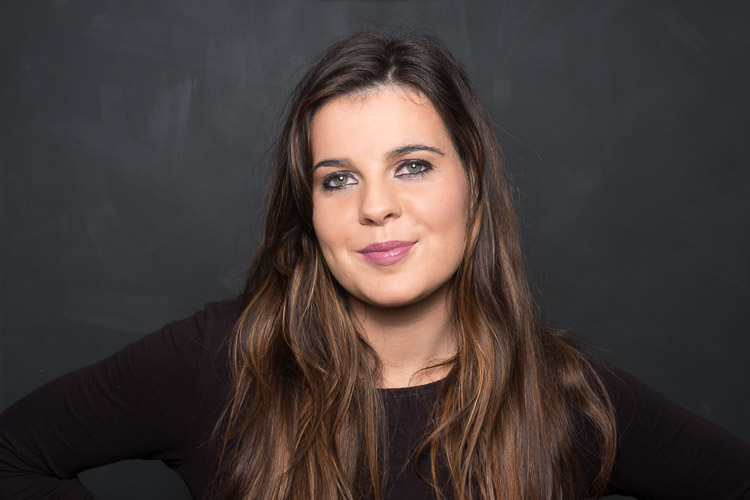
By moving the model and the light evenly away from the wall, you’ll notice the light on the subject stays the same, but the background gets darker.

Low key portrait example 03

Moving the model away from the wall means the light falls off and the background gets darker.

Move the light to the side

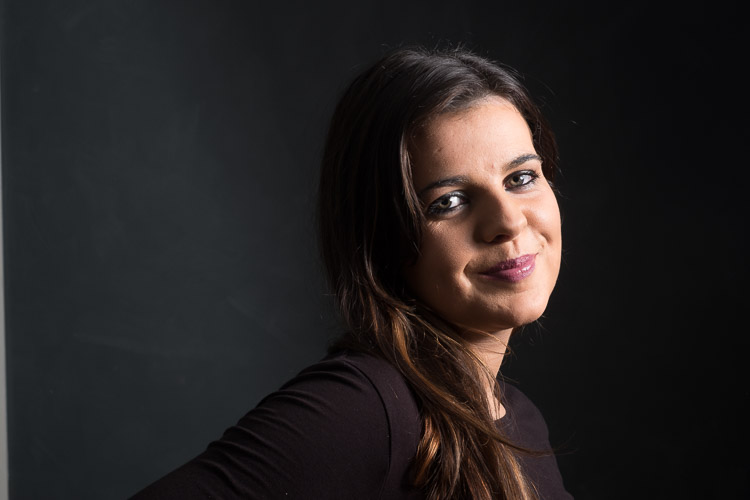
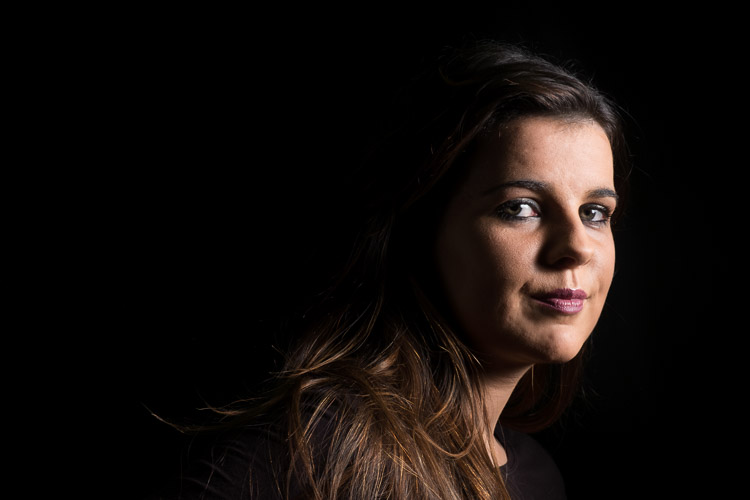
If you move the light around to the side, into a short lighting position, you’ll see the background darkens even more, and there is an increase in the drama of the shot. We still have light spilling on to our background, though.

Low key portrait example 05

Moving the light to the side means even less light falls on the background, darkening it even more.

Low key portrait example 04

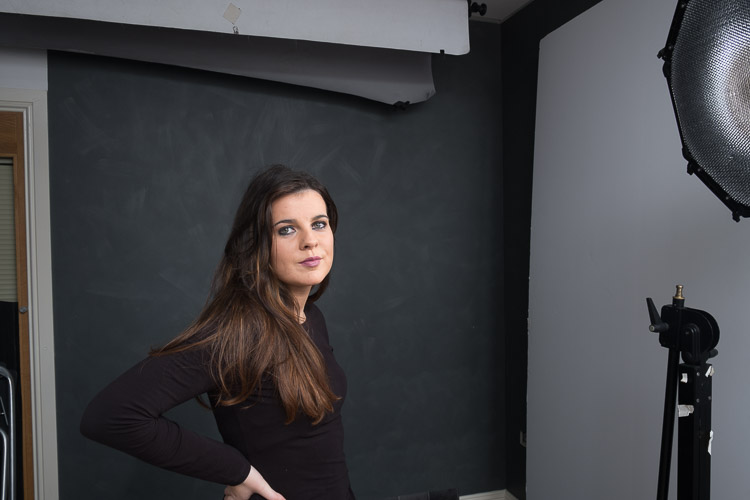
Add a grid to the light

By adding a grid to the light, you can control the light even more. The grid restricts the light to whatever is in front of the light only, none bounces around or spills out the sides.

Low key portrait example 07

With a grid added to the light.

Low key portrait example 06

Light with grid added.

Add light onto the hair

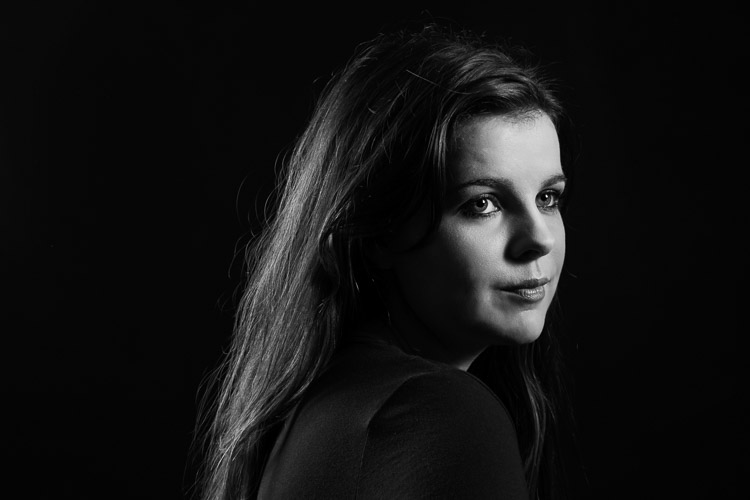
You’ll see that the hair is starting to blend in with the background now. This can be a great effect sometimes, but if you want separation between the hair and the background, you need to add fill light in there somehow.

You could choose a reflector, but a second light offers more control. I’ve added a strip light on the other side of the subject opposite the main light. Make sure that light doesn’t hit your lens or you will get flare. Use a grid or a flag to block it if necessary.

Low key portrait example 09

Second light added for her hair.

Low key portrait example 08

Light position with main light (with a grid) and hair light (also with a grid) opposite and behind the subject.

Practice it!

These examples should get you going towards making your own low key portrait. The trick is to control the light so you darken the environment. Try the curtain trick if you don’t have any lights. You can even use that trick with an off-camera speed light by putting the flash outside the window to replace the natural light for more control.

Have you done any low key portraits? Have any questions? Please share in the comments below.

googletag.cmd.push(function() {
tablet_slots.push( googletag.defineSlot( “/1005424/_dPSv4_tab-all-article-bottom_(300×250)”, [300, 250], “pb-ad-78623” ).addService( googletag.pubads() ) ); } );

googletag.cmd.push(function() {
mobile_slots.push( googletag.defineSlot( “/1005424/_dPSv4_mob-all-article-bottom_(300×250)”, [300, 250], “pb-ad-78158” ).addService( googletag.pubads() ) ); } );

The post How to Make a Low Key Portrait Step by Step by Sean McCormack appeared first on Digital Photography School.


Digital Photography School

 
Comments Off on How to Make a Low Key Portrait Step by Step

Posted in Photography


Step by Step Plan for Backing Up Your Images While Traveling

11 Nov

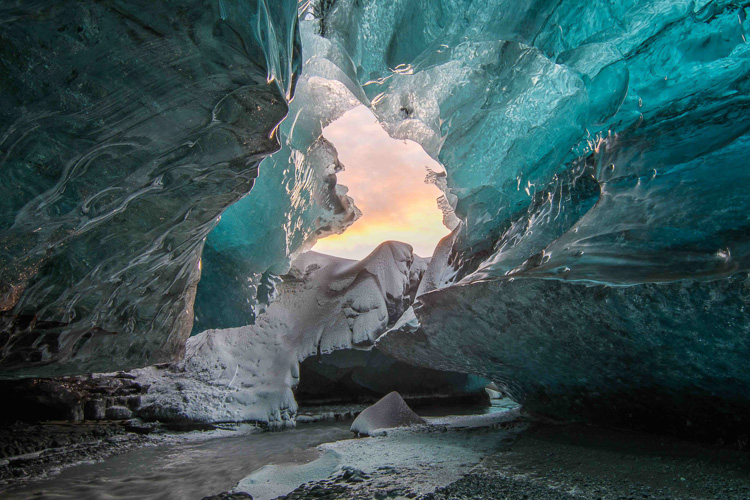
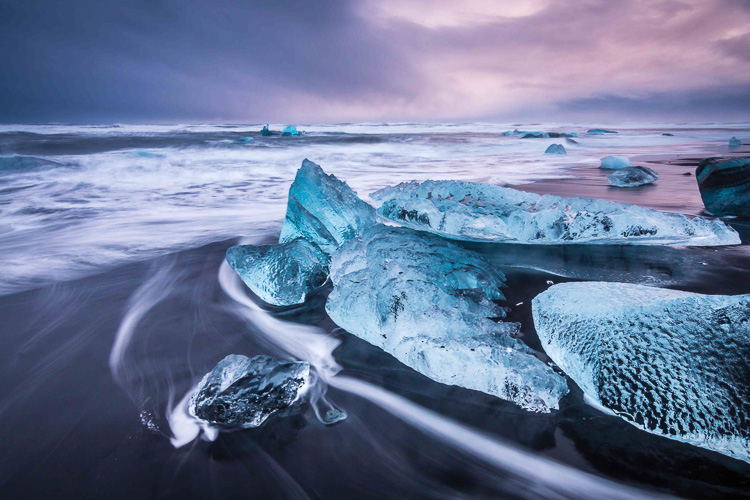
Planning how to back up your images while you travel isn’t nearly as exciting as planning your itinerary or buying gear for your upcoming trip. But it’s an important step in the travel planning process. Especially if you’re going someplace rugged and amazing like Iceland in the dead of winter, having a plan for uploading and backing up your images while you travel will help you ensure that all of your images are securely stored in multiple locations. After all, if you finally get a chance to photograph ice caves and the aurora borealis, you don’t want to worry about getting those hard-won images safely home with you.
Backing up images traveling 01

Following is a step-by-step plan for backing up your images starting with preparing to travel, guidelines for backing up during your trip, and how to complete the process once you return home.

Part I. Before you leave on your trip

Step #1 – Examine, reformat and test all of your memory cards

Before you leave on your trip, make sure that you have plenty of memory cards. I budget approximately two 32gb cards per day. You may need more or fewer, depending on your style of shooting.

First, examine all of your memory cards for damage. If any are visibly bent, warped or deeply scratched, it might be time to retire them.

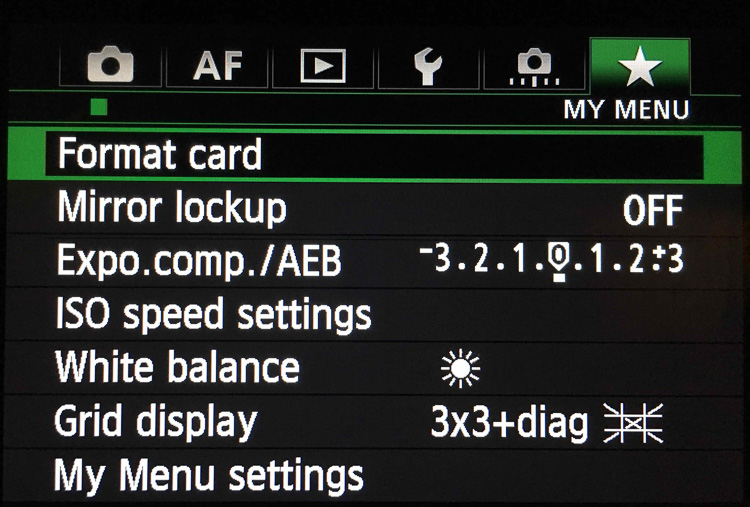
Next, reformat all your memory cards in your camera. Take and save several images on each memory card and then upload the images, one card at a time. This test verifies that each memory card is still in good working order. If a memory card does not pass the upload test, retire it.
Backing up images traveling 02

Step #2 – Buy smaller memory cards to reduce risk

If you need to buy additional memory cards, evaluate using smaller cards like 32gb and 64gb. You have to change memory cards more often while you’re shooting but if one memory card goes bad, you’ll have endangered far fewer images than if a huge 256gb or 512gb memory card corrupts.

Use stickers to indicate if memory cards are full or empty.

Create a system to keep full memory cards separate from empty memory cards. An easy method is to buy a memory card case or folder with clear pockets. Put blue sticker dots on one side of your memory cards. Put red sticker dots on the other side of your memory cards.

Blue sticker dots mean used or full cards. You can remember this mnemonically since blue, used and full all contain the letter U in them. Red sticker dots mean empty cards. You can this remember this mnemonically since red and empty all contain the letter E in them.
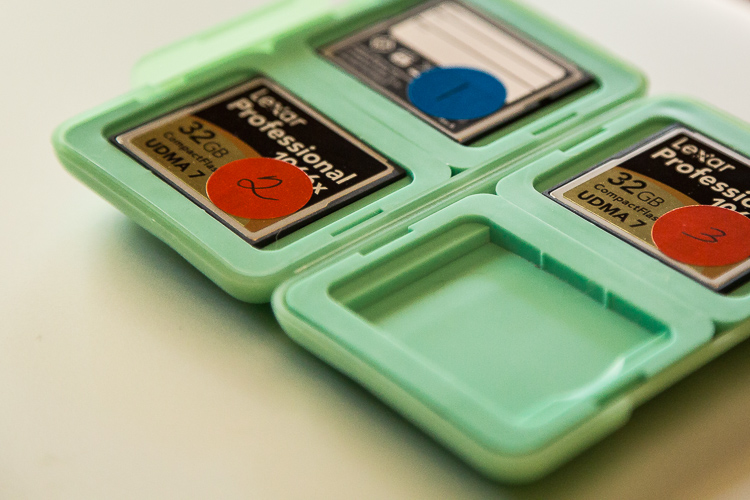
Memory cards case stickers Image C

Step #3 – Number your memory cards sequentially

Before placing the stickers on the cards, I also like to number the sticker dots one through however many cards I have. I file the memory cards numerically in the case. On day number one of my trip, I’m using cards numbered one and two. On day number two of my trip, I’m using cards three and four. By numbering the cards, I ensure I rotate them which further reduces the chance of corruption since no one card is used excessively. Then if I do lose a card, it’s also easier to keep track of which card from which day has gone missing if the memory cards are numbered sequentially.

Lastly, if a card does corrupt, it’s easy to keep track of which one because it’s numbered. I usually pull it out of my case and stow it separately in a secure pocket elsewhere in my bag. If memory card number four goes bad on a trip, I want to ensure I don’t accidentally reformat it or save more images to it before I’ve tried to recover the images.

After you test, number, and sticker all of your memory cards, place them in the case with the red sticker dot facing up. While you’re traveling, place full (used) memory cards back into the case sequentially with the blue dots facing up. If you’ve budgeted the amount of cards you need for your trip correctly, on the last day of your trip, all of the memory cards in your case should have blue dots facing up.

SD or CF cards or both?

If your camera has two memory card slots, evaluate carefully whether or not you want your main memory card to back up to the second card while you’re shooting. My Canon 5D Mark III has two memory card slots. One is a CF card slot and the other is for an SD card. I typically only use the CF card slot because they write faster than SD cards. Since I photograph horses and wildlife and set my camera to high-speed burst mode, I want my images to write to my memory card as fast as possible. Since my camera defaults to the write speed of the slowest card, I leave the SD card slot empty.

While this method works for me, your camera might function differently than mine. You may also have different priorities than I do when you shoot. Landscape photographers, for example, don’t use high-speed burst mode very often. Neither do macro photographers. If you specialize in landscape or macro photography, automatically creating a backup in camera by writing your RAW images to two memory cards simultaneously might be a good failsafe for you.

Step #4 – Buy two identical portable hard drives for travel
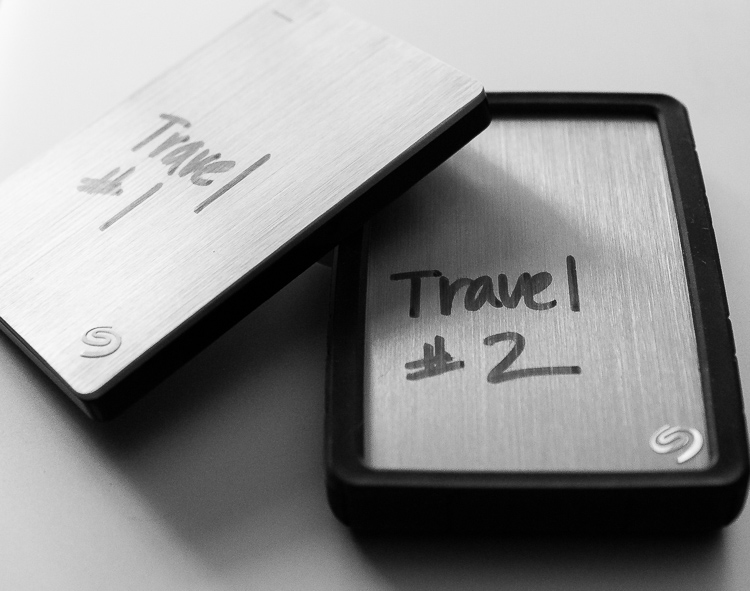
Travel Hard Drives Image D

I recommend uploading your travel images to two identical, high-quality, portable hard drives. I use 1TB drives. One terabyte is typically enough for my style of shooting since I rarely travel for more than 10 days at a time. Digital storage is inexpensive these days. So evaluate the best size portable hard drive for you by reviewing your image files from past trips. Buying more storage than you think you need is more effective in the long run. So if you think you need 500gb drives, buy 1TB. If you think you need 1TB, buy 2TB.

Step #5 – Protect your new hard drives

Now that you have two new hard drives to keep your images safe, you need to physically protect them. Use rubber bumpers or cases to protect the drives in case they fall out of your bag or are dropped. If you’re shopping online, you can usually find the correct size bumper or case listed on the same web page as your hard drive.

Step #6 – Label your portable hard drives

When you are setting up your new portable hard drives, label each one clearly. I literally use a thick permanent marker to do this. Keep the names consistent since you’ll be referencing these drives frequently. Mine are simply called Travel #1 and Travel #2.

Step #7 – Format and set up your portable hard drives

Format your new portable storage drives according to your operating system – usually OSX or Windows. When you’re formatting the hard drives, you’ll probably also be prompted to register them with the manufacturer. Registering your new drives might seem like a silly step but it often activates your warranty or image rescue software so don’t skip it.

Step #8 – Create a backup recipe

Once my new portable hard drives are set up and working, I create a folder on each drive called Travel Photos #1 (on drive Travel #1) and Travel Photos #2 (on drive #2). I use a software program called Chronosync (for Mac) to create a recipe that when it is run, backs up drive Travel #1 to drive Travel #2. There are many options for backup software and I would encourage you to do a little research to find the software that’s best for you.
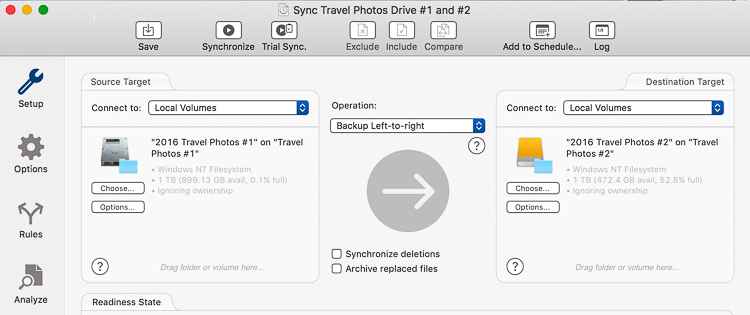
Backing up images traveling 05

Step #9 – Back up and update your laptop

Right before you go, back up the entire contents of your laptop. I use a MacBook Pro so I run Time Machine. After the backup finishes, I have an up-to-date copy of everything on my laptop on a small hard drive that I leave at home. That copy will come in handy if my laptop is stolen or damaged while I’m traveling. Also, I also check for software updates – especially any related to security – and install those as well.

I skip beta versions or major operating system upgrades since sometimes those are glitchy. I want my laptop software as safe and secure as possible while I travel but I don’t want to have to deal with any new OSX headaches.

Now that you’ve done all that prep work, it’s time to pack, hit the road and make some memorable images.

Part II. While you’re traveling

I know that after a long day of travel, the last thing you want to do is unpack your laptop, upload, and duplicate your image files. But get in the habit of doing it anyway. After a while, it will become routine, like brushing your teeth or washing your face, and you won’t dream of skipping it.

When your friends tell you their horror stories about losing images while they travel, you’ll have to work hard to wipe the smug look off your face because you’ll know you’ve minimized your chances of that happening to you.

Step #1 – Upload images with Lightroom

My first step when I upload images is to plug in my hard drive called Travel #1, then I plug in my CF card reader, insert the memory card and open up Lightroom CC. I always use Lightroom to catalog all of my images. When uploading, I tell Lightroom to import the day’s images to the folder called Travel Photos #1 on the portable hard drive called Travel #1.
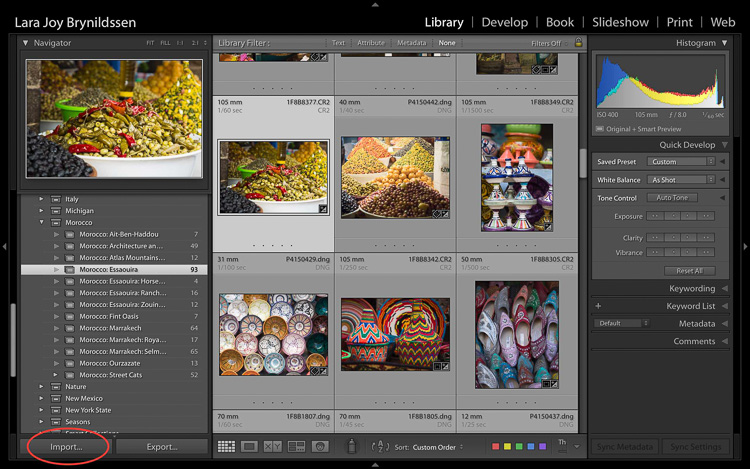
Backing up images traveling 06

Step #2 Option A – Duplicate images on import

In the Import Dialog, you can check a box to tell LR to “Make a 2nd copy to” and duplicate your images by importing them to two locations at once. If you check that box, you also want to click the tiny arrow to the right, click Choose Folder and select the location you want the duplicate images to be stored.

In my case, I would choose the folder called Travel #2 on the portable hard drive called Travel #2. I normally do not duplicate on import because I only have two USB ports on my MacBook Pro. During the import process, both are in use: one for the hard drive Travel #1 and one for my CF card reader. If you have space in your camera bag, you can carry a USB port hub that enables you to attach more drives to your laptop at the same time.
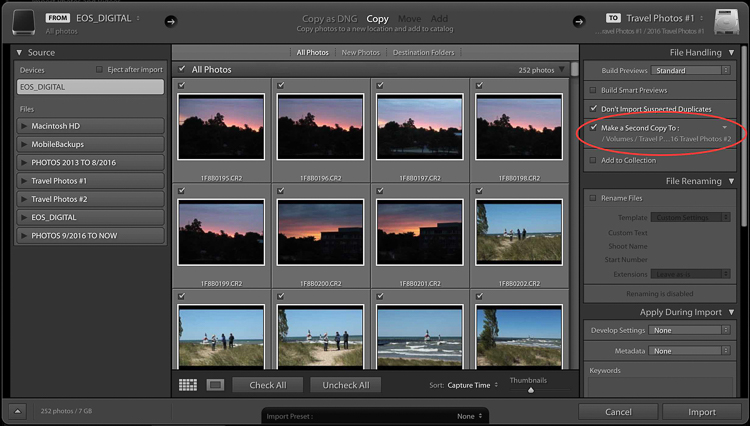
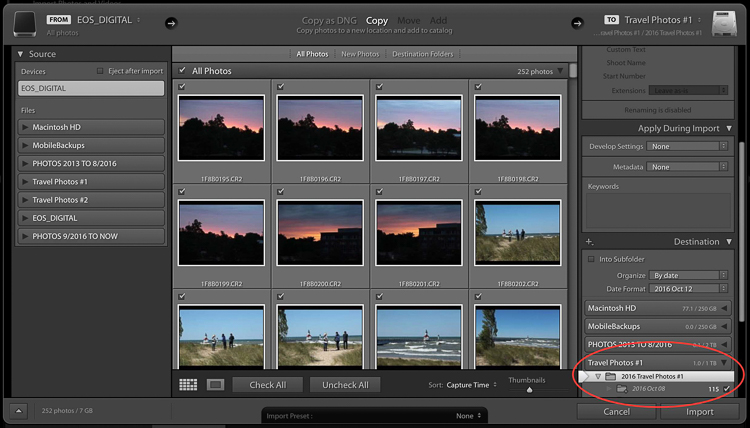
Backing up images traveling 07

Backing up images traveling 08

Step #2 Option B – Use software to create a backup

Since I don’t carry a USB port hub, instead of checking the “Make a 2nd copy to” box in the LR import dialog, I use Chronosync to sync one drive to another. This is the backup recipe we set up above. After the images are loaded to my first drive, I run my Chronosync recipe to duplicate them to the second drive. Once I’m done, I have three copies of each image; one on the original memory card and one on each portable of my portable hard drives, Travel #1, and Travel #2.

Don’t erase your memory cards

If possible, don’t erase the images on your memory cards while you’re on the trip. Instead, save them in the memory card holder you prepared in Part I.

Step #3 – Upload after every shoot

When you travel, I encourage you to upload and back up images after every shoot. If you have one shoot per day at sunset, upload and back up before you head out to dinner.

Tip: This is a good time to plug in and charge your batteries too.

Before you head to bed, verify that the image files are mirrored on each drive. Swap the batteries in your charger before bed too to make sure you’ll be all set to shoot again in the morning.

If you have two photo shoots per day, follow these same steps, except do them twice a day. In addition to uploading before dinner, I upload before lunchtime. I usually sneak in a quick nap then too.
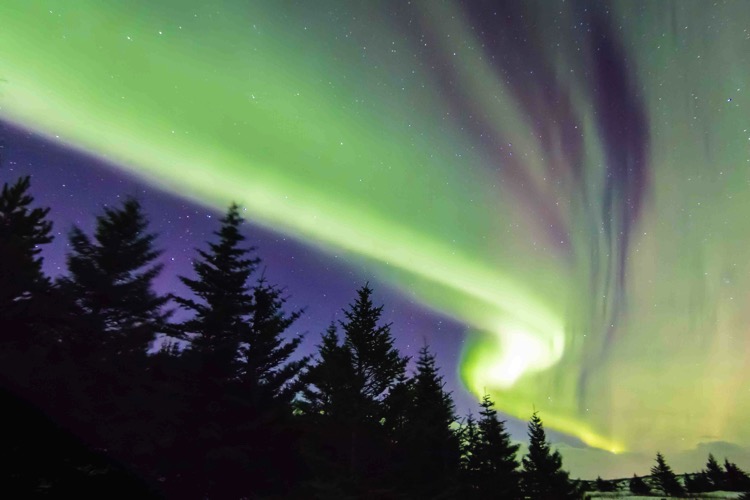
Aurora borealis Image A

Step #4 – Sync images to the cloud

If you have an excellent Wi-Fi connection you might also consider syncing to your cloud service. I normally don’t have very strong Wi-Fi service when I travel so I don’t waste time with this step.

Step #5 – Store your hard drives in different locations

Now that you’ve done all this work setting up this system to back up your travel images, you have one more step to ensure their safety while you travel. You want to keep each of your two drives in different locations. For example, keep one drive in your camera bag and keep one in your luggage.

Always make sure to keep one drive in the bag on (or very near) your person. Keep your luggage with your second drive in your hotel room (or locked in the trunk of the car if you are traveling between locations). In the case of theft, accident, or fire, one copy of your images will be safely stored on the drive in the alternate location.

Part III. When you return home

Once you return home, you need to move your images from Travel Drive #1 to your main photography hard drive. The easiest way to do this is to do it inside Lightroom.

Step by step

Here’s a step-by-step guide for moving your images from your travel drive to your main photography storage drive:

  1. Attach Travel Drive #1 to your laptop.
  2. Attach your main photography hard drive to your laptop. In this example, my main drive is called PHOTOS 9/2016 TO NOW.
  3. Open Lightroom CC in the Library module.
  4. One by one, drag and drop each folder of your images from Travel Drive #1 to your main storage drive.
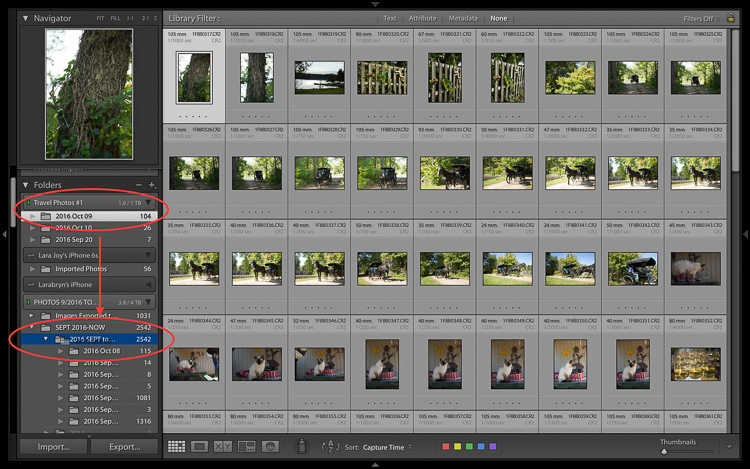
Backing up images traveling 09

  1. Note that at this stage, since I keep all my images organized chronologically I drop my travel images into the folder on the drive labeled 2016 SEPT to DEC. Next year I’ll drop images into the folder labeled 2017.
  2. Be patient while your computer works. It takes a few minutes for Lightroom to show you that this task is complete and your images have been successfully moved to your main storage drive. Tip: This is a good time to clean your gear.
  3. Now that your images are on your main drive, run another backup.
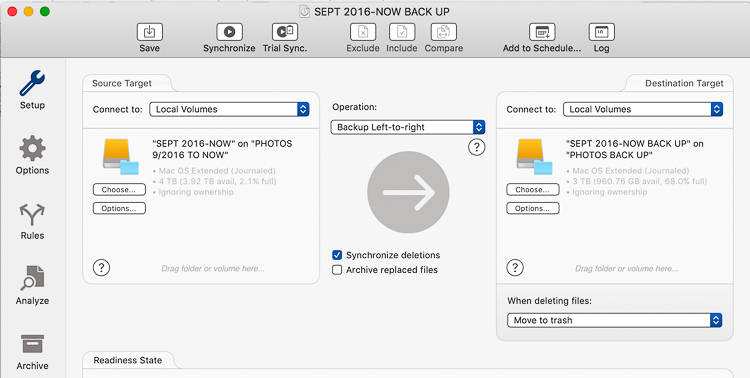
Backing up images traveling 10

  1. I use a Chronosync recipe to back up my drive called PHOTOS 9/2016 TO NOW to my drive called PHOTOS BACK UP.
  2. After completing this step, verify that the images have been moved. I do this by opening a Finder window on my MacBook Pro and checking that the image file names match on both my main storage drive and my backup drive.
  3. After you verify that you have two copies again, you can wipe your travel hard drives and memory cards to prepare them for your next trip.
  4. At this point, it’s good idea to back up to your cloud service so that you once again have three copies of your images.

Final notes

Since I travel often, I find it easiest to keep my entire Lightroom catalog on my MacBook Pro. If I need to work on a bigger screen, I connect to an external display.

If you keep your main Lightroom catalog on a different computer than the one you travel with, rather than dragging and dropping as I’ve instructed above, attach your travel hard drive and your main photography storage drive to your home computer, open Lightroom and go through the complete import process to your main storage drive. After you’ve imported your travel images to your main Lightroom catalog on your home computer, in addition to formatting your memory cards and wiping your travel hard drive, I’d recommend completely removing the images from the Lightroom catalog on your laptop.

Now you can go unpack and do laundry. Or, if you’re like me, you can start to cull, edit, and create collections with your travel images.
Backing up images traveling 12

googletag.cmd.push(function() {
tablet_slots.push( googletag.defineSlot( “/1005424/_dPSv4_tab-all-article-bottom_(300×250)”, [300, 250], “pb-ad-78623” ).addService( googletag.pubads() ) ); } );

googletag.cmd.push(function() {
mobile_slots.push( googletag.defineSlot( “/1005424/_dPSv4_mob-all-article-bottom_(300×250)”, [300, 250], “pb-ad-78158” ).addService( googletag.pubads() ) ); } );

The post Step by Step Plan for Backing Up Your Images While Traveling by Lara Joy Brynildssen appeared first on Digital Photography School.


Digital Photography School
 
Comments Off on Step by Step Plan for Backing Up Your Images While Traveling

Posted in Photography


How to Give Your Landscape Photos Extra Punch in One Easy Step

09 Nov

Have you ever felt that your landscape photography is missing a little punch? You look at other photographers’ images and their colours have a very appealing amount of contrast. But no matter how much you play around with HSL (Hue, Saturation, Luminance), Contrast, Vibrance or Saturation, your colours just don’t get the same depth and contrast and end up looking fake and oversaturated.

The quality of the lens being used affects color greatly (more expensive lenses generally give a much better colour contrast than entry-level lenses). But there is a step that you can do when post-processing your recent landscape photos to give the colours an extra little bit of punch and contrast and more importantly, keep them from looking overcooked.

before-after

Color space

You may be aware of a term Colour space which essentially determines how devices represent colour. The two most common colour spaces are Adobe RGB and sRGB. Adobe sRGB is used on the web and for many smart devices. Adobe RGB is a little bigger than sRGB and can show more colors. However, these are not the only colour spaces around. Lightroom, for example, uses one of the largest (able to produce a larger amount of colours) called ProPhoto RGB.

But enough about colour spaces! I can already see your eyes glazing over, mine are already as I type this. But knowing that there are different colour spaces can be helpful. Knowing exactly how they work isn’t necessarily all that important.

Convert to Lab Color

The colour space that you’ll want to recognize is LAB Color. How does it work? Doesn’t really matter. But how can you use it give your images that extra punch? In this article, I’ll explain how a very simple step (and I mean simple!) that will help give your images that extra punch using the LAB colour space in Photoshop.

Okay, so first up you’re going to want to bring your image into Photoshop. Before you do this, you may need to develop the image a little in Adobe Camera Raw or Lightroom. Fix up any exposure issues, correct the white balance, etc.

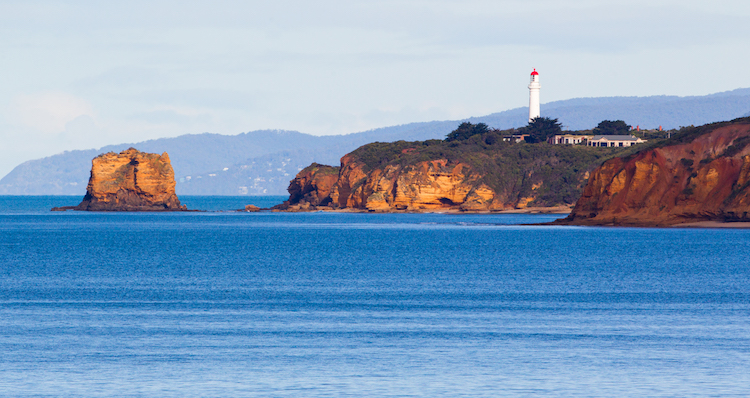
This is the image that I’ll use as an example.

before

This image has had very little done to it prior to Photoshop. A simple crop, general contrast and exposure correction were all that was applied.

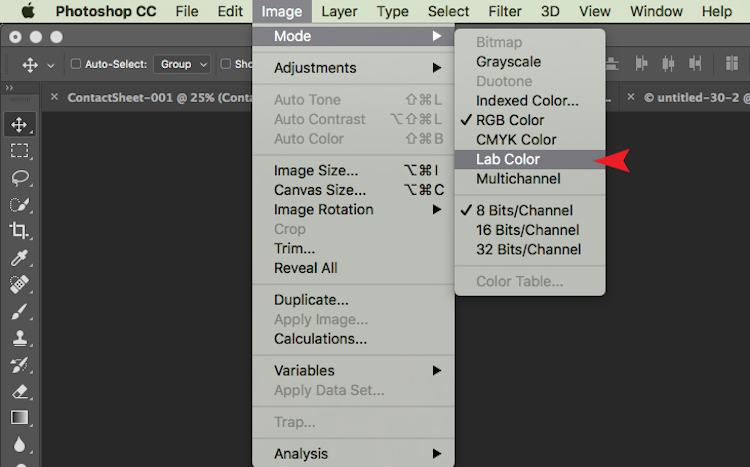
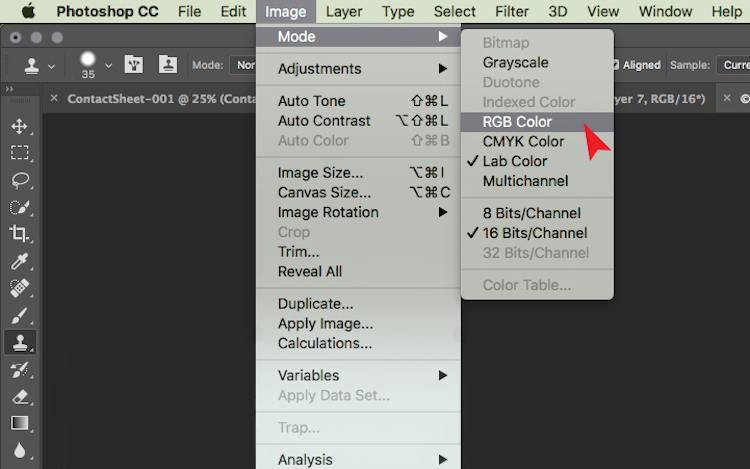
Now that your images is open in Photoshop, the very first thing you need to do is convert it from Adobe RGB or sRGB (depending on what you have set as the working colour space in Photoshop) to LAB Color.

To do this, go to: Image > Mode > Lab Color.

The tick next to RGB Color means that Adobe RGB is currently being used.

The tick next to RGB Color means that Adobe RGB is currently being used.

Now Photoshop is using LAB instead. You won’t notice a change at all at this step because nothing has changed on your end. All you have simply done is tell Photoshop which method to use to display colours.

Add a Curves Adjustment Layer

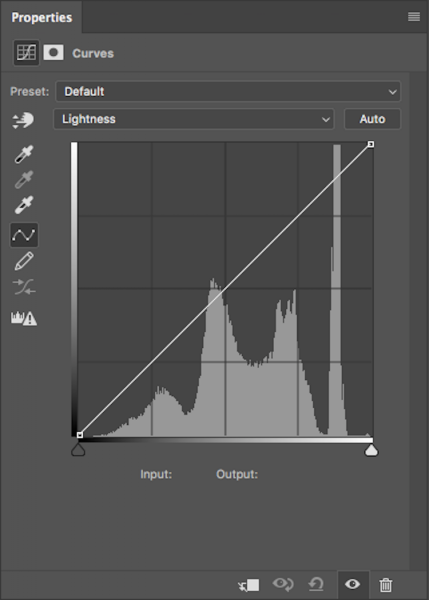
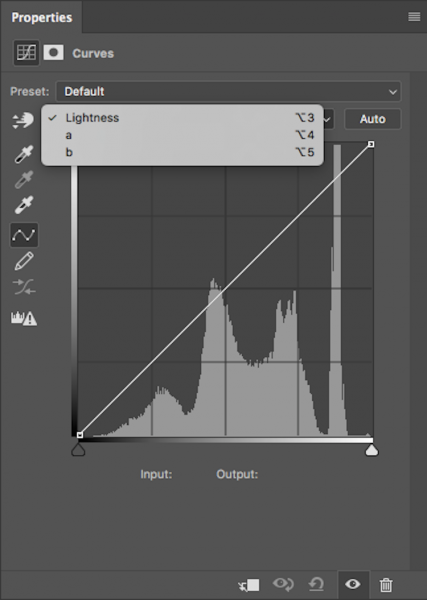
With your image in LAB Color, the next step is to create a Curves Adjustment Layer. Once this layer has been created, you should see something like this:

lab-curves1

Generally, this doesn’t look any different to any other Curves Adjustment Layer except for one thing. Instead of having RGB in the drop down menu, you will see Lightness.

With this adjustment layer created, the next step is to click on the Lightness drop down menu. This brings up Lightness, A, B; which is what LAB is short for!

lab-curves

Adjust Channel A

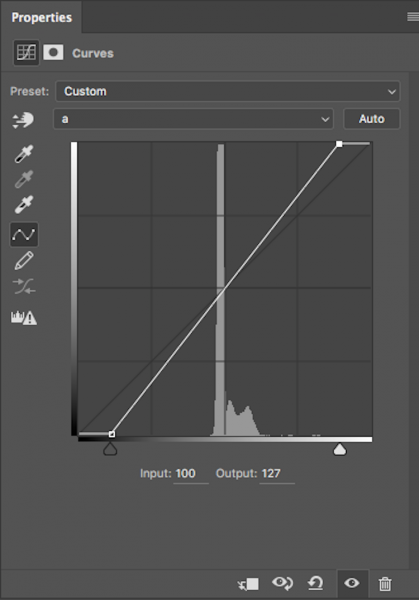
Now, you need to select the A-channel. With the A-channel selected, bring in the shadows anchor point at the bottom-left corner toward the bottom-centre. You will notice the Input numbers increasing from -128. As a starting point, I like to bring this value to -100. Now, find the highlight anchor point (top-right) and bring that toward the top-centre by the same value; for -100 set it to 100.

Notice the anchor points have moved toward the centre equally?

Notice the anchor points have moved toward the centre equally?

You’ll notice strange things happening to your colours as you slide the anchor points along. Don’t panic – this is supposed to happen.

Adjust Channel B

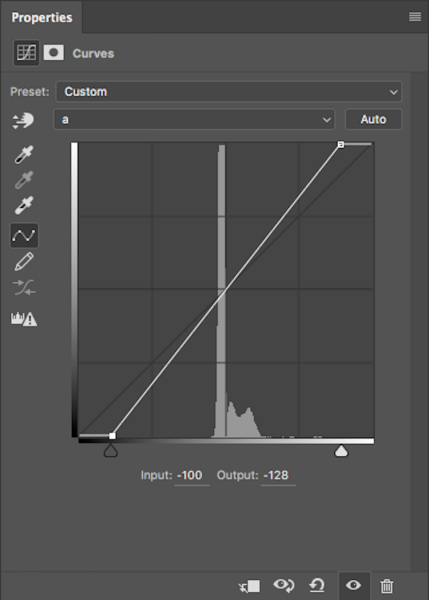
Now do the same steps by the same values for both shadows and highlights for the B-channel.

Same steps have been done for Channel B

Same steps have been done for Channel B

NOTE: make sure your Output value remains at -128 for the shadows and 127 for the highlights. If these numbers are altered it means that the anchor point is being lifted from the bottom for shadows and dropped from the top for highlights. You just want to drag the sliders along horizontally (not move them up or down).

With both A and B channels having been done now, the colour and colour contrast of your image should look different from the original. This is how my original image looks after these steps.

This is after setting A/B shadows to -100 and highlights to 100.

This is after setting A/B shadows to -100 and highlights to 100.

Fine tuning

For me, that is looking a little overdone. But no problem! To change this, all you have to do is reduce the amount you moved the anchor points in both A and B channels. I generally find going by increments of 10 is most helpful.
If you feel your image needs more punch, then you will want to bring the anchor points closer to the centre. Just remember to keep each value across the shadow/highlight, A/B channels the same.

After increasing the numbers in my images, I felt that -110/110 in A/B worked the best (see below).

after-110

Convert back to RBG

Once you are happy with how your image looks, it’s time to change it back to RGB. To change your image from LAB to RGB, go to: Image > Mode > RGB color.

change-to-rgb

You’ll be alerted that changing modes will discard adjustment layers, but that is fine. Select OK and you’ll be brought back into RGB. You’ll notice that the Curves Adjustment layer is now gone and that your image is now the background layer. However, the effect on the colours should remain. Now you’re free to go about editing the photo as much as you like.

So that’s a very simple technique to add more colour punch in your images. Just remember these two points:

  • This is something that you should do at the beginning of editing your image in Photoshop and not the end as you will lose all your adjustment layers when changing modes.
  • Remember to alter the anchors points from A/B b by the same value to eliminate strange things happening to your colours.

googletag.cmd.push(function() {
tablet_slots.push( googletag.defineSlot( “/1005424/_dPSv4_tab-all-article-bottom_(300×250)”, [300, 250], “pb-ad-78623” ).addService( googletag.pubads() ) ); } );

googletag.cmd.push(function() {
mobile_slots.push( googletag.defineSlot( “/1005424/_dPSv4_mob-all-article-bottom_(300×250)”, [300, 250], “pb-ad-78158” ).addService( googletag.pubads() ) ); } );

The post How to Give Your Landscape Photos Extra Punch in One Easy Step by Daniel Smith appeared first on Digital Photography School.


Digital Photography School
 
Comments Off on How to Give Your Landscape Photos Extra Punch in One Easy Step

Posted in Photography


Step by Step Tutorial for How to Shoot Tethered

04 Oct

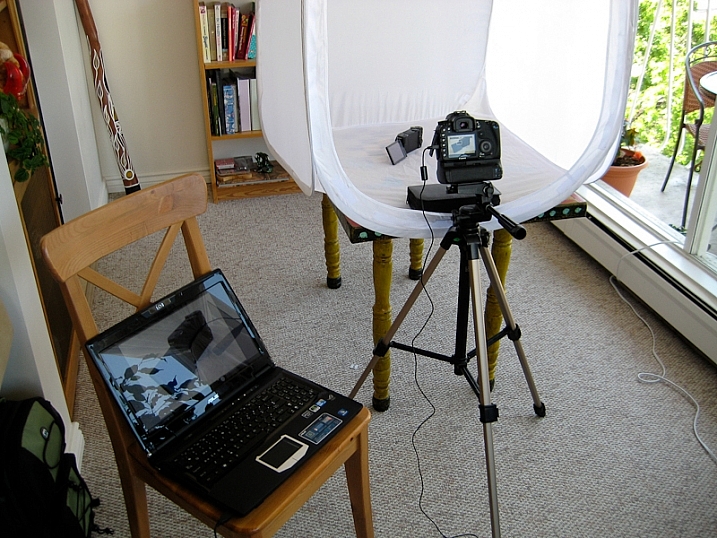
Tethered shooting is a photography technique that has been practiced by many professional photographers for years. In short, tethering allows you to connect your camera to a computer or tablet and almost instantly view your digital images on the device within seconds after it is captured. Due to expense and accessibility, tethered-shooting was generally reserved for photographers who do a lot of studio work and high-end commercial photo shoots. However, as tethering technology became significantly cheaper and easier to use, tethered shooting as been practiced by professionals and enthusiasts alike.

If you’ve ever been curious about tethered shooting, this article will give a brief overview of the process as well as some steps to easily get started.

Tyler Ingram

By Tyler Ingram

What is tethered shooting?

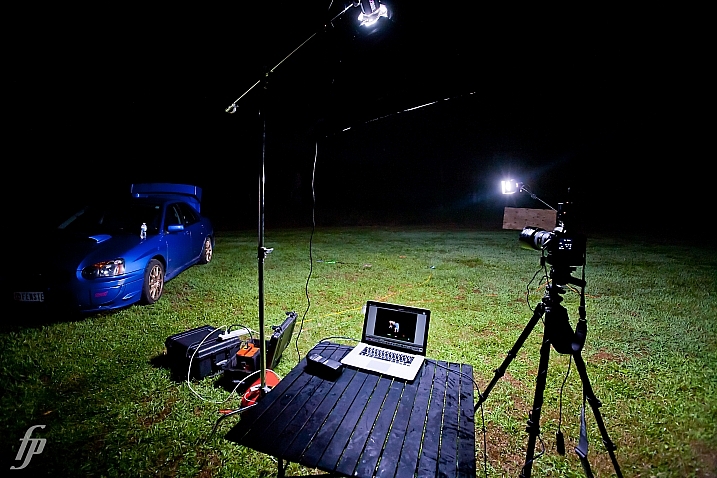
Tethered photography is the process of connecting your camera to a computer, tablet, or even a smartphone using either a cable or wireless app. After a successful connection between the devices, any new image captured by the camera is then passed directly to the computer and saved in a pre-designated folder. You’re then able to see the image fully displayed on the computer screen and even do some post-processing to the image.

Benefits of tethered shooting

The main benefit of tethered shooting is the ability to quickly preview the image on a large monitor within seconds of capturing it with your camera. This allows both you and a client to scrutinize your images on a big screen, allowing you to make adjustments to the photo shoot as it’s taking place. Depending on the tethering software you’re using, you might even be able to do quick edits to the photo on-site. Both you and the client can see exactly what’s being photographed and can make sure your visions for the shoot are in alignment. Overall, this type of collaboration should lead to a better result.

Photographer

By Photographer

Downsides of tethered shooting

The ability to almost instantly preview photos as they’re being captured does come with a few downsides.

First, either you or your client could get too caught up in little details while inspecting the photos, and this can stall a photo shoot. Thus, it’s important to set expectations with your client and be able to push forward without focusing too much on details. Second, tethering can suck the battery life out of both your camera and your connected computer. If your tethered photo shoot may take longer than an hour, you’ll want to have extra batteries on hand and be shooting near a wall socket in case you need to plug in. Lastly, tethering software can be notoriously finicky and is prone to not working for no apparent reason, so you’ll want to have a backup plan in case of an outage.

What you need for tethered shooting

The traditional and most reliable way to connect your camera to a computer or another device is by using a cable. There are a variety of different cables and ports available, so which cable you use will depend on your exact devices. Some DSLRs with built-in Wi-Fi even offer wireless tethering or remote shooting, but this is typically limited to being used on a tablet or mobile device only, not a laptop computer.

In this particular instance, we’ll assume the camera is a DSLR and the connected device a laptop computer, as this is a very common tethered shooting setup. In this case, you’ll need:

  • An extra long (ie. 15 feet) USB cable to connect your camera to your laptop
  • Tethering software, such as Adobe Lightroom or Canon EOS Utility 3
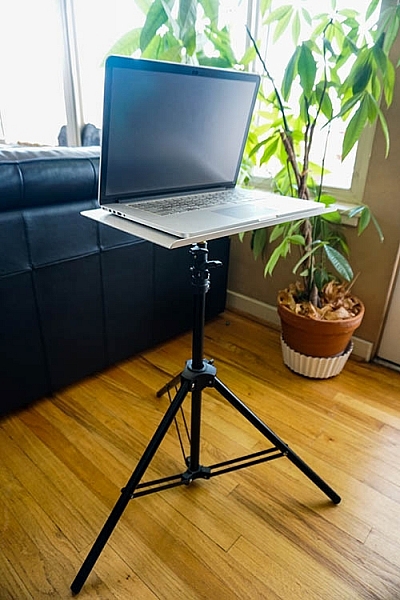
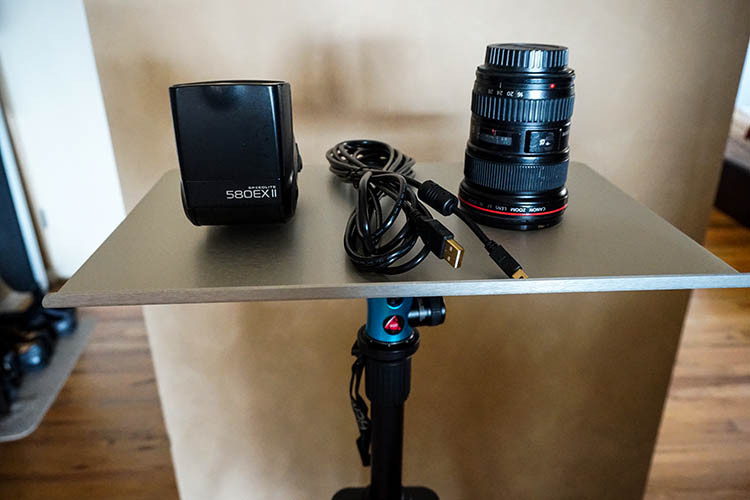
  • Optional – a portable table to hold your laptop such as Tether Tools’ Aero Table
  • Optional – a JerkStopper to prevent accidentally yanking your USB cable from your camera
Tether Table Aero for tethered shooting

Tether Table Aero is a lightweight, durable aluminum platform that attaches to almost any tripod or light stand, turning it into a handy utility table for holding a laptop or extra camera gear.

Tether Table Aero for tethered shooting

To be clear, there are many tethered shooting programs available, but this article will highlight two low-cost, simple methods in particular: Adobe Lightroom and EOS Utility 3.

Simple tethered shooting with Lightroom

The quickest and arguably the easiest way to start tethered shooting is by using Adobe Lightroom’s Tethered Capture feature. Follow these steps to set it up:

Step 1 – Connect the camera to the laptop

Connect your DSLR to your laptop with a USB cable. Then turn the camera on.

Step 2 – Start Tethered Capture in Lightroom

Open Lightroom and navigate to File > Tethered Capture > Start Tethered Capture

Step 3 – choose tethered settings

In the Tethered Capture Settings dialogue box, you have the option of choosing a Session Name (e.g., “Tethered Shooting Test,” specifying the photo names, choosing a destination for your photos, and adding metadata and keywords. Be sure to pay particular attention to where the photos will be saved so you can find them later. After setting your options, click OK.

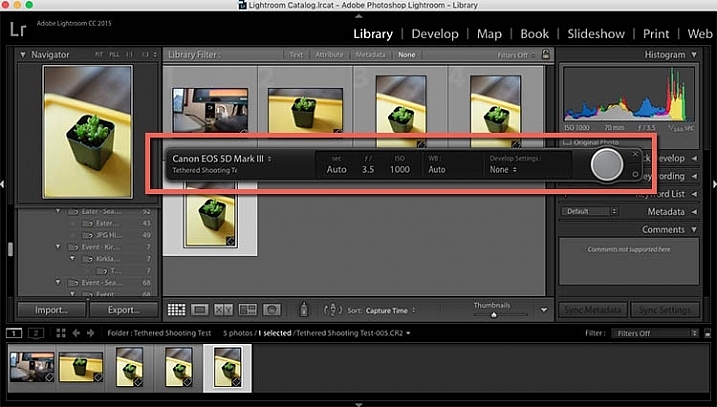
If all goes well, the screen below will pop up, giving you a narrow control panel (outlined in red below) for some light remote shooting options, and a Library in which photos captured via the tethered shooting connection will populate.

tethered-03b

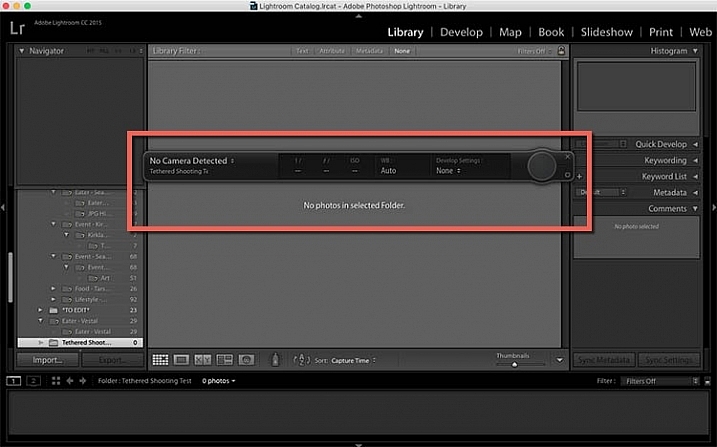
However, it’s not uncommon for Lightroom to have difficulty detecting the connected camera. If you follow the above steps and still see this screen below, try troubleshooting by first making sure your version of Lightroom and your camera’s firmware are both updated. Also, check compatibility to ensure your camera can tether capture with Lightroom. Note: there are third party plugins available for other non-compatible cameras such as the Fuji X-T1, do a search for your camera model and you may find a solution (Pentax here, Sony here.

Finally, try rotating through several different USB cables to make sure they’re working well. But if you’re looking for a more consistent way to tether shoot, check out the other option below.

tethered-04b


Reliable Tethered Shooting with EOS Utility 3

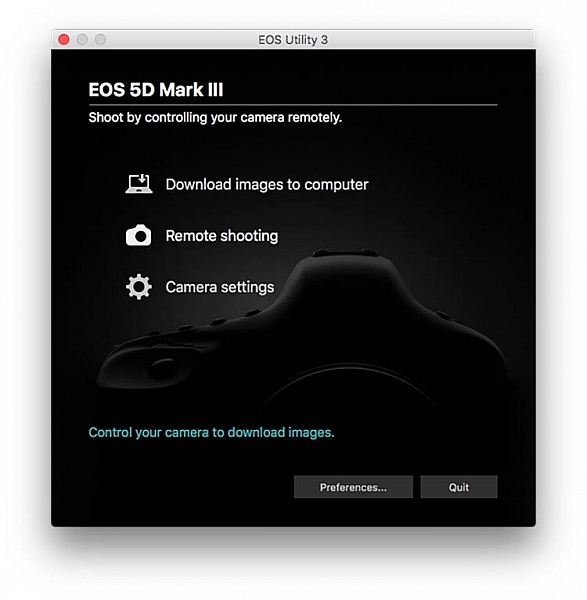
If you shoot with a Canon DSLR, whip out that CD that came with your camera and install the EOS Utility 3 onto your computer. When your Canon DSLR is connected to your computer, you’ll be able to use this program to control your camera remotely and shoot tethered. This method is much more reliable and consistent than using Lightroom’s tethered capture option.

Steps for using EOS Utility 3 for tethering:

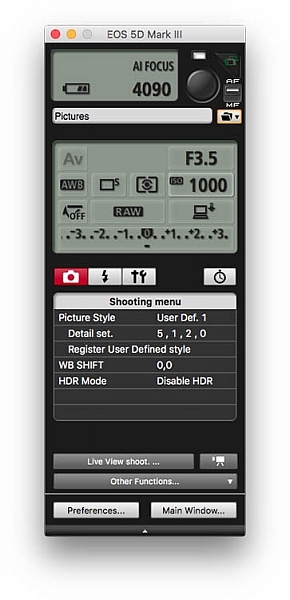
  1. Start by downloading the EOS Utility 3 and opening it on your computer. Click on the “Remote shooting” option.Tethered shooting
  2. Selecting that option will display the following interface. The display gives you the ability to alter some settings such as white balance or drive mode on your camera directly from this interface, but there are still some functions, such as lens zooming, that you’ll have to do manually.Tethered 05
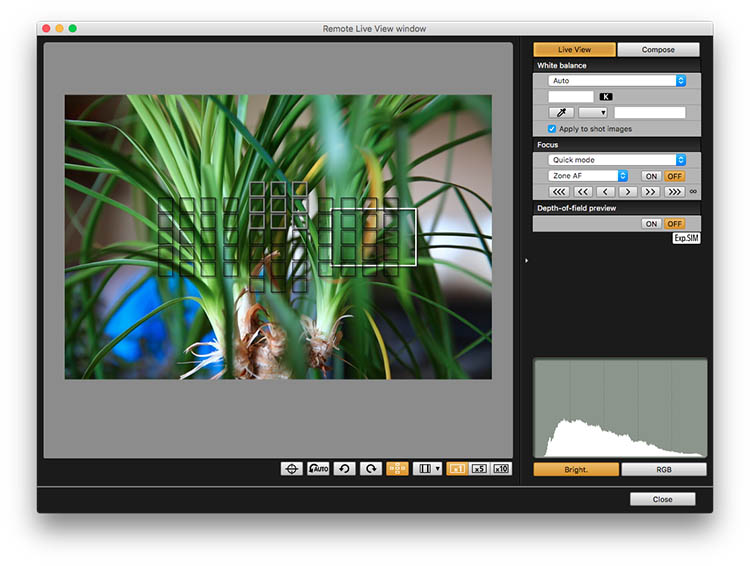
  3. While still in the Remote Shooting setting of EOS Utility 3, set your camera to Live View mode, and tethered shooting will be enabled. In this case, Live View will appear directly on your computer screen so you will see exactly what your camera sees. When you take a photo in tethered shooting mode, the captured photo will appear on your desktop.Tethered 09

Over to you

These are just two of many options available for tethered shooting. Do you frequently shoot tethered? If so, what types of programs do you use for reliable results? Please let us know your tethered shooting tips and tricks in the comments below.

googletag.cmd.push(function() {
tablet_slots.push( googletag.defineSlot( “/1005424/_dPSv4_tab-all-article-bottom_(300×250)”, [300, 250], “pb-ad-78623” ).addService( googletag.pubads() ) ); } );

googletag.cmd.push(function() {
mobile_slots.push( googletag.defineSlot( “/1005424/_dPSv4_mob-all-article-bottom_(300×250)”, [300, 250], “pb-ad-78158” ).addService( googletag.pubads() ) ); } );

The post Step by Step Tutorial for How to Shoot Tethered by Suzi Pratt appeared first on Digital Photography School.


Digital Photography School
 
Comments Off on Step by Step Tutorial for How to Shoot Tethered

Posted in Photography


Step by Step How to Clean Camera Gear so it Stays in Good Shape

29 Sep

You may be very aware that photography equipment is not cheap. If you’re not, you’re in for a rude awakening! Camera bodies can cost thousands of dollars and it’s not uncommon for a lens to be even more expensive than a body! Sometimes it’s very tempting to baby your equipment; treat it with extra caution and wrap it up in cotton wool so as no harm will come to it. But with the right care and maintenance, your equipment will last and continue to perform for many years, no matter what, and without the babying!

DANS4206-2

Being a professional photographer myself, my equipment is often subject to some not-so-camera-friendly circumstances. Rain, snow, dust, and even champagne (!) are not uncommon encounters for my equipment. Even though I generally take the right precautions (for example, I use rain covers on for my cameras and lenses if it’s raining) there are times when the conditions are just unavoidable and my equipment gets a little dirty. It’s going to happen. But because I care for my equipment (even though it may look like I don’t!), it keeps on performing and hasn’t let me down. So I thought that I would share some of my tips to help you do care and maintenance on your gear, too.

Supplies needed

The good news about caring for your equipment is that it’s relatively cheap to buy what you need. With so few things in photography being cheap, this comes as a nice relief! Here is a list of what I use to care for my gear.

From a camera store (camera specific tools)

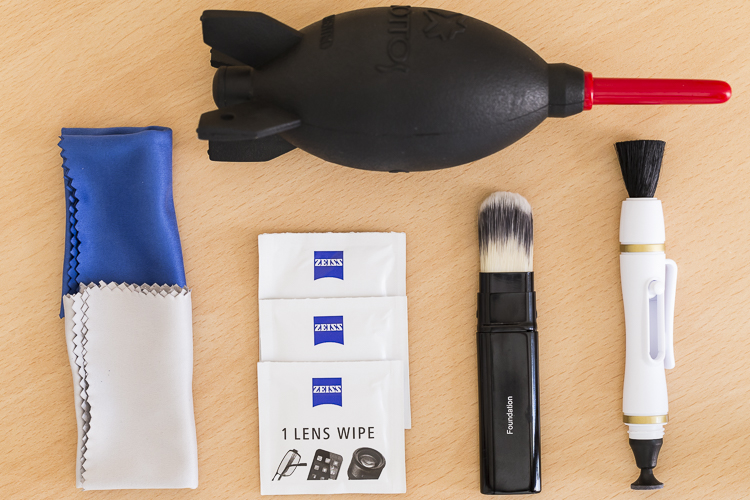
An overview of essential cleaning items.

An overview of some essential cleaning items.

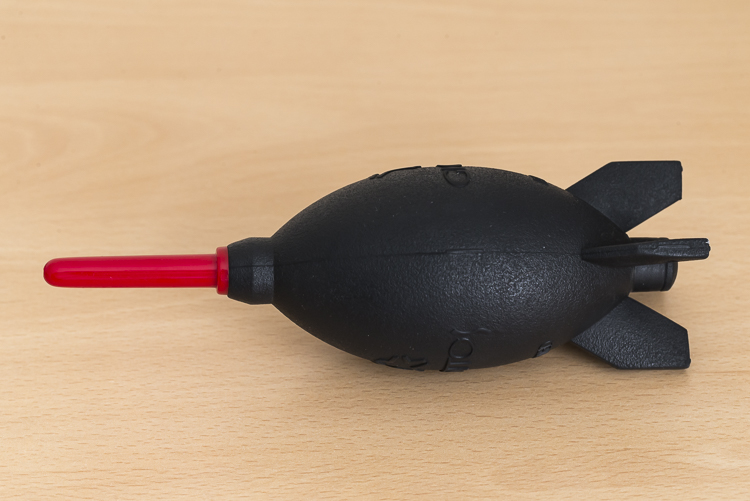
  • Rocket blower: I use this a lot! Squeezing it blasts out a puff of air to blow away any dust.

DANS4199

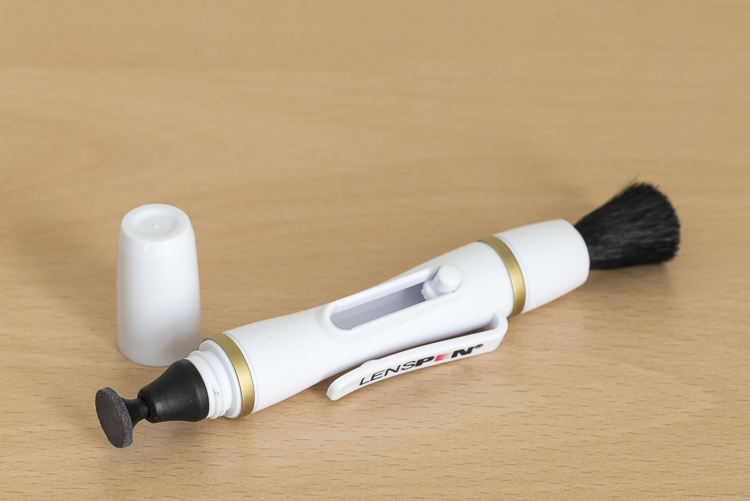
  • LensPen: I have just added one of these to my kit. At one end there’s a small soft, cleaning tip. At the other, is a retractable brush. I haven’t yet used it extensively but have been impressed with it so far. However, the cleaning tip is quite small so it’s not something I use on my larger lenses, such as a 400mm f/2.8; it would take forever.
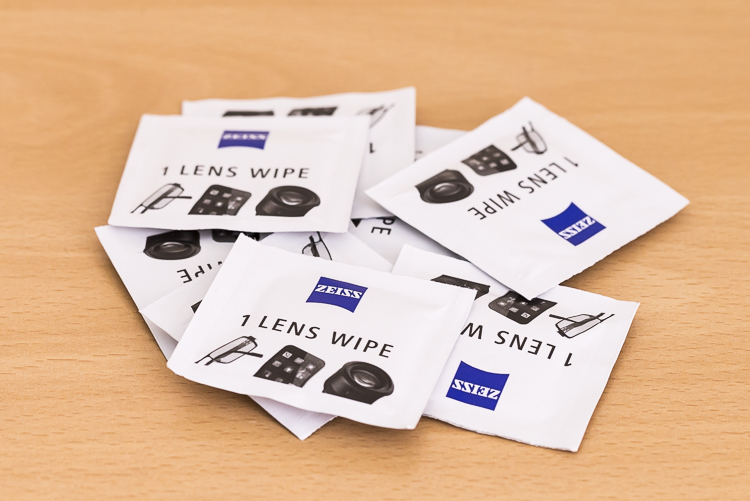
  • Pre-moistened lens wipes: I love these things. These are almost like the refresher towelettes you can get at KFC, but for lenses. They’re pre-moistened with a lens cleaning solution that quickly evaporates from the lens. They’re also dirt cheap. I use the Zeiss brand ones (only ones I’m aware of) which for a pack of 200, cost about $ 13.90USD. (Note: also available by Hoodman especially for camera lenses)

DANS8686

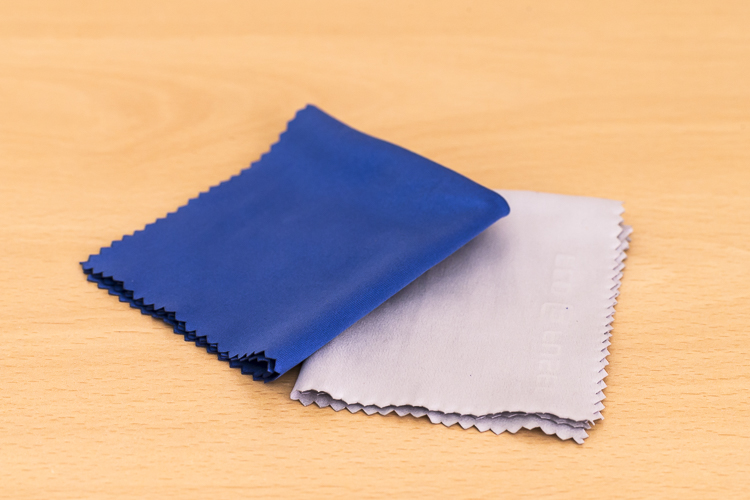
  • Microfibre cleaning cloths: Another cheap must have. I like to have several of these. I reserve one just to buff lenses after using the wipes, and another just for cleaning the lenses without any product at all. I avoid using the same one across many devices, for example, using the same clothing to clean my iPhone screen, then using it to clean my lenses.

DANS8688

From a regular store (non-camera tools):

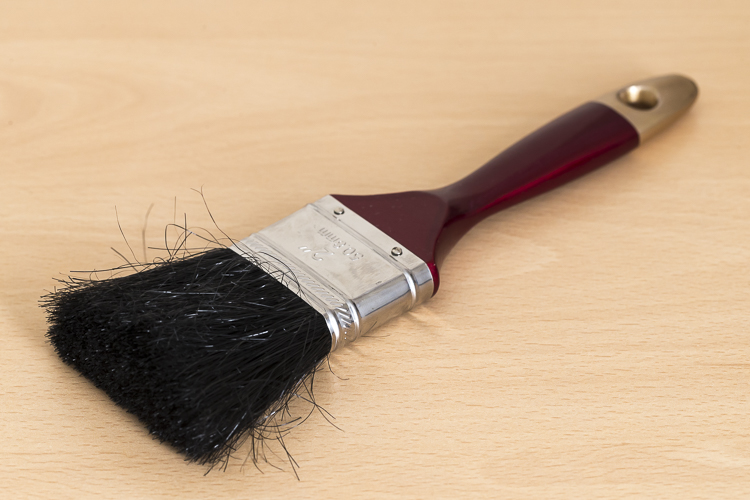
  • A paint brush: These are very handy at removing dust from the surface of camera bodies and lens barrels. Again, buy this brand new. You don’t want this to be super soft either, as it’s just being used on the outside of the cameras and lenses and not on anything that needs to be protected.

DANS4195

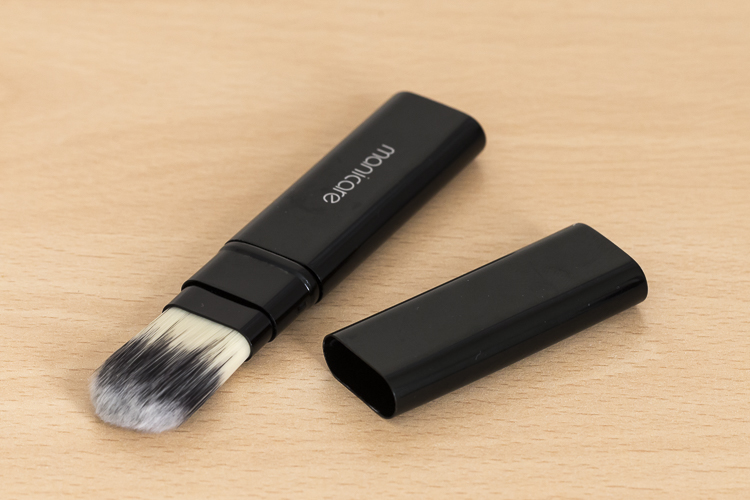
  • Make-up brush: this is something that people often have a laugh at when they see it in my bag. But then think, “Hey that’s a good idea”. If you want to add one to your kit, make sure you buy one brand new. You don’t want your partner’s blush going all over your lens. Generally, the more expensive brushes are better as their bristles are much softer. The one I have is also retractable, which is ideal as it protects the brush.

DANS4193

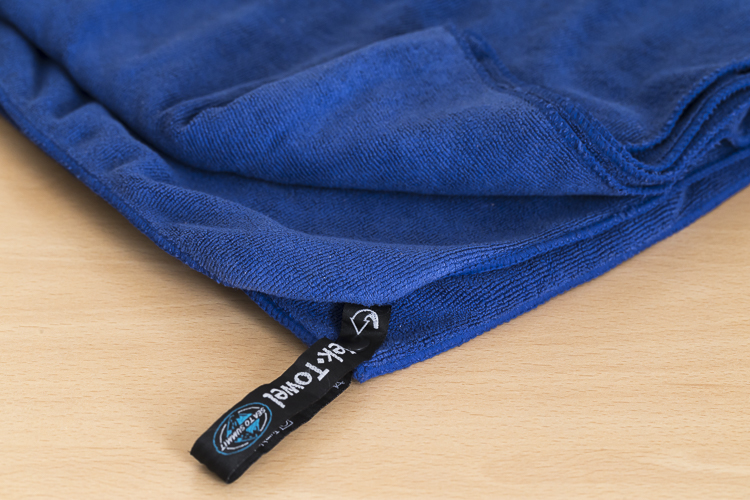
  • Teck Towel: I got a Tek Towel for my birthday years ago and decided to give it a go cleaning my gear. It works brilliantly, but a clean towel will work just as well.

DANS4197

  • Zip-Lock Bag: This is where I store my cleaning gear, to keep it clean and as dust free as possible!

With these items, I am able to keep my lenses and camera bodies looking (almost) like new. Here’s my workflow when it comes to cleaning time.

Lenses

Step 1. Use the Rocket Blower

The first step is to remove any larger bits of dust, etc., from the lens. For this, I use the rocket blower. Squeezing it blows air out of the tip and will blow away larger, loose bits of dust, etc. It’s important not to use a cloth for this step as this can drag dust over the lens and scratch it. This is why the Rocket Blower is very useful.

Step 2. Use the LensPen

DANS4194

Hopefully, the blower was able to remove all the dust. However, there are times when some little specs remain. To remove these, I use the brush on the end of the LensPen. Doing a quick flick of the brush around the lens should do the trick. There shouldn’t be a need to apply much if any pressure at all. This should remove all the dust from the surface of the lens. You may need to do a quick repeat with the blower, though. If you don’t have a LensPen, using a makeup brush works just as well.

If you don’t have a LensPen, using a makeup brush works just as well.

Step 3. Clean the glass

Your lens should now be free of dust and other debris. If there are some marks surface on the lens, this is when to give it a little clean. First off, use the cleaning end of the LensPen. It is very soft and doesn’t damage the glass at all so it is ideal for this. Using a circular motion, work your way around the lens until all the marks have been removed. This may take several passes to achieve. It’s important to not be tempted to push on the lens too hard. Just keep going around in a circular fashion until it’s satisfied. Give the blower another quick go over, too if necessary.If you don’t have a LensPen using a

If you don’t have a LensPen using a clean micro fibre cloth will also do the job. Just use the same circular motion and again, repeating the motion is preferred over applying more pressure.

Step 4. Get rid of stubborn marks

After Step 3, I am normally done cleaning the lens. Step four is completely optional, but sometimes, there is some muck on the lens that just will not budge; no matter how many times it’s gone over. This is when to use the pre-moistened lens tissues.

Using the same circular motion, I work my way around the lens until it’s been completely gone over (I normally go over it two or three times). Then I get a microfibre cloth (generally, a different one that I use just for this purpose) and give the lens a bit of a buff using the same circular motion. I’ll go over it a few times.

I favour these tissues over sprays because I don’t like the idea of having a bottle of liquid inside my camera bag. If it breaks, it can leak into my gear and cause major damage. I also quite like their single-use quality.

For me, using cleaning solutions is an absolute last resort and not something I do each and every time I clean my gear. I also don’t breathe on my lenses (you know, to fog them up to make it easier to wipe off grime) if I can avoid it. If you’re like me and quite a coffee drinker, your breath can be slightly acidic and with repeated use, it can wear down the coatings on your lens. At least that’s what Nikon mentioned a while back in an article I read (ps, I’m a Canon guy).

Step 5. Don’t forget the lens cap

The front element is now clean. But for me, the process is still not yet finished. Before placing the lens cap back on, I have a quick look at it – there could be grit and dust on it that is about to put back on my newly cleaned lens. Giving it a quick once over with the blower and a paint brush will keep it and the lens cleaner.

Step 6. Clean the rear element

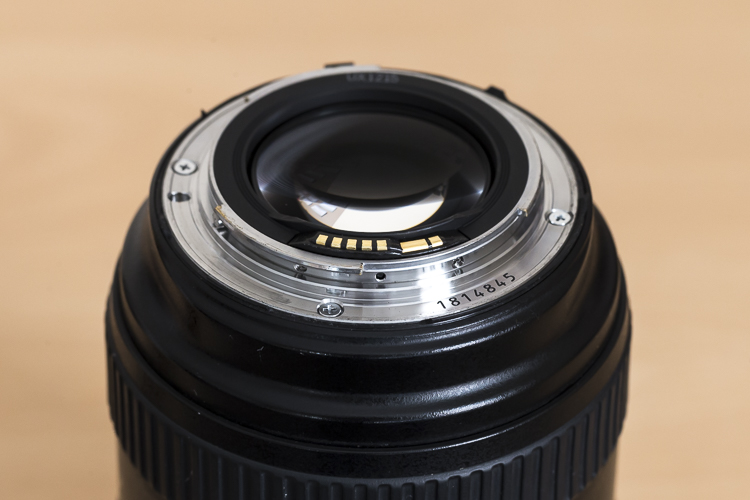
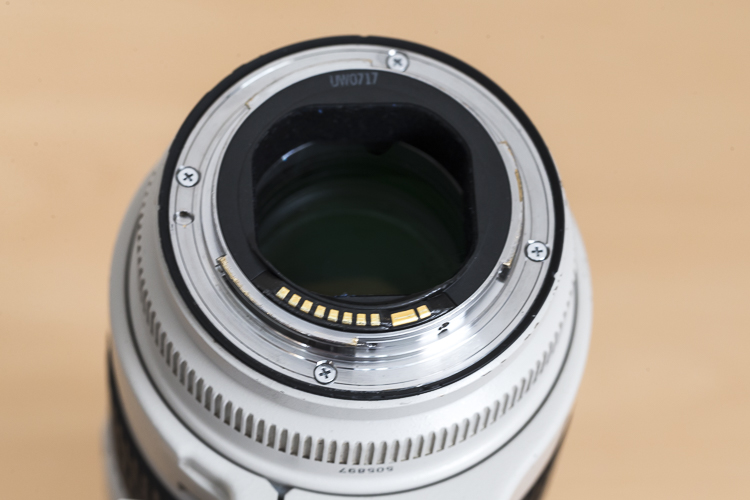
Now it’s time to have a quick look at the rear element – the bit that goes inside your camera. This shouldn’t be too messy; after all, it stays inside the camera. But dust can fall on it, especially when changing lenses and this dust, while it may not show up in pictures, can definitely make its way on to the sensor. I give it a quick once over with the Rocket Blower making sure the bottom of the lens is facing down. Doing so will stop any dust from falling back on it.  Some rear elements are further recessed into the lens than others. With lenses that have the rear element much closer, I also may give it a quick wipe with a micro fibre cloth or LensPen to clean it up.

DANS4207

Notice with this lens, the rear element is very close to the surface. Also, those gold bars are the lens contacts.

Occasionally, I’ll also give the mount a clean up too, as well as the lens contacts. For this, I just use a Tek Towel, although any clean towel will do. Carefully wipe around the mount and go over it a couple of times. A small amount of alcohol on a cotton tip can be used to clean the contacts. Cleaning the contacts every now and then can help to prevent errors between the camera and lens caused by a build up of grime.

Now it’s time to give the rear cap a quick go over. Remove any dust with the blower and put it back on the lens.

With this lens the rear elements sits deeper in the lens barrel.

With this lens, the rear element is recessed deeper into the lens barrel.

Step 6. Clean the outside of the lens

Now that the elements (both front and rear) and the lens mount are clean, it’s time to give the outside a quick go over. For this, I whisk away any dust with the paint brush and wipe the whole surface area with the Tek Towel. If I’ve been at the beach (salt in the air), or my lens has had a shower, I’ll dampen the towel in fresh water to remove any salt or champagne, etc.

This step, while very quick and simple, has proven to be quite helpful in picking up some things that may need my attention. For example, a while back I was cleaning my 70-200mm lens and I noticed that the end of the barrel was a little loose. I took it into Canon it was fixed in 10 minutes and cost nothing. Prevention is the best remedy.

Camera

Here is a view of one of my camera bodies without its body cap. Care should be taken when cleaning around the lens mount so as to avoid dust/dirt etc from falling in. It's good practice to do this with the lens mount facing down.

Here is a view of one of my camera bodies without its body cap. Care should be taken when cleaning around the lens mount as to avoid dust, dirt, etc., from falling inside. It’s good practice to do this with the lens mount facing down.

Cleaning the camera is MUCH easier and quicker than the lenses. First off, I start by giving the outside a once over with the paint brush, followed by a thorough wipe down with the towel. I make sure the screens and the viewfinder are all nice and clean, too. As with lenses, I make sure that the mount and the contacts on the body are clean using the same steps and dampen the towel in fresh water if I’ve been at the beach.

While I have the body cap off, I’ll also blow out any dust that may be in the camera with the blower. With this step, I am much more cautious as I don’t want to blow into the body too much. Again, I also have the camera mount facing down to prevent dust from re-entering. This step can help reduce the amount of particles inside the camera which may eventually find their way onto the sensor.

Sensor

For me, this is where the cleaning process stops. I don’t do my own sensor cleaning as I much prefer it be done by the right people. Some people like to do their own sensor cleaning, and that’s completely fine. This is just something I like to give to professionals because if anything goes wrong, I can blame them.

Filters

Cheap-UV-Filters-202px.jpgYou may have noticed that I haven’t mentioned anything about UV filters. The reason for that is simply I don’t use them. I am yet to be convinced that they will actually save a lens from breaking if being dropped and have the view that if a lens is going to break from a fall, it will break; filter or no filter. I always use lens hoods which not only help to reduce lens flare but also provide some protection from objects falling on to the front element. However, if you’re in an extremely dusty environment, for example, then the use of a UV filter could be a smart investment.

Conclusion

So that’s it for my gear cleaning process. This isn’t something I do after each and every shoot, but I do try to get to it at least once a month or after shoots where my gear has been a little abused by the elements. It may seem that there are a lot of steps involved, but it really doesn’t take that long to do it. It’s even quite therapeutic when you get into it.

How do you clean your gear? Do you have any other tools you use? What’s your procedure and how often do you do it? Please share in the comments below.

googletag.cmd.push(function() {
tablet_slots.push( googletag.defineSlot( “/1005424/_dPSv4_tab-all-article-bottom_(300×250)”, [300, 250], “pb-ad-78623” ).addService( googletag.pubads() ) ); } );

googletag.cmd.push(function() {
mobile_slots.push( googletag.defineSlot( “/1005424/_dPSv4_mob-all-article-bottom_(300×250)”, [300, 250], “pb-ad-78158” ).addService( googletag.pubads() ) ); } );

The post Step by Step How to Clean Camera Gear so it Stays in Good Shape by Daniel Smith appeared first on Digital Photography School.


Digital Photography School

 
Comments Off on Step by Step How to Clean Camera Gear so it Stays in Good Shape

Posted in Photography