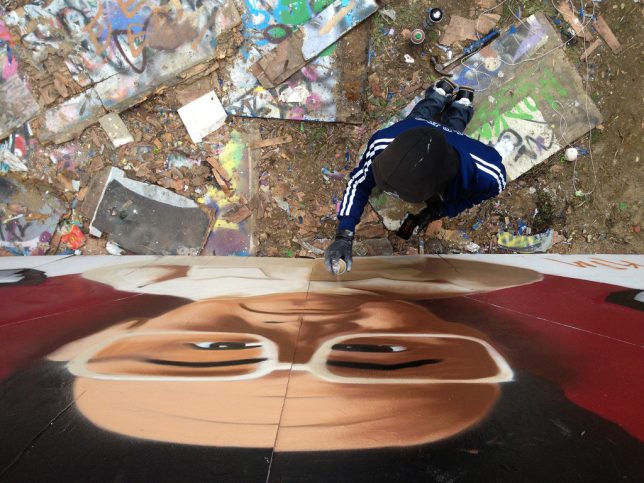
North Korea may be making the headlines like never before but the world’s graffiti artists have been featuring the Hermit Kingdom’s leaders for years.
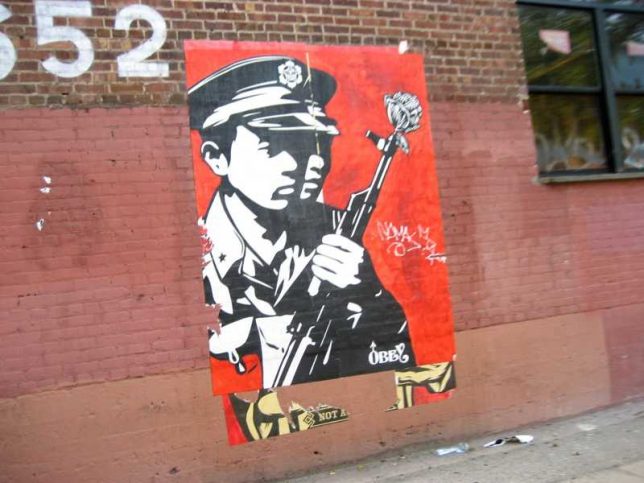
When it comes to North Korea, there’s a lot to look down on. Take the country’s unique leadership – a communist dynasty? Who knows what the late Karl Marx might think of that (though it’s not hard to guess). In any case, NK-themed graffiti and street art should never be looked down upon, at least not by those living outside North Korea. Flickr user _eddie999_ brings us our lead image featuring Team America: World Police’s take on Kim Jong-il, snapped in Brighton, UK early in 2012. Just below, Mauricio Balvanera’s (maubrowncow) 2007 photo of a stenciled North Korean soldier with a flower in the muzzle of his rifle gazes out from a wall near the Toy Factory Lofts in Los Angeles, California.
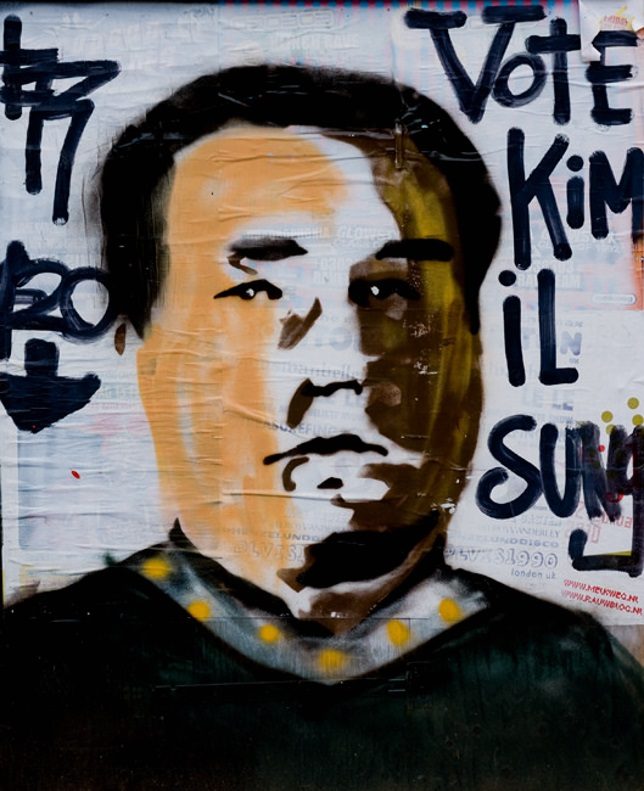
The Sun Is (Still) There
Kim Il-sung (“Kim become the sun”) was North Korea’s first supreme leader – the “Great Leader” in official parlance – who held power from 1948 to his death from natural causes in 1994. Among his most lasting accomplishment was the establishment of the Kim ruling dynasty, now into its third generation in the form of Kim Jong-un. Speaking of lasting accomplishments, Flickr user Loïc Brohard snapped the above artwork captioned “Vote Kim il Sung” in Amsterdam, the Netherlands, in April of 2010.
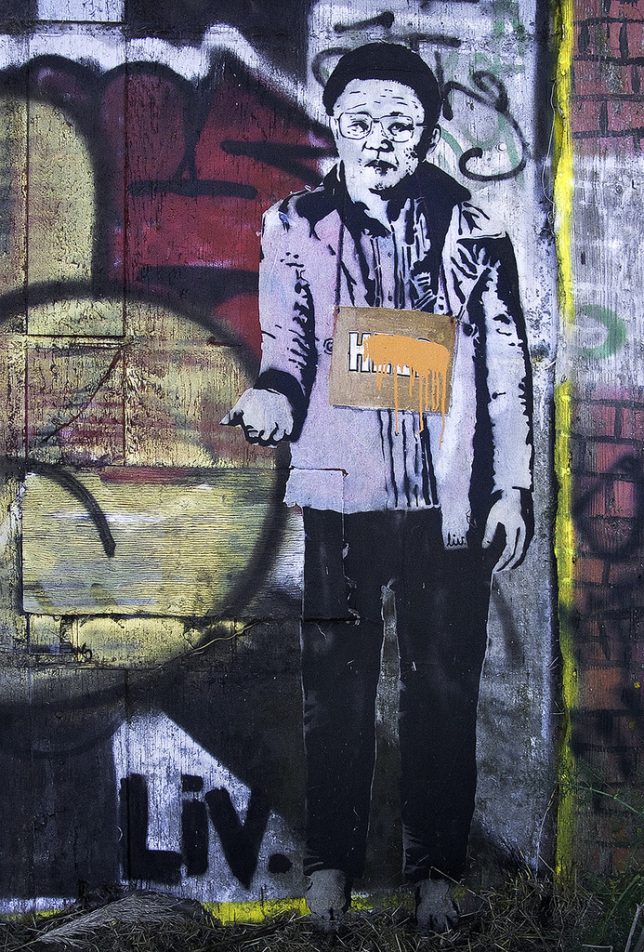
The Son Is Here
Kim Jong-il inherited power from his father in 1994 and was known in North Korea as the “Dear Leader”. Flickr user Larry Jones (westbymidwest) captured this full-color portrait of Kim Jong-il in full panhandler mode on September 20th of 2009 at the Albany Bulb, an artificial landfill peninsula extending westward from the the east shore of San Francisco Bay. It’s uncertain whether the splash of orange paint across the portrait’s “HELP” sign is part of the original composition or a later amendment.
A Spectacles Of Himself
Kim Jong-il was over 50 years old when he assumed North Korea’s leadership but he had been groomed for the position since the early 1980s. Kim the Second raised the cult of personality established and encouraged by his father to ever-greater heights. The stencil above, found in NYC’s Koreatown district, dates from 2009 and was captured in April of that year by Flickr user e.yamasaki.
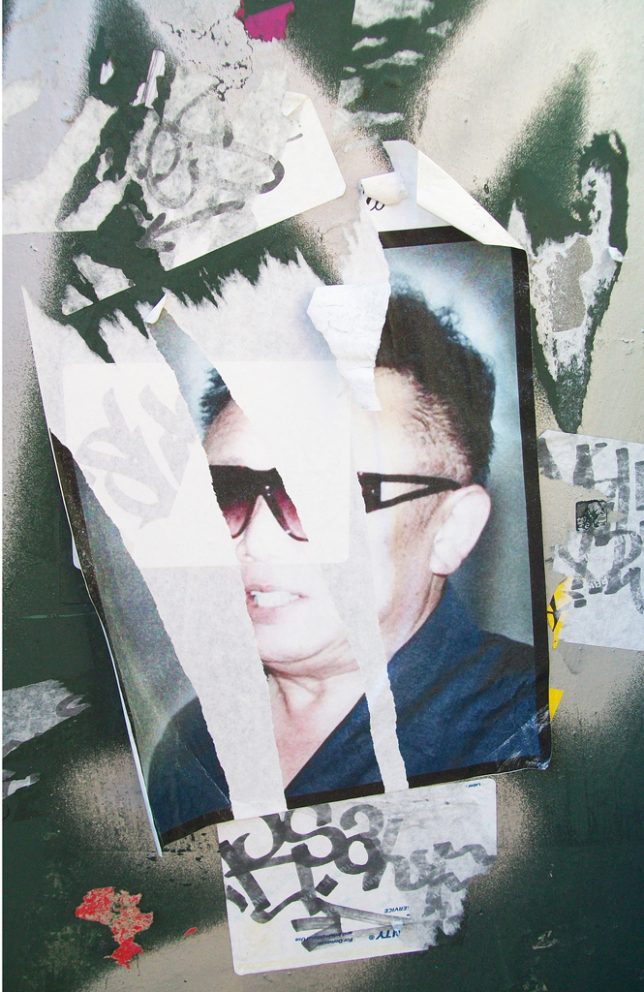
The Future’s So Bright…
Kim Jong-il’s designer shades take center stage in the above NYC photo pastiche snapped in late 2011 by Flickr user allan molho (amolho4). Sources state Kim Jong-il was a fervent fan of Western cinema, boasting a collection of over 20,000 titles including every Elvis Presley flick. His fascination with “The King” in his late-1960’s rhinestone jumpsuit phase may have influenced Kim’s sartorial preferences, at least when it came to prescription and fashion eyewear.
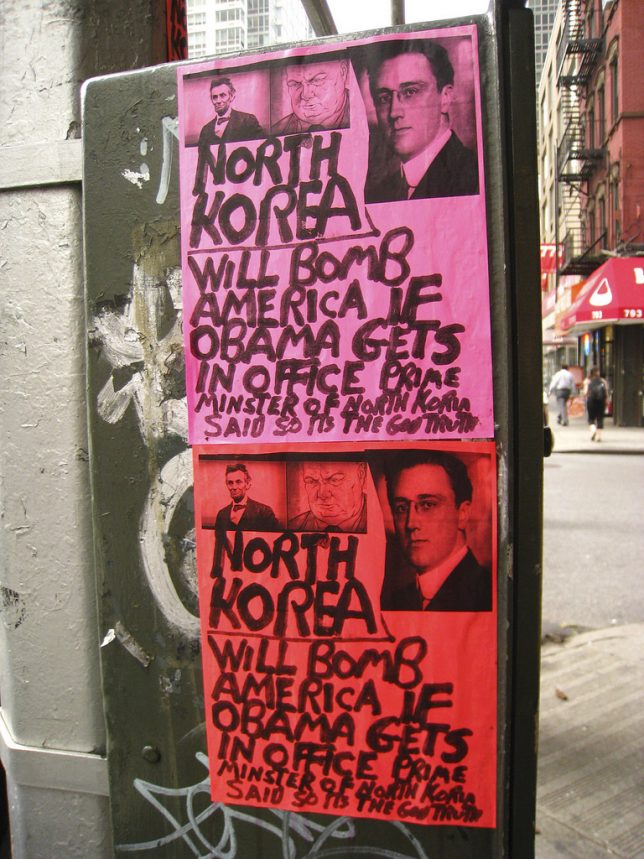
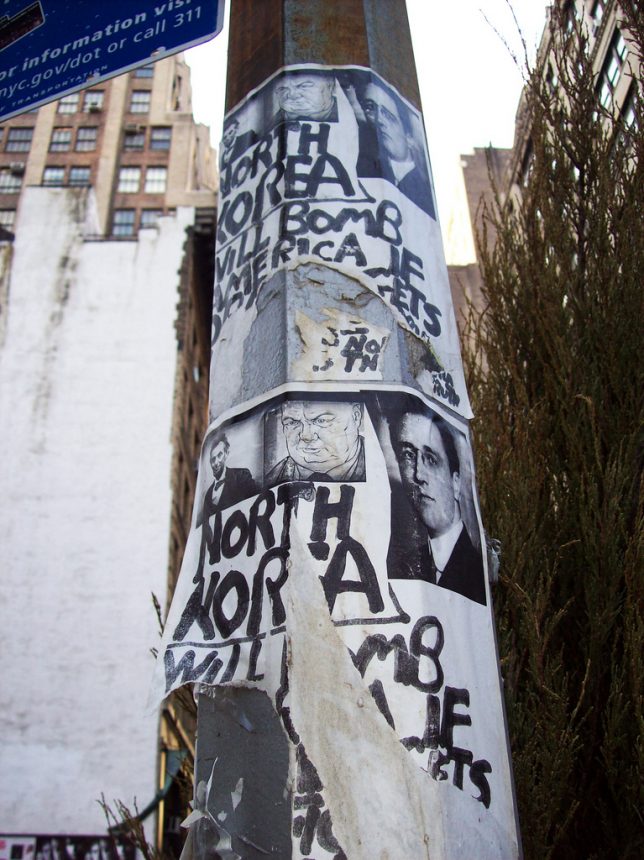
Thanks, Obama
First rule of tinfoil-hat prognostication and doomsday cult propaganda: never predict near-future events! The unknown creator of the above paste-up mini-manifesto evidently didn’t get that memo. To their credit, they did manage to evoke the spirits (and images) of Lincoln, Churchill and an alarmingly youthful FDR to add weight to their shrill Cassandra callout. Bonus: stating “Prime minister of North Korea said so its the God truth.” Kudos to Flickr users shoehorn99 and allan molho (amolho4) for capturing these ravings in August of 2008 and April of 2009, respectively.
Next Page – Click Below to Read More: Nk Ink North Korea Graffiti Stencils Street Art
Exclucity: Unique GoPro Footage of Pyongyang, North Korea
Notoriously restrictive of the media, the North Korean government surprisingly granted the request of an outsider seeking to shoot a virtually unprecedented video: a continuous car tour of the …
Banksy Art: Street Graffiti, Paper Drawings & Wall Stencils
(images via: Banksy.co.uk and Art of the State and Brighton Arts Blog)
Say what you will about the legality and morality of graffiti; it is difficult to argue that it is not at times real art. …
Beyond Brutalism: Cutting-Edge North Korean Architecture
The infamous Ryugyong Hotel in Pyongyang may have stolen the spotlight but North Korea can boast many other examples of unusual cutting-edge architecture.
[ By WebUrbanist in Art & Street Art & Graffiti. ]
Nearly photo-realistic figures stenciled in place make bright surrounding tags all the more vibrant in this series of street art juxtapositions by artist Martin Whatson of Norway.
The characters, generally rendered in black and white, are sized and scaled like residents and passers by in the built environment. The tags, rich and overlapping, look more like what most people would call “graffiti.” The anti-artist Gray Ghost comes to mind, famous for painting over the works of other artists, like Banksy.
On their own, each component is somewhat predictable, but in their interactions these works come to life. The characters look through windows surrounded by color, or sweep up street graffiti, or pull back walls to reveal it. The tags, in turn, add light and life to the scenes, points of color in a drab and dreary city.
Much of his work breaks this format as well, but generally still finds itself at the interaction of urban spaces and imaginary worlds. Below, a figure painting clouds on the wall gives depth and dimension on both fronts: the clouds seem to go back and the painter appears to stand out.
More about the artist and his approach: “Martin has a continuous urge to search for beauty in what is commonly dismissed as ugly, out of style or simply left behind. He looks for inspirations in people, city landscapes, old buildings, graffiti, posters and decaying walls. This interest for decay has helped develop his style, motives and composition and he enjoys creating either unity or conflict between materials, backgrounds, motives and human intervention” (via Colossal).
Banksy Tags Manhattan: Fresh New Graffiti Live from NYC
Making his way through the boroughs of New York, the infamous but mysterious interventionist Banksy is broadcasting new stencils, installations and mixed media work all month as a …
Tag Clouds & More: Geek Street Artist Remakes Messy Graffiti
To the uninitiated, used to seeing it but not to reading it, graffiti scrawl can seem illegible. In a play on both tagging and technology, this artist turns traditional tags into computer-style …
Colorful Art Writers: 10 of the Best Graffiti Artists
Humans have been expressing themselves by scrawling on walls since the earliest people lived in caves. But it wasn’t until the 1970s that we started taking our messages to the walls, trains and …
[ By WebUrbanist in Art & Street Art & Graffiti. ]
Urban travelers love taking pictures, but ideal angles are not always obvious to visitors – many ultimately either stand in same hard-to-find spot or fail to take an interesting photograph altogether.
That’s where Mimi Chan and Utsavi Jhaveri step in, spray-painting a set of shoe prints around cities. These markings in turn tell people where to place their feet, point and click to capture the ‘perfect’ (if a bit redundant) image of a given monument or sight.
Starting with San Francisco and New York City, the pair found some of the project upsides included: having an excuse to wander cities (especially after dark), getting external sponsorship to cover expenses and ultimately being thanked by tourists who genuinely appreciated being told how and where to take a better picture – all that and increasingly copious press coverage, of course.
Overtly, the #noshittyphotos project is aimed at reducing poor photography via these cookie-cutter stencils, but of course it makes you wonder: does the world really need more photos taking from the same angle of the same thing? What is it about retaking the same shot that attracts people to documenting something over and over again? Does it help us remember or is it simply a way to lay our own small claim to having seen something?
Want More? Click for Great Related Content on WebUrbanist:
Banksy Art: Street Graffiti, Paper Drawings & Wall Stencils
Some of the many works of prolific street artist Banksy in the media of graffiti, stencils, and drawings.
Click Here to Read More »»
Night Graffiti: Shake-Powered LED Spray Paint Can Sleeve
The nature of graffiti tends to result in nocturnal excursions, but painting completely in the dark can be a be problem and sometimes you just need a little …
Click Here to Read More »»
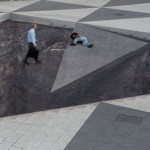
Mind Your Step: Dizzying 3D Street Art Mural [Pics & Vids]
Pedestrians seem to hover over a terrifying geometric sinkhole as they walk across the street art exhibit ‘Mind Your Step’ in Stockholm, by Erik Johansson.
Click Here to Read More »»
Ever tried painting with light but got an amorphous blob instead of the heart you meant to draw? Us, too.
That’s why light stencils are so so so great!
Instead of free-hand drawing with an LED light, you’ll use a cardboard box with a shape inside of it to shoot super detailed light paintings.
You don’t even have to cut out a stencil!
Just print out an old photo or a silhouette and slide it into your homemade lightbox. Pop the flash a few times, and create surreal dreamscapes even Salvador Dali would be envious of.
What better way to take advantage of those daylight savings hours?
How to Make Photo Light Stencils
p.s. Make a light stencil photo, and share it with us on Twitter! We’ll spotlight 3 winners on the Photojojo Tumblr. Just 1) Follow us @photojojo and 2) Hashtag it #photojojodiy. We’ll pick winners Monday morning 11/26 PST!
Why it’s cool:
Photoshopping people into your photos… meh.
Light painting people into your photos… YAY!
You can’t go wrong with this tutorial.
You’re essentially making a reusable, portable light box that can house any image you can dream of.
Combine that with sweet backdrops around your neighborhood, and your light painting possibilities are endless.
Ingredients:
Medium Sized Cardboard Box
Cardboard Cutter
Black Duct Tape
Ruler
Pencil
Printed Images on a Black Background (Step 9)
9″x 12″ Self-Laminating Sheets from any office supply store
External Flash
Tripod
Your Camera
STEP 1: Cut Image Opening:
First, you want to make an opening on the bottom of your box for your image to sit.
If you’re printing on 8 1/2″ x 11″ paper, make an opening that is 1/4″ less on all sides.
That means you’ll measure and draw a rectangle that is 8 1/4″ tall by 10 3/4″ wide.
Use a cardboard cutter to cut out the rectangle.
TIP: You may have to pass through each cut a few times if your box is thick.
Step 2: Cut Sides:
Start with one of the sides perpendicular to the bottom of the box that now has a rectangle cut out.
Center your flash at the top of this side. The top is edge furthest away from the rectangle cutout.
Make diagonal lines from the sides of the flash to the bottom corner of that side of the box.
Repeat this step for all four sides perpendicular to the bottom of the box.
Remember: The bottom of the box is where you just cut out the image opening in Step One.
Step 3: Cut Away:
Using your utility knife, cut along the diagonal lines you drew.
This will remove the corner pieces from the four sides perpendicular to the rectangular image area cutout at the bottom of the box. By doing this, you will be able to tape the edges back together at an angle, creating a trapezoid.
When you have cut all four sides, they should lay flat in a star-like shape.
Step 4: Rebuild:
.Using black duct tape, line up the tapered sides you just made.
Make sure to leave an opening at the tapered end for your flash to slide in.
It’s kind of like building the pyramid, but with less work!
Step 5: Line Edges:
Once you have all the sides sealed together, use your black tape to line the edges of your image opening.
This will prevent any wild cardboard pieces from showing up in your image.
Do the same thing to the opening for your flash.
Step 6: Black it out:
Now, cover the entire box with black tape.
This will prevent it from showing up in your images.
If you prefer, you could spray paint it black instead.
Just make sure to let it dry completely before moving on.
Step 7: Make a handle:
Handles come in handy, eh?
You’ll be glad you added this step once you’re out taking photos.
Cut a scrap piece of cardboard into a rectangle that is 2″ wide by 10″ long.
Cover it with black tape.
Step 8: Attach:
Tape the ends of your handle to one side of the box close to the smaller opening.
Make sure it’s really secure and that your hand fits through it.
Remember, you’ll need one hand holding the box, and one using the flash.
Make your handle the most comfortable it will be for you.
Step 9: Prep Images:
So the trick is, you need to print your images with a black background.
This will prevent light from passing through, and help them integrate better with the rest of the scene you’ll be photographing.
Using image editing software, place your image on a black background.
These steps show you how to cut an image out of the existing background.
You could also make you image into a silhouette.
Step 10: Print:
Once you have your images the way you like them, print them out.
Make two copies of each image.
Line them up perfectly, and tape them together.
Step 11: Laminate:
Laminating the image will make them reusable.
We used self-laminating sheets from a craft store, but most local print shops can laminate for you as well.
Just peel of the backing sheet and lay your image down smoothly.
Place another laminate sheet on the backside to seal them together.
Trim off the excess, but leave a bit of a border around your image.
Step 12: Place Image:
Tape on your laminated image to the large opening at the bottom of the box.
Use black duct tape for this, too.
Make sure to cover up any borders on your image so extra light doesn’t creep through the edges.
Step 13: Set your Flash:
Manual mode on your external flash works best for this.
Start at 1/8 normal power.
You may have to adjust this while shooting.
Step 14: Place flash:
Put your flash through the small opening at the other end of your box.
Your flash won’t stay in this opening unless you’re holding it in place. Be sure not to let it drop.
Use the handle you created to hold the box with one hand, and your other hand to hold the flash.
Bam. Now, you’re ready to go photograph.
Step 15: Set up your scene:
Find your perfect location. Use a tripod and a long exposure.
If you have a friend willing to help you out, it will make this process smoother.
If not, practice makes perfect, huh?!
Step 16: Make Background Exposure:
Test out the exposure for the background first.
This will help you know how long you have to work with.
For this image, we used a 2.5 second exposure at f/8.
Step 17: Focus and Adjust:
Place your image where you want it in the scene.
Focus your camera on your lightbox image.
Start the exposure by pressing your shutter button. Pop the flash once by pressing the “test” button, then move out of the scene.
Take a look at your image, and adjust where necessary.
TIP: If you see your black background around your lightbox image, you need to adjust your settings. Turn down your flash power, or stop down your aperture, i.e., change it from f/8 to f/11 or f/16.
Step 18: Trial and Error:
Keep playing around with placement and exposure to get the perfect combination.
Your aperture settings will control the amount of light from your flash. The shutter speed will control the ambient light.
So, if your flash is too bright, stop down the aperture. If your background is too dark, increase your shutter speed.
TIP: Don’t forget your scarf and mittens! Oh, and a hot chocolate!
Take it further
Move around and pop the flash a lot during your exposure to create more stencils.
Check out this Flickr group pool for more light stencil ideas.
Try to make daytime light stencils
Thanks to Trevor Williams and Fiz-Iks for this amazing project idea! Check out his video.
Related posts:
Turn Your Laptop into a Photo Light Box Could you pick your laptop out of a lineup? We’ll…
Light Painting with Moth Trails Extra photos for bloggers: 1, 2, 3 OMG, it’s finally…
Jean Francois Rauzier’s Hyper-Detailed Photos, Creating a Dreamworld with Thousands of Shots A game!: Inception or Not Inception? Mad man constructs faux…


 Photoshopping people into your photos… meh.
 First, you want to make an opening on the bottom of your box for your image to sit.
  Start with one of the sides perpendicular to the bottom of the box that now has a rectangle cut out.
  Using your utility knife, cut along the diagonal lines you drew.
  .Using black duct tape, line up the tapered sides you just made.
 Once you have all the sides sealed together, use your black tape to line the edges of your image opening.
 Now, cover the entire box with black tape.
 Handles come in handy, eh?
 Tape the ends of your handle to one side of the box close to the smaller opening.
  So the trick is, you need to print your images with a black background.
 Once you have your images the way you like them, print them out.
 Laminating the image will make them reusable.
 Tape on your laminated image to the large opening at the bottom of the box.
 Manual mode on your external flash works best for this.
 Put your flash through the small opening at the other end of your box.
 Find your perfect location. Use a tripod and a long exposure.
 Test out the exposure for the background first.
  Place your image where you want it in the scene.
 Keep playing around with placement and exposure to get the perfect combination.
You must be logged in to post a comment.