RSS
 

Posts Tagged ‘starry’

Video: Starry time-lapse at the ESA’s Ariane 6 rocket launch site

13 May

The European Space Agency (ESA) recently published a stunning time-lapse of the star-filled night sky at the ESA’s Ariane 6 launch site in French Guiana, South America. Europe’s Spaceport in French Guiana is preparing for the arrival of Ariane 6, ‘Europe’s next-generation launch vehicle.’

The Ariana 6 rocket will come in two versions depending on mission requirements. The A62 has two strap-on boosters, while the A64 has four. The Ariane 6 is 207′ (63m) tall with a diameter of 18′ (5.4m). The mass of the rocket ranges from 1,170,000-1,900,000 lbs (530,000-860,000kg). Replacing the Ariane 6 launch vehicle, the Ariane 6’s maiden test flight is scheduled for 2022 following several delays.

You can see what a typical Ariane 6 mission might look like in the ESA’s video below. Ariane 62 can launch payloads of approximately 9,920 lbs (4,500kg) into a geostationary orbit and 22,700 lbs (10,300kg) into low Earth orbit. By strapping on an additional two boosters, Ariane 64 can launch payloads of around 25,350 lbs (11,500kg) into geostationary orbit and 45,400 lbs (20,600kg) into low Earth orbit. With a full payload, Ariane 6 weighs about the same as one and a half Airbus A380 passenger airplanes.

The development of Ariane 6 has comprised an industrial network of more than 600 companies in 13 European countries, including 350 small- and medium-sized companies. The development is led by prime contractor ArianeGroup. The Ariane 6 launch facilities in French Guiana, seen in the time-lapse video above, are being prepared by France’s space agency, CNES.

Artist’s rendition of the two configurations of Ariane 6, the two-booster A62 and the four-booster A64. Image credit: ESA

The modular design of Ariane 6 means that it will be suitable for a wide range of missions, including Earth observation, telecommunications, meteorology, science and navigation. Adapters have been developed to allow Ariane 6 to carry multiple small satellites at once, allowing small companies more cost-effective access to the space industry. For more information on Ariane 6, click here.

Articles: Digital Photography Review (dpreview.com)

 
Comments Off on Video: Starry time-lapse at the ESA’s Ariane 6 rocket launch site

Posted in Uncategorized


Tips and Tricks for Night Photography of the Starry Sky

04 Sep

During the last year, I’ve become a big fan of night photography and the night sky. I’ve always enjoyed it but my hometown in Norway doesn’t have the most interesting landscape. So I rarely bothered to go out during night – unless there was a rare show of Northern Lights or meteorite showers. After packing up my stuff and moving to the north of Spain, however, I’ve found myself spending more and more time photographing the stars. What appears pitch black to the naked eye can be beautiful scenery through the camera.

In this article, I’ll share some tips and tricks on how you can photograph the various states of the night sky including The Milky Way, new moon, or northern lights.

Camera Settings for Night Photography

Light is the most important part of photography; without light, there’s no picture to be taken. During the night it is dark and the light is sparse, making it challenging to photograph. In fact, in order to capture an image during the night, you’ll most likely have to sacrifice some image quality – forget about using a narrow aperture and low ISO.

Unlike regular landscape photography, night photography requires less than ideal settings in order to capture enough light to properly expose the scene. Since there’s not a lot of available light, that means opening the aperture, increasing the ISO and lengthening the exposure time (shutter speed).

Tips and Tricks for Night Photography the Starry Sky

There isn’t one correct setting for each and every scenario as it depends on many factors (such as the brightness of the moon). But as a rule of thumb, you want to use the widest aperture your lens allows in order to get the sky as detailed as possible. Lenses with an aperture of f/2.8 are widely popular amongst nighttime and astrophotographers and if your lens allows for such an open aperture, this is where you should begin.

ISO and shutter speed

The ISO also needs to be increased quite a lot for night photography. For regular landscape photography, I always stress the importance of shooting with the lowest possible ISO. Even though we still want to shoot with the lowest possible setting we’re now looking at an ISO of at least 1600 at night. It’s not uncommon to use an ISO of 3200 or 6400 during the night. Still, to maintain as much quality as possible, try to use the lowest possible option.

Tips and Tricks for Night Photography the Starry Sky

Choosing the shutter speed is slightly more challenging as it depends on the focal length of your lens, but I recommend not going longer than 30 seconds unless you want to photograph star trails (I’ll come back to this later in the article). The 500 Rule is a good guideline when choosing the shutter speed. Basically, divide 500 by the focal length of the lens you’re using and you’ll know the maximum shutter speed you can use (to avoid star trails). If you’re using a crop sensor camera you’ll need to calculate the equivalent focal length of a full-frame lens (for example 20mm on crop sensor = 30mm. 500/30 = 16.6 seconds).

Remember that a tripod is essential for night photography in order to get a sharp image. It’s simply not possible to hold your camera still for several seconds!

Planning to Photograph the Night Sky

Scouting can be hard during the night so it’s often beneficial to have familiarized yourself with the area before going there in the dark. I know this isn’t always possible but the very least use an app such as PhotoPills to learn the phase of the moon, its position, as well as the time of sunrise, sunset, moonrise, moonset and anything else related to your shoot. The more you’ve prepared, the higher the chance you’ll get a great image.

Tips and Tricks for Night Photography the Starry Sky

Let’s summarize what you should know before going out photographing:

  • Time of twilight
  • Time of Nautical and Astronomical dark
  • Phase of the moon
  • Moon’s position in the sky
  • Time of moonrise and moonset
  • When The Milky Way is visible (if applicable)
  • The Milky Way’s position (if applicable)

All this information is easy to find in an app such as PhotoPills or by doing a quick search online.

General Ideas for Night Photography

If your goal is photograph stars and the natural night sky, I think it’s fair to guess that you want to see as many stars as possible. In order to get the best possible view of the stars, you’ll need to position yourself at a location that’s away from larger cities and light pollution.

Tips and Tricks for Night Photography the Starry Sky

A subtle display of Northern Lights in Lofoten.

Website and maps such as DarkSiteFinder are great resources when searching for areas with less light pollution. If you live close to a major city you’ll probably have to travel a little further than if you live near a small town. There are filters, such as NiSi’s Natural Night Filter, that help reduce the light pollution but it won’t magically remove it all and give you a starry sky – it simply neutralizes the color of the light pollution.

For the most detailed night sky, it’s also ideal to avoid the weeks closest to a full moon. During that period, the sky is brighter and there are fewer stars visible to both the camera and the naked eye. However, that doesn’t mean that you should stay home; there are many interesting subjects during the full moon as well.

The Milky Way

Norway is known for Northern Lights, dark and starry nights, as well as the overall beautiful landscape but what we don’t have is The Milky Way. Let me be a little more specific; the Galactic Center (the brightest most visible part of The Milky Way that you see in most photos) is never visible in Norway – we only see the edges of it. So, you can imagine my excitement every time I get a chance to photograph the Galactic Center and The Milky Way in its most beautiful display.

Milky Way photography - Tips and Tricks for Night Photography the Starry Sky

The techniques for photographing The Milky Way are mostly similar to other types of night photography. You’ll want to use an open aperture, high ISO and a shutter speed of no more than 30 seconds. I find that a slightly higher ISO and a shutter speed of around 25 seconds (when shooting at 14mm @f/2.8) gives the highest amount of detail when photographing The Milky Way. By using a slower shutter speed, the camera starts picking up slight movement in the stars (due to earth’s rotation) and it begins to get blurry.

It’s also best to photograph The Milky Way during the new moon or before the moon has risen. The darker the sky, the more stars you see and the more detailed The Milky Way becomes.

Photographing a Meteor Shower

Whenever there’s a meteor shower, such as the recent Perseids Meteor Shower, I keep my fingers crossed for clear skies. There’s nothing more magical than being outside in the pitch black, looking up at dozens or even hundreds of shooting stars during a span of several hours.

Northern Light Meteorite - Tips and Tricks for Night Photography the Starry Sky

Since most the shooting stars last for only a second or two, it can be hard to capture them in an image. In order to capture as many of them as possible, I set my camera to interval shooting and I let it go continuously. To pick up even the smaller shooting stars I increase the shutter speed slightly to approximately 15 seconds (depends on the brightness of the night).

Photographing the Northern Lights

Northern Lights is a phenomenon that we’re lucky to have in the northern hemisphere. It’s unlike anything else and I can guarantee that once you see it, you’ll want to witness it again.

The challenges when photographing the Northern Lights is that it often moves quite quickly and it can be rather bright. In order to freeze the motion, you’ll need a quicker shutter speed such as 1-10 seconds. Exactly how quick depends on the intensity of the lights. Just keep in mind that if they’re moving quickly, you should use a quicker shutter speed.

Northern Lights Iceland - Tips and Tricks for Night Photography the Starry Sky

Also, pay attention to the histogram as it’s easy to blow out the highlights. Since it’s a bright phenomenon in the otherwise dark night, the contrast can be great. I recommend always exposing for the highlights and if needed take a second exposure for the landscape that you can blend in later during post-processing.

Slow it Down and Photograph Star Trails

Due to the rotation of the earth, your camera registers movement in the stars once the shutter speed becomes too long. This creates a blurry and soft sky and can be quite displeasing to watch.

That being said, every now and then this is something you want to use as an advantage rather than viewing it as a problem. By lengthening the shutter speed to several minutes or even an hour (this lets you use a low ISO and narrow aperture but may result in hot pixels) you’re able to capture what’s known as star trails. This effect can be really interesting but make sure that the shutter speed is long enough so that the stars don’t just look blurry.

Tips and Tricks for Night Photography the Starry Sky

Stars over the Sahara desert – image by dPS Editor Darlene Hildebrandt. Series of 30-second exposures over 45 minutes, stacked using StarStax, blended with a couple of light painted images of the tent.

Alternatively, you can capture a series of images using a shorter shutter speed and merge them together in Photoshop or a software such as StarStax.

Full Moon and Bright Moon Phases

As I’ve mentioned previously, nights, when the moon is small, are best for night photography as it’s during this period you’ll see most stars. However, when the moon is up there are still many interesting images to be captured.

moonrise in lofoten - Tips and Tricks for Night Photography the Starry Sky

First of all, since the moon is a bright source of light, you can get away with using a slightly lower ISO or narrower aperture. It can also be easier to find a composition as the landscape is brighter. Use this light to your advantage and pay attention to the shadows in the landscape. Perhaps the moon lights up a mountain? Perhaps it creates a nice reflection in a lake? During this period, it can be wise to compose your image to include more landscape than sky as that’s where the most interesting things are happening.

Personally, I prefer to photograph the moon when it has a low position in the sky as I find the shadows to be slightly more interesting during that time. Note: This is for the same reasons shooting at sunrise and sunset are best for daytime landscape photography.

Conclusion

Have you tried night photography before? If not, grab your camera and tripod (and maybe a buddy for some company) and get out and give it a go. Share any other night photo tips you have in the comments below as well as your night sky images. We’d love to see them.

The post Tips and Tricks for Night Photography of the Starry Sky by Christian Hoiberg appeared first on Digital Photography School.


Digital Photography School

 
Comments Off on Tips and Tricks for Night Photography of the Starry Sky

Posted in Photography


From the forums: Starry skies time-lapse

08 May

Longtime DPReview member Tanveer, whose username is tsk1979, created this beautiful time-lapse over the past two years, mostly with a Sony a7 mirrorless camera. The video includes the summer Milky Way, the winter Orion, Andromedia in the North and Sagittarius in the South.

So throw on a pair of headphones, dim the lights and take a few minutes out of your day to immerse yourself in the night sky. Also be sure to check out Tanveer’s image galleries and Facebook photography page.

Articles: Digital Photography Review (dpreview.com)

 
Comments Off on From the forums: Starry skies time-lapse

Posted in Uncategorized


Night House: Artist Cloaks Suburban Home Facade in Starry Skies

02 Dec

[ By WebUrbanist in Art & Installation & Sound. ]

night house suburban intervention

House painting is such time-consuming and meticulous work just to get a single color on a facade; perhaps next time you could clad your home in printed image of the night sky instead.

night house looking up

night house in making

For the Night House, Chicago artist Kate McQuillen covered a suburban house with a contiguous skyscape of nighttime space images digitally printed on weatherproof styrene panels.

night house poster project

The project was funded by sales of a screenprinted poster and created as part of the Terrain Biennial, an Oak Park-based international exhibition of yard, balcony and porch interventions.

night house glowing stars

night house screenprinted wall

Like some kind of suburban camouflage, the covered sections of the home start to disappear against the backdrop of the sky at the right times of early evening and morning. Read also: The Night House, a poem by Billy Collins.

Share on Facebook


[ By WebUrbanist in Art & Installation & Sound. ]

[ WebUrbanist | Archives | Galleries | Privacy | TOS ]


WebUrbanist

 
Comments Off on Night House: Artist Cloaks Suburban Home Facade in Starry Skies

Posted in Creativity


Photographing Starry Skies for Nocturnal Landscape Without Breaking the Bank

02 Aug
Photo01

Milky Way over the Belgian countryside – Sony RX100, 28mm equivalent f/1.8 + LPR (Light Pollution Reduction) filter, ISO 6400. Panorama composed of 12×3 frames, each frame is the image average of four different photos

Photography in low-light conditions is one of the most challenging things to do with a camera. In conditions with faint, moving, distant lights it is even trickier. There is something about a starry sky that simply inspires awe in all of us. And it does so more often since light pollution is getting worst all around the world. I wonder how many children have seen The Milky Way first hand.

Recently, night photography caught my attention because, it is convenient for me. It is the time my duty as father can be left to sleep alongside my son, and the photographer in me can go out hunting starry skies. What is not convenient, is that I live in Belgium. People may know Belgium for its massive variety of beer, but also sports one of the most light polluted skies in all of Europe (dare I say the world?). Don’t believe me? Check the image below, extracted from the Dark Site Finder website.
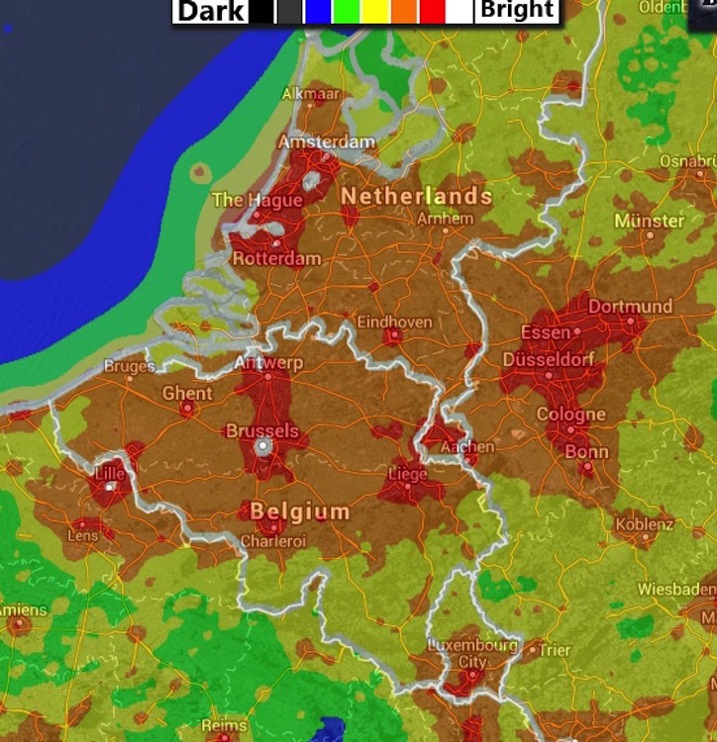
Photo02

Light pollution in Belgium (Source: Dark Site Finder)

As you can see, in Belgium the most you can hope for is a moderately dark sky, somewhere between typical urban suburbs and rural skies. This is mostly due to the presence of street lights lighting up almost all of the Belgian road network. Unfortunately, true dark skies are among the rarest gems in Europe: small, precious, and hard to find. Let me be clear here – nothing beats a truly dark sky and a clear atmosphere when it comes to photographing the stars.

But fear not – we can still get some pretty photos of starry nights with a bit of patience and the right gear.

Astrophotography versus nocturnal landscape

There are two main kinds of night photography that involve the starry sky: astrophotography and nocturnal landscape photography.

The first, in my view, is the attempt to photograph distant objects in the sky (planets, nebulae, galaxies) with no landscape. This kind of photography is usually achieved by using a camera mounted to a telescope (or to a long telephoto lens), all mounted on a motorized head on a tripod. Objects in the sky move pretty fast, so if you cannot track their movement with some sort of tracking device, you will not get many astrophotos. This kind of photography has its own challenges, but it is pretty straightforward: get a telescope, a tracking head, a sturdy tripod and you are pretty much done. A number of filters are also available to enhance the view of nebulae, planet and galaxies, as well to suppress the sky glow and punch through light polluted skies.

Nocturnal landscapes, instead, are another kind of beast entirely – the main problem is that you have the stars moving (fast!) across the fixed landscape. If your exposure is too long, stars will stop appearring as dots, and will begin to become trails. And you cannot track their movement or the landscape will be blurred. Here is the difficulty – you are trying to photograph in low light faint, distant lights and you want to do that as fast as possible (except if you do want to photograph star trails). The technical steps you have to adopt in order to capture a nocturnal landscape may vary depending if you want record star trails or not, and on the darkness of the sky above you.

What you cannot (easily) control: The ideal conditions

Ideally you want to have:

  • The darkest sky possible above you
  • A clear, moonless night (few clouds are allowed)
  • A clear and thin atmosphere
  • An interesting view or foreground

Remember, you are still doing landscape photography. A boring landscape with a dark, empty foreground will ruin even the most majestic of skies. You need to balance both parts to get a keeper.

What you can control: The ideal gear

Ideally, money is one of your last concerns and you have a digital full frame camera (oh what the heck, let’s take a digital medium format camera, even better) with excellent ISO capabilities and a set of fast (ideally f/1.4 to f/2.8) and sharp lenses to put in front of your sensor. Also, you need a sturdy tripod and head, a remote shutter, a headlamp (to see what you are doing) and strong lights (or even off-camera flashguns if you are brave enough) to do some light painting.

If you are like me, and money is a constraint, you can get away with any camera able to shoot at 3200 ISO (while still retaining some image quality) in RAW format. But you will still need fast glass (a lens with a large maximum aperture), anywhere from f/1.8 up to f/3.5.

To give you an idea, below there is the list of my current gear for nocturnal landscape photography:

  • Olympus OM-D EM–10
  • Samyang 7.5 f/3.5 UMC fisheye (Micro Four Thirds) – equivalent to 15mm on full frame
  • Samyang 12 f/2.0 NCS CS
  • Sigma 30 f/2.8 Art DN
  • Sony DSC-RX100 M2 (yes, a compact camera)
  • Manfrotto 055XPROB + ball head
  • MeFoto + ball head with uncoupled pano movement
  • Spare SD memory cards and batteries
  • Remote shutters with intervalometer

Nocturnal Landscapes with star trails
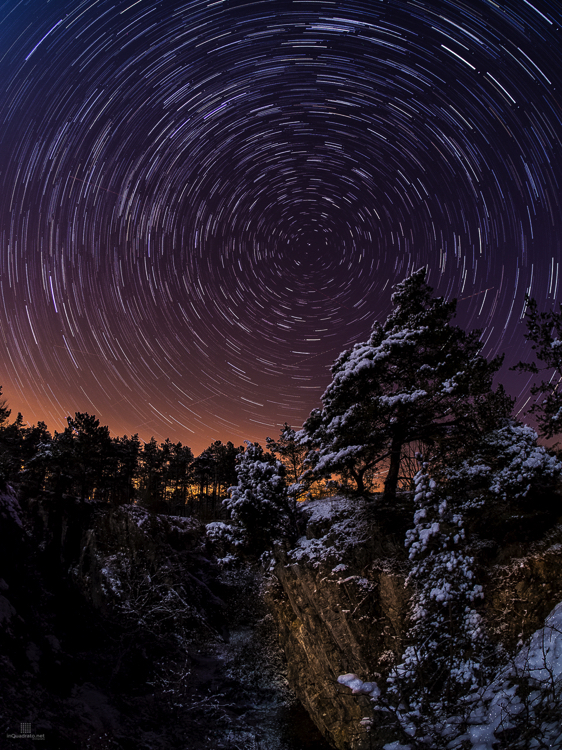
Photo03

Star trails (Stack of 60 frames taken with Olympus OM-D EM–10 + Samyang 7.5 f/3.5 fisheye lens)

The easiest nocturnal landscape you can take is one with star trails, mainly because you are not trying to fight the sky’s rotation (well, technically the Earth’s rotation). Instead, use this to your advantage to create striking images, in particular if you can get the North Star in the frame, so that you will end up having concentric star trails, all centred on the North Star (assuming you are in the northern hemisphere, of course).

In principle, all you need to do is: compose your scene, focus on infinity, set the camera in BULB mode and go grab some coffee. The longer you let the camera register the scene, the higher the number of trails you will record; and they will be longer and more continuous. Practically however, you do not want to do that because the noise due to the overheating sensor (hot pixels) will degrade the quality of the final image. You are better off by taking many shorter exposures (30 seconds each) and stack them later using software like StarStax or similar. This will allows you to keep the digital noise under control, with the downside of recording a great number of images to process later. Be sure you have a high capacity SD card that is empty, and your battery is fully charged before you start taking the sequence. An intervalometer is a must in order to set the appropriate number of shots to take, and the time interval between them. Never touch your camera until the end of the shot sequence.

In summary, get an interesting composition and fire at will. It does not require much more than that. You can even do cityscapes with star trails, like the shot below; this is a view over the city center of Brussels (Belgium), from the roof of my building.
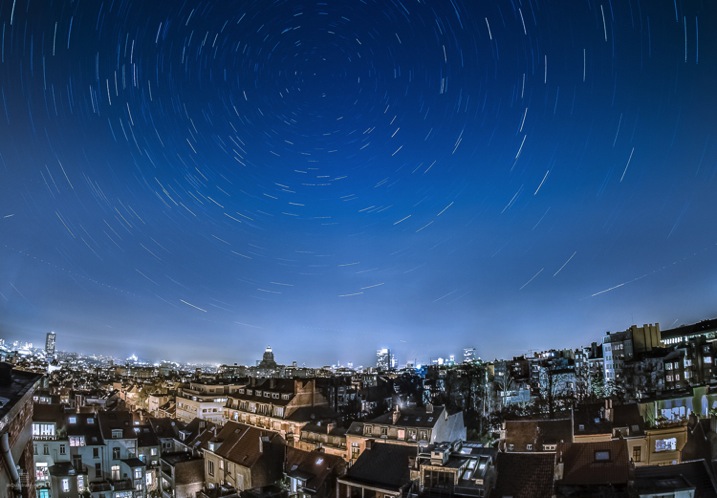
Photo04

Star trails over Bruxelles, Belgium. (Stack of 400 frames taken with Olympus OM-D EM–10 + Samyang 7.5 f/3.5 fisheye lens)

With cityscapes there is the extra difficulty of not blowing out the city lights, which are much brighter than the sky. Graduated filters may be of great help if you have a distant, flat horizon. Else, just expose (to the right) for the city and hope for the best, but some stars should show through. Mind your exposure time will be short because of the bright cityscape, so be prepare to shot a lot of frames (note the number for the shot above).

Nocturnal landscapes without star trails

Basically, the Holy Grail is getting a bright, sharp, colourful, and structured image of the Milky Way to shine across your landscape. This is the most difficult task and requires much more thinking that just doing star trails.

  • Size matters – the Milky Way is huge, so you need an ultra wide angle, or a fisheye, lens to fully capture our galaxy
  • Time matters – you want to get a sharp image of the sky, meaning you should avoid recording the stars movement. There are a couple of mathematical relations that can be used to estimate the longest time you can record the scene at a given focal length (or the equivalent in 35mm if you have a cropped sensor) before stars begins to form trails. These are called 600 and 500 rules: the longest time you can record the image is given by the following equations:Exposure time (t) = 600 / Focal Length OR Exposure time (t) = 500 / Focal LengthWhere the 500 rule is the most conservative of the two. Once you get the maximum exposure time (t) for your chosen focal length, it is just a matter of setting the proper aperture and ISO settings to match it. Usually you will need to use a larger aperture (small f-number), a good starting point for setting the proper ISO value is given by the following equation:

ISO = (6000 * f^2) / Exposure time  – f^2 means the f-number to the power of two

For example, with my Samyang 12mm f/2.0 on my Olympus OM-D (crop factor 2x), in order to get a good sky I should use a shutter speed no longer than: Exposure time = 500/(12*2) or approximately 21 seconds.

Assuming I go for the widest aperture, I should use an ISO value of about:  ISO = 6000 * (f2.0 to the power of 2 = 4) / 21 = 1142 or rounded up to ISO 1150. 

If, say, the aperture was set to f/4.0 instead of f/2.0, the ISO will need to be: ( 6000 * (4.0 ^2)  / 21 OR ( 6000 * 16 ) / 21 = 4571.

With this in mind, it is obvious that wider and faster your lens is, the easier it will be to record a good sky. This will also allow you to use a relatively low ISO, to keep the digital noise as low as possible. The shot below is one of my first attempts to capture the Milky Way. It has been done with my OM-D EM–10 with the Samyang fisheye at f/3.5, ISO 1000 with a shutter speed of 40 seconds, under a fairly dark sky (for Belgian standards).
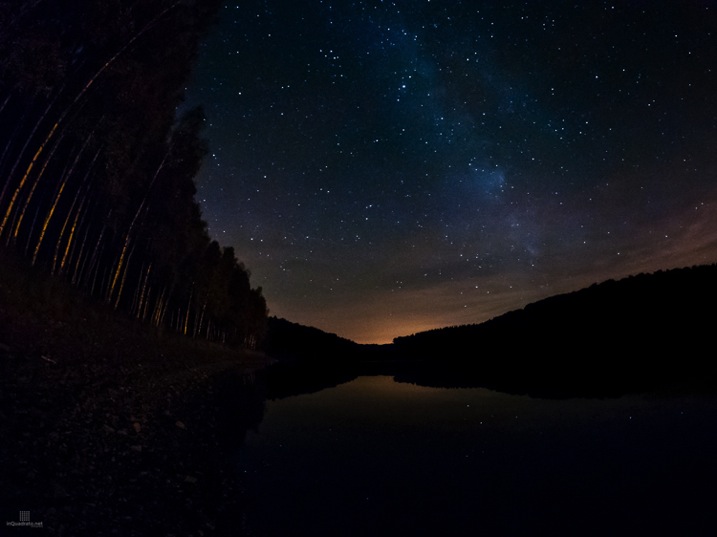
Photo05

The Milky Way in the winter Belgian sky (Olympus OM-D EM–10 + Samyang 7.5 f/3.5 fisheye lens)

Doing nocturnal landscape panoramas

As if the things were not already complicated enough, sometimes a single shot is not enough; either because it is not wide enough, or because you want to produce really large prints and you need to have a file with a resolution larger than that of a single photo. Sometimes you want to do a nocturnal panorama and that means taking different images and merging them later to form a panorama. The only difficulty is that you need to be precise in the camera movements and work as fast as possible to avoid large star movements between one photo and the next. In my experience it is also best to use a wide lens, like a 28mm (in 35 or full frame format) or wider. This because software struggles to automatically stitch together photos containing only stars and no big, fixed points, like a part of a rock or a tree, and also because longer focal lengths will require a greater number of frames to stitch together to cover the same view. For seamless stitching of the different frames, it is best to allow a superposition between the frames in the order of 30–50%.

To help you to work fast, note the vertical and horizontal angles of view for your lens and your camera before heading out. A great tool for this is the Angle of View Calculator. Once you know the vertical and horizontal angles of view you can move precisely and fast with your camera by using the graduated scales on you tripod head.
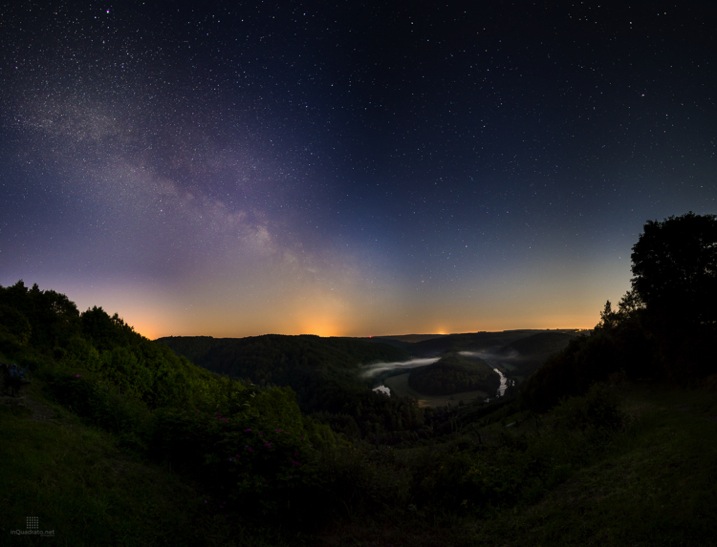
Photo06

The Milky Way over the Belgian Ardennes – Olympus OM-D EM–10 + Samyang 12 f/2.0; panorama composed of 12 (4×3) photos.

Fighting the evil orange glow: LPR filters

Light pollution is, unfortunately, a sad reality in many countries. It is not always possible to be under your dream sky and you have to try to deal with light pollution and the resulting orange glow in the sky. As I mentioned when introducing astrophotography, some filters exist to help holding back light pollution by absorbing light of specific wavelengths: in particular, broad band Light Pollution Reduction (LPR) filters try to reduce the orange glow by absorbing the light emitted by streetlights used in cities and on roadways. Those lights are from low and high pressure sodium lamps, which emit light at around 583nm; this light is cut by the LPR filters. The transmission spectrum for my Sky-watcher LPR filter is shown below.
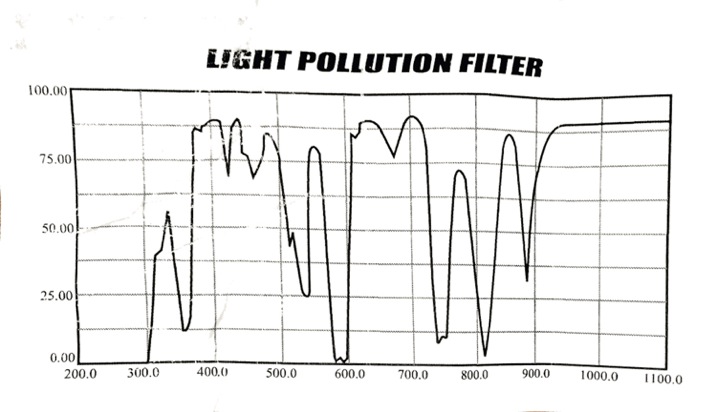
Photo07

Typical transmission spectrum of a broadband LPR filter.

There are many kinds of filters and light polluting sources so you have to find the right filter to suppress or reduce the kind of light in your location. At the moment, here in Belgium, I am happy with the Sky-watcher LPR filter. There are several manufacturers who produce different filters to suit different equipment, as well as large and small wallets. Just have a look for Sky-watcher LPR and UHC filters or Astronimik CLS filters just to name two options.

Do the filters really help in the field? It depends on the kind of light pollution, and also on the amount of pollution versus ambient light. I found that in some circumstances the filter clearly helps, and the non-filtered image cannot be saved in post processing. Other times, the filter seems to be less important. Anyway, with a polluted sky I’d say the filter does help. The image below shows the effect of the filter on street lights compared to using no filter; in both cases you can see the RAW and edited image. They should speak for themselves.
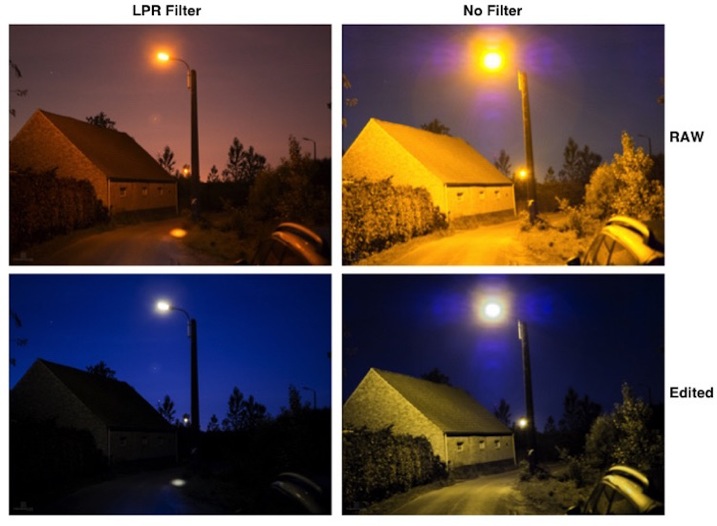
Photo08

Comparison between test shots with and without an LPR filter

Note there are some downsides to the use of this filter. First, it darkens the scene of about one stop (the images above are taken at the same exposure value by using a slower shutter speed when the filter was in use), and it does not work with wide angle lenses. This is because it is an interference filter, and cannot handle light coming in with very different angles, like when using a wide angle – it will generate banding on the image that is difficult or impossible to remove. The solution is using lenses with an equivalent focal length of about 30mm or more and shoot a panorama.

Having to deal with a one stop loss of light, and the use of lenses with a relatively long focal length is challenging, in particular if the lenses you have are not very fast, but it is worth giving the filter a shot.

A final word of caution: cheap LRP filters like mine come usually in sizes of 1.25” or 2” in diameter, and the most suitable diameter of the two is 2”, which corresponds to a 48mm threaded filter. This size suits very well many lenses for micro four thirds camera, such as the Panasonic Lumix 14mm f/2.5 and Lumix 20mm f/1.7, old Zuiko legacy lenses, Sigma 19 and 30 f/2.8 and so on. With larger lenses the amount of vignette you will get will probably make it impossible to produce a useable panorama.

Because my fastest, not too wide lens, is the wide end of the zoom on my Sony DMC-RX100 M2, which is equivalent to a 28mm f/1.8, I decided to play along and use it to photograph the Milky Way. I went to the Chateau de la Hulpe, in La Hulpe (Belgium), which is located a few miles from Bruxelles, under a heavily polluted sky (even for Belgian standards) and I made a 8×4 panorama of the Castle under the Milky Way. I fitted the camera with the LPR filter and shot 18, 20 second long, exposures at f/1.8 and ISO 6400. To contain the digital noise, each frame used for the panorama is the result of image averaging two shots. The result is shown below. I think it is not bad at all and that there is still plenty of room for improvement.
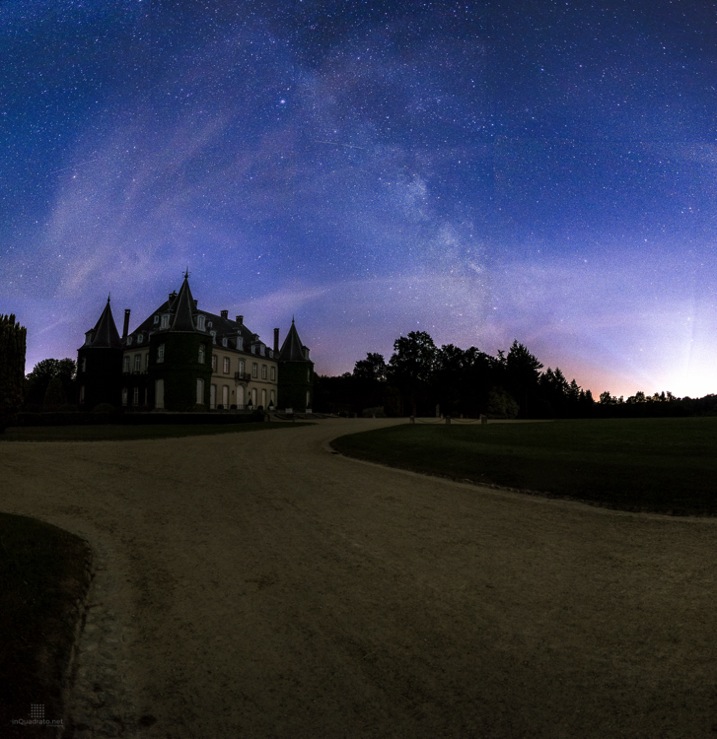
Photo09

The Milky Way in the Belgian heavily light polluted sky – Sony DMC-RX100 M2 at 10.4mm (equivalent to 28mm on full frame camera) and f/1.8 + LPR filter; panorama composed of 32 (8×4) frames.

In summary, don’t give up just yet, if you live in a light polluted area; with a bit of luck (and gear) there is hope, even in the orange glowing sky.

Disclaimer: I am not associated in any way with Skywatcher, Astronomik, Panasonic, Olympus or with any of the other brands I have mentioned in this article.

googletag.cmd.push(function() {
tablet_slots.push( googletag.defineSlot( “/1005424/_dPSv4_tab-all-article-bottom_(300×250)”, [300, 250], “pb-ad-78623” ).addService( googletag.pubads() ) ); } );

googletag.cmd.push(function() {
mobile_slots.push( googletag.defineSlot( “/1005424/_dPSv4_mob-all-article-bottom_(300×250)”, [300, 250], “pb-ad-78158” ).addService( googletag.pubads() ) ); } );

The post Photographing Starry Skies for Nocturnal Landscape Without Breaking the Bank by Andrea Minoia appeared first on Digital Photography School.


Digital Photography School

 
Comments Off on Photographing Starry Skies for Nocturnal Landscape Without Breaking the Bank

Posted in Photography


Secret Skies: See Starry Nights Normally Hidden by City Lights

03 May

[ By WebUrbanist in Art & Photography & Video. ]

sky glow

With the rise of urbanization, an estimated 80% of the world population has never seen the Milky Way – and while rural dwellers see thousands of stars on a typical night, those in cities typically see a few dozen at best.

night sky la overloook

time lapse anitmation

As part of their Skyglow project, astrophotographers Harun Mehmedinovic and Gavin Heffernan taking pictures from around the country in darkened areas where the night sky is visible, in some cases turning them into true-to-life composites showing what the skies above cities would look like with the lights turned off. In other instances, their timelapses show the rotation of Earth against the sky.

night sky images

night sky timelapse

night urban swirl

Urban light pollution is not just a problem of lost views – it has been known to interfere with bird migrations and other animal behavior, not to mention sleep disorders and disease correlations in humans. Cities like Phoenix, Arizona, are trying to take back the night sky, dimming non-essential artificial lights to cut energy consumption.

You can support the project on Kickstarter for rewards as well: “SKYGLOW will also explore the evolution of our relationship with astronomy over time, including the impact of stars on imagination, mythology, and the sciences. By visiting incredible archaeoastronomy locations like Canyons of the Ancients, Chaco Canyon and Mesa Verde, SKYGLOW will explore the relationship between ancient civilizations and the galaxies they worshiped. Can we learn from them? “

Share on Facebook


[ By WebUrbanist in Art & Photography & Video. ]

[ WebUrbanist | Archives | Galleries | Privacy | TOS ]


WebUrbanist

 
Comments Off on Secret Skies: See Starry Nights Normally Hidden by City Lights

Posted in Creativity


Starry Night: Glow-in-the-Dark Bike Path Inspired by Van Gogh

14 Nov

[ By WebUrbanist in Technology & Vehicles & Mods. ]

night cycling visibility green

Opening last night in Nuenen, Holland, this illuminated cycling surface is free to the public, storing sunlight during the day to create stellar patterns to guide riders after dark. First of its kind on the planet, the swirling shapes of this path are recognizably inspired by one of Vincent van Gogh’s most famous paintings.

night path now open

night cycling path glowing

Developed by Dutch artist and innovator Daan Roosegaarde in conjunction with infrastructure specialists from Heijmans, this pathway is a potential prototype for future cycling paths using smart paint technologies as well as an extension of an ongoing series of glow-in-the-dark highway projects and other urban improvement proposals in the works around the world.

night path standing view

night cycling rider shot

Part practical lighting scheme and part installation art project, the path is located along a stretch of a bicycling route passing through Noord Brabant, the region from which van Gogh originated, which in turn connects various notable sites from his personal life and work. Its creator explains: “I wanted to create a place that people will experience in a special way, the technical combined with experience – that’s what techno-poetry means to me.”

night cycling image large

night path holland biking

night biking path lights

The semi-abstract pixelated swirls are a high-tech reference to Starry Night, painted in 1889 and depicting an idealized view from the east-facing window of the painter’s asylum room at Saint-Rémy-de-Provence (now part of the permanent collection of the Museum of Modern Art in New York City).

night cycling aerial view

starry night inspired path

night cycling path image

night path cyclist picture

Studio Roosegaarde is known for “tactile high-tech environments in which viewer and space become one. This connection, established between ideology and technology, results in what Roosegaarde calls ‘techno-poetry’. His often interactive work connects people with art and people with people.”

Share on Facebook


[ By WebUrbanist in Technology & Vehicles & Mods. ]

[ WebUrbanist | Archives | Galleries | Privacy | TOS ]


WebUrbanist

 
Comments Off on Starry Night: Glow-in-the-Dark Bike Path Inspired by Van Gogh

Posted in Creativity


Weekly Photography Challenge – Starry Nights

27 Sep

Earlier today I shared a collection of starry night photos.

Photograph Fossilized UFO by Sakhr Abdullah on 500px

Fossilized UFO by Sakhr Abdullah on 500px

We have some good articles on shooting the stars and night photography here on dPS including;

  • How to Photograph the Stars
  • Photography Under the Stars
  • Down and Dirty Guide to Milky Way Photography
  • Tips for Photographing Star Trails

As you may have guessed you’re going to need these tips because it’s your turn to go out and shoot in this week’s challenge:

Starry nights

Photograph Mt Bromo Under The Stars by Elia Locardi on 500px

Mt Bromo Under The Stars by Elia Locardi on 500px

Photograph Startrails Matterhorn by Stanley Chen Xi on 500px

Startrails Matterhorn by Stanley Chen Xi on 500px

Photograph Stars 1 - Las Vegas Photographer - Ati Nagy by Ati Nagy on 500px

Stars 1 – Las Vegas Photographer – Ati Nagy by Ati Nagy on 500px

Photograph Eternal Loneliness by Stergos Skulukas on 500px

Eternal Loneliness by Stergos Skulukas on 500px

So grab your camera and tripod and get shooting!

Share your starry night images

Simply upload your shot into the comment field (look for the little camera icon in the Disqus comments section as pictured below) and they’ll get embedded for us all to see or if you’d prefer upload them to your favourite photo sharing site and leave the link to them. Show me your best images in this week’s challenge.

Share your starry night images

Simply upload your shot into the comment field (look for the little camera icon in the Disqus comments section as pictured below) and they’ll get embedded for us all to see or if you’d prefer upload them to your favourite photo sharing site and leave the link to them. Show me your best images in this week’s challenge.

The post Weekly Photography Challenge – Starry Nights by Darlene Hildebrandt appeared first on Digital Photography School.


Digital Photography School

 
Comments Off on Weekly Photography Challenge – Starry Nights

Posted in Photography


Collection of Starry Night Images

27 Sep

Photographing the night sky is challenging and also very rewarding. Doing it well takes patience and skill. In this collection I’ve searched for some outstanding starry night images for you.

Let the star gazing begin!

Photograph A Legend of Starry Night by Shawn Yang on 500px

A Legend of Starry Night by Shawn Yang on 500px

Photograph Home on the Range by Ben Canales on 500px

Home on the Range by Ben Canales on 500px

Photograph Starry night in Santorini by Luca Bettarini on 500px

Starry night in Santorini by Luca Bettarini on 500px

Photograph Black Magic! by Piyush Hatolkar on 500px

Black Magic! by Piyush Hatolkar on 500px

Photograph the road by jonathan sander on 500px

the road by jonathan sander on 500px

Photograph ~ Early morning ~ by Prakash Bajracharya on 500px

~ Early morning ~ by Prakash Bajracharya on 500px

Photograph Medieval Vortex by Javier Martinez Moran on 500px

Medieval Vortex by Javier Martinez Moran on 500px

Photograph Galaxy love by Leung King Lun on 500px

Galaxy love by Leung King Lun on 500px

Photograph The Sky Watcher by Nimrod Genisher on 500px

The Sky Watcher by Nimrod Genisher on 500px

Photograph Starry Night by Vahid Varasteh on 500px

Starry Night by Vahid Varasteh on 500px

Photograph The Path to God by Hammad Iqbal on 500px

The Path to God by Hammad Iqbal on 500px

Photograph Starry Night by Alan Aurmont on 500px

Starry Night by Alan Aurmont on 500px

Photograph Life Struggles by Royce's NightScapes on 500px

Life Struggles by Royce's NightScapes on 500px

Photograph Starry night by Jorge Maia on 500px

Starry night by Jorge Maia on 500px

Photograph Past Life by Ben Canales on 500px

Past Life by Ben Canales on 500px

Photograph Mobius Arch by Sungjin Ahn on 500px

Mobius Arch by Sungjin Ahn on 500px

Photograph Night Train by Aaron J. Groen on 500px

Night Train by Aaron J. Groen on 500px

Photograph Stars over Teton homestead by Royce's NightScapes on 500px

Stars over Teton homestead by Royce's NightScapes on 500px

Photograph Starry lighthouse by Ivan Pedretti  on 500px

Starry lighthouse by Ivan Pedretti on 500px

Photograph Starry road by Ivan Pedretti  on 500px

Starry road by Ivan Pedretti on 500px

Photograph Starry Night over Crater Lake by Rick Parchen on 500px

Starry Night over Crater Lake by Rick Parchen on 500px

Photograph Starfalls by Ben Coffman on 500px

Starfalls by Ben Coffman on 500px

Photograph Stars over Historic Ward Charcoal ovens by Royce's NightScapes on 500px

Stars over Historic Ward Charcoal ovens by Royce's NightScapes on 500px

Photograph In the Still of the Night by Jessica Hendelman on 500px

In the Still of the Night by Jessica Hendelman on 500px

Photograph All That Glitters – Milky Way Above Yosemite Forest by Jim Goldstein on 500px

All That Glitters – Milky Way Above Yosemite Forest by Jim Goldstein on 500px

Photograph Stargazing Through A Window by Jerry Patterson on 500px

Stargazing Through A Window by Jerry Patterson on 500px

Photograph Reflection of the Galaxy | Pfeiffer Beach, California by Ali Erturk on 500px

Reflection of the Galaxy | Pfeiffer Beach, California by Ali Erturk on 500px

Photograph Earth, Air, Fire and Water by Greg Gibbs on 500px

Earth, Air, Fire and Water by Greg Gibbs on 500px

Photograph Andromeda Galaxy by Rogelio Bernal Andreo on 500px

Andromeda Galaxy by Rogelio Bernal Andreo on 500px

The post Collection of Starry Night Images by Darlene Hildebrandt appeared first on Digital Photography School.


Digital Photography School

 
Comments Off on Collection of Starry Night Images

Posted in Photography


Weekly Challenge – Starry Night Photography

24 May

This week we had some Beginners Tips for Night Sky and Star Photography by one of our newest dPS writers, Phillip VanNostrand. Earlier today I shared a collection of Dreamy Star Photography.

By Dennis Behm

So, now it ‘s your turn. Get out into the night and photograph some stars for this week’s challenge:

Starry Night Photography

Here are a few more starry night photos to get you motivated, inspired and ready to go shoot.

By Bill Shupp

By Kris Williams

By slworking2

By Tom Bricker

By David Kingham

By Brian Hawkins

Need more help with some tips and tutorials? Try these:

  • Lake Tekapo Under the Stars
  • The Night Sky In Landscape Photography
  • Tips for Photographing Star Trails
  • Photography Under the Stars

Share your starry night photography

Simply upload your shot into the comment field (look for the little camera icon in the Disqus comments section as pictured below) and they’ll get embedded for us all to see or if you’d prefer upload them to your favourite photo sharing site and leave the link to them. Okay, ready to impress us?


The post Weekly Challenge – Starry Night Photography by Darlene Hildebrandt appeared first on Digital Photography School.


Digital Photography School

 
Comments Off on Weekly Challenge – Starry Night Photography

Posted in Photography