RSS
 

Posts Tagged ‘stands’

6 Ways to Do Architecture Photography That Stands Out

11 Sep

Architecture offers a great advantage over other fields of photography in that your subject will remain in one place. It is, therefore, easier to locate a subject and it will still be there the next time you visit. But this does not mean that photographing buildings is easy. To capture striking architecture photography requires hard work and lots of practice.

Architecture photography 01

Here are some tips to help you create architecture photos that stand out and catch the eye:

1) Nighttime illuminations

You can create your own interesting images of architecture by shooting a city at night.

Photographing architecture at night as opposed to daytime can transform an image with the variety of light providing a unique perspective. While sunlight can provide shadows and interesting angles of light during the day, you will find nighttime can help to make an image more radiant with bursts of building and street light contrasting a vivid color palette from the sky.

One way to obtain eye-catching images is to start photographing at dusk when the sky retains some light as it begins to be tinged with darkness. At this time of day (blue hour), the rich blue hue nicely balances the lights on the building.

Architecture photography 02

You will find it is best to use a tripod at nightfall because of the low light levels. I recommend that you try different exposures to find the best settings and experiment with your composition.

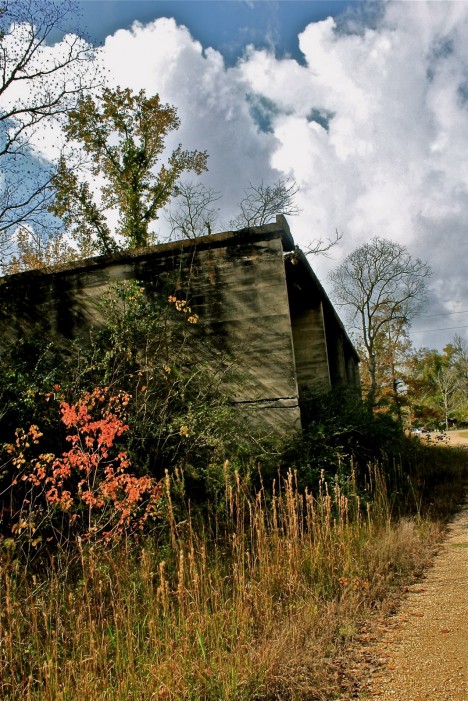
2) The postcard look

Have you ever wondered how to shoot that wow factor image? To create something fresh and distinct you will need to consider your viewpoint and the building you are photographing.

Often, the best viewpoint is the one that reveals queues of tourists, street signs, or other unsightly elements.

This photogenic prospect of a church on a hilltop was partially obscured by bushes and trees so I found a position that shows off the building while concealing any eyesores. A wider landscape (horizontal) shot suited this subject better over a portrait (vertical) format and creates a picture-postcard look.

Architecture photography 03

It can be very rewarding when you nail a great image that you would be proud to hang on your wall.

Light is another factor to consider when striving to capture your very best architecture images. Consider the interplay of light and any interesting patterns that emerge.
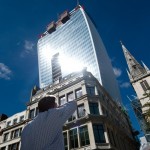
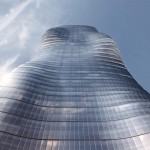
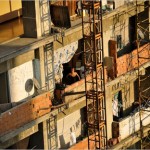
3) Abstract views

Many example photos of modern architecture offer a visual treat with massive forms and flows of energy. But how do you capture the qualities inherent to a building in one image?

Sometimes it is impossible to photograph a building in its entirety either because you cannot stand far back enough without an obstruction or you are at risk by standing in a traffic-heavy street. Instead, move closer to the building and capture some of its details.

You can also shoot at a wide-angle setting to capture abstract views that provide a sense of the space or shoot upwards towards the upper structure of the building.

Architecture photography 04

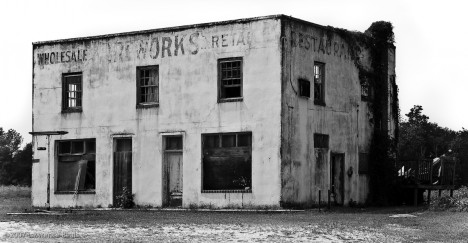
4) Iconic city landmarks

When photographing important architectural landmarks, we tend to photograph them in a certain way that has been photographed before. There is nothing wrong with capturing this familiar and general view. In fact, I encourage you to shoot an iconic monument in this way as there is often a limited number of uninterrupted views.

It is also good practice to try and find another view of the icon, perhaps by including other buildings or subjects.

Architecture photography 05

5) World landmarks

The world is a huge place with a spectacular abundance of photogenic global landmarks. The Taj Mahal in Agra, India is a magnificent architectural example that is breathtakingly beautiful in any light. When you capture a world landmark such as the Taj Mahal, I suggest you select the largest picture size settings for your camera and the optimal image quality to ensure the finest images are captured.

If you can, photograph the landmark at different times of the day. The changing light can be used to develop interesting compositions. Shoot in broad daylight to capture vibrant colors, strong shadows, and clouds and then create a more atmospheric image by shooting the landmark at sunset.

Architecture photography 06

Architecture photography 07

6) Bridges and bridge life

Bridges throughout the world are the hub of daily life and transport. Whether old or new, suspended or cantilever and of stone or metal construction, bridges are full of photographic potential.

To create images with impact, consider what you want to shoot. Photographing a bridge and the city shows more context and distance while shooting an intrinsic part of the structure such as girders and cable displays defines the bridge’s details.

Architecture photography 08

Another aspect to consider is the life that the bridge conveys such as the flow of pedestrians and vehicles. You could capture foot and car traffic with the bridges to give more of a feel to the construction and location.

Conclusion

Remember these tips when you next do architecture photography and you will soon be capturing images that you can be proud of. Share your tips and photos in the comments below.

The post 6 Ways to Do Architecture Photography That Stands Out appeared first on Digital Photography School.


Digital Photography School

 
Comments Off on 6 Ways to Do Architecture Photography That Stands Out

Posted in Photography


Fruitless: 10 Abandoned Roadside Fruit & Produce Stands

17 Apr

[ By Steve in Abandoned Places & Architecture. ]

abandoned-produce-stand-0
Once vital threads in the fabric of Americana, these abandoned fruit & produce stands no longer entice hungry travelers into making roadside pit stops.

abandoned-produce-stand-1a

An urban farm in a state whose rivers have been known to catch on fire? It’s more likely than you think: the six-acre Ohio City Farm in Cleveland operates between June and November though the Farm Stand only opens on weekends.

abandoned-produce-stand-1b

Etsy member GregMurrayPhoto and Flickr users MMW Horticulture Group and LAND studio, respectively, snapped the photos above. Gotta love that eggplant-purple, zombie-proof corrugated facade – all that’s missing is a herd of vegetarian walkers milling about in front. BROOOCCCOLIIII…

An Apple Less

abandoned-produce-stand-2

North of the border, a similar unsavory situation is unfolding as Canada builds more major highways and country farms lose access to vehicular travelers – and vice-versa. The abandoned apple stand above was snapped along Highway 11 near Coulson’s Hill in northern Ontario

Michaux Lonely

abandoned-produce-stand-3b

abandoned-produce-stand-3a

Speaking of TWD, the abandoned Michaux Produce stand (and matching flatbed truck) in Goochland County, VA might have served as an alternate filming location had Georgia’s governor not vetoed a certain bill. They could call it “Michonne’s Produce”, harvested with a samurai sword while-u-wait! Kudos to Flickr user Aes D for getting up close and personal with the pleasant yet eerie scene in September of 2015.

Sign of the Times

abandoned-produce-stand-4

No sign remains of this Florida roadside produce stand – er, the stand seems to be gone but the sign remains, though not for much longer by the looks of it. Flickr user Dan Optimus Prime (dvn225) captured the sorry signboard standing – barely – just outside Daytona Beach in March of 2013.

Next Page – Click Below to Read More:
Fruitless 10 Abandoned Roadside Fruit Produce Stands

Share on Facebook


[ By Steve in Abandoned Places & Architecture. ]

[ WebUrbanist | Archives | Galleries | Privacy | TOS ]


WebUrbanist

 
Comments Off on Fruitless: 10 Abandoned Roadside Fruit & Produce Stands

Posted in Creativity


Supporting Your Off-Camera Flash – Tripods, Monopods or Light Stands?

31 Oct

I’ve generally been a natural light photographer. I understand natural light and love its variability. Normally it’s enough to get some beautiful photographs; many photographers stop here and go no further.

Constantly critical of my own photographs, I realized that I was at the mercy of natural light, searching and modifying, but rarely creating or directing. That’s why I chose to learn how to use flash those years ago. To get full control, it’s essential to put the flashes where you want them, and for this, you need to support them. This article will talk about the options available to you for holding your speedlights and off-camera flash.

Off Camera Flash

Off-camera flash

Human Light Stands

Using a human light stand is one of the easiest ways to support an off-camera flash and is often overlooked. If you can get someone to hold your flash, you get what’s effectively a voice activated light stand (VAL). It’s easier to change lighting setups this way, especially if your subject is moving. There’s also less hassle on windy days. That said, most people won’t know how to position the lighting modifier and it will tend to drift as you’re shooting. Another photographer or an experienced photography assistant will be very useful.

DSC_0472-2

Handheld

Hand holding is quite simply, having either you, or an assistant hold the flash. It’s perfectly possible to do this yourself if you feel comfortable taking pictures with one hand, and it gives you a lot of control. Or hand the flash to someone else and let them know where to point it.

Monopod Boom

Again, you can do this yourself, and it helps if you have the monopod touching the ground because it means that your arm doesn’t feel as tired while holding a larger softbox or beauty dish. Or your photography assistant (or family member, friend, or passer-by) can boom, or hold the flash up, to light your subject from a higher angle. This gives you a lot of control and if you look at photographers like Annie Leibovitz and Joey L, you’ll see that their assistants are often using this approach.

DSC_5516-3

It can be heavy so make sure you pause for breaks. I use a long aluminium Benro monopod that allows me to attach a flash to either end. It’s cheaper than the Gitzo alternative, but do bear in mind that there seems to be no after-sales support. Carbon-fibre is lighter, but not essential.

off-camera-light-stand_4396

Off-camera flash

Tripods

I’ve been using my tripods to support my off-camera flashes for a long time. First because I already have them, and secondly because they are perfect for uneven ground. Generally they don’t get the flash high enough, but they are stable, especially if you weight them down by hanging a heavy camera bag from the center column.

Small, Lightweight Tripod

This is my go-to option when I’m travelling light and won’t have an assistant. The idea is that the tripod is so small and light, that I can wear it on my belt and largely forget about it. Of course it doubles as a tripod, which I’d normally want to have with me anyway. It’s flimsy by itself and needs to be weighted down with a camera bag. It’s also far too small for most purposes, so it needs to be up on tables and so, to get more height. But you’re more likely to actually carry it, so that’s a good thing. I use a 1kg Sirui tripod that I’m pretty happy with, especially for the price, with an equally small and light ball-head.

english-photographer-light-stand

Big, Heavy Tripod

As I began to use larger lighting modifiers, like huge octoboxes and parabolic umbrellas, I needed a heftier support for them. I happened to have an enormous old tripod which has been excellent. It weighs a lot by itself, and is definitely bulky, but is easily carried with its broad shoulder strap. It’s perfect for uneven ground, and can be made more stable by hanging the camera bag from it. I use one of Manfrotto’s largest tripods which gets the flash over my head (I’m 6’2″). It’s old, and very durable.

DSC_1979-2

Proper Light Stands

And then there are dedicated light stands, designed for the purpose of supporting off-camera flashes. I started using these when I wanted to get the flashes higher above the subjects. Some are light and flimsy, and others heavy and stable. Some stack together, and others are designed precisely for travel. They seem to break regularly in transit, or just being used on set. They do get the flashes high off the ground, but they don’t seem particularly stable because they’re tricky to weight down with the camera bag, and as soon as the ground is uneven, they’re a pain to use and won’t work on a steep slope.

Off Camera Flash

Supporting Larger Flash Modifiers

Light Stands

These come in several shapes and sizes. Generally all the legs open at the same angle so they only work on fairly flat ground. Smaller light stands meant for travelling are a good solution, though they can be flimsy. Larger light stands can get the flash very high off the camera. Balanced properly, they can be used with a boom pole to get the flash over your subject.


C (entury) Stand

My most recent acquisition, and now my go-to light stand unless I’m travelling light, is the C-Stand or Century Stand. It’s an old design from Hollywood film studios, and very well engineered. It weighs a lot which is inconvenient if you’re walking to your shooting location, but helpful because it means the stand is more stable in use. The legs are also made so that it’s very easy to weight them down using sand bags. I personally use a lead diving weight belt for ballast. Importantly, one of the legs can move along the central column, which means that you can use the stand on uneven ground and on stairs. It’s not quite as versatile on uneven ground as the huge tripod, but it’s much taller; up to 3 meters (9.8 feet). It’s cumbersome to pack because it’s an L-shape, but when it’s on location, it’s perfect. The included boom is very useful, and can handle hanging backdrops too. I use the C-Stand from Pixapro which is well made enough to outlast me. It’s designed to make it a pleasure to use. Though not a pleasure to carry!

DSC_5120

You can see the various light modifiers in the video below, as well as see them used on location.

Any questions, let me know in the comments below. Do you have any other creative solutions for holding off-camera flash?

googletag.cmd.push(function() {
tablet_slots.push( googletag.defineSlot( “/1005424/_dPSv4_tab-all-article-bottom_(300×250)”, [300, 250], “pb-ad-78623” ).addService( googletag.pubads() ) ); } );

googletag.cmd.push(function() {
mobile_slots.push( googletag.defineSlot( “/1005424/_dPSv4_mob-all-article-bottom_(300×250)”, [300, 250], “pb-ad-78158” ).addService( googletag.pubads() ) ); } );

The post Supporting Your Off-Camera Flash – Tripods, Monopods or Light Stands? by Ben Evans appeared first on Digital Photography School.


Digital Photography School

 
Comments Off on Supporting Your Off-Camera Flash – Tripods, Monopods or Light Stands?

Posted in Photography


‘Death Ray’ Skyscraper Stands Accused of Blowing People Over

28 Jul

[ By WebUrbanist in Architecture & Cities & Urbanism. ]

walkie talkie construction progress

Already infamous for its curved facade that ignited fires in adjacent buildings and melted nearby cars basking in its reflected sunlight, the Walkie Talkie skyscraper in London is now being blamed for toppling signs, overturning food carts and even knocking passers-by off their feet. Dubbed ‘Walkie Scorchie’ as well as the ‘Death Ray’ during its last public debacle, critics may need a new name for this building more suited to its fresh source of infamy.

wind tunnel heat

Local business owners, employees and residents have reported a dramatic increase in downdraughts since the completion of the 36-story downtown structure, suggesting its completion coincides with an upsurge of urban wind tunnel effects on surrounding streets.

skyscraper london downtown

A worker at a local retail outlet told The Times: “It has only really been windy since the Walkie Talkie has been here. When they were building it and there were the building works going on, it was fine. But ever since they’ve completed it, the wind really picked up.”

Walkie Talkie rips

A temporary screen erected at street level, eventually replaced with permanent shades hung from its concave side, solved the previous heat-generating problems tied to light reflection; it is unclear if something analogous can be done to address current wind-related concerns. For now, local food trolleys have been instructed to carry warning signs indicating they could tumble over and crush customers or pedestrians, a very incomplete and unsatisfactory solution for all potentially impacted parties.

urban curved building

Meanwhile, officials suggest there will be stricter reviews for new construction. According to Gwyn Richards, the City of London Corporation’s head of design, “The wind outcome at street level experienced post-construction on a number of projects differs somewhat to the conditions we were expecting from the one outlined in the planning application wind assessments. This is why we are asking for an independent verification of the wind studies on a number of new schemes to ensure as rigorous and resilient an approach as possible.” (images via Matt Brown and Duncan H).

Share on Facebook


[ By WebUrbanist in Architecture & Cities & Urbanism. ]

[ WebUrbanist | Archives | Galleries | Privacy | TOS ]


WebUrbanist

 
Comments Off on ‘Death Ray’ Skyscraper Stands Accused of Blowing People Over

Posted in Creativity


Choosing Light Stands

03 Sep
Light stands are designed to oppose gravity. Pretty simple. And the designs are, for the most part, pretty similar. I think of light stands as being in three categories: normal stands, compact stands (seen just above) and specialty stands such as C-stands.

For light stands I like LumoPro for many of the same reasons I like the LumoPro LP180 speedlight. Their stands are well-built, reasonably priced and guaranteed out the wazoo. LumoPro has good service, too, should you need to replace a broken knob or bolt or whatever.

Honestly, it makes me wonder why other manufacturers don’t warranty their grip gear like this. Seems like a no-brainer, if you are making good stuff.

For normal, full-sized stands, I like the 10-foot LumoPro LP608. It is air-cushioned, has a five-year warranty and costs $ 45. It is a solid value choice and you can certainly spend more but get less.

Most stands are pretty interchangeable. That’s not to say that there aren’t some cool designs to be had. For a “splurge” light stand I’d consider Manfrotto stackers. They have a unique design that allows them to snap flat together for easy transport and space-saving storage. They are more expensive ($ 84 for 8-foot version and $ 115 for the 12-foot) so you’ll have to make that call. But they are a great upgrade if you frequently lug around a flock of light stands.

If you don’t need all of that functionality, skip the stackers. In fact, many speedlight folks who don’t need a lot of stand height prefer to use “compact” 5-section stands. They rise to about 7 feet and collapse to about 21″.

For that, my recommendation is easy and clear-cut: get the LumoPro LP605, seen above. It is the best-built of the five-section stands, includes ground spikes for more stability in wind and has LumoPro’s outsized warranty.

For $ 40, it is hard to go wrong here. There are more expensive versions of this, but they are not as well-built, have no ground spikes and you won’t get a five-year warranty either. Done deal.
__________

As far as C-stands go (more on what they are, here) they are pretty much all built like tanks. Which is part of their weighty charm. LumoPro C-stands ($ 100 for the riser and another $ 35 for the arm—make sure to get both pieces) are a good value choice as they back up the build quality with their five-year warranty.

If you want to get fancy, Kupo C-stands offer a quick-release mechanism for faster setup. But both are all but indestructable.
__________

While we are on the subject of stands, please do this: Take $ 20 and buy some sand bags. Get the bags from Amazon ($ 13 for 2, shipped). Get a few to start.

And don’t fill them with sand but rather “pea gravel,” from your local home improvement store. It’s super cheap ($ 3.50 worth will fill three sets of sandbags) and way less messy than sand.

You won’t need these cheap insurance policies until a stand comes down in the wind, breaking your flash or your mod or your subject’s noggin. Then you will have needed the sand bags retroactively.

Start with three or four. You’ll probably end up getting more as you go. Cheapest insurance (and piece of mind) policy you’ll ever buy.

NEXT: Soft Modifiers


Strobist

 
Comments Off on Choosing Light Stands

Posted in Photography


Boom To Bust: 10 Abandoned Fireworks Stores & Stands

01 Sep

[ By Steve in Abandoned Places & Architecture. ]

abandoned fireworks store Savannah Georgia
Fireworks sales are “fly by night” on several levels, and when boom turns to bust the colors fade faster than the aftermath of a bombshell in a moon-washed sky.

Take the outstanding image above of an abandoned fireworks stand outside Savannah, Georgia. Flickr user Mike Garde employs HDR to tease every last photon out of the corrugated sheet metal shack helpfully painted in explosive yellow and red by its builders. By the way, is “Cheap Fireworks” really the way to go when purchasing explosive materials intended to entertain one’s loved ones up close & personal? Just wonderin’.

Faded Glory

KONICA MINOLTA DIGITAL CAMERA

Fireworks were invented by the ancient Chinese and Americans have used them to celebrate momentous occasions since, well, since before there even WAS an America. By the looks of it, this long-abandoned wholesale/retail fireworks emporium near, um, Emporia, VA opened its doors not long after John Hancock signed his, er, John Hancock. Kudos to long-time Flickr user Lawrence Beals for capturing the ramshackle edifice in 2006 in all its gritty glory about three years before it was torn down.

Red, White & Blew

OLYMPUS DIGITAL CAMERA

OLYMPUS DIGITAL CAMERA

OLYMPUS DIGITAL CAMERA

Ever since the first shell slammed into Fort Sumter, America’s proud southerners have loved the sight, sound and smell of explosions. The length and breadth of the former Confederacy is crammed with shotgun shacks selling all manner of fireworks – some open, others not. The 5,000-odd residents of Piedmont, Alabama alone have at least a couple of fireworks stands and credit Second Period Industries with capturing a couple of the more patriotically decorated ones for posterity.

Abandoned Fireworks Warehouse Is Where?

abandoned fireworks warehouse

We won’t tell you where this beautifully desolate abandoned fireworks warehouse is because, well, if we (or BrightBird, where its image can be found) did, it likely wouldn’t look as striking as it does thanks to squatters, vandals and taggers. For this moment captured in time, at least, we all can enjoy the sight of Mother Nature’s own fireworks taking back what’s rightfully Hers.

Next Page – Click Below to Read More:
Boom To Bust 10 Abandoned Fireworks Stores Stands

Share on Facebook


[ By Steve in Abandoned Places & Architecture. ]

[ WebUrbanist | Archives | Galleries | Privacy | TOS ]


WebUrbanist

 
Comments Off on Boom To Bust: 10 Abandoned Fireworks Stores & Stands

Posted in Creativity


Time Stands Still: Sublime Slow-Motion Subway Panoramas

11 Feb

[ By WebUrbanist in Art & Photography & Video. ]

slow mo foto

A subway speeds by the platform, leaving most passengers with a fleeting impression and fast-fading memories of people glimpsed only for a moment, but not this crafty slow-motion documentarian. If you watch no other video today, this week or this year, make the time for at least one of those below.

In the above video excerpt, Adam Magyar captures frozen bystanders in fast succession (50 frames per second) at a Tokyo, Berlin and New York (Grand Central) train stations. His custom technology captures everything, and limited post-processing generates a kind of three-dimensional panoramic portrait of everyone in view. These finished products come both in the form of prints and videos, but the latter in particular are must-watch wonders.

“In Stainless, I scan rushing subway trains arriving to stations. The images record a number of tiny details of this moment. We see people staring towards their destinations standing at the doors framed by the sliding door windows. They are scrutinizing the uncertain future. Similarly to all my images, their main motivation is arrival. The darkness of the tunnels deep below the city turns these chemically clean mock-ups into fossils of our time. “

time subway black white

Magyar uses slit-scan and other technologies and techniques to, as writer Joshua Hammer describes, “bend conventional representations of time and space, stretching milliseconds into minutes, freezing moments with a resolution that the naked eye could never have perceived. His art evokes such variegated sources as Albert Einstein, Zen Buddhism, even the 1960s TV series The Twilight Zone.”

The extended film from Tokyo is shown above. It is truly mesmerizing to watch the most mundane behaviors caught in mid-act, be it a wet dog in mid-shake, creamer hanging over coffee mid-pour or a woman seen in mid-sneeze. It took Magyar years to perfect his craft – the worthy projects that led up to it (shown below) are essential to understanding how he achieved his current mastery.

1-uyFMTPB431muvczp1PH1uQ

time people linear rows

time square people aligned

If the process behind this uncanny effect seems impossibly complex: his signature un-moving montages came with a great deal of time and technological experimentation. This Stainless series is indeed just the latest in a long line of  experimental photo projects, starting with Squares (shown above) which features collections of people taken out of time and selected to force a grid-like order on passersby.

Next Page – Click Below to Read More:
Time Stands Still Sublime Slow Motion Subway Panoramas

Share on Facebook


[ By WebUrbanist in Art & Photography & Video. ]

[ WebUrbanist | Archives | Galleries | Privacy | TOS ]


WebUrbanist

 
Comments Off on Time Stands Still: Sublime Slow-Motion Subway Panoramas

Posted in Creativity


Scooped: 12 Chilled Out Abandoned Ice Cream Stands

19 May

[ By Steve in Abandoned Places & Architecture. ]

abandoned ice cream stands
Cone in 60 seconds? Though these 12 cool abandoned ice cream stands thought they could take a licking and keep on ticking, they ended up just being licked.

Twistee Treat Retreat

abandoned ice cream Twistee Treat(image via: Telestar Logistics)

Around 90 fiberglass Twistee Treat buildings were produced from 1983 until 1990, when the original company filed for bankruptcy, and about half the distinctive, cone-shaped buildings remain standing. Above is an abandoned Twistee Treat in Sarasota, Florida, captured in September of 2005 by Flickr user Telstar Logistics.

abandoned ice cream Twistee Treat(images via: Noahsgram, Yooperann and Facebook/Twistee Treat)

Designed by Robert G. Skiller, many of the 28 ft tall and 20 ft wide buildings have been painted in a wide variety of colors; others don’t even sell ice cream anymore. Due to their unique visual appeal, abandoned Twistee Treat buildings often exist in an odd architectural limbo between being quickly re-opened/re-purposed or (thanks to their light, unit construction) transported someplace where someone’s opening a new ice cream shop – it’s free advertising from the get-go, without the expense of a sign!

Ice Of The Beholder

Sarah Ortmeyer abandoned ice cream shop Lasso Laden Sad Eis(image via: Latitudes)

German Photographer/artist Sarah Ortmeyer‘s first solo show, “Sad Eis” (Sad Ice), included the above evocative snap of the closed Lasso Laden ice cream shop. Would it not have been easier to simply leave the shop’s seats inside and locked up instead of chained together outside, vulnerable to the vagaries of vagrants? Only Ortmeyer knows for sure, and she’s keeping that scoop to herself.

Ore-gone

abandoned ice cream shop Portland Forest Park(image via: Swedotorp)

Flickr user Swedotorp picked the perfect days (June 14th and 15th of 2008) to immortalize the abandoned Forest Park ice cream stand in all its faded glory. Located near Portland, Oregon, the stand would seem to be the right business in the right place at the right time. Unfortunately, the aged elegance of the mid-century style paint & neon signage indicates this stand’s time has long since melted away.

abandoned ice cream Forest Park Portland Darren Sethe(image via: Darren Sethe)

Flickr user Darren Sethe stopped at the abandoned Forest Park ice cream shop four years later in 2012 but not much had changed, barring the loss of a few more flakes of paint from the ancient sign. Sethe’s stark monochrome treatment seems to add a dash of timelessness to the ice cream-less scene.

The Other Meltdown

abandoned ice cream Kiyosato Japan(images via: Spike Japan)

Kiyosato, Japan was a popular travel and tourism destination whose prospects weren’t improved by the 2011 Great East Japan Earthquake and the subsequent Fukushima Daiichi Nuclear Plant accident. Among the area’s attractions was the now-abandoned One Happy Park, explored and recorded in September 2011 by urban explorers from Spike Japan. The abandoned park exudes an unfortunate and uneasy aura epitomized by the not-so-merry Merry Land ice cream kiosk just outside a ramen restaurant.

Next Page:
Scooped 12 Chilled Out Abandoned Ice Cream Stands

Share on Facebook


[ By Steve in Abandoned Places & Architecture. ]

[ WebUrbanist | Archives | Galleries | Privacy | TOS ]


WebUrbanist

 
Comments Off on Scooped: 12 Chilled Out Abandoned Ice Cream Stands

Posted in Creativity


Someone’s Listening: Pre-Drilled, Strapped Compact Light Stands

22 Feb

Many photographers who use a compact stand as the basis for an on-the-go lighting kit like to drill and strap their stands. This is something I have done since back before the early Lighting 101 days. I keep two strapped stands, as more than that on a job and you would probably case them anyway.

LumoPro, who makes the sturdy-but-compact LP605 compact stand, now also offers a pre-drilled and strapped variant. The LP605s will set you back an extra $ 5.

-30-


Strobist

 
Comments Off on Someone’s Listening: Pre-Drilled, Strapped Compact Light Stands

Posted in Photography


DIY Photo Stands: How to Train Your Photojojo Dinos

24 Jan

Extra photos for bloggers: 1, 2, 3

You just got your Photojojo package (yay!). And what’s this? A stowaway-a-saurus!

Learn how to train your newly found dino friends to sit, stay, and speak–er– hold a photo!

Gather up those stowaways and put them to good use by turning them into photo holders.

In a few easy steps, you can turn your dino collection in to a dino photo collection! (ooooh ahhhhhh)

*Don’t worry, no dinosaurs were hurt in the making of this tutorial.

Turn Your Dinos into Roaring Photo Stands
(…)
Read the rest of DIY Photo Stands: How to Train Your Photojojo Dinos (630 words)


© Margo for Photojojo, 2013. |
Permalink |
No comment |
Add to
del.icio.us

Post tags:


Photojojo

 
Comments Off on DIY Photo Stands: How to Train Your Photojojo Dinos

Posted in Equipment