Introduction
The following is an excerpt from the SLR Lounge Lightroom Workflow System Workshop on DVD, a system designed to increase your post production speed by 5 to 10 times! Click here to learn more.
In this article, we are going to talk about creating a develop preset that you would like to apply to all of your images when they are first imported into Lightroom.
Although Adobe’s RAW image processing is extremely powerful, one common complaint is that your images may look flat and colorless at first. Often photographers will lament how beautiful their colors looked on the back of their camera.
Well, in an effort to fix this problem and make our images automatically look a little more crisp and vibrant when we first bring them into Lightroom, we’re going to create a “Standard Import” preset.
For this tutorial we will use the following image as our example:

Basic Adjustments Panel
The goal for a standard preset is twofold: First, to simply help every image look a little better overall, of course. Secondly we also want to apply default settings such as a personal blend of sharpening, lens corrections, or other calibration-related things.
First, let’s tackle the Basic Adjustments. Open the Basic Adjustments panel in the Develop Module and apply the following settings:
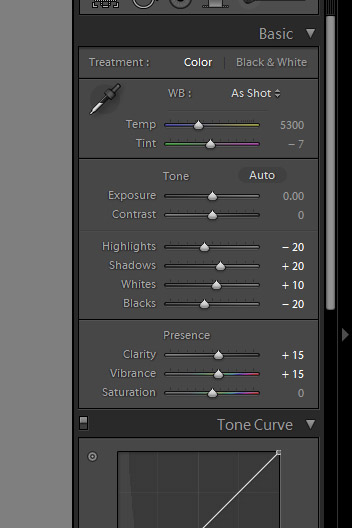
The idea here is that you want to keep detail in any bright highlights or deep shadows, but do it without making the image look flat overall. This is why we bring down the highlights to -20 yet push the Whites up to +10, and the same with the Shadows and Blacks. The image gets a little “punch” to it, without blowing out any highlights or clipping any shadows.
To enhance that subtle punch a little further, next we’ll boost both the Clarity and Vibrance to +15. Note that we leave alone settings like Saturation and Contrast, because for the most part those adjustments are too strong for them to be applied to every single image.
Of course, YOU should tailor the adjustments to your own personal style! Usually however we advise that going too much further than subtle editing should be saved as a separate preset that you use part of the time, but not necessarily 100% of the time.
The goal, of course, is to minimize the amount of editing you have to do to the majority of your images. If for example you find that 80-90% of the time you wind up adjusting some of these settings even further, or less, …then you might as well create your Standard Import preset that way because it will minimize the amount of editing you have to do later, even if you have to undo one or two settings just 10-20% of the time. See how that works?
To be avoided, however, is using a standardized preset to cover your habitual mistakes. A good indicator for this is is if you feel like you ought to adjust your Exposure slider in your standardized preset. Unless you have a very good reason; you’ll probably want to simply work to meter and expose your images better in the first place!
Detail Panel Adjustments
In the Detail Panel, we are going to apply our own special blend of sharpening that we apply to 99% of our RAW images. These settings are shown below:
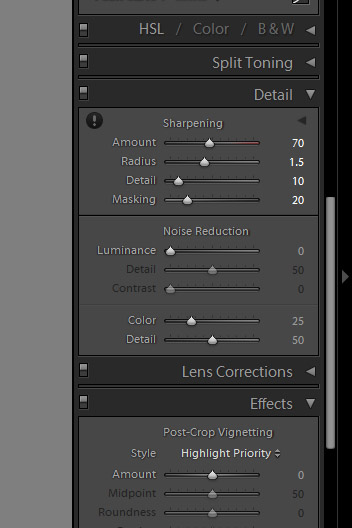
Sharpening is definitely one of the most subjective aspects of post-production, however this “recipe” is our tried-and-true blend for RAW images, and we use it for all types of images from general portraits, weddings, and details.
So adjust the settings to your taste, however just remember that your goal is for these settings to become the foundation for all your images! Try out these settings on many different types of images, and settle on something that works best for all of them.
Lens Correction Adjustments
Another common issue on DSLR cameras and lenses these days is vignetting. By default, we prefer to correct for a slight amount of vignetting by dialing our Lens Corrections’ “Manual” tab to the following settings:
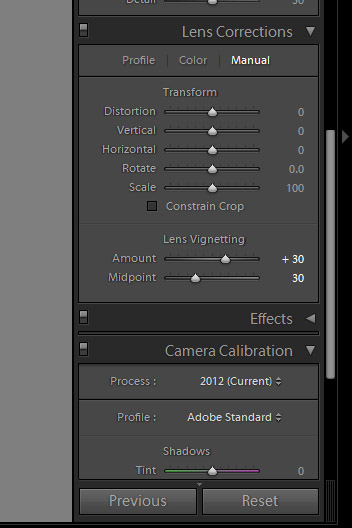
Again, if you commonly shoot with certain lenses that have less vignetting, or more, then feel free to adjust these settings slightly. Or, of course, if you actually utilize vignetting in your personal style, then feel free to zero-out this adjustment.
If you followed our adjustments approximately, then your final image will look something like this:
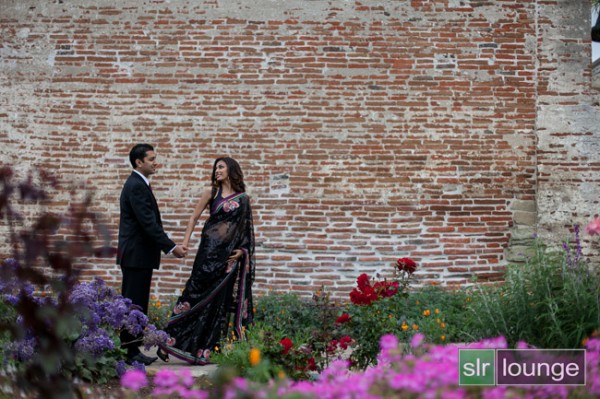
To see the real difference in the processing, let’s zoom in a bit:
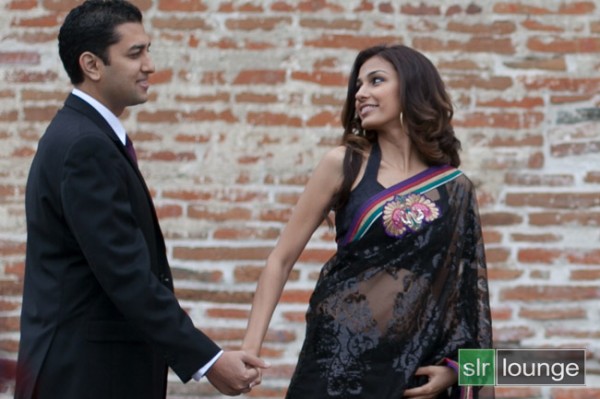
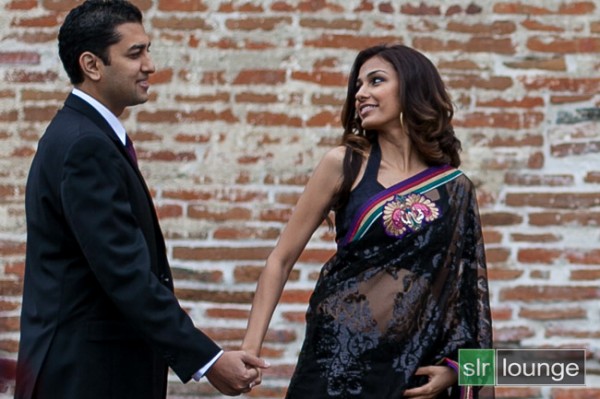
Again, the goal here is not to make the image over-the-top contrasty or colorful, just to und0 the “flatness” that you initially see in your RAW images.
Saving the Standard Import Preset
If there are any other settings you would like to add to your “Standard Import” develop preset, do that now. For example certain cameras may need adjustments in the Camera Calibration section, to correct for faint hues or tints in the shadows or highlights. There are also Camera Profiles that attempt to emulate specific in-camera colors, (“Faithful”, “Neutral”, Landscape”, etc.) …however in our opinion the “Adobe Standard” profile is the best.
When you’re ready to create a preset, open the Develop Module’s left-hand panel and click the little plus sign on the Presets tab:
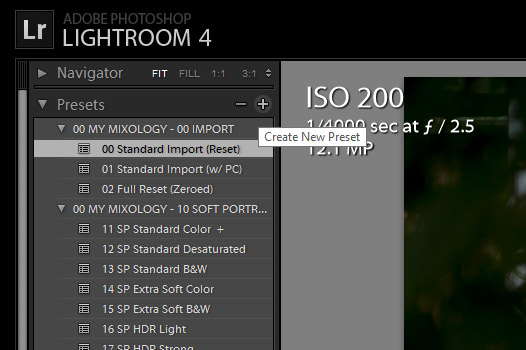
In the New Develop Preset window you can select which adjustments become part of this preset. You may wish to only select a few parameters, such as for the specific tabs which we adjusted, however consider selecting “Check All” so that this preset can be used to reset images entirely.
Name this preset “00 Standard Import”, and be sure to put the two zeros at the beginning (or a similar code) so that this preset shows up at the top of your list of presets for easy access. Similarly, you may want to create a new folder and give it a numerical name so that all your presets show up at the top of the Presets panel, instead of below the (annoyingly un-deletable) Adobe-included Lightroom Presets.
Applying the Preset During The Import Process
Now that you have saved this new preset, you can apply it any time when you’re working on images in Lightroom. However there is another awesome tool that we can utilize which will help us automate or workflow overall.
When you get back from a photo shoot with images that are ready to be imported into Lightroom, you’ll be able to apply this preset to all your images during the import process!
Open the import dialog box by either clicking on the Import button at the bottom of the left-hand panel of the Library module, or simply type the hotkey “Ctrl + Shift I”.
On the right-hand side of the import panel, you will see “Apply During Import” and the first option will be for develop settings. Find your Standard Import Preset and select it.
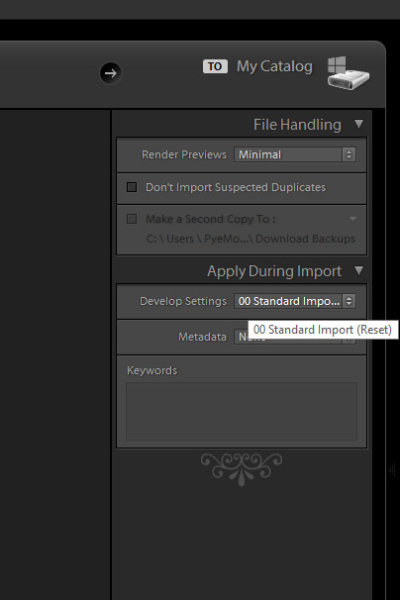
By default, these options will remember themselves the next time you import images, so don’t forget this in case you want to change or stop using presets during the import process.
One of the main advantages of setting up your workflow this way is that, by applying a preset such as this during the time of import, combined with the option tell your computer to render previews after it is done importing, (in the “File Handling” section above) …you can tell Lightroom to import an entire photo shoot, apply a preset to every photo, and then render 1:1 previews all at once!
At the end of a long photo shoot or wedding day or whatever, this allows you to simply download and backup your photos once, then commence the Lightroom import workflow and go to bed. By morning you’ll have your entire Lightroom catalog full of images with the preset and full previews ready to go!
Conclusion
It takes time to fine tune your own “Standard Import” preset and get it to work on the majority of your images, but once you develop it you can save hours and hours of post-production time.
Once we have created a standard preset for all our images, theoretically in post-production we will mostly spend our time just editing certain settings on an image-to-image basis, such as white balance and exposure. Even these settings can be adjusted in batches though. (This is why we did not adjust the settings for White Balance and Exposure in the Basic Panel for the “Standard Import” preset.)
The SLR Lounge Workflow System Workshop on DVD
The SLR Lounge Workflow System Workshop on DVD takes everything that we taught in the Lightroom 4 A to Z Workshop on DVD and builds by teaching you how to maximize your shooting and post processing efficiency and workflow. This 7 hour DVD covers data safety procedures, file management, culling standards and overall develop techniques to increase your post production efficiency by up to 15x! In fact, using this Workflow System we can cull and edit over 1,500 images per hour! Don’t believe us, watch the teaser video! The Workflow System is also available as a part of the Lightroom 4 Workshop Collection. To learn more, click this link.
Post originally from: Digital Photography Tips.
Check out our more Photography Tips at Photography Tips for Beginners, Portrait Photography Tips and Wedding Photography Tips.
How to Create a “Standard Import” Preset in Lightroom 4


You must be logged in to post a comment.