RSS
 

Posts Tagged ‘Stamp’

12 Tips to Master the Clone Stamp Tool in Photoshop

09 Jul

The post 12 Tips to Master the Clone Stamp Tool in Photoshop appeared first on Digital Photography School. It was authored by Jim Hamel.

12 tips to master the Clone Stamp tool in Photoshop

The Clone Stamp tool is one of Photoshop’s most useful editing options. After all, it can get rid of all sorts of unwanted objects! Yet for beginners – and even more experienced photo editors – it can be intimidating, frustrating, and discouraging.

That’s why, in this article, I’m going to share everything you need to know about the Clone Stamp tool, including how it works, how to use it to remove unwanted items from your photos, and the simple tips and tricks that will make you a Clone Stamp master.

Let’s dive right in.

When should you use the Clone Stamp tool in Photoshop?

Photoshop offers several tools for making minor adjustments to your photos (e.g., the Healing Brush tool and the Spot Healing Brush tool). But while such tools are great for minor edits – such as removing spots and power lines – when it comes time for serious, intensive surgery on your photos, the Clone Stamp tool is the way to go.

You can use the Clone Stamp tool to:

  • Remove people standing in the background of a portrait
  • Remove people walking through your travel shots
  • Remove cars that are positioned in awkward places
  • Remove distracting street signs
  • Remove distracting shadows
  • Remove distracting reflections

And those are just a few of the many applications of the Clone Stamp tool.

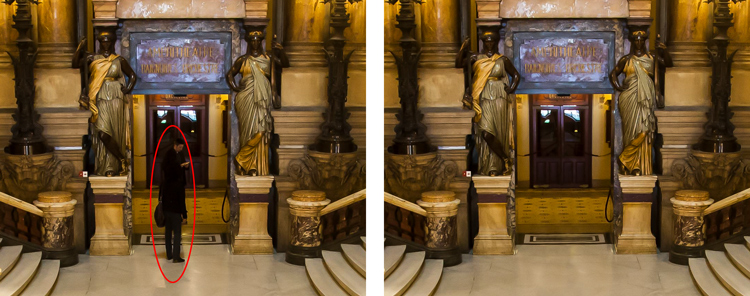
Clone Stamp Tool example on the Palais Garnier interior
You will not often find the stairs of the Palais Garnier in Paris free of people, so you will need to put the Clone Stamp tool to work if you want a clean picture. This applies at many other tourist destinations, as well.

How to use the Clone Stamp tool: the basics

Getting started with the Clone Stamp tool is simple. You just tell Photoshop two things:

  1. The area you want to target for removal (i.e., the target area).
  2. The area Photoshop should use to supply replacement pixels (i.e., the source area).

So if you were removing a person from a staircase (as I did in the example above), you would set the source area as some nearby stairs, and you would set the target area as the person you wanted to remove.

Here’s the step-by-step process for using the tool:

Step 1: Select the Clone Stamp tool from the Tools panel

You’ll find the Tools panel on the left-hand side of your screen (the Clone Stamp tool looks like a rubber stamp):

selecting the Clone Stamp tool

Once you have the tool selected, click on the Brush menu dropdown:

opening the Brush settings

And set both the Size and the Hardness.

adjusting brush size and hardness

Step 2: Select the source area

Remember, the source area refers to the portion of the image you will use to source replacement pixels.

So hover your cursor over the source area, hold the Alt/Option key (your cursor will now become a target), and do a single click.

Step 3: Paint over the target area

Release the Alt key and move your mouse over to the area you’d like to remove. Hold down the mouse button and carefully paint in the new pixels.

And that’s it. You’re done! But while the process sounds simple, there’s a lot to understand, especially if you want to become a Clone Stamp expert.

So let’s take a look at some tips and tricks to help you conquer this important Photoshop tool, starting with:

1. Work on a new layer

Before making changes with the Clone Stamp tool, always create a new layer. Then make sure your adjustments all happen on the layer (you can flatten the image when you’re done).

Why should you do this?

There are many reasons. First of all, Photoshop layers are nondestructive – so changes to the layer won’t change the underlying pixels of your image. In addition, if you don’t like where the changes are going, you can always delete the layer and start over.

And if you later decide there are portions of the Clone Stamp changes you don’t want, you can always use a layer mask to selectively delete those changes. Plus, you can apply adjustments specifically to cloned areas if they are on a new layer (as will be explored in more depth below).

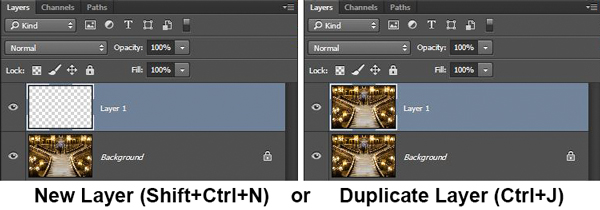
Now, creating a new layer is easy. Simply press Ctrl/Cmd+J to create a duplicate of your current image layer, or press Shift+Ctrl/Cmd+N to create a new blank layer.

Working on a new layer with the Clone Stamp tool

Note: If you do create a new blank layer, make sure you have All Layers selected as your source in the Clone Stamp tool settings.

selecting All Layers for the Clone Stamp tool

I personally prefer working on a new layer (as opposed to a duplicate layer), but either way will work.

2. Zoom in (way in)

When working with the Clone Stamp tool, you should always zoom in – in fact, I recommend you zoom way in (potentially to 100% and beyond).

zoomed in image with Clone Stamp tool on the side
I tend to do my Clone Stamp work zoomed in to 100% or more.

Zooming in will help isolate the area you are working on, and it will allow you to work with far more detail and precision than would otherwise be possible. Make your changes look as good as you can with this higher level of detail, then when you zoom back out, the changes will blend in perfectly.

A shortcut for zooming quickly is to hold the Alt/Option key with your left hand while using the scroll wheel on your mouse to zoom in and out. You can also use Ctrl/Cmd and the + or key on the keyboard. That way, you can zoom in and out with speed.

3. Set your brush size using shortcuts

When working with the Clone Stamp tool, you’ll need to change your brush size often.

Why? You should always make sure your brush size fits the changes you’re making. Big changes require a big brush, whereas small changes require a fine brush for detail work.

Unfortunately, changing the size through the Brush panel is cumbersome, but there are some easy keyboard shortcuts:

  • The left bracket key [ makes the brush smaller
  • The right bracket key ] makes the brush larger

Thanks to these shortcuts, you’ll be able to rapidly tailor the tool to your specific circumstances.

4. Set the proper brush hardness

The Clone Stamp tool can be set to whatever hardness you desire. Simply open the Brush panel, then adjust the Hardness slider:

Setting the hardness of the brush

Now, hardness determines the extent to which your cloning will blend in with the surrounding pixels. If you set the hardness toward 100%, the cloned edges will be hard and definite:

hard-edged Clone Stamp brush example

If you set the hardness toward 0%, the edges will blend in with the surroundings:

soft-edged Clone Stamp brush example

In general, keep the hardness at 0%. It will help you seamlessly blend in your effect. There will be times, however, where you are working near a defined edge, in which case you should increase the hardness. Even then, around 50% will usually do. Setting the hardness any higher creates harsh transitions, and these often look unnatural (they’ll also make it very clear you’ve used the Clone Stamp tool).

5. Clone before making other adjustments

Here’s a quick Clone Stamp tool tip:

Do your cloning before making adjustments (via adjustment layers) to contrast, color, etc. If you apply the Clone Stamp tool after creating those adjustment layers, you’ll bake the changes permanently into your picture when you clone – which can be a problem if you later decide you want to remove some of your earlier adjustments.

However, in some cases, you’ll need to clone, yet you will have already made changes on an adjustment layer. So what do you do? Photoshop actually lets you decide whether to include adjustment layer changes in your cloning, and I generally recommend you don’t include these changes.

Simply select the circle with a line through it in the Clone Stamp tool Options bar:

preventing the Clone Stamp tool from being affected by adjustment layers

And Photoshop will ignore adjustment layers when you clone.

6. Grab the low-hanging fruit

Most of the time, your pictures will have some easy items to clone out – along with some harder items.

Clone out the easy items first, such as small blemishes on a portrait subject, dirt in a landscape, trash in a street scene, etc.

For one, this will give you confidence in your Clone Stamp tool abilities (always a good thing!). Plus, removing unnecessary items will help when the time comes to make hard changes.

How will it help? When using the Clone Stamp tool, the cleaner the space you have from which you can draw pixels, the better. So by making the easy changes first, you’re cleaning up the areas that may feature in your more difficult clone jobs later.

Make sense?

7. Watch for patterns

Sometimes, it’s a good idea to include patterns in your cloning; for instance, if you’re removing a person from in front of a building, you’ll want to use a similar building as your cloning source.

However, there are often times when you don’t want discernible patterns in your cloned areas. For instance, if you get rid of a bird in the sky, you don’t want to replace it with an obvious set of repetitive clouds – that would look super unnatural and would immediately indicate to viewers that you used the Clone Stamp tool.

There is an easy way to avoid patterns: as you clone, frequently choose a new source point. Sample from one area and clone one part of your image, then sample from another area and clone another part, and so on. Keep it up until you’ve finished all the necessary cloning, and you’ll end up with an image featuring zero repetition and an invisible clone job.

removing distractions from a lighthouse photo without creating a pattern
The right side of this image was filled with distractions, and the Clone Stamp tool eliminated them. But I had to be careful not to create patterns in the rocks or in the trees/water!

8. Follow the lines

A key to the successful use of the Clone Stamp tool is making all the lines in your picture match. Even slight deviations from the correct lines will look fake and destroy the effect you are trying to achieve.

For example, if you’re cloning parts of a landscape, make sure the edges of the tree branches match up. In an urban context, follow lines on buildings such as roof edges, doorways, and brickwork.

When you’re using the Clone Stamp tool, I recommend you start with – and stay focused on! – the lines. Let the rest of the pixels fall where they may. Afterward, if you need to go back over other areas, you can do so.

removing a person from an interior shot
Here, I’ve zoomed in on a portion of an architectural shot. As you can see, I’ve used the patterns on the floor and door to recreate the space behind the distracting person.

9. Avoid selecting from adjacent areas

As previously mentioned, a dead giveaway of the Clone Stamp tool is repetition.

Of course, in a sense, the Clone Stamp tool is all about repetition – you’re repeating a part of your image to cover up a part you don’t like – but you need to do it in such a way that the viewer doesn’t notice. If you draw pixels from an immediately adjacent area, you risk the viewer noticing the repetition. So take the pixels from somewhere else in the image instead.

Inadvertently creating a pattern is an easy trap to fall into when using adjacent areas, but at the same time, using non-adjacent areas can be tricky. The immediately adjacent areas are usually the closest in color and tone to the area you want to replace, and as you move farther away, tones and colors change so the pixels get harder to match.

So work hard. Find a way to use pixels from somewhere else in your photo, especially when the adjacent pixels contain obvious patterns. It might take extra time, but it’ll be worth it in the end.

10. Muddle through (and accept the messiness)

Once you’ve made the “easy” changes to your photo, it’s time to tackle a bigger problem – a crowd of people, for instance, or a car that takes up a large portion of the scene. And I get it: it’s the scary part of using the Clone Stamp tool.

The key is to just dive in. Don’t try to figure it all out beforehand (you never will). You can use a couple of different approaches:

  1. Go big first. Set your brush a little larger than is strictly necessary and just replace the entire area in one fell swoop. You should then go back and clean up with a smaller brush.
  2. Go small and steady. Stick with the smaller brush and paint over the problem area gradually. Here, the key is to keep going. Remember that you can go over the area again if necessary. Whatever you do on your first pass, while probably not perfect, will undoubtedly look better than what you started with.

You’ve just got to do it. There is a tendency to freeze up and to try to map out the entire clone job, step by step, before actually doing anything. But this just causes you to stare at the computer screen for long periods of time and isn’t especially helpful.

Remember, you can always undo what you’ve done! In addition, because you hopefully followed the first tip in this article and are working on a new layer, you can always mask out certain areas or even delete them if you don’t get the result you want.

11. Mirror your source pixels

The Clone Source panel contains lots of adjustments you can make to your brush when cloning.

To access the panel, go to Window, then click on Clone Source:

opening the Clone Source window

Once in the panel, you can change the angle of the replacement pixels, you can give the tool an offset, and more.

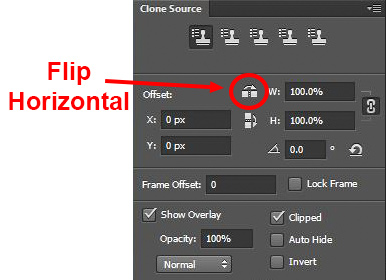
One of the most useful features in the Clone Source panel is the Flip Horizontal option:

using the Flip Horizontal setting in the Clone Source panel

Click on this, and the pixels will be replaced in the opposite horizontal direction to the source.

Confused? Don’t be. You’re basically just mirroring source pixels. For example, in the crop below, I selected the road line on the right as my source, then cloned it off to the left. You can see how the pixels are flipped horizontally:

example of Flip Horizontal in action

While this may seem like a pointless trick, it can actually be very useful. Imagine you’re dealing with a symmetrical object; instead of sourcing pixels from above or below the clone target, you can simply use pixels from its opposite (reflective) side.

Here’s a typical example: A person is covering one side of a doorway, and you want to get rid of them. By clicking on Flip Horizontal, you can use the other side of the doorway as your source, and you don’t have to scramble for pixels all around the frame.

12. Change the cloned areas with adjustment layers

Sometimes, your cloned areas just won’t look exactly like the surroundings. Perhaps the source areas you used were too bright or too dark, or perhaps the colors were just a bit off.

But don’t worry; you can fix this without affecting the surrounding pixels. You just need the power of adjustment layers.

Simply create a new adjustment layer (e.g., Levels, Curves, or Hue/Saturation):

creating a new adjustment layer

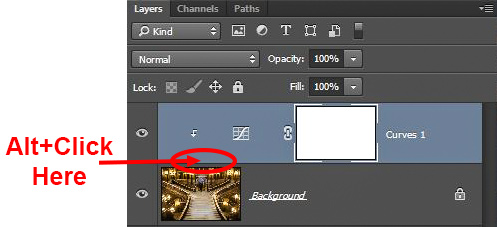
Make sure it’s positioned above your cloning layer. Then hold down the Alt/Option key and click on the spot between the two layers:

clipping an adjustment layer to the cloning layer below it

This will clip the adjustment layer to your cloning layer. Now any adjustments you apply will only change the layer below it, and you’re free to brighten, darken, add contrast, adjust colors, etc.

Mastering the Clone Stamp tool: final words

Remember: Using the Clone Stamp tool can be a messy process. So don’t worry if you find yourself having to redo changes or make things up as you go along. There is no magical “clean” method – instead, the Clone Stamp tool involves a lot of experimentation, a lot of problem-solving, and a dose of determination.

Take your time and just keep moving. You can always undo your changes (or, if you are working on a new layer, you can delete the changes without losing the rest of your work).

And have fun!

Now over to you:

Do you have any tips or tricks for using the Clone Stamp tool? Share your thoughts in the comments below!

The post 12 Tips to Master the Clone Stamp Tool in Photoshop appeared first on Digital Photography School. It was authored by Jim Hamel.


Digital Photography School

 
Comments Off on 12 Tips to Master the Clone Stamp Tool in Photoshop

Posted in Photography


Put a stamp on it: The astrophotography of Matt Dieterich

10 Jul

The Astrophotography of Matt Dieterich

Star trails and aurora over Mount Rainier from Reflection Lakes. This photograph was selected by the United States Postal Service for a new ‘Forever Stamp’ celebrating the National Park Service 2016 centennial.

The year 2016 is the centennial anniversary of the U.S. National Park Service, which manages over 400 parks, monuments, and historical places across the United States. To observe this anniversary, the U.S. Postal Service recently issued a special series of stamps celebrating the National Parks, featuring images from 16 parks across the country.

One of those images was taken by astrophotographer Matt Dieterich of Morgantown, WV, whose image of star trails over Mt. Rainier was selected by the Postal Service for this historic series of stamps. The opportunity couldn’t have happened to a better person: not only is Matt an accomplished photographer, he’s an enthusiastic supporter of the National Parks, and even spent a summer working at Mt. Rainier National Park in Washington state. On the following pages, Matt gives us some insight into his photography, how his image ended up on a postage stamp, and why the National Parks are such an important resource.

If you would like to own a part of history, Matt is offering a limited-edition series of prints featuring the image of Mt. Rainier that appears on the stamp. Head over to his website for more information.

The Astrophotography of Matt Dieterich

This large Milky Way panorama was created from 14 individual images.

How did you discover astronomy, and at what point did your interest in astronomy translate into astrophotography?

“When I was about 10 years old my godparents gave me a telescope. Then, when I was about 16 I got another one for Christmas. It was just a little one, but it had a computer on it and you could tell it where to go. I could have it point to Jupiter, the Orion Nebula, or anything I wanted. It was really cool, but I wanted to show people what I was seeing, because being outside by the telescope all by yourself wasn’t as much fun. The only way I could do that was to connect a camera to the telescope.”

“I originally bought a film SLR, but the images turned out horrible. Later that year my parents helped me buy a DSLR, and from then on it was history because I could get instant results from the digital camera. That’s what I needed to learn quickly with astrophotography – it’s trial and error and experimentation. Going through high school it helped spur my interest in science; there’s an experimental thought process and you never give up on trying to figure out what’s wrong when you take a photo, and how to improve it.”

The Astrophotography of Matt Dieterich

The Milky Way, with light pollution from Portland, Oregon, captured from Mt. Rainier National Park.

Was your experience in astronomy, and astrophotography in particular, part of what inspired you to study sciences in college and graduate school?

“It was. The reason I went into geology and environmental science was because I love being outside. I like understanding why the earth looks the way it does. Why am I seeing what I’m seeing? To me, it’s motivation to learn more about what’s around us as humans. The night sky is something that we don’t all get to experience a lot. Everyone’s usually asleep, and many people don’t fully understand what’s above our heads because of the city lights.”

“My background and interest in photography definitely pushed me towards a career that would give me the time and opportunity to take photographs.”

The Astrophotography of Matt Dieterich

The Milky Way as seen from Zion National Park in Utah. Matt took this photo from his campground and remembers how much it inspired the other campers to look at his photos of the night sky.

Your portfolio has amazing images from lots of places, but something that really jumps out are all the photos of the night sky in National Parks. What’s special about the National Parks that makes them such a great place for your photography?

“The National Parks serve as islands – islands of protected resources. Just like the meadows and the trees and the animals, the parks serve to protect the night sky. That’s the purpose of National Parks in general. They’re regions that are to remain unchanged by man, and the night skies across National Parks are phenomenal, especially out west where the elevation is high and where climates are dry. Southern Utah, Death Valley, and other regions like that are pretty inhospitable to humans, and as a result you’re going to get some pretty amazing landscapes and night skies.”

The Astrophotography of Matt Dieterich

Matt decided to have a little fun with this image captured in Badlands National Park in South Dakota, and pointed his flashlight toward the galactic arm stretching across the sky.

Are you hoping to inspire other people to discover astronomy, or to go to the National Parks and have their own park experiences?

“Oh, without a doubt. The goal of my photography is to get everyone, but especially kids, involved in astronomy. All it took for me was a photograph, looking at an astronomy magazine, or a book about space, when I was a kid. It gets the hamster wheel in your head turning and your imagination going. It really gets you thinking. You never know what a kid will dream about just from a simple photograph of say, the Milky Way, or Earth from space. Also, I want to inspire people to get out and enjoy the National Parks that we have, because they belong to all of us. They’re amazing to experience in person and they can really humble you.”

The Astrophotography of Matt Dieterich

Matt Dieterich, appearing at an event to support Washington’s National Park Fund, posing with the photo that now appears on a special-issue postage stamp honoring the U.S. National Park Service.

It’s often said that luck is what happens when preparation meets opportunity; it seems that this was true in your case. Can you share the story of how your photo of Mt. Rainier was selected for a postage stamp?

“It’s a fun story. A year ago I was working at Mt. Rainier. I had finished grad school and wanted to work as a night sky ranger. I’ve always dreamed about going on a road trip and just taking photos. I drove 3,500 miles form Pittsburg to Mt. Rainier and stopped at parks along the way. When I was working there I used every free chance to go outside at night, to roam the park and capture the night sky. By August, I had a handful of great photos taken in the park.”

“One day my boss emailed me and said that someone in Washington, DC, was looking for photos of people looking through a telescope. I sent them what I had, but they couldn’t use it because I didn’t have a model release. So I just sent them the rest of my gallery of Mt. Rainier, and within an hour or two they responded in all caps, just loving the photo of Mt. Rainier with the star trails and aurora. Within a day they got back to me and said ‘Hey, this is going to be a stamp. But you can’t say anything about it until it gets released.’”

“The person at the Postal Service told me they had been working on this for years, and all of a sudden – rush, rush, rush – they needed a photo of the night sky. It’s kind of amazing when I think about it, but I’m just very humbled by the fact that they liked my photograph so much.”

The Astrophotography of Matt Dieterich

The Milky Way with green airglow over Glacier National Park in Montana.

Having your image on a postage stamp is a rare, and likely once-in-a-lifetime, opportunity. What is it like knowing that one of your photos is part of this history? Does it have special meaning given your relationship with the National Parks?

“It’s very humbling. I’m kind of at a loss for words. It’s an honor to be able to represent the Park Service and also promote the night skies. As a person trying to get my name out there for my photography… I never expected it to happen in this manner. The irony is that when I started working at Mt. Rainier they went around the room of interpretive rangers asking what our goal was for the summer. I’ll never forget; I said that if I could take one good photograph, I would be happy. Looking back now, it hits me hard knowing that this is something people are going to enjoy for the rest of time. It’s pretty remarkable.”

The Astrophotography of Matt Dieterich

Matt captured this Milky Way photo over a muddy pond in Arches National Park, in Utah, after hiking up to Delicate Arch. He liked the mud in the foreground, and the standing water made for a great Milky Way reflection.

Does an image on a postage stamp have the power to connect people you’ve never met to the National Parks? Can it inspire them to visit one?

“Sure. I definitely think so. When I gave my thank-you speech in New York City [at the official unveiling of the stamp series] I had this gentleman come up to me afterward. He was crying, saying how much it was a remarkable photo. He had some emotional connection to it, because I don’t think I gave an amazing speech that would bring someone to tears. But there was something about this photo… He had some emotional experience with the mountain and that photo was really meaningful.”

“It’s not the experience I expected when I went out to take the photo, but if that photo gets people to go outside, to look up, then that’s all I wanted to do. I want them to experience it. To me, the night sky is very emotional. It’s a human connection that I want everyone to experience. Maybe some people won’t feel it, but for many people it could really be life changing. What I’ve seen through my work, shooting the night sky, is that people are blown away because it’s not what they’re able to see every day. It’s very powerful, and the fact that a photograph could do that is astonishing.”

The Astrophotography of Matt Dieterich

Matt shot this Milky Way panorama with northern lights from Mt. Rainier National Park in Washington.

What type of equipment do you use for your work?

“Oh, I just use a disposable camera. No – I’m kidding. I use a Nikon D750. It’s a great full frame, low-noise camera for night sky photography, and is great for capturing wide views of the sky. I also use a Rokinon 24mm F1.4 lens, an Induro tripod with a ball head, and a shutter release intervolameter cable.”

“The Rokinon is great, but it definitely has a lot of coma, because I shoot wide open. I shoot F1.4 because my goal is to collect as much light as I can. When I’m doing a time-lapse I need to take as many frames as I can, and it takes 30 images to make a one second time-lapse video. I also have the Nikon 14-24mm F2.8 which is amazing as well, and it has practically no coma wide open. It’s pretty amazing, but you get what you pay for at $ 2,000. I have a D800 as well. I’ll use the D750 for a time-lapse while roaming around taking other photos with my D800.”

The Astrophotography of Matt Dieterich

Milky Way over Haystack Rock on Cannon Beach in Oregon.

How much post-processing is involved in your work? Is it a matter of just exposing correctly, or are there techniques that are important?

“After doing this for many years I’ve gone through different periods, and I guess, as an artist, that’s the way you change. In the beginning, I would process things very heavily because you have do do that when shooting through a telescope. You stretch the data. You physically stretch the histogram, but you have to make sure that everything is in that window of available dynamic range to avoid blowing the highlights or clipping the blacks. Working through the telescope you have to take calibration frames. You have to take not just one photo of the Orion Nebula, you’re taking a hundred. The more photos, the better, because you’re going to stack them like a sandwich, and it reduces the long exposure noise that cameras produce.”

“Then I transitioned to night sky work with just a camera and tripod. You see a lot of artistic images now and it’s possible to change the way an image looks, but I try to keep it natural. However, by stretching the data you’re already taking it beyond anything you’re physically going to see with the naked eye.”

“It’s tough to replicate exactly what you’re seeing, but I try to be natural and be gentle with the images. It’s what I want to do more of now. For example, in my Cannon Beach shot, I’m standing there on the beach with the Milky Way. I tried to process that very gingerly, bringing up the Milky Way just a little bit, and darkening the sides of the sky to make the Milky Way stand out just a little bit more. Folks fell in love with that. That’s my most liked Instagram photo and I think it’s because it looks real.”

The Astrophotography of Matt Dieterich

The Milky Way and Perseid meteor shower over Mt. Rainier.

A lot of photographers use apps that help see what’s in the night sky, or to plan their shoot. Are there any particular apps that you recommend?

“I know a lot of photographers, including night sky photographers, who swear by some of these apps on their phone. But when I was living at Mt. Rainier I was under the night sky every night, so I learned where things were going to be and how to frame and set things up. My general rule of thumb was ‘Okay, the sun rises in the East and sets in the West,’ and knowing the constellations as well. If folks just get a star map or star chart to learn the constellations, that’s important during meteor showers to know where the meteors are coming from.”

“Once you can point out a few objects in the night sky then you know them. You’ll know them for the rest of your life. No matter where you go – as long as you stay in the same hemisphere – the sky is going to be the same. It might change a little as you move from Mt. Rainier to Big Bend in Texas, where you get closer to the southern horizon, but other than that it’s a matter of learning some basics and getting out there. I haven’t used any apps for planning shoots, but I know a lot of people swear by them, and maybe one day I’ll try to find a benefit for using them.”

The Astrophotography of Matt Dieterich

The Milky Way appearing to erupt out of the summit of Mt. Rainier, a dormant volcano.

What other National Parks are high on your list of places to shoot?

“Oh, goodness… Let’s see… I was only at Yellowstone for one night and I didn’t get to pull out my camera because the clouds came in. So I think Yellowstone, because the night skies are amazing there. Big Bend National Park is on my list too because they have some of the darkest skies in the U.S., and I haven’t been there yet. I’d go back to one of the parks in Utah again, probably Bryce Canyon. I haven’t been to the Grand Canyon, either, but I’ve seen photos from there and the skies are remarkable. So there’s a lot. There’s a long list, but those are a few that I’d try to go to.”

The Astrophotography of Matt Dieterich

Matt created this panorama from 16 frames and shows the Milky Way right before dawn in Glacier National Park in Montana. He was able to use the soft light of dawn to illuminate the foreground stream.

What are your long term goals as a photographer? What do you hope to accomplish?

“I want to use my images to keep advocating, to use those images to inspire people, as well as doing public speaking and writing. People can relate to an image. It grabs them, and it’s another way we can connect them to protecting natural resources like the night sky. It’s something we can reclaim, but it’s something we’ve lost touch with, especially from city lights.”

“We’re at a point in time that we can really have an impact and can improve the night sky, but it’s only going to come through educating people and bringing them out into the night sky, bringing them to the resource. Photography does that. You can bring it right to their desk, but my goal is to get them outside because that way we can get them emotionally connected to it.”

“If we don’t get people emotionally connected to a resource, what’s the likelihood they will want to protect it? Whether it’s bison in Yellowstone, or elk in Rocky Mountain National Park, it’s the emotional connection that drives people wanting to do something, and that’s the real goal of my photography.”

For more information on Matt’s photography, or to purchase a print of the photo that appears on the postage stamp, you can visit his website. You can also follow him on Instagram.

Articles: Digital Photography Review (dpreview.com)

 
Comments Off on Put a stamp on it: The astrophotography of Matt Dieterich

Posted in Uncategorized


How to Use the Clone Stamp Tool in Photoshop to Make Clear Skin

06 Apr

We’re all beautiful. Sometimes however, we have imperfections that can be a distraction (most often they are magnified in our minds and really not as bad as we think). In this tutorial, I am going to show you how you can use a basic Photoshop tool, the Clone Stamp, to create clear, natural looking skin in your photos.

Image 1

It’s always a good idea to work on a separate layer when editing or retouching images in Photoshop. Once you have your image open, you should create either a new layer or a duplicate layer which you will edit on. You can create a new layer by clicking the new layer button in your Layers Panel, or by selecting Shift+Ctrl+N on a PC (or Shift+Command+N on a Mac). If you prefer to create a copy layer like I have, you can right click on the image in the Layers Panel and select the Duplicate Layer option provided. If you prefer to use keyboard shortcuts, you can simply press Ctrl+J if you’re using a Windows PC, or Command+J if you’re using a Mac.

Image 2

Select the Clone Stamp tool from the tools panel, it conveniently looks like a miniature office stamp. In the options bar at the top of your screen, ensure that your brush softness is set to zero, the mode is normal, and it is set to sample Current & Below. You can keep your opacity anywhere between 10 and 30% depending on the subject. To get a natural looking result, it’s best to gradually work your way up to the final complexion or shade you are trying to attain.

Image 3

Image 4

Zoom in on the area you would like to retouch by pressing Ctrl (or Command) and the plus (+) symbol on your keyboard. In this image, I’m going to focus on the shoulders mainly. You don’t need to zoom all the way in to the area, but ensure that it’s zoomed enough for you to clearly see the area you are trying to adjust.

Image 5

The Clone Stamp tool works by allowing you to duplicate a selected area, over to another section of your image. It’s really great for removing unwanted elements from your photos. Hold down the Alt key on your keyboard and click on an area of skin close to the spot you are trying to remove. If your spot is lighter than the overall skin tone, select an area that is darker than the spot; if the spot is darker than the surrounding skin, you will make your selection from an area that is slightly lighter than it.

Play around with your Clone Stamp brush size and the opacity, until you find a combination that gives your best results. You will more than likely end up using a variety of brush sizes and opacities for the image (change the sample area frequently as well so you don’t get a repetition of patterns). The clone stamp method is very effective at clearing skin but requires patience on your part. A few other minor adjustments resulted in the final image below.

Image 6

With practice and patience you can clone your way to clear skin with the Clone Stamp tool. Have fun!

Please share any questions and comments you have about using the Clone Stamp tool to make clear skin.

googletag.cmd.push(function() {
tablet_slots.push( googletag.defineSlot( “/1005424/_dPSv4_tab-all-article-bottom_(300×250)”, [300, 250], “pb-ad-78623” ).addService( googletag.pubads() ) ); } );

googletag.cmd.push(function() {
mobile_slots.push( googletag.defineSlot( “/1005424/_dPSv4_mob-all-article-bottom_(300×250)”, [300, 250], “pb-ad-78158” ).addService( googletag.pubads() ) ); } );

The post How to Use the Clone Stamp Tool in Photoshop to Make Clear Skin by Tricia Bent appeared first on Digital Photography School.


Digital Photography School

 
Comments Off on How to Use the Clone Stamp Tool in Photoshop to Make Clear Skin

Posted in Photography


12 Tips for Mastering the Clone Stamp Tool in Photoshop

29 Apr
Clone Stamp Tool - Opera Garnier shot

You will not often find the stairs of Opera Garnier in Paris free of people, so you will need to put the Clone Stamp tool to work to remove the people if you want a clean picture. This applies at many other tourist destinations as well.

There are a lot of good post-processing tools available for making minor edits to your photos. Within Photoshop, there are the Healing Brush and the Spot Healing Brush tools. Lightroom now has its own healing brush. Those are great for minor edits to your photos like removing spots or power lines. When it comes time for serious, intensive surgery on your photos, however, there is no substitute for the Clone Stamp tool. You will only find this in Photoshop and Photoshop Elements, there is no Lightroom substitute.

Getting started with the Clone Stamp tool is simple. You just have to tell Photoshop two things: (1) where you want to replace the pixels (target area), and (2) from where Photoshop should take the pixels to use as replacements (s0urce area). To use the Clone Stamp tool, just follow these steps:

  1. Select the Clone Stamp tool from the tool bar on the left side of your screen (you can also use the keyboard shortcut S). Once selected, set the brush size and hardness.
  2. Put your cursor in the area where you want to change the pixels.
  3. Select the source area: Press the Alt key (your cursor will now become a target) and move your cursor to the location where you want to take pixels from (source area). Click your mouse in that location.
  4. Paint in the target area: Release the Alt key and move your mouse back to the original location. Hold down the mouse button and paint in the pixels from the location you chose.

That is a simple process, but if you have used the Clone Stamp tool you realize that there is a lot more involved if you want to master it. This article will provide you with some tips to move you along the road towards conquering this important tool in Photoshop.

#1 – Work on a New Layer

First, always create a new layer before making changes with the Clone Stamp tool. Any changes you make should be made on the new layer. You can flatten the image when you’re done.

Why should you do this? There are many reasons. First of all, it is non-destructive – meaning you are not changing the underlying pixels of your image. In addition, when you use a layer, you can delete it if you don’t like where the changes are going. You can also create a mask if there are portions of the changes that you decide later you do not want. Finally, you can target adjustments to just the cloned areas if they are on a new layer (as will be shown below).

Creating a new layer is easy; simply press Ctrl+J (Cmd+J on Mac) to create a duplicate. You can also press Shift+Ctrl+N (Shift+Cmd+N on Mac) to create a new blank layer, but if you do so, make sure that you have “All Layers” selected as your source in the Clone Stamp Tool settings.

Clone Stamp Tool - Work on a New Layer

I prefer working on a new layer (as opposed to a duplicate layer) but either way will work.

#2 – Zoom in (way in)

When working with the Clone Stamp tool, zoom in on the area you are working on. In fact, zoom way in (to 100% even). That will help isolate the area you are working on, and importantly, it will also allow you to work at a much greater level of detail than you otherwise would. Make your changes look as good as you can at this higher level of detail, then when you zoom back out, the changes will be indistinguishable (which is what you want).

A shortcut for zooming quickly is to hold the Alt key with your left hand while using the scroll wheel on your mouse to zoom in and out (or use Cntrl/Cmd and the + or – key on the keyboard). That will allow you to move in and out quickly.

#3 – Set Your Brush Size Quickly

You will change your brush size often when working with the Clone Stamp tool. You should do this often to make sure that your brush size is tailored to the change you are making. Changing the size through the Brushes panel is cumbersome. Instead, use the keyboard shortcuts for changing brush size:

  • Left bracket [ makes brush smaller
  • Right bracket ] makes brush larger

Using these keys will allow you to rapidly tailor your brush to the specific circumstance.

#4 – Set the Proper Brush Hardness

The Clone Stamp brush’s edges can be set to whatever hardness you desire. Hardness determines the level to which the cloning will blend in with the surrounding pixels. If you set the hardness level more toward 100%, the edges will be hard and definite. If you set the hardness more toward 0%, the edge will blend in with the surroundings.

Clone Stamp Tool - Setting Hardness of Brush

In general, keep the hardness level at 0%. That will help you seamlessly blend in the effect. There will be times, however, where you are working near a defined edge, in which case you should increase the hardness. Even then around 50% will usually do. Setting the hardness any higher creates harsh transitions that are dead giveaways to your use of the Clone Stamp tool.

#5 – Clone Without Adjustments

Do your cloning before making other adjustments to contrast, color and other changes often made via adjustment layers in Photoshop. If you use the Clone Stamp tool after creating those layers, you are baking the changes permanently into your picture when you clone.

Clone Stamp Tool - Adjustments

However, in some cases you will have already made changes on an adjustment layer, and you need to decide whether your cloning should include those adjustments. Photoshop lets you decide whether to include those changes in your cloning. After you have selected the Clone Stamp tool, the top row of your screen will include a circle with a line through it (see graphic above). Photoshop defaults to applying the changes of any adjustment layers, but if you click on this icon, Photoshop will ignore any adjustment layers when cloning.

#6 – Grab the Low Hanging Fruit

Most of the time your pictures will have some easy items to clone out, as well as some harder things. Clone out the easy ones first. In addition to giving you confidence in the tool, this will also help you when the time comes to make the hard changes.

How will that help you? Remember that you need clear space from which to draw pixels when using the Clone Stamp tool. By making the easy changes first, you are doing just that so you can draw replacement pixels and will make your job easier when it comes time for the harder, more in-depth changes.

#7 – Watch for Patterns

Sometimes you want to include patterns in your cloning. In that case, when selecting pixels from which to draw, try to find patterns in your picture that match the area you are replacing. For example, if the background is a building, look for a similar building. Then make them match (which will be the subject of the next tip).

Clone Stamp Tool - removing distractions without creating a pattern

Here is a different example to show the Clone Stamp tool in another context. The right side of this image was filled with distractions, but the Clone Stamp tool eliminates them. Be careful that you do not create patterns by using pixels immediately adjacent, or it will give away your use of the Clone Stamp tool

But many times you will not want there to be any discernible patterns in your cloning. Usually a pattern is a dead giveaway to your having cloned something out. In that case, the way to ensure that there will be no patterns is to keep resetting your source point. Sample from one area and clone one part, then sample from another area – repeat frequently. Keep doing that to blend everything together without repeating a pattern.

#8 – Follow the Lines

A key to successful use of the Clone Stamp tool is making all the lines in your picture match. Even slight deviations look fake and destroy the effect you are trying to achieve. For example, in a landscape setting make the edges of tree branches match up. In an urban context, follow lines in buildings such as roof lines, doorways, and patterns on the ground.

When you are using the Clone Stamp tool, start with the lines and then let the rest of the pixels fall where they may. After that, if you need to go back over other areas, you can do so.

Here I've zoomed in on a portion of another shot of the Opera Garnier. Use the patterns on the floor and door to recreate the space where you clone over the people.

Here I’ve zoomed in on a portion of another shot of the Opera Garnier. Use the patterns on the floor and door to recreate the space where you clone over the people.

#9 – Avoid Selecting from Adjacent Areas

As previously mentioned, a dead giveaway of Clone Stamp tool usage is repetition. The Clone Stamp tool is all about repetition – you just need to do it in such a way that the viewer doesn’t notice it. If you draw pixels from an immediately adjacent area, you are risking the viewer noticing the repetition. Take the pixels from somewhere else in the picture instead.

Inadvertently creating a pattern is an easy trap to fall into because the immediately adjacent areas usually are the closest in color and tone to the area you want to replace. As you move further away, tones and colors change so that the pixels get harder to match. Working hard to find a way to use pixels from somewhere else in your picture will pay dividends because the viewer won’t see the repetition.

#10 – Muddle Through (accept the messiness)

By now you have fixed all the easy areas in your picture and you’re ready to tackle a bigger problem. It might be a crowd of people or a car that entered your frame, but it is a large area of your picture. This is the scary part of using the Clone Stamp tool.

The key is to just dive in. Don’t try to figure it all out beforehand (you never will). You can do this in a couple of different ways:

  1. Go big first: Set your brush a little larger than you might otherwise use and just replace the entire area in one fell swoop (and then clean up with a smaller brush), or
  2. Go small and steady: Stick with the smaller brush and paint in gradually, but the key is to keep going. Remember that you can go over it again. Whatever you are doing, while it is probably not perfect, will undoubtedly look better than what you started with.

The key thing is just to do it. There is a tendency to freeze up and plot the entire change before doing anything, which causes you to stare at the computer screen for long periods of time.

Remember, you can always undo what you’ve done (Ctrl/Cmd+Z). In addition, because you followed tip #1 above and are working on a new layer, you can always mask this area off or delete it if it isn’t heading in the direction you want.

#11 – Use the Mirror Function

You can affect a lot of settings involving the Clone Stamp tool in the Clone Source panel (to see it, go to Window and then click on Clone Source). For instance, you can change the shape of the brush or the angle of the replacement pixels.

One of the most useful features in the Cone Source panel is the flip-horizontal option in the middle of the panel. If you click on it, the pixels will be replaced in the opposite horizontal direction as the source. This can be extremely useful in many instances since often you will be dealing with a symmetrical subject where you can now draw from the other side.

Clone Stamp Tool - Flip Horizontal setting

A typical example where you might want to use the flip horizontal option is where something covers one side of a doorway or window that you want to remove. By clicking on flip-horizontal, you can use the other side of the doorway or window as your source. Take another look at the Opera Garnier examples above and you will see how the flip horizontal tool would be used quite frequently whenever your picture contains any symmetry (I used this feature in those pictures quite a bit).

#12 – Change the Cloned Areas with Adjustment Layers

Sometimes your cloned areas just won’t look exactly like the surrounding areas. Perhaps it is too bright or too dark, or perhaps the colors are just off a little bit. You can fix it without affecting the surrounding pixels.

Clone Stamp Tool - tying adjustment layers

One of the great benefits of working on layers is that you can create adjustment layers that affect only the areas you just cloned. Simply create a new adjustment layer (levels, curves, or hue/saturation), which will appear above your cloning layer. Then hold down the Alt key and click at the bottom of the adjustment layer (you will see your cursor change). Doing so will apply the changes of the adjustment layer only to the layer below it.

Conclusion

Remember that using the Clone Stamp tool can be a messy process. Don’t worry if you find yourself having to redo changes or make things up as you go. There is no magical “clean” process. One of the fun parts about the cloning process is the problem-solving that goes into it. Take your time and just keep moving. You can always redo your changes or, if you are working in layers, get rid of them without losing the rest of your work.

The Clone Stamp tool will save more pictures than almost any other tool in your post-processing. If you master it, you can remove almost anything in your pictures that you do not want.

googletag.cmd.push(function() {
tablet_slots.push( googletag.defineSlot( “/1005424/_dPSv4_tab-all-article-bottom_(300×250)”, [300, 250], “pb-ad-78623” ).addService( googletag.pubads() ) ); } );

googletag.cmd.push(function() {
mobile_slots.push( googletag.defineSlot( “/1005424/_dPSv4_mob-all-article-bottom_(300×250)”, [300, 250], “pb-ad-78158” ).addService( googletag.pubads() ) ); } );

The post 12 Tips for Mastering the Clone Stamp Tool in Photoshop by Jim Hamel appeared first on Digital Photography School.


Digital Photography School

 
Comments Off on 12 Tips for Mastering the Clone Stamp Tool in Photoshop

Posted in Photography


Fair use? US stamp featuring photo of monument nets sculptor $650,000

29 Sep

Stamp.jpg

Heard the one about the sculptor awarded over half a million dollars because a stamp was made including a war memorial he’d designed? At first that may sound surprising, but reading the court’s judgement (and the rejections of the various defenses put forward by the US Postal Service), is an informative lesson about copyright and fair use. Click here to read more.

News: Digital Photography Review (dpreview.com)

 
Comments Off on Fair use? US stamp featuring photo of monument nets sculptor $650,000

Posted in Uncategorized


Photoshop Tutorial : Clone Stamp Tool Tutorial

02 Aug

Photoshop Tutorial for Clone Stamp Tool. This is a tutorial on using the Clone Stamp Tool in Photoshop. Its an extremely useful Tool for editing photographs & pictures. Makes photo editing easy and looks professional. Watch this photoshop tutorial to get help starting you on the road to editing your own photos in a impressive manner. digitalvisions.org
Video Rating: 5 / 5